Oracle Cloud Infrastructure (OCI) File Storage service provides a durable, scalable, secure, enterprise-grade network file system. Within File Storage, network file system (NFS) exports control client access to your file system. Each export includes client export options, which are several parameter options that specify the level of access granted to NFS clients when they mount the file system. In this blog, we explore one of these export options: Identity squash.
If you are looking for a deep dive into File Storage or NFS security, this blog isn’t for you. Until a month ago, I had never heard of identity squash. This blog was inspired by me hearing about identity squash, trying to set it up, and then struggling to fully understand and implement it with the documentation and blogs currently out there. Instead, I want this blog to be a jumping off point for File Storage and identity squash—something that teaches you the basics and encourages you to dig deeper. For more detailed information, refer to read the official OCI File Storage documentation or corresponding operating system documentation.
FSS concepts
Before jumping into identity squash, I want to discuss some of the key file storage concepts we use in this blog. You need some basic networking concepts to use File Storage, but I assume you know them and don’t discuss them in detail.
-
Mount target: An NFS endpoint that lives in a subnet of your choice and is highly available. A mount target provides the IP address or domain name system (DNS) name used in the mount command when connecting NFS clients and is what the file systems are made available through.
-
Export: Control how NFS clients access file systems when they connect to a mount target. A file system must have at least one export in one mount target for instances to mount the file system.
-
Export path: Uniquely identifies the file system within a mount target, letting you associate many file systems to a single mount target. This path is unrelated to any path within the file system itself, or the client mount point path.
-
Export options: Set of parameters within the export that specify the level of access granted to NFS clients when they connect to a mount target.
An image is useful for visualizing how these concepts work together.

Figure 1: File Storage service concepts visualized
Export options
Export options are a set of parameters that specify the level of access granted to NFS clients when they connect to a mount target. Let’s explore what these parameters are.
-
Source: The IP address or CIDR block of a connecting NFS client
-
Require privileged source port (true/false): Determines whether you need to connect from a privileged source port. Privileged ports are any port including 1–1023.
-
Access (Read-only or read/write): Specifies NFS client access
-
Identity squash (All, root, or none): Determines whether clients accessing the file system have their user ID (UID) and group ID (GID) remapped. UID and GID are Linux concepts for identifying users and groups and determining which system resources they can access.
There it is! We finally have our first definition of what identity squash is. Let’s investigate it more.
Identity squash
As stated in the File Storage service documentation, identity squash determines whether the source clients accessing the file have their UID and GID remapped. According to Go Linux Cloud, squash means to limit or destroy the power of the remote user.
Identity squash can be used to prevent users, including superusers (root), from having certain permissions on the mounted NFS volume. This process can help improve security posture by ensuring that no users, including root, mounting this export have root access to the filesystem.
File Storage has the following options for this identity squash parameter:
-
None (default): No users are remapped.
-
Root: Only the root user is remapped.
-
All: All users and groups are remapped.
By default, it maps UID and GID to anonymousUid (65534) and anonymousGid (65534), but you can also specify these values.
Setup
I have three exports mounted on the same virtual machine (VM) to three different directories under the /mnt folder to represent the three squash options: None, root, and all. I mounted the three exports to the same VM for simplicity, but they can also be on three separate machines. Ensure that you have proper networking setup. The following figure shows the reference architecture:

Figure 2: Setup reference architecture
Next, let’s look at our export options.
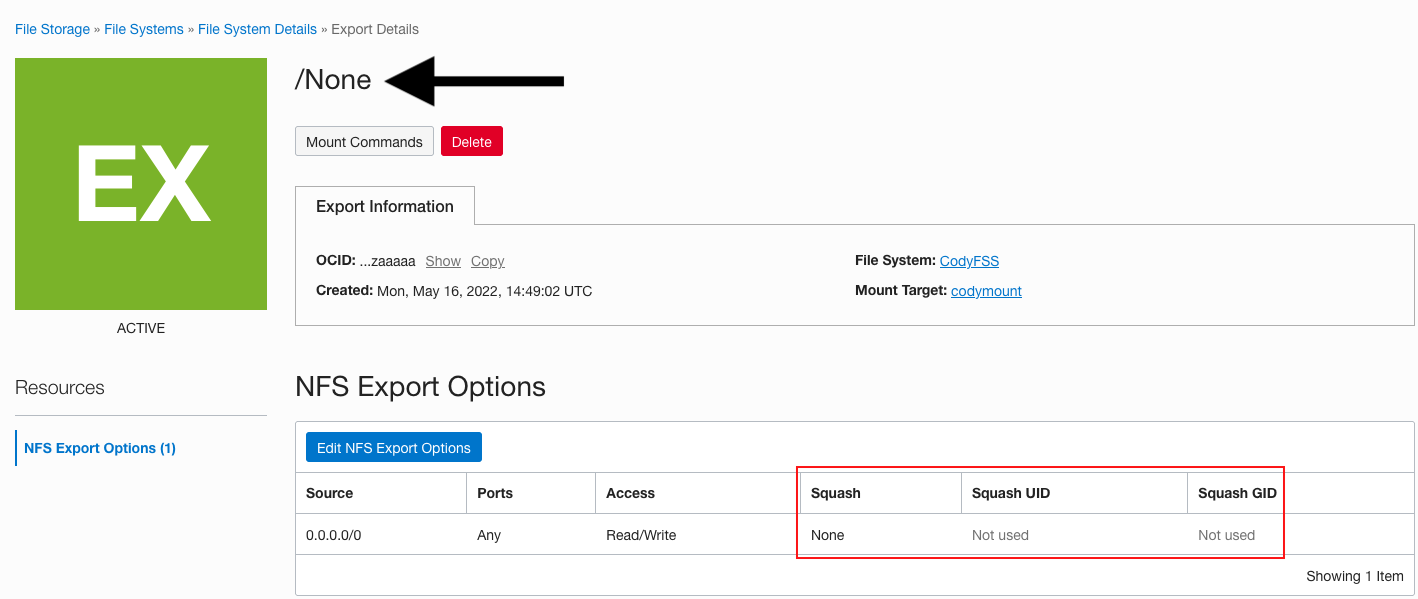
Figure 3: /None export options
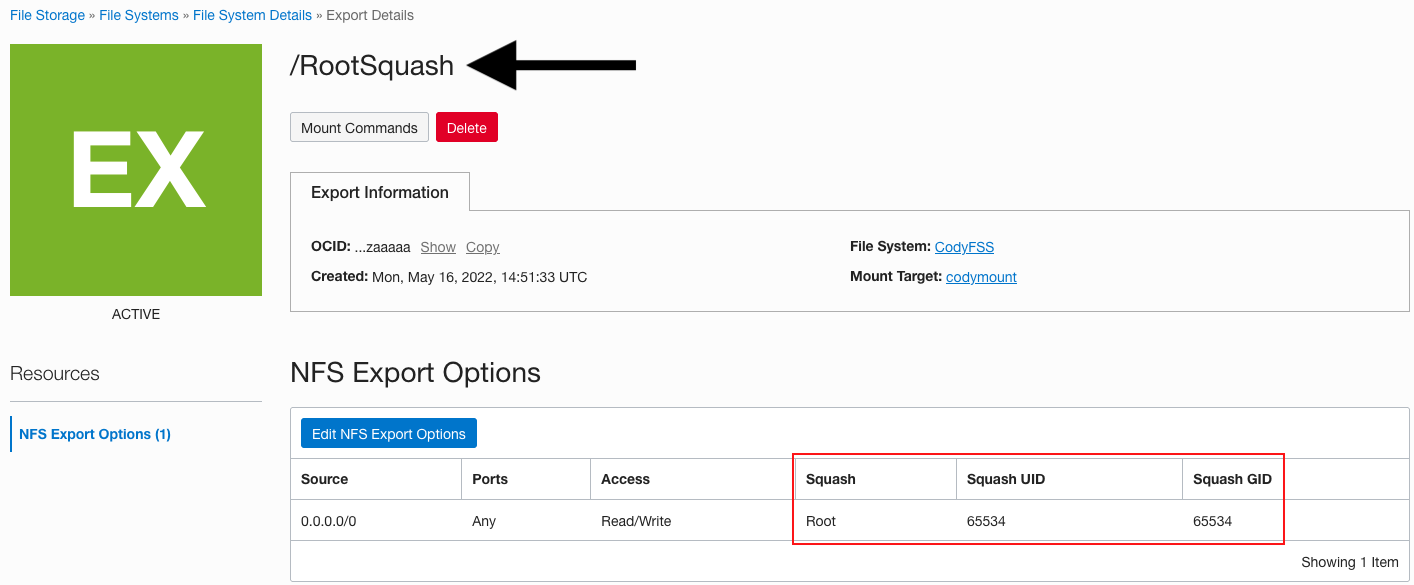 Figure 4: /RootSquash export options

Figure 5: /AllSquash export options
Last, let’s look at the file permissions in my /mnt directory.
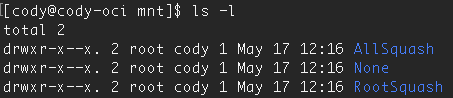
Figure 6: Linux file permissions
We have 751 permissions for all three mounts of the file system, and all files in those directories. I also created user cody as a member of the cody group.
-
Owner, root, has read, write, and execute permissions (7)
-
Group, cody, has read and execute permissions (5)
-
Other, any user other than root or cody, have execute permissions (1)
Expected behavior
Before we test this setup, let’s look at the theory and predict what happens with each different squash option.
/None
We aren’t squashing any users in this export. So, all permissions should remain the same:
| User | Initial permissions | Squashed? | Final permissions |
|---|---|---|---|
| root | read, write, execute | No | read, write, execute |
| cody | read, execute | No | read, execute |
| other | execute | No | execute |
/RootSquash
We can now see squashing in action. We’re squashing root to anonymous user, so root has permissions squashed to others permissions: execute only. User cody remains untouched.
| User | Initial Permissions | Squashed? | Final Permissions |
|---|---|---|---|
| root | read, write, execute | Yes | execute |
| cody | read, execute | No | read, execute |
| other | execute | No | execute |
/AllSquash
All users are now squashed to the other user permissions, so every user can execute only.
| User | Initial Permissions | Squashed? | Final Permissions |
|---|---|---|---|
| root | read, write, execute | Yes | execute |
| cody | read, execute | Yes | execute |
| other | execute | Yes | execute |
Actual behavior
Let’s jump into our VM and see what happens! If you don’t want to inspect all the image outcomes, see the Results Summary.
/None
Can root read? Yes!
![]()
Figure 7: root can read in /None
Can root write? Yes!
![]()
Figure 8: root can write in /None
Can root execute? Yes!
![]()
Figure 9: root can execute in /None
Can cody read? Yes!
![]()
Figure 10: cody can read in /None
Can cody write? No.
![]()
Figure 11: cody can’t write in /None
Can cody execute? Yes!
![]()
Figure 12: cody can execute in /None
Can another user, represented by opc, read? No.
![]()
Figure 13: other can’t read in /None
Can other write? No.
![]()
Figure 14: other cannot write in /None
Can other execute? Yes!
![]()
Figure 15: other can execute in /None
/RootSquash
Can root read? No.
![]()
Figure 16: root cannot read in /RootSquash
Can root write? No.
![]()
Figure 17: root cannot write in /RootSquash
Can root execute? Yes!
![]()
Figure 18: root can execute in /RootSquash
Can cody read? Yes!
![]()
Figure 19: cody can read in /RootSquash
Can cody write? No.
![]()
Figure 20: cody cannot write in /RootSquash
Can cody execute? Yes!
![]()
Figure 21: cody can execute in /RootSquash
Can other read? No.
![]()
Figure 22: other cannot read in /RootSquash
Can other write? No.
![]()
Figure 23: other cannot write in /RootSquash
Can other execute? Yes!
![]()
Figure 24: other can execute in /RootSquash
/AllSquash
Can root read? No.
![]()
Figure 25: root cannot read in /AllSquash
Can root write? No.
![]()
Figure 26: root cannot write in /AllSquash
Can root execute? Yes!
![]()
Figure 27: root can execute in /AllSquash
Can cody read? No.
![]()
Figure 28: cody cannot read in /AllSquash
Can cody write? No.
![]()
Figure 29: cody cannot write in /AllSquash
Can cody execute? Yes!
![]()
Figure 30: cody can execute in /AllSquash
Can other read? No.
![]()
Figure 31: other cannot read in /AllSquash
Can other rrite? No.
![]()
Figure 32: other cannot write in /AllSquash
Can other execute? Yes!
![]()
Figure 33: other can execute in /AllSquash
Results summary
/None
| User | Expected behavior | Actual behavior |
|---|---|---|
| root | read, write, execute | read, write, execute |
| cody | read, execute | read, execute |
| other | execute | execute |
/RootSquash
| User | Expected behavior | Actual behavior |
|---|---|---|
| root | execute | execute |
| cody | read, execute | read, execute |
| other | execute | execute |
/AllSquash
| User | Expected behavior | Actual Bbehavior |
|---|---|---|
| root | execute | execute |
| cody | execute | execute |
| other | execute | execute |
Our predictions were all correct! In /None, nothing was squashed, and permissions were the same as they showed in Linux. In /RootSquash, root was squashed to same permissions as other (other), but cody’s permissions remained the same. In /AllSquash, all users had their permissions squashed to other.
Conclusion
In this blog we learned how identity squashing helps improve NFS security by preventing root ownership of file systems by “squashing” permissions to an anonymous UID, GID, or another user of your choice. After learning this concept, we saw it in action by mounting the same file system with all three File Storage service squashing options—None, root, and all—and seeing how permissions are changed for users in each scenario. With no squashing, all users had their expected permissions. With root squashing, only the root user was squashed. In all squashing, all users were squashed.
Identity squashing is only one aspect of securing Oracle Cloud Infrastructure File Storage service. Other export options include restricting access based on source IP or port and specifying a client as read-only. I encourage you to read more about export options.
If you want to try this lab for yourself, check out Oracle Cloud’s Free Tier with US$300 credits for a 30-day free trial. Free Tier also includes several Always Free services that are available for an unlimited time, even after your credits expire.