
Introduction
Using Cluster API Provider for Oracle Cloud Infrastructure (CAPOCI), OCI Cloud Controller Manager (CCM), and Cilium, you can deploy a self-managed Kubernetes cluster on OCI with native pod routing. This approach avoids a pod-network overlay by allocating each node a pod CIDR from OCI-routable subnet address space.
Cilium combines eBPF-based packet processing in the Linux kernel with direct routing to reduce networking overhead and avoid overlay encapsulation. Giving pods VCN-native IP addresses makes them directly reachable through the OCI network and allows VCN-level access controls to govern traffic to and from pod IPs. Together, these capabilities support efficient networking and security controls at both the Kubernetes and VCN layers.
The OCI CCM Flex CIDR provider controller assigns pod CIDRs to Kubernetes nodes, and Cilium uses those CIDRs through Kubernetes IP address management (IPAM) in native-routing mode.
This blog explains the architecture and walks through the deployment sequence implemented in the accompanying repository.
Architecture overview
The solution uses the following components:
- CAPOCI provisions and reconciles the Kubernetes control plane and worker instances on OCI.
- OCI CCM initializes cloud-provider integration and runs the FlexCIDR controller.
- FlexCIDR allocates a distinct pod CIDR to each node from an OCI subnet CIDR block.
- Cilium provides the Kubernetes CNI dataplane using
routingMode=nativeandipam.mode=kubernetes.
The management cluster hosts Cluster API and CAPOCI controllers. It creates and manages the workload cluster, which runs OCI CCM and Cilium.
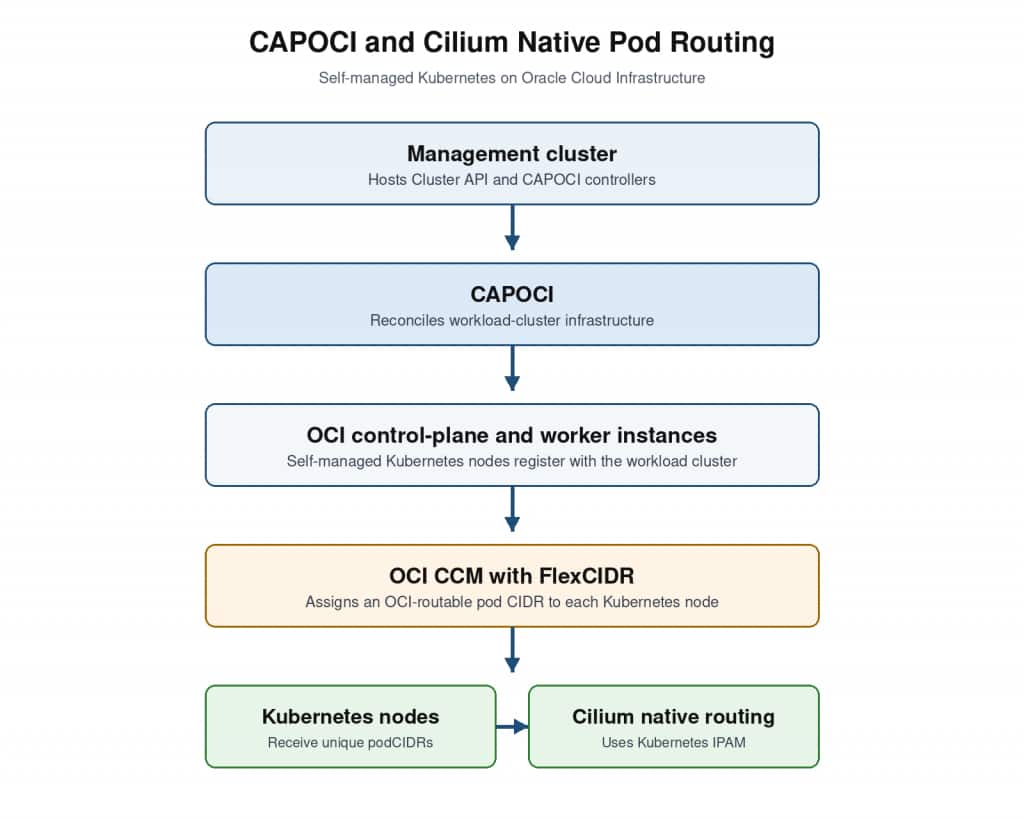
The deployment order is important. Install Cilium only after OCI CCM has assigned a pod CIDR to every node.
Prerequisites
Before starting, prepare the following:
- A Kubernetes management cluster with Cluster API and CAPOCI initialized.
- An OCI image for self-managed Kubernetes control-plane and worker nodes.
- An existing OCI VCN and subnets for the control-plane endpoint, control-plane nodes, and worker nodes.
- Appropriate OCI route tables, gateways, and NSG or security-list rules.
- An SSH public key and the OCI identifiers required by the CAPOCI template.
The workload-cluster nodes require access to OCI APIs, container registries, and the Kubernetes API server. Configure an Internet Gateway or NAT Gateway for egress as appropriate. A Service Gateway can provide private access to OCI services such as OCIR.
Create Kubernetes management cluster with Cluster API and CAPOCI
Cluster API Provider for OCI is installed into an existing Kubernetes cluster, called the management cluster. For development and testing, you can use kind to create a local management cluster. Each node in the kind cluster runs as a container on the machine where you run the kind command. For production, it is recommended to run management cluster a managed Kubernetes cluster, such as an Oracle Container Engine for Kubernetes (OKE).
In this example, I use kind to create a local cluster that will serve as the initial management cluster: Before proceeding, install the following tools:
- clusterctl to install and manage Cluster API providers.
- kind to create a local Kubernetes cluster. Ensure Docker or another supported container runtime is installed and running.
- kubectl to interact with Kubernetes clusters.
Create the management cluster using kind command:
kind create cluster
kubectl config use-context kind-kind
export MGMT_KUBECONFIG=$HOME/.kube/config
kind creates or updates $HOME/.kube/config with the management cluster’s connection details and credentials.
Install Cluster API and CAPOCI controllers by running the following command:
clusterctl init --infrastructure oci
Create OCI custom image for self-managed Kubernetes
To create a custom OCI node image for a specific Kubernetes version, install git to clone the Kubernetes Image Builder repository and run make deps-oci from its images/capi directory; capi is included in the repository.
git clone https://github.com/kubernetes-sigs/image-builder.git
cd image-builder/images/capi
make deps-oci
Configure OCI authentication for Packer and ensure the build host can reach the temporary build instance over SSH. The OCI plugin for Packer supports three options for authentication. By default, it uses OCI signing key looking for config file in $HOME/.oci/config. Alternatively you can use instance principal or security token authentication. For building a custom Kubernetes node image with OCI Image Builder/Packer, grant the build user’s IAM group permission to manage build instances and custom images, and to use the existing network and volumes.
Here is an example of OCI IAM policy that my be assigned to the user group when using OCI signing key:
Allow group <group-name> to manage instances in compartment <compartment-name>
Allow group <group-name> to manage instance-images in compartment <compartment-name>
Allow group <group-name> to use volume-family in compartment <compartment-name>
Allow group <group-name> to use virtual-network-family in <compartment-name>
Note: If you prefer instance principal authentication, create a dynamic group that includes the OCI Compute instance running Packer, and grant that dynamic group the same permissions required to build the custom image.
The following example shows how to create a custom OCI image for Kubernetes 1.35 on Ubuntu 22.04, using Kubernetes patch version v1.35.0.
{
  "compartment_ocid": "<build-compartment-ocid>",
  "subnet_ocid": "<build-subnet-ocid>",
  "region": "<region-name>",
  "availability_domain": "<tenancy-prefixed-availability-domain>",
  "kubernetes_semver": "v1.35.0",
  "kubernetes_series": "v1.35",
  "kubernetes_deb_version": "1.35.0-1.1"
}
Note: you can find kubernetes_deb_version matching the Kubernetes version using the following command:
curl -fsSL 'https://pkgs.k8s.io/core:/stable:/v1.35/deb/Packages'
Run the command below to create a custom image:
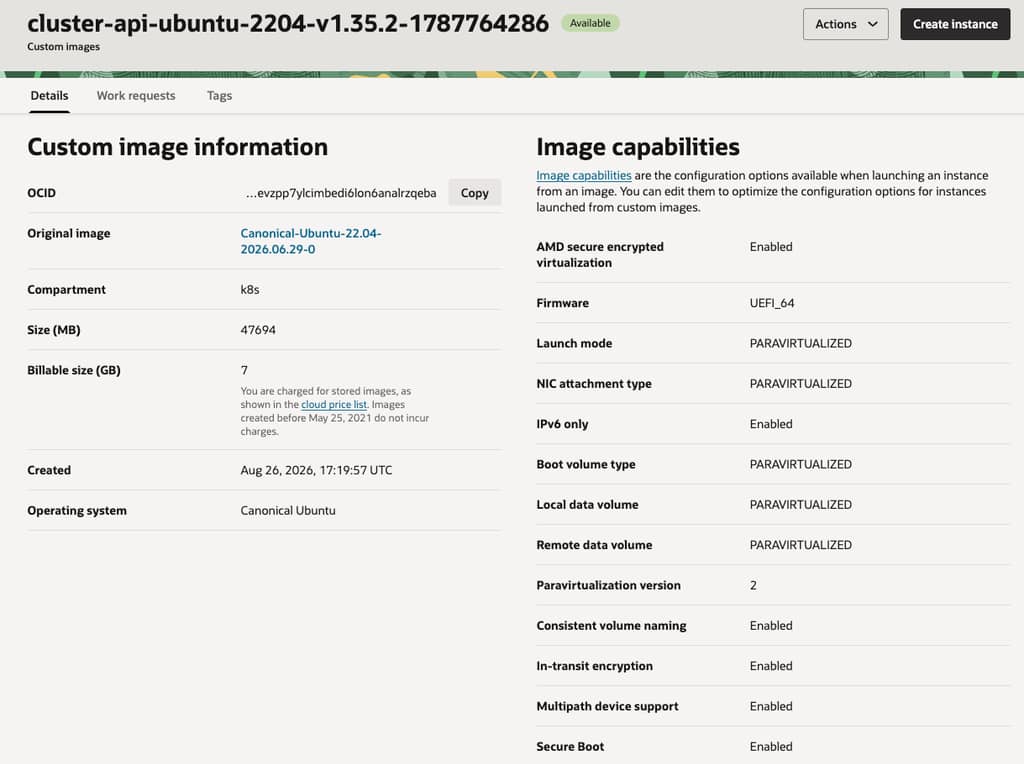
PACKER_VAR_FILES=oci.json make build-oci-ubuntu-2204After the build completes successfully, you can view the custom image in the OCI Console. In OCI Console go to Compute > Custom Images. Select the compartment specified by compartment_ocid in oci.json, then click the new image to view its details and copy its OCID for use in the CAPOCI template.
Prepare OCI subnet address space for pods
Native pod routing requires OCI-routable addresses for pods. Reserve a pod-address range within the OCI node subnet, and add it as an additional IPv4 CIDR block to the subnet when required.
The pod range must be contained within the OCI node subnet, must not overlap node addresses or reachable networks, and must be large enough for the aggregate pod capacity of all nodes.
The example uses the following settings:
export OCI_CONTROL_PLANE_CIDR_BLOCKS="10.0.100.0/22"
export OCI_CONTROL_PLANE_IP_COUNT=16

export OCI_MACHINE_POOL_CIDR_BLOCKS="10.0.100.0/22"
export OCI_MACHINE_POOL_IP_COUNT=32
ip-count determines the size of the node allocation. For example, 16 produces a /28 allocation and 32 produces a /27 allocation. Control-plane and worker nodes can use different allocation sizes, but individual node allocations must never overlap.
Note: Control-plane and worker nodes must have non-overlapping Pod IP allocations, whether they share an OCI subnet or use different subnets.
Create the workload cluster with CAPOCI
Configure IAM policies required by CAPOCI as described in CAPOCI documentation. It recommends using instance principal authentication when the management cluster runs on OCI. In my example the management cluster is running on OCI compute instance. To enforce usage of instance principal authentication I set the following environment variables:
export USE_INSTANCE_PRINCIPAL="true"
export USE_INSTANCE_PRINCIPAL_B64="$(echo -n "$USE_INSTANCE_PRINCIPAL" | base64 | tr -d '\n')"
The associated dynamic group is granted the following IAM permissions:
Allow dynamic-group <name> to manage instance-family in compartment <workload-compartment>
Allow dynamic-group <name> to manage load-balancers in compartment <workload-compartment>
Allow dynamic-group <name> to manage virtual-network-family in <network-compartment>
This example assumes that compute instances and load balancers are created in workload-compartment, while network resources are managed in network-compartment.
The complete deployment assets are available in the CAPOCI self-managed Kubernetes cluster repository. Clone or download the repository to get the cluster-template.yaml CAPOCI manifest and the create-cluster.sh generation script used in this post.
Prepare a CAPOCI template that defines your workload cluster configuration. In this example, I use the following cluster-template.yaml as a starting point. The CAPOCI template configures OCI FlexCIDR metadata for both control-plane and worker nodes:
OCIMachineTemplate.spec.template.spec.metadataconfigures control-plane instances.OCIMachinePool.spec.instanceConfiguration.metadataconfigures worker instances.
The metadata key is flexcidr-primary-vnic. It supplies the CIDR pool and allocation count to OCI so that FlexCIDR can assign a Kubernetes pod CIDR when the node registers. Before rendering and applying rendered.yaml, verify that OCI_CONTROL_PLANE_CIDR_BLOCKS, OCI_CONTROL_PLANE_IP_COUNT, OCI_MACHINE_POOL_CIDR_BLOCKS, and OCI_MACHINE_POOL_IP_COUNT have the intended values.
Customize create-cluster.sh script to define all template variables from cluster-template.yaml. Run the script to render the workload-cluster manifest yaml, and apply it to the management cluster:
clusterctl generate cluster "${CLUSTER_NAME}" \
  --from cluster-template.yaml > rendered.yaml

kubectl --kubeconfig "$MGMT_KUBECONFIG" apply -f rendered.yaml
Do not apply the CAPOCI manifest to the workload cluster. The management cluster contains the Custom Resource Definitions (CRDs) and controllers installed by Cluster API and CAPOCI. The CRDs define resource types such as Cluster, OCICluster, KubeadmControlPlane, OCIMachineTemplate, and OCIMachinePool, while the controllers reconcile these resources to provision and manage the workload cluster.
For worker nodes, the MachinePool and OCIMachinePool resources cause CAPOCI to create an OCI instance configuration and an OCI instance pool in the workload compartment. The instance configuration defines the worker-node image, shape, metadata, networking, and bootstrap configuration. The instance pool then creates and maintains the number of worker instances specified by WORKER_MACHINE_COUNT. In other words, applying rendered.yaml does not create only Kubernetes API objects: CAPOCI reconciles those objects into the OCI instance-pool resources and the worker VMs that form the node pool.
For the control plane, the KubeadmControlPlane resource references the OCIMachineTemplate. The template defines the OCI infrastructure for each control-plane node, including its image, shape, boot-volume options, metadata, and networking. CAPOCI creates the control-plane nodes as individual OCI instances from that template, rather than as an OCI instance pool; CONTROL_PLANE_MACHINE_COUNT sets the desired number of control-plane replicas.
After CAPOCI creates the instances, retrieve the workload-cluster kubeconfig:
clusterctl --kubeconfig "$MGMT_KUBECONFIG" get kubeconfig \
"$CLUSTER_NAME" -n "$NAMESPACE" > $HOME/.kube/workload.kubeconfig

export KUBECONFIG="$HOME/.kube/workload.kubeconfig"
At this stage, nodes can register as NotReady. This is expected because a CNI has not yet been installed.
Install OCI CCM and enable FlexCIDR
The self-managed nodes use the external cloud-provider model. OCI Cloud Controller Manager (OCI CCM) with enabled OCI FlexCIDR provider controller must run before the workload cluster can become fully initialized. The cluster-template.yaml file already sets flexcidr-primary-vnic metadata for both worker and control-plane nodes. No separate instance-metadata update is required.
Oracle recommends Instance Principals to be used by CCM for authentication. The dynamic group must include every worker node on which the CCM pod can run. When configuring IAM permissions for the dynamic group, it helps to distinguish between permissions required for pod IP allocation and permissions required for other CCM features, such as load balancer management.
The OCI CCM installation guide uses broader resource families to simplify configuration. For tighter access control, the Flex CIDR provider controller documentation lists individual resource types.
Here are the base permissions for CCM with Flex CIDR provider controller:
Allow dynamic-group <ccm-dynamic-group> to read instances in compartment <workload-compartment>
Allow dynamic-group <ccm-dynamic-group> to inspect vnic-attachments in compartment <workload-compartment>
Allow dynamic-group <ccm-dynamic-group> to use vnics in compartment <network-compartment>
Allow dynamic-group <ccm-dynamic-group> to use subnets in compartment <network-compartment>
These permissions allow the controller to discover instance networking information and perform the VNIC and subnet operations needed for IP allocation.
Add permissions for the cluster’s IP families. For IPv4 or dual-stack clusters, add:
Allow dynamic-group <ccm-dynamic-group> to use private-ips in compartment <network-compartment>For IPv6 or dual-stack clusters, add:
Allow dynamic-group <ccm-dynamic-group> to manage ipv6s in compartment <network-compartment>If CCM also manages OCI Load Balancer resources for Kubernetes Services, add:
Allow dynamic-group <ccm-dynamic-group> to manage load-balancers in compartment <load-balancer-compartment>Set the CCM release used by this deployment, then download and customize its provider configuration:
export RELEASE=v1.35.0

curl -L \
  https://raw.githubusercontent.com/oracle/oci-cloud-controller-manager/${RELEASE}/manifests/provider-config-example.yaml \
  -o provider-config.yaml
Customize the downloaded provider-config.yaml file and set region name, and OCID of tenancy, compartment, vcn, loadBalancer.subnet1, loadBalancer.subnet2. For instance-principal authentication, set useInstancePrincipals: true. Populate the securityLists mapping only when you explicitly want OCI CCM to manage security lists.
I recommend using a regional subnet for load balancers. A regional subnet spans availability domains, allowing OCI to host the primary and standby load balancer using that single subnet.
In cloud-provider.yaml, specify your regional load balancer subnet OCID as subnet1 and omit subnet2. Here is an example of provider-config.yaml used in my environment.
useInstancePrincipals: true

compartment: "<workload-compartment-ocid>"
vcn: "<vcn-ocid>"

loadBalancer:
  subnet1: "<regional-load-balancer-subnet-ocid>"
  securityListManagementMode: "All"
SecurityListManagementMode configures how security lists are managed by the CCM. The values are:
| Value | Meaning |
|---|---|
"All" | CCM manages security-list rules for load balancer ingress/egress, backend worker traffic, and health checks. |
"Frontend" | CCM manages only ingress rules for the load balancer’s frontend listener ports. |
"None" | CCM does not manage security-list rules; you configure them yourself. |
In this example, I set securityListManagementMode: "All" so that CCM manages the security-list rules required for application load balancers, including frontend traffic, worker-node backend traffic, and health checks.
Note: If you choose to have security lists or network security groups managed by the CCM, ensure you have setup the following additional OCI policies:
Allow dynamic-group <ccm-dynamic-group> to manage security-lists in compartment <load-balancer-compartment>
Allow dynamic-group <ccm-dynamic-group> to manage security-lists in compartment <network-compartment>
Allow dynamic-group <ccm-dynamic-group> to manage network-security-groups in compartment <network-compartment>
Create the configuration Secret:
kubectl -n kube-system create secret generic oci-cloud-controller-manager\
  --from-file=cloud-provider.yaml=provider-config.yaml
Download the CCM DaemonSet and RBAC manifests from the same release:
curl -L \
  https://raw.githubusercontent.com/oracle/oci-cloud-controller-manager/${RELEASE}/manifests/cloud-controller-manager/oci-cloud-controller-manager.yaml \
  -o oci-cloud-controller-manager.yaml

curl -L \
  https://raw.githubusercontent.com/oracle/oci-cloud-controller-manager/${RELEASE}/manifests/cloud-controller-manager/oci-cloud-controller-manager-rbac.yaml \
  -o oci-cloud-controller-manager-rbac.yaml
In oci-cloud-controller-manager.yaml, enable the FlexCIDR provider controller in the container environment:
env:
  - name: ENABLE_FLEX_CIDR_CONTROLLER
    value: "true"
Also add this toleration under spec.template.spec.tolerations. It permits CCM to schedule on the control-plane node while that node is still NotReady:
 - key: node.kubernetes.io/not-ready
   operator: Exists
   effect: NoSchedule
Apply RBAC first, followed by the CCM DaemonSet:
kubectl apply -f oci-cloud-controller-manager-rbac.yaml
kubectl apply -f oci-cloud-controller-manager.yaml
Verify pod CIDR allocation
Wait until OCI CCM is running, then verify that every Kubernetes node has a pod CIDR:
kubectl get nodes -o jsonpath='{range .items[*]}{.metadata.name}{" podCIDR="}{.spec.podCIDR}{"\n"}{end}'Example output:
test-control-plane-lg2rd  podCIDR=10.0.101.96/28
inst-1vn9n-test-mp-0      podCIDR=10.0.103.128/27
inst-momez-test-mp-0      podCIDR=10.0.102.224/27
If a node does not receive a pod CIDR, inspect OCI CCM logs:
kubectl -n kube-system logs ds/oci-cloud-controller-managerVerify the FlexCIDR metadata on the instance, the available OCI subnet CIDR space, and the CCM IAM permissions before continuing.
Install Cilium with native routing
After all nodes have pod CIDRs, use helm to install Cilium. The following command uses a VCN CIDR of 10.0.0.0/16; replace that value with the CIDR of your VCN:
helm upgrade --install cilium cilium/cilium --version 1.20.1 \
  --namespace kube-system --create-namespace \
  --set routingMode=native \
  --set ipam.mode=kubernetes \
  --set enableEndpointRoutes=true \
  --set kubeProxyReplacement=false \
  --set ipv4.enabled=true \
  --set enableIPv4Masquerade=true \
  --set ipMasqAgent.enabled=true \
  --set ipv6.enabled=false \
  --set bpf.masquerade=true \
  --set ipv4NativeRoutingCIDR=10.0.0.0/16 \
  --set nodePort.enabled=true \
  --set ipMasqAgent.nonMasqueradeCIDRs='{10.0.0.0/16}' \
  --set ipMasqAgent.masqLinkLocal=false
The essential settings are:
routingMode=nativeto use native routing instead of an overlay.ipam.mode=kubernetesso Cilium uses the nodepodCIDRvalues assigned by FlexCIDR.ipv4NativeRoutingCIDRandnonMasqueradeCIDRsset to the OCI VCN address range.
Avoid Cilium node selectors unless every intended node has the required label. A restrictive selector can prevent Cilium from scheduling and keep nodes in the NotReady state.
Validate the cluster
Validate the Cilium deployment:
kubectl -n kube-system get pods -o wide | grep cilium
kubectl -n kube-system exec ds/cilium -- cilium status
kubectl -n kube-system exec ds/cilium -- cilium-health status
Then verify node readiness and CoreDNS:
kubectl get nodes -o wide
kubectl -n kube-system get pods -o wide | grep coredns
The expected result is:
- OCI CCM is running on the control plane.
- Each node has a unique
spec.podCIDR. - Cilium runs on every node.
- Nodes transition to
Ready. - CoreDNS is scheduled and running.
Conclusion
CAPOCI, OCI CCM FlexCIDR, and Cilium provide a clear separation of responsibilities for self-managed Kubernetes on OCI. CAPOCI manages cluster infrastructure, FlexCIDR provider controller assigns OCI-routable pod CIDRs to nodes, and Cilium provides native pod routing using those CIDRs.
The deployment sequence is the key to a reliable installation: create the nodes with CAPOCI, install OCI CCM and confirm pod CIDR assignment, then install Cilium. Following that sequence avoids common bootstrap failures and provides a foundation for an OCI-native Kubernetes network design.
References
Example repository and deployment scripts
Kubernetes Cluster API
Cluster API Provider for OCI (CAPOCI)
CAPOCI — cluster templates and provider manifests
Kubernetes Image Builder — OCI
OCI Cloud Control manager
OCI CCM installation guide
Flex CIDR Provider Controller
Cilium native routing