Oracle Cloud VMware Solution is a fully certified and supported solution that uses Oracle Cloud Infrastructure to host a highly available and scalable VMware software-defined data center (SDDC). A standard VMware implementation, it works with existing operational practices.
A key use case is running your application tier or analytics software in your VMware solution cluster, while using the multimodal and highly automated Oracle Autonomous Database for your data management layer. Many customers have moved to Autonomous Database to reduce their operational overhead and take advantage of the improved security and reliability. You can use this architecture as an interim solution on the path to a full cloud native application or as a practical short-term solution to reduce administration.
This blog post explains how an enterprise can securely connect applications running on Oracle Cloud VMware Solution to the Oracle Autonomous Database running on Oracle Cloud Infrastructure using private IP.
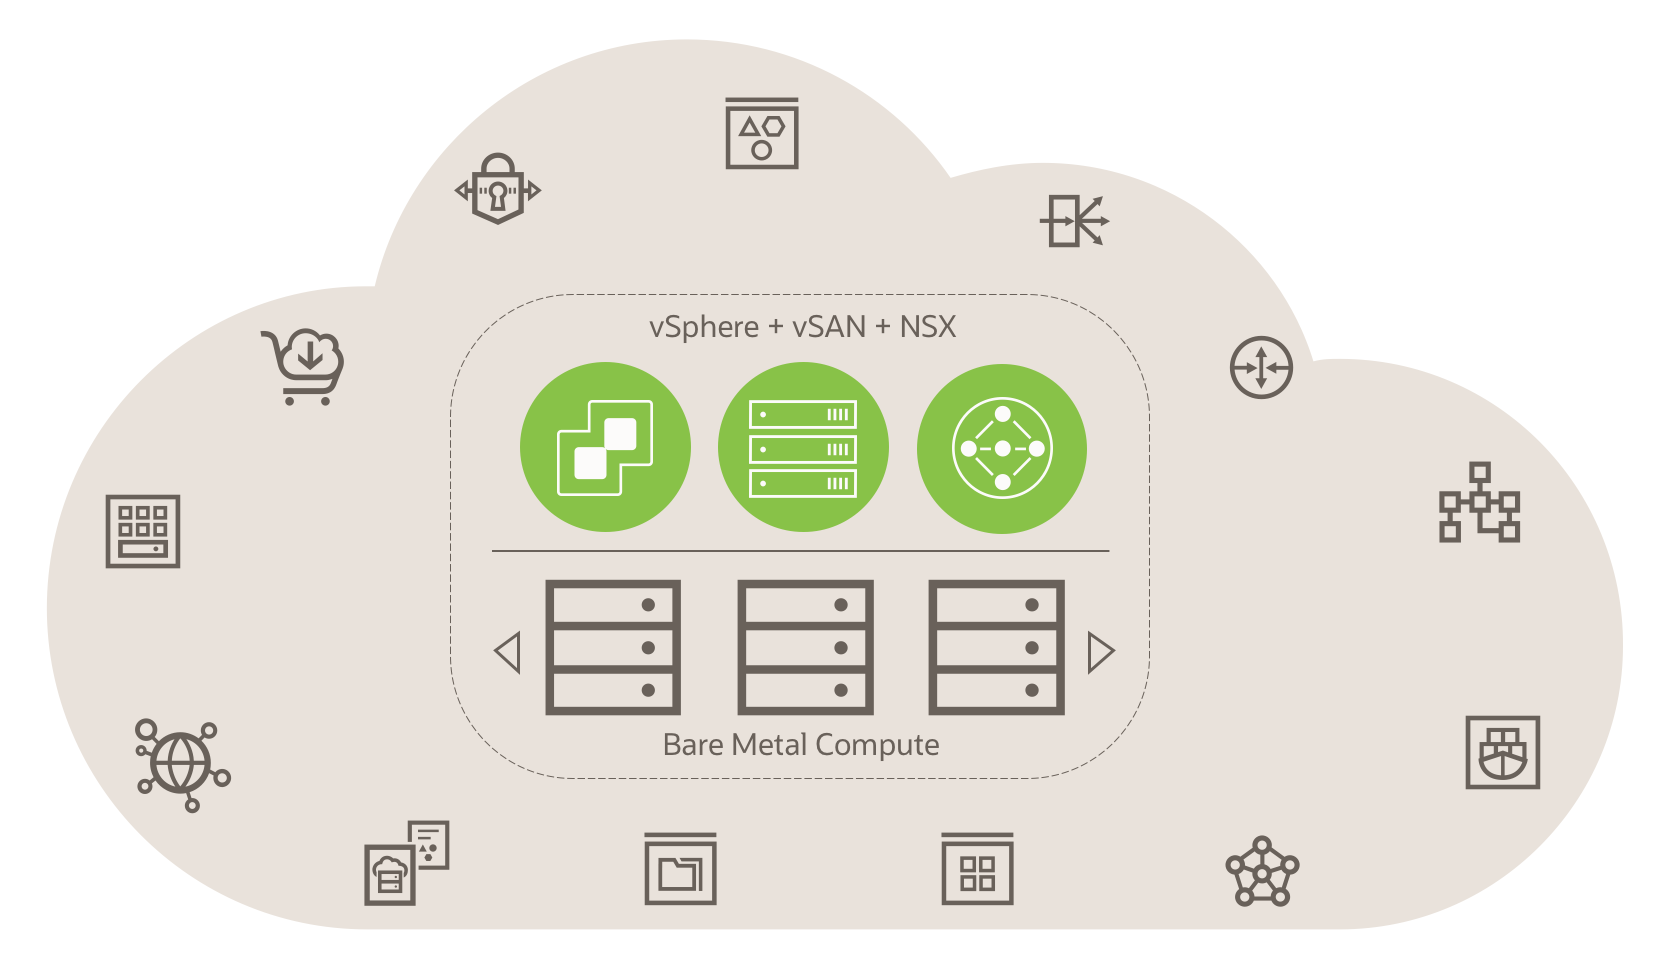 Figure 1: The Architecture of Oracle Cloud VMware Solution
Solution Summary
This solution uses Oracle Autonomous Database as a fully managed, preconfigured database environment with two workload types available, Autonomous Transaction Processing and Autonomous Data Warehouse. We used a social media application, an online transactional processing application running on Oracle Cloud VMware Solution that connects privately to the Autonomous Transaction Processing database running on Oracle Cloud Infrastructure.
We configured the cloud network and the required network resources on Oracle Cloud Infrastructure for both Oracle Cloud VMware Solution and Autonomous Database. The virtual cloud network (VCN) was configured with private classless interdomain routing (CIDR) and subnet on Oracle Cloud Infrastructure.
We configured the necessary routing rules and enabled the security ports for the application tier, running on Oracle Cloud VMware Solution connecting to the Autonomous Database.
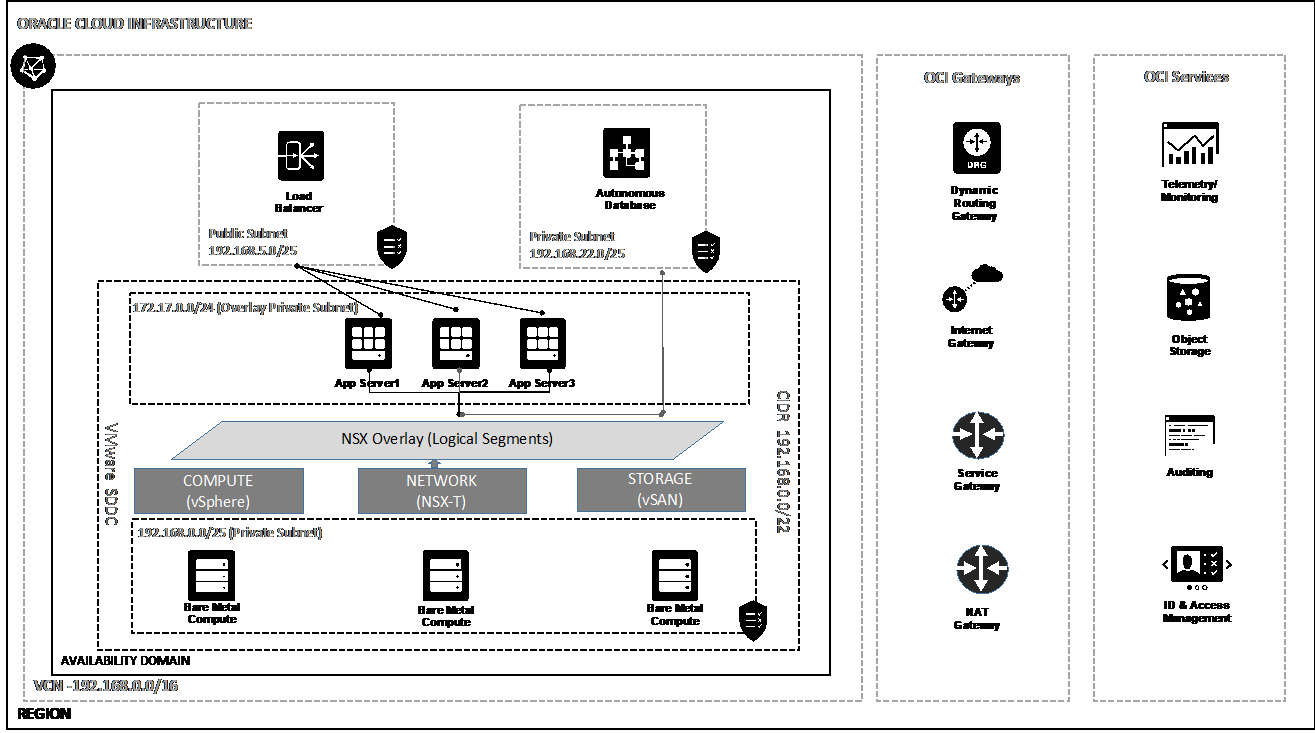
Figure 2: The architecture of the VMware Solution
Before You Start
Before you start connecting to Autonomous Database from the app tier running on Oracle Cloud VMware Solution using private IP endpoint, follow these steps:
-
Create an Oracle Cloud VMware Solution cluster. See this example.
-
Create a private subnet on the Oracle Cloud VCN used to build the Oracle Cloud VMware Solution.
-
Add appropriate route rules to allow traffic from overlay guest virtual machine (VM), which acts as the app tier.
-
Add appropriate route rules to allow traffic from Autonomous Database.
-
Enable security ports to allow connectivity from Autonomous Database.
Step 1: Create a Route Table for Autonomous Database
As a best practice, create a separate dedicated route table for Autonomous Database on the Oracle Cloud VCN used for Oracle Cloud VMware Solution. Add the route rules as private IP rule, use the overlay CIDR block used for application tier as the destination, and use NSX edge VIP as the target.
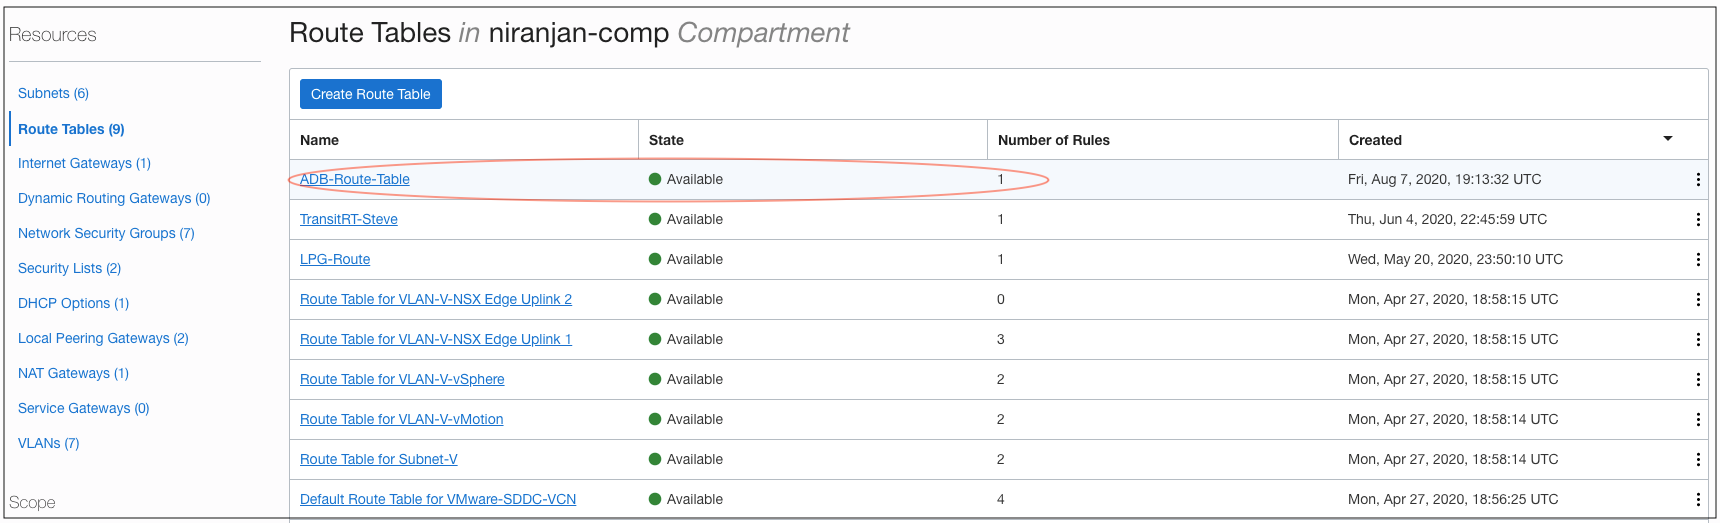
Figure 3: The route table created for Autonomous Database
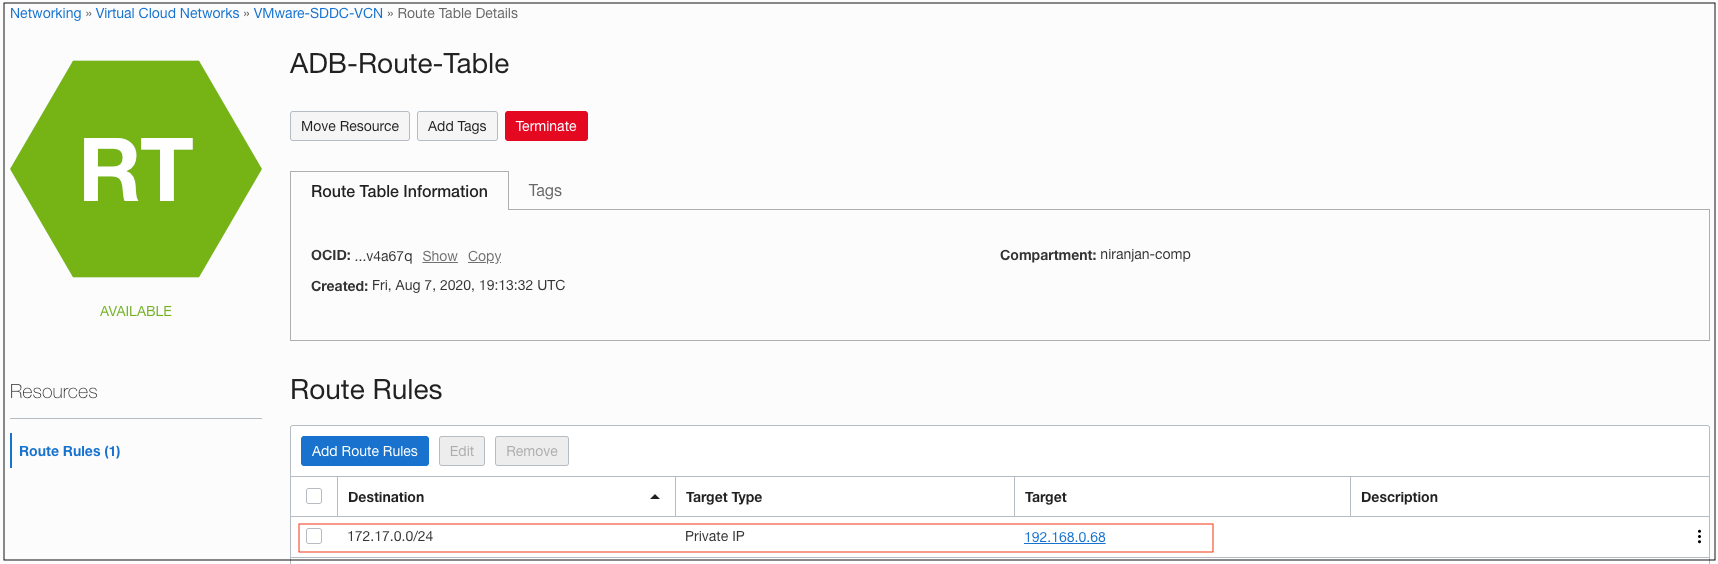
Figure 4: The route rule added to route table for Autonomous Database
Step 2: Create a Separate Subnet for Autonomous Database
As a best practice, create a separate subnet dedicated for Autonomous Database on the Oracle Cloud Infrastructure VCN used for Oracle Cloud VMware Solution. Use the smaller size of the CIDR for the new subnet from the CIDR block. Choose the private subnet for Autonomous Database private endpoint.
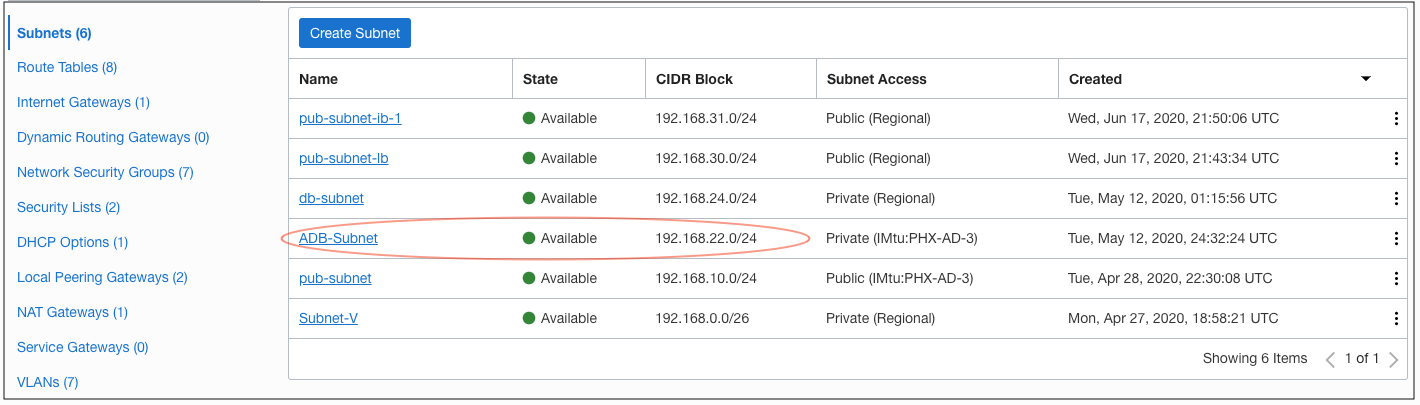
Figure 5: The subnet created for Autonomous Database
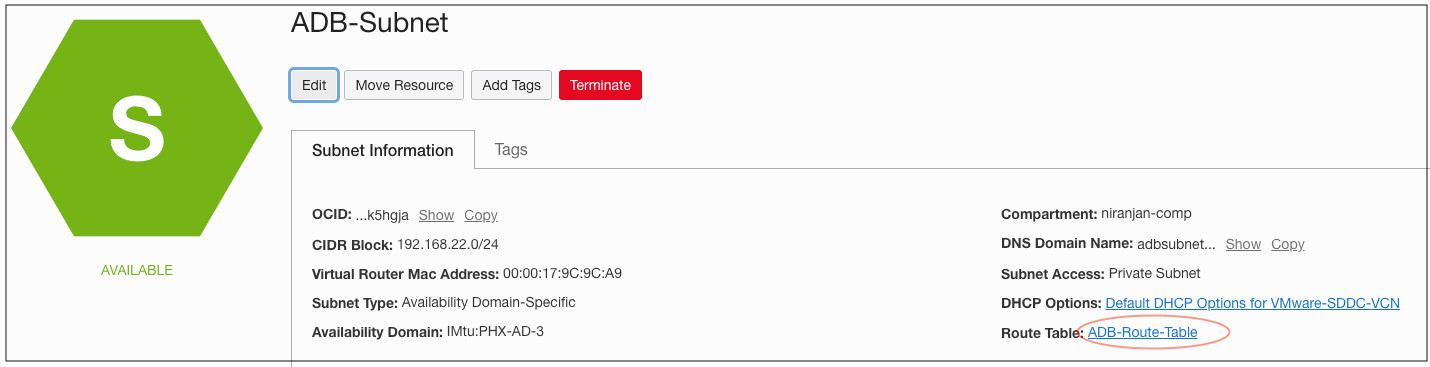
Figure 6: The Autonomous Database subnet and associated route table
Step 3: Create the Network Security Group for Autonomous Database
A network security group (NSG) consists of a set of virtual network interface cards (VNICs) and a set of security rules that apply to those VNICs. For example, you create a network security group for all the instances in the VCN that have the same security posture. In contrast, a VCN security list consists of a set of security rules that apply to all the VNICs in the subnets that the security list is associated with. Learn more about network security groups.
You need an NSG to control the network traffic from overlay application server or any other application running natively on Oracle Cloud Infrastructure and connecting to an Autonomous Database. In this example, we create a network security group and allow the overlay subnet to connect to the Autonomous Database.
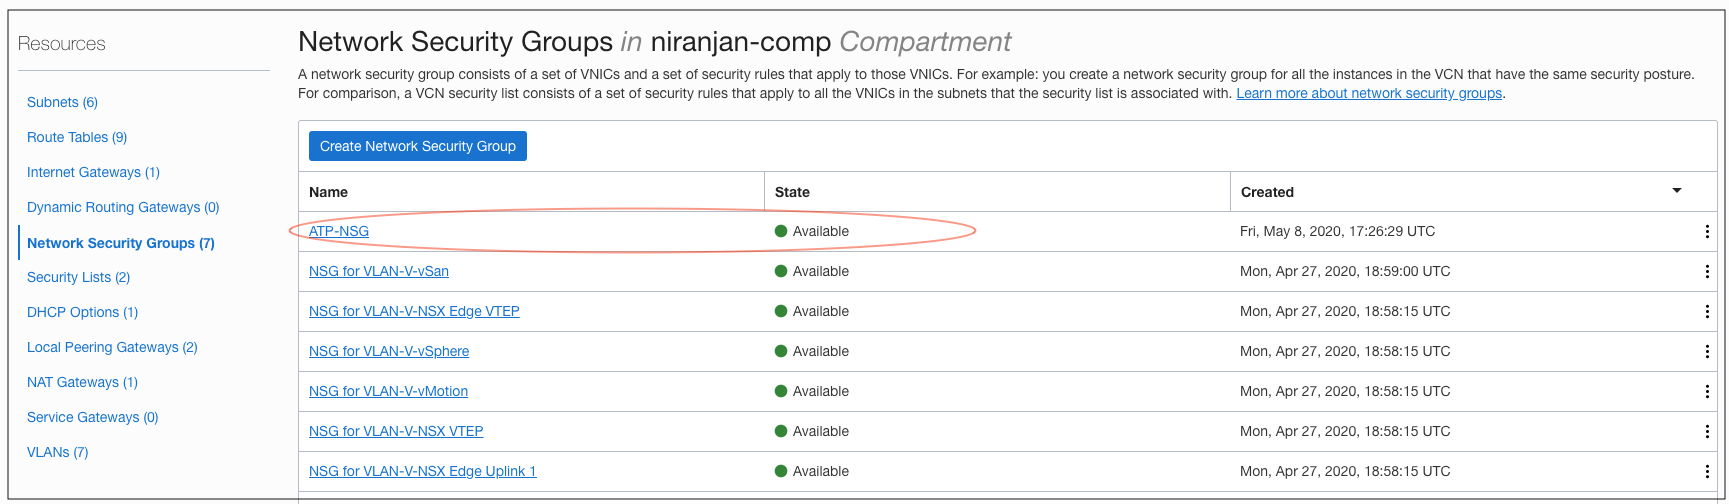
Figure 7: The NSG created for Autonomous Database
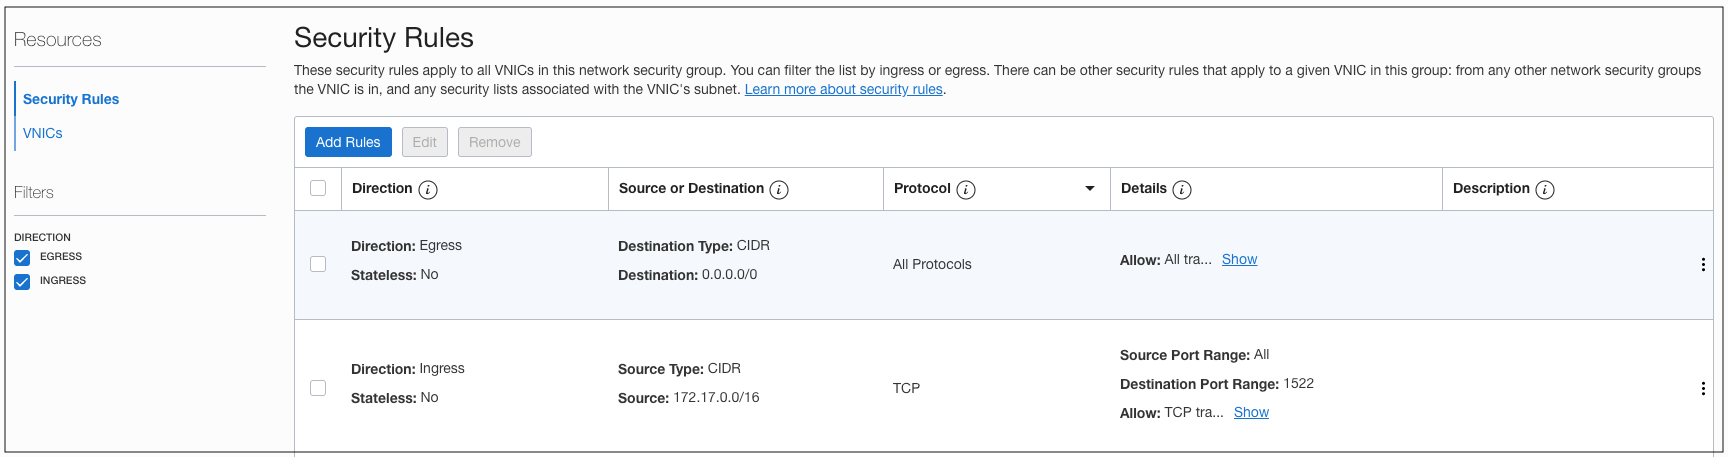
Figure 8: The security rule added to the NSG for Autonomous Database
Step 4: Add Security Rules to Allow Access to Overlay Application Server
An NSG is created to control network traffic from the overlay VM. Add a security rule to that NGS to allow network traffic to application server running on Oracle Cloud VMware Solution.
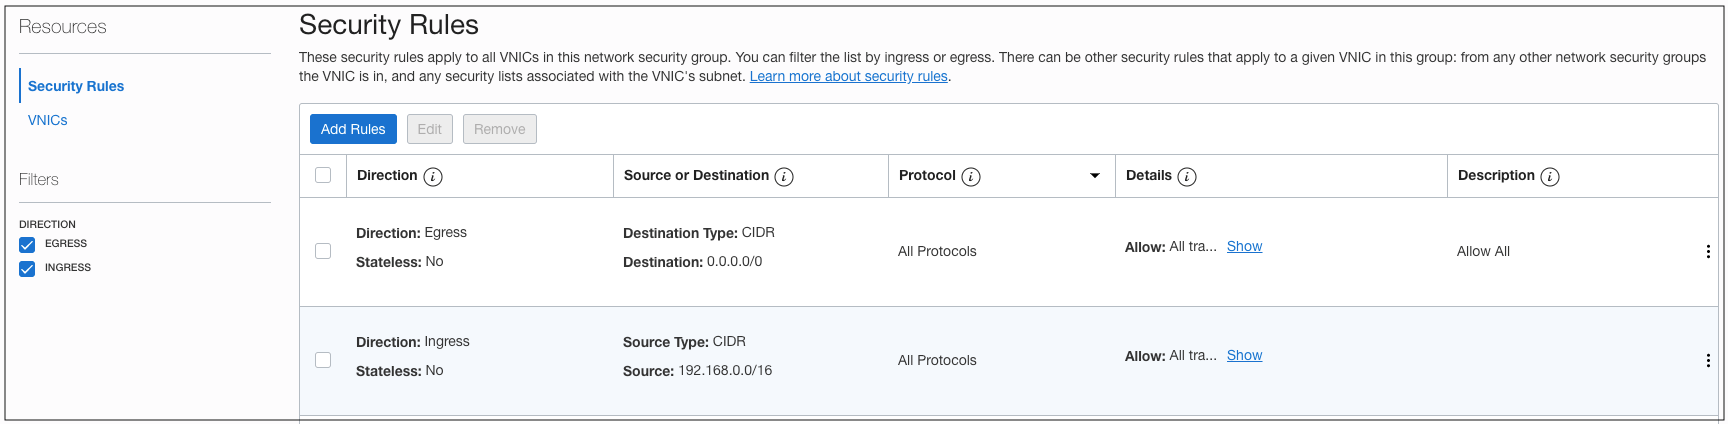
Figure 9: The security rule added to the NSG for Application Server (overlay VM).
Step 5: Create an Autonomous Database
Create an Autonomous Database using the Oracle Cloud Console. Provide the VCN, subnet, and NSG created in previous steps. You can set the value appropriately for the optional and customizable parameters. In this example, I provided all required parameters to attach the Autonomous Database to VCN.
If you’ve already created an Autonomous Database and want to use it for the application running on Oracle Cloud VMware Solution using private endpoints, you can update the network access properties of the Autonomous Database and associate it with the VCN, subnet, and NSG.
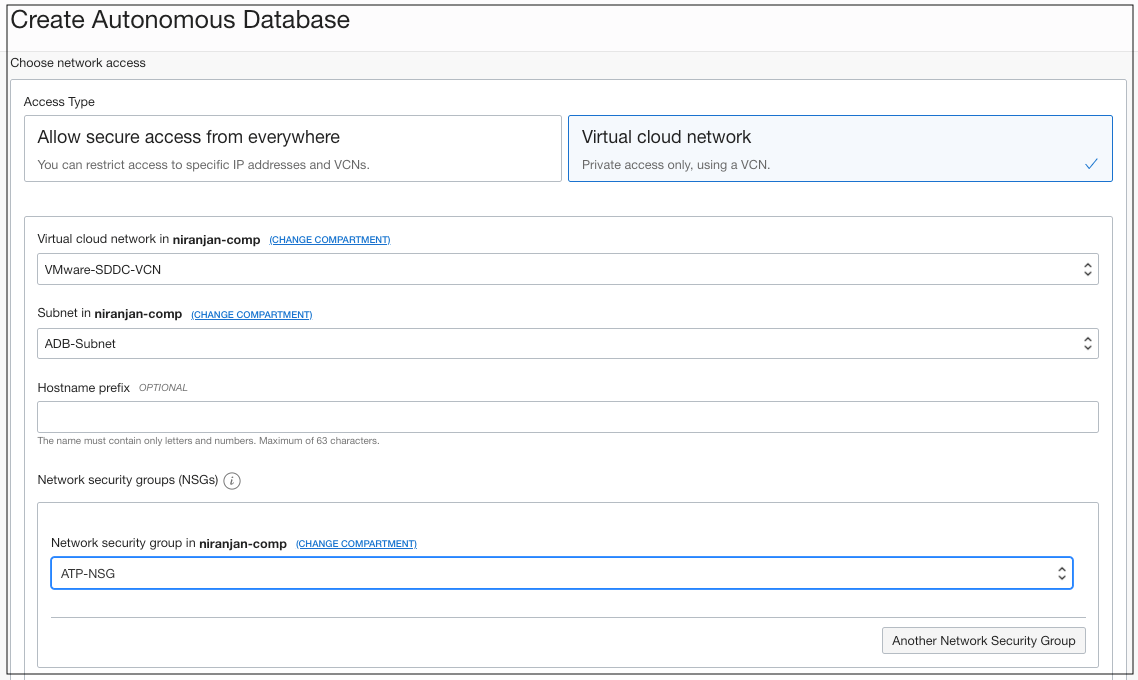
Figure 10: The VCN and NSG association with Autonomous Database
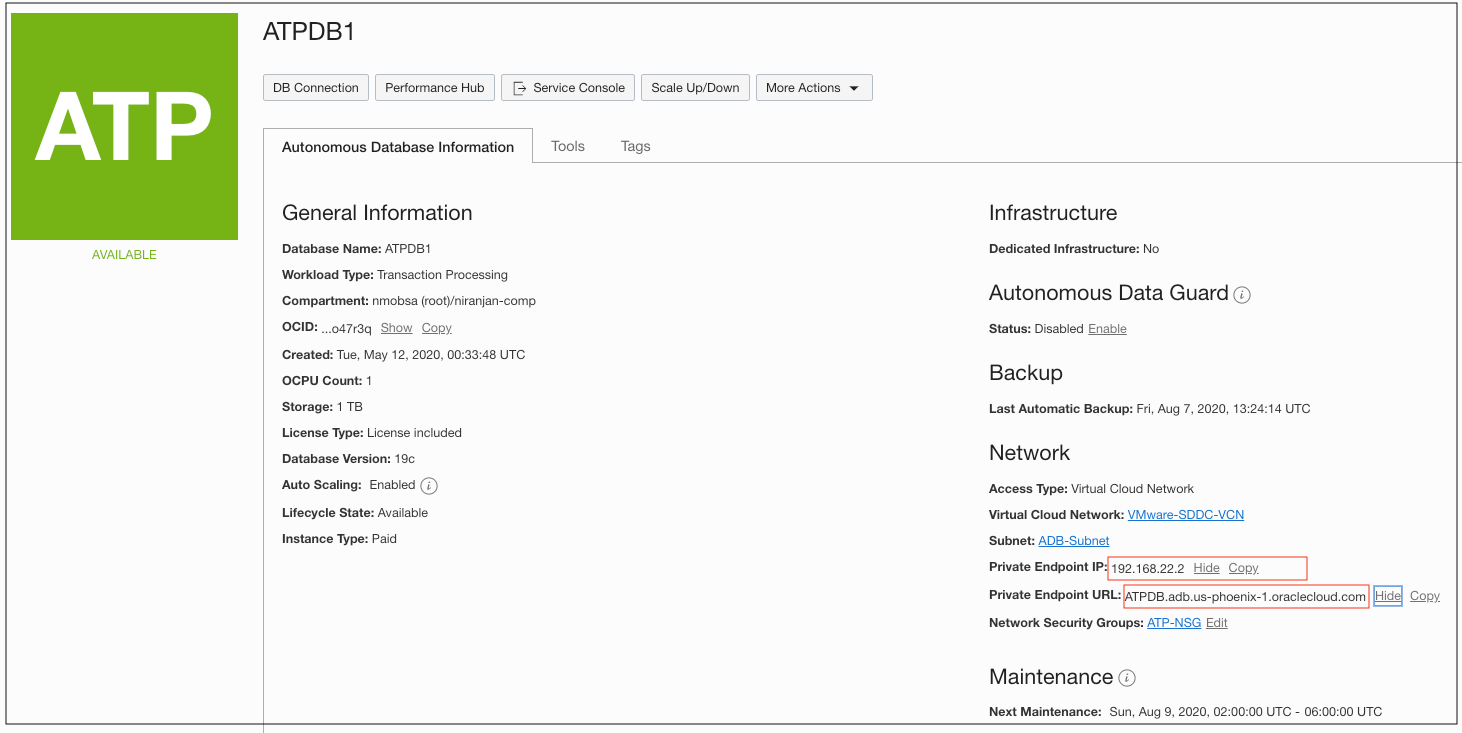
Figure 11: The private endpoint IP of the Autonomous Database
Step 6: Download Database Connection Wallet
Download the database connection credential wallet file from the Oracle Cloud Console Autonomous Database display. Once you extract the database connection wallet file, the database connect string is in the tnsnames file. You can use the private IP or the private FQDN of the Autonomous Database for the application configuration, connecting to the Autonomous Database.
Step 7: Create the Logical Switch on NSX-T for Guest VM
Create a logical switch after login to the NSX manager. Provide a private IP CIDR block for the logical switch. Ensure that the private IP CIDR block isn’t overlapping with Oracle Cloud Infrastructure VCN. Use this logical switch for the application server.
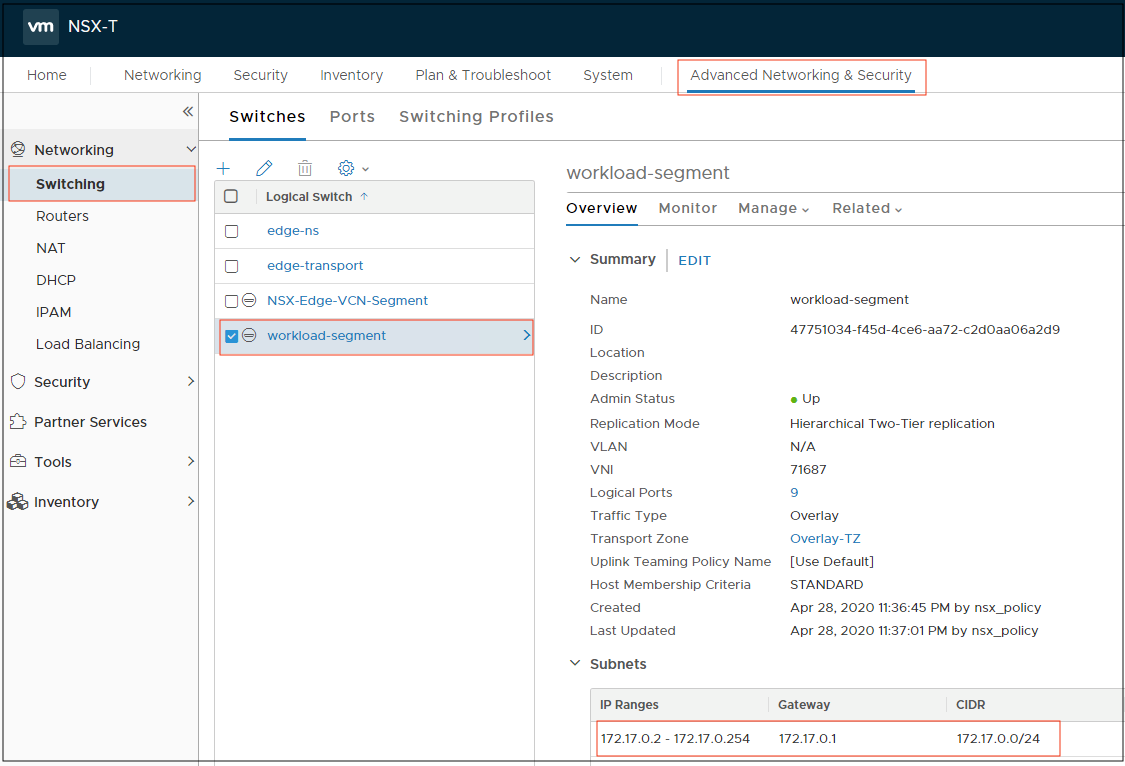
Figure 11: The logical switch configuration on NSX Manager
Step 8: Create the Application Server on Oracle Cloud VMware Solution
Log into the vCenter server and deploy the VM. Use the logical switch created in previous step for the network configuration of the VM. Install the operating system and application on the virtual machine.
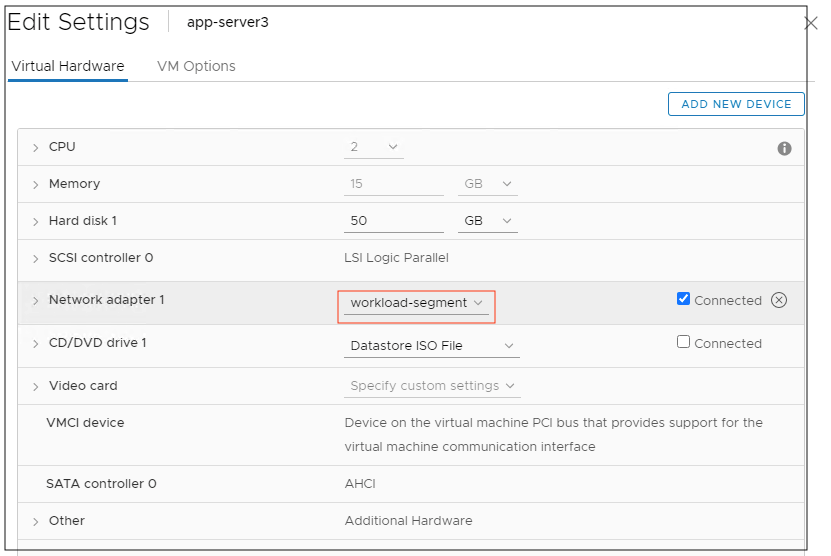
Figure 12: The network adapter configuration of the VM
Step 9: Configure the Application with Autonomous Database Connect String
Update the application server database configuration file for database connection running on Oracle Cloud VMware Solution. Use the database connect string with private IP or the private FQDN of the Autonomous Database.
Now you can connect to the Autonomous Database running on Oracle Cloud Infrastructure from the application server host using the private IP.

Figure 12: The private endpoint IP of the Autonomous Database used in Application server
Step 10: Access the Application Connecting to Autonomous Database
In this example, we used a social media application running on an overlay guest VM connected to Autonomous Database using private IP or private FQDN endpoint. Now, we can access the application from overlay guest VM running on Oracle Cloud VMware Solution.
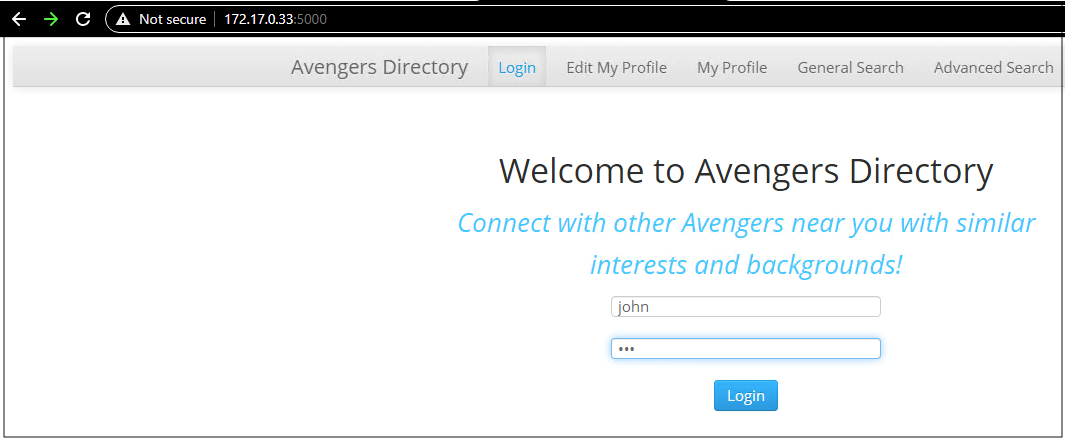
Figure 14: The application user login screen
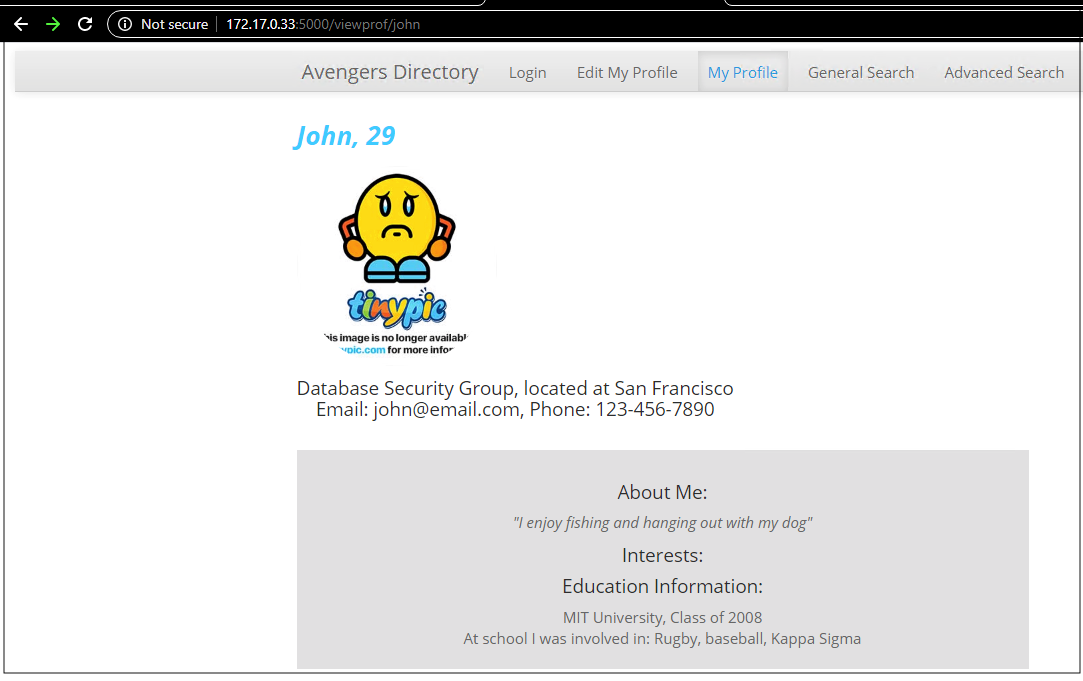
Figure 15: The user profile data retrieved from the Autonomous Database
Conclusion
One of the benefits of running VMware on Oracle Cloud Infrastructure is native access to other Oracle Cloud services, such as the powerful Autonomous Database. One aspect of native access is simple, secure network connectivity to those services. This blog highlights connectivity using the private endpoints of Autonomous Databases. You can establish connectivity with the Oracle Cloud Infrastructure Service Gateway, but this method is more efficient.
Every use case is different. The only way to know if Oracle Cloud Infrastructure is right for you is to try it. You can select either the Oracle Cloud Free Tier or a 30-day free trial, which includes US$300 in credit to get you started with a range of services, including compute, storage, and networking.