
In the first article, I explained why a finding alone is not enough to prioritize Security Rules. In this second part, I walk through a practical toolkit that makes it easier to extract, load, and analyze the network data needed to add the missing context: where rules are applied, whether relevant routes exist, whether public IPs are present, and which metadata can help map findings back to affected assets. The goal is to support this analysis without requiring scripting, database, or SQL expertise. Beyond that, I also share a reference model that can be reused in other use cases or built into your own tools.
This is part 2 of a two-part blog series:
Part 1: Gaining Visibility into Your Network Exposure in OCI: Why Context Matters
https://blogs.oracle.com/cloud-infrastructure/gaining-visibility-into-network-exposure-part1
Part 2: Gaining Visibility into Your Network Exposure in OCI: A Practical Toolkit for Prioritization
https://blogs.oracle.com/cloud-infrastructure/gaining-visibility-into-network-exposure-part2
We could add even more detail to these findings, such as tags from resources or from the compartments where those resources are deployed, including defined tags for environment (Prod, Test, Dev), criticality (High, Medium, Low), or compliance-related information such as PCI or HIPAA. For now, I want to keep the focus on the network information needed to evaluate and prioritize them.
What we need to collect and why
To gain the visibility needed to evaluate and prioritize findings, we need to rely on additional sources of information, not just security rules. Security Lists and NSGs tell us what is allowed inbound or outbound, but by themselves they do not tell the whole story.
To enable that analysis, the toolkit collects the following elements.
- nsgdata: NSG metadata, such as name and identifier, which lets us relate the NSG to other elements, such as VNICs and NSG rules.
- nsgrules: The NSG rules themselves, which we use to identify permissive ingress rules.
- nsgvnic: The association between NSGs and VNICs, showing where each NSG is actually applied.
- vnics: VNIC information, including the subnet to which it belongs, whether it has a public IP, and any VNIC-specific route details, when present.
- securitylists: Security List identifiers, used to relate Security Lists to subnets, and the rules used to identify critical allowed inbound ports and protocols.
- subnets: The attributes to check whether public IP assignment is allowed, which route table is applied, and which Security Lists are attached.
- routes: Route rules used to check whether there is a path to an Internet Gateway.
- publicips: Used mainly when there are secondary IPs on the VNIC, allowing us to relate them back to a secondary private IP.
- privateips: Used mainly when there are secondary IPs on the VNIC, allowing us to relate them back to the VNIC and, when applicable, to secondary public IPs.
How the data points connect
To make the findings useful, our analysis needs to follow a simple path: identify the insecure rule, locate where it is applied, and confirm whether there is a real internet path to the affected asset. This is also the logic behind the main queries in the toolkit.
Security Lists
- Identify Security Lists exposing critical services or allowing access from any source.
- Find the subnets using those Security Lists.
- Check whether those subnets allow public IP assignment.
- Check which route table is applied to those subnets.
- Confirm whether that route table has a path to an Internet Gateway.
- Prioritize Security List findings.
Network Security Groups
- Identify NSG ingress rules exposing critical services or allowing access from any source.
- Find which VNICs have those NSGs associated.
- Check the subnet of each VNIC.
- Check whether that subnet allows public IP assignment.
- Check whether that subnet has a route to an Internet Gateway.
- Check whether the VNIC has a public IP.
- Optionally extend the analysis to secondary IPs when needed.
- Prioritize NSG findings.
VNICs
1. Check whether the VNIC is in a subnet that allows public IP assignment.
2. Check whether that subnet has a route to an Internet Gateway.
3. Check whether the VNIC has a public IP.
4. Check whether the VNIC has an insecure NSG associated with it.
5. Check whether its subnet has an insecure Security List applied.
6. Use VNIC metadata to help identify the affected resources.
A practical toolkit to support this analysis
To make these tasks easier, I provide a ready-to-use toolkit that includes:
- a Python script to extract the network information from the tenancy,
- instructions to load the resulting files into an Oracle Autonomous AI Database (or another type of deployment), in a few simple steps, even for users with no prior ADB knowledge.
- three sets of SQL queries that correlate the collected data and return prioritized results, without requiring SQL knowledge.
The detailed prerequisites, examples, IAM permissions, and SQL files are available in my personal GitHub repository.
https://github.com/michelrhub/nw_exposure
Note: This toolkit is not an official Oracle tool. It is provided as is, without warranties.
Here is a summarized view of the process.
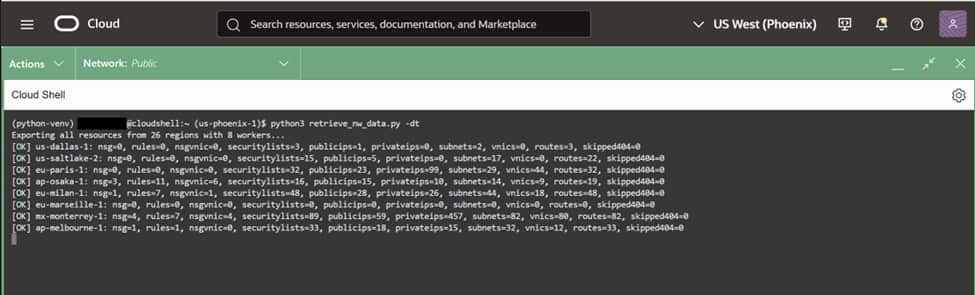
Step 1: Extract the data with a Python script
The toolkit starts with a Python script built to collect network data cross all subscribed OCI regions and compartments in a single run. It can be executed from Cloud Shell or from a host with OCI CLI access and Python configured, using the OCI SDK to gather the required information.
At a high level, the script extracts the nine data layers described earlier: nsgdata, nsgrules, nsgvnic, securitylists, publicips, privateips, subnets, vnics, and routes. That combination is important because it gives us both the rule itself and the network details needed to interpret it.
Step 2: Load the dataset into Oracle Database
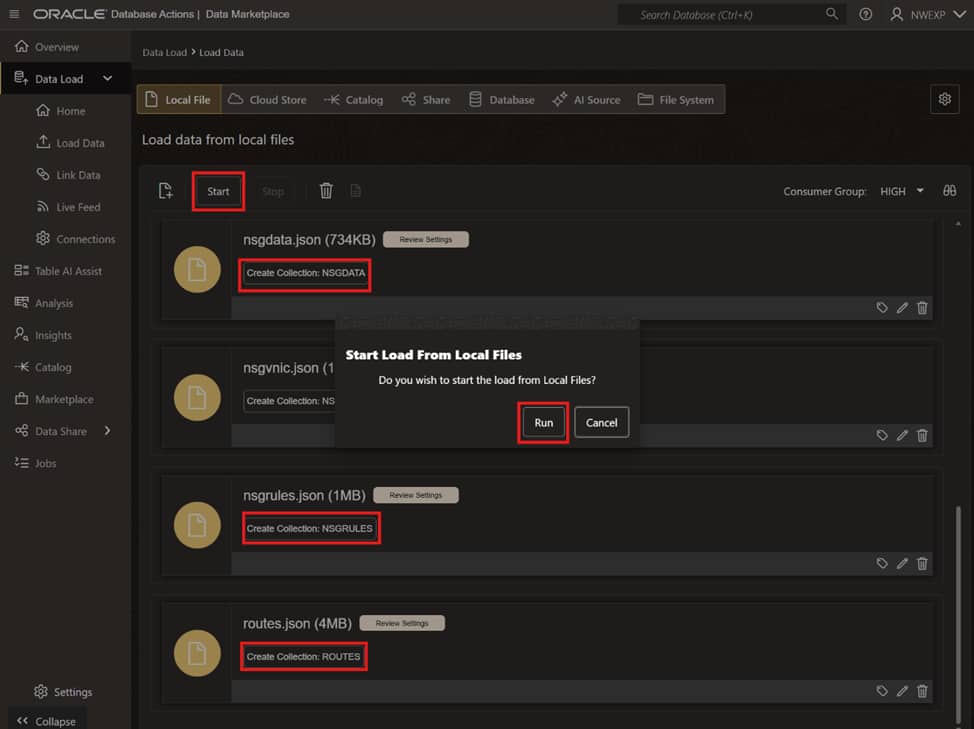
After the extraction step, the generated files are loaded into Oracle Autonomous AI Database as JSON collections. This choice keeps the process simple and practical, because Oracle Database can ingest JSON quickly and lets us correlate these different datasets without forcing us to build a complex pipeline first.
The walkthrough uses Autonomous AI Database along with Database Actions and Data Studio for simplicity and ease of use, including for users who are not familiar with databases. The same idea can also be applied to other types of Oracle Database deployments.
Step 3: Run the queries that answer the real questions
Once the data is loaded, the query packs correlate subnet attributes, route tables, Internet Gateway paths, NSG associations, VNIC data, and IP information to show where a finding is effectively in use.
The internet-facing query pack is designed to answer questions such as:
- Which insecure Security Lists are in use in public networks?
- Which insecure NSGs are attached to VNICs in public subnets?
- Which VNICs are reachable in public networks, and with which services?
- Which other ports or protocols are exposed in public networks beyond ALL, TCP/22, and TCP/3389?
- Which Security Lists or NSGs are not in use, including those with critical findings?
- And additional prioritization questions.
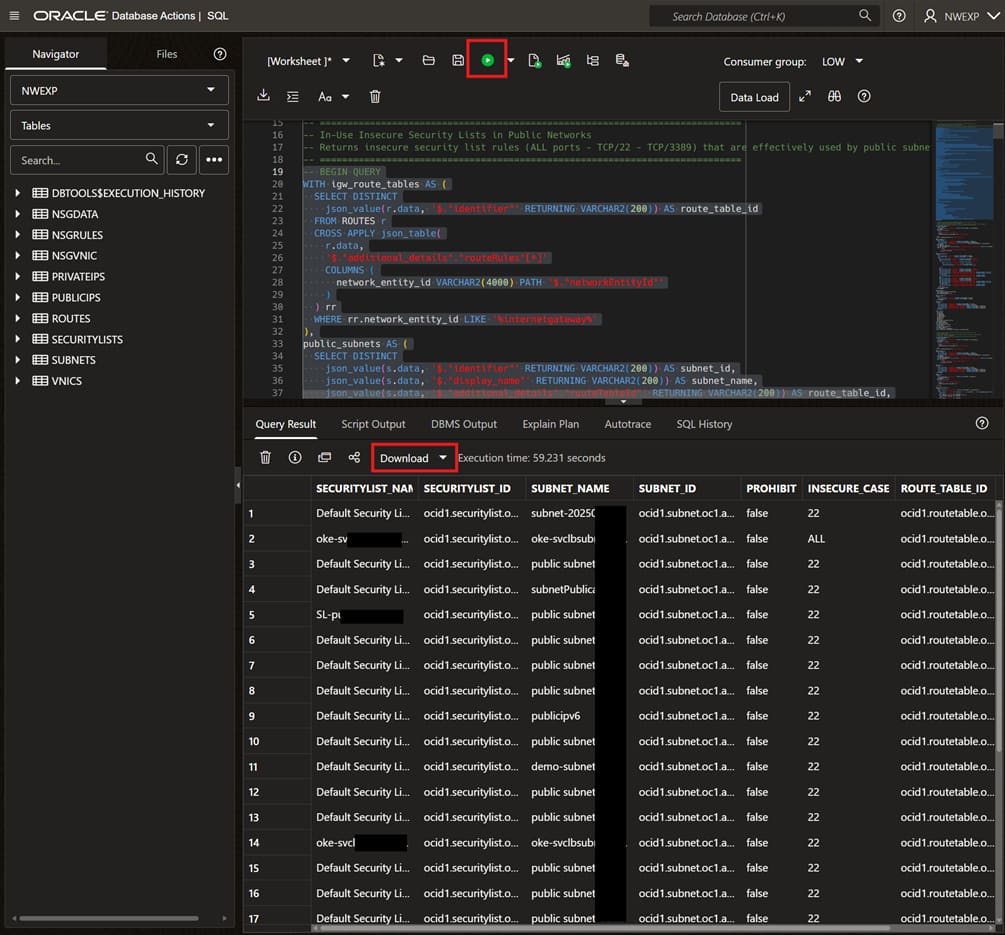
With the provided queries, the objective is to go beyond CIS 2.1 to 2.4 findings and support prioritization, remediation planning, and cleanup of low-value or unused rules.
What this gives you in practice
With this approach, teams can move from a flat list of findings to a much more useful view of risk. They can distinguish between a wide-open rule on a truly public path and a permissive rule that exists in a network path with no internet reachability. They can identify unused rules, see which workloads are really affected, and decide what needs immediate action and what can be addressed later.
Once the cleanup is done, continuous monitoring through Cloud Guard or another preferred tool becomes much more effective. From there, preventive controls such as Security Zones can play a stronger role in stopping the same patterns from coming back.
Where to find the full step-by-step
For the detailed walkthrough, including prerequisites, least-privilege IAM policies, Python environment preparation, script execution examples, data loading steps, and SQL files, refer to my personal GitHub repository.
https://github.com/michelrhub/nw_exposure
The goal of this toolkit is to make network risk reviews easier to explain and prioritize, ultimately helping teams accelerate risk reduction. In a future article, I plan to explore how AI can make this interaction even simpler by allowing teams to work with the same dataset using natural language.