1.1. Introduction
Organizations are increasingly rely on seamless data migration and real-time replication to ensure application uptime and maintain data consistency across environments. OCI PostgreSQL, equipped with robust logical replication extensions, provides a flexible solution for both bulk data transfers and Change Data Capture (CDC).
Leveraging pg_dump and pg_restore alongside pglogical (or native logical replication) enables near-zero-downtime migrations and efficient CDC in OCI PostgreSQL Database. pg_dump/pg_restore manages the initial full data load, while pglogical captures ongoing changes during and after this process.
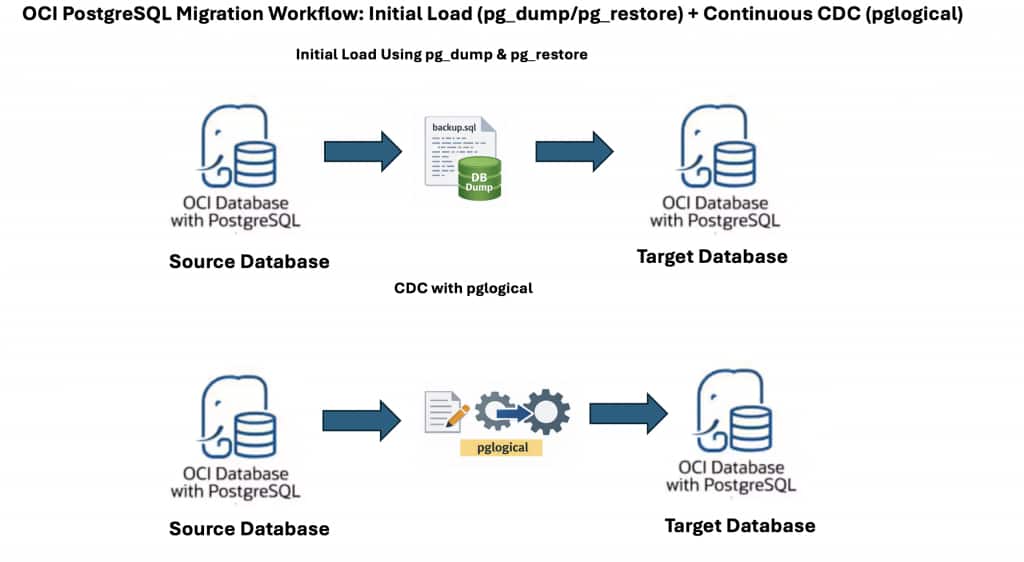
This guide outlines a reliable approach: first, use pg_dump and pg_restore for the initial data migration, then configure pglogical for continued, incremental replication. This method ensures minimal downtime and robust data consistency between source and target OCI PostgreSQL databases.
While the walkthrough focuses on OCI PostgreSQL, the same pattern works for PostgreSQL running on other cloud providers or on‑premises, as long as prerequisites such as network reachability, appropriate permissions, and support for required extensions are met.
1.2. Step 1: Initial Data Load – Exporting from the Source Database
A reliable replication setup starts with a consistent and complete data snapshot. The first step is to export global objects, the database schema, and the actual data from the source OCI PostgreSQL database.
1.2.1. Export Global Objects (Roles, etc.)
Export users, groups, and privileges to preserve access controls without tablespace information:
pg_dumpall -U psql -h <source_ip_address> -g --no-role-passwords --no-tablespaces -f global_role_object.sql- -g: Dump only global objects, no databases.
- –no-role-passwords: Use this flag to avoid dumping of passwords.
- –no-tablespaces: OCI PostgreSQL Database supports only in-place tablespaces.
1.2.2. Export Database Schema
Generate a schema-only dump, which includes the structure (tables, indexes) but not the data:
pg_dump -U psql -h <source_ip_address> -s -C -E 'UTF8' -d <database_name> -f schema_dump.sql- -U: User creating the dump
- -h: Source database host address.
- -s: Dump only schema, no data
- -C: CREATE DATABASE statement.
- -E: Set the client encoding of the dump file to UTF-8.
- -d: Database to dump.
- -f: O/p file to dump database schema
1.2.3. Export Table Data
Extract all table data, excluding schema details:
pg_dump -U psql -h <source_ip_address> -a -E 'UTF8' -d <database_name> -f data_dump.sql- -a: Dump only the data, not the schema
1.3. Step 2: Initial Data Load – Importing to the Target Database
With the data exported, the next stage is to restore it onto the target server.
1.3.1. Import Global Objects
Re-create user accounts, groups, and associated privileges:
psql -U psql -d postgres -h <target_ip_address> -f global_role_object.sql-h: Target OCI PostgreSQL Database database system IP. See Getting Details About a Database System for instructions on how to find a database system’s IP address.
Note:
- Because the admin user of the OCI PostgreSQL database system doesn’t have SUPERUSER privileges, NOSUPERUSER, NOREPLICTION, and so on, need to be removed from the
CREATE USERstatements in the dump. - Make the necessary changes in the global dump file to remove any commands that need SUPERUSER privileges. For example:ALTER ROLE/USER test WITH NOSUPERUSER NOINHERIT NOCREATEROLE NOCREATEDB LOGIN NOREPLICATION NOBYPASSRLS PASSWORD ‘test’;
- Should be modified to:ALTER ROLE/USER test WITH LOGIN PASSWORD ‘test’;
1.3.2. Import Database Schema
Create the database structure on the target system:
psql -U psql -d postgres -h <target_ip_address> -f schema_dump.sqlNote: Fix any errors with privileges or object mismatches before proceeding further.
1.3.3. Import Table Data
Populate target tables with the exported data:
psql -U psql -d postgres -h <target_ip_address> -f data_dump.sqlFor additional information, please refer to the official OCI documentation on Migrating data using pg_dump and pg_restore.
1.4. Step 3: Configure pglogical for Change Data Capture (CDC)
With both environments now synchronized, use pglogical to replicate ongoing changes from source to target in real time. This enables smooth, incremental updates without recurring full data loads.
1.4.1. Source Database – Set Up as Provider
1.4.1.1. Create the Provider Node
Establish the source database as a logical replication provider:
SELECT pglogical.create_node(
node_name := 'provider1',
dsn := 'host=source_fqdn port=5432 user=psql password=xxxx dbname=postgres'
);
1.4.1.2. Create a Replication Set
Specify which kinds of changes to replicate (inserts, updates, deletes, truncates):
SELECT pglogical.create_replication_set(
'default1',

replicate_insert := true,

replicate_update := true,

replicate_delete := true,

replicate_truncate := true

);
1.4.1.3. Add All Tables to the Replication Set
Include all tables from the public schema in the replication set:
SELECT pglogical.replication_set_add_all_tables('default1',ARRAY['public']);1.4.2. Target Database – Set Up as Subscriber
To establish CDC without data loss, you must synchronize the replication start point with the dump snapshot.
1.4.2.1. Create the Subscriber Node
Configure the target as a logical replication node:
a. Create the Subscriber Node:
Defines the target as a logical replication node.
SELECT pglogical.create_node( node_name := 'subscriber1', dsn := 'host=target_fqdn port=5432 user=psql password=xxx dbname=postgres' );b. Create the Subscription:
Create the subscription without initial data copy. Subscribes to changes from the provider node.
SELECT pglogical.create_subscription( subscription_name := 'subscription1', provider_dsn := 'host=source_fqdn port=5432 user=psql password=xxx dbname=postgres', replication_sets := ARRAY['default'], synchronize_data := false );synchronize_data := false: Data has already been loaded by the initial dump/restore, so only new changes will be replicated.
At this point, CDC starts flowing.
1.4.3. Check the status of subscription:
Check the status of subscription using below command:
SELECT * FROM pglogical.show_subscription_status();You should see the subscription in replicating state.
1.5. Key Considerations:
The following section highlights important considerations for using pg_dump for initial load in combination with pglogical for CDC.
- Disable initial data synchronization in pglogical
Setsynchronize_data = falseto prevent pglogical from re-copying data already loaded viapg_dump. - Verify primary keys or replica identity
Logical replication requires primary keys or a defined replica identity to track row changes accurately. - Plan for sequence synchronization
Sequences may fall out of sync during migration and should be validated and synchronized after CDC catch-up. - Handle schema changes manually
pglogical does not replicate DDL changes; all schema modifications must be applied separately on the target. - Optimize large table dumps and restores
Use custom-format dumps and parallel restores to reduce migration time for large datasets. - Run VACUUM and ANALYZE after restore
Refresh statistics on the target database to ensure optimal query performance. - Validate data before cutover
Compare row counts, sequence values, and sample data to confirm consistency. - Plan a controlled cutover
Pause writes on the source, allow CDC to fully catch up, and then redirect applications to the target. - Test rollback and recovery strategy
Always have a fallback plan in case issues are detected after migration.
1.6. Conclusion
In summary, leveraging OCI PostgreSQL’s native pg_dump/pg_restore tools for initial data loading, combined with the power of pglogical for real-time Change Data Capture (CDC), provides a robust, flexible solution for database migration and synchronization. This approach ensures your target environment starts from a consistent dataset and seamlessly stays up to date with ongoing changes from the source.
By following the detailed steps outlined in this guide, teams can minimize downtime, reduce data loss risk, and build a reliable foundation for both high-availability and data integration use cases. As always, it’s essential to test these steps in a controlled environment before deploying to production and to tailor the configuration to your organization’s security and compliance requirements.
Additional Resources