Compute instances from Oracle Cloud Infrastructure can be configured with local NVMe SSD storage capacity, which provides the lowest-latency data access profile. Oracle Cloud Infrastructure DenseIO virtual machine (VM) and bare metal shapes deliver some of the highest performance capabilities of any cloud configuration available today by using the power of high-capacity local NVMe SSD storage. This post shows how to build a high-performance Container Engine for Kubernetes configuration on Oracle Cloud Infrastructure using DenseIO compute instances.
Prerequisites
- A cluster of nodes on Container Engine for Kubernetes
- One or more DenseIO VM or bare metal compute instances
Preparation
Use SSH to connect to the worker nodes and prepare the NVMe drives for Kubernetes, as follows.
-
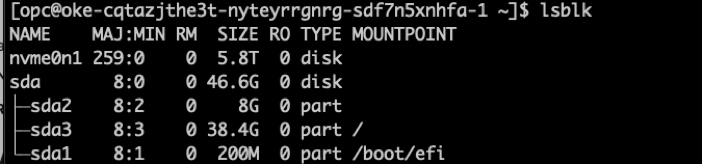
Run the lsblk command on each worker node to identify NVMe devices. I am using VM.DenseIO2.8 for the compute shape in this example. The following example output shows just one NVMe device, nvme0n1.
-
Format the NVMe device as xfs:
$ sudo mkfs.xfs /dev/nvme0n1 -
Create mount points and mount the device:
$ sudo mkdir -p /mnt/data/vol1 $ sudo chmod -R 777 /mnt $ sudo mount /dev/nvme0n1 /mnt/data/vol1 -
Permanently mount the device:
$ sudo blkid /dev/nvme0n1To get it to mount every time, add the following line to the /etc/fstab file:
UUID=nvme_UUID /mnt/data/vol1 xfs defaults,nofail 0 2 -
Clone the local provisioner repository:
$ git clone https://github.com/kubernetes-sigs/sig-storage-local-static-provisioner.git
Create a Storage Class
Create a StorageClass that sets the volumeBindingMode field to the WaitForFirstConsumer mode to enable volume topology-aware scheduling. This mode instructs Kubernetes to wait to bind a Persistent Volume Claim (PVC) until a pod that uses it is scheduled.
|
$ kubectl apply -f storageclass.yaml
Create Local Persistent Volumes for Kubernetes
From the cloned repository, run the following commands:
helm template ./helm/provisioner > ./provisioner/deployment/kubernetes/provisioner_generated.yamlkubectl create -f ./provisioner/deployment/kubernetes/provisioner_generated.yaml
$ kubectl get pv
After the persistent volumes are available, workloads can start using them by manually creating a PVC and pod or a stateful set with volumeClaim templates.
Here’s an example stateful set file:
|
$ kubectl apply -f statefulset.yaml
After the stateful is up and running, the PVCs are bound:

Cleaning Up
Run the following commands:
$ kubectl delete -f statefulset.yaml

$ kubectl delete pvc <pvc-name>

$ kubectl delete pv <pv-name>
Then, unmount the NVMe drives and remove the fstab entry.
What’s Next
Today, the local static provisioner doesn’t support dynamic provisioning. So, you can expect to see:
-
Local block devices as a volume source, with partitioning and fs formatting
-
Dynamic provisioning for shared local persistent storage
-
Local PV health monitoring, taints, and tolerations
-
Inline PV (use dedicated local disk as ephemeral storage)
If you want to learn more about Oracle Cloud Infrastructure and Container Engine for Kubernetes, our cloud landing page is a great place to start.