As Kubernetes adoption increases, more applications are converted to be containerized and cloud native by design, which requires vigilance and continuous monitoring of the Kubernetes cluster for possible threats. In a typical environment, hundreds and thousands of containers run across numerous worker nodes, serving various applications and workloads requirements. Containers are usually a backbox from the host’s perspective and idempotent by design. Applications are continuously scaled, updated, and fixed for security fixes that result in containers dying and getting resurrected at scale throughout the lifecycle of an application.
Threat detection in Kubernetes requires a mechanism to analyze the containers from within, to monitor security and threats. This is where tools like Falco come to the rescue. Originally developed by Sysdig and later contributed to the Cloud Native Computing Foundation (CNCF) in 2018, Falco is the de facto standard for continuous risk and threat detection across Kubernetes, containers infrastructure. Falco works by intercepting kernel system calls and analyzes against the rich set of default security rules and other user-defined configuration rules.
About Falco and installation
Falco monitors the Linux system level calls at runtime and parses the data against the rule engine and notifies when rules are violated. The default ruleset for Falco monitors and alerts on the following common threats and vulnerabilities:
-
Shell spawning from inside a container
-
Running binaries directly inside a containers
-
Privilege escalation inside a privileged container
-
Files and directories ownership changes inside a container
For a complete list of threats and capabilities that Falco can detect, refer to the product documentation.
You can install Falco for Kubernetes threat detection using one of the following methods:
-
Install Falco directly on the host system to isolate Falco from Kubernetes if a compromise occurs. This method is the most secure and recommended way of installation.
-
Deploy Falco as a DaemonSet, either using Helm or manifest files.
Blog overview
For this blog, I deploy Falco directly on the Linux hosts using the cloud-init initialization script on Oracle Cloud Infrastructure (OCI) Container Engine for Kubernetes (OKE). OKE uses cloud init scripts to set up worker nodes, installs, and configures Kubernetes on them. The major benefit of deploying Falco through cloud-init script is that any future node addition to an existing setup automatically installs and configures Falco on the newly commissioned worker nodes.
By default, Falco sends the alerts to journald, which handles all the messages produced by the kernel, initrd, and services. As a part of cloud-init script for OKE deployment, I will modify the Falco configuration file to write to a dedicated file for Falco related alerts. Later, OCI Logging services are configured to read the Falco log file from the OKE worker nodes and ingest the log data. Using the above mentioned steps, I will execute the steps in the same sequence to have a fully functional Falco implementation and its integration with the OCI Logging service.
Create an OKE cluster using cloud-init scripts
You can create an OKE cluster on OCI using the Oracle Cloud Console or Terraform scripts. Both methods support the custom cloud-init scripts during the OKE provisioning. For details of the default script, see the GitHub page.
Create a cloud-init script in bash
Create a bash script for the cloud-init script to use while creating an OKE cluster.
# DO NOT MODIFY
curl --fail -H "Authorization: Bearer Oracle" -L0 http://169.254.169.254/opc/v2/instance/metadata/oke_init_script | base64 --decode >/var/run/oke-init.sh

# run oke provisioning script
bash -x /var/run/oke-init.sh

# adjust block volume size
/usr/libexec/oci-growfs -y

timedatectl set-timezone ${worker_timezone}

# Provision Falco on the Worker Nodes
export VERSION=`cat /etc/oracle-release | grep -Po '.(?=.{2}$)'`
echo $VERSION
sudo yum-config-manager --enable ol${VERSION}_developer_EPEL
sudo rpm --import https://falco.org/repo/falcosecurity-3672BA8F.asc
sudo curl -s -o /etc/yum.repos.d/falcosecurity.repo https://falco.org/repo/falcosecurity-rpm.repo
sudo yum -y install kernel-devel-$(uname -r)
sudo yum -y install falco
awk -i inplace '/file_output:/,/enabled: false/{sub("false", "true", $0)}{print}' /etc/falco/falco.yaml
awk -i inplace '/file_output:/,/filename:/{sub("./events.txt", "/var/log/falco.log", $0)}{print}' /etc/falco/falco.yaml
sudo systemctl enable falco --now
sudo yum-config-manager --disable ol${VERSION}_developer_EPEL
The top lines of the script are mandatory. Those commands enable the installation and configuration of Kubernetes software on all the worker nodes, so don’t modify them.
The user-defined component of the bash script determines the version of the operating system on the worker nodes and appropriately enables the developer’s Extra Packages for Enterprise Linux (EPEL) repository. This is required to download the dependency on dkms rpm package. After the Falco installation is complete, modify the falco.yaml configuration file located at /etc/falco using the awk command to redirect the output to a log file at /var/log/falco.log. Enable and run the Falco as a service and disable the EPEL repository that was enabled to download the Falco-related dependencies.
You can use the same bash script for OKE provisioning through the Console or using an Infrastructure-as-a-Code (IaaC) tool like Terraform.
Create an OKE cluster using the Console
While creating the OKE cluster using the Oracle Cloud Console, use the Custom create option. The Quick create menu doesn’t have the option to specify the custom cloud-init script. While specifying the node pool details in the Console, you can select the custom cloud-init script under the advanced options. Specify the bash script created earlier as the non-default Initialization script.
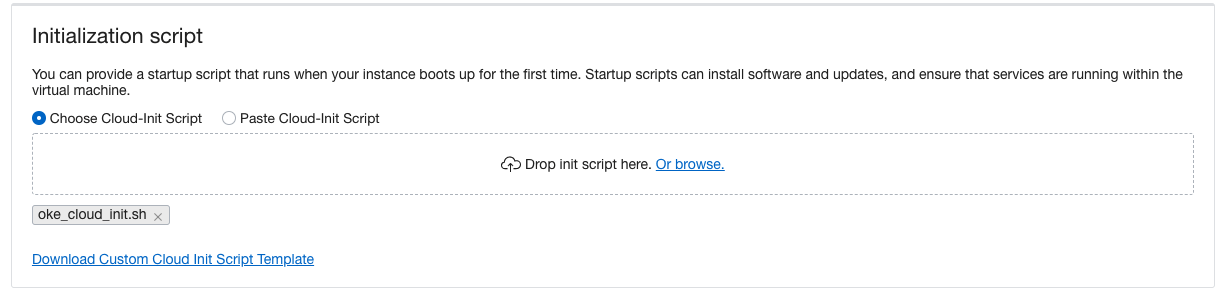
Figure 1: Upload the cloud-Init script
After the successful OKE node pool creation, Falco is installed, configured, and enabled on all the worker nodes.
Create an OKE cluster using Terraform
If you plan to use Terraform scripts for OKE deployment, you can specify the cloud-init script in the definition of the node pool under the user_data in base64 format. The following code snippet was used to provision the OKE cluster for this demonstration.
# Create OKE Cluster
resource "oci_containerengine_cluster" "oke_cluster" {
  compartment_id     = var.compartment_id
 kubernetes_version =  element(data.oci_containerengine_cluster_option.oke_cluster_option.kubernetes_versions, length (data.oci_containerengine_cluster_option.oke_cluster_option.kubernetes_versions)-1)
  name               = var.cluster_name
  vcn_id             = var.vcn_id
  endpoint_config {
    is_public_ip_enabled = true
    subnet_id            = var.public_subnet_id
  }
  options {
    service_lb_subnet_ids = [var.public_subnet_id]
  }
}

# Create an OKE NodePool
resource "oci_containerengine_node_pool" "oke_node_pool" {
  cluster_id         = oci_containerengine_cluster.oke_cluster.id
  compartment_id     = var.compartment_id
  kubernetes_version = var.cluster_kubernetes_version
  name               = var.node_pool_name
  node_shape         = var.node_pool_node_shape[1]
  initial_node_labels {
    key   = "Chipset"
    value = "AMD"
  }
  node_config_details {
    #Required
    placement_configs {
      #Required
      availability_domain = data.oci_identity_availability_domains.AD.availability_domains[0]["name"]
      subnet_id           = var.private_subnet_id
    }
    size = var.node_pool_size

  }
node_metadata = {
    user_data = filebase64(var.oke_cloud_init)
}
  node_source_details {
    #Required
    image_id    = data.oci_core_images.InstanceImageOCID.images[0].id
    source_type = "IMAGE"
    #Optional
    boot_volume_size_in_gbs = 50
  }
  ssh_public_key = file(var.oke_public_key)
}
Verify the Falco configuration on the worker nodes
Log in to the OKE worker nodes and ensure that the Falco is running as a service.
opc@oke-cvzcvzhxopa-nuvq3y5biwq-shlf7rloeua-0 ~]$ sudo systemctl status falco.service
● falco.service - Falco: Container Native Runtime Security
   Loaded: loaded (/usr/lib/systemd/system/falco.service; enabled; vendor preset: disabled)
   Active: active (running) since Sat 2022-08-20 21:53:23 UTC; 20h ago
     Docs: https://falco.org/docs/
 Main PID: 48316 (falco)
    Tasks: 13 (limit: 99224)
   Memory: 19.0M
   CGroup: /system.slice/falco.service
           └─48316 /usr/bin/falco --pidfile=/var/run/falco.pid
Check the configuration file for Falco to ensure that the location of the logs is modified to the path specified earlier in the cloud-init script. The output is abridged to remove irrelevant configuration.
opc@oke-cvzcvzhxopa-nuvq3y5biwq-shlf7rloeua-0 ~]$ sudo cat /etc/falco/falco.yaml

file_output:
  enabled: true
  keep_alive: false
  filename: /var/log/falco.log
Enable Logging for your OKE cluster
Create a dynamic group
Create a dynamic group and specify the individual OCIDs of all the worker nodes or the compartment OCID that encircles all the hosts running within the compartment.

Figure 2: Dynamic group specification
Create a log group
In the Logging section, create a log group under the Observability and Management section.

Figure 3: Log group specification
Create a log
Create a custom log within the Logging service under the Observability and Management section. Modify the log retention as required for compliance requirements.
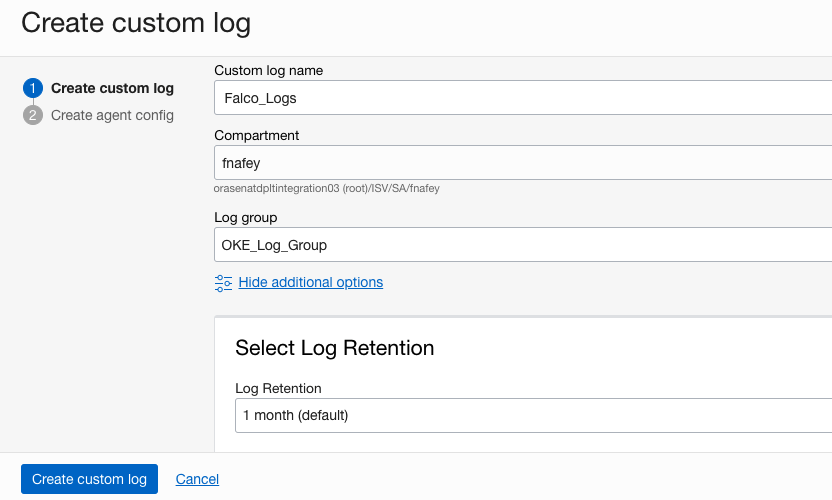
Figure 4: Log specification
On the next screen, add a new agent configuration. Specify the details and create the policy to allow dynamic groups to use the Logging service if necessary. The policy creation is only required if you’re not part of an administrator group. Select the dynamic group you created and specify the file path as /var/log/falco.log, which was specified in the OKE custom cloud-init script.
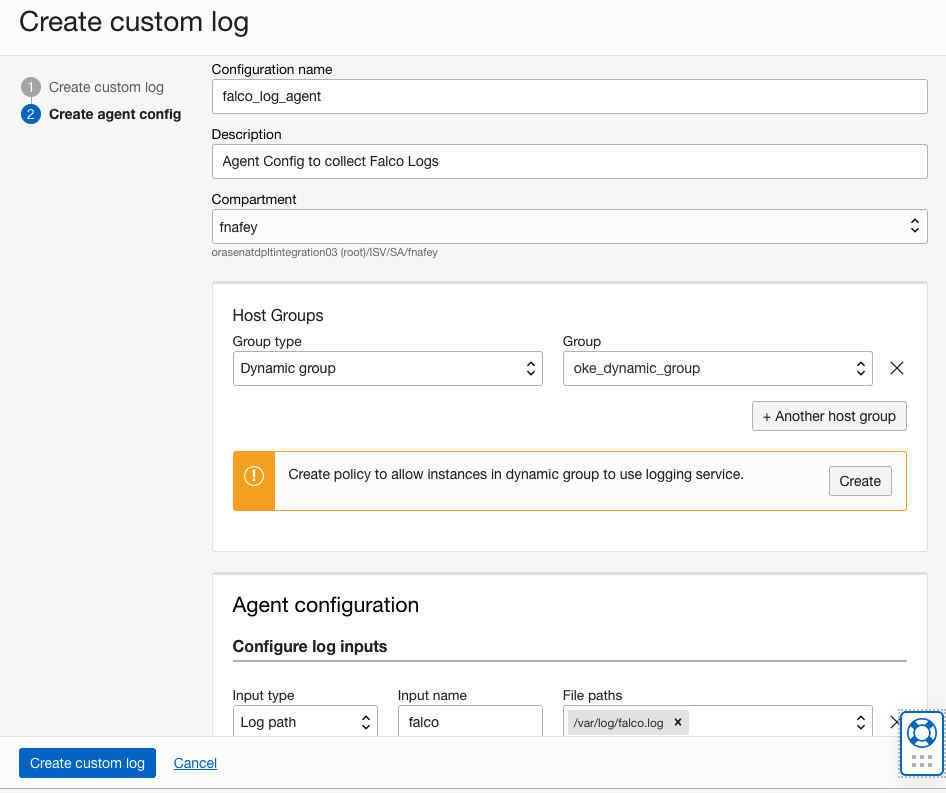
Figure 5: Custom log agent configuration
It can take some time before the first stream of data starts flowing in the logs and is visible in the Console.
Verify that custom logs monitoring is enabled
By default, any instance created in OCI using the provided platform images has the custom logs monitoring agent installed and configured. Verify that the agents are enabled and started.
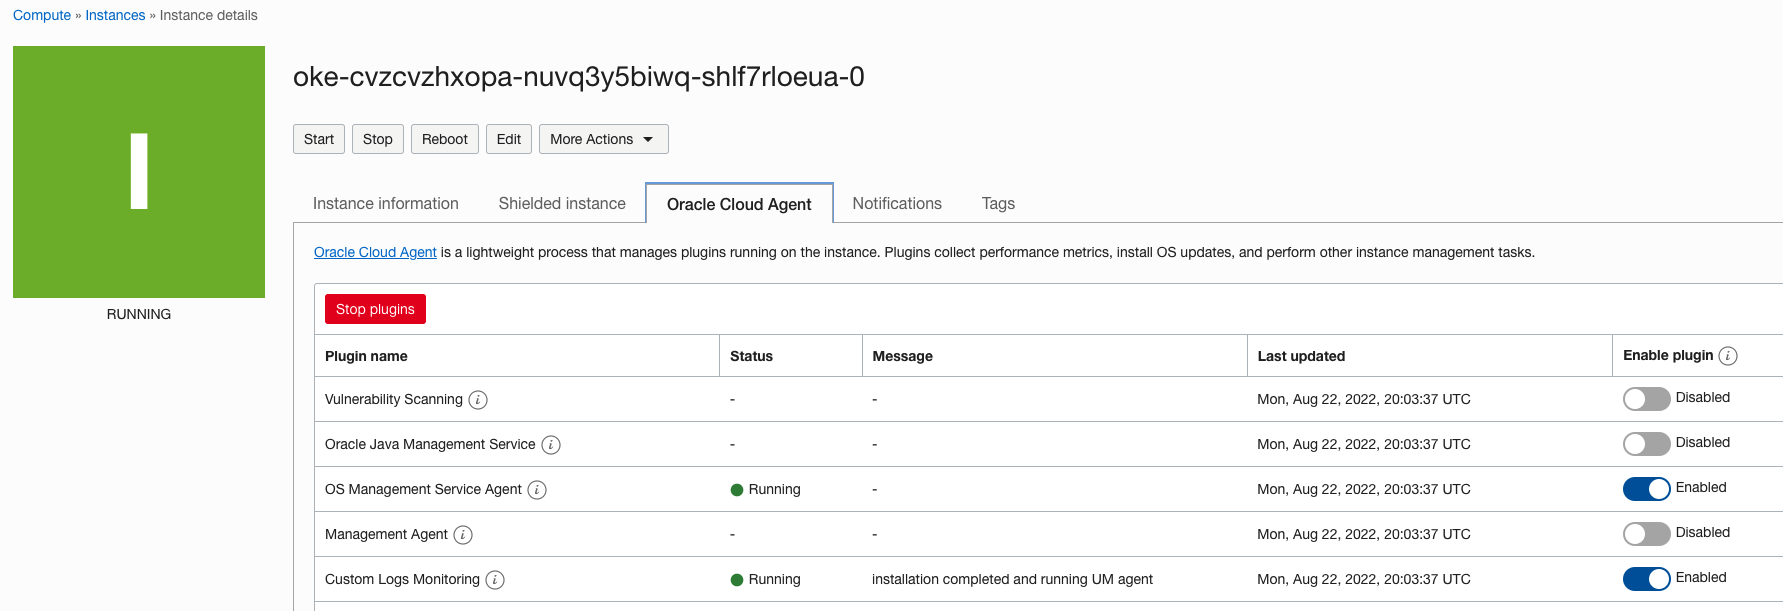
Figure 6: Compute agent status
Verification
The steps of Falco installation and configuration on the worker nodes is now complete, and the worker nodes ingest the logs into the OCI Logging service. Now we can validate the configuration and setup.
Create a Kubernetes deployment
Create a Kubernetes deployment against the OKE cluster.
kubectl create deploy nginx --image=nginx --replicas=2
deployment.apps/nginx created
Verify that the pods are created successfully and running.
kubectl get pods -o wide
NAME                    READY   STATUS    RESTARTS   AGE   IP             NODE             NOMINATED NODE   READINESS GATES
nginx-8f458dc5b-7dvbz   1/1     Running   0          64s   10.244.0.4     172.31.255.218   <none>     <none>
nginx-8f458dc5b-qdc6f   1/1     Running   0          64s   10.244.0.131   172.31.255.139   <none>     <none>
Generate an error for Falco to Detect
Make a shell connection to one of the containers from the deployment and update the packages using apt command. This connection triggers a warning that the Falco daemon running from the worker nodes captures and writes the message to /var/log/falco.log.
kubectl exec -it nginx-8f458dc5b-qdc6f -- sh
# hostname
nginx-8f458dc5b-qdc6f
# apt update && apt upgrade -y
Hit:1 http://deb.debian.org/debian bullseye InRelease
Hit:2 http://deb.debian.org/debian-security bullseye-security InRelease
Hit:3 http://deb.debian.org/debian bullseye-updates InRelease
Reading package lists... Done
Building dependency tree... Done
Reading state information... Done
4 packages can be upgraded. Run 'apt list --upgradable' to see them.
Reading package lists... Done
Building dependency tree... Done
Reading state information... Done
Calculating upgrade... Done
The following packages will be upgraded:
  libgnutls30 libtirpc-common libtirpc3 tzdata
4 upgraded, 0 newly installed, 0 to remove and 0 not upgraded.
Verify the error in the Logging service
If successful, you can see the warning message in the Console’s Logs section. The following images show the warning message for a shell connection to a running container.
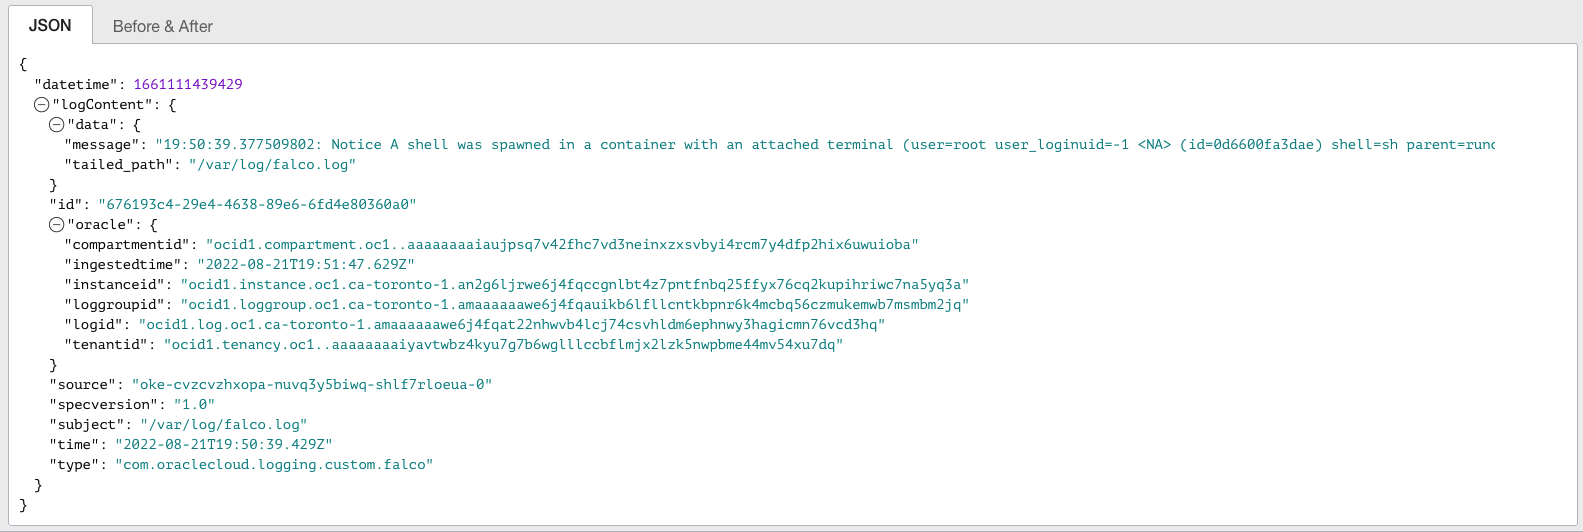 Figure 7: Output from OCI Logging highlighting the warning from the Falco log
Another rule that Falco checks by default is for any package management processes launched inside a container.
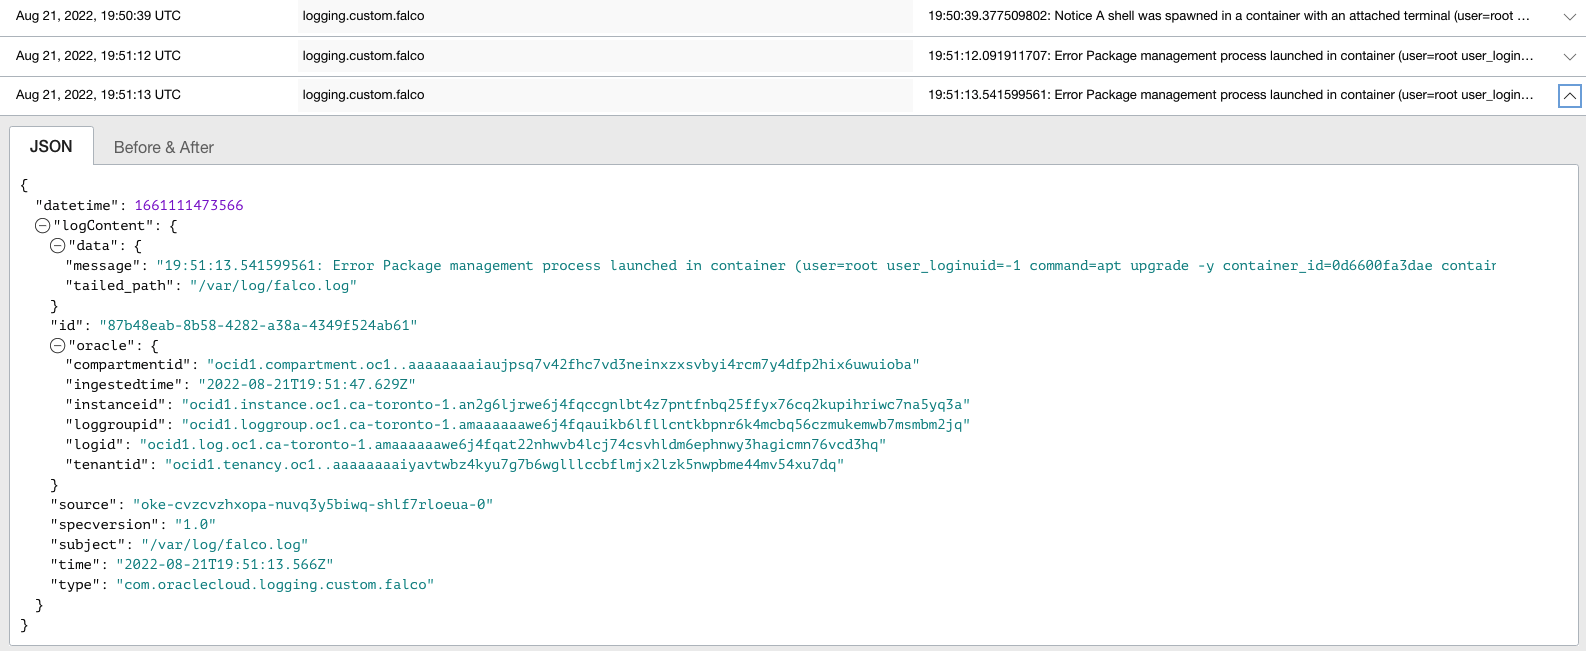
Figure 8: Output from OCI Logging highlighting more warnings from Falco log
Conclusion
Oracle Container Engine for Kubernetes is flexible and allows for any custom software to be installed during the cluster creation. This capability enables advanced users to install and configure security oversight products like Falco during the cluster provisioning and later use the Oracle Cloud Infrastructure Logging service to gain insight into any security warnings reported by Falco.
For more information, see the following resources: