In this post, we show you how to migrate all the Oracle Integration Cloud (OIC) integrations from one environment to another using the OIC REST APIs. You can monitor the migration process and identify any issues encountered during the migration process.
By using clone utility’s REST APIs, we can migrate the following examples:
-
Integrations
-
Connections
-
Packages
-
Libraries
-
Certificates
-
Lookups
If you have a connectivity agent to connect to on-premises systems, you must configure it manually on the target instance.
Prerequisites
-
OIC services with admin access in both instances
-
Certificate authority (CA) cloud storage container with create and update access permissions
-
A tool to run API calls, such as Postman
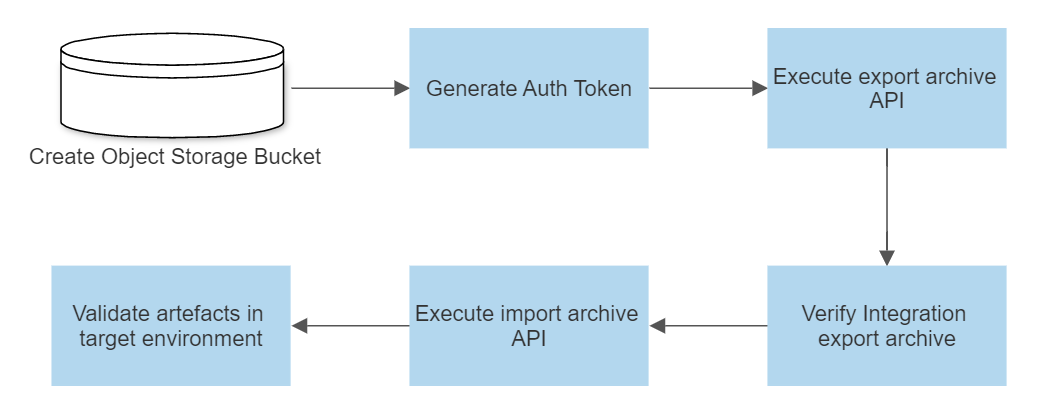
Steps for migration
This blog post takes you through the following steps:
-
Create an Oracle Cloud Infrastructure (OCI) Object Storage bucket in the OCI source environment.
-
Generate an auth token to access the storage container using the REST API.
-
Run the export archive API to export the integrations archive from the source OIC instance to the storage container.
-
Verify the export of the integration archive.
-
Run the import archive API to import the integrations archive into the target OIC instance.
-
Validate the imported artifacts in the target environment.
The following graphic shows the migration process:
Create an object storage bucket
To create a storage bucket, navigate to your Oracle Cloud tenancy. In the menu, go to Storage, and select Buckets.
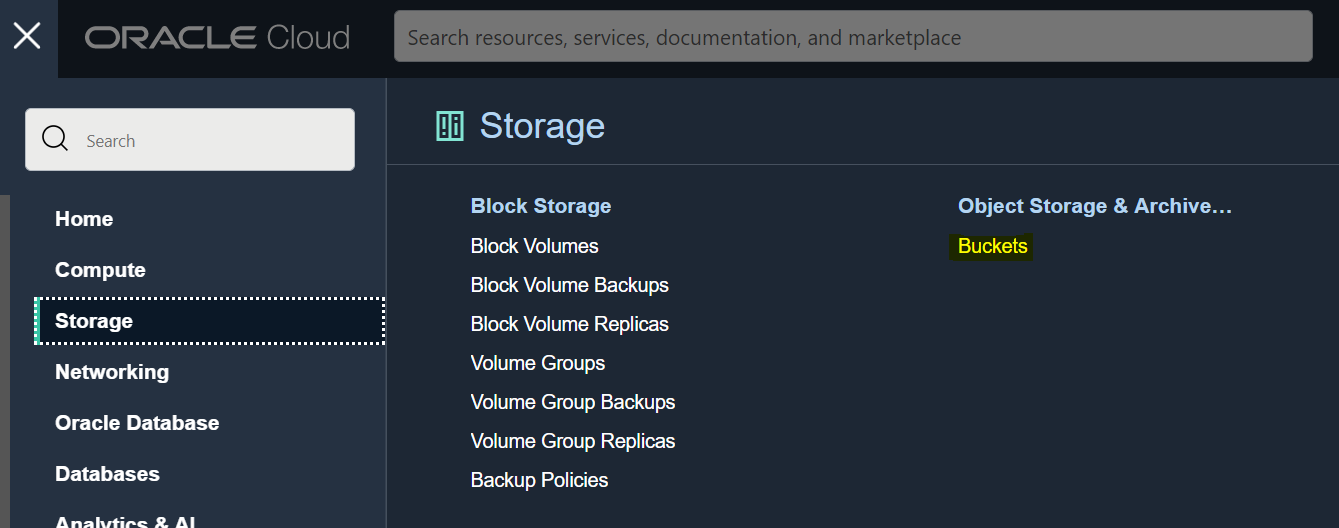
Click the Create Bucket button and fill in the details such as the bucket name and select Standard for the default storage tier:

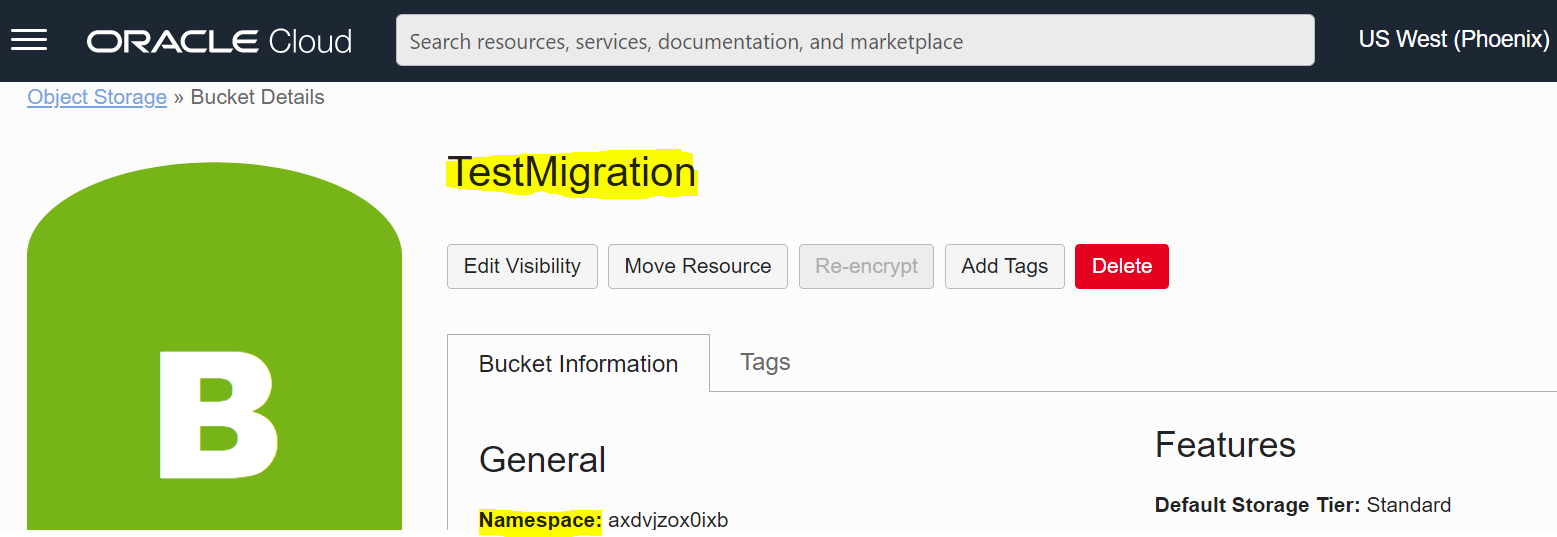
Save the bucket name and namespace for the newly created storage bucket to be used later in storage URL construction.
Generate an auth token
A security token is required when you access your storage bucket with an API. Oracle Integration uses the OCI Object Storage service APIs to read and write files to your bucket. So, we need to create a token for the process to use.
To create an auth token, click your profile in the Oracle Cloud Console and select My Profile. Select the Auth tokens tab and click the Generate Token button.
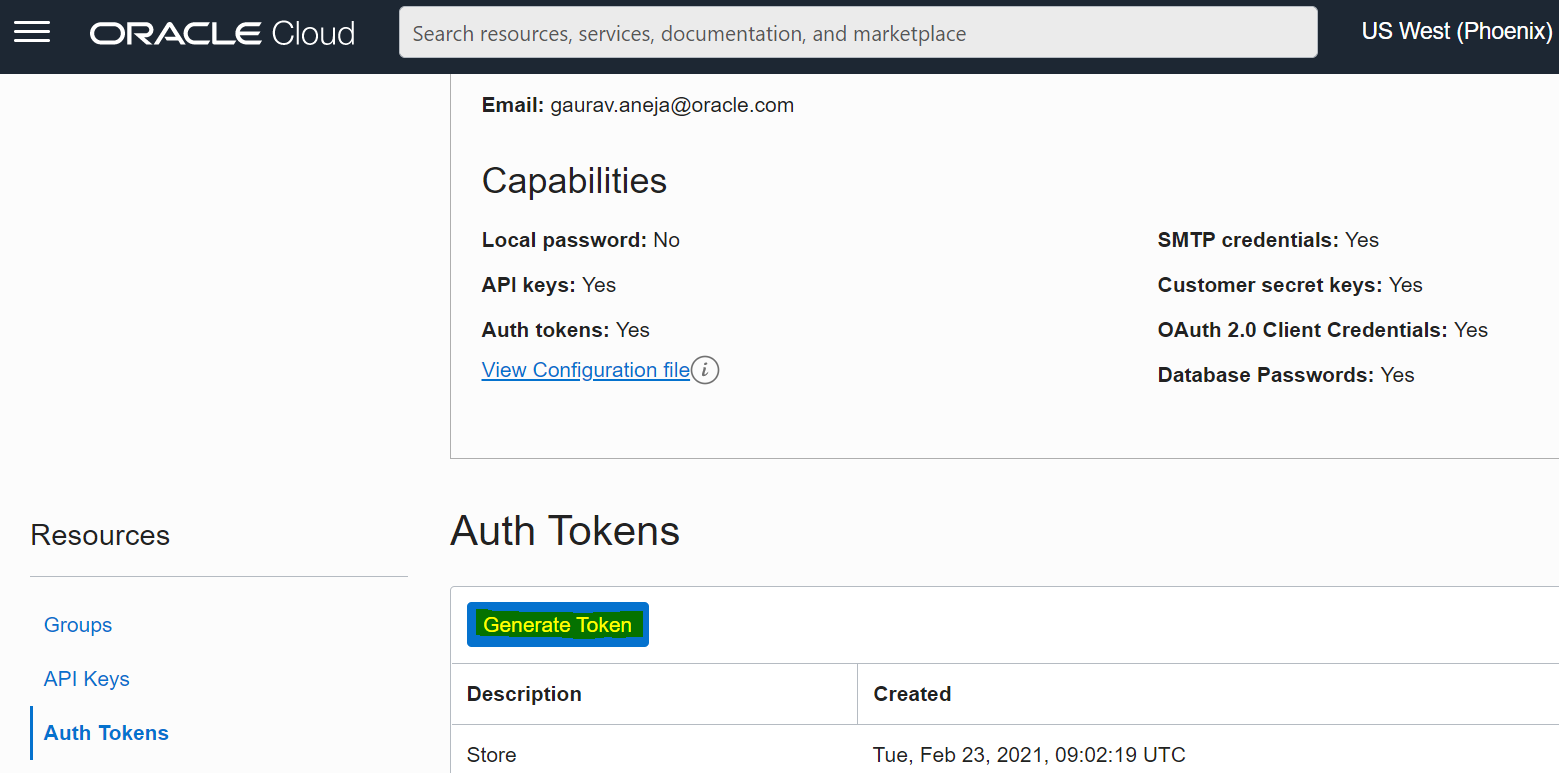
Keep this auth token somewhere safe because you can’t retrieve it later.
Run the export archive API
To do the next steps, we need to be able to make API calls to OCI. The easiest way uses a tool such as Postman, but you can use your preferred tool.
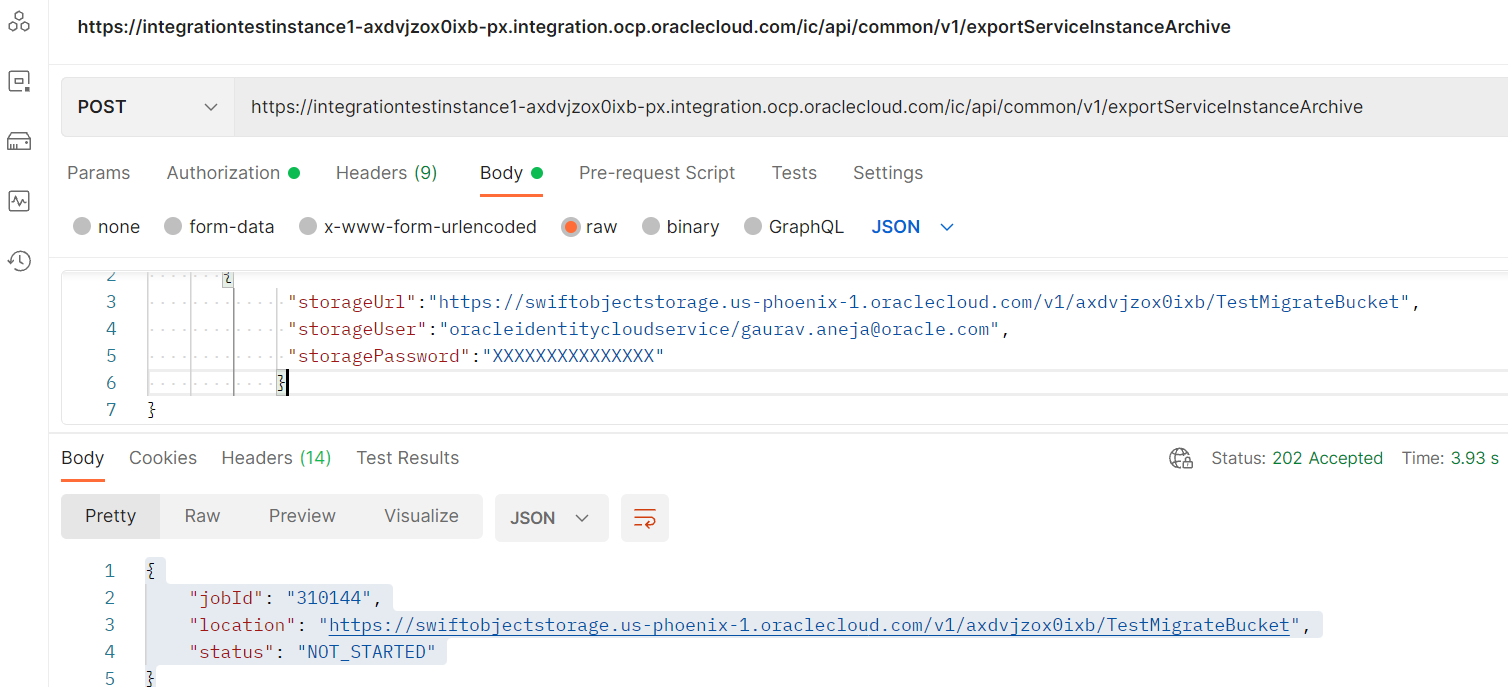
To export the integration artifacts from the source OIC instance, we make a POST API call, replacing the following server and port references with your source instance’s details. You also must tailor the body of the post to reference your storage details.
Request

URL:

https://OIC Server:port/ic/api/common/v1/exportServiceInstanceArchive

HTTP Verb: POST

Header:

Authorization: Basic <OICusername:password>

Body

{"storageInfo":

       {

             "storageUrl":"https://swiftobjectstorage.us-phoenix-1.oraclecloud.com/v1/axdvjzox0ixb/TestMigrateBucket",

             "storageUser":"oracleidentitycloudservice/gaurav.aneja@oracle.com",

             "storagePassword":"XXXXXXXXXXXXXXX"

            }

}
The storage URL is constructed by appending the bucket name that we created earlier. The storage password is the auth token generated earlier. So the url looks like the following examples:
-
https://Storage-<unique_identifier>.us.storage.oraclecloud.com/v1/Storage-<unique_identifier namespace>/bucket-name
-
https://swiftobjectstorage.us-phoenix-1.oraclecloud.com/v1/axdvjzoxxxxxx/TestMigrateBucket
The following example shows the expected response of the successful API call:
{

    "jobId": "310144",

    "location": "https://swiftobjectstorage.us-phoenix-1.oraclecloud.com/v1/axdvjzox0ixb/TestMigrateBucket",

    "status": "NOT_STARTED"

}
Verify the export of the integration archive
You can monitor the status of the export archive using a GET API call using the JOBID provided in the previous response. The URL for the API call is https://<instagrationserver>/ic/api/common/v1/exportServiceInstanceArchive/<jobid>.
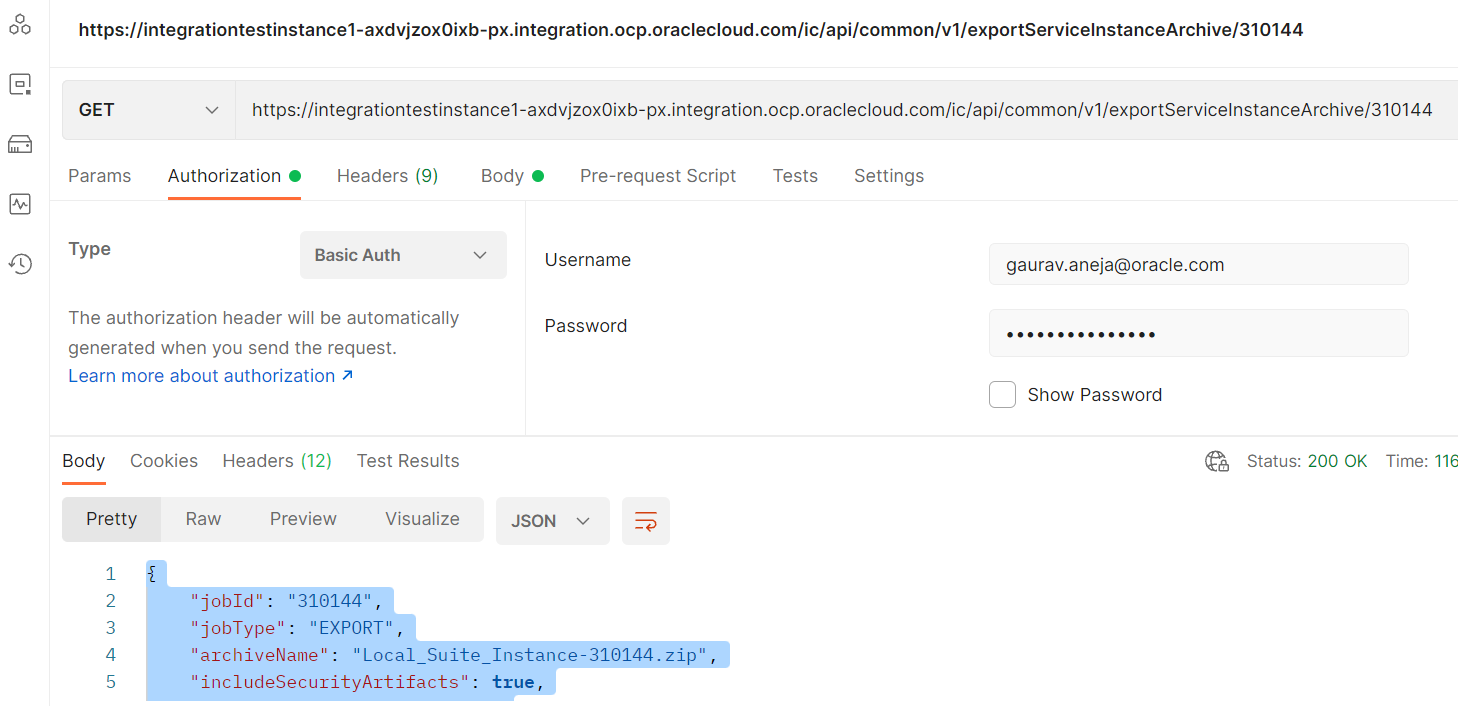
The full response from the GET call on the API looks like the following example:
RESPONSE-
{
"jobId": "310144",
"jobType": "EXPORT",
"archiveName": "Local_Suite_Instance-310144.zip",
"includeSecurityArtifacts": true,
"overallStatus": "COMPLETED",
"startTime": "Wed May 18 09:58:33 UTC 2022",
"endTime": "Wed May 18 10:04:13 UTC 2022",
"components": [
{
"name": "Integration",
"status": "COMPLETED",
"percentage": 100
},
{
"name": "Process",
"status": "COMPLETED",
"percentage": 100
}
]
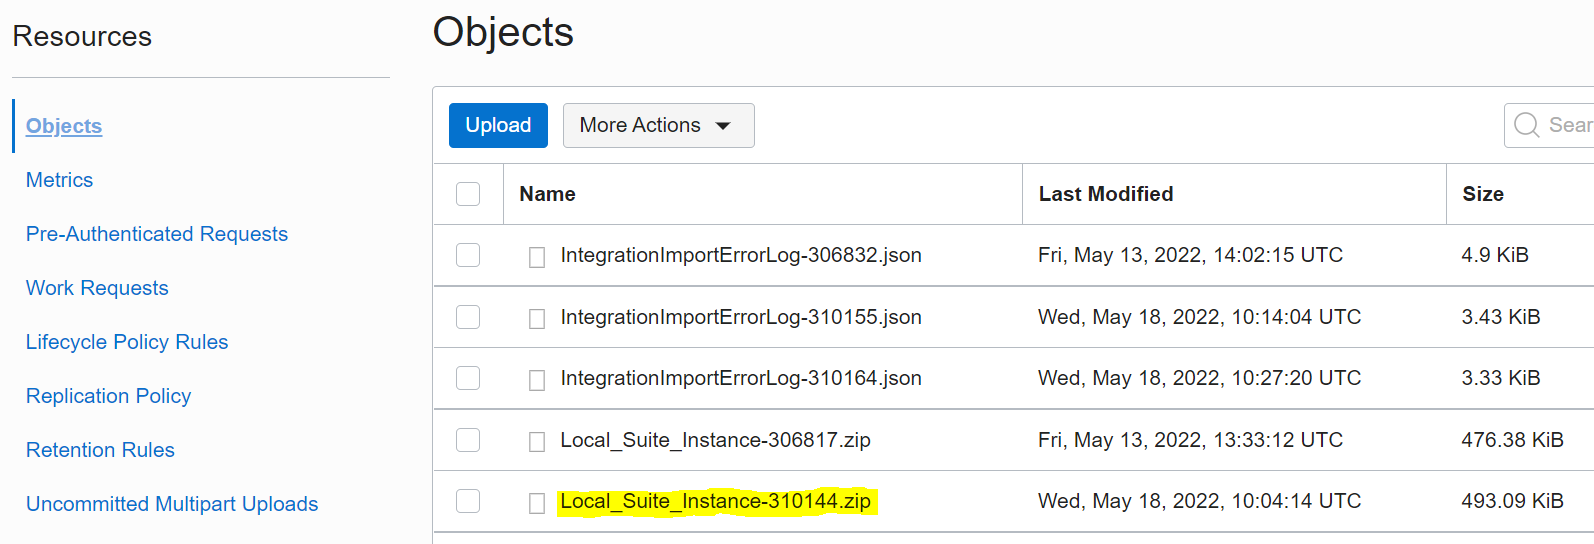
}Alternatively, you can verify in the Object Storage bucket to see if the integration export is available.
We need to access the storage bucket to copy the .zip file name for the next step and import the archive file into the target OIC instance. The following graphic shows the files in our bucket:
Run the import archive API to import the integrations archive into the target OIC instance
After the archive file is stored in the bucket, you can run the import API using the OIC target instance endpoint to import the integration artifacts. Use the archive file name created in the storage bucket in the request payload.
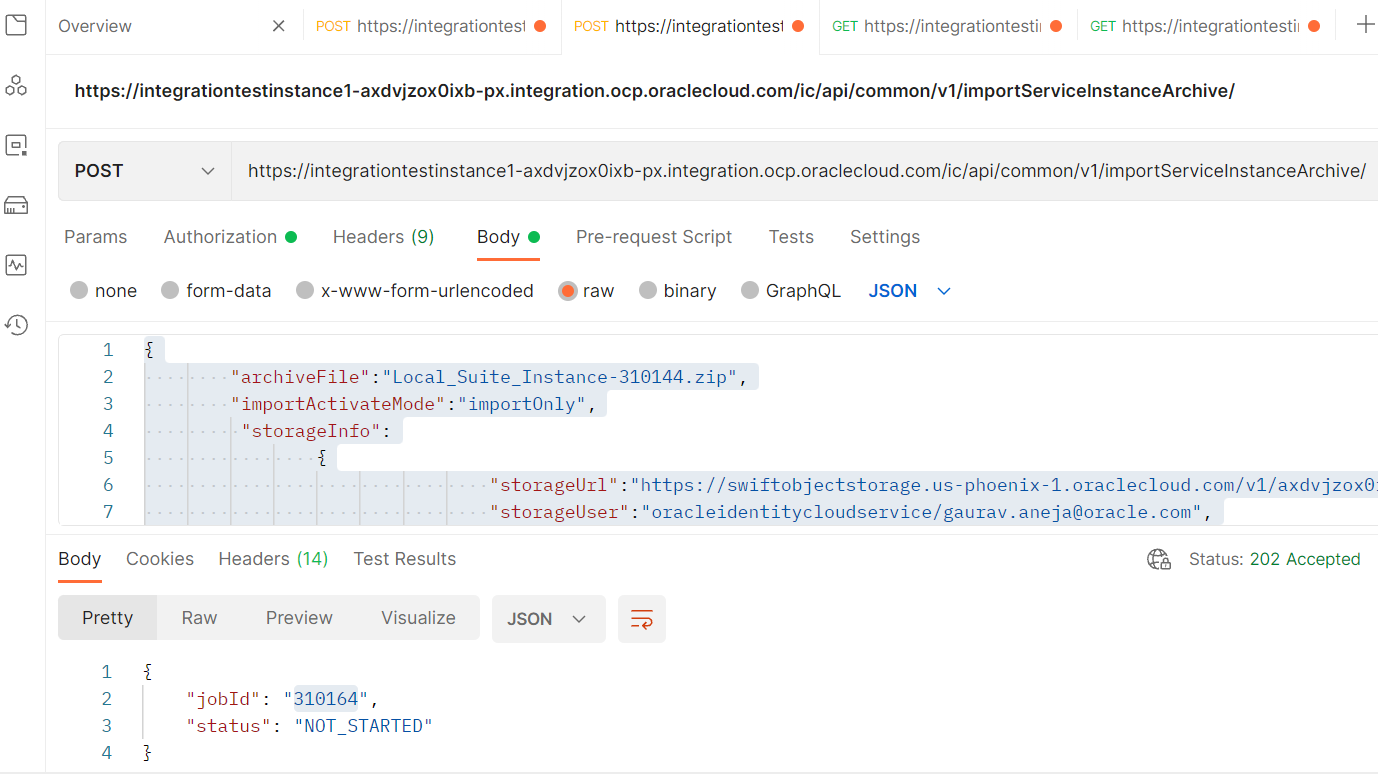
Request
Create the request with the following details, substituting in your own target server address and credentials:
-
URL: https://OICSserver/ic/api/common/v1/importServiceInstanceArchive
Example: https://integrationtestinstance1-axdvjzox0ixb-px.integration.ocp.oraclecloud.com/ic/api/common/v1/importServiceInstanceArchive -
HTTP verb: POST
-
Header:
-
Authorization: Basic <OIC username:password>
-
Body:
{

        "archiveFile":"Local_Suite_Instance-310144.zip",

        "importActivateMode":"importOnly",

         "storageInfo":

                {

                                "storageUrl":"https://swiftobjectstorage.us-phoenix-1.oraclecloud.com/v1/axdvjzox0ixb/TestMigrateBucket",

                                "storageUser":"oracleidentitycloudservice/gaurav.aneja@oracle.com",

                                "storagePassword":"XXXXXXXXXXXXXXXXX"

                }

}
As a result of the REST API call, we receive the following response:
Response
{

                “jobId”:”5123″,

                “status”:”NOT_STARTED”

}
Validate the imported artifacts in the target OIC instance
We can monitor the import status using the following GET API. After it reports that the job is complete, log in to the target instance and check all integration artifacts are imported as complete.
The status check of the API call is a GET call. This time, we use the target OIC instance server and the import job id.
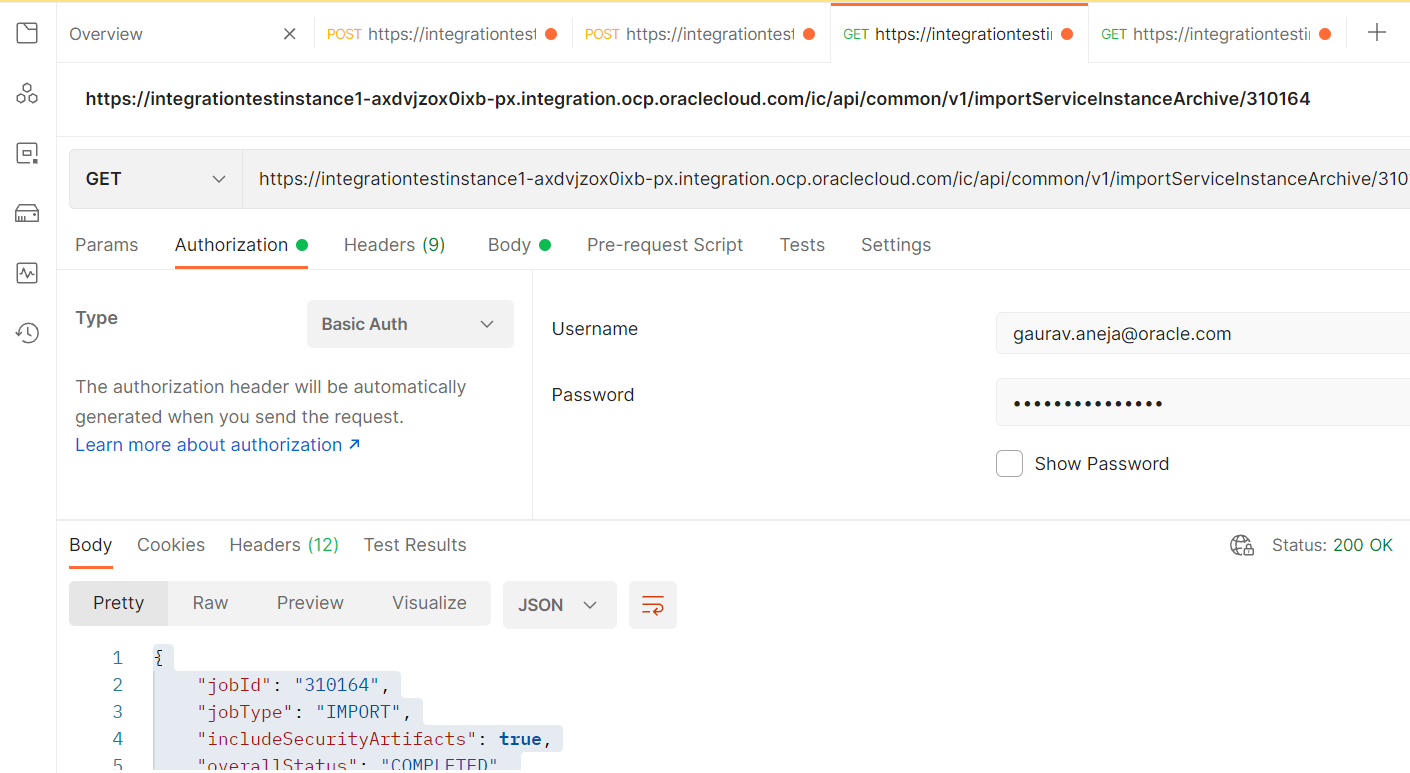
The full response payload looks like the following example:
RESPONSE-

{

    "jobId": "310164",

    "jobType": "IMPORT",

    "includeSecurityArtifacts": true,

    "overallStatus": "COMPLETED",

    "startTime": "Wed May 18 10:22:53 UTC 2022",

    "endTime": "Wed May 18 10:28:14 UTC 2022",

    "mode": "ImportOnly",

    "importScheduleParams": false,

    "startSchedules": false,

    "components": [

        {

            "name": "Integration",

            "status": "COMPLETED",

            "percentage": 100

        },

        {

            "name": "Process",

            "status": "COMPLETED",

            "percentage": 100

        }

    ]

}
To check import issues and errors, go to the storage bucket where you can find the log file for the import status with issues logged, if any during the import process.
Conclusion
This post showed the migration of integration artifacts from one OIC instance to another using the REST API. The process offers an easy way to migrate all your integrations seamlessly.