This post was co-authored with Nabeel Al-Saber, my colleague at Oracle.
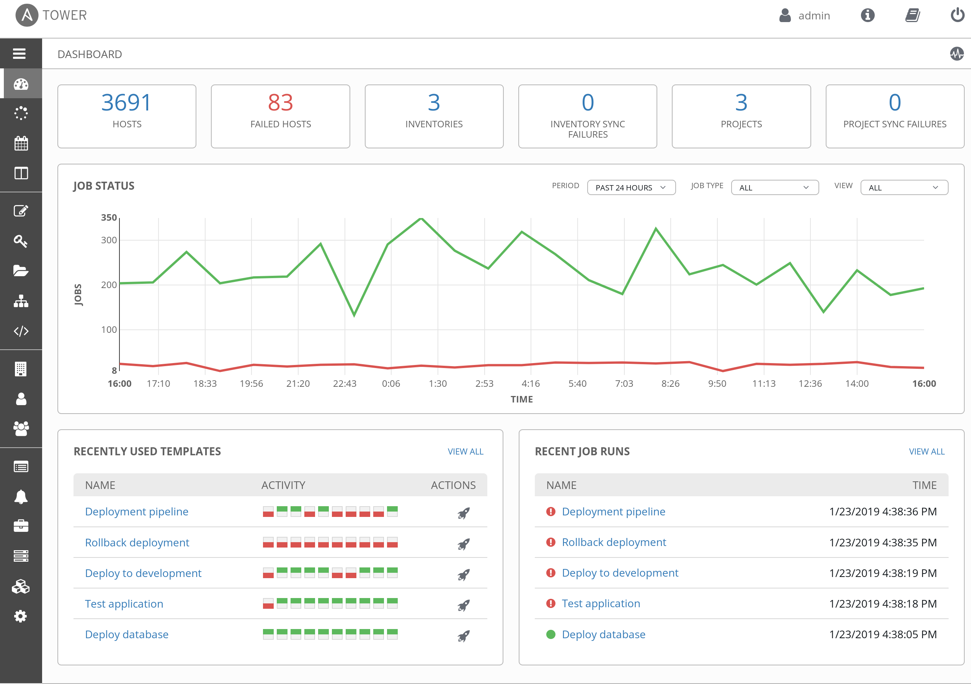
Red Hat Ansible Tower and AWX can centralize and control your IT infrastructure with a visual dashboard, role-based access control, job scheduling, integrated notifications, and graphical inventory management. Its task engine is built on Ansible. AWX is the open source community project and the upstream project for Tower.
Oracle Cloud Infrastructure (OCI) supports installing AWX quickly on Oracle Compute instance using the Resource Manager service. My colleague Jason Rothstein from the Oracle Managed Cloud services team contributed the AWX installation solution.
Ansible AWX makes it easy to run and manage your Oracle Cloud Infrastructure using the Ansible Modules Collection. This collection was released in 2020 and highlighted in Latest Updates on Oracle Ansible Modules and Comparison with Terraform. It supports all OCI services, and it has an inventory plugin that you can use to query the Compute instances and the database instances.
This blog explains how to set up and use the OCI modules and the inventory plugin with Ansible Tower version 16.
Prepare your project
To use an inventory plugin from a collection in Ansible Tower, we need to source it from a project. A project within Ansible Tower is the integration of a source control repository, such as a Git repository. In Ansible Tower, projects pull Ansible playbooks, variables, and inventories.
The contents of my source control repository are simple:
├── collections
│ └── requirements.yml
│ └── install_python_sdk.yml
└── inventory.oci.yml
The inventory.oci.yml file contains the following details for the inventory plugin:
$ cat inventory.oci.yml
plugin: oracle.oci.oci
regions: all
fetch_db_hosts: true
For more options, you can refer to the dynamic inventory documentation. No details of the OCI instance that we want to connect to, or any credentials are defined here. Those details are configured within Ansible Tower later.
You need the collections or requirements.yml file so that Ansible Tower can download the collection and, therefore, the inventory plugin. Otherwise, we have to manually install and maintain the collection on all of our Ansible Tower nodes.
Create a requirements file at collections or requirements.yml that looks like the following string:
$ cat collections/requirements.yml
collections:
– name: oracle.oci
The OCI collection depends on the OCI Python SDK to run. To install the SDK, you have the following options:
- Create a tower virtual environment and use it when running the playbooks.
- Use a playbook to install the SDK in the current environment.
The following example playbook shows how to install the SDK in the current environment:
$ cat install_python_sdk.yml
—
– name: Install python sdk
collections:
– oracle.oci
hosts: localhost
tasks:
– name: Installing oci python library using Ansible pip module
pip:
name: oci
Update the OCI Python SDK regularly to get new features supported in Oracle Cloud modules. Please follow proper alignment.
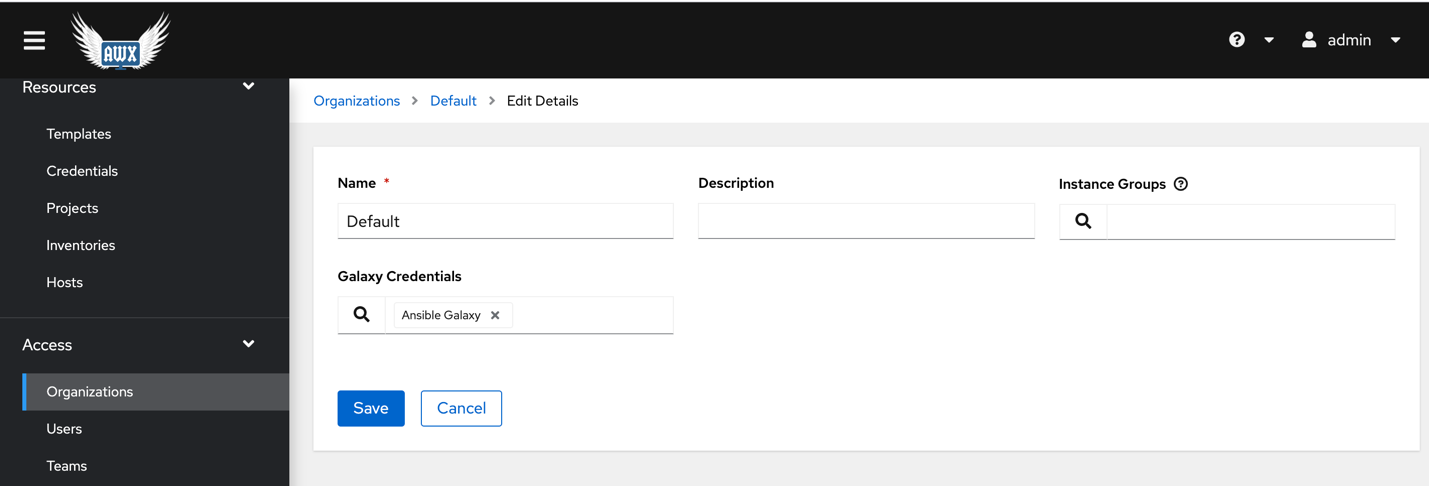
For AWX v16 Create an organization. Make sure the Galaxy Creds are defined. Please check the step below for adding Ansible Galaxy credentials.
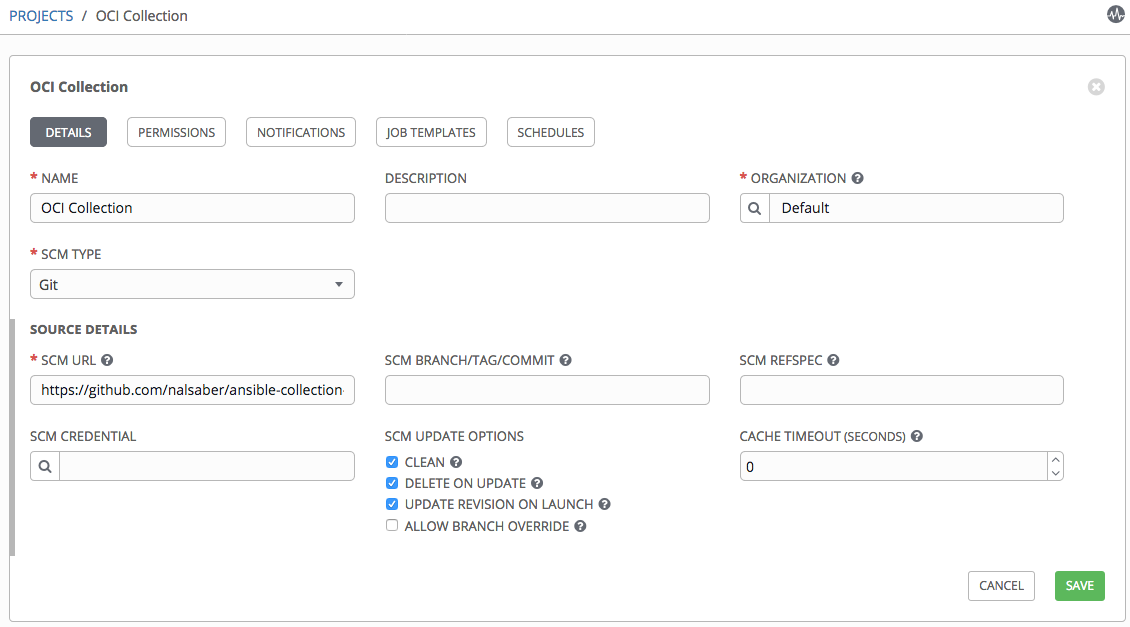
When we push this configuration into the source control repository, we can create a project in Ansible Tower referencing the repository. The following example links Ansible Tower to my GitHub repository. Note the SCM URL. If the repository is private, we can specify a credential and set a specific branch, tag, or commit to pull from. For AWX v16 specify organization as well.
Create the OCI credential
The configuration in our repository doesn’t include credentials to use with OCI. So, we create a credential in Ansible Tower to define those values. Looking at the OCI inventory plugin documentation, we can see that we can set several environment variables to define the connection details, including the following example:
OCI_CONFIG_FILE, OCI_USER_KEY_FILE and OCI_USER_KEY_PASS_PHRASE
However, in Ansible Tower, there’s no credential type for OCI where we can enter these details. Luckily for these use cases, Ansible Tower allows us to define custom credential types.
- Go to Administration, Credential Types, and then New Credential Type.
- Copy the following fields for Input Configuration:
- fields:
- – id: user_ocid
- type: string
- label: User OCID
- – id: fingerprint
- type: string
- label: Fingerprint
- – id: tenant_ocid
- type: string
- label: Tenant OCID
- – id: region
- type: string
- label: Region
- – id: private_user_key
- type: string
- label: Private User Key
- secret: true
- multiline: true
- required:
- – user_ocid
- – tenant_ocid
- – region
- – fingerprint
- – private_user_key
If the private user key uses a passphrase, you can add that field in the input configuration and set it as an environment variable in the injector configuration.
The credentials are exposed as environment variables of the same name. Add the following code in the Injector Configuration box:
env:
OCI_CONFIG_FILE: ‘{{ tower.filename.config }}’
OCI_USER_KEY_FILE: ‘{{ tower.filename.keyfile }}’
file:
template.config: |-
[DEFAULT]
user={{ user_ocid }}
fingerprint={{ fingerprint }}
tenancy={{ tenant_ocid }}
region={{ region }}
template.keyfile: ‘{{ private_user_key }}’
With the custom credential type defined, we can now add an OCI credential.
Go to Resources and Credentials and make a new credential. You receive the following result:

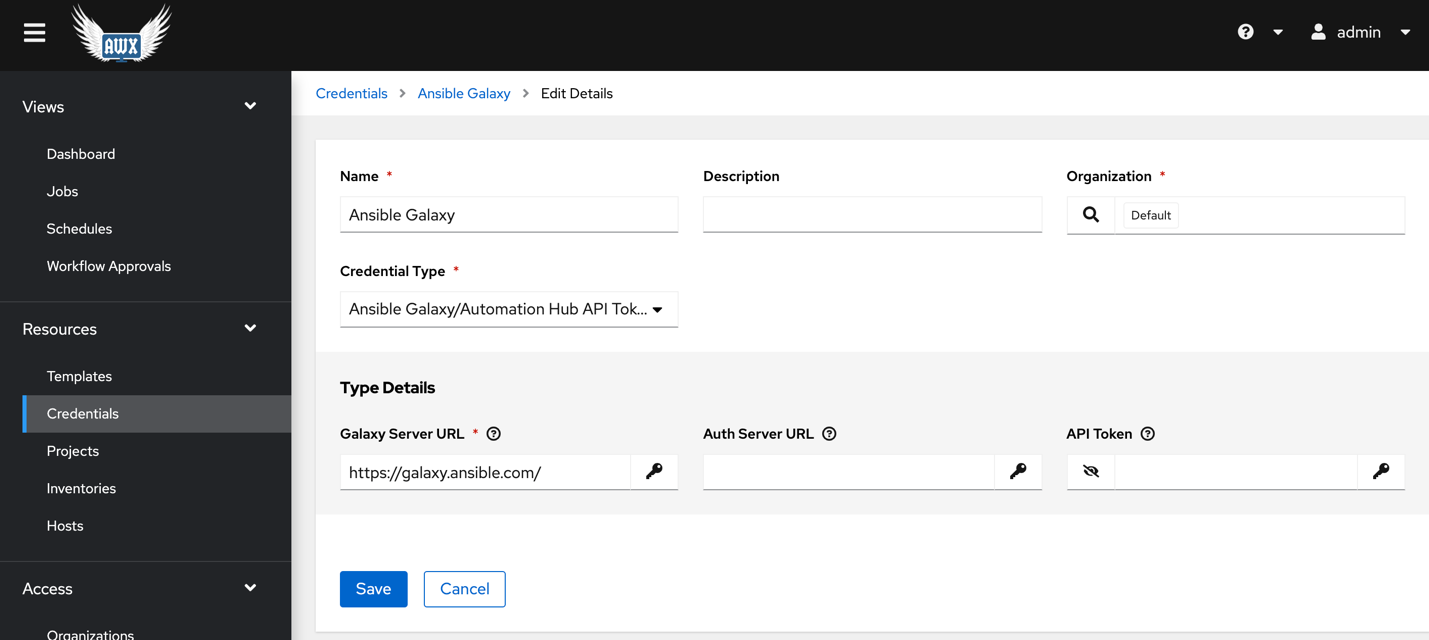
For AWX v16 create one more credential for Ansible Galaxy.
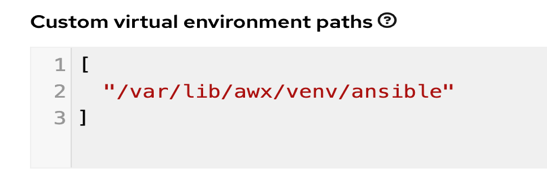
Also specify the virtual environment path under Settings >> Miscellaneous settings.
Create the inventory
Create an inventory for OCI under Resources and Inventories. The name and organization fields are required.
After the inventory is created, we can now attach a source to it. Fill the following fields:
- Name: Fill in the inventory source name.
- Project: Specify the project that we created earlier and enter.
- Source: Choose Sourced from a Project.
- Inventory file: The path to our inventory YAML file in the source control repository. This example uses inventory.oci.yml.
- Credential: Pick the OCI credentials that you created in the previous step.
- Vairables: “ansible_connection: local”
The result looks something like the following screenshot:

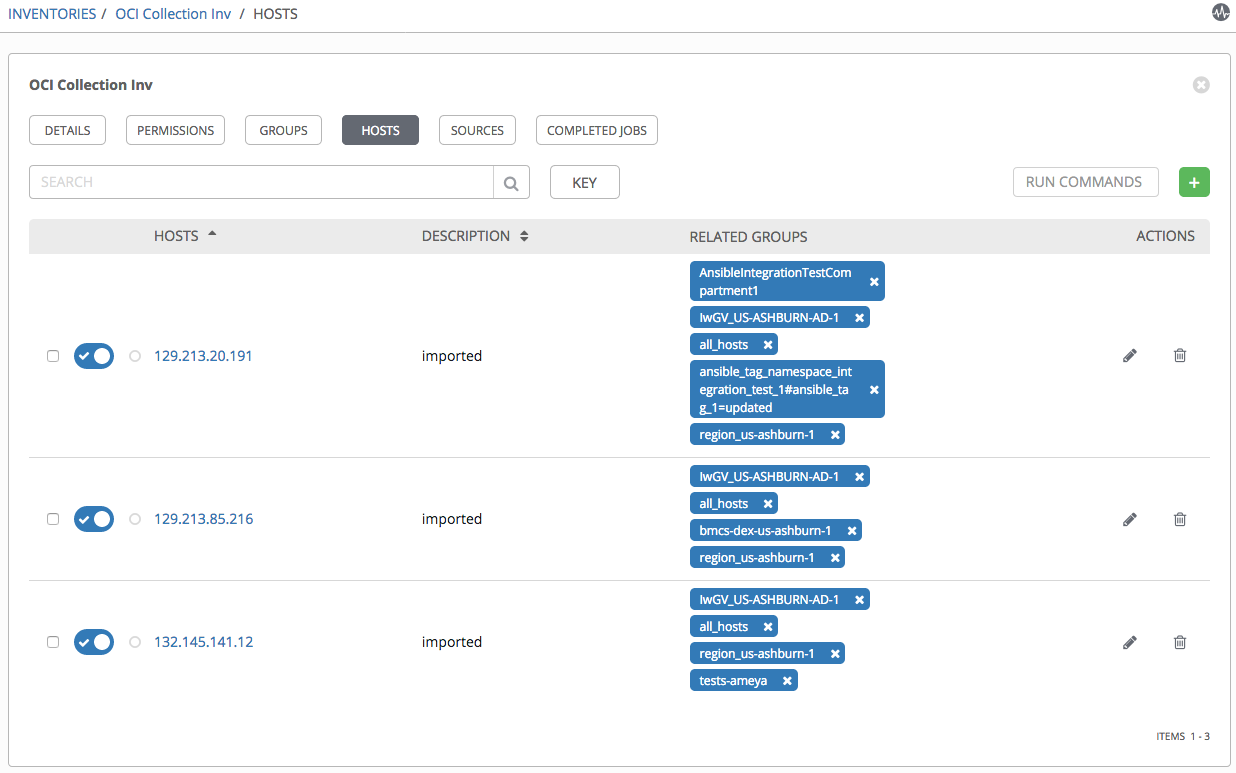
To test the setup, we can sync with the source by clicking Sync all. If everything was configured correctly, the hosts are imported into the inventory:
Run OCI module playbooks
In this section, I show the steps to run OCI Ansible modules using Tower. But before we run any OCI ansible playbook we need to install the Python SDK.
Create a template under Templates. Fill the following required fields:
- Template name
- Project: Specify the Project that we created earlier.
- Job type: Choose Run.
- Inventory: Pick the OCI inventory that you created in the previous step.
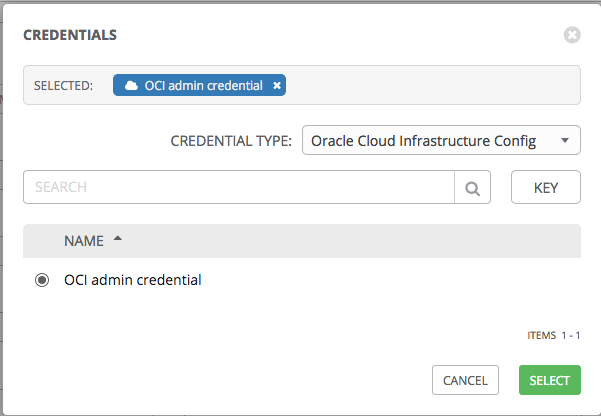
- Credential: Pick credential type Oracle Cloud Infrastructure Config. Then pick the OCI credentials that you created in the previous step.
- Playbook: The path to the install_python_sdk.yaml playbook to run.
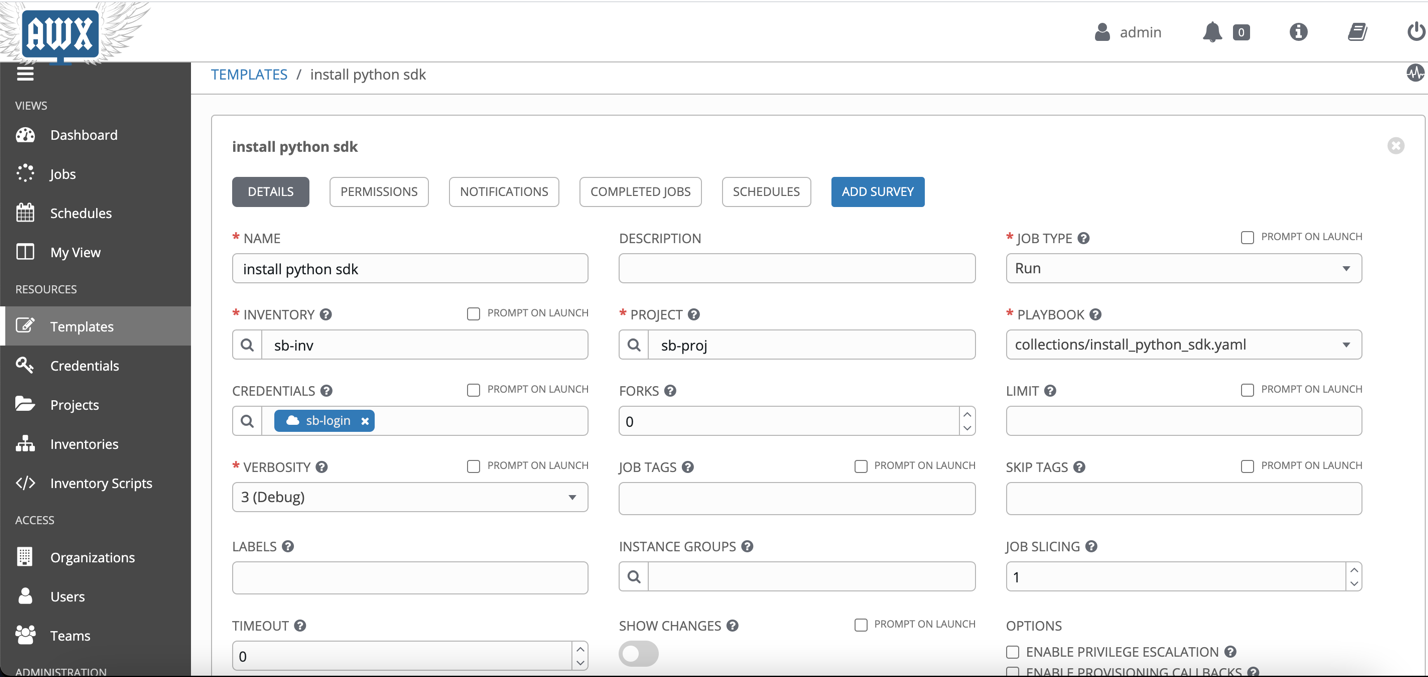
After creating the template, you can launch the job.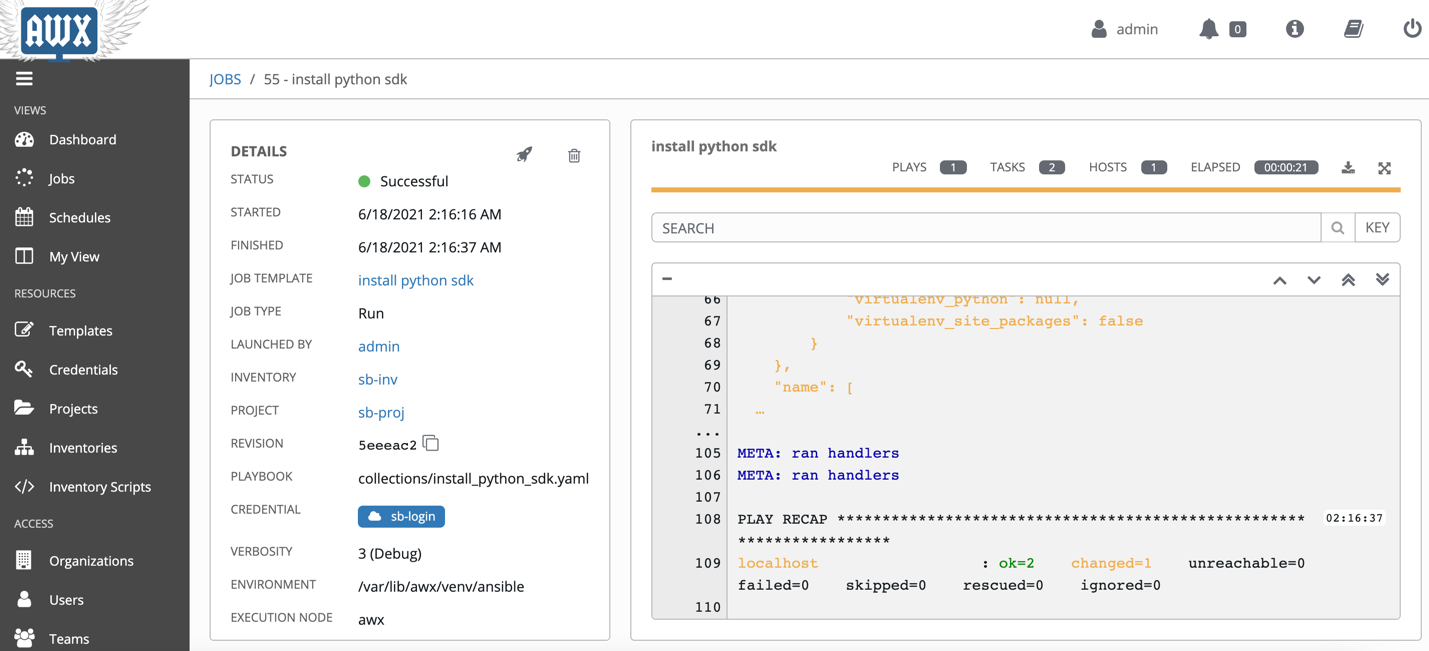
Now create a workflow template under Templates. Fill the following required fields:
- Name
- Inventory: Pick the OCI inventory that you created in the previous step.
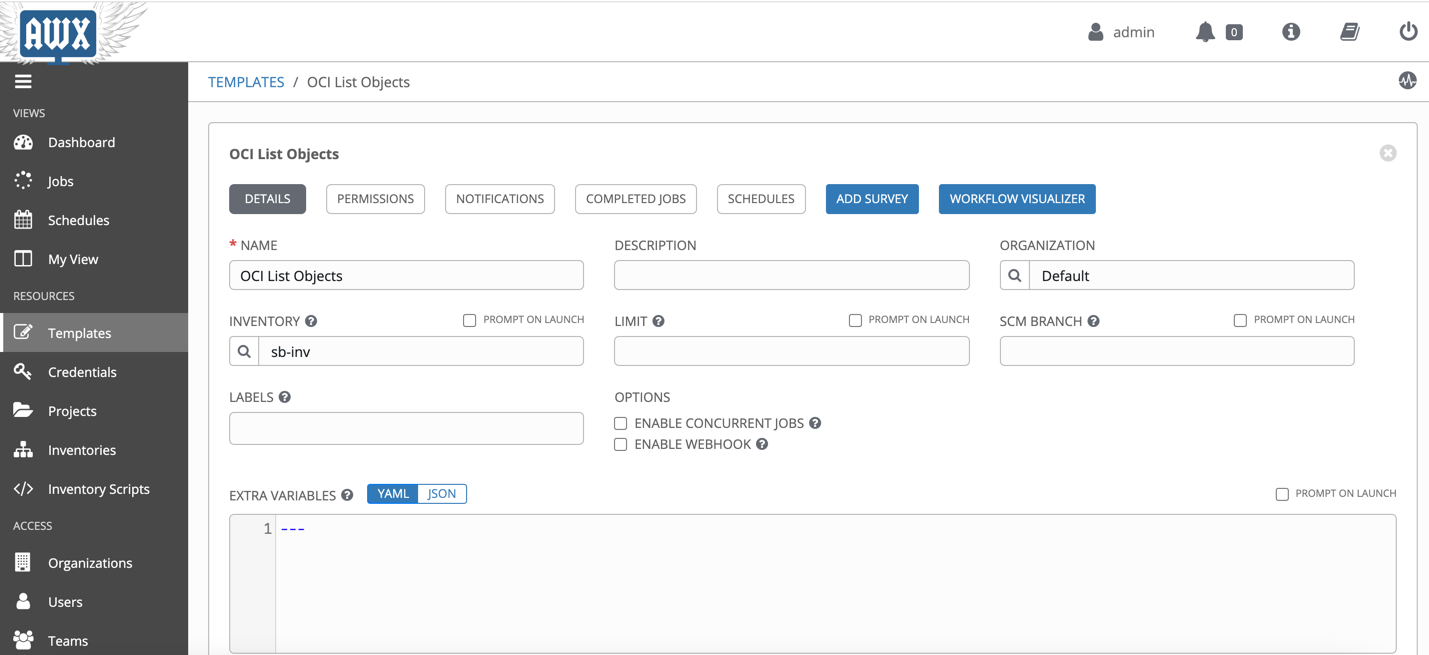
Save the details and then click on WORKFLOW VISUALIZER. Create a simple workflow where we first install the python sdk then run the playbook.
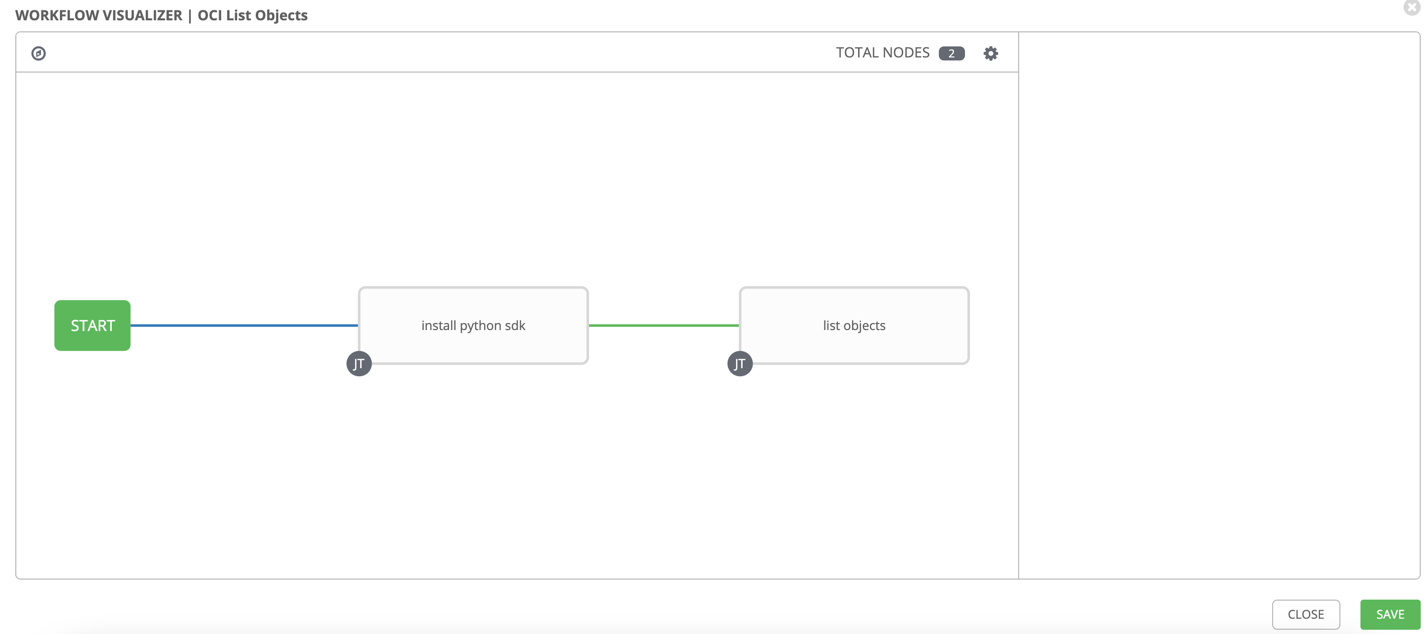
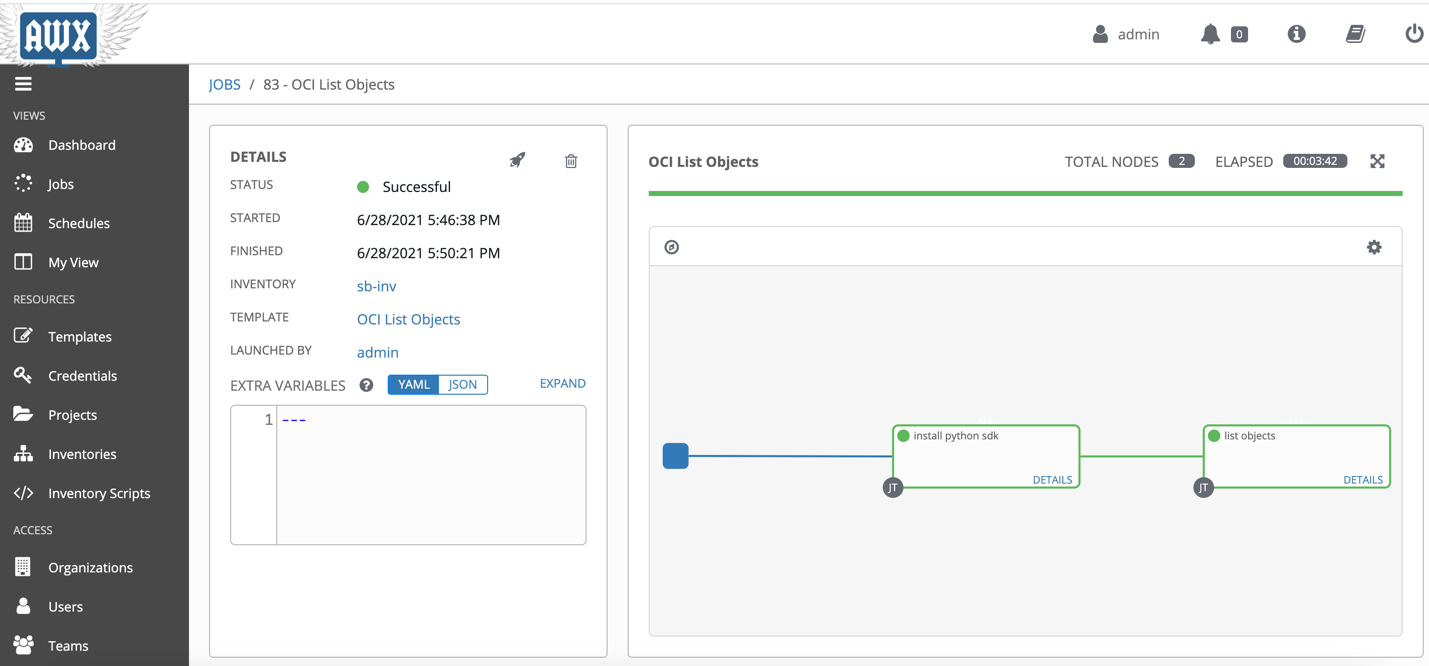
Once it is launched, you can see the details.
You can run any playbook without creating this workflow template but once the cleanup scripts are run, you will have to manually run the install_python_sdk.yaml template before you can run other playbooks.
Following are the steps to create a Job Template to run a sample playbook. Create a template under Templates. Fill the following required fields:
- Template name
- Project: Specify the Project that we created earlier.
- Job type: Choose Run.
- Inventory: Pick the OCI inventory that you created in the previous step.
- Credential: Pick credential type Oracle Cloud Infrastructure Config. Then pick the OCI credentials that you created in the previous step.
- Playbook: The path to the sample playbook to run. We provide many OCI samples on GitHub.
- Extra variables: Add any other variables needed to run the sample.
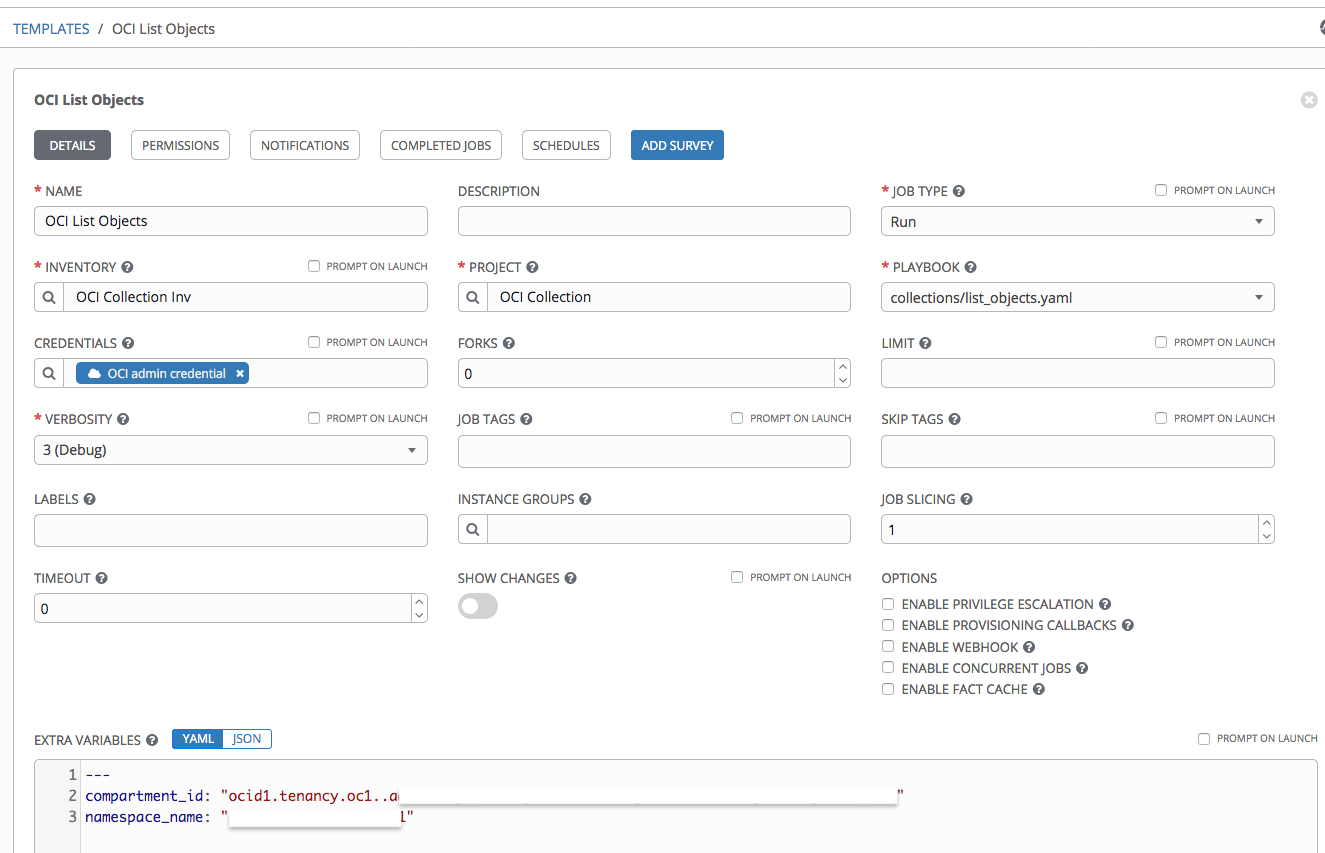
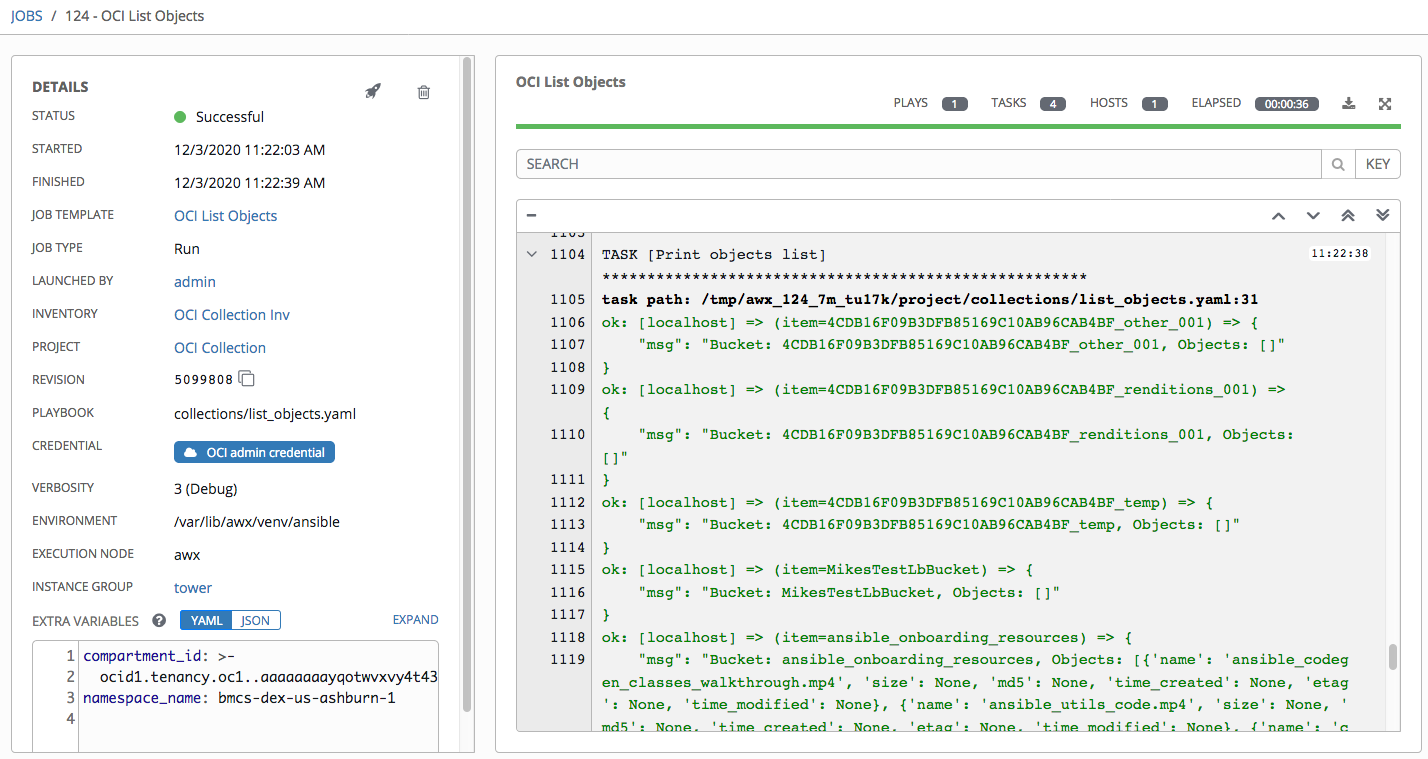
After creating the template, you can launch the job. This job runs the sample to list buckets and objects. The same can be run for different hosts as well which can be fetched from the Inventories >> <your_inventory> >> Groups.
Summary
Ansible Tower and AWX make it easy to manage your cloud resources across different cloud vendors. Oracle provides modules to manage OCI using the Oracle Cloud Infrastructure Ansible Modules Collection. This blog showed how to set up and use the Oracle Cloud modules and the inventory plugin with Ansible Tower and AWX.
FAQ
- How to install AWX?
- Please follow awx git repository.
- How to debug AWX container?
- SSH into the AWX instance and check whether Docker and Docker-compose is running
- If the Docker service is running, then check the Docker container for AWX is running.
- If Docker/Docker-compose service is not running, then either you can manually install it or raise an issue.
- If the AWX container is not running then `metadata.awx.sh` file, it should be under directory `/var/lib/cloud/instance/script/part-002`. Run that file and it should start the AWX container.
- How to debug AWX Inventory/Template issues?
- Make sure you keep the Verbosity level to Debug or more so that you can see detailed logs.
- How to make sure that new changes are getting picked up?
- If you make any changes in the Git repo then make sure you reload the project in AWX UI.
Red Hat Ansible Tower and AWX can centralize and control your IT infrastructure with a visual dashboard, role-based access control, job scheduling, integrated notifications, and graphical inventory management. Its task engine is built on Ansible. AWX is the open source community project and the upstream project for Tower.
Oracle Cloud Infrastructure (OCI) supports installing AWX quickly on Oracle Compute instance using the Resource Manager service. My colleague Jason Rothstein from the Oracle Managed Cloud services team contributed the AWX installation solution.
Ansible AWX makes it easy to run and manage your Oracle Cloud Infrastructure using the Ansible Modules Collection. This collection was released in 2020 and highlighted in Latest Updates on Oracle Ansible Modules and Comparison with Terraform. It supports all OCI services, and it has an inventory plugin that you can use to query the Compute instances and the database instances.
This blog explains how to set up and use the OCI modules and the inventory plugin with Ansible Tower version 16.
Prepare your project
To use an inventory plugin from a collection in Ansible Tower, we need to source it from a project. A project within Ansible Tower is the integration of a source control repository, such as a Git repository. In Ansible Tower, projects pull Ansible playbooks, variables, and inventories.
The contents of my source control repository are simple:
├── collections
│ └── requirements.yml
│ └── install_python_sdk.yml
└── inventory.oci.yml
The inventory.oci.yml file contains the following details for the inventory plugin:
$ cat inventory.oci.yml
plugin: oracle.oci.oci
regions: all
fetch_db_hosts: true
For more options, you can refer to the dynamic inventory documentation. No details of the OCI instance that we want to connect to, or any credentials are defined here. Those details are configured within Ansible Tower later.
You need the collections or requirements.yml file so that Ansible Tower can download the collection and, therefore, the inventory plugin. Otherwise, we have to manually install and maintain the collection on all of our Ansible Tower nodes.
Create a requirements file at collections or requirements.yml that looks like the following string:
$ cat collections/requirements.yml
collections:
– name: oracle.oci
The OCI collection depends on the OCI Python SDK to run. To install the SDK, you have the following options:
- Create a tower virtual environment and use it when running the playbooks.
- Use a playbook to install the SDK in the current environment.
-
The following example playbook shows how to install the SDK in the current environment:
$ cat install_python_sdk.yml
—
– name: Install python sdk
collections:
– oracle.oci
hosts: localhost
tasks:
– name: Installing oci python library using Ansible pip module
pip:
name: oci
Update the OCI Python SDK regularly to get new features supported in Oracle Cloud modules. Please follow proper alignment.
For AWX v16 Create an organization. Make sure the Galaxy Creds are defined. Please check the step below for adding Ansible Galaxy credentials.
When we push this configuration into the source control repository, we can create a project in Ansible Tower referencing the repository. The following example links Ansible Tower to my GitHub repository. Note the SCM URL. If the repository is private, we can specify a credential and set a specific branch, tag, or commit to pull from. For AWX v16 specify organization as well.
Create the OCI credential
The configuration in our repository doesn’t include credentials to use with OCI. So, we create a credential in Ansible Tower to define those values. Looking at the OCI inventory plugin documentation, we can see that we can set several environment variables to define the connection details, including the following example:
OCI_CONFIG_FILE, OCI_USER_KEY_FILE and OCI_USER_KEY_PASS_PHRASE
However, in Ansible Tower, there’s no credential type for OCI where we can enter these details. Luckily for these use cases, Ansible Tower allows us to define custom credential types.
- Go to Administration, Credential Types, and then New Credential Type.
- Copy the following fields for Input Configuration:
- fields:
- – id: user_ocid
- type: string
- label: User OCID
- – id: fingerprint
- type: string
- label: Fingerprint
- – id: tenant_ocid
- type: string
- label: Tenant OCID
- – id: region
- type: string
- label: Region
- – id: private_user_key
- type: string
- label: Private User Key
- secret: true
- multiline: true
- required:
- – user_ocid
- – tenant_ocid
- – region
- – fingerprint
- – private_user_key
-
If the private user key uses a passphrase, you can add that field in the input configuration and set it as an environment variable in the injector configuration.
The credentials are exposed as environment variables of the same name. Add the following code in the Injector Configuration box:
env:
OCI_CONFIG_FILE: ‘{{ tower.filename.config }}’
OCI_USER_KEY_FILE: ‘{{ tower.filename.keyfile }}’
file:
template.config: |-
[DEFAULT]
user={{ user_ocid }}
fingerprint={{ fingerprint }}
tenancy={{ tenant_ocid }}
region={{ region }}
template.keyfile: ‘{{ private_user_key }}’
With the custom credential type defined, we can now add an OCI credential.
Go to Resources and Credentials and make a new credential. You receive the following result:
For AWX v16 create one more credential for Ansible Galaxy.
Also specify the virtual environment path under Settings >> Miscellaneous settings.
Create the inventory
Create an inventory for OCI under Resources and Inventories. The name and organization fields are required.
After the inventory is created, we can now attach a source to it. Fill the following fields:
- Name: Fill in the inventory source name.
- Project: Specify the project that we created earlier and enter.
- Source: Choose Sourced from a Project.
- Inventory file: The path to our inventory YAML file in the source control repository. This example uses inventory.oci.yml.
- Credential: Pick the OCI credentials that you created in the previous step.
- Vairables: “ansible_connection: local”
-
The result looks something like the following screenshot:
To test the setup, we can sync with the source by clicking Sync all. If everything was configured correctly, the hosts are imported into the inventory:
Run OCI module playbooks
In this section, I show the steps to run OCI Ansible modules using Tower. But before we run any OCI ansible playbook we need to install the Python SDK.
Create a template under Templates. Fill the following required fields:
- Template name
- Project: Specify the Project that we created earlier.
- Job type: Choose Run.
- Inventory: Pick the OCI inventory that you created in the previous step.
- Credential: Pick credential type Oracle Cloud Infrastructure Config. Then pick the OCI credentials that you created in the previous step.
- Playbook: The path to the install_python_sdk.yaml playbook to run.
-
After creating the template, you can launch the job.
Now create a workflow template under Templates. Fill the following required fields:
- Name
- Inventory: Pick the OCI inventory that you created in the previous step.
-
Save the details and then click on WORKFLOW VISUALIZER. Create a simple workflow where we first install the python sdk then run the playbook.
Once it is launched, you can see the details.
You can run any playbook without creating this workflow template but once the cleanup scripts are run, you will have to manually run the install_python_sdk.yaml template before you can run other playbooks.
Following are the steps to create a Job Template to run a sample playbook. Create a template under Templates. Fill the following required fields:
- Template name
- Project: Specify the Project that we created earlier.
- Job type: Choose Run.
- Inventory: Pick the OCI inventory that you created in the previous step.
- Credential: Pick credential type Oracle Cloud Infrastructure Config. Then pick the OCI credentials that you created in the previous step.
- Playbook: The path to the sample playbook to run. We provide many OCI samples on GitHub.
- Extra variables: Add any other variables needed to run the sample.
-
After creating the template, you can launch the job. This job runs the sample to list buckets and objects. The same can be run for different hosts as well which can be fetched from the Inventories >> <your_inventory> >> Groups.
Summary
Ansible Tower and AWX make it easy to manage your cloud resources across different cloud vendors. Oracle provides modules to manage OCI using the Oracle Cloud Infrastructure Ansible Modules Collection. This blog showed how to set up and use the Oracle Cloud modules and the inventory plugin with Ansible Tower and AWX.
FAQ
- How to install AWX?
- Please follow awx git repository.
- How to debug AWX container?
- SSH into the AWX instance and check whether Docker and Docker-compose is running
- If the Docker service is running, then check the Docker container for AWX is running.
- If Docker/Docker-compose service is not running, then either you can manually install it or raise an issue.
- If the AWX container is not running then `metadata.awx.sh` file, it should be under directory `/var/lib/cloud/instance/script/part-002`. Run that file and it should start the AWX container.
- How to debug AWX Inventory/Template issues?
- Make sure you keep the Verbosity level to Debug or more so that you can see detailed logs.
- How to make sure that new changes are getting picked up?
- If you make any changes in the Git repo then make sure you reload the project in AWX UI.
- If you make any changes in the Git repo then make sure you reload the project in AWX UI.