Original Publish Date : 8/30/2018
Service Provider Configuration at JCS :
Click on the following hyperlink to download the sample application :
JCS_SSO_Test_application.zip (Unzip this file and deploy)
Below is a quick Demo on how to deploy sample application from this blog and enable VirtualUser :
Step 1 :
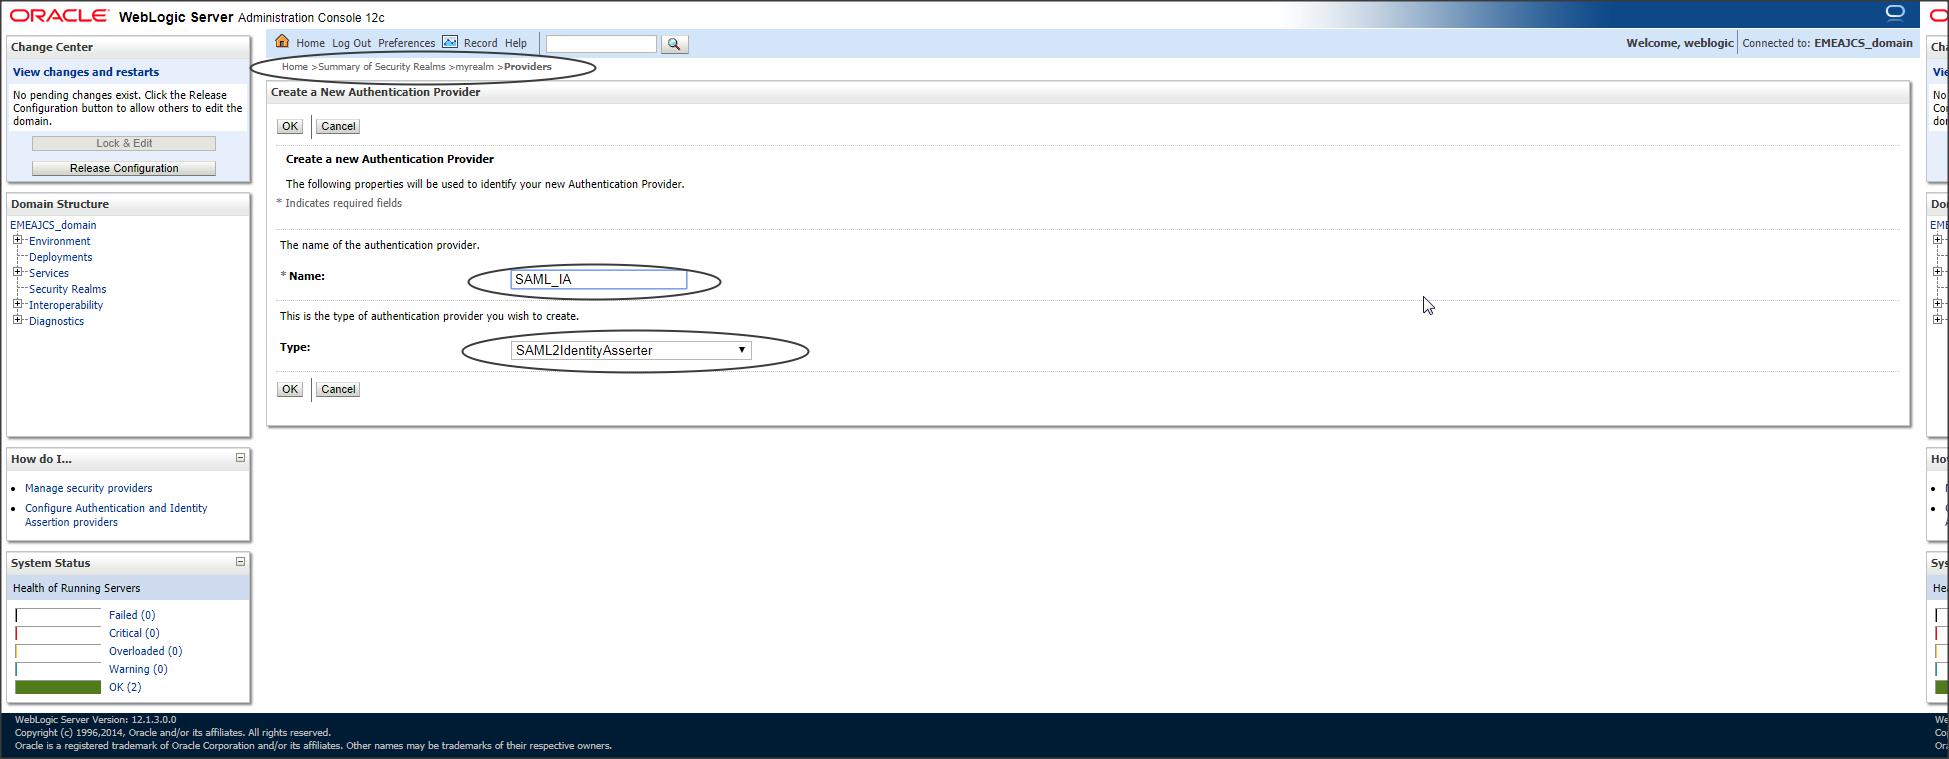
Since JCS is acting as a Service Provider (which accepts a token), we need to create a SAML Identity Asserter provider from console :
Login to console -> Security Realms -> myrealm -> Providers -> Authentication -> new :
Step 2 :
Now select the server where SSO application will be deployed and navigate to “Federation Services” as shown below :
Login to console -> +Environment -> Servers -> <server_where_SSO_application_will_be_deployed> -> Federation Services -> SAML 2.0 General :
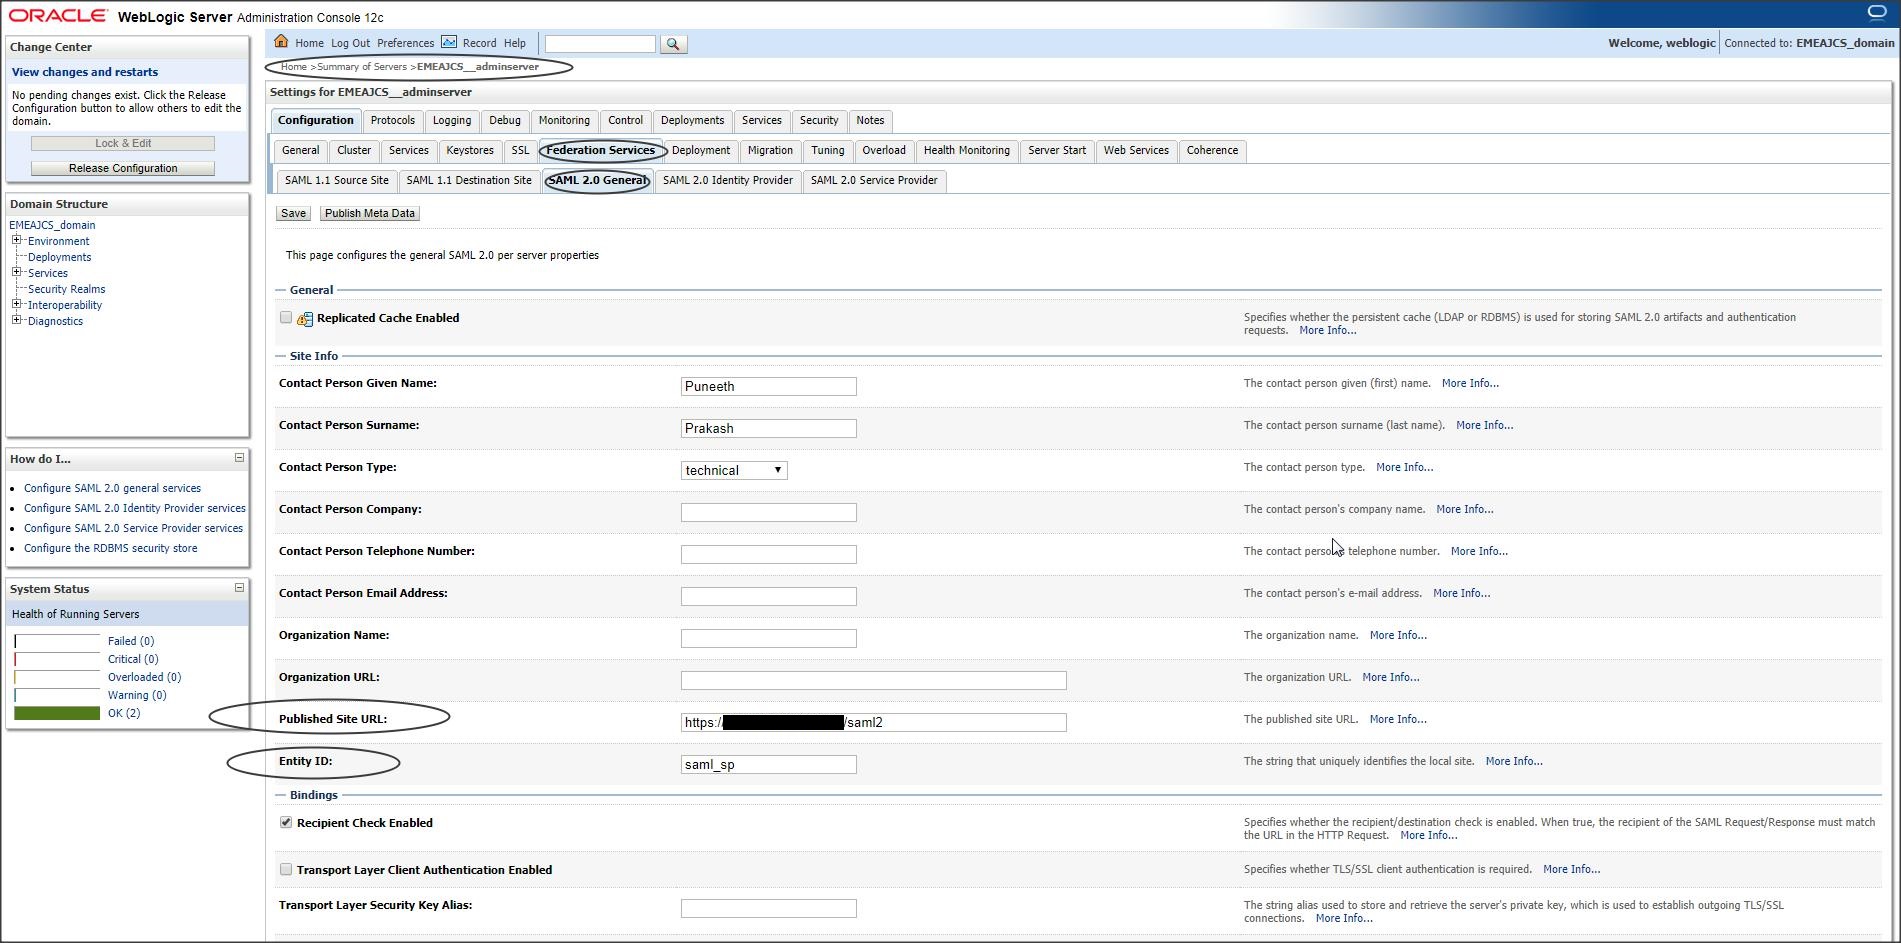
Two most important fields here are :
– Published Site URL : <protocol>://<public_host>:<public_port>/saml2
// This URL should always contain an external host:port.
// Protocol can be http or https.
// URL should always contain “/saml2” at the end. (This is an internal application deployed in WLS and cannot be changed).
– Entity ID : <Any_name> ( This is a Unique identifier)
Other fields are optional and can be left blank.
Step 3 :
Restart your servers.
Step 4 :
Navigate to SAML 2.0 Service Provider tab :
Login to console -> +Environment -> Servers -> <server_where_SSO_application_will_be_deployed> -> Federation Services -> SAML 2.0 Service Provider :
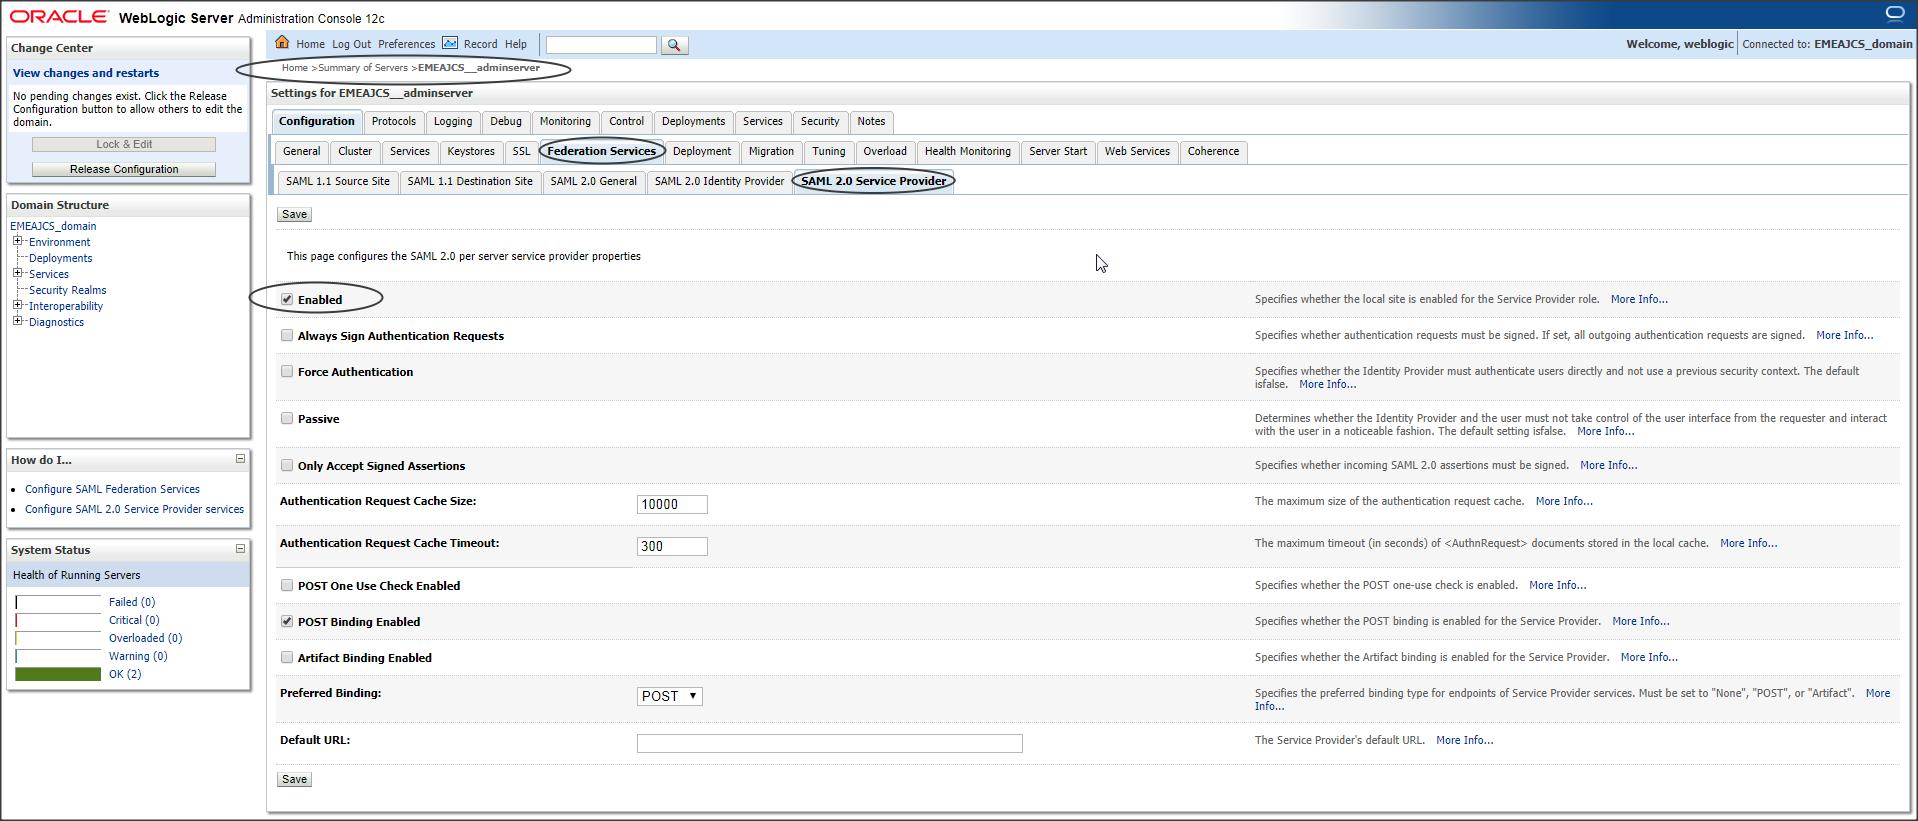
Make sure you that “Enable” checkbox is checked.
Step 5 :
Navigate to SAML 2.0 General and export the SP metadata :
Login to console -> +Environment -> Servers -> <server_where_SSO_application_will_be_deployed> -> Federation Services -> SAML 2.0 General -> Click on “Publish Meta Data”
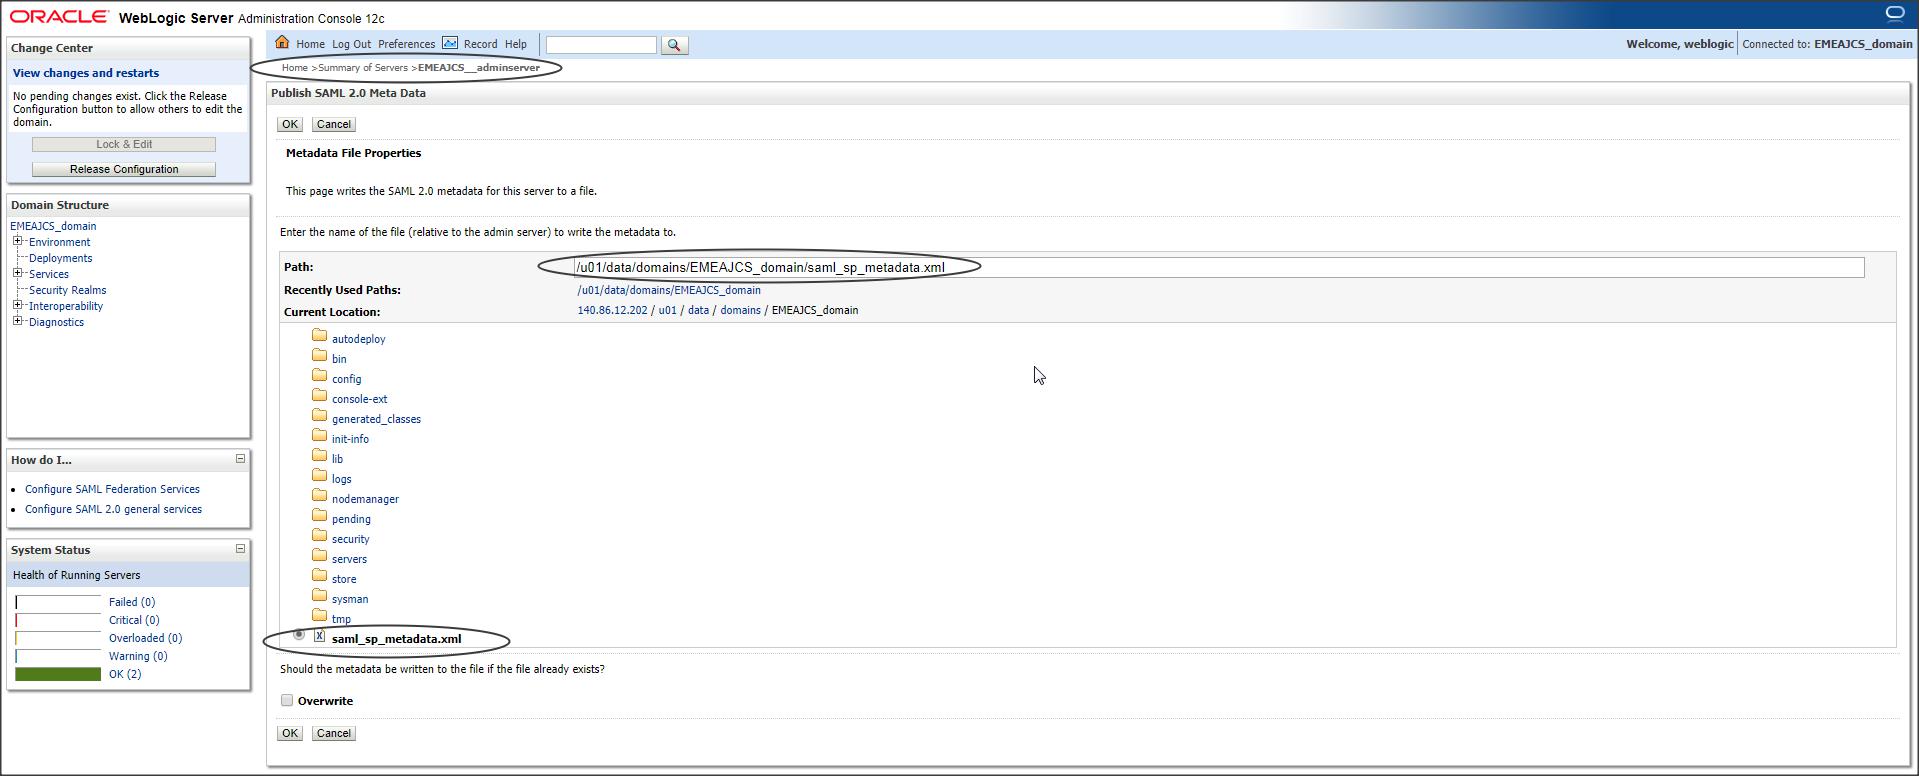
Save the metadata with an extension .xml
Step 6 :
Now open an SR with SAAS team and provide this metadata and ask them to create an SP partner in SAAS.
Step 7 :
SAAS team will create a partner for SP and provide their IDP metadata.
Step 8 :
IDP metadata provided by SAAS contains additional information in it, which has to be manually removed to get it working with JCS
Open the IDP metadata in a text editor like Notepad++ and search for :
– md:SPSSODescriptor
Now remove this entire tag.

Then search for :
– md:RoleDescriptor
Remove this entire tag.
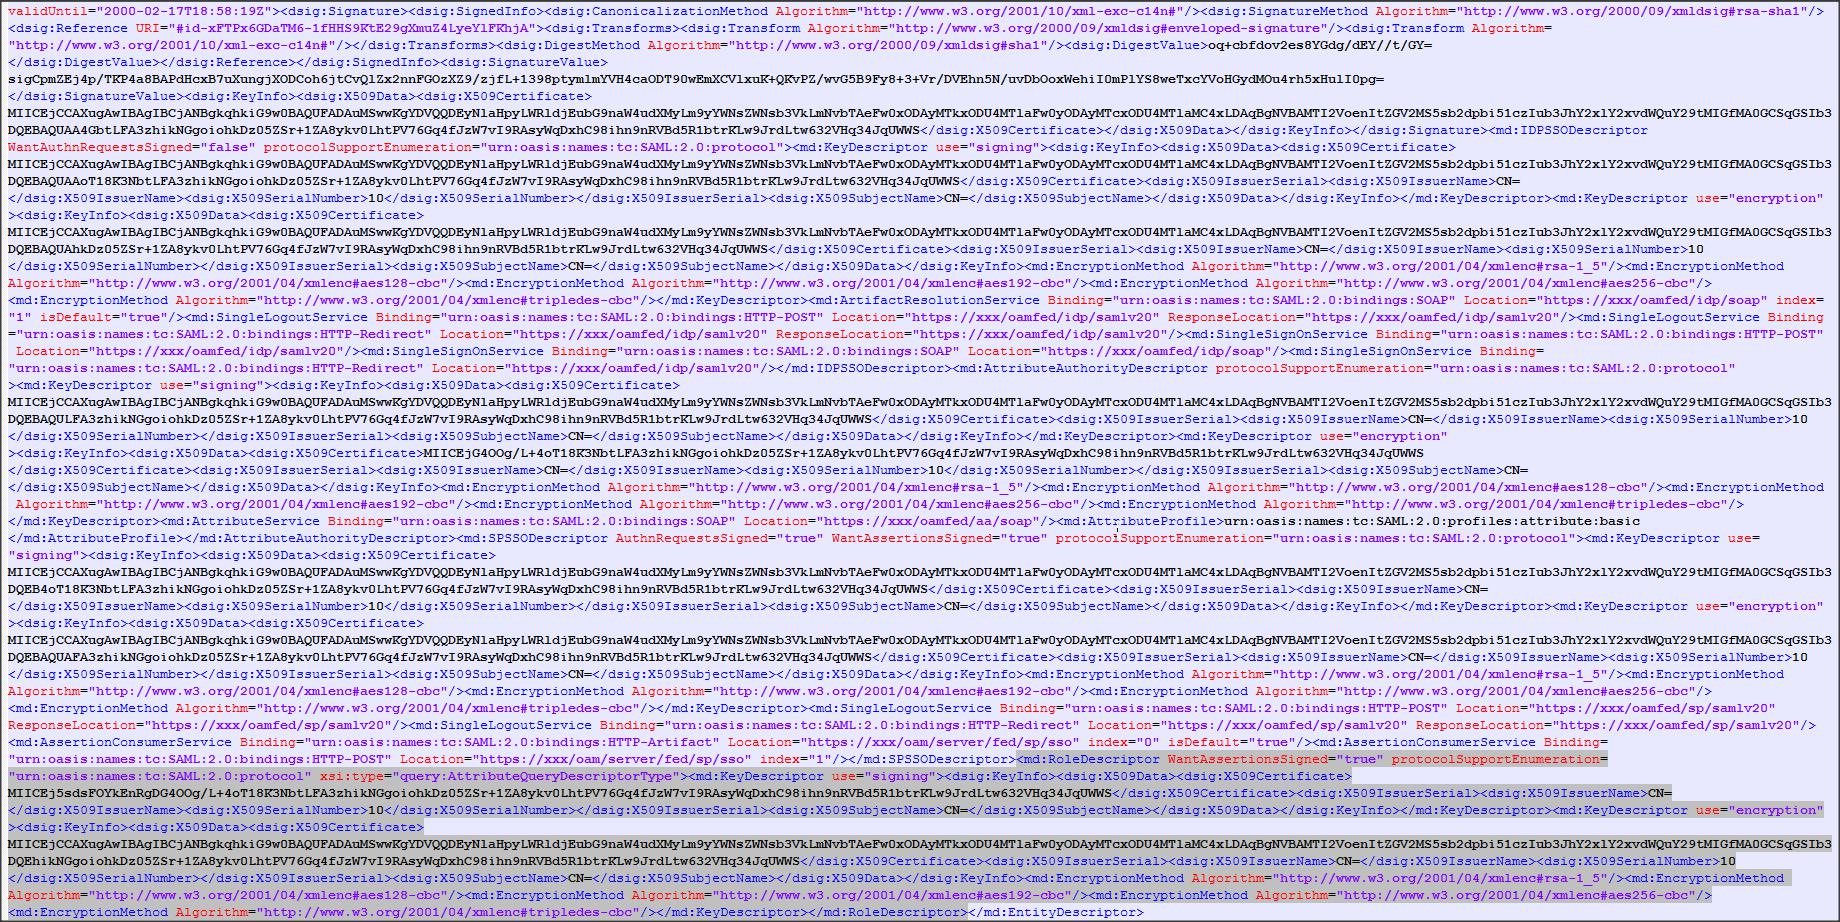
Now copy the modified IDP metadata to JCS instance.
Step 9 :
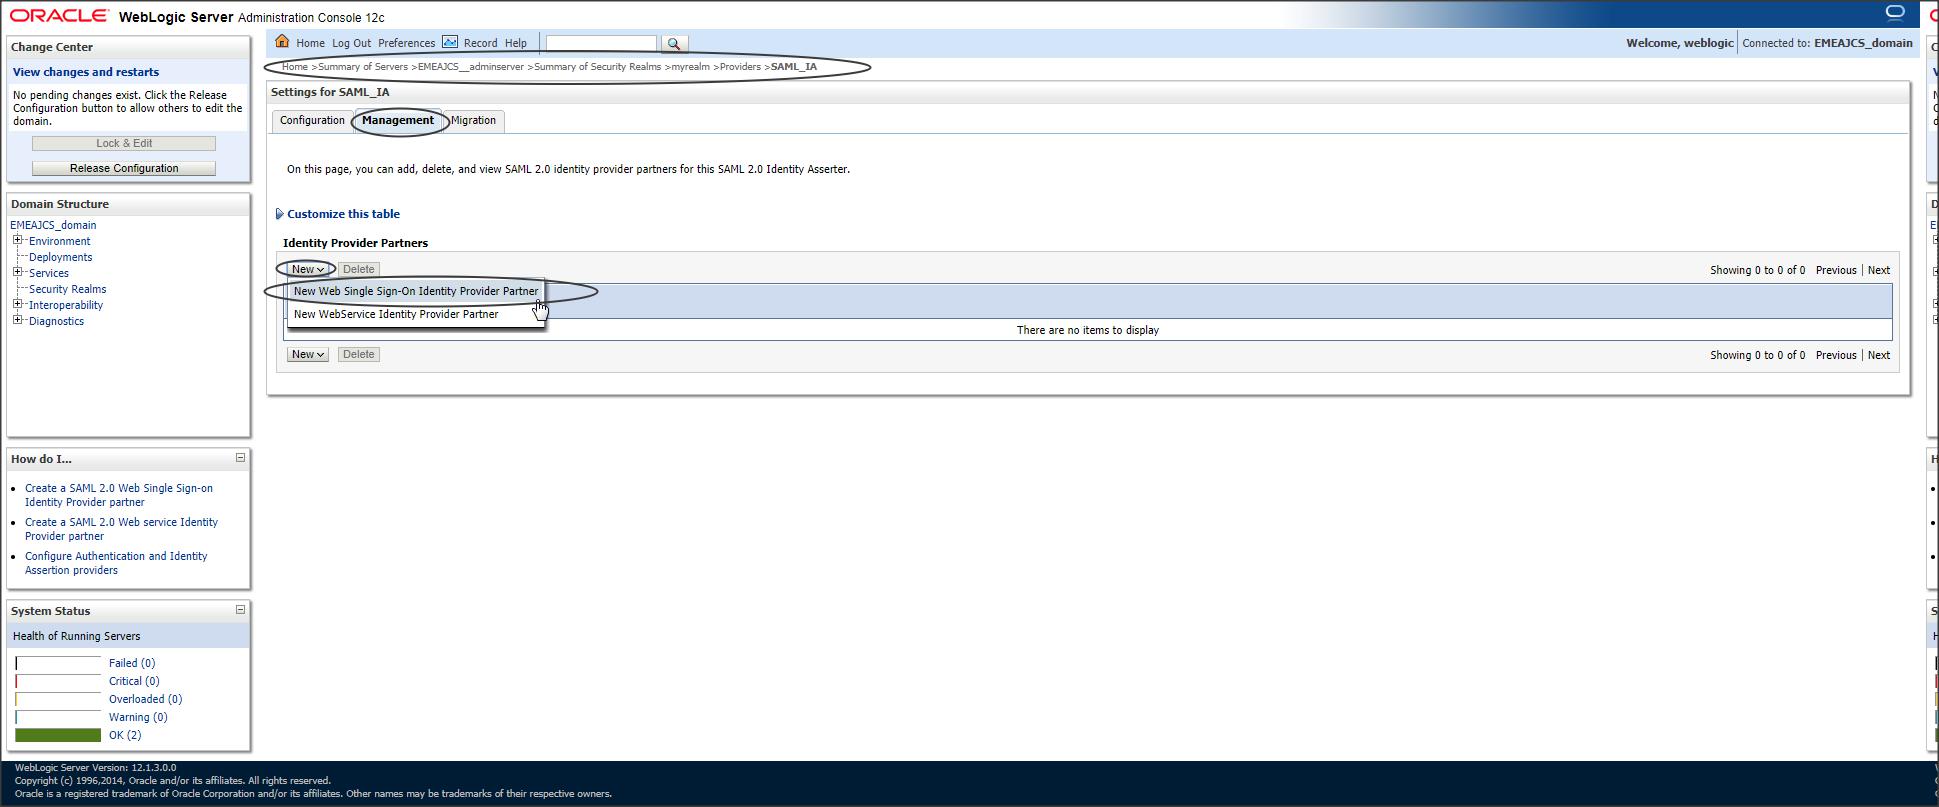
Now let’s create a partner for IDP in JCS using the modified IDP metadata
Navigate to the Identity Asserter you created earlier to create the partner :
Login to console -> Security Realms -> myrealm -> Providers -> Authentication ->SAML_IA -> Management -> New -> “New Web Single Sign-On Identity Provider Partner”
Select the modified IDP metadata and click OK.
Step 10 :
Click on the newly created IDP partner -> Enable (check)
Step 11 :
To avoid manually creating all the users in SAAS on to JCS, we can make use of a feature called Virtual User.
Which is enabled by default.
However, this gets activated only when a SAML Authenticator provider is configured.
Lets create that now.
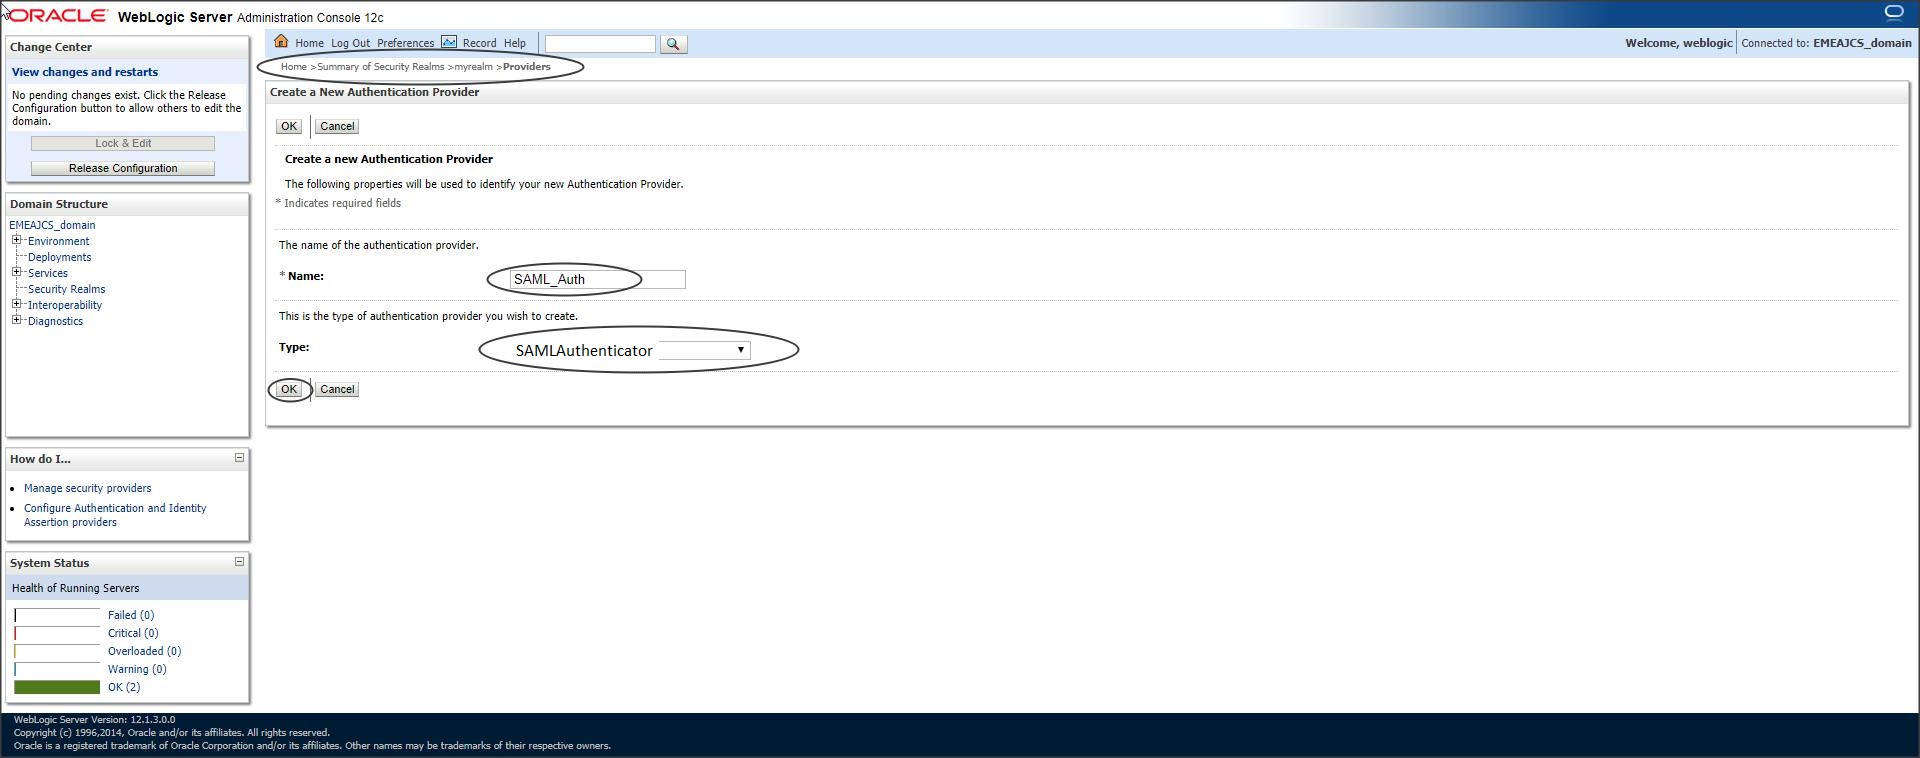
Login to console -> Security Realms -> myrealm -> Providers -> Authentication -> New ->
Type : SAMLAuthenticator
Step 12 :
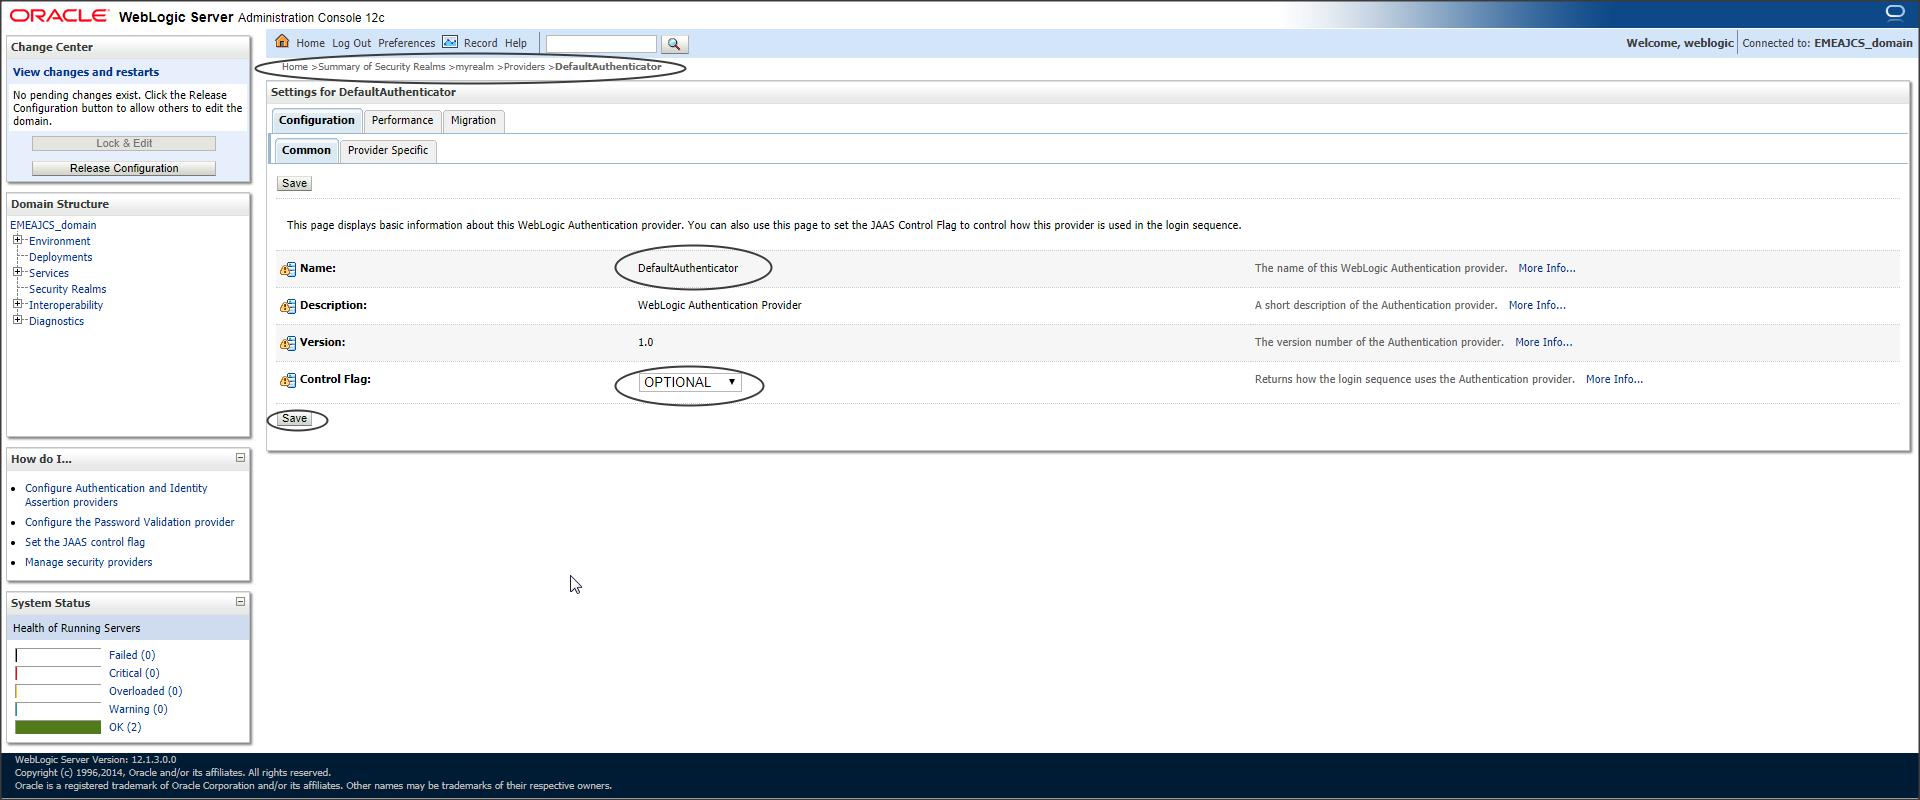
Since we have multiple Authentication Providers now, we need to change the control flag
Login to console -> Security Realms -> myrealm -> Providers -> Authentication -> Default Authenticator -> Control Flag -> “Optional”
Step 13 :
Restart your VM now.
Step 14 :
Now lets test if SSO is working fine using a sample application :
Download “JCS_SSO_Test_application.zip” and deploy it to the server where Federation Services was configured.
Step 15 :
Now lets set the “Redirect URI” for this application to enable SP initiated SSO
Login to console -> Security Realms -> myrealm -> Providers -> Authentication ->SAML_IA -> Management -> WebSSO-IdP-Partner-0
Redirect URIs : /JCS_SSO_Test_application/restricted/protected_page.jsp
Step 16 :
Create a test user in SAAS called “saas_testuser” or you can use any user who is part of “Administrator” group.
Step 17 :
Now when you access the protected page of JCS_SSO_Test_application you will be redirected to IDP login page asking for a challenge.
Access URL: http://<host>:<port>/JCS_SSO_Test_application/restricted/protected_page.jsp
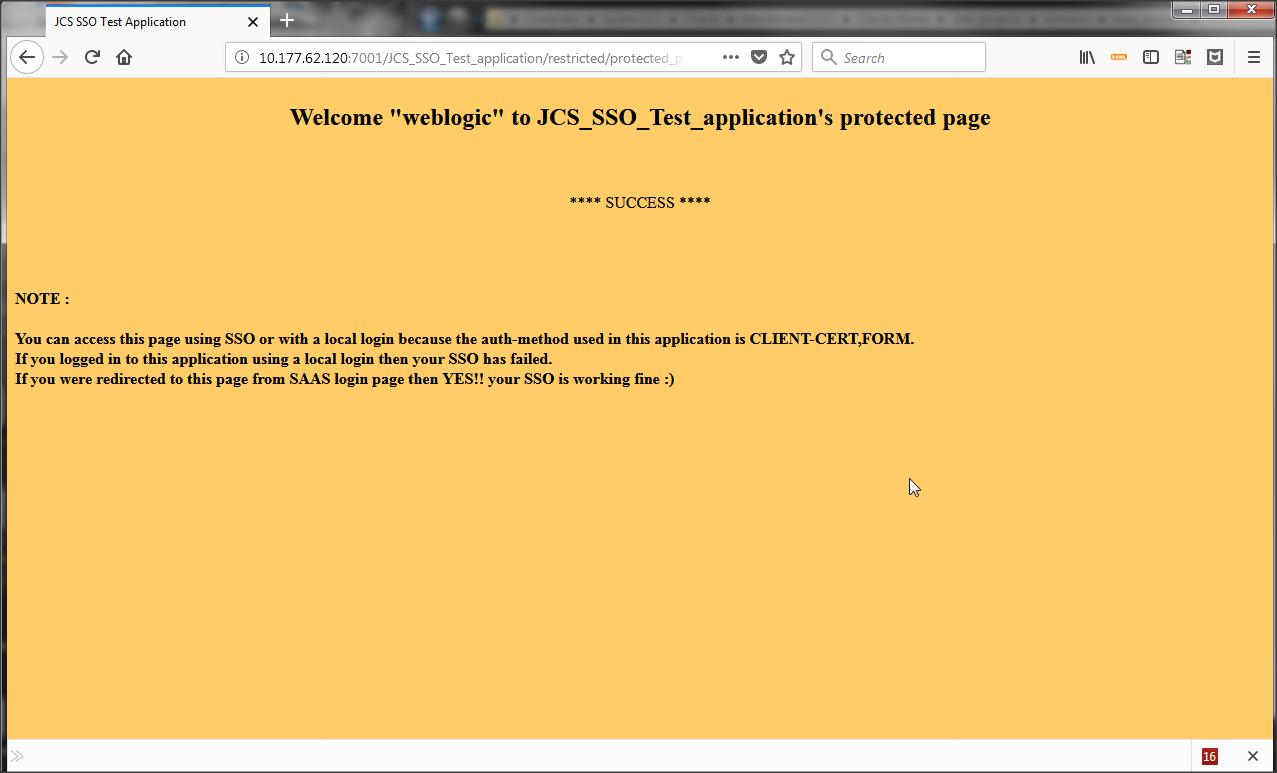
After you are successfully authenticated in IDP you should be able to see the protected page of JCS_SSO_Test_application.
Success :
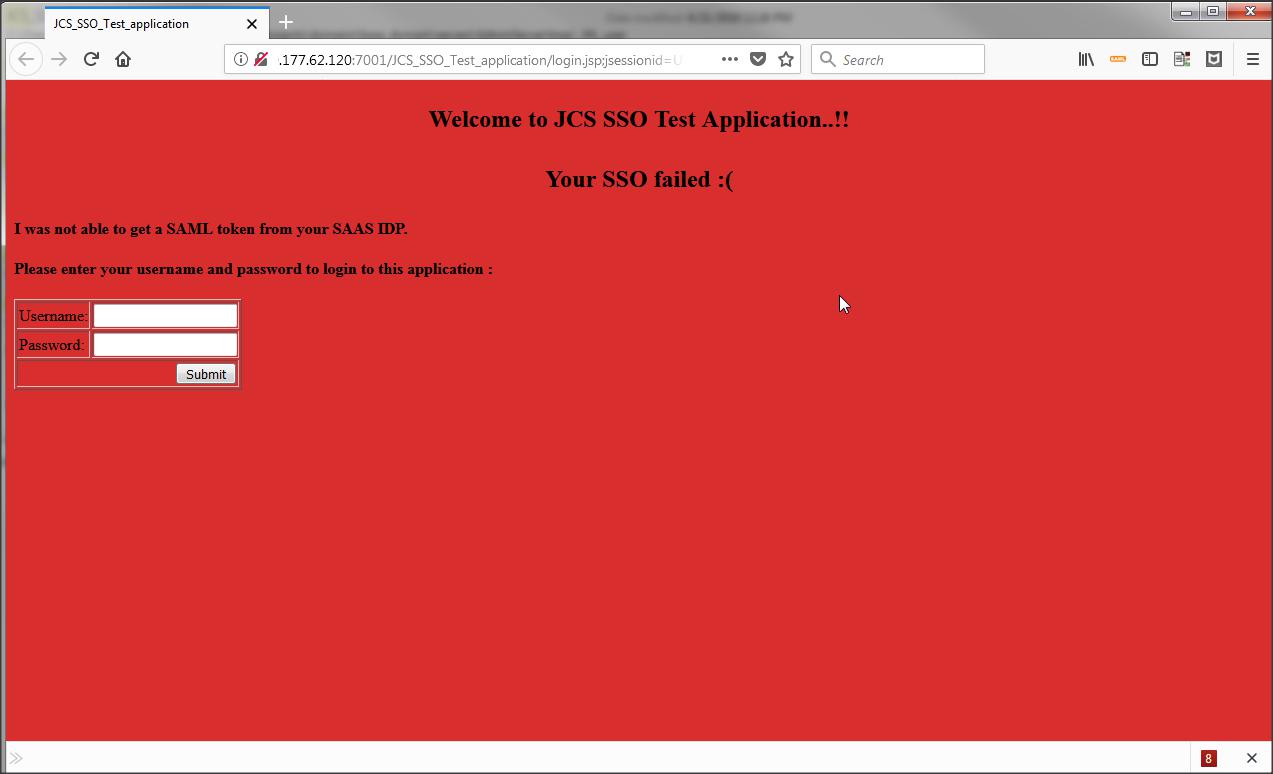
Failure :
Step 18 :
Cloud-specific APIs are not provided for any logout functionalities.
However, the application can safely redirect to /oamsso/logout.html, which is the mechanism responsible for invalidating the SSO cookie. This URL takes an optional parameter end_url which can be assigned a URL to which you will be redirected after logout, e.g. in a JSP:
<%
response.sendRedirect(“/oamsso/logout.html?end_url=/public-and-secured-application”);
// this will logout and redirect to the fully public part of the example application
%>
Refer : https://docs.oracle.com/en/cloud/paas/javase-cloud/csjsu/securing-applications-oracle-java-cloud-service-saas-extension.html
