The Approvals component in Oracle APEX streamlines the implementation of human approvals within your applications. It offers a streamlined setup process and flexibility for tailoring the approval process. It allows you to define task approvers and administrators, make dynamic assignments at runtime, and designate task definition parameters as updatable.
Task Definition, a key part of the Approvals Component, is a shared component that outlines how approval tasks function. It includes details such as participants, parameters, actions, and due dates. Within a Task Definition, you can define Actions, which determine what happens at different stages of a task – such as when it is created, completed, or delegated – offering flexibility in managing approvals.
In this blog post, we will show how to configure In-Email Approvals for the Approvals component in Oracle APEX. This blog post will use an Employee Leave Request Approval system where a Leave request approval is sent to the approver via Email. Approvers can take action directly from their email. Using the Microsoft Graph API, the system reads approval emails, checks the task status, and processes the response without needing to open the app.
GIF 1: In-Email Approval Walkthrough
Why In-Email Approvals?
In-email approvals allow users to approve or reject requests directly from their email, eliminating the need to log into the APEX application. This streamlines the approval process, making it faster and more convenient, especially for users who are frequently on the move.
Key Benefits:
Faster Decision-Making Approve requests instantly from email.
Improved Efficiency – No need to log in for simple approvals.
Better User Experience – Easy for busy stakeholders to respond.
In-email approvals streamline workflows, making business processes smoother and quicker.
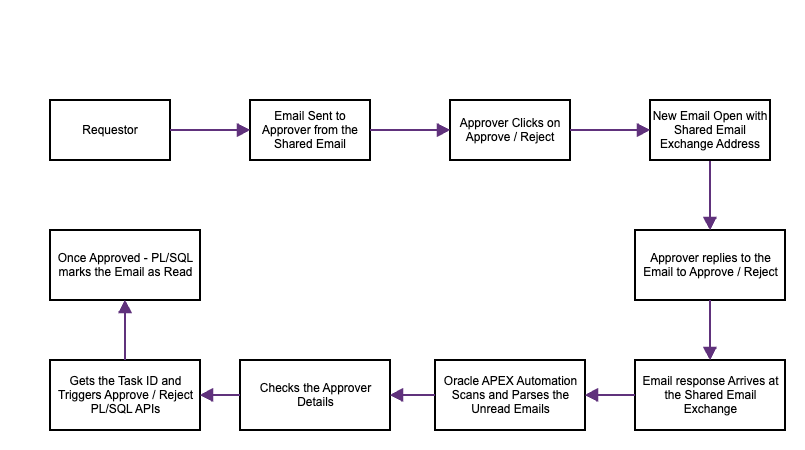
Figure 1: Flowchart showing how In-Email Approvals work
Creating an Email Template in Oracle APEX
To enable in-email approvals, we first need an email template that will be sent to approvers when a request is raised. The Leave Request Approval email template that we create allows approvers to quickly approve or reject requests directly from their inbox. It includes key details like leave type, number of days, task ID, and task description for easy review.
The email features two action buttons: Approve and Reject. Clicking either button opens a pre-filled email in the approver’s default email client. The pre-filled email contains details like Task ID, Approval Status, etc., which will be leveraged later while reading the emails and when Approving/rejecting tasks.
Sample Email Template:
<html>

<head>

    <title>Leave Request Approval for Task #TASK_ID#</title>

</head>

<body>

    <p>Dear #APPROVER_NAME#,</p>

    <p>Please review the following Leave Request and approve or reject as necessary:</p>

    <h3>Approval Details</h3>

    <ul>

        <li><strong>Leave Type:</strong> #LEAVE_TYPE#</li>

        <li><strong>Number of Days:</strong> #NO_OF_DAYS#</li>

    </ul>

    <h3>Task Details</h3>

    <ul>

        <li><strong>Task ID:</strong> #TASK_ID#</li>

        <li><strong>Task Description:</strong> #TASK_DESC#</li>

    </ul>

    <p><strong>Click below to approve or reject:</strong></p>

    <!-- Approve Link (mailto with minimal approval body) -->

    <a href="mailto:#APPROVER_EMAIL#?subject=Leave%20Request%20Approval%20-%20Task%20#TASK_ID#&body=Approved"

       style="background-color: green; color: white; padding: 10px 20px; text-decoration: none; border-radius: 5px; display: inline-block; margin-right: 10px;">

        Approve

    </a>

    <!-- Reject Link (mailto with minimal rejection body) -->

    <a href="mailto:#APPROVER_EMAIL#?subject=Leave%20Request%20Rejection%20-%20Task%20#TASK_ID#&body=Rejected"

       style="background-color: red; color: white; padding: 10px 20px; text-decoration: none; border-radius: 5px; display: inline-block;">

        Reject

    </a>

    <br><br>

    <p>Best regards,</p>

    <p>#EMP_NAME#.</p>

</body>

</html>
This email includes placeholders (‘TASK_ID’, ‘APPROVER_NAME’, ‘LEAVE_TYPE’, ‘NO_OF_DAYS’, ‘APPROVER_EMAIL’, etc.) that will be replaced with actual values while configuring the Send Email Action under Task Definitions.
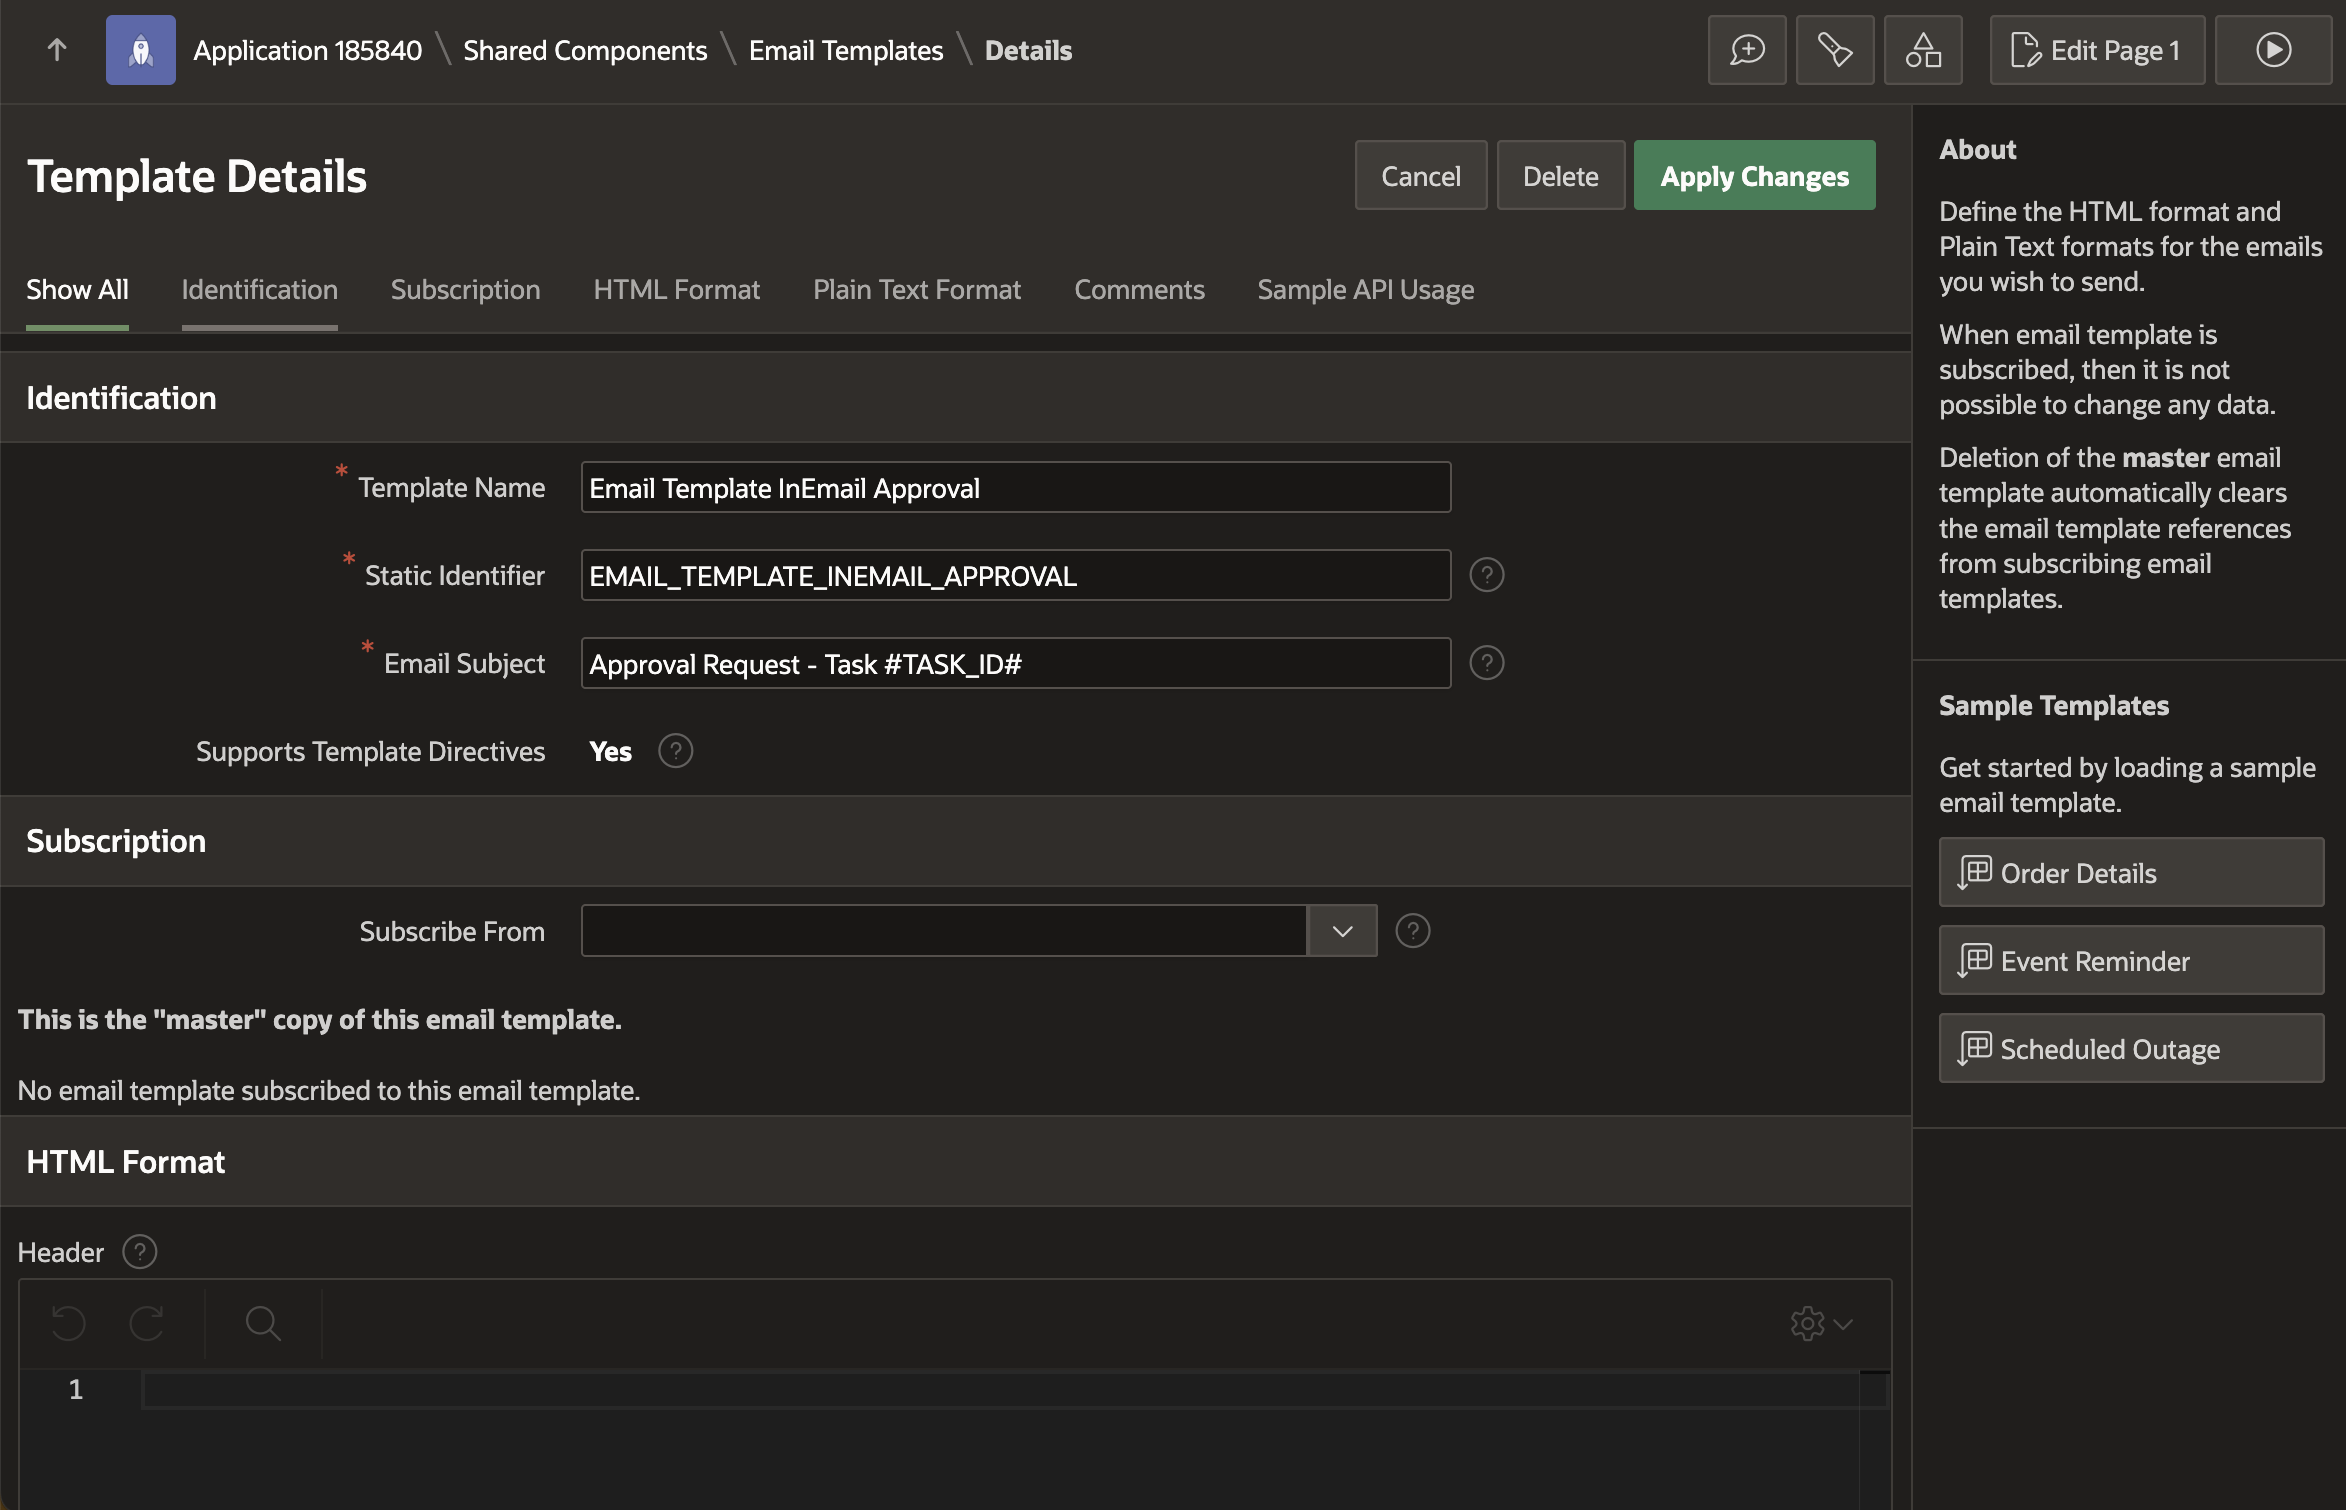
Figure 2: Email Template Used for In-Email Approvals
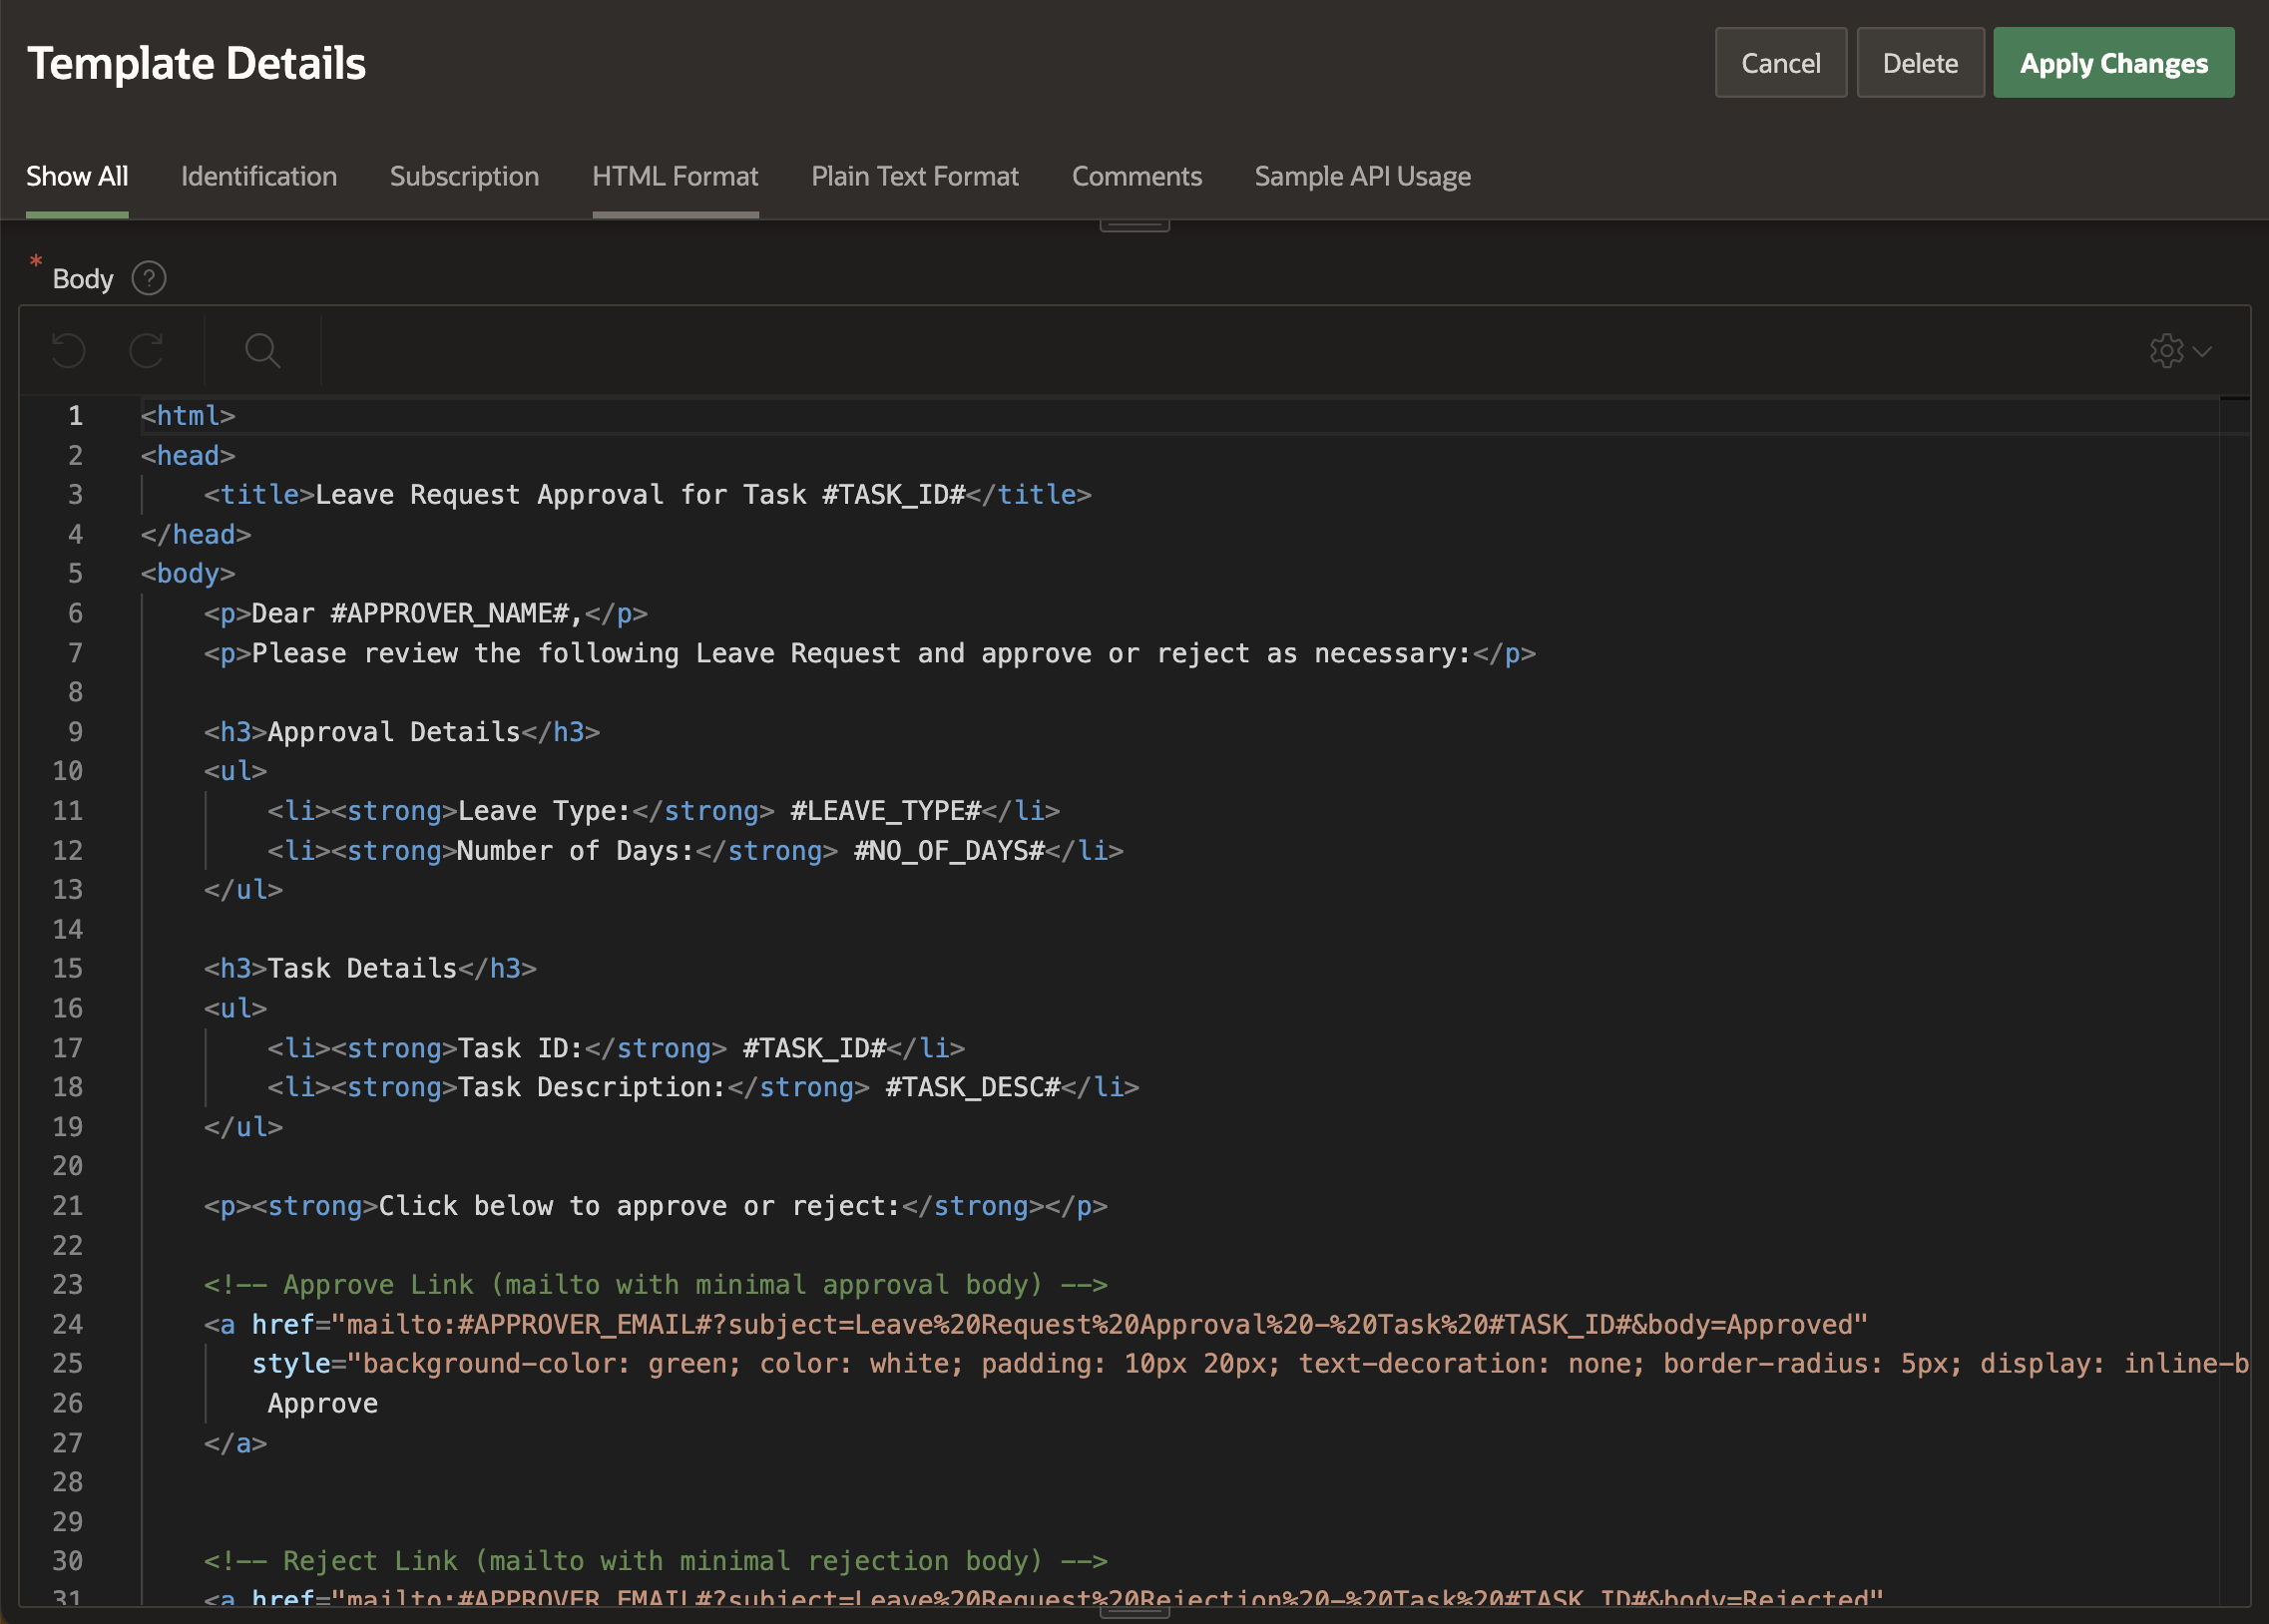
Figure 3: Email Template Body Used for In-Email Approvals
Follow the steps in this documentation to learn more about defining an Email Template in Oracle APEX.
Configure the Task Definition and Add a send Email Action to the Task Definition:
The Approvals component in Oracle APEX allows you to create and manage tasks that require user approval. Task Definitions are at the heart of this system, defining how tasks function and covering everything from participant roles to deadlines and actions.
What Are Task Definitions?
A Task Definition is a blueprint that outlines the structure and behavior of a task in Oracle APEX. It defines essential aspects like deadlines, who can interact with the task, and what actions they can perform. Task definitions are managed at the application level under the Shared Components section.
To learn more about creating a Task Definition, follow the steps mentioned in this blog post.
Adding an Email Action to Notify the Approver in Oracle APEX
In this section, we will add an action to send an email to the Approver when a task is created. Follow these steps to configure the email action in your Leave Request Application:
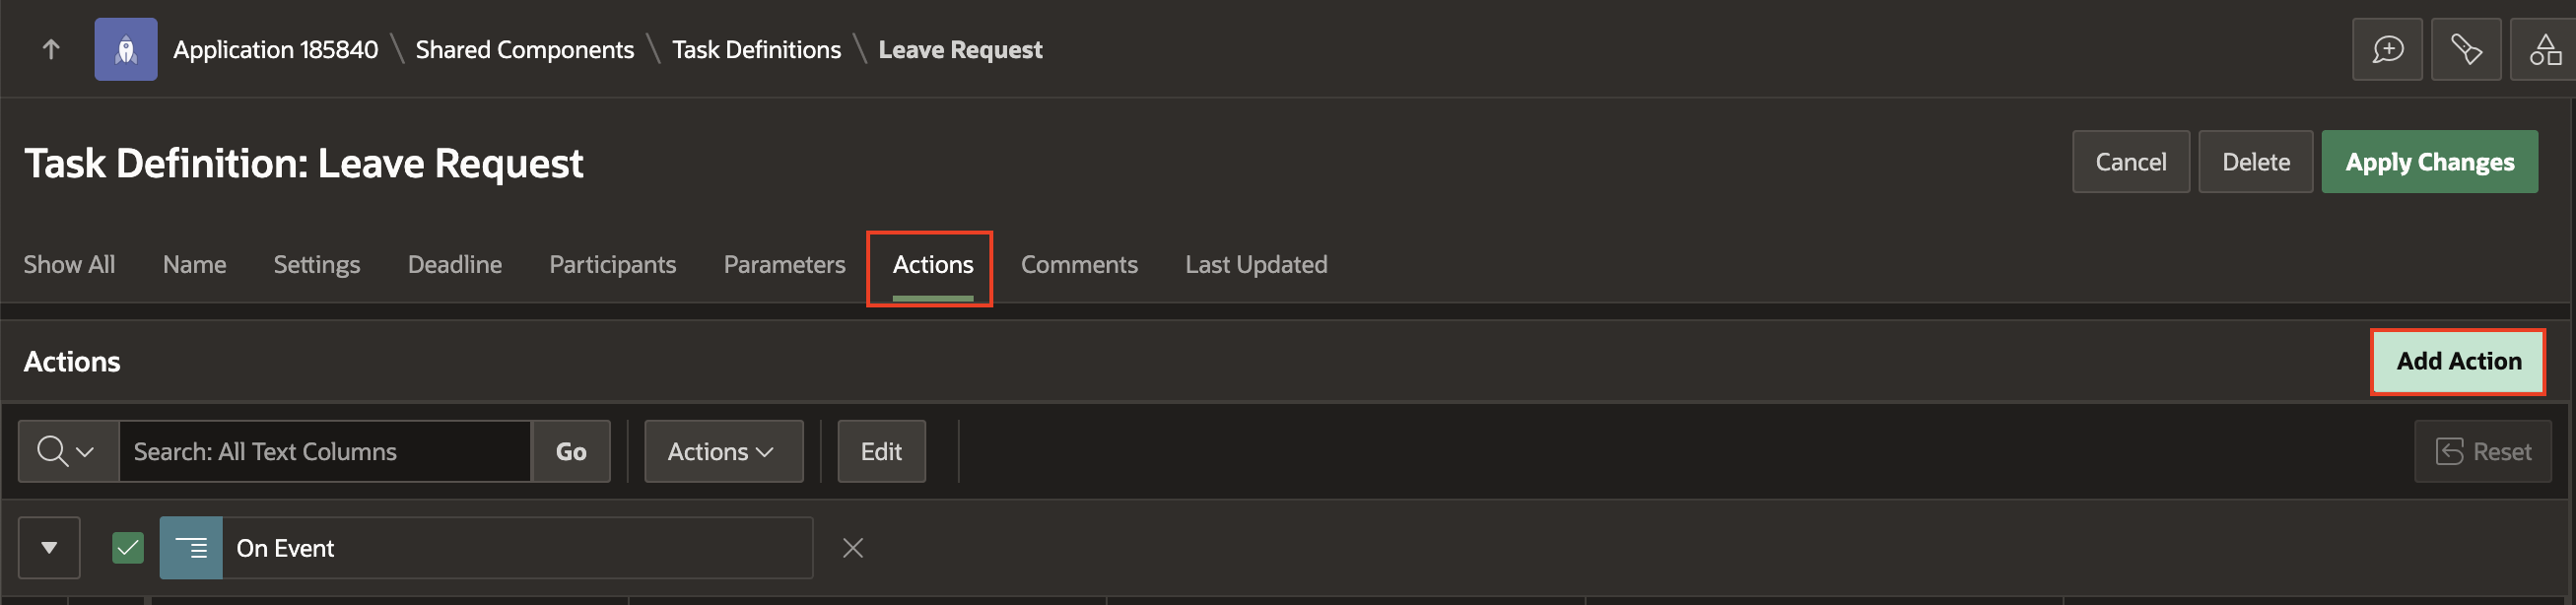
In your APEX application, go to Shared Components > Task Definitions. Open an existing Task Definition or create a new one.
Navigate to the Actions tab and click Add Action. Set the Action Name (e.g., “Send Approval Email”) and choose Send Email as the Action Type.
Figure 4: Adding an Action to the Leave Request Task Definition
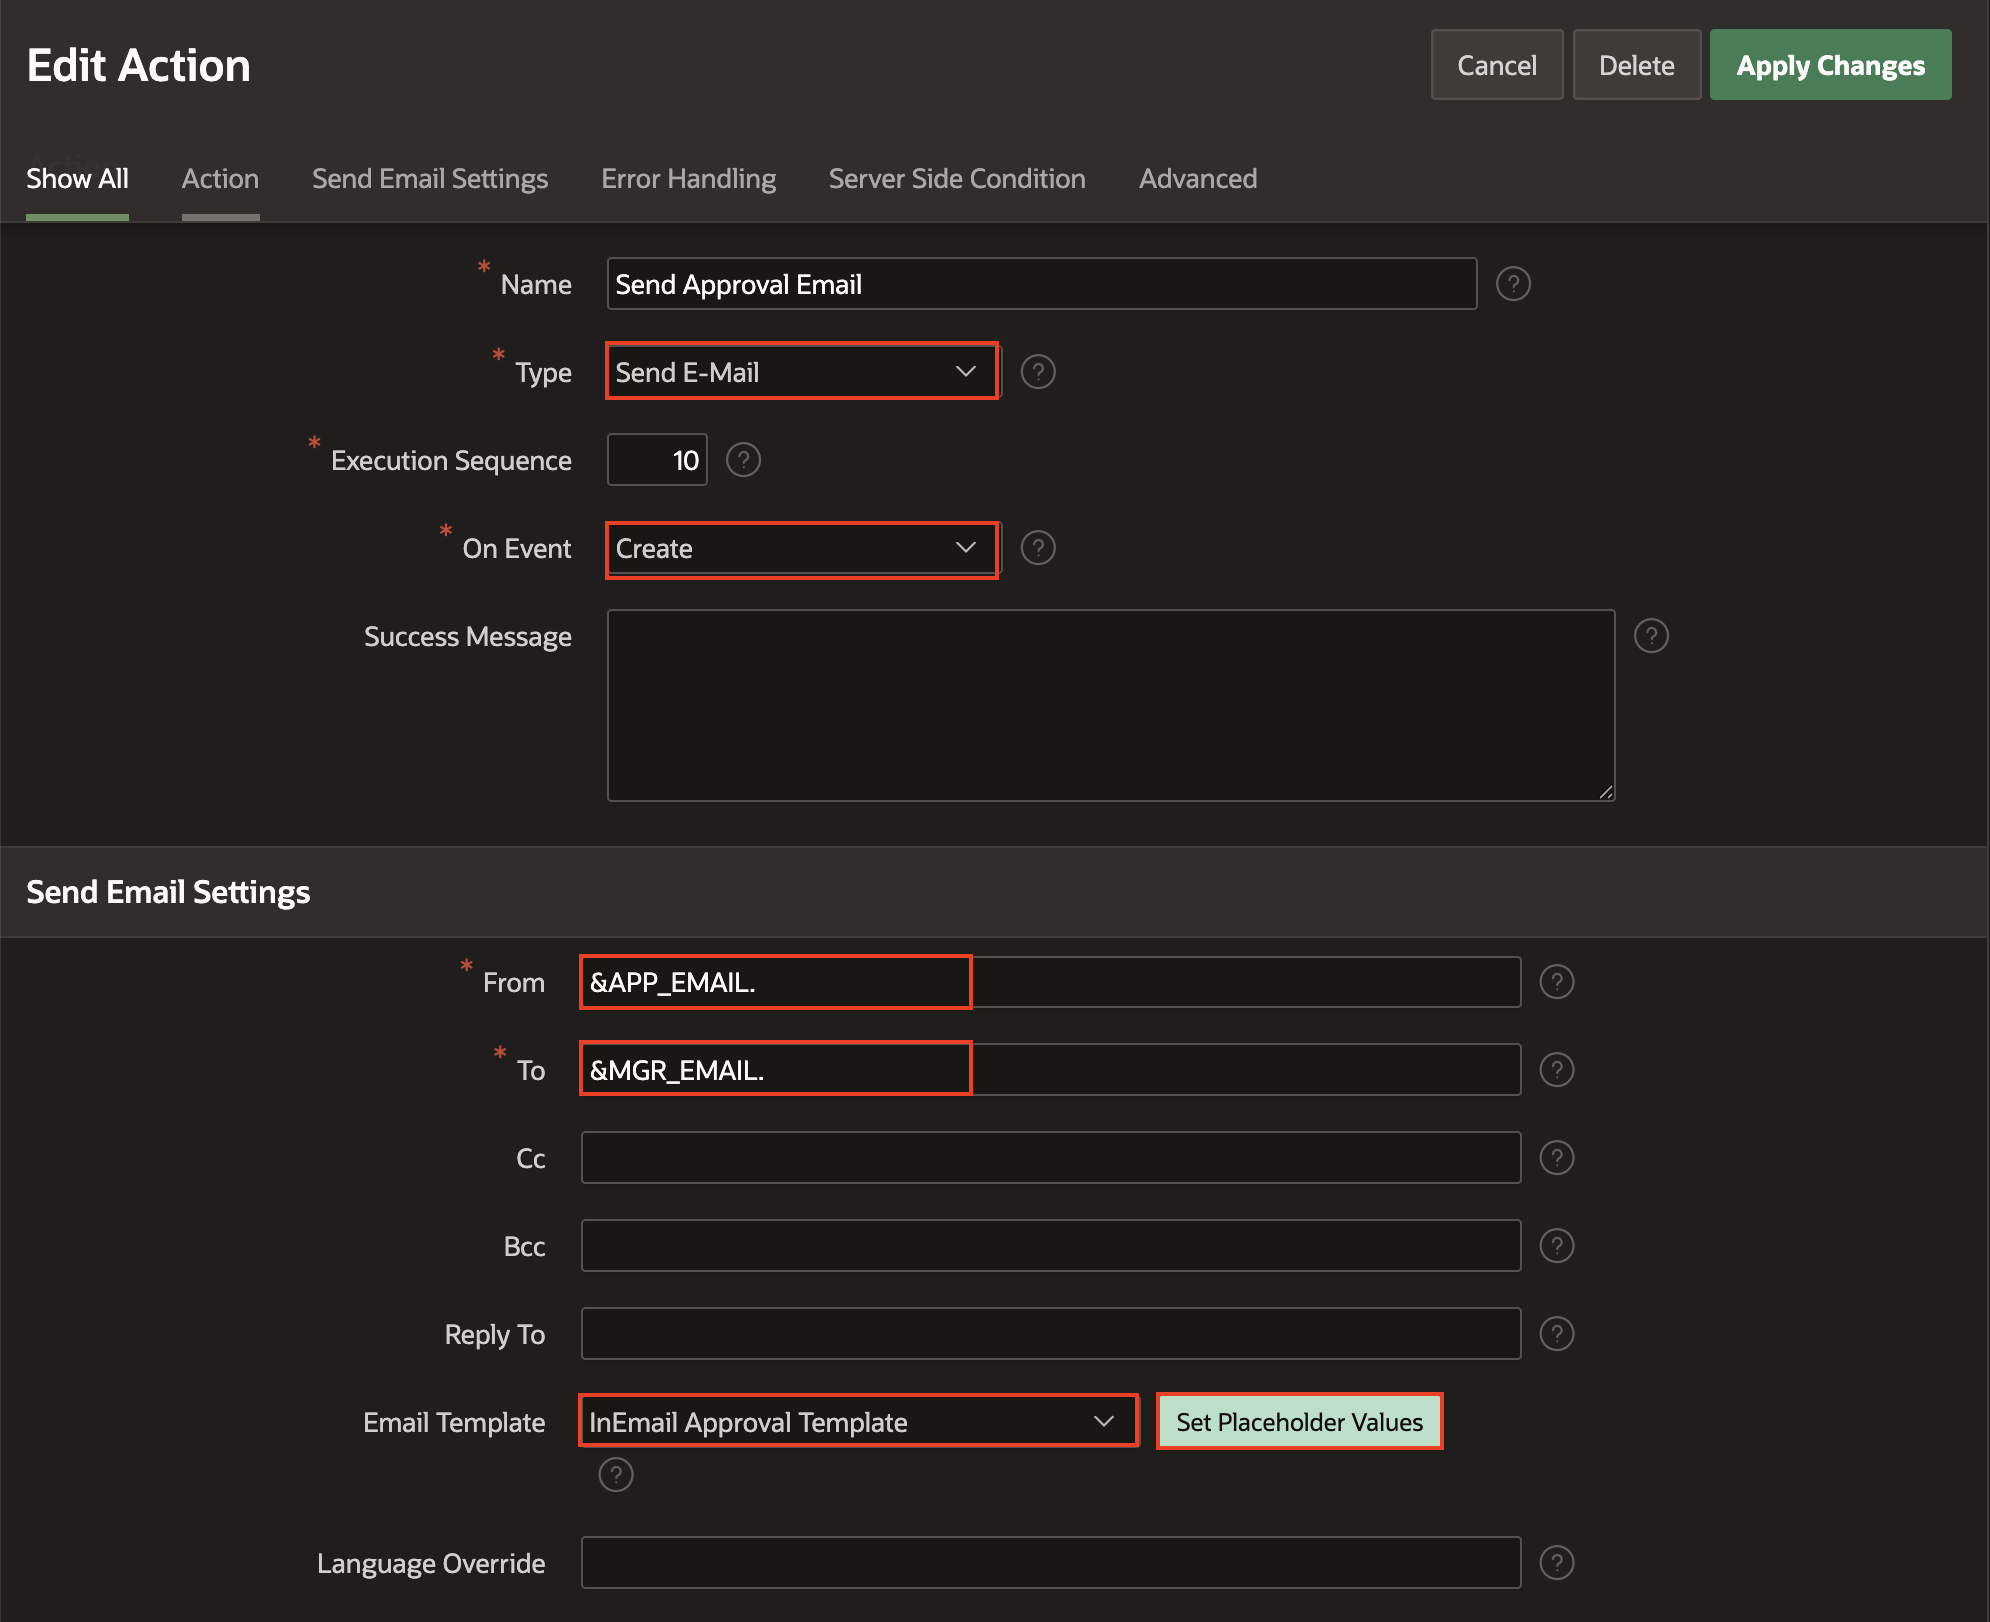
Under Action Settings, select Create for On Event (this triggers the email when a task is created).
To / From: Specify the recipients (e.g., task initiator, potential owners, or a specific email address).
Email Template: Select the email template created in the previous step.
Figure 5: Configuring the Send Email Action
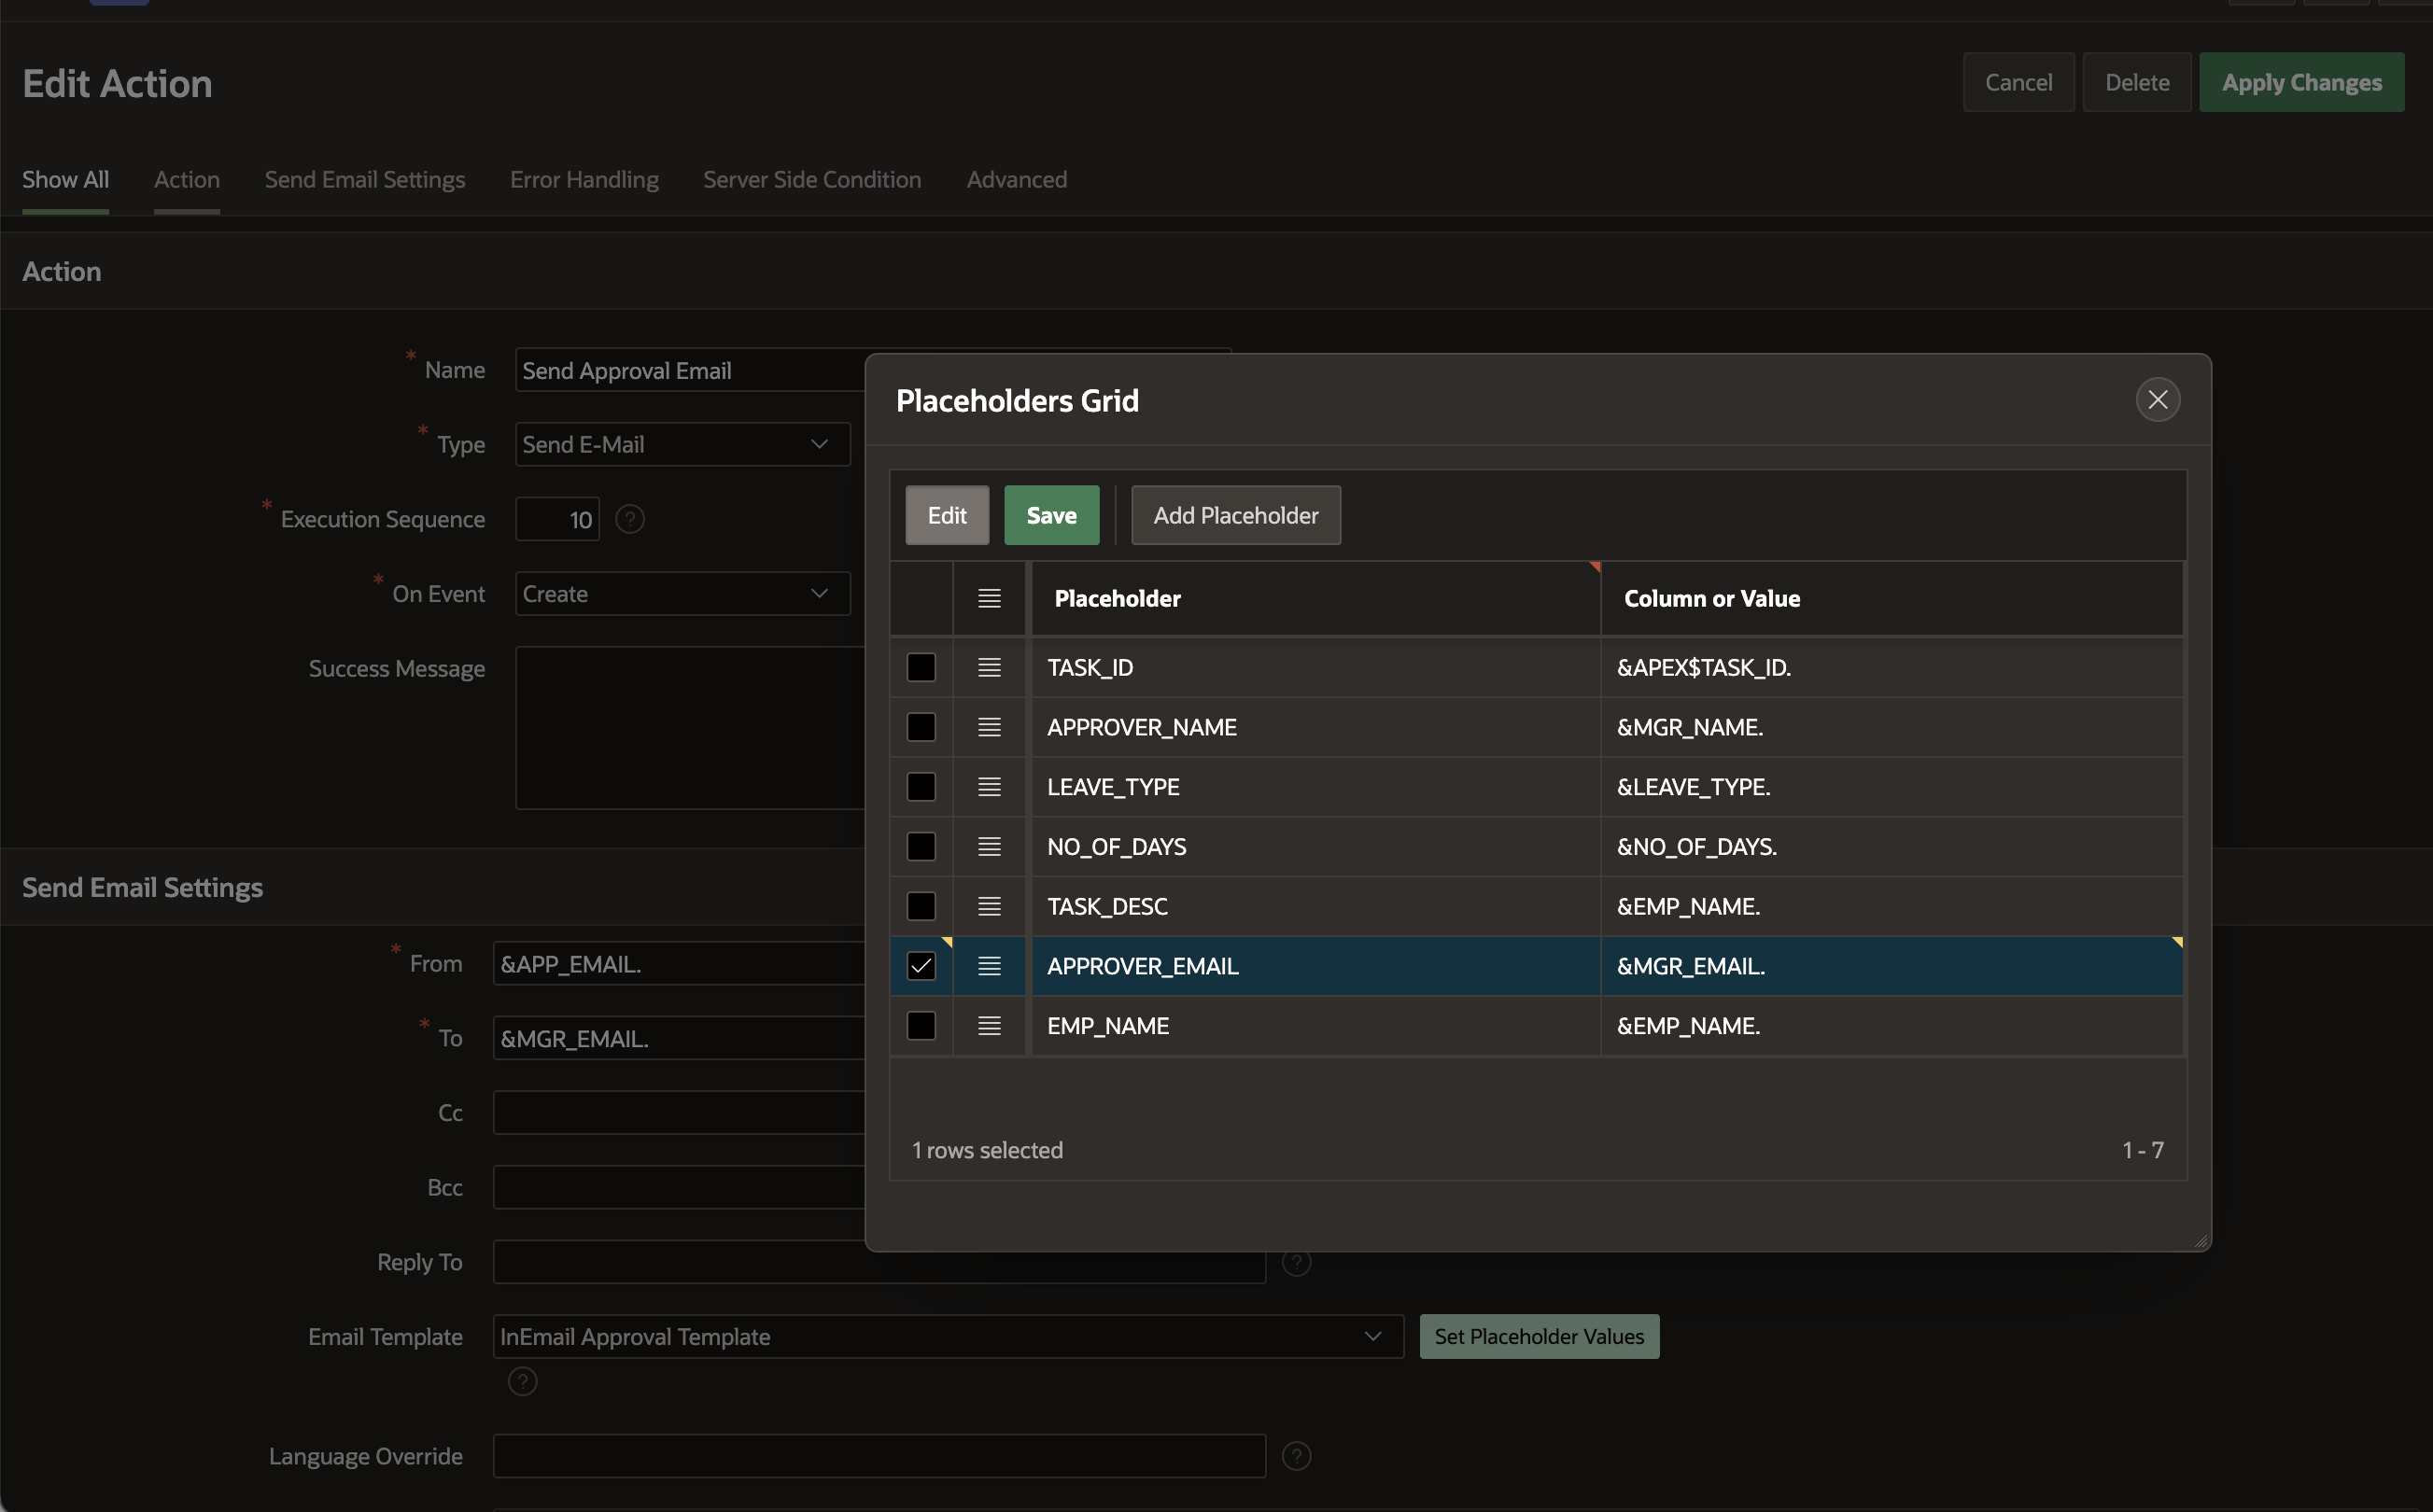
Click Set Placeholder Values to map the task data to the email content.
In the Placeholders Grid, provide the corresponding columns or values for:
TASK_ID
APPROVER_NAME
LEAVE_TYPE
NO_OF_DAYS
TASK_DESC
APPROVER_EMAIL
EMP_NAME
Figure 6: Setting Up Placeholders for the Email Template
Click Create or Apply Changes to save the action.
Create a task and ensure the email is sent with the correct placeholder values.
By following these steps, you can successfully notify the approver via email whenever a new task is created.
Integrating Emails through APIs
While this blog post focuses on Microsoft Outlook via the Microsoft Graph API, you can also integrate other email services (such as Gmail or custom SMTP/IMAP configurations). The same principles of authentication, reading emails, and updating status apply to other email services with the appropriate API endpoints. Microsoft Graph API is a unified RESTful web interface that allows developers to access various Microsoft 365 services, including Outlook, OneDrive, and Microsoft Teams.
Perquisites for Integrating Graph APIs with Oracle APEX:
The application/client ID of the application was created using Microsoft Entra Admin Center.
Directory / Tenant ID configured for the Application.
Client Secret Value configured for accessing the Application.
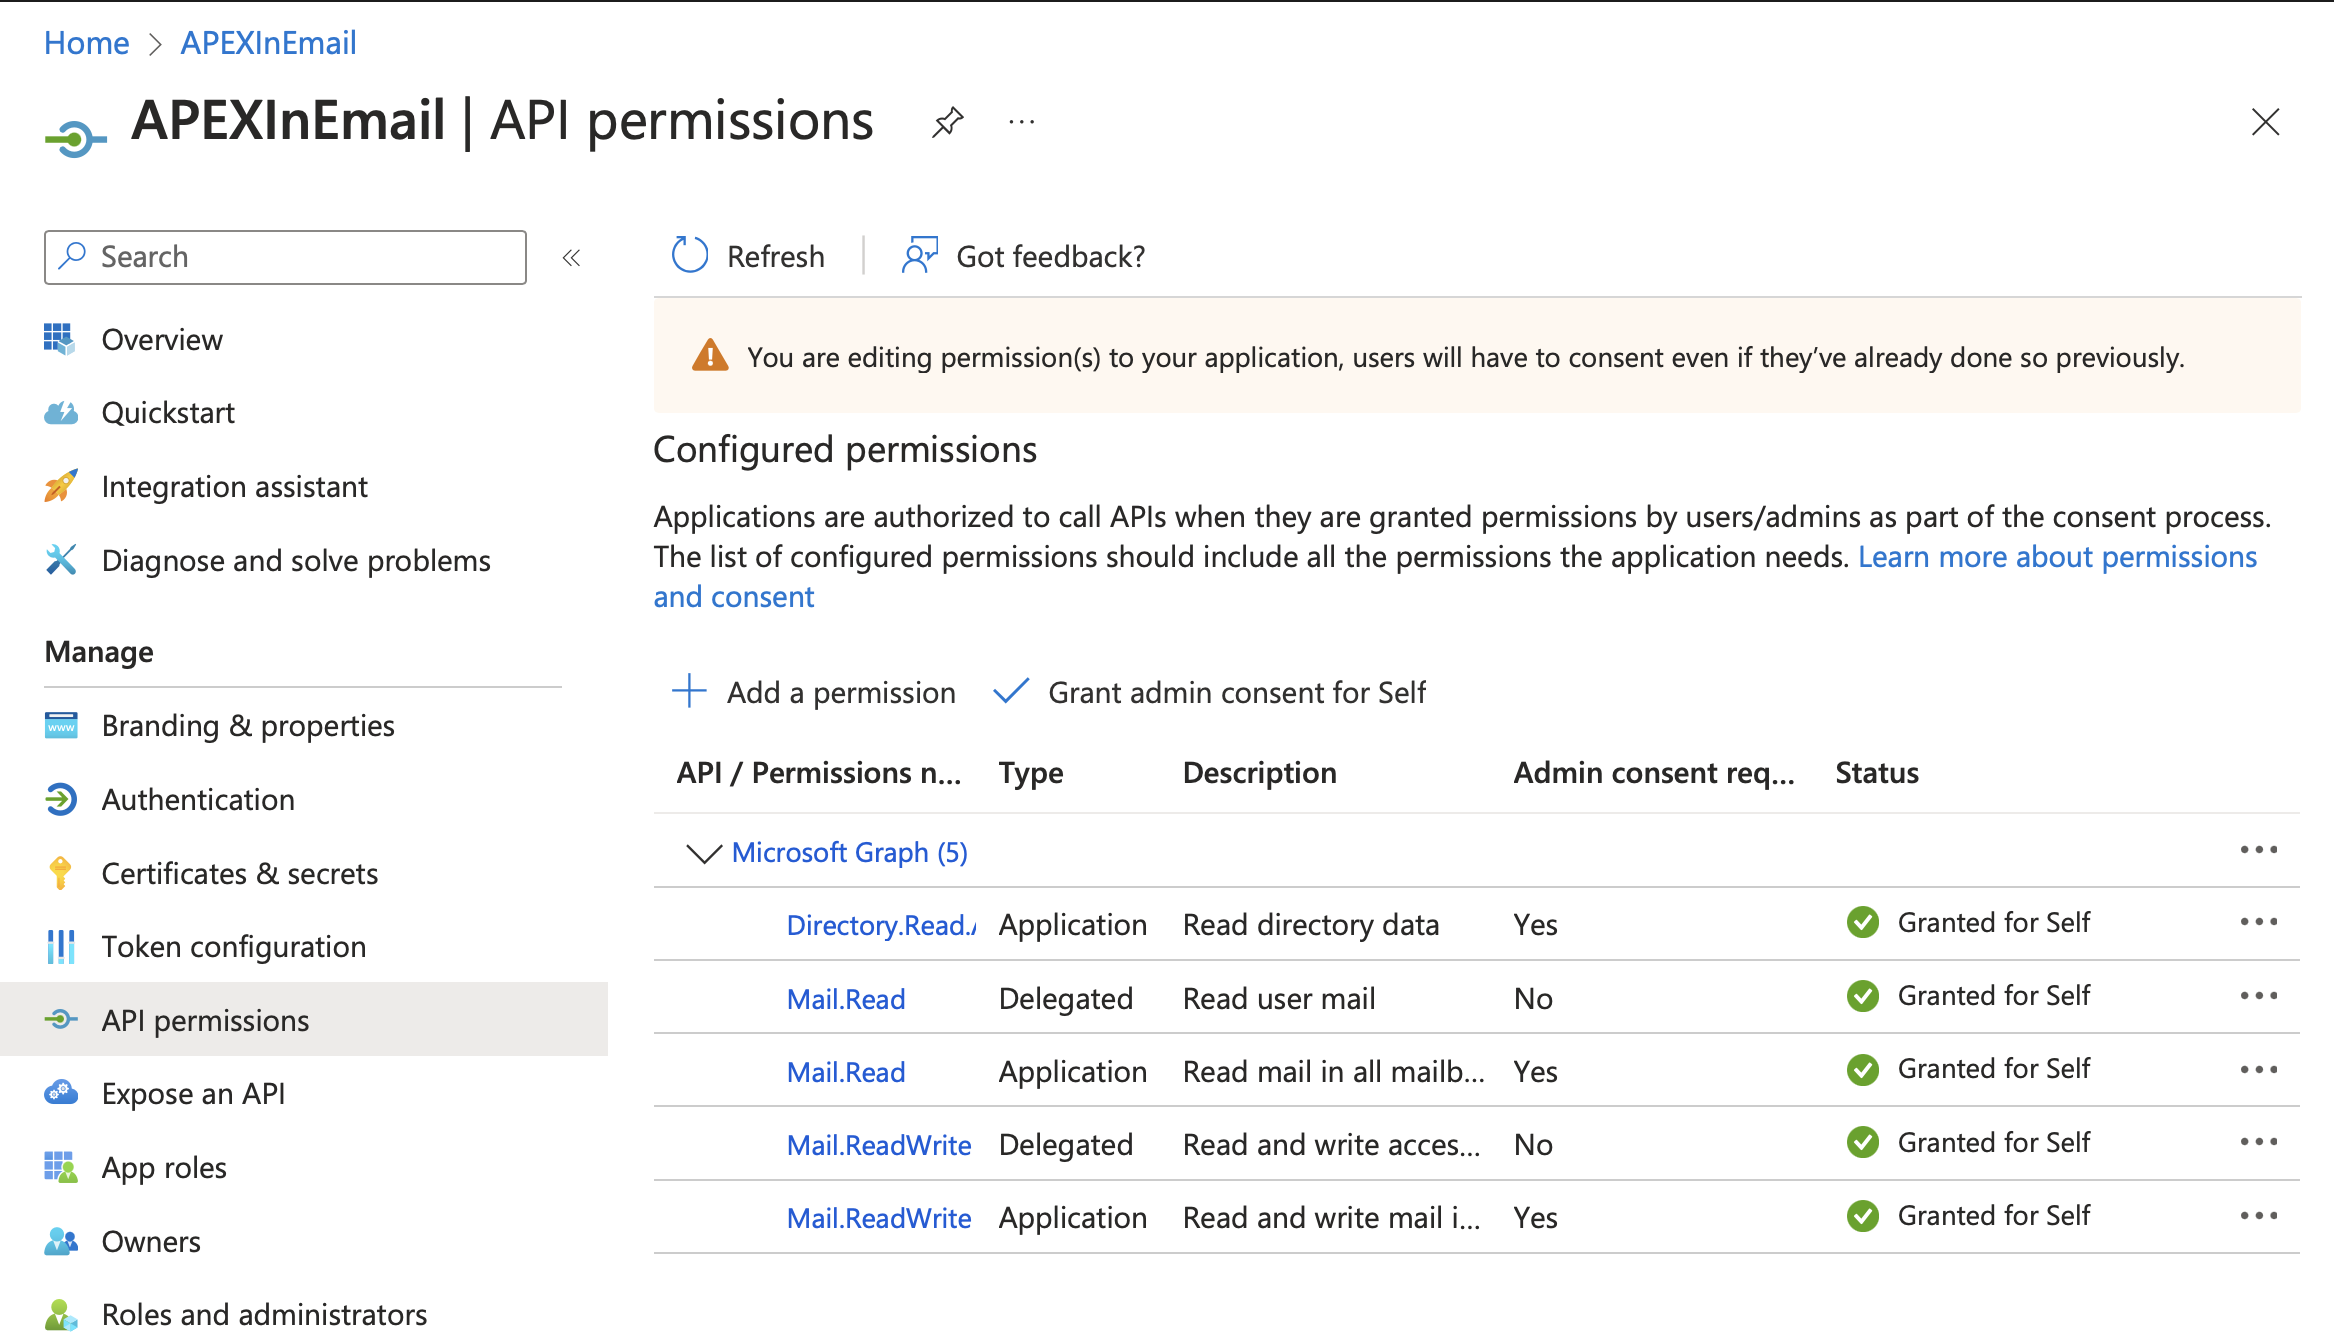
API Permissions Required to Read and Write Outlook Mails. To read emails and mark them as read, we need the following API permissions:
Delegated (User Context):
Mail.Read
ReadWrite
Application (App-only)
Mail.Read
Mail.ReadWrite
Figure 7: Required API Permissions for Reading and Writing Emails
Create Web Credentials
Web Credentials in Oracle APEX allow you to securely store and encrypt authentication details for external REST services or REST-enabled SQL services. Once saved, credentials can’t be retrieved in plain text, helps ensure security. Since they’re stored at the workspace level, they’re accessible across all applications within that workspace.
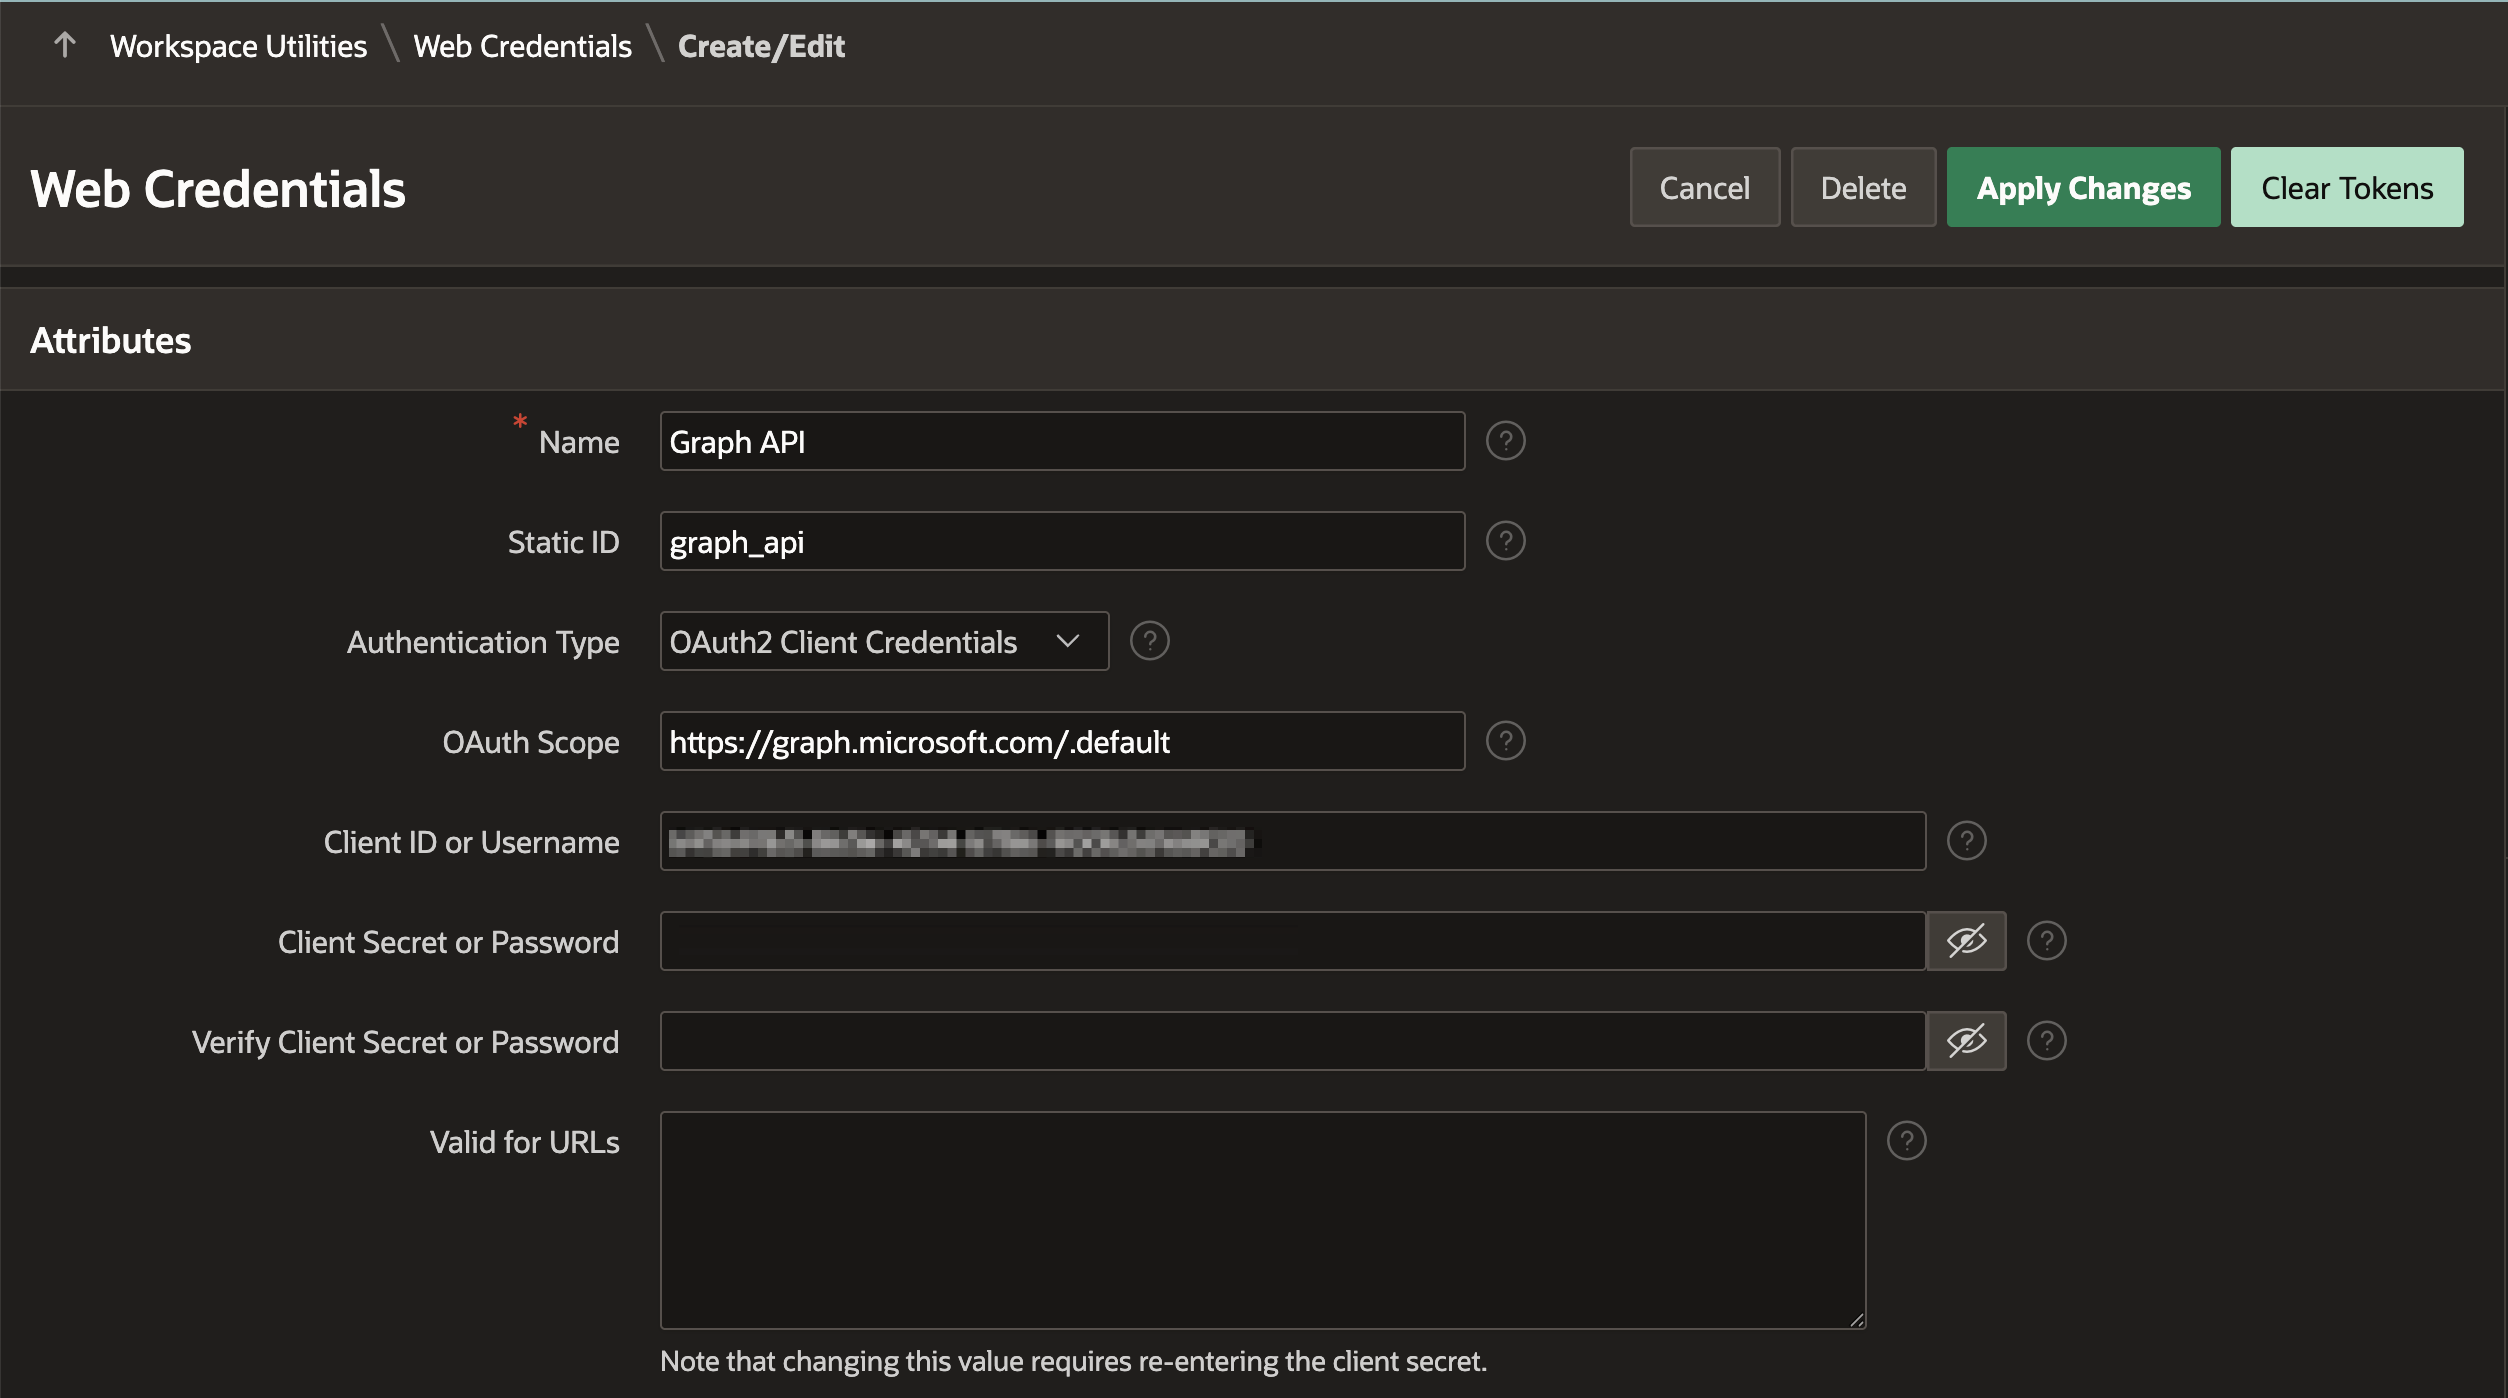
In this use case, since we are integrating with the Microsoft Graph API, which leverages OAuth2 Credentials, we will create Web Credentials using the Application/Client ID and Client Secret Value we copied in the previous Step. This ensures secure authentication when making API requests to access Outlook APIs. If you would like to learn more about how to Create Web Credentials, please follow the steps mentioned in this documentation.
Figure 8: Creating Web Credentials with OAuth2 Client Credentials
Create a REST Data source using the Graph API from Microsoft:
Navigate to Shared Components > REST Data Sources, and click Create.
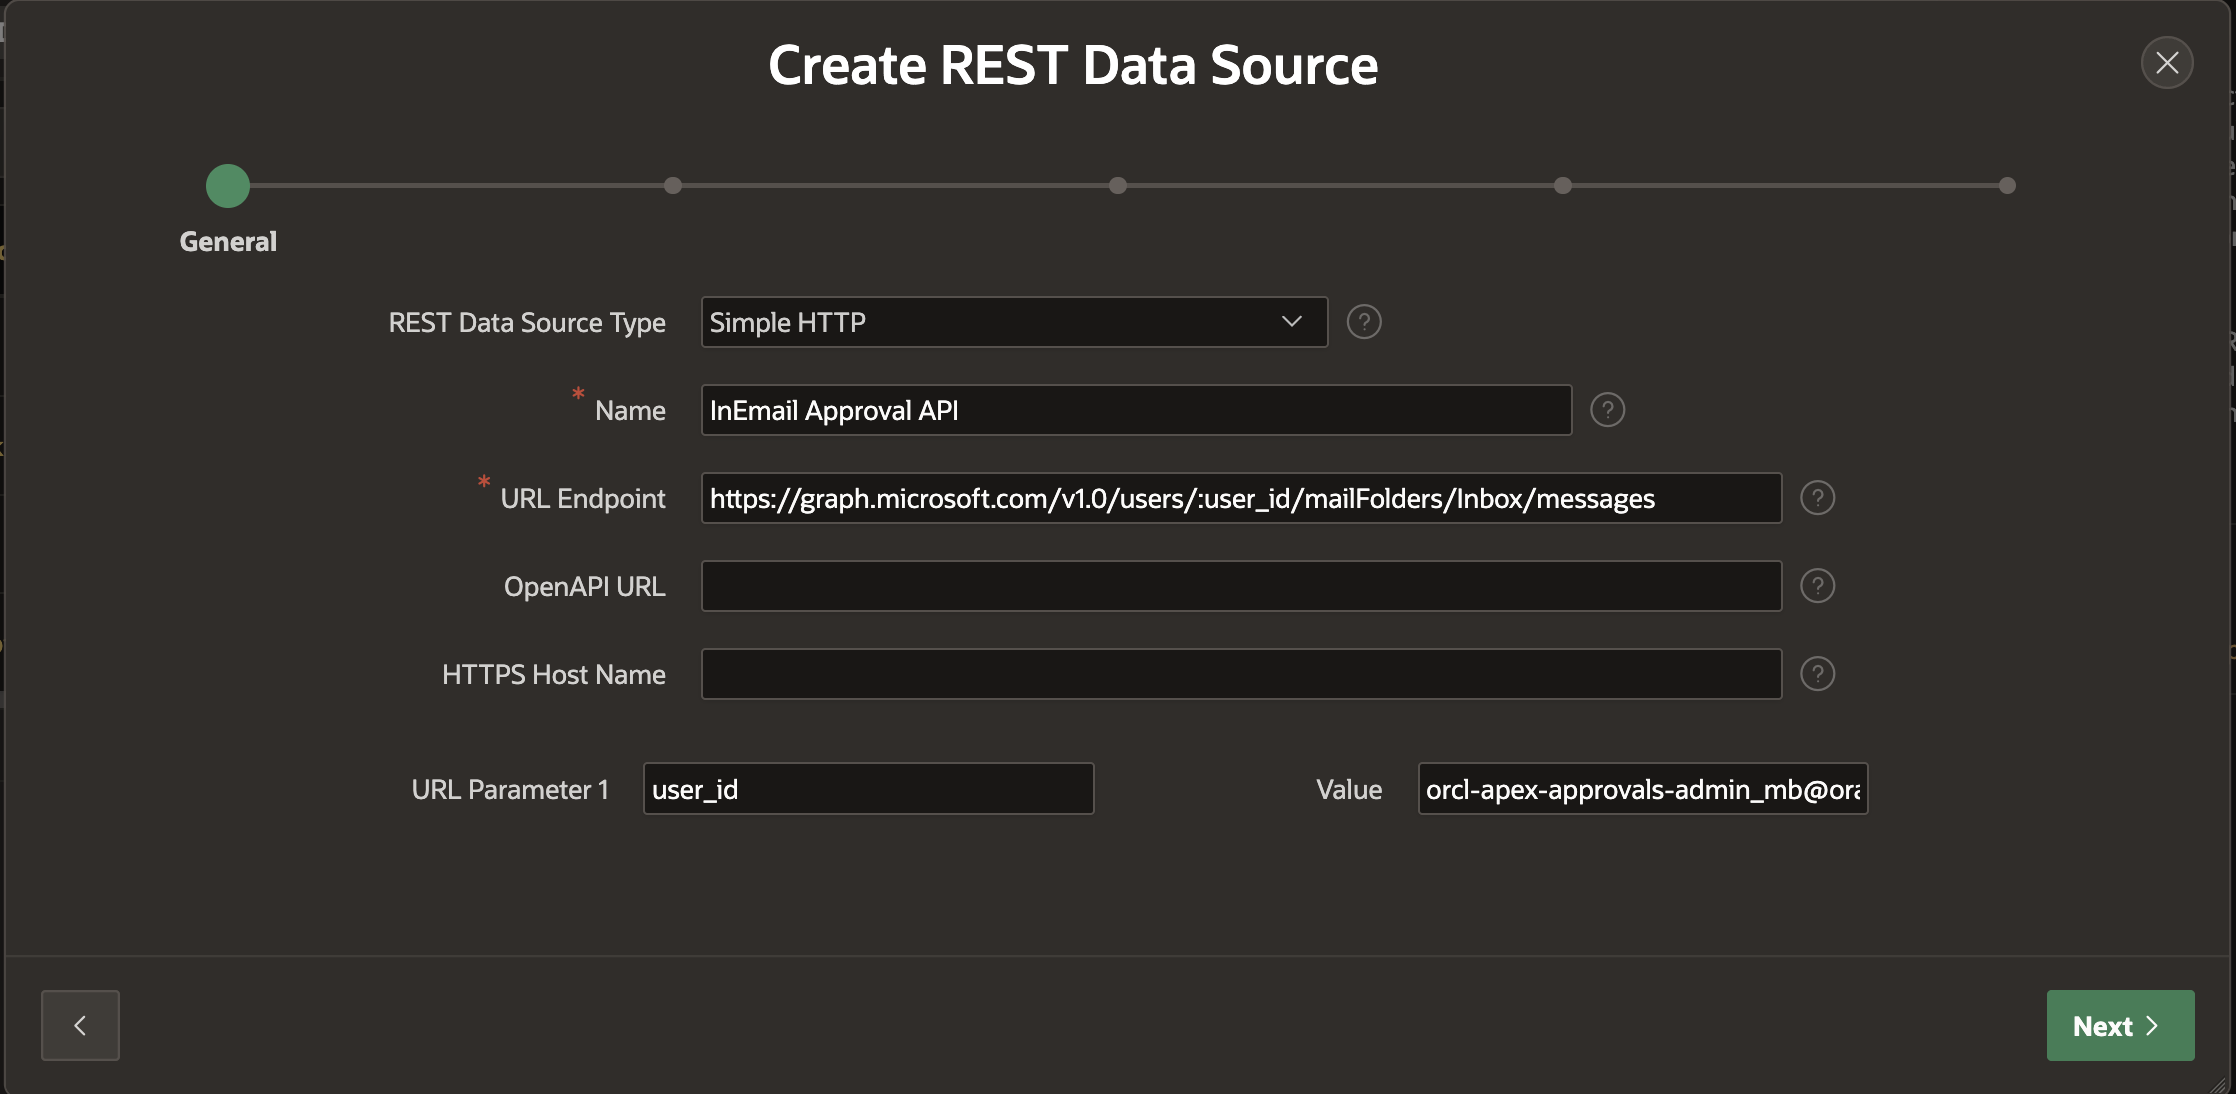
Choose Simple HTTP as the source type.
Provide a meaningful name, such as InEmail Approval API. When prompted for the endpoint URL, use the following — replacing :user_id with your shared mailbox email address (for example, sharedinbox@yourdomain.com): https://graph.microsoft.com/v1.0/users/:user_id/mailFolders/Inbox/messages
Figure 8: Create Simple HTTP REST Data Source
This endpoint fetches messages directly from the Inbox folder of the specified shared mailbox.
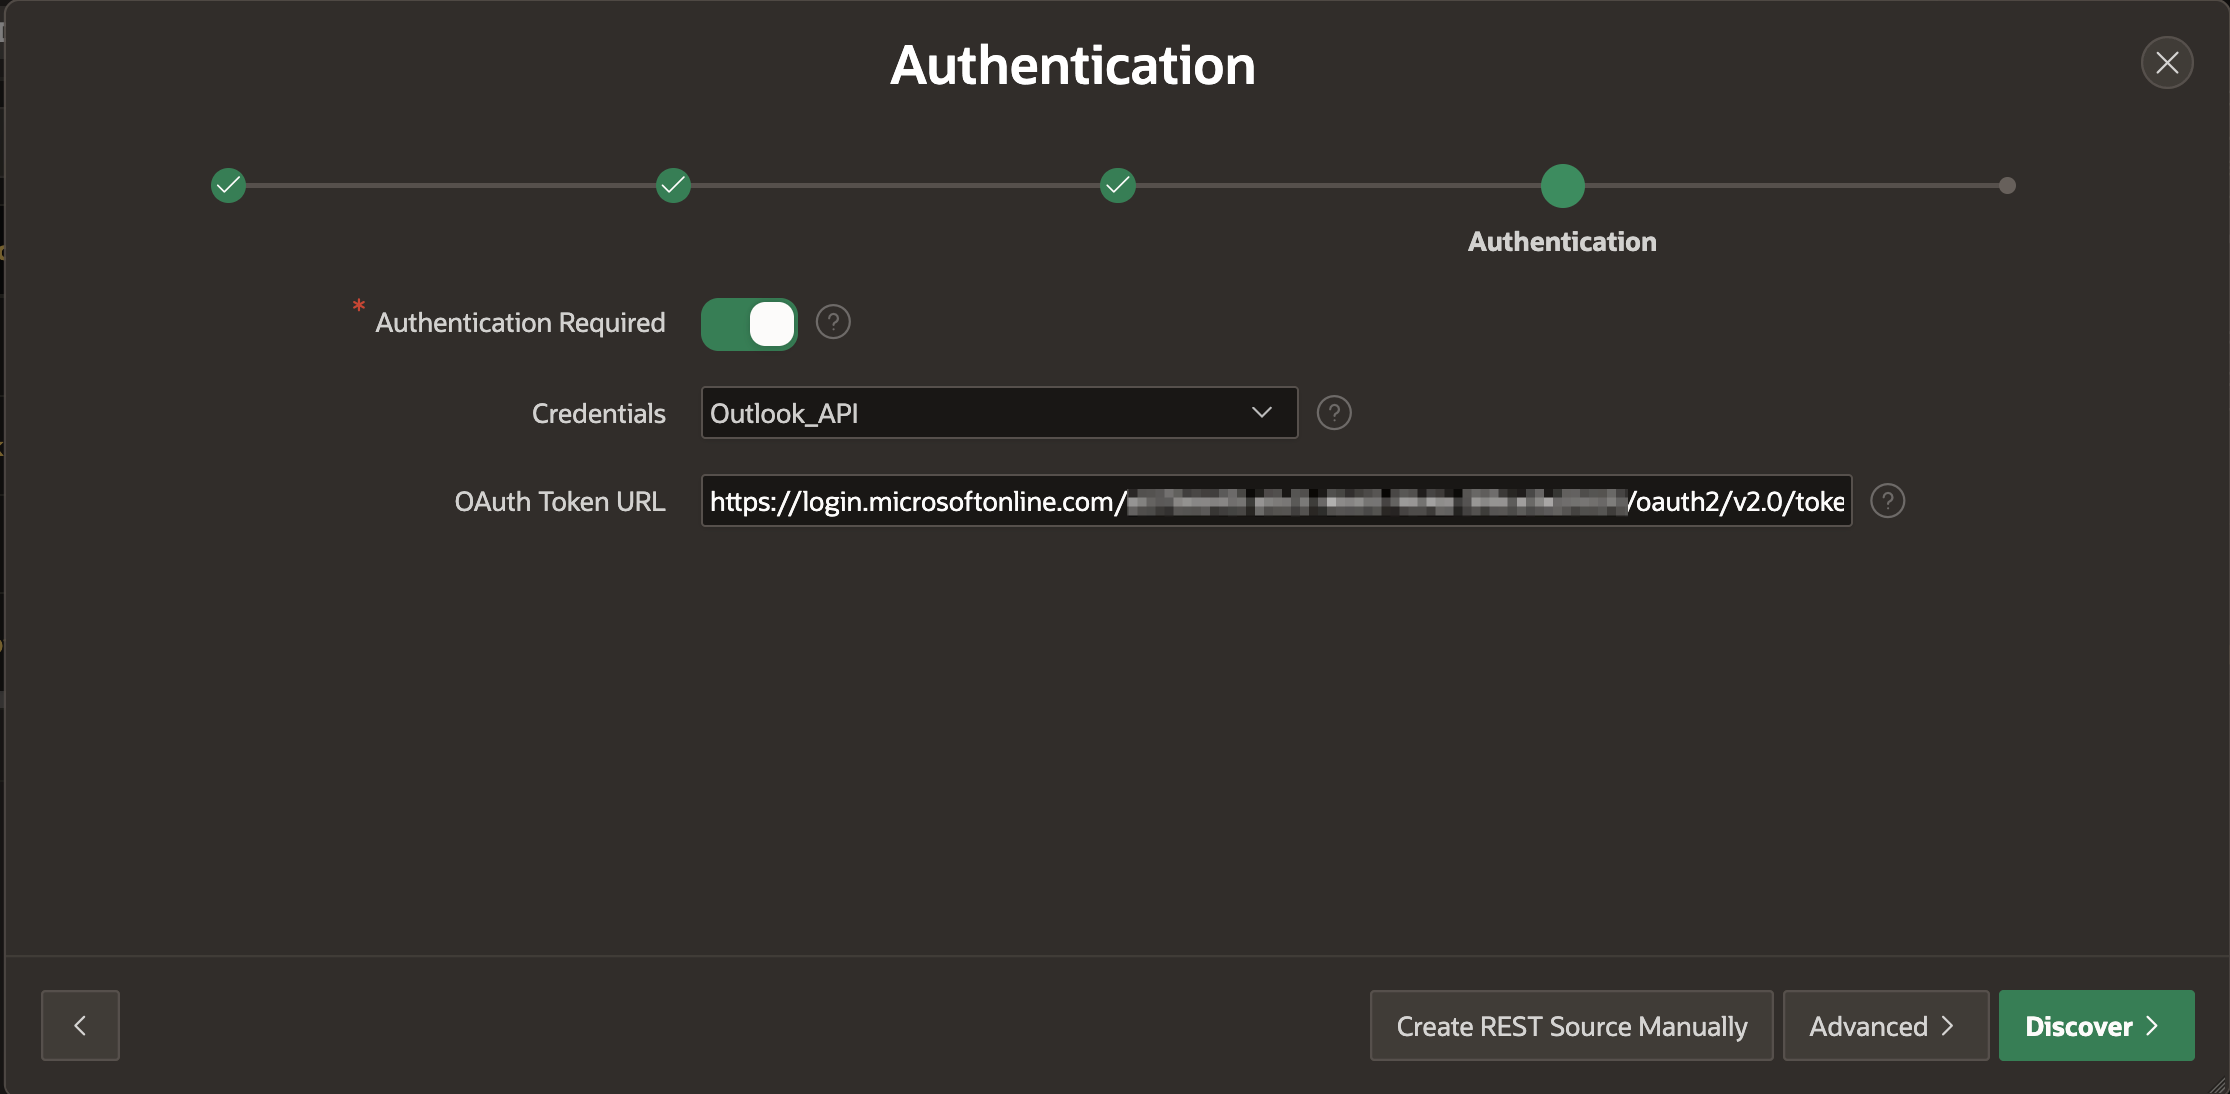
We will use the OAuth2-based web credentials that we have previously configured for this integration. For the Token URL, enter the OAuth2 token endpoint for your Azure Active Directory tenant, replacing <TENANT_ID> with your directory’s actual Tenant ID. https://login.microsoftonline.com/<TENANT_ID>/oauth2/v2.0/token
Figure 9: Select Web Credentials and Enter the OAuth Token URL
This ensures secure token-based communication between Oracle APEX and Microsoft Graph API.
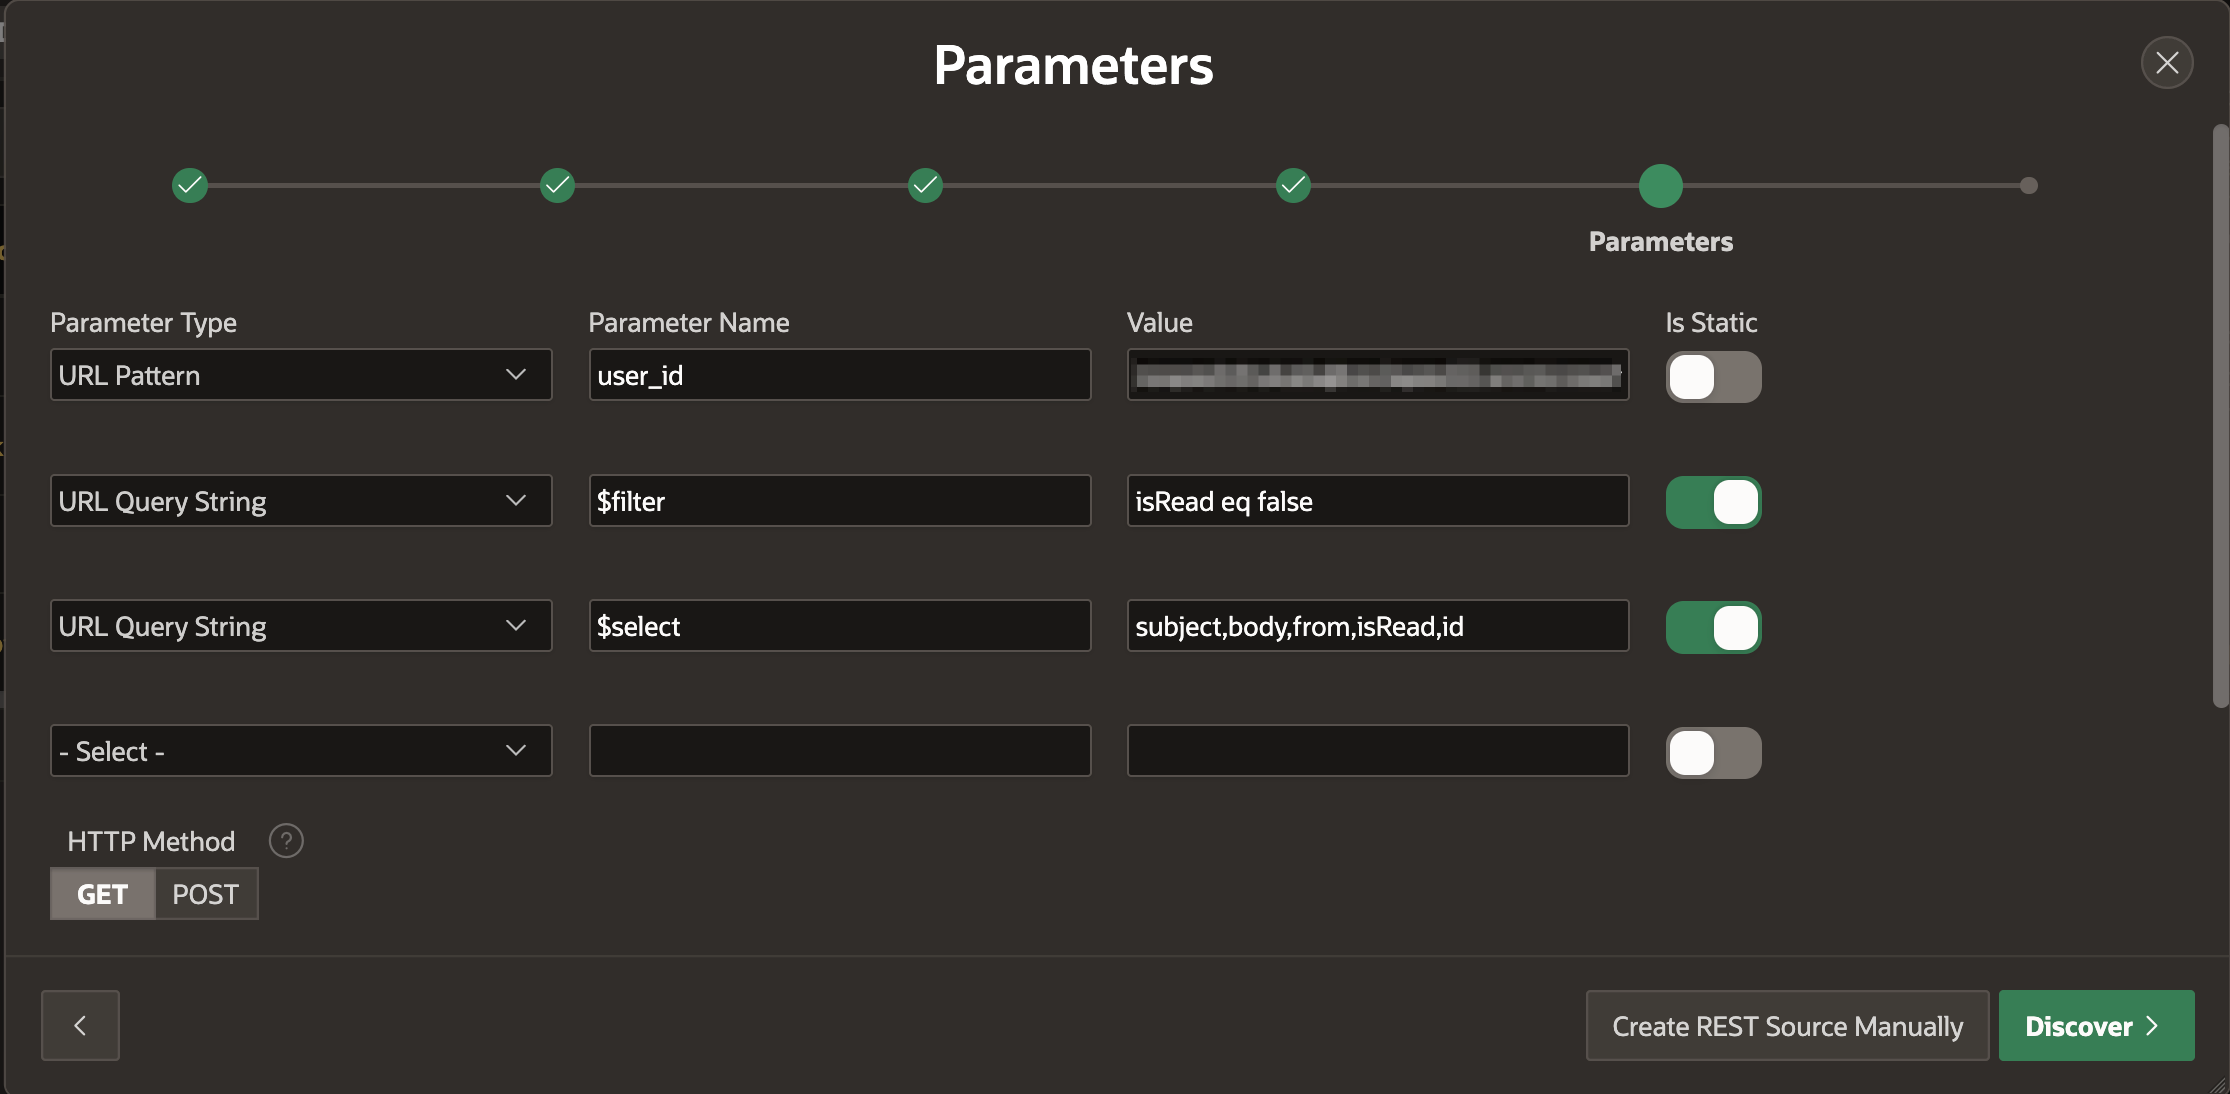
To refine the API response and limit the data payload to what you actually need, add query string parameters in the Advanced Parameters section:
$filter → isRead eq false
$select → subject,body,from,isRead,id
Click the button Create REST Source manually.
Figure 10: Set Up Filter and Select URL Query String Parameters
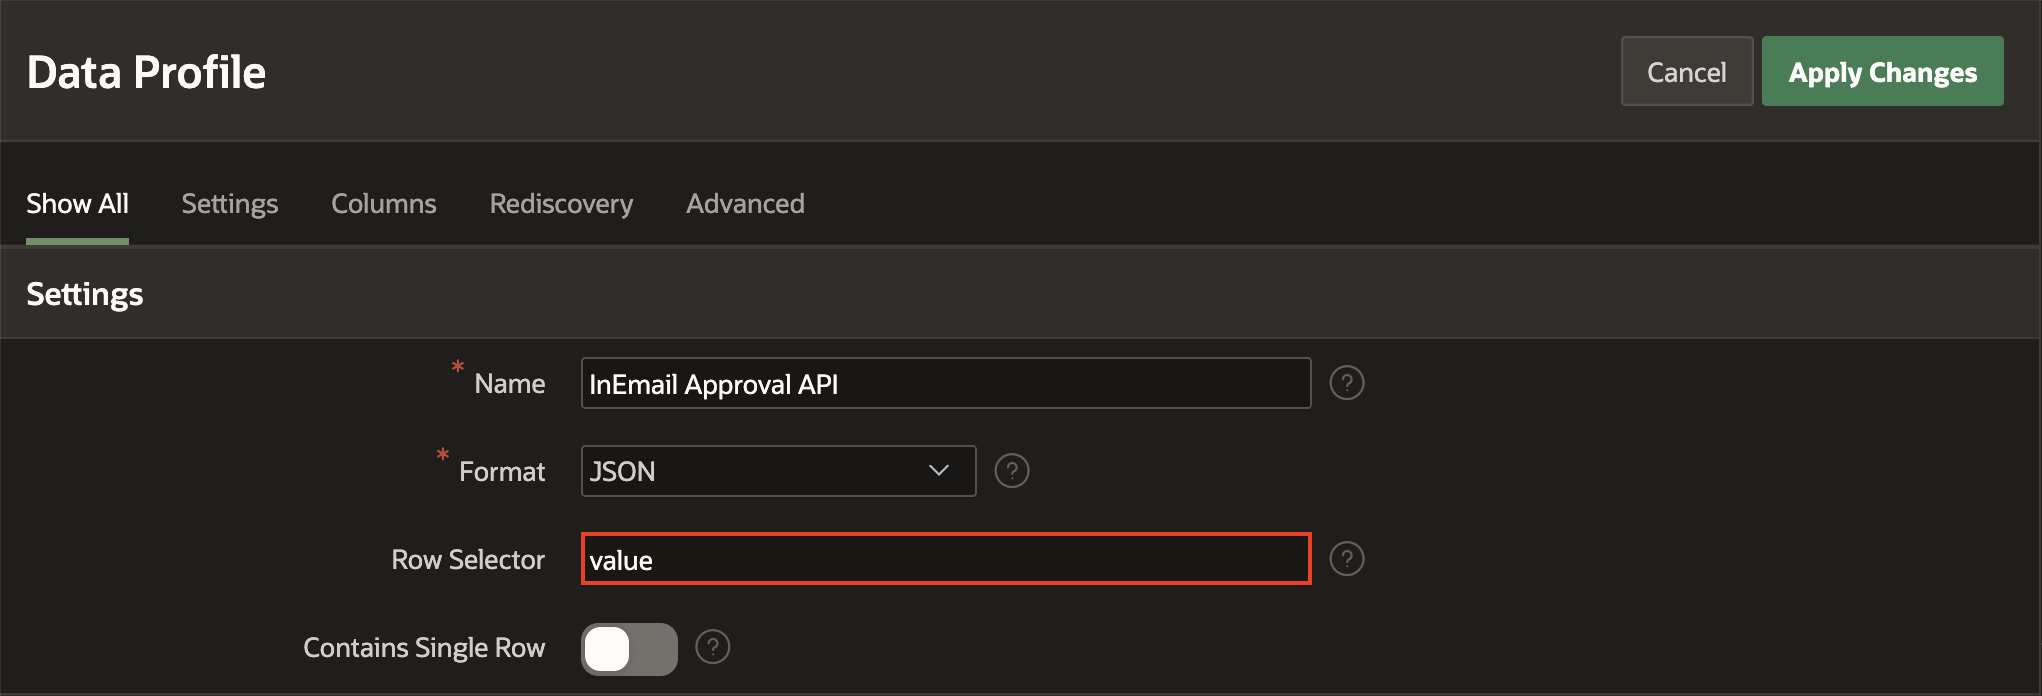
After creating the REST Data Source, Open the Data Profile and Set the Row Selector to value. This is essential because the Microsoft Graph API wraps response data within a valuearray, and APEX needs to be directed to look there for individual records.
Figure 11: Update Row Selector Value in the Data Profile
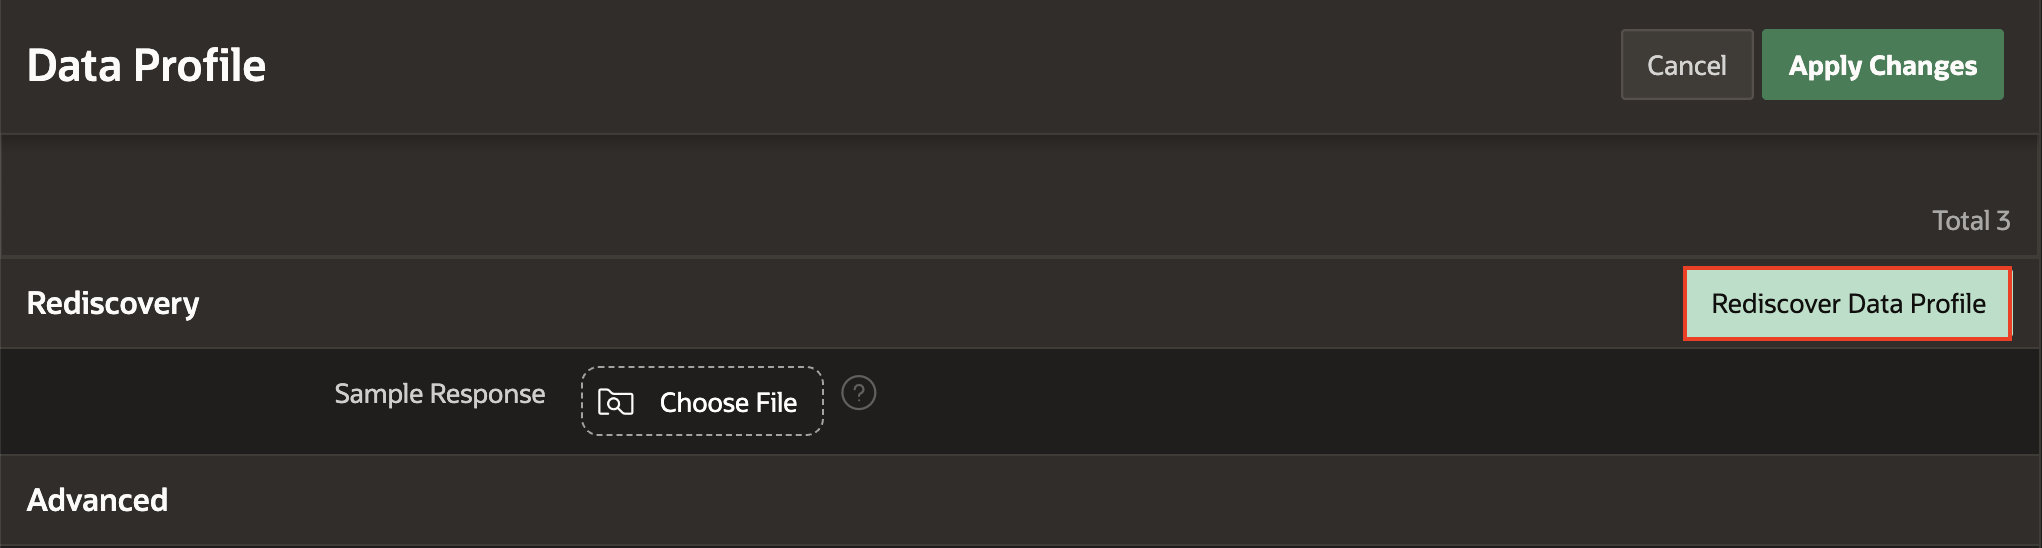
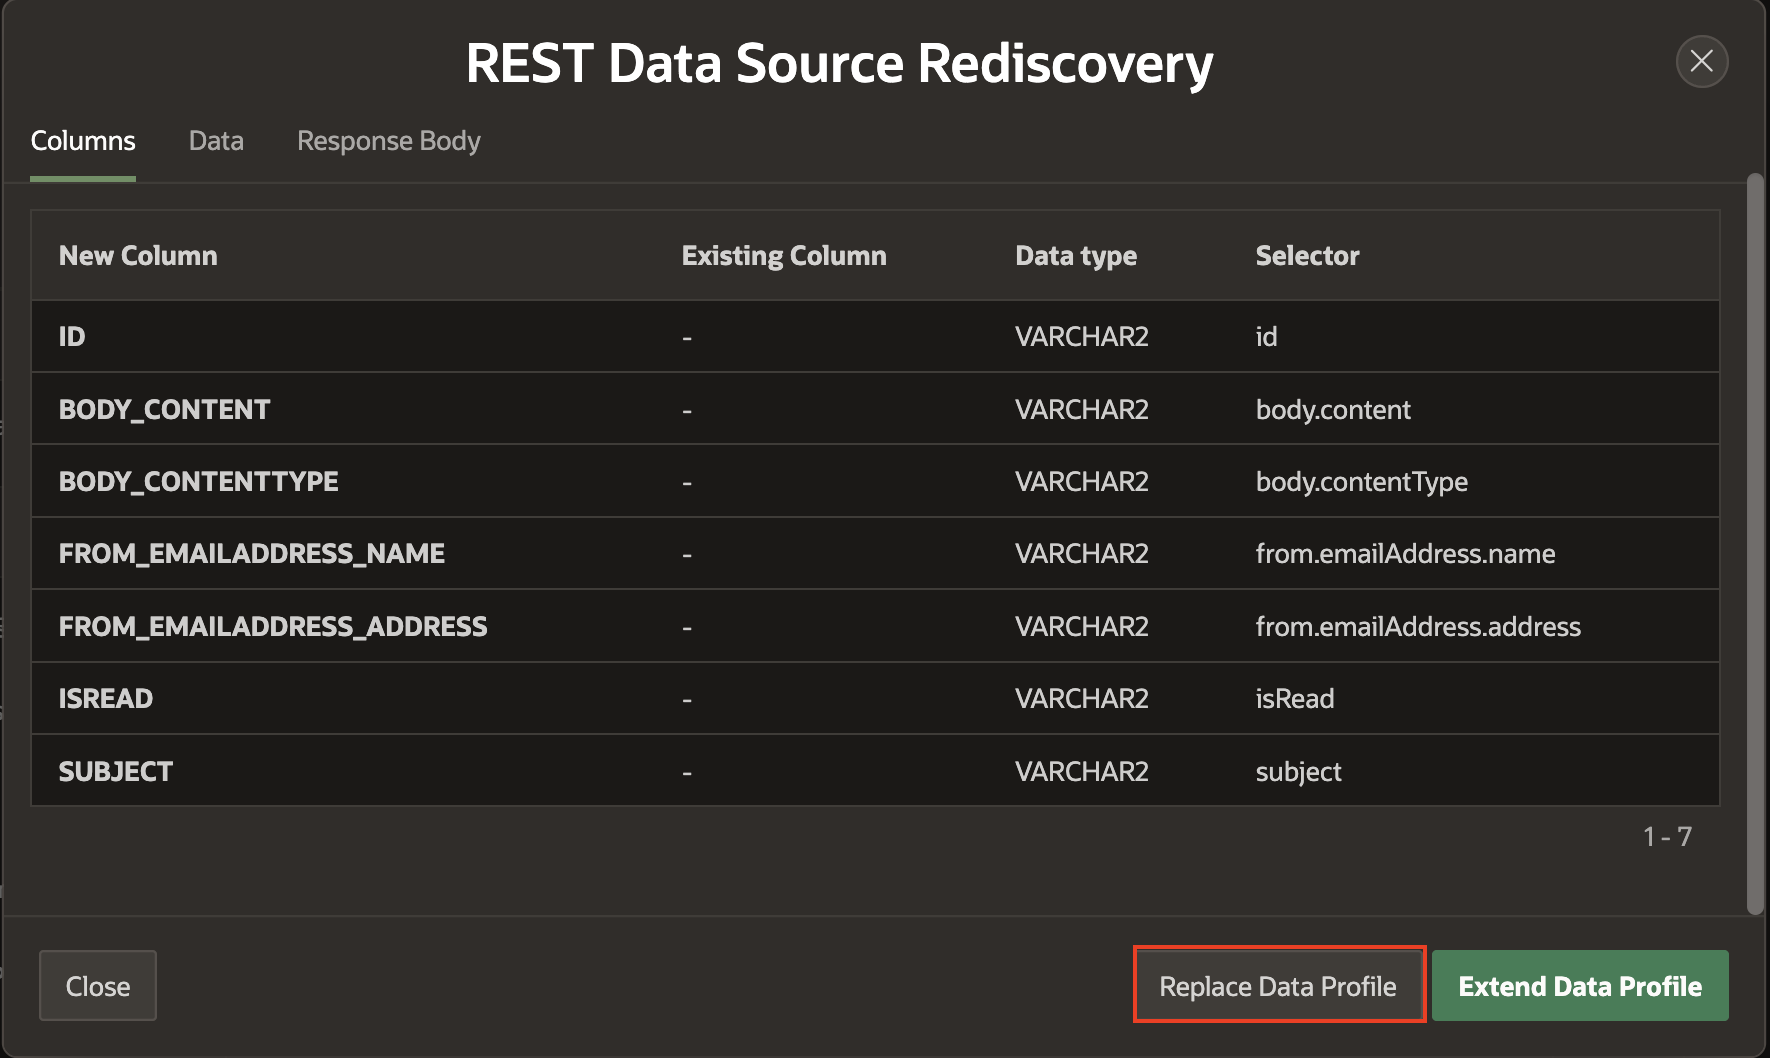
Then, click Rediscover Data Profile, choose Replace existing, and confirm. This updates your field mappings based on the latest API response structure, ensuring your data source stays in sync with the response.
Figure 12: Rediscover Data Profile
Figure 13: Replace Data Profile
You can now use this REST Data Source in reports, forms, or anywhere else in your APEX app. Also, while creating an Automation, we will use APEX_EXEC.OPEN_REST_SOURCE_QUERY API is used to open and read the data in this REST Data Source.
Create a PL/SQL Package to process Emails.
The next step is to Create a PL/SQL Package that will Read Emails from a Shared Email Exchange, Process them, and Mark them as Read.
Read Emails from the Shared Email Exchange
The process starts by fetching unread emails from the shared Microsoft Exchange inbox using the REST Data source that we have configured in the above step. This call retrieves emails that are still unread and extracts details like the subject, body, sender’s email, and message ID(of the Email). Using regular expressions, the email content is then processed to find key details such as the Task ID, Approver’s Name, and Approval Status (Accept/Reject). Once the necessary details are extracted, the email is sent for further processing.
The process starts by connecting to a shared Microsoft Exchange inbox using a REST Data Source in Oracle APEX. It fetches all unread emails, pulling details like the Subject, Body, Sender’s Email, and Message ID. The email content is cleaned by stripping out unnecessary characters and formatting, then scanned for key details such as the Task ID (extracted from the subject) and the sender’s email, which is used to look up the approver’s name from an employee table. Based on whether the email body contains the word “APPROVE” or “REJECT,” the corresponding task is processed through APEX Human Task APIs. Once handled, the email is marked as read via a REST PATCH call to Microsoft Graph, ensuring it isn’t processed again.
Process the Emails using APEX_HUMAN_TASK PLSQL API.
After extracting the task details, the system processes approvals or rejections using Oracle APEX Approvals API. A new APEX session is created under the approver’s name to ensure the task action is authorized for the approver. If the email indicates an approval, the task is approved; if it indicates a rejection, the task is rejected. Once processed, the APEX session is deleted.
Mark the Email as Read
Once the task is processed, the email is marked as read in Microsoft Exchange to avoid duplicate processing. This is done by sending a PATCH request to Microsoft Graph API and updating the email’s status. If a valid message ID is found, the request marks the email as read; otherwise, a log message is generated, and the update is skipped. This ensures that only new emails are processed in future runs.
Database Package
Package Specification:
CREATE OR REPLACE PACKAGE EMAIL_TASK_PROCESSOR AS

    PROCEDURE FETCH_UNREAD_EMAILS;

    PROCEDURE PROCESS_EMAIL (

        P_TASK_ID         VARCHAR2,

        P_APPROVER_NAME   VARCHAR2,

        P_MESSAGE_ID      VARCHAR2,

        P_APPROVAL_STATUS VARCHAR2

    );

    PROCEDURE MARK_EMAIL_AS_READ (

        P_MESSAGE_ID VARCHAR2

    );

END EMAIL_TASK_PROCESSOR;
Package Body:
CREATE OR REPLACE PACKAGE BODY EMAIL_TASK_PROCESSOR AS

    PROCEDURE FETCH_UNREAD_EMAILS IS

        L_CONTEXT       APEX_EXEC.T_CONTEXT;

        L_BODY          VARCHAR2(4000);

        L_STATUS        VARCHAR2(100);

        L_ID            VARCHAR2(4000);

        L_FROM_EMAIL    VARCHAR2(4000);

        L_SUBJECT       VARCHAR2(1000);

        L_TASK_ID       VARCHAR2(100);

        L_APPROVER      VARCHAR2(200);

        L_APPROVER_NAME VARCHAR2(200);

        L_IDX_BODY      PLS_INTEGER;

        L_IDX_ID        PLS_INTEGER;

        L_IDX_FROM      PLS_INTEGER;

        L_IDX_SUBJECT   PLS_INTEGER;

    BEGIN

    -- Open REST source query

        L_CONTEXT := APEX_EXEC.OPEN_REST_SOURCE_QUERY(

            P_STATIC_ID => 'inemail_approval_api',

            P_MAX_ROWS  => 1000

        );

    -- Get column positions

        L_IDX_BODY := APEX_EXEC.GET_COLUMN_POSITION(L_CONTEXT, 'BODY_CONTENT');

        L_IDX_ID := APEX_EXEC.GET_COLUMN_POSITION(L_CONTEXT, 'ID');

        L_IDX_FROM := APEX_EXEC.GET_COLUMN_POSITION(L_CONTEXT, 'FROM_EMAILADDRESS_ADDRESS');

        L_IDX_SUBJECT := APEX_EXEC.GET_COLUMN_POSITION(L_CONTEXT, 'SUBJECT');

        WHILE APEX_EXEC.NEXT_ROW(L_CONTEXT) LOOP

            L_BODY := APEX_EXEC.GET_VARCHAR2(L_CONTEXT, L_IDX_BODY);

            L_ID := APEX_EXEC.GET_VARCHAR2(L_CONTEXT, L_IDX_ID);

            L_FROM_EMAIL := APEX_EXEC.GET_VARCHAR2(L_CONTEXT, L_IDX_FROM);

            L_SUBJECT := APEX_EXEC.GET_VARCHAR2(L_CONTEXT, L_IDX_SUBJECT);

        -- Clean and normalize body content

            L_BODY := LOWER(L_BODY);

            L_BODY := REPLACE(L_BODY,

                              CHR(10),

                              ' ');

            L_BODY := REPLACE(L_BODY,

                              CHR(13),

                              ' ');

            L_BODY := REPLACE(L_BODY,

                              UNISTR('\FEFF'),

                              '');

            L_BODY := REGEXP_REPLACE(L_BODY, '<[^>]+>', ' ');

            L_BODY := REGEXP_REPLACE(L_BODY, '[^[:print:]]', '');

            L_STATUS := TRIM(L_BODY);

        -- Extract task ID from subject

            L_TASK_ID := REGEXP_SUBSTR(L_SUBJECT, '\d{10,}');

        -- Extract approver name from body (assumes format: Approver Name: JOHNDOE)

            L_APPROVER := L_FROM_EMAIL;

            SELECT

                EMP_NAME

            INTO L_APPROVER_NAME

            FROM

                EMP_1

            WHERE

                EMAIL = L_APPROVER;

        -- htp.p('Approver Name: ' || l_approver_name);

        -- Call your processing logic

            PROCESS_EMAIL(L_TASK_ID, L_APPROVER_NAME, L_ID, L_STATUS);

        END LOOP;

        APEX_EXEC.CLOSE(L_CONTEXT);

    EXCEPTION

        WHEN OTHERS THEN

            APEX_EXEC.CLOSE(L_CONTEXT);

            RAISE;

    END FETCH_UNREAD_EMAILS;

    PROCEDURE PROCESS_EMAIL (

        P_TASK_ID         VARCHAR2,

        P_APPROVER_NAME   VARCHAR2,

        P_MESSAGE_ID      VARCHAR2,

        P_APPROVAL_STATUS VARCHAR2

    ) IS

    BEGIN

    -- Create a new session

        APEX_SESSION.CREATE_SESSION(

            P_APP_ID   => 185840,

            P_PAGE_ID  => 20,

            P_USERNAME => P_APPROVER_NAME

        );

        IF UPPER(P_APPROVAL_STATUS) LIKE '%APPROVE%' THEN

            APEX_HUMAN_TASK.APPROVE_TASK(P_TASK_ID => P_TASK_ID);

        ELSIF UPPER(P_APPROVAL_STATUS) LIKE '%REJECT%' THEN

            APEX_HUMAN_TASK.REJECT_TASK(P_TASK_ID => P_TASK_ID);

        END IF;

    -- Delete Session

        APEX_SESSION.DELETE_SESSION(P_SESSION_ID => V('APP_SESSION'));


    -- Mark email as read

        IF P_MESSAGE_ID IS NOT NULL THEN

            MARK_EMAIL_AS_READ(P_MESSAGE_ID);

        ELSE

            DBMS_OUTPUT.PUT_LINE('No Message ID found. Skipping PATCH.');

        END IF;

    END PROCESS_EMAIL;

    PROCEDURE MARK_EMAIL_AS_READ (

        P_MESSAGE_ID VARCHAR2

    ) IS

        L_URL_PATCH      VARCHAR2(1000);

        L_PATCH_RESPONSE CLOB;

    BEGIN

        L_URL_PATCH := 'https://graph.microsoft.com/v1.0/users/<User_ID>/messages/' || P_MESSAGE_ID;

    -- Prepare headers

        APEX_WEB_SERVICE.G_REQUEST_HEADERS.DELETE;

        APEX_WEB_SERVICE.G_REQUEST_HEADERS(1).NAME := 'Content-Type';

        APEX_WEB_SERVICE.G_REQUEST_HEADERS(1).VALUE := 'application/json';

    -- PATCH request

        L_PATCH_RESPONSE := APEX_WEB_SERVICE.MAKE_REST_REQUEST(

            P_URL                  => L_URL_PATCH,

            P_HTTP_METHOD          => 'PATCH',

            P_BODY                 => '{ "isRead": true }',

            P_TOKEN_URL            => 'https://login.microsoftonline.com/<Tenant_ID>/oauth2/v2.0/token',

            P_CREDENTIAL_STATIC_ID => 'outlook_api'

        );

    END MARK_EMAIL_AS_READ;

END EMAIL_TASK_PROCESSOR;

/
Note: Replace user-id, tenant-id, credential-static-id, app-id, and page-id per your configurations.
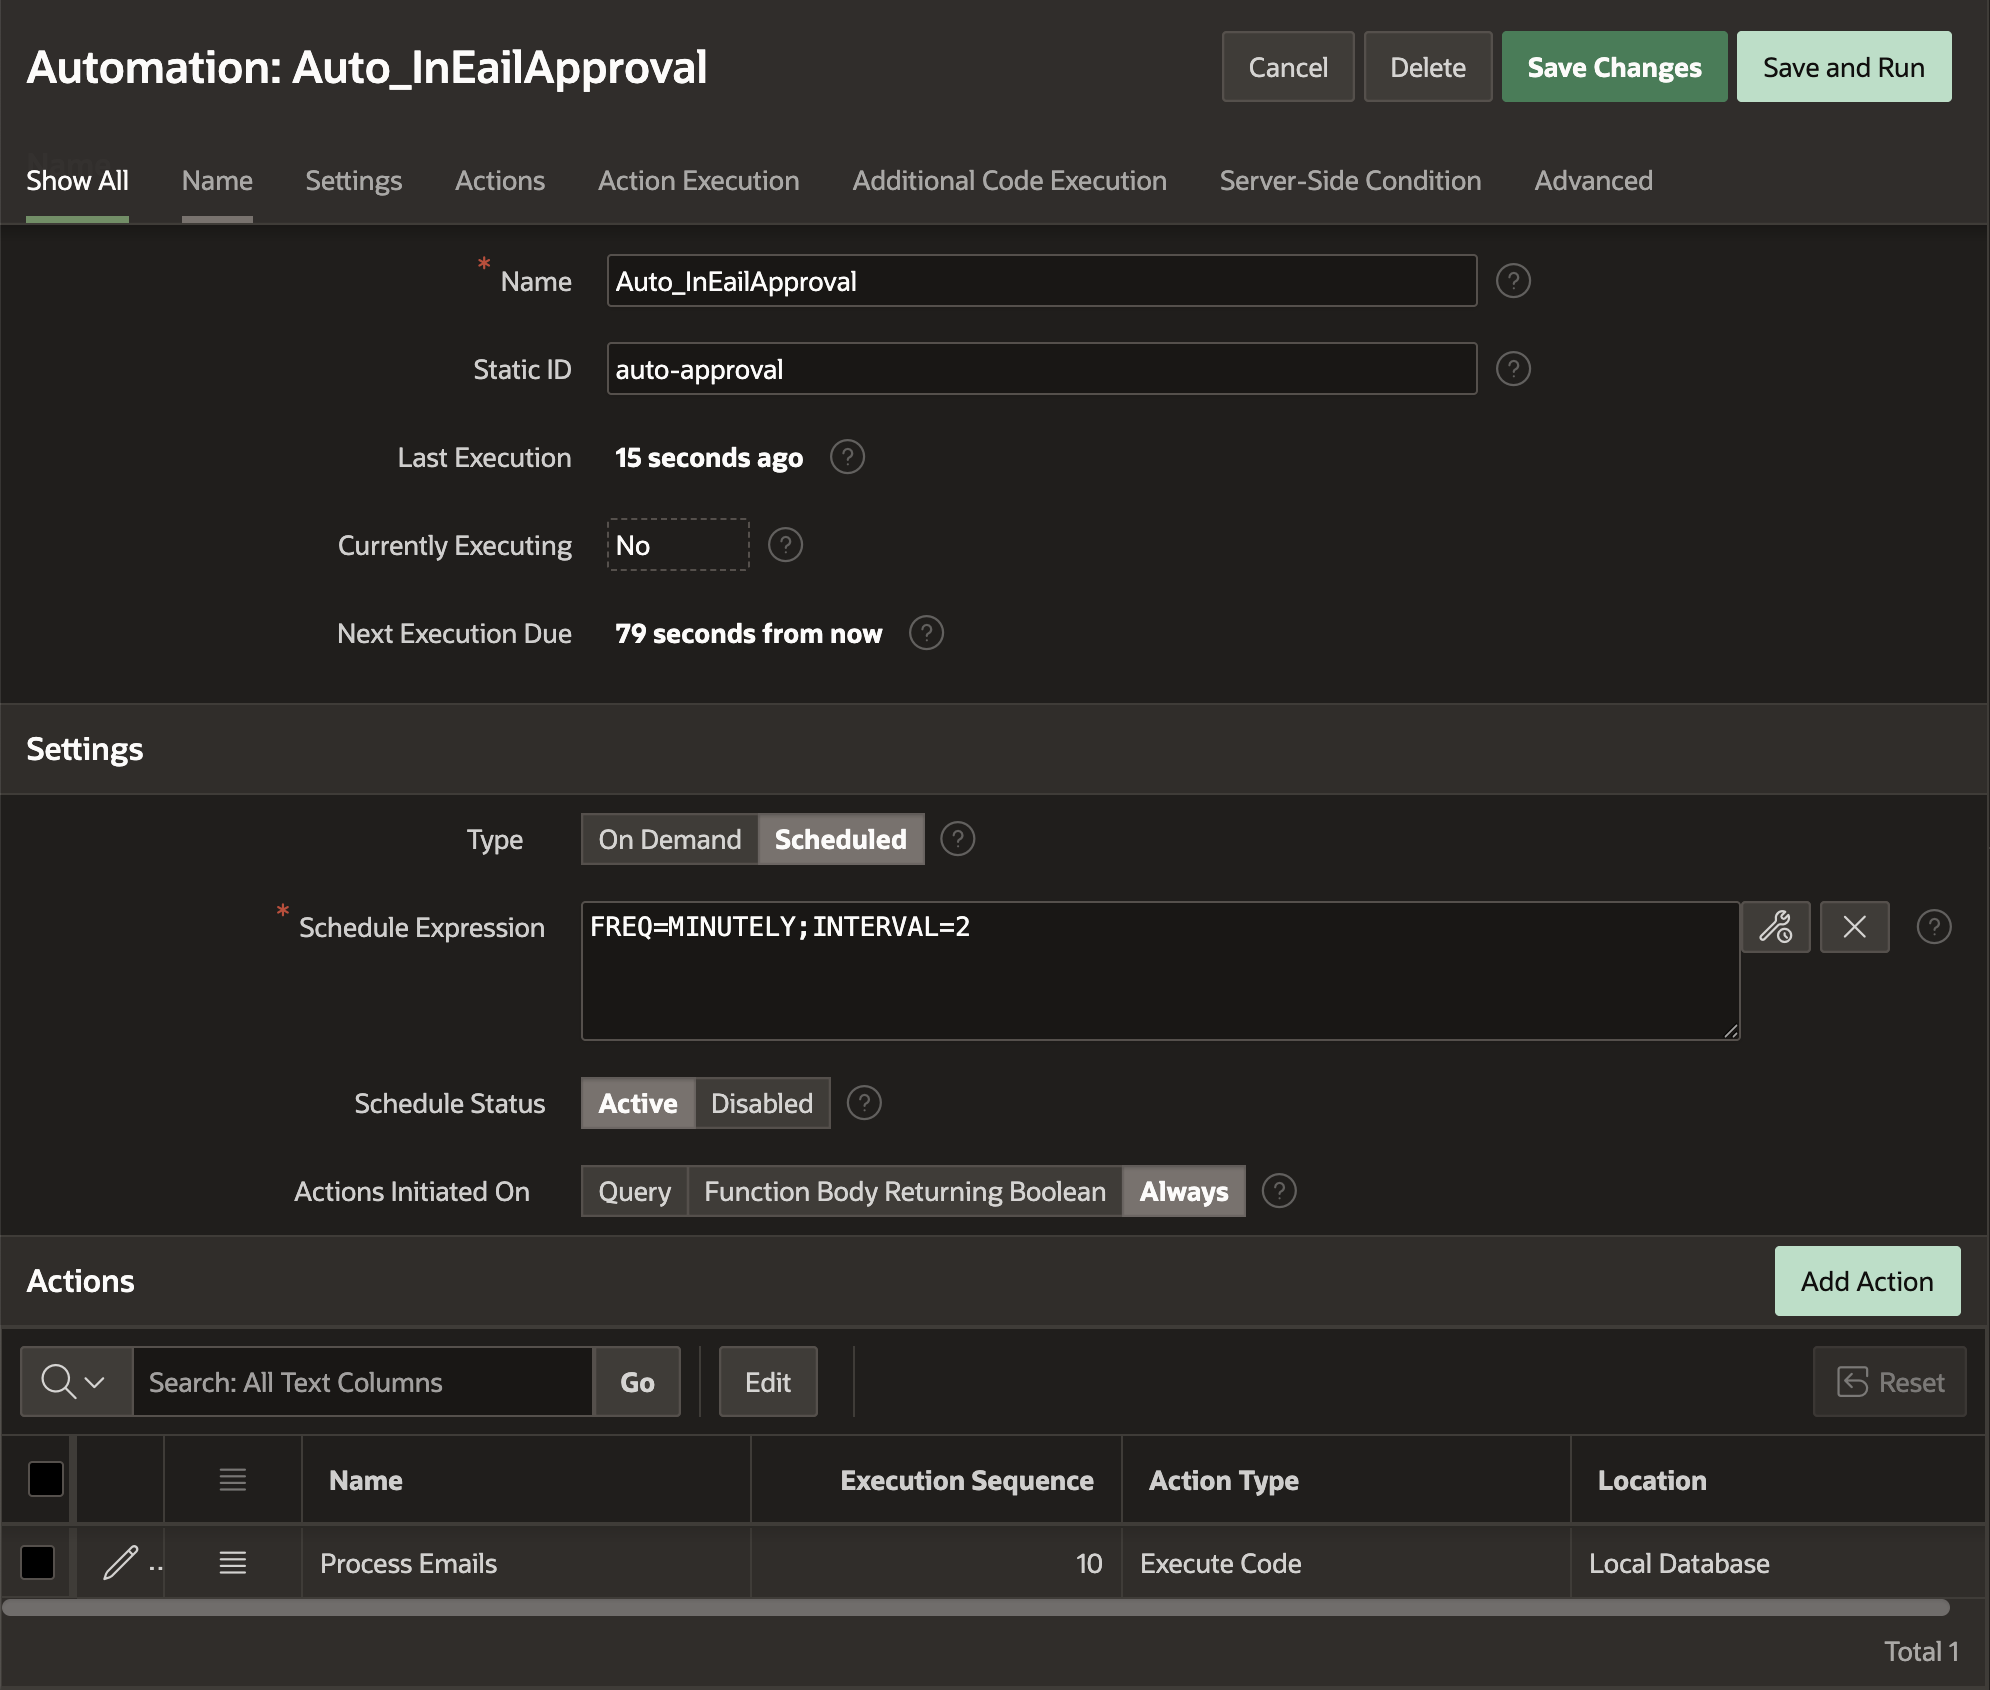
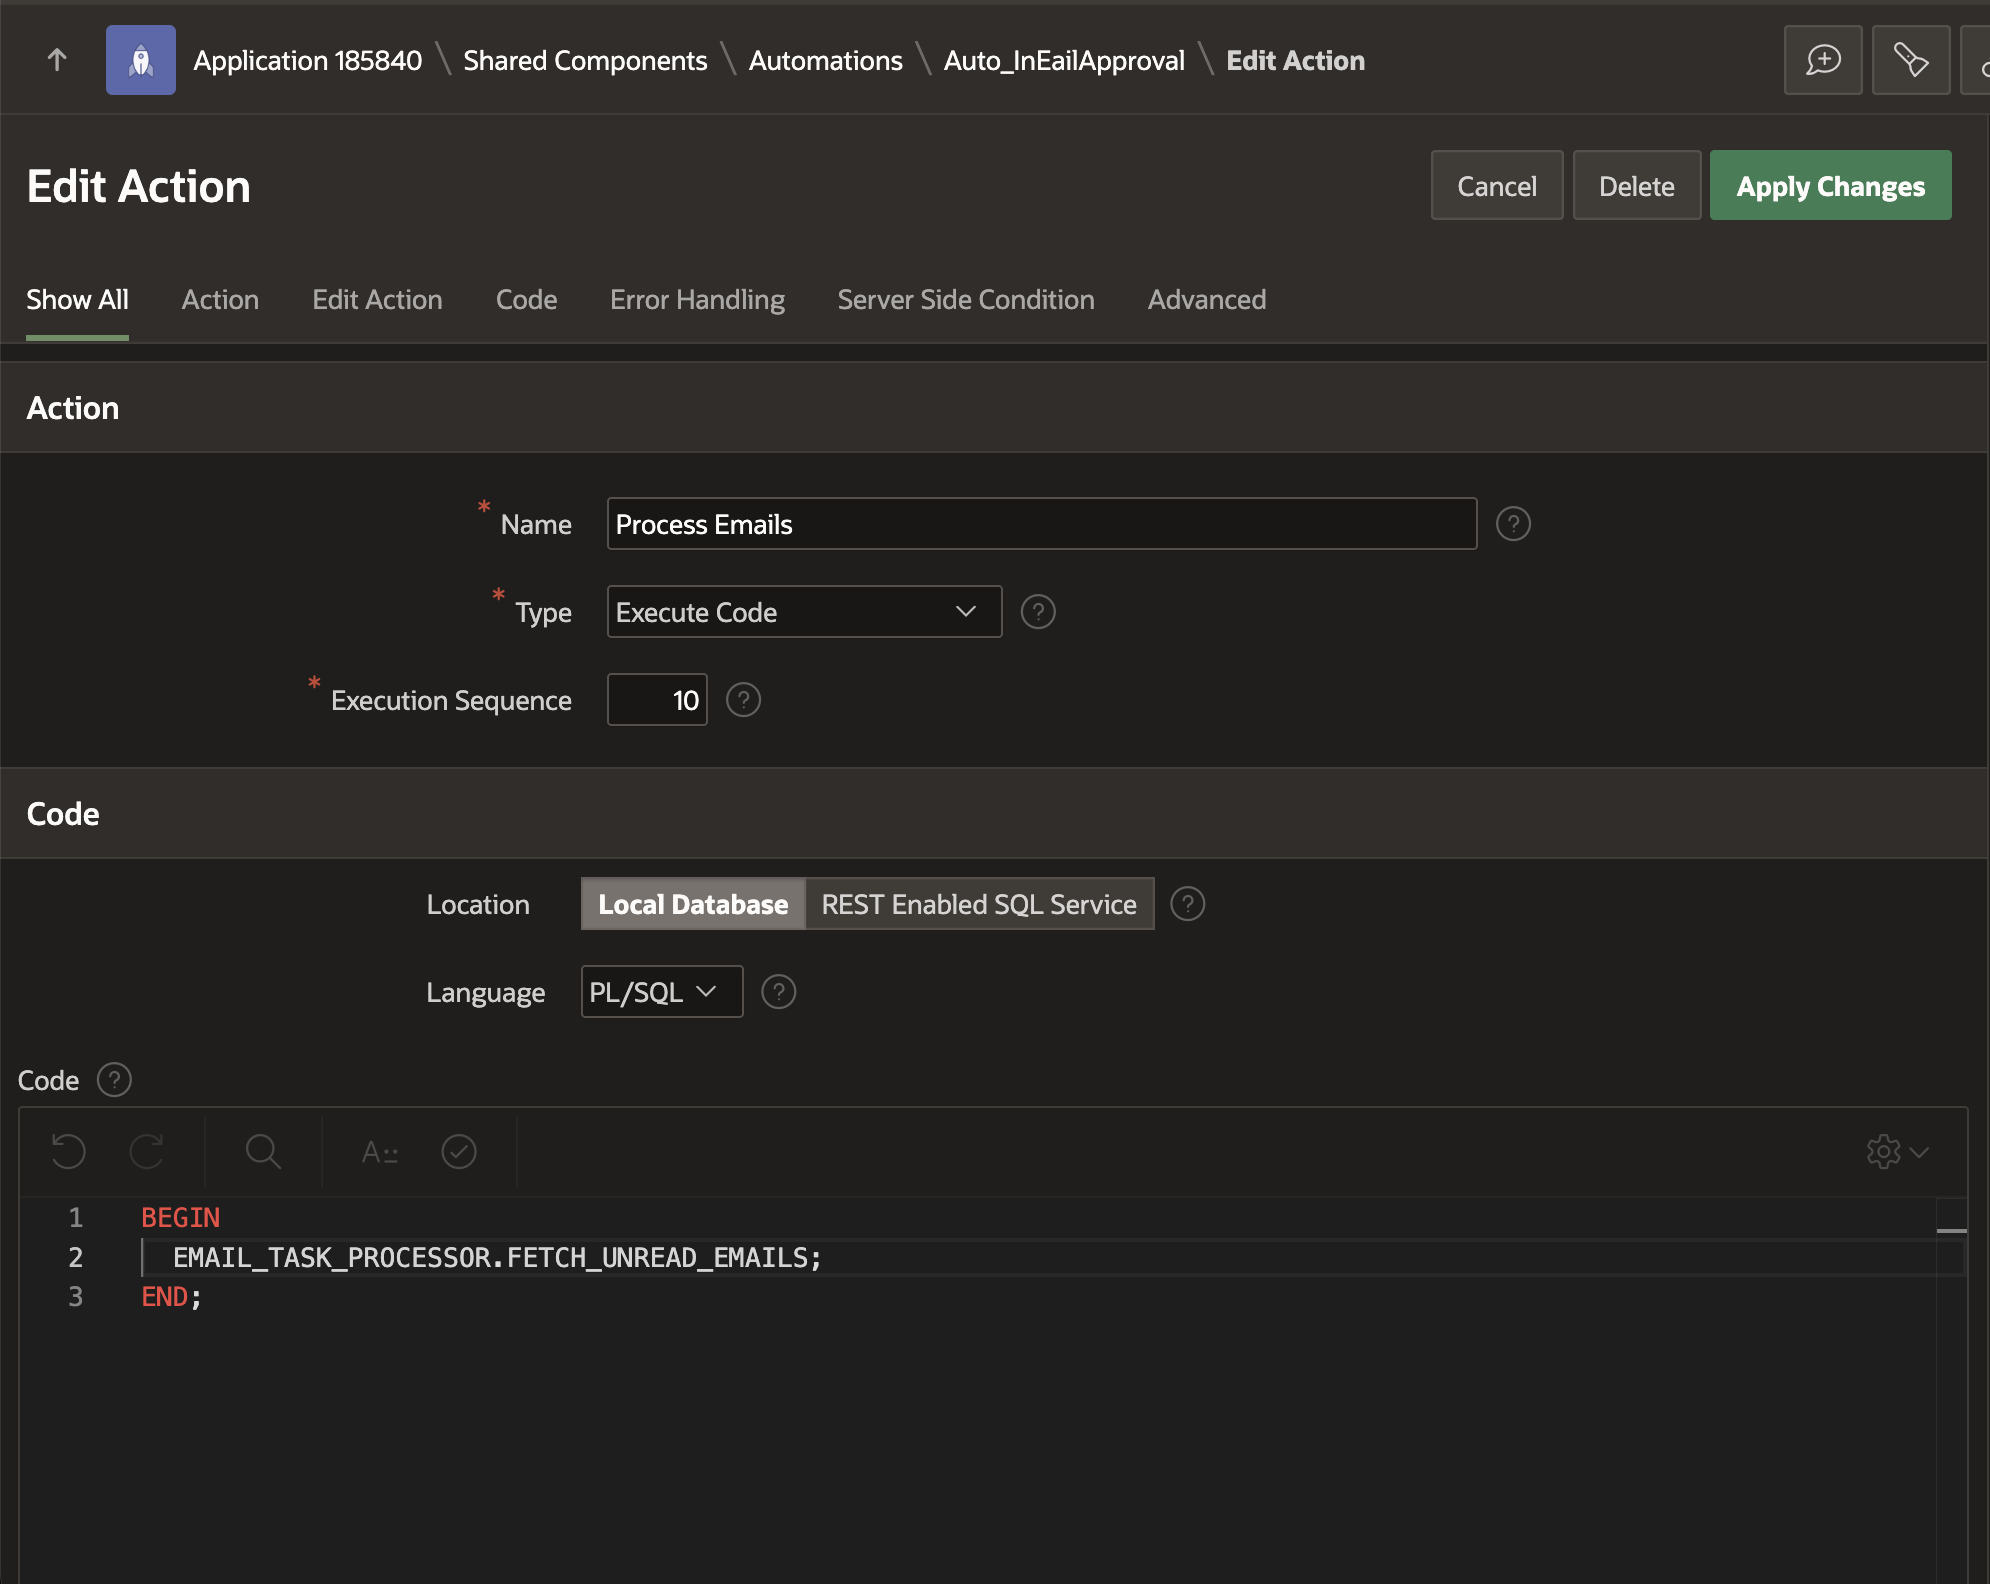
Create Automation to read Emails and process them
Since approvals are done via email, we need an automation process to fetch responses and update the approval status in Oracle APEX. Automations can monitor emails, extract relevant details, and execute PL/SQL procedures to process approvals without manual intervention. For the use case mentioned in this blog post, we have created an automation that runs every two minutes and executes the PLSQL Block below. To learn more about how to create an Automation, follow the steps mentioned in this documentation
BEGIN
  EMAIL_TASK_PROCESSOR.FETCH_UNREAD_EMAILS;
END;
Figure 14: Create an Automation
Figure 15: Configure the Process Emails Action in Automation
Conclusion
The Oracle APEX Approvals Component streamlines human approvals within APEX applications. This blog explains how to configure In-Email Approvals, enabling users to approve or reject requests directly from their inbox using Microsoft Graph API. This approach speeds up decision-making, improves efficiency, and enhances user experience by eliminating the need to log into the APEX app for approvals.
The process involves creating an email template with action buttons, configuring Task Definitions to manage approvals, and leveraging Microsoft Graph API to read Outlook emails and process approval actions. A PL/SQL package automates email processing, extracting task details, and updating statuses, while an automation process ensures approvals are handled in real-time. This seamless integration significantly enhances workflow efficiency and reduces approval delays.
Authors
Roopesh Thokala
Principal Product Manager, Oracle APEX
Roopesh Thokala is a Principal Product Manager at Oracle APEX. He is responsible for Product Management activities for APEX, including APEX on Autonomous Databases and APEX Services on OCI and Multicloud, with a strong focus on the JAPAC Region. He excels in customer evangelism and takes pride in promptly resolving customer issues. Prior to his role in the APEX Team, Roopesh served as an APEX Developer, Solution Engineer, and Solution Architect. He also actively supports various Oracle APEX user groups across the JAPAC region.