This blog post was originally published on May 31, 2022.
Approval Management – Claim, Delegate, Release and more..
In this blog, we will further extend the Leave Request Application, to see how tasks could be assigned to multiple potential owners and then explore possible actions that these potential owners perform on the task. We will also enhance the task actions to update the Employee Leave Balance once a leave has been approved.
Sample Table and Sample Data
Install the Dataset
Navigate to SQL Workshop and click SQL Scripts
Click Create
Copy and Paste the commands below into the Script Editorto create the Employee Leave Table and add sample records.
Click Run
Click Run Now.
CREATE TABLE "EMP_LEAVES"
( "EMP_LEAVE_ID" NUMBER GENERATED BY DEFAULT ON NULL
AS IDENTITY MINVALUE 1 MAXVALUE 9999999999999999999999999999
INCREMENT BY 1 START WITH 8000 CACHE 20
NOORDER NOCYCLE NOKEEP NOT NULL ENABLE,
"EMP_NO" NUMBER NOT NULL REFERENCES EMP_1 ON DELETE CASCADE,
"LEAVE_BALANCE" NUMBER,
CONSTRAINT "EMP_LEAVE_PK" PRIMARY KEY ("EMP_LEAVE_ID"));
insert into EMP_LEAVES(EMP_LEAVE_ID, EMP_NO, LEAVE_BALANCE) values (1, 10, 22);
insert into EMP_LEAVES(EMP_LEAVE_ID, EMP_NO, LEAVE_BALANCE) values (2, 20, 13);
insert into EMP_LEAVES(EMP_LEAVE_ID, EMP_NO, LEAVE_BALANCE) values (3, 30, 25);
insert into EMP_LEAVES(EMP_LEAVE_ID, EMP_NO, LEAVE_BALANCE) values (4, 40, 6);
commit;
Note: The steps to create and populate the table EMP_1 were shared in the Introductory Blog . Ensure that you have that table created and populated before running the commands below.
Add a new column HR_MGR (HR Manager) to the existing Employee table EMP_1 and update the existing Employee records as shown below:
alter table "EMP_1" add "HR_MGR" varchar2(10);
update EMP_1 set HR_MGR = 'SOPHIE'
 where EMPNO in  (10,20);
update EMP_1 set HR_MGR = 'ROBIN'
 where EMPNO in  (30,40);
commit;
NOTE: Don’t forget to create 2 Users SOPHIE and ROBIN using the Manage Users And Groups menu option under Workspace Administration.
Extending the Task Definition
In the Leave Request Approval Application created in the Introductory Blog, go to the Shared Components→ Workflows and Automations→ Task Definitions and select the Leave Request Task Definition.
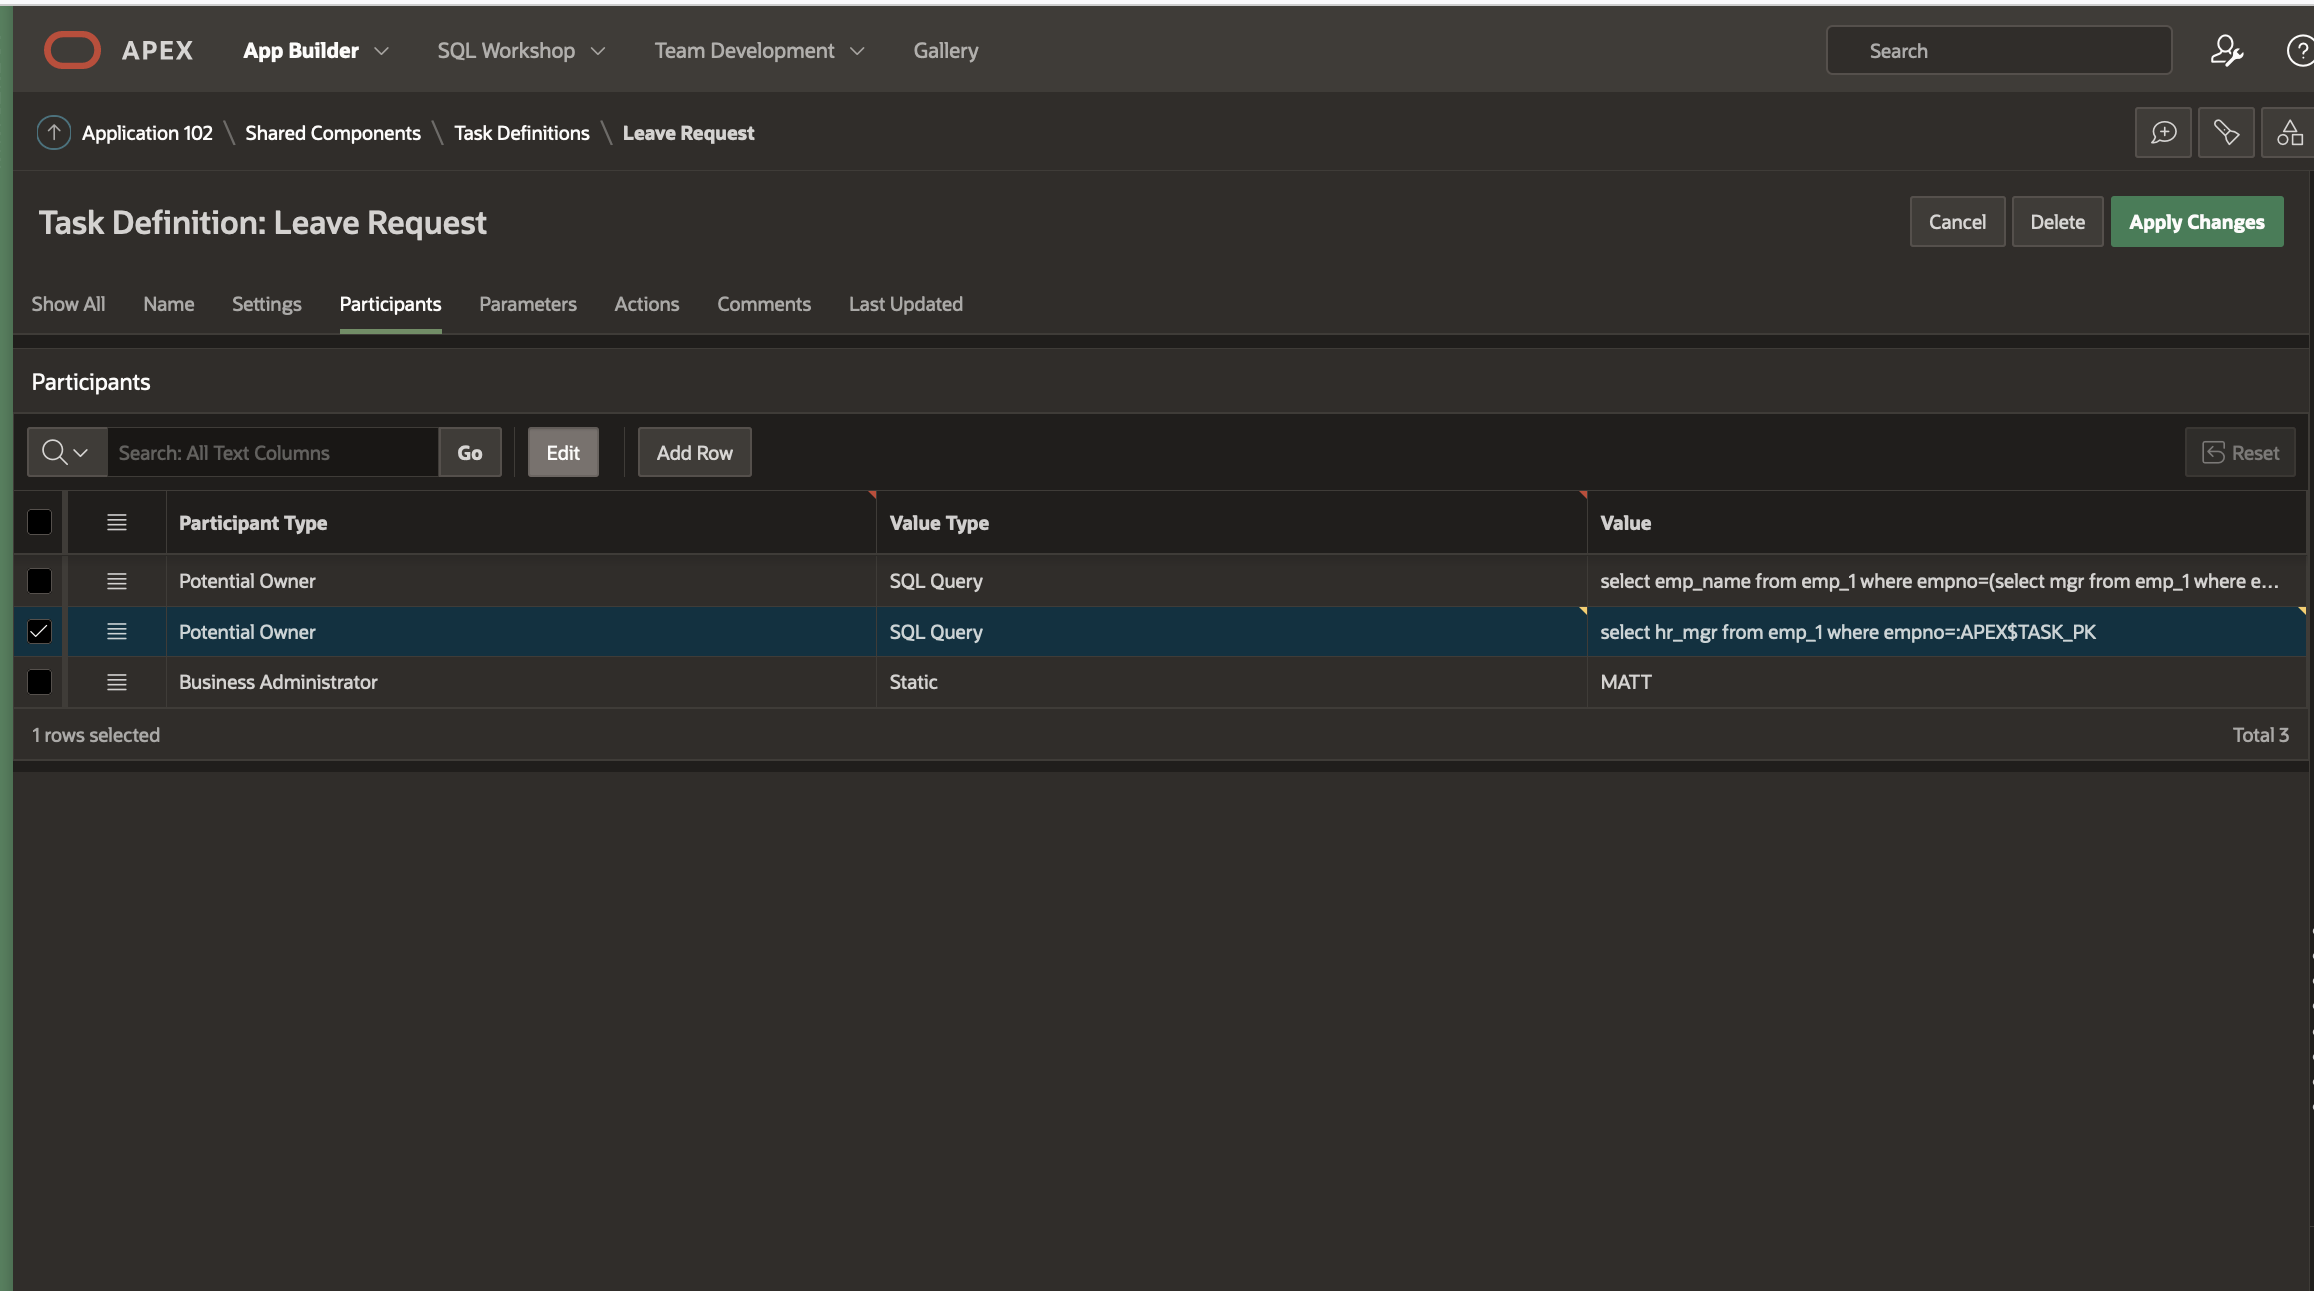
We can now further update the Participants section in the Leave Request Task Definition in the Edit Task Definition screen that opens.
Click on Add Row in the Participants section.
select Participant Type as Potential Owner and Value Type as SQL Query. In the Value field, add the following SQL query
select hr_mgr from emp_1 where empno=:APEX$TASK_PK
APEX$TASK_PK is a substitution string that holds the value of primary key of the system of records to which the task is tied. In this case, it will hold the employee number of the employee for whom this leave request task is being submitted. Note: Please check the documentation for a complete list of Substitution Strings available for Approvals Component.
Click on Apply Changes to save the updated Participants
What this means?
Adding the new Participant entry implies that for each employee, the approver of the leave is either the manager he/she reports to or his/her HR Manager. In this Example, if Clara was applying for leave, the task could be approved by either her manager Jane or her HR Manager Sophie.
We now essentially have a scenario where there can be more than one potential owner of a leave request task. This will help us to demonstrate the operations like Claim, Release and Delegate that can be performed on tasks with >1 potential owner(s).
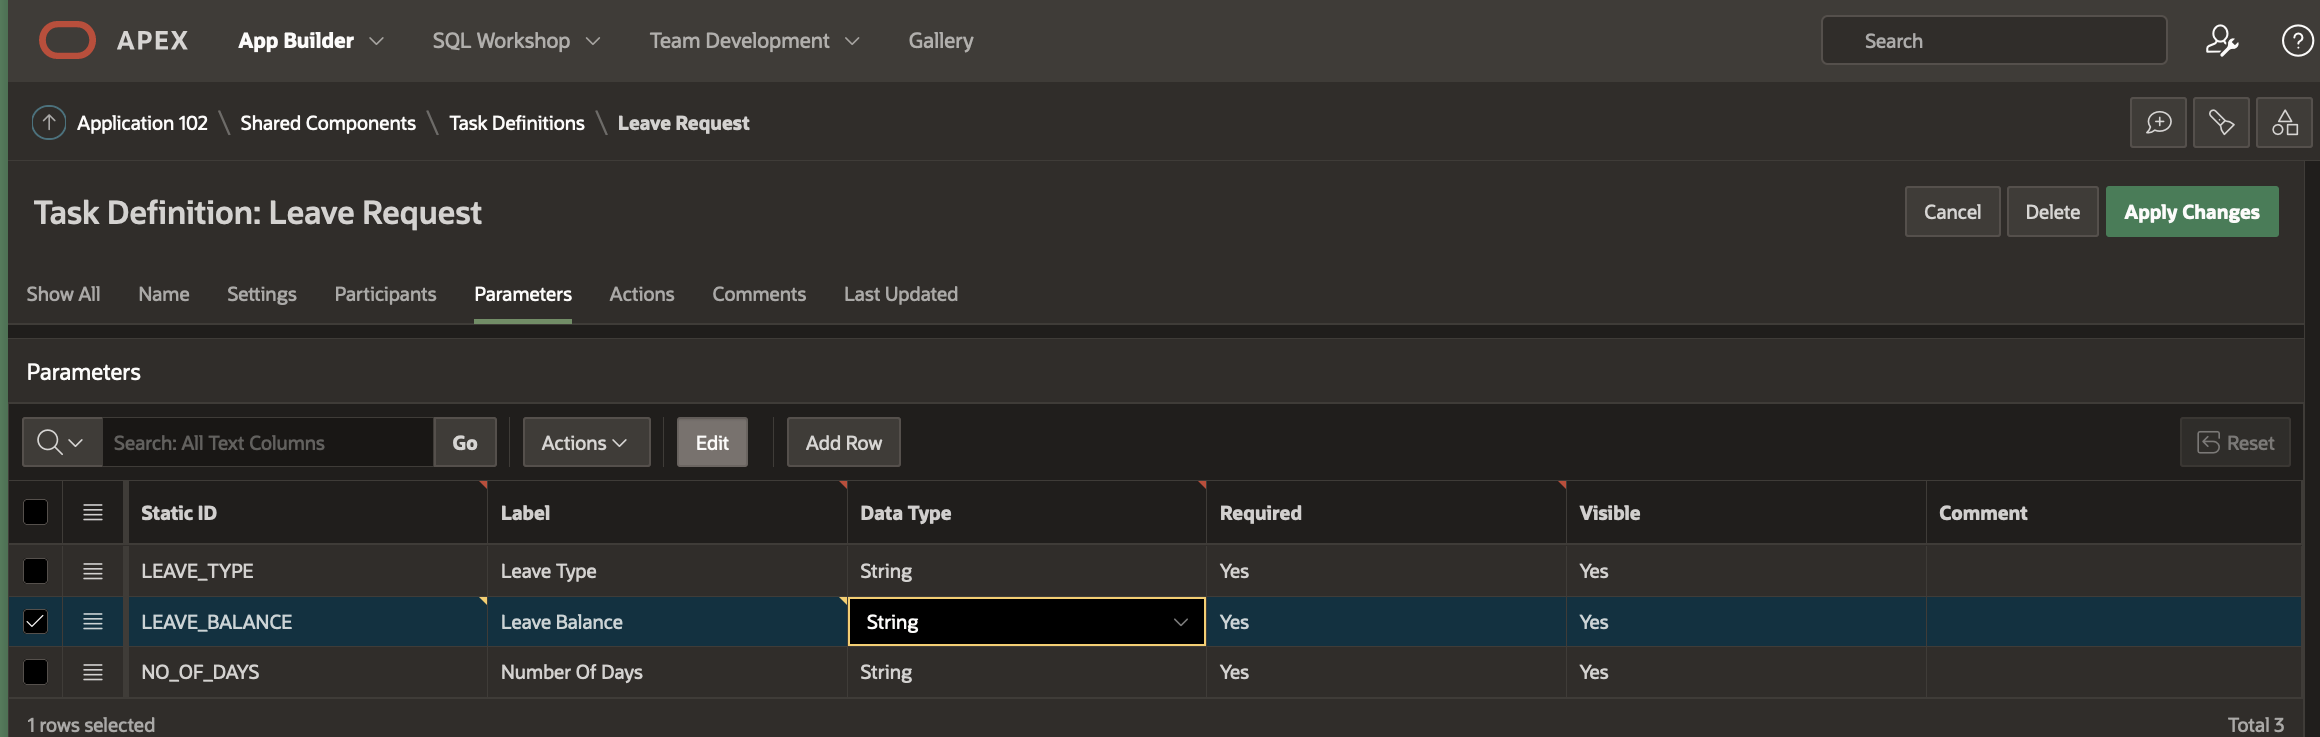
Add Task Parameters
Add the following new entry to the Task Parameters section.
Note: Any parameter you add to the Task Parameters , can be used as bind variables in your participant or actions source SQL queries, as well as substitution strings in the task definition subject as shown in this example, where the subject contains a reference to the LEAVE_TYPE parameter.
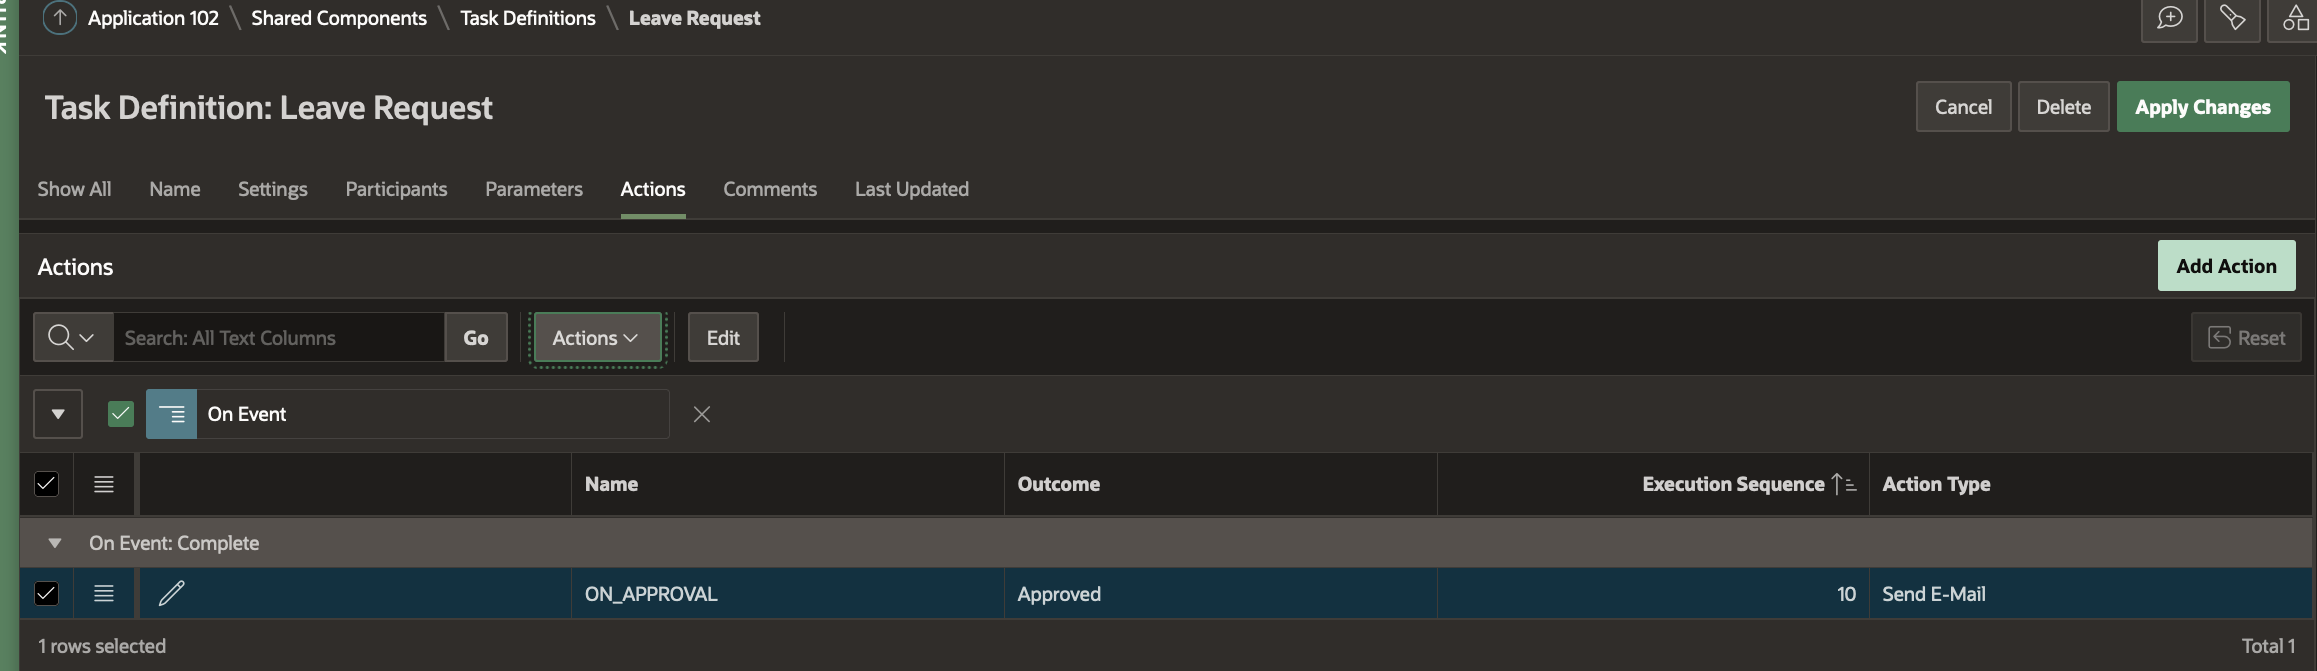
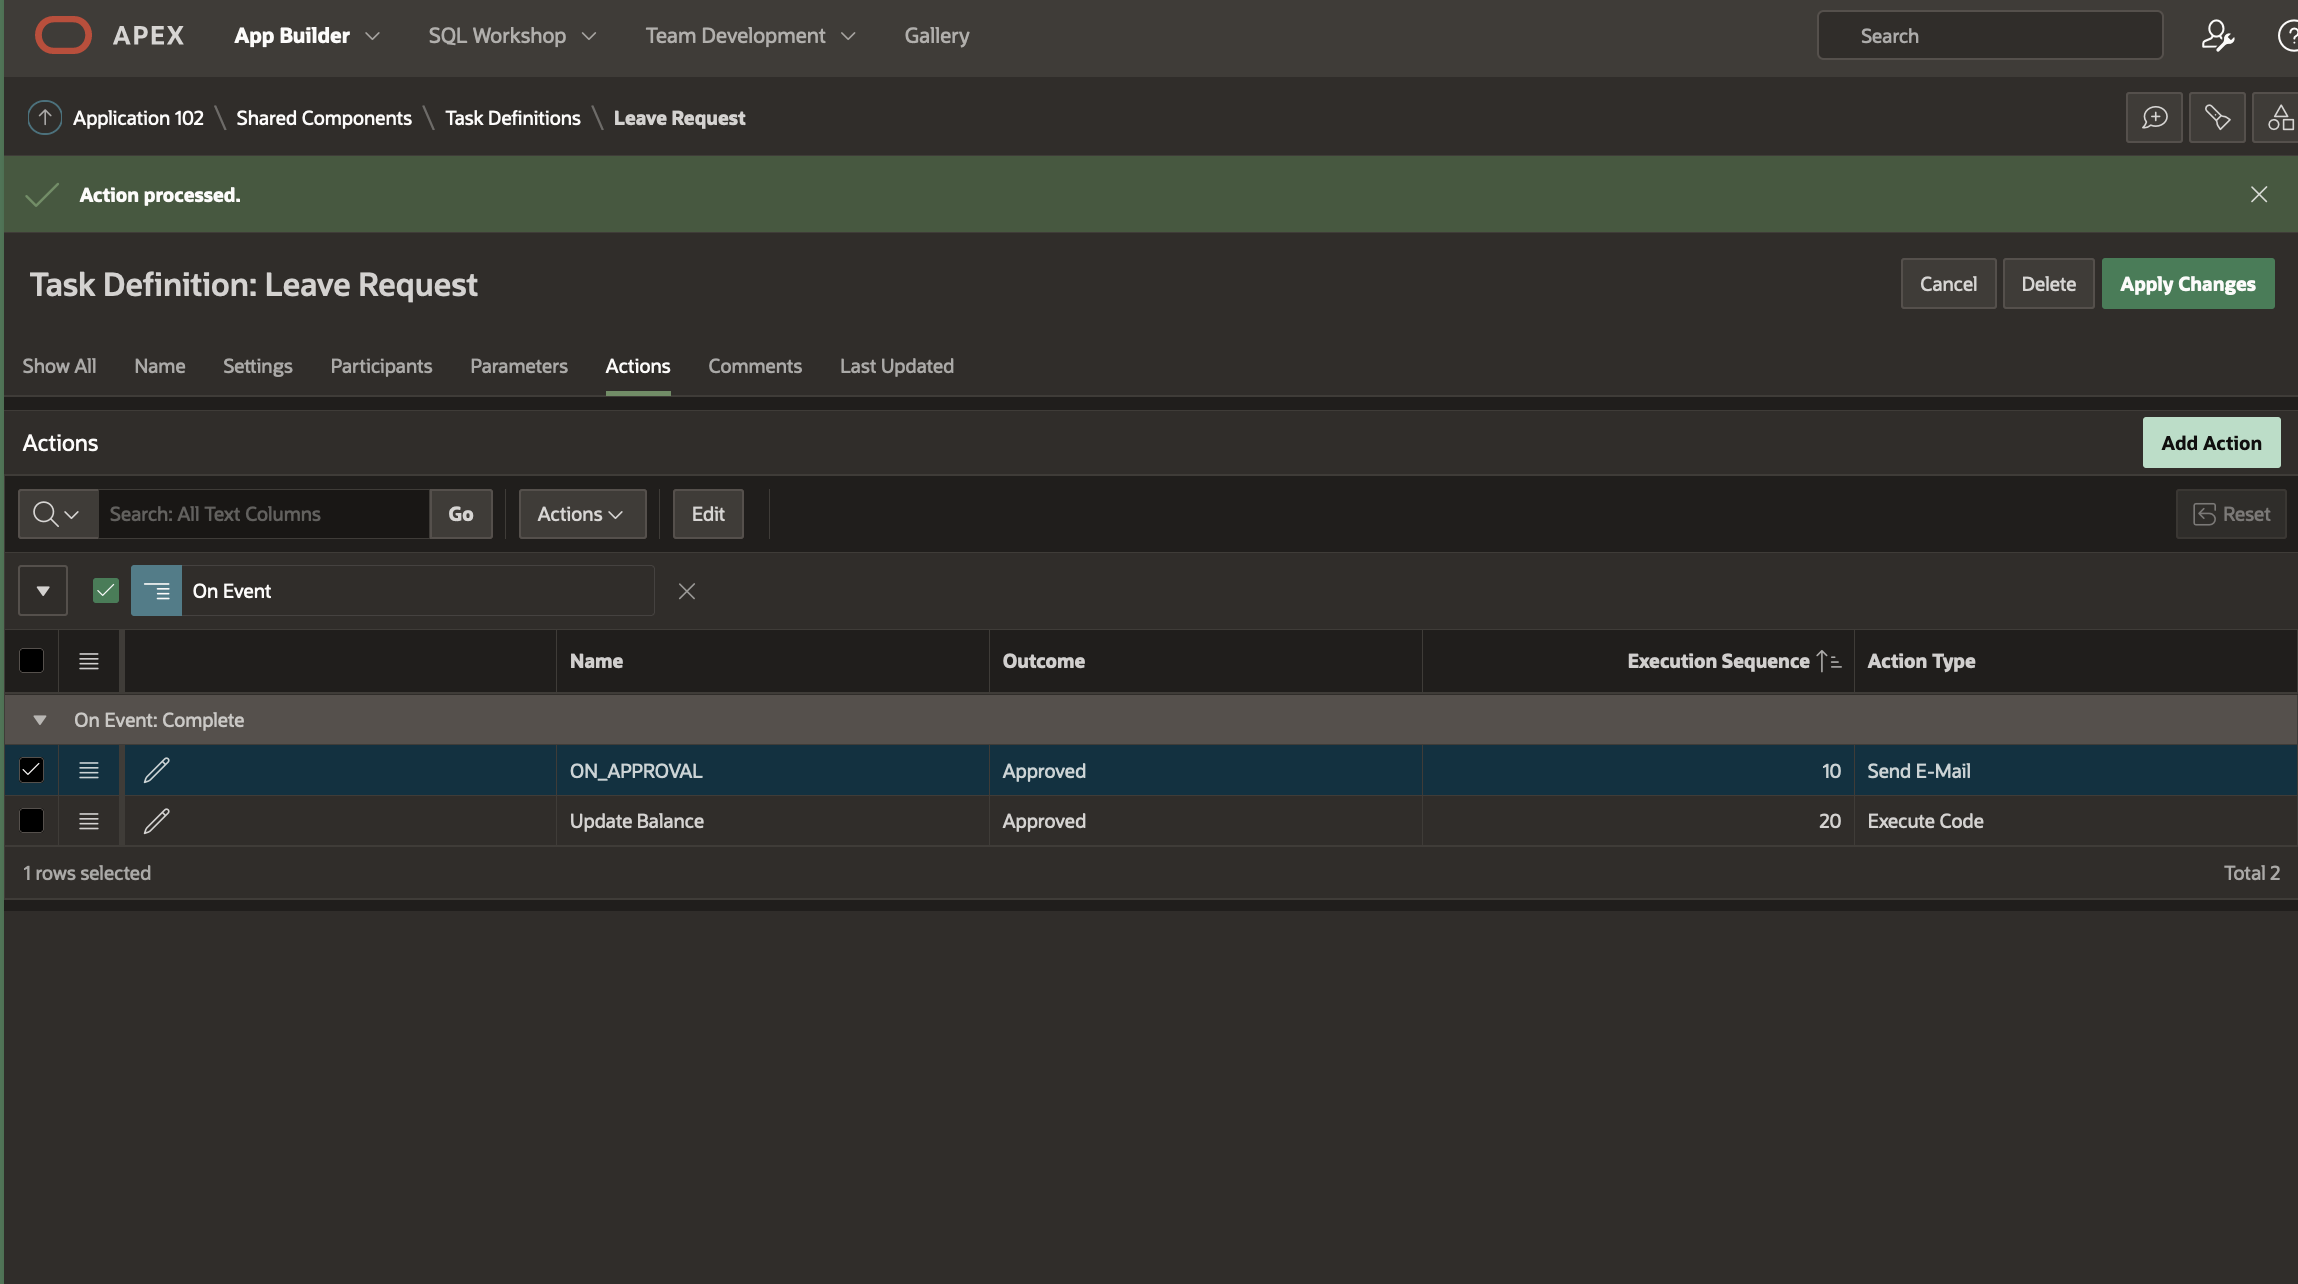
Add Actions
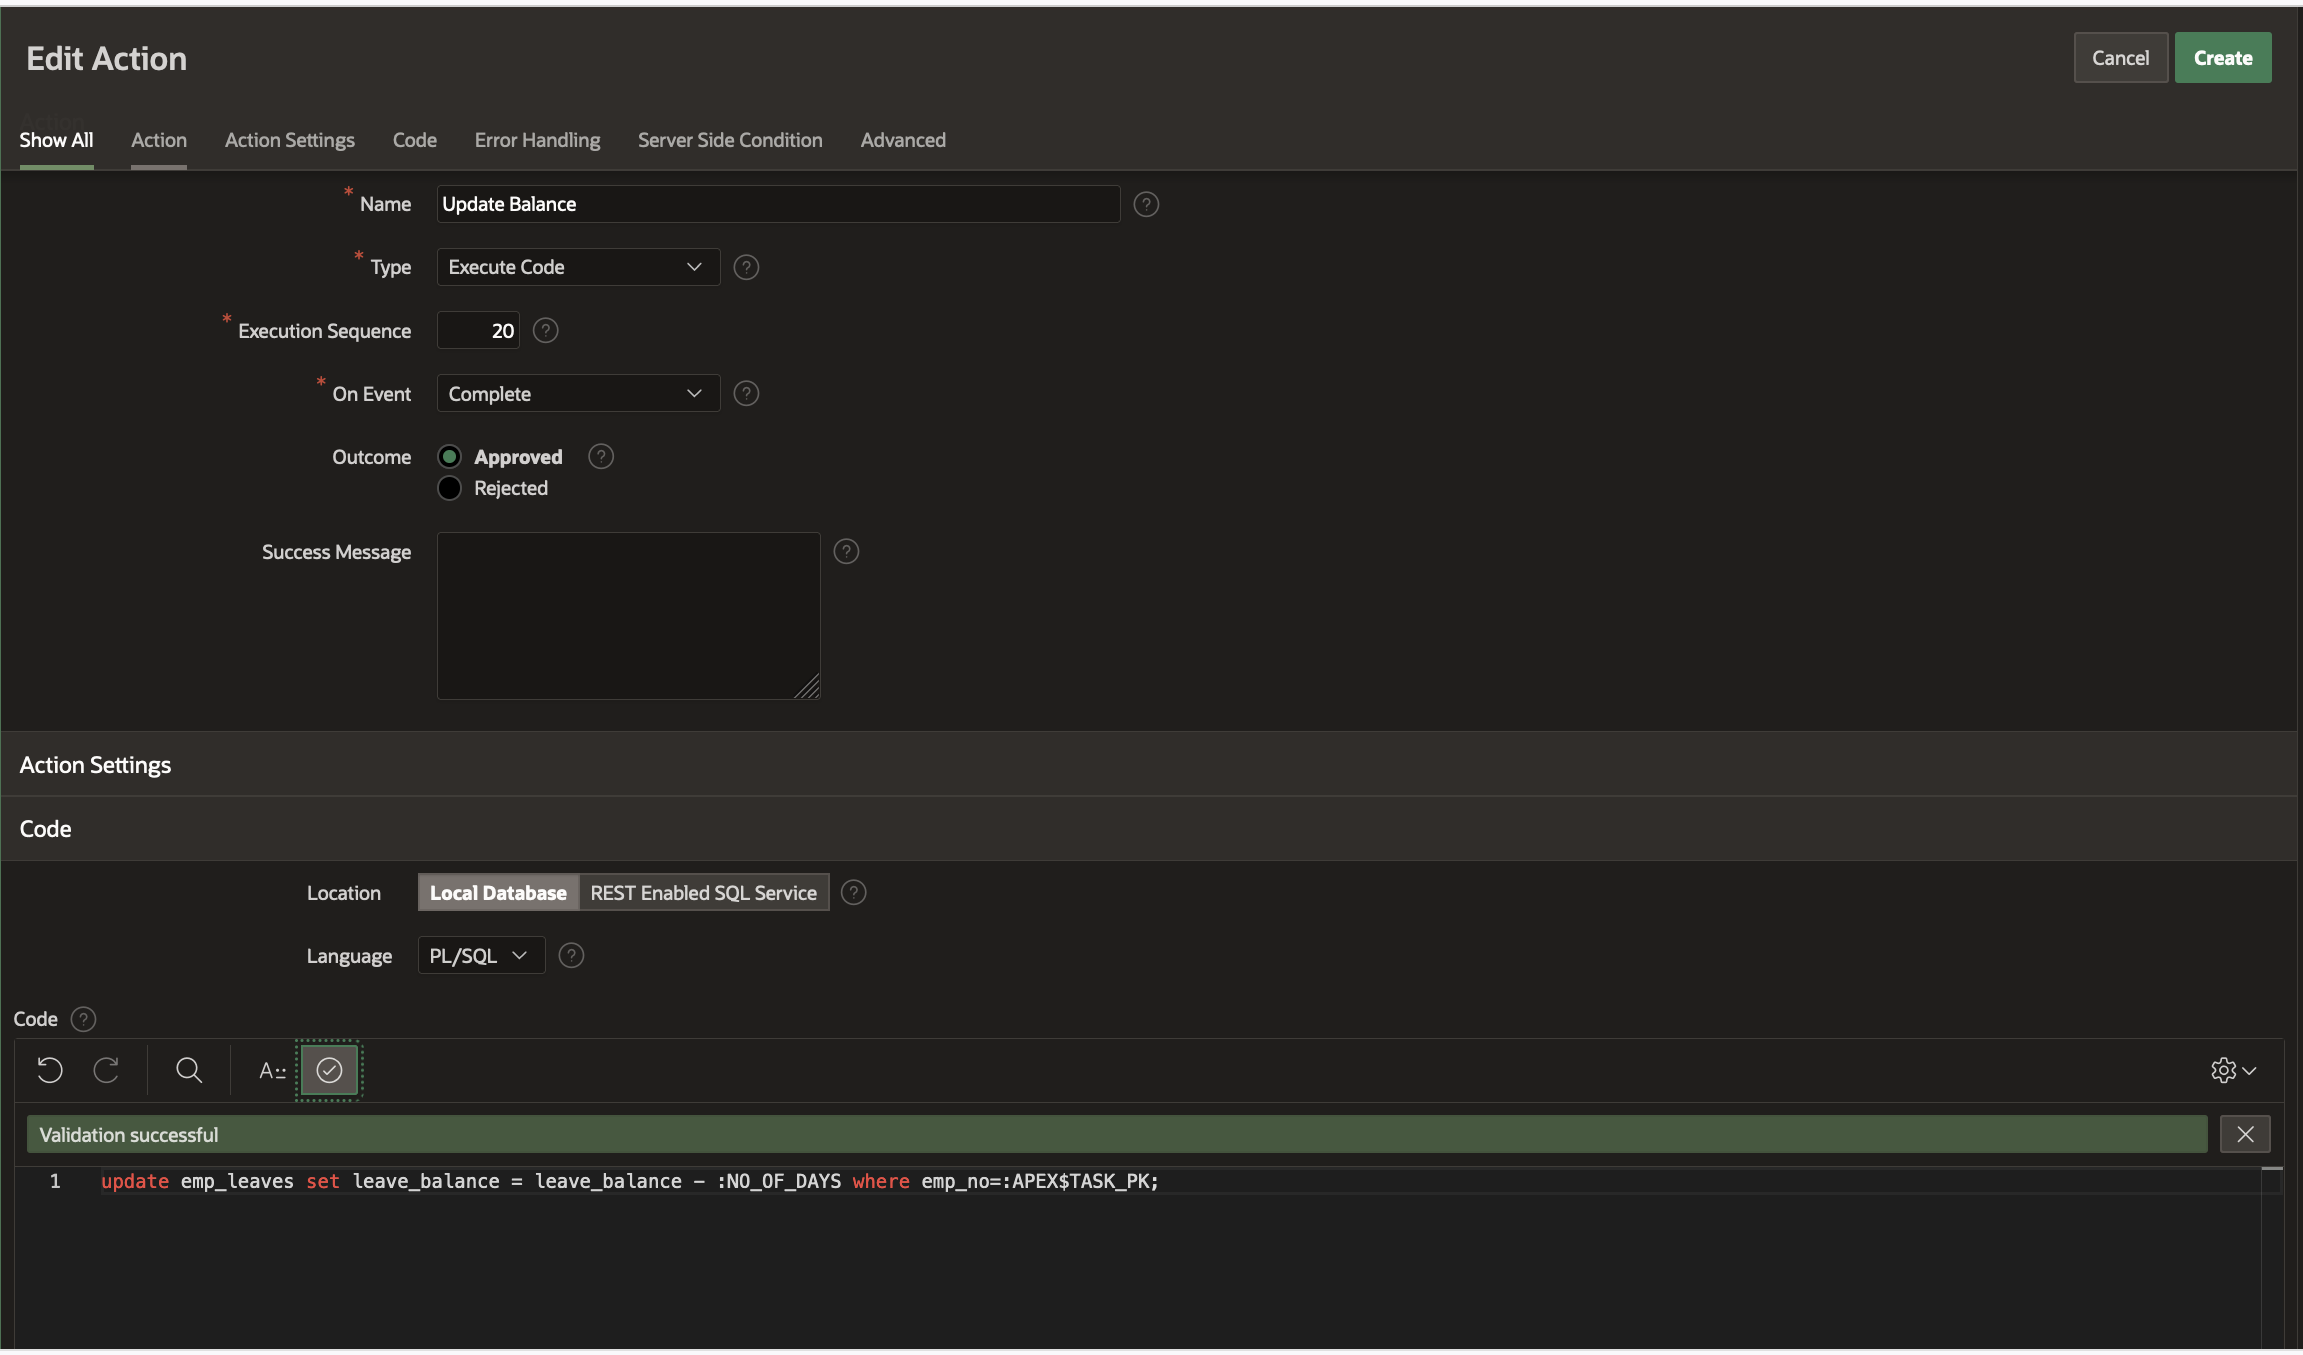
In our earlier blog, we had seen how an action could be defined for a Task Event. We had defined an action to Send an Email to the Leave Requestor when the Leave was approved. We will now define another action to adjust the leave balance when a leave request was approved. Click on Add Action as shown below . This will take you to the Task Definition Actions Edit Page
Fill out the Edit Action page as shown below to add the following PL/SQL code and then hit Create:
update emp_leaves
set leave_balance = leave_balance - :NO_OF_DAYS
where emp_no=:APEX$TASK_PK;
Note: NO_OF_DAYS was defined earlier as a Task Parameter and all such defined parameters can be used as bind variables in the Task Action code.
That’s all! Changes to your task definition for Leave Request are complete. Apply Changes and come back to your application.
Updating the Apply for Leave page
Now that we have the task definition updated, we will need to update the “Apply For Leave” page which the employee will submit when requesting for leave. Submitting this page will create a Leave Request task based on the task definition we have just updated.
Open the Apply For Leave Page.
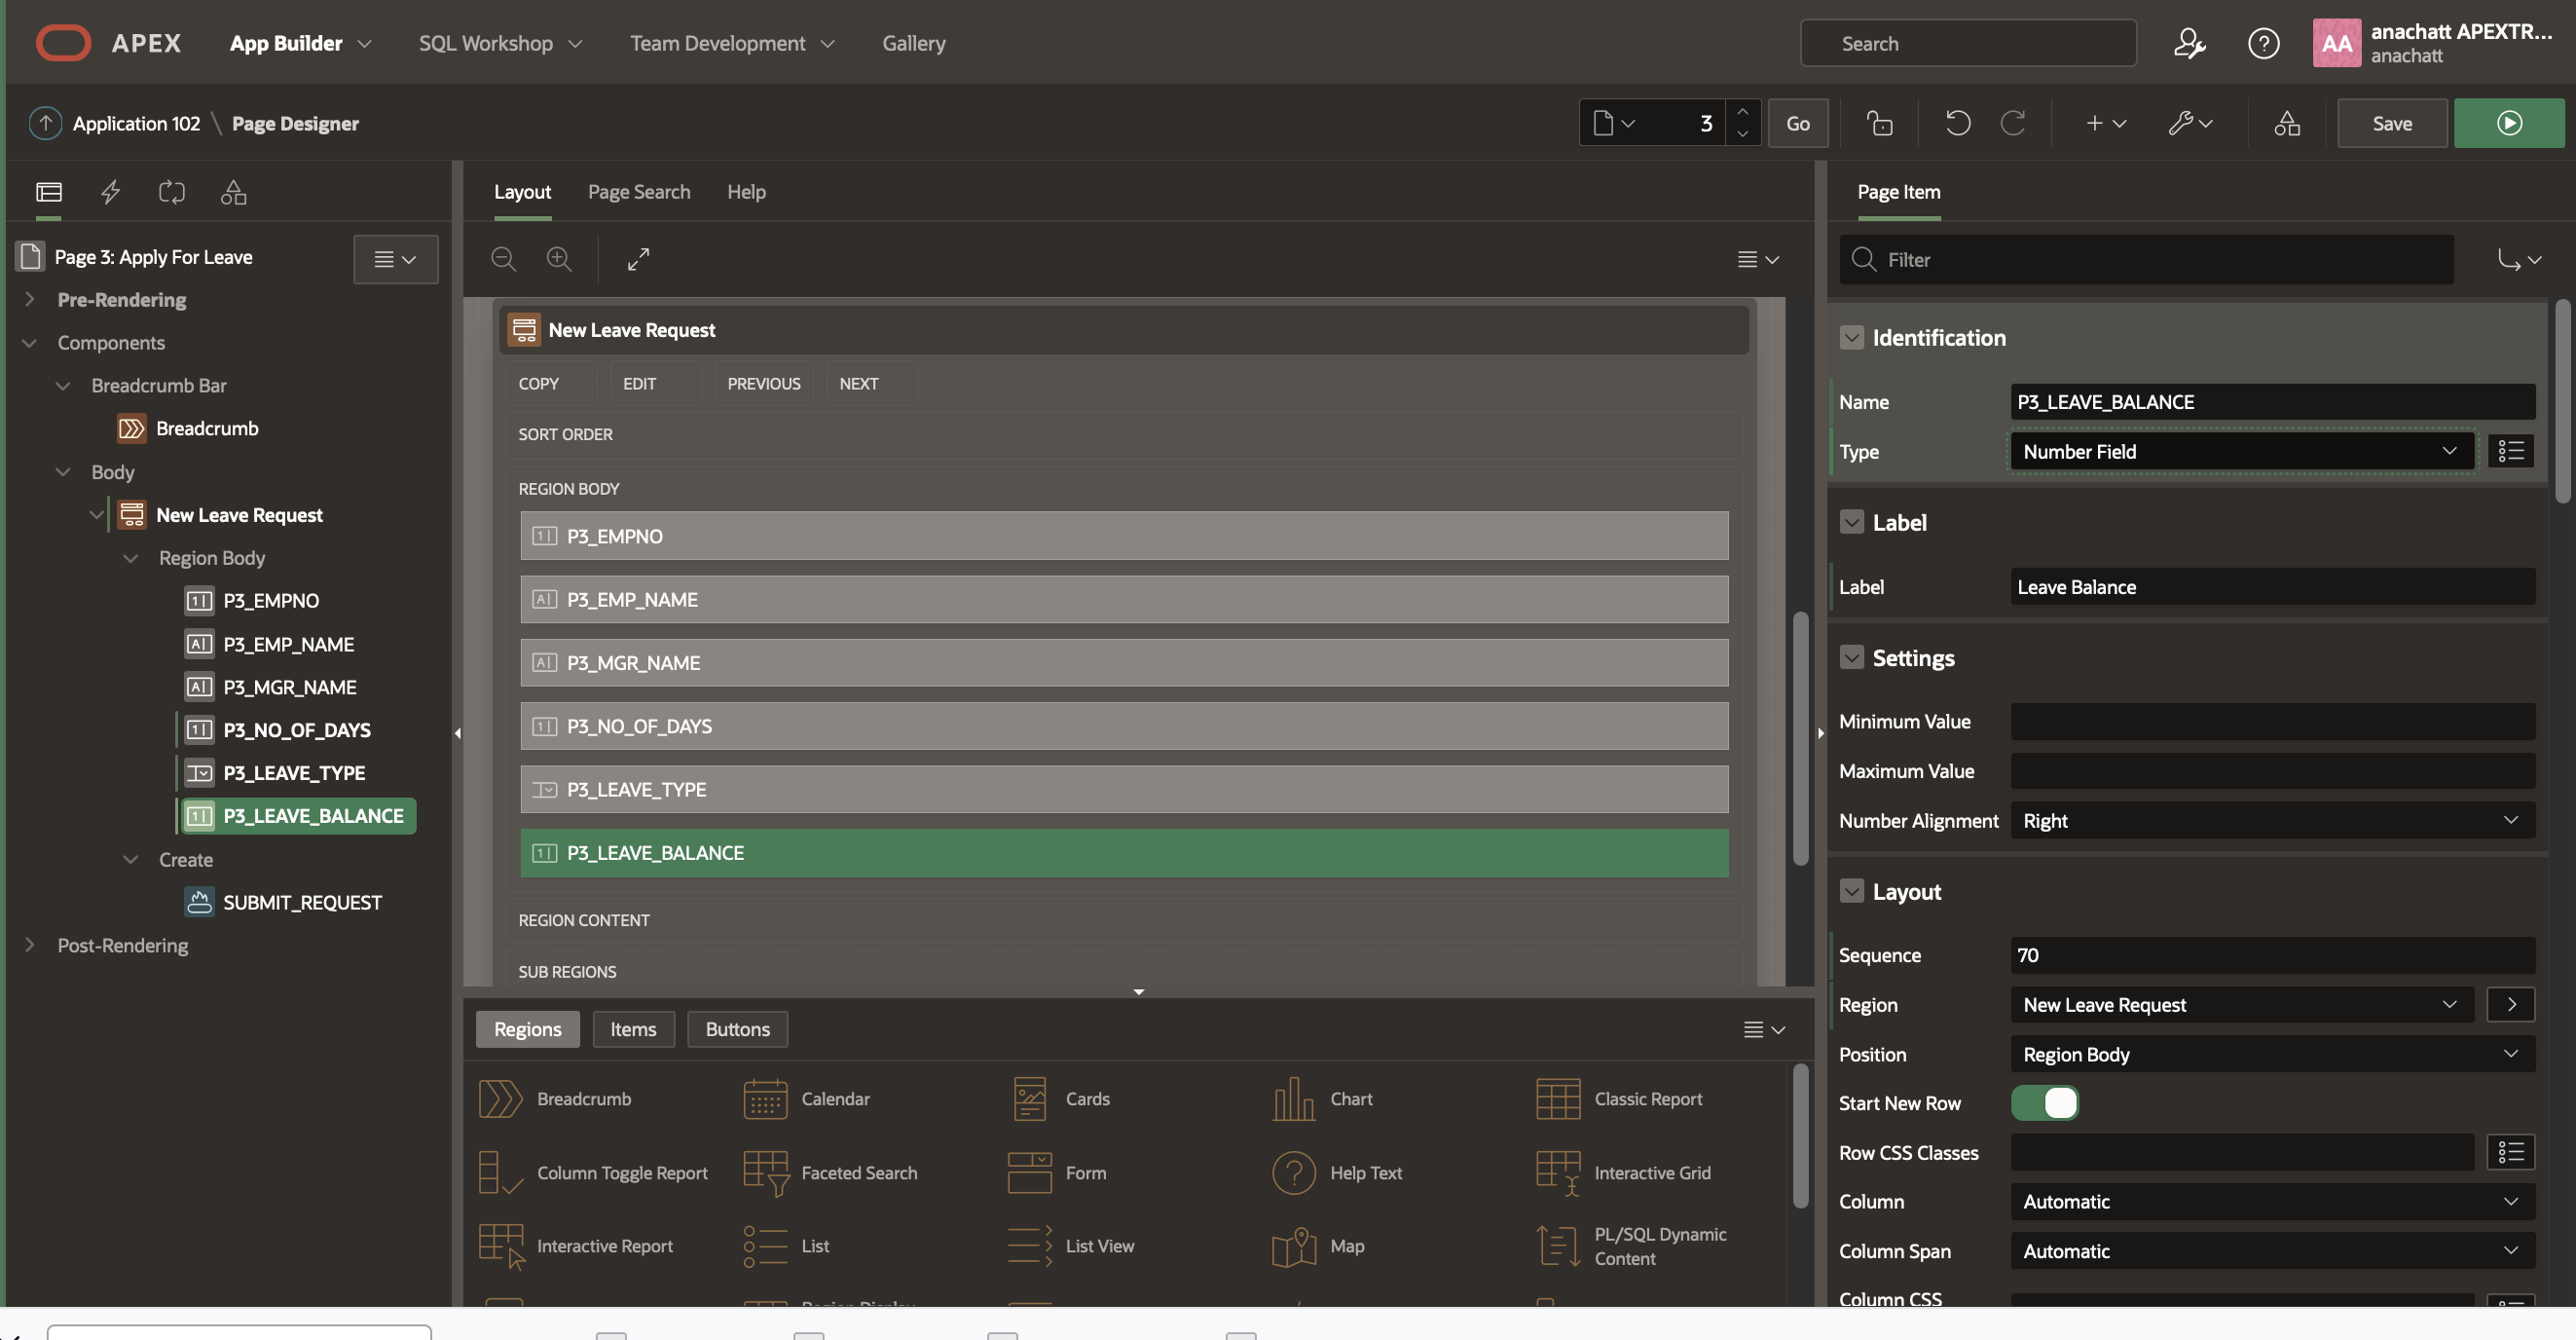
In the Page Designer, update the New Leave Request Form’s source and enter the following in the query region:
select e.empno,
       e.emp_name,
       m.emp_name as mgr_name,
       l.leave_balance
  from emp_1 e, emp_1 m ,emp_leaves l
 where m.empno(+)=e.mgr
   and e.empno=l.emp_no
   and e.empno=:P3_EMPNO;
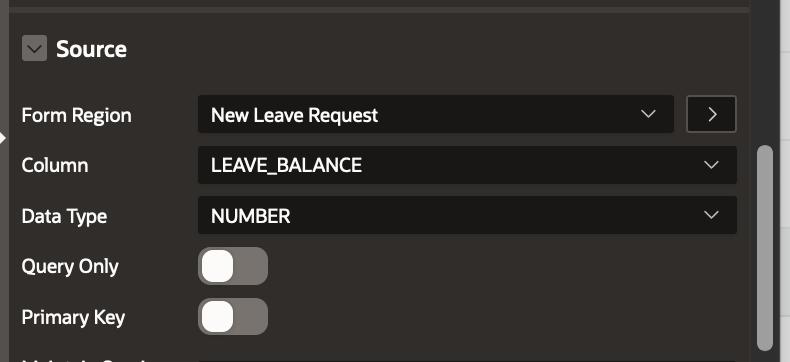
You will find the following page items already created: P3_LEAVE_BALANCE. Update the type to Number Field and set the source as LEAVE_BALANCE column. (There will be an extra P3_LEAVE_BALANCE_1 item created as well. You could delete it!)
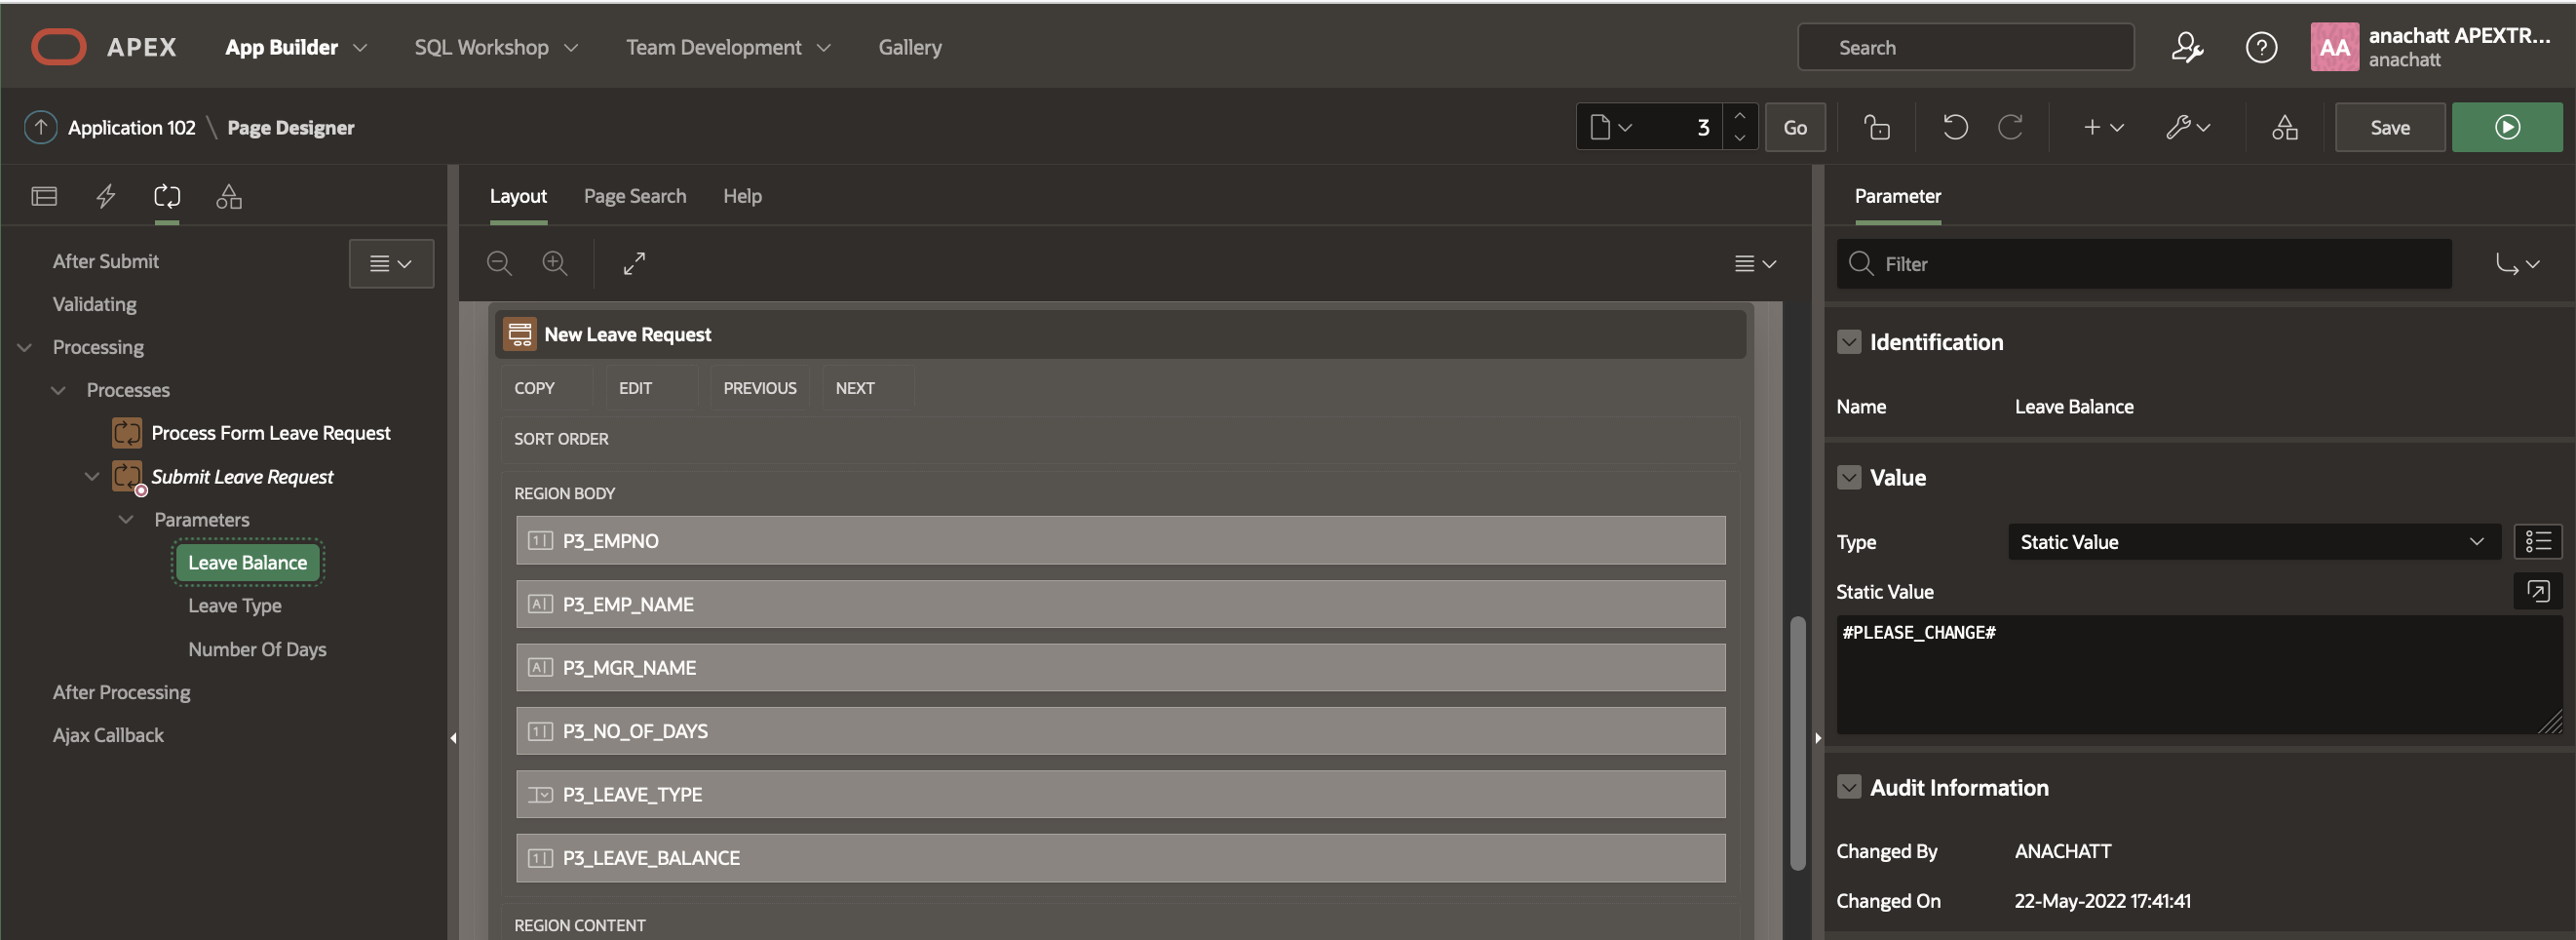
Navigate to the Processing Tab and click on the process “Submit Leave Request”.
You will find the Leave Balance already added as Parameter with a preset value #Please Change#
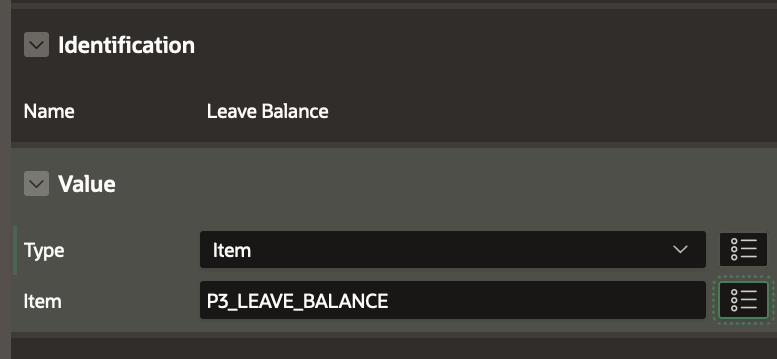
Update the Parameter type to Item and set the value as shown below:
Click Save
Your changes to the Apply For Leave Page are now complete!
The Administrative Tasks Page
In the previous blog we created the My Approvals page where the manager of the employee could go to approve or reject a leave request and My Requests page where the employee could go and check the status of his request. For this we had created two Unified Task Lists.
Now we will create a page which allows Matt who is the Business Administrator defined for the Leave Request Task (check the Participants section in the Task Definition for the Business Administrator participant type) to perform administrative actions on a Leave Request task.
What are Administrative operations on a Task?
As a Business Administrator of a task, a user can perform these operations.
a) Delegate the task to another potential owner.
b) Add an ad-hoc potential owner for the task. Note that this action is specific to the task instance and does NOT change the participants defined in the original Task Definition the task instance is based upon.
c) Update the priority of a task.
Creating the Administrative Tasks Page
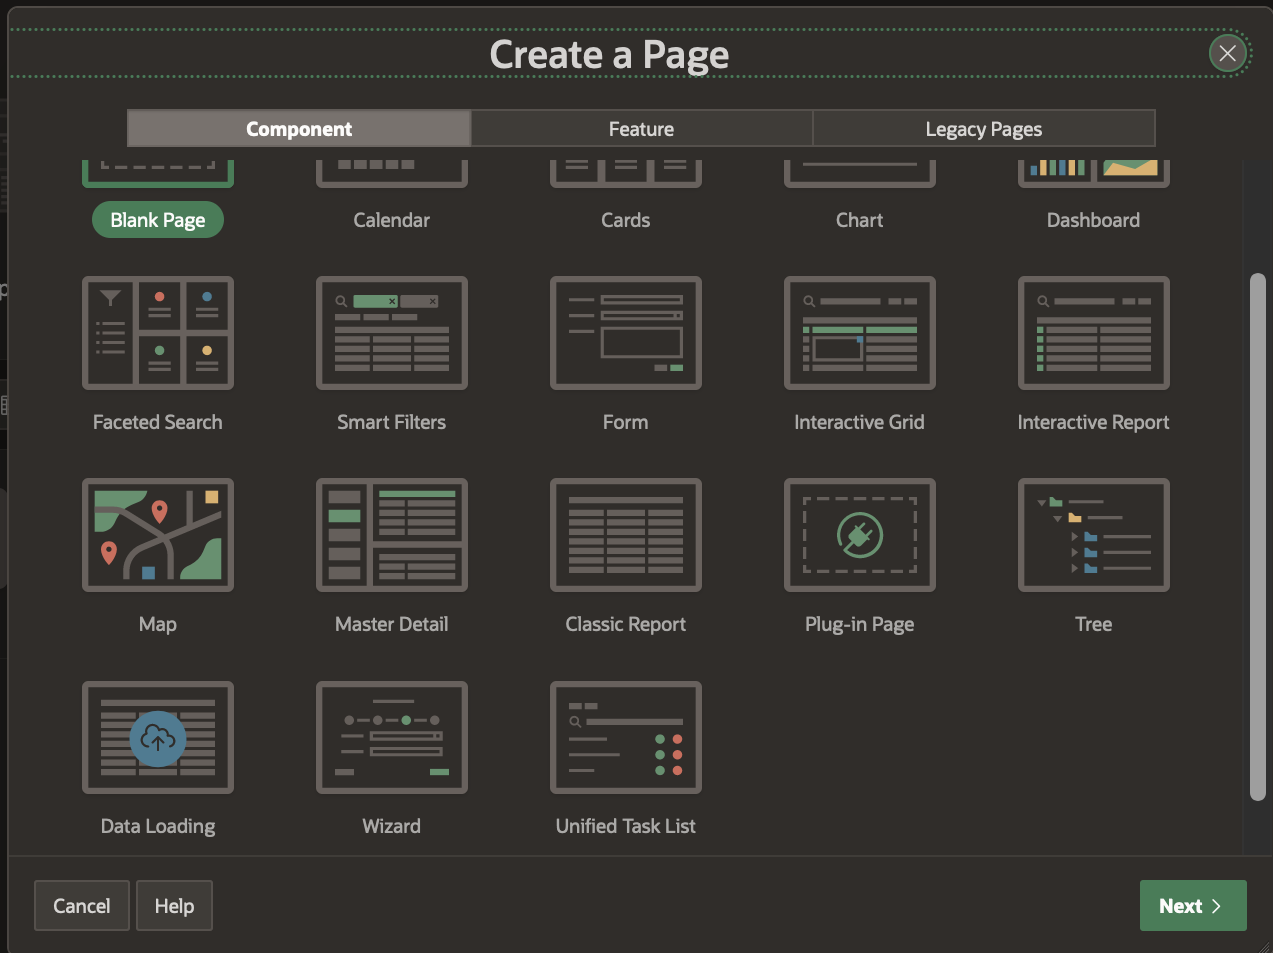
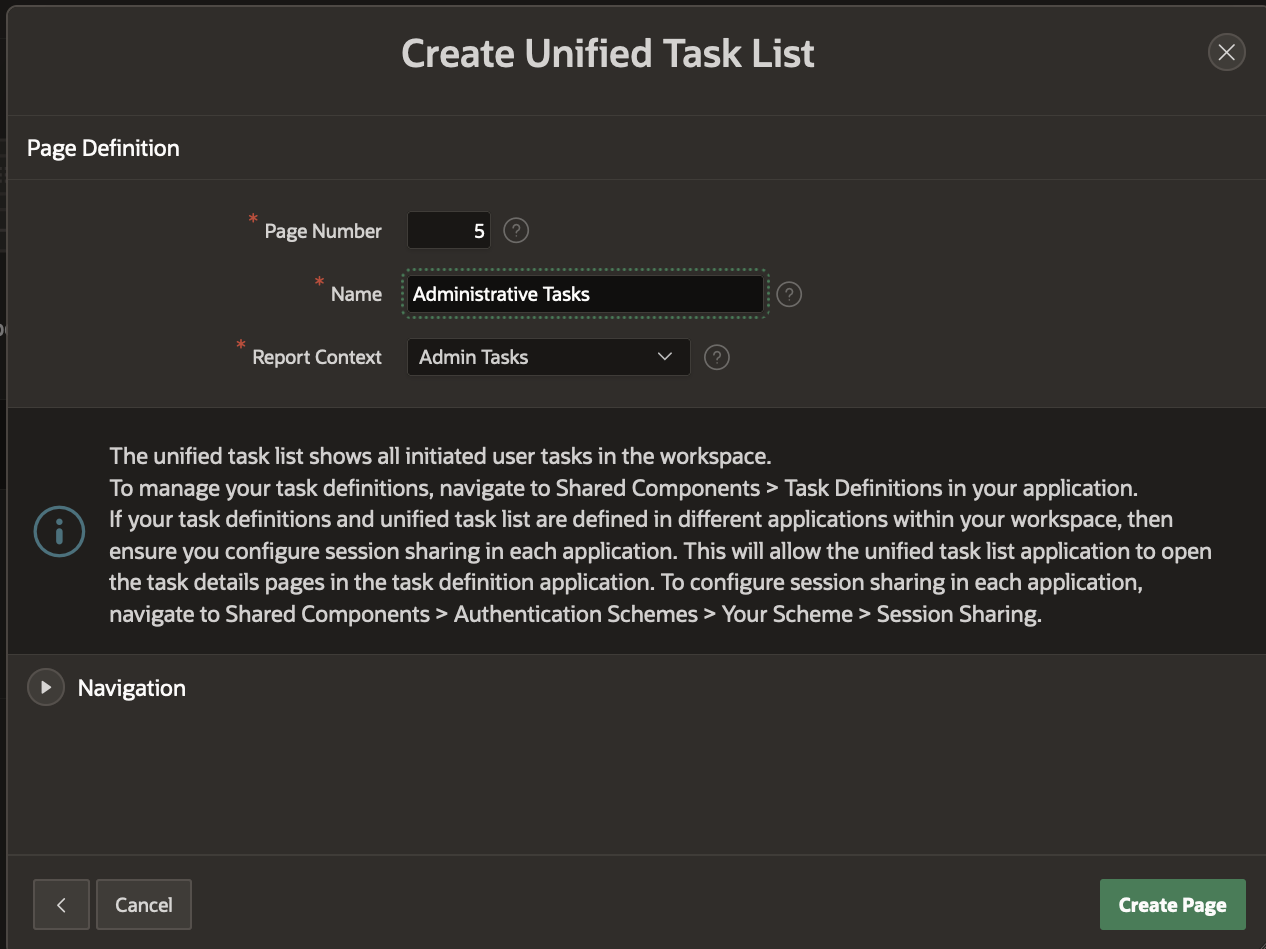
Click on the Create Page wizard and select Unified Task List from the Components section . Name the Page “Administrative Tasks” and select Report Context as “Admin Tasks”.
Note: Unified task list page can be customized in the Page Designer. But for this example we will use the one generated out of the box.
Running the Application
Select the Leave Request Approvals in the App Builder and click on Run Application. The Application is launched on a separate tab.
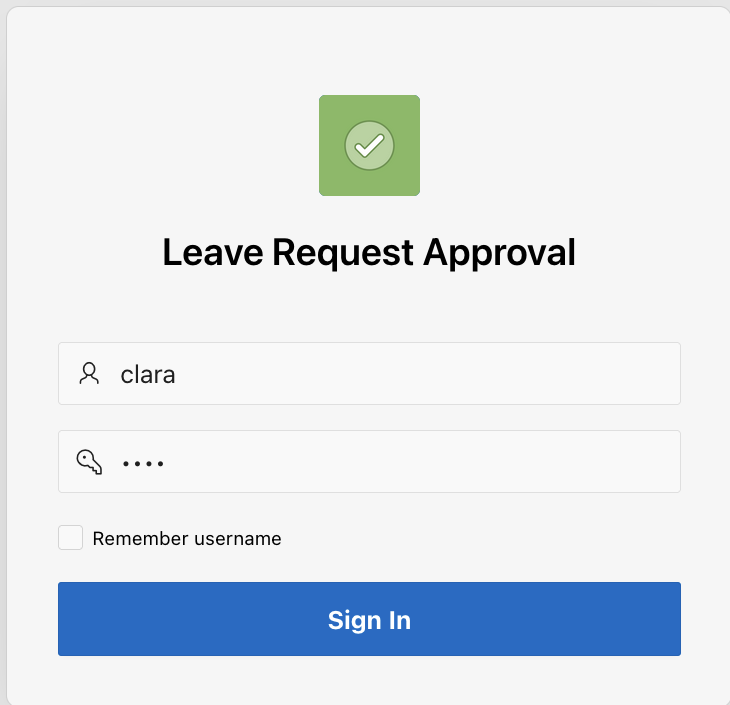
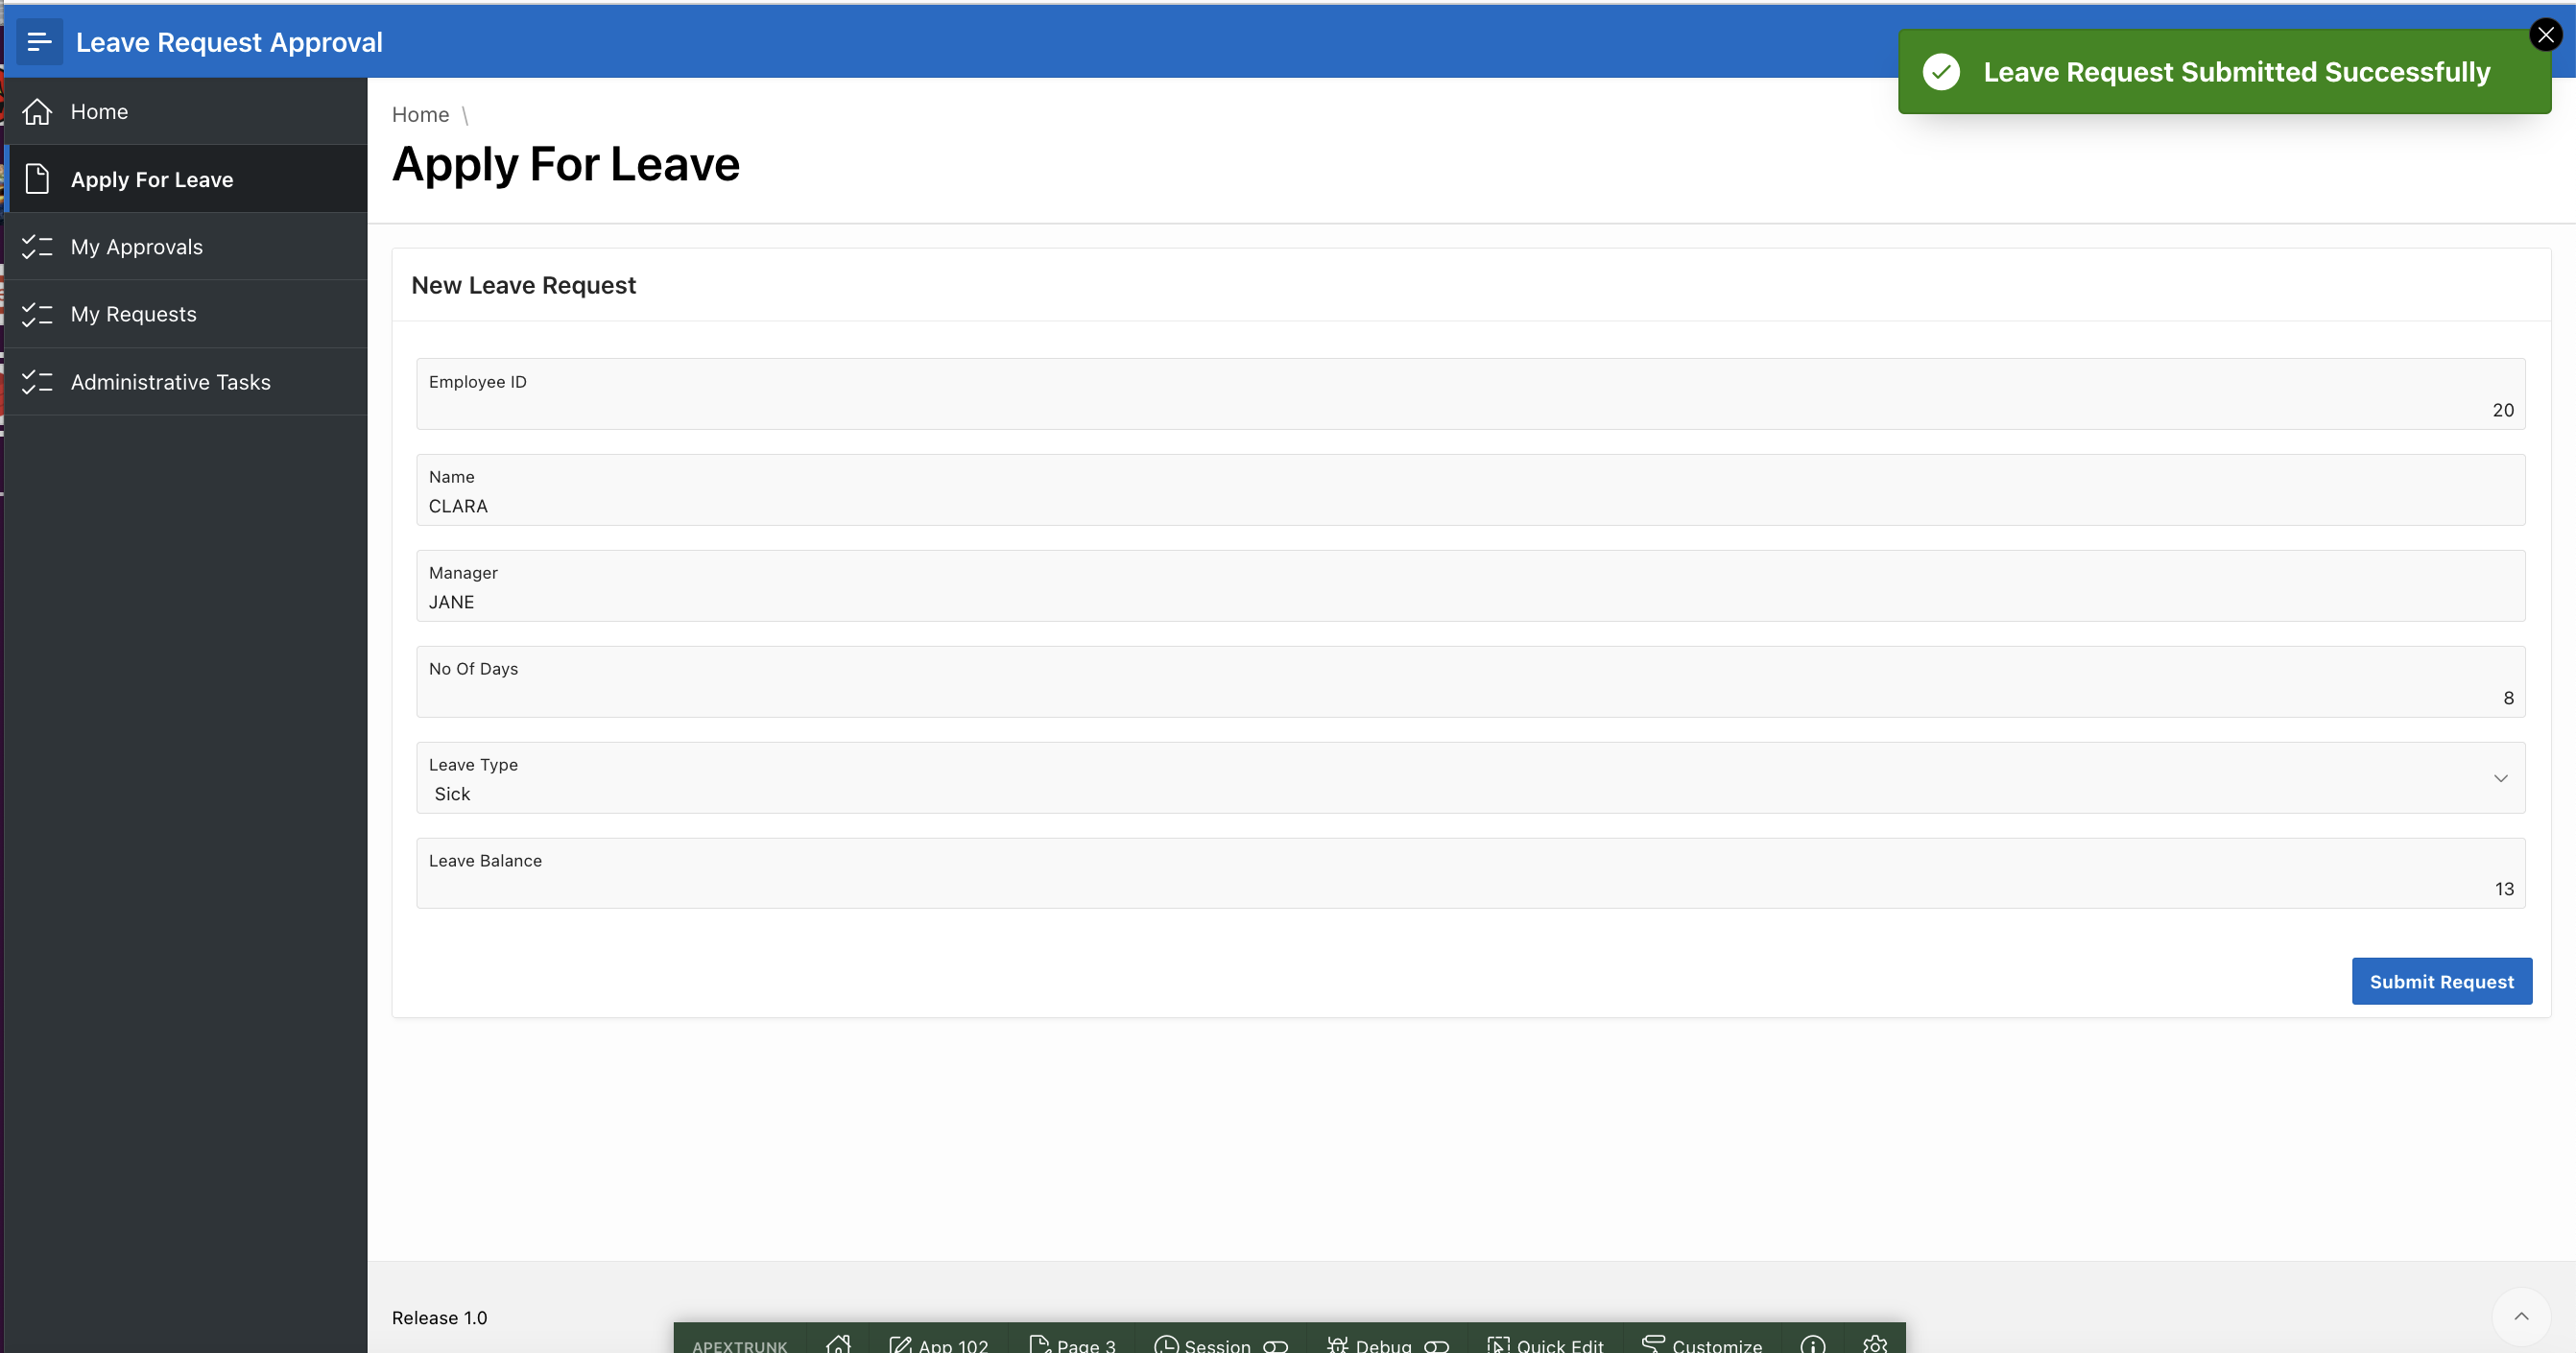
Log in as CLARA and navigate to the Apply For Leave page.
The Employee ID, Name Manager and Leave Balance fields will be pre-populated.
Enter values for the No. Of Days and Leave Type as shown below. Hit “Submit Request” after that.
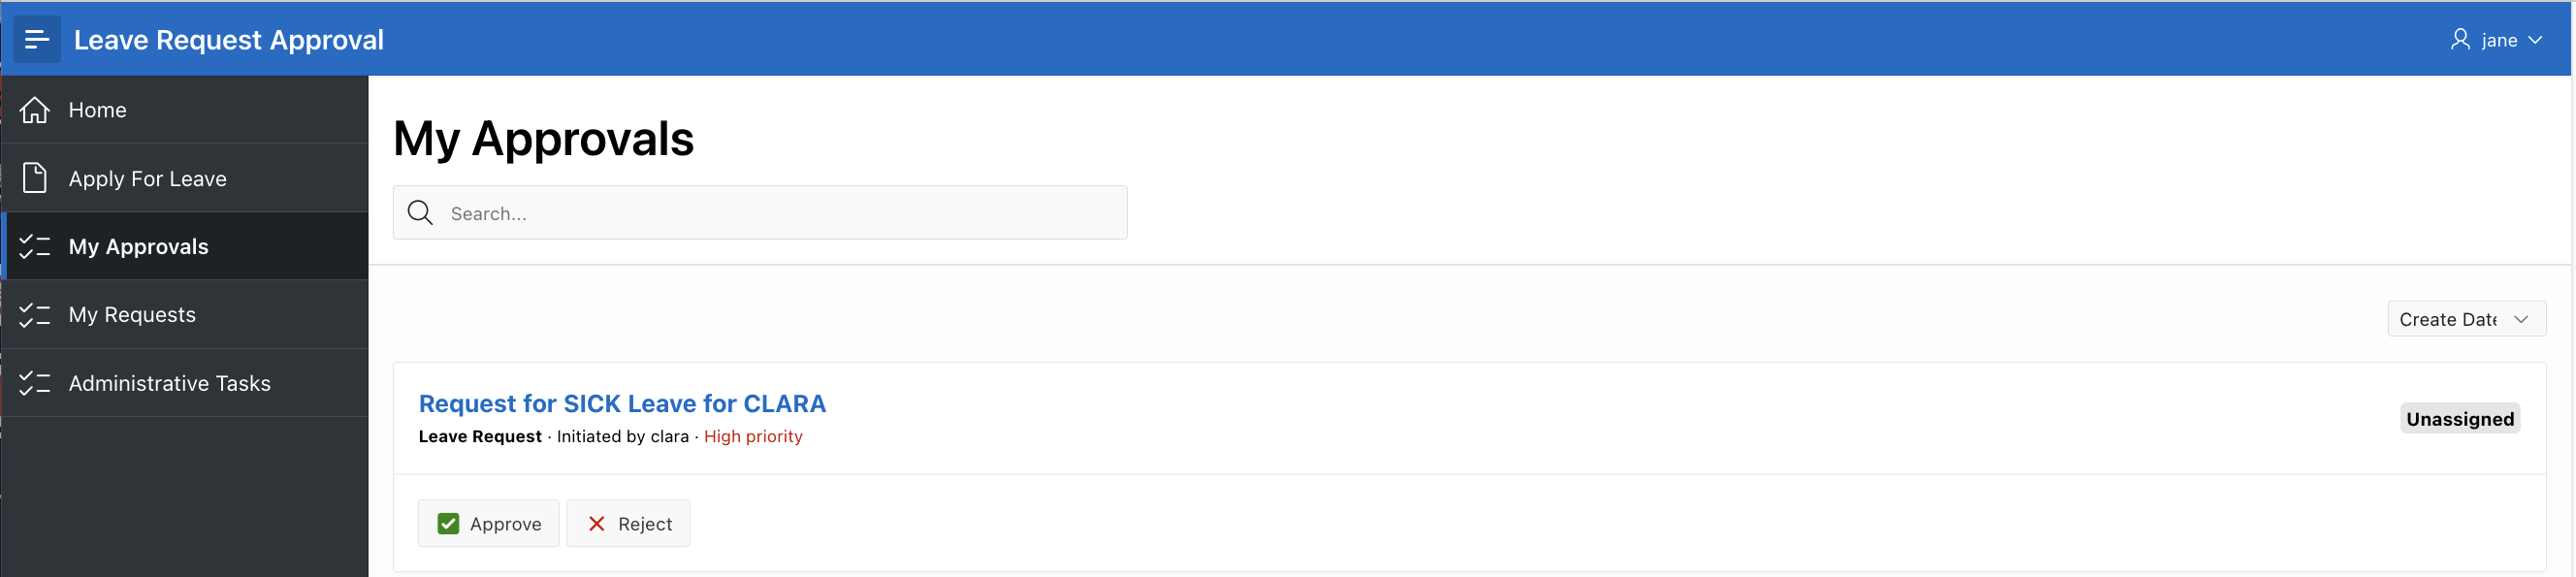
Log out and Log back in as Jane who is the manager of Clara. Navigate to the “My Approvals” page . You will find Clara’s request for Sick Leave and will notice that the Task State is Unassigned.
This is because now we have both Jane (Manager) and Sophie (HR Manager) as Potential Owners for this task and one of them must “Claim” the task before approving or rejecting it. Until then the task is Unassigned.
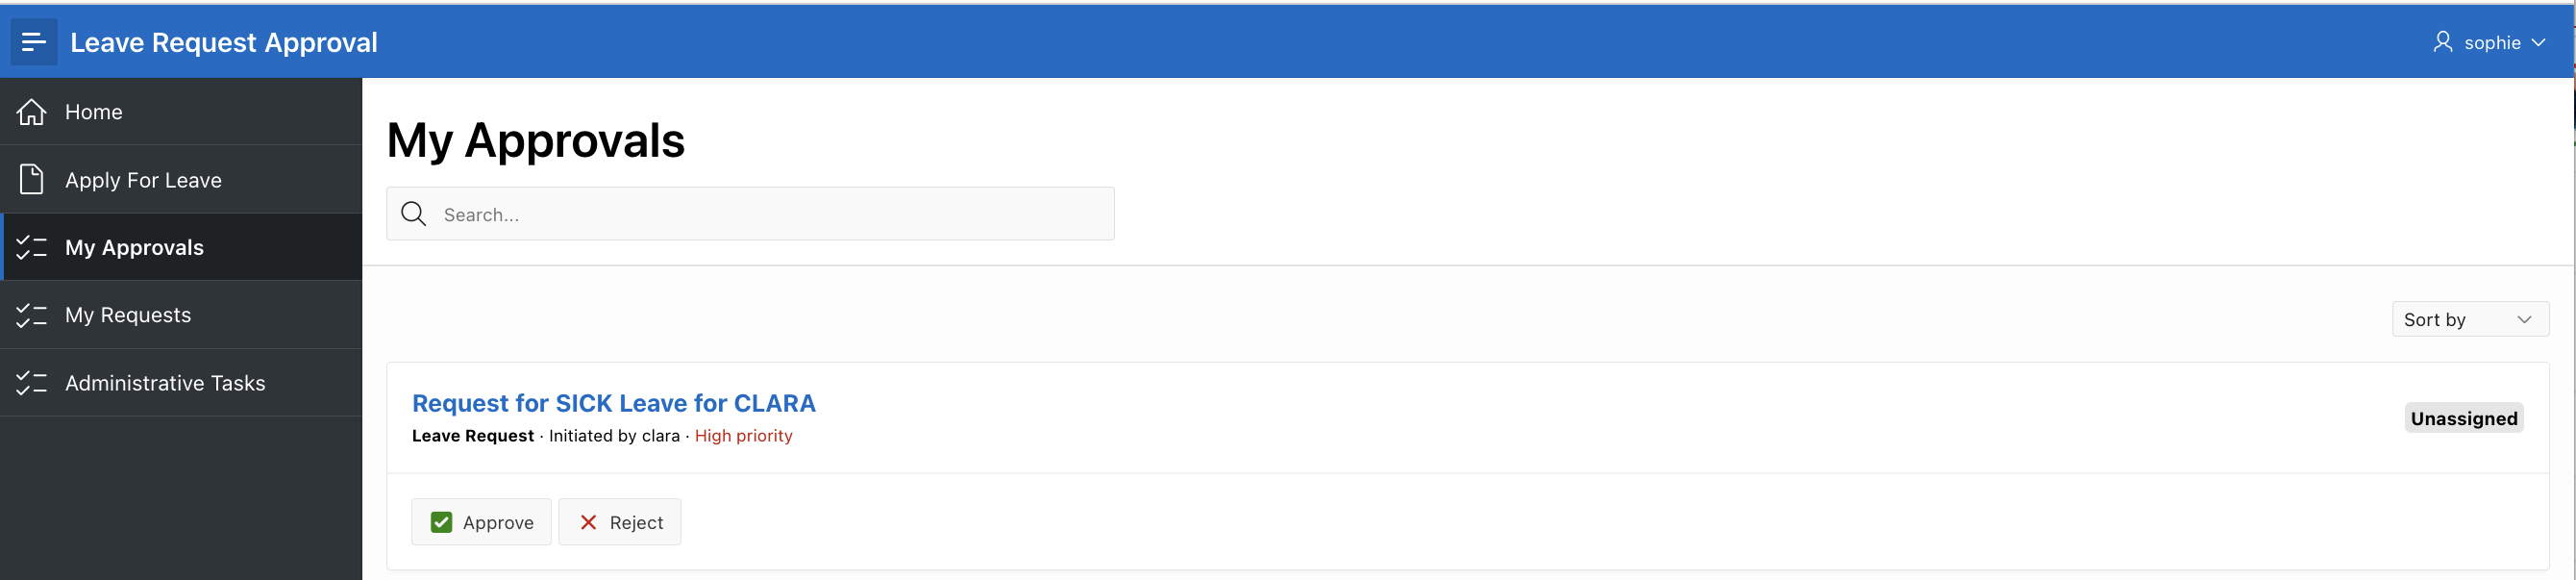
Log out and Log back in as Sophie. You will see the same task in the My Approvals for her as well.
Note: Sophie or Jane can Approve or Reject the request using the buttons shown above in the Unified Task List. In this case, the “Claim” of the task happens implicitly before the Approve or Reject.
Click on the task while staying logged in as Sophie. You will find a Claim Button , which you would need to click before you can perform any other action on the Task.
Note: The Details section shows the values of the task parameters that were configured in the Leave Request Task Definition including the Leave Balance Parameter that we added later in the task definition. As explained in the Introductory Blog, the task details page is an out of the box generated page that gets created when editing the task definition. This page is customizable so that one can choose to display more data from their System of Records and also remove some of the generated sections if they don’t find them relevant. We will explore these customization in a future blog.
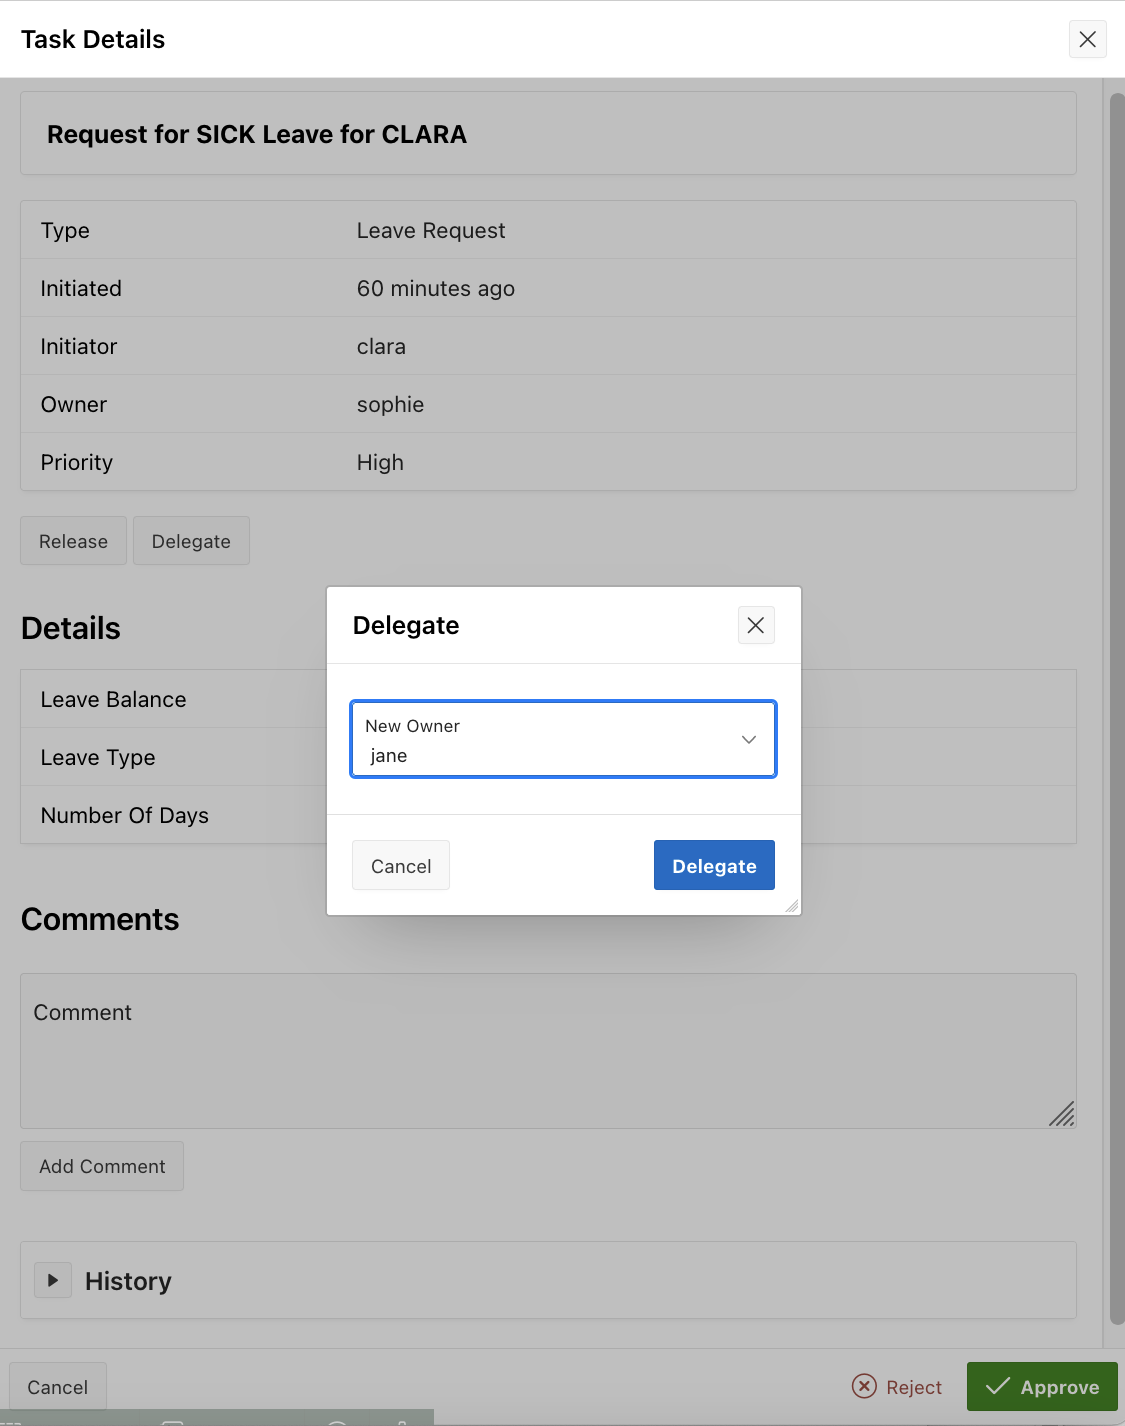
Click on Claim Task. You will now find the Approve and Reject buttons appearing in the Task Details. Additionally, you will find Release and Delegate buttons just above the Details section of the Task.
Now that the task is claimed by Sophie , if you log out and log back in as Jane, you will no longer find this task on her My Approvals Page.
Let us do a quick recap of what the Release and Delegate buttons will help us achieve.
Release – This is the reverse action of Claim. The task goes back to being Unassigned and can be claimed by any of the Potential Owners again. So, if Sophie clicks on this action (Release), we will see this task appear on Jane’s My Approvals page again and the state will be Unassigned. Either Sophie or Jane can claim and work on it.
Delegate – This opens a pop-up with a list of Potential Owners to whom Sophie can Delegate the task. In this case Jane is the other Potential Owner. So the list shows her name. Unlike Release, Delegate exclusively assigns the task to the New Owner. So the task state is Assigned and only the New Owner can act on it once it is delegated to him/her.
Click on Delegate. Once the task is Delegated it disappears from Sophie’s My Approvals page.
In this way, Jane and Sophie can keep delegating the work to each other. (Not infinitely hopefully, since Clara, meanwhile, is waiting for her Leave to get Approved!)
The Business Administrator intervenes
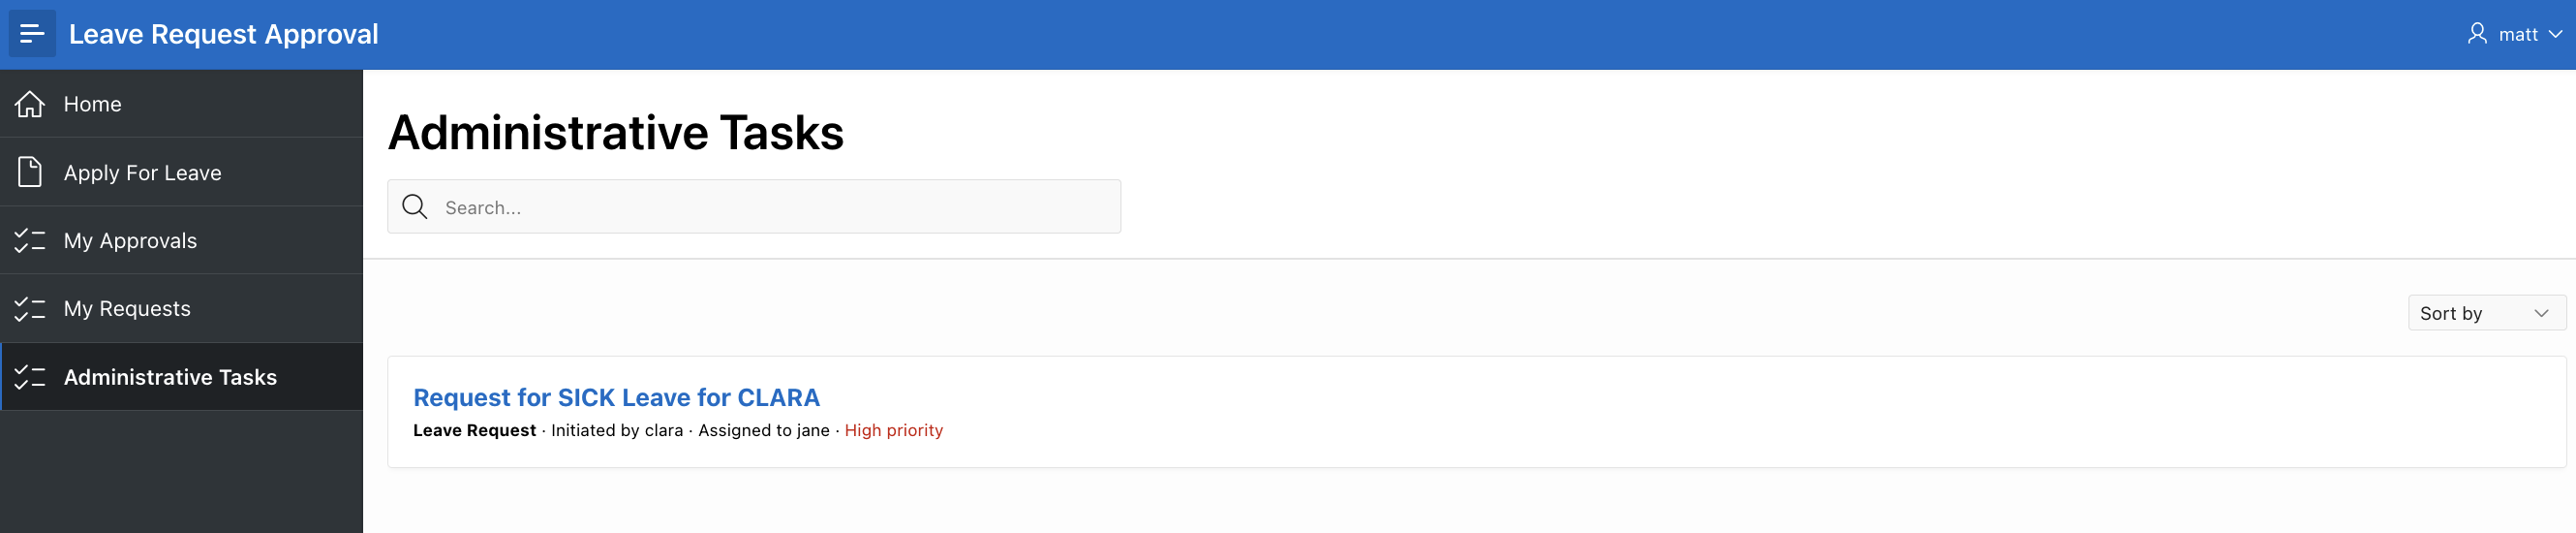
Log out and Log back in as Matt and navigate to the Administrative Tasks page.
Matt, as the Business Administrator can update the priority of this task to Urgent so that Jane or Sophie can expedite the work on it.
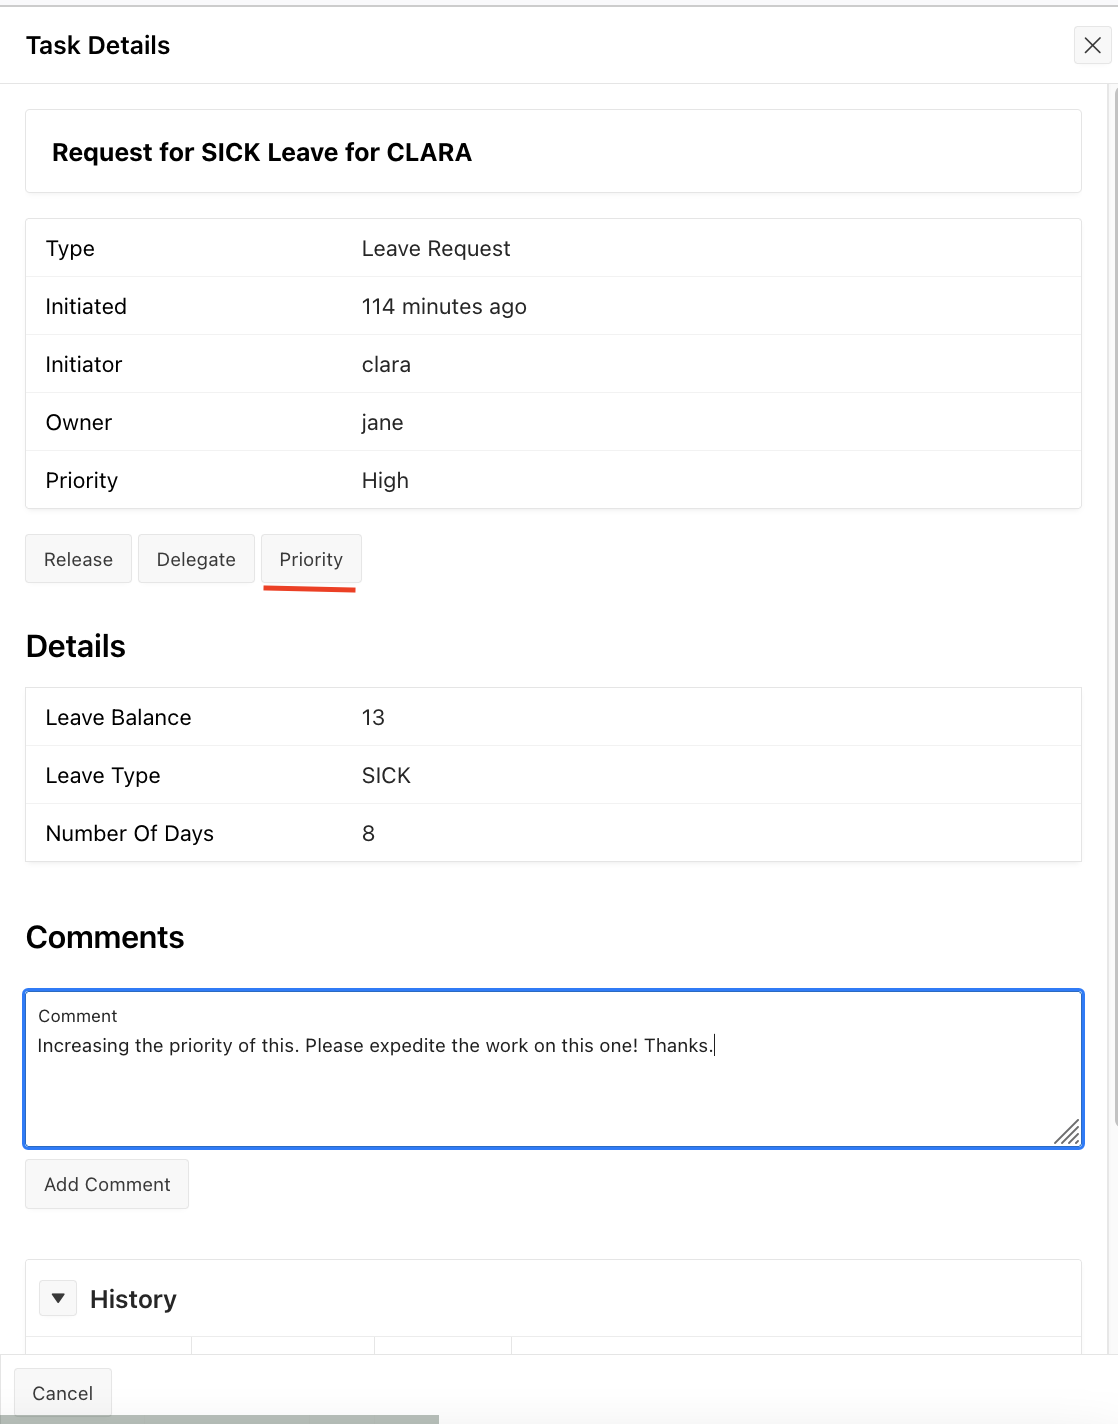
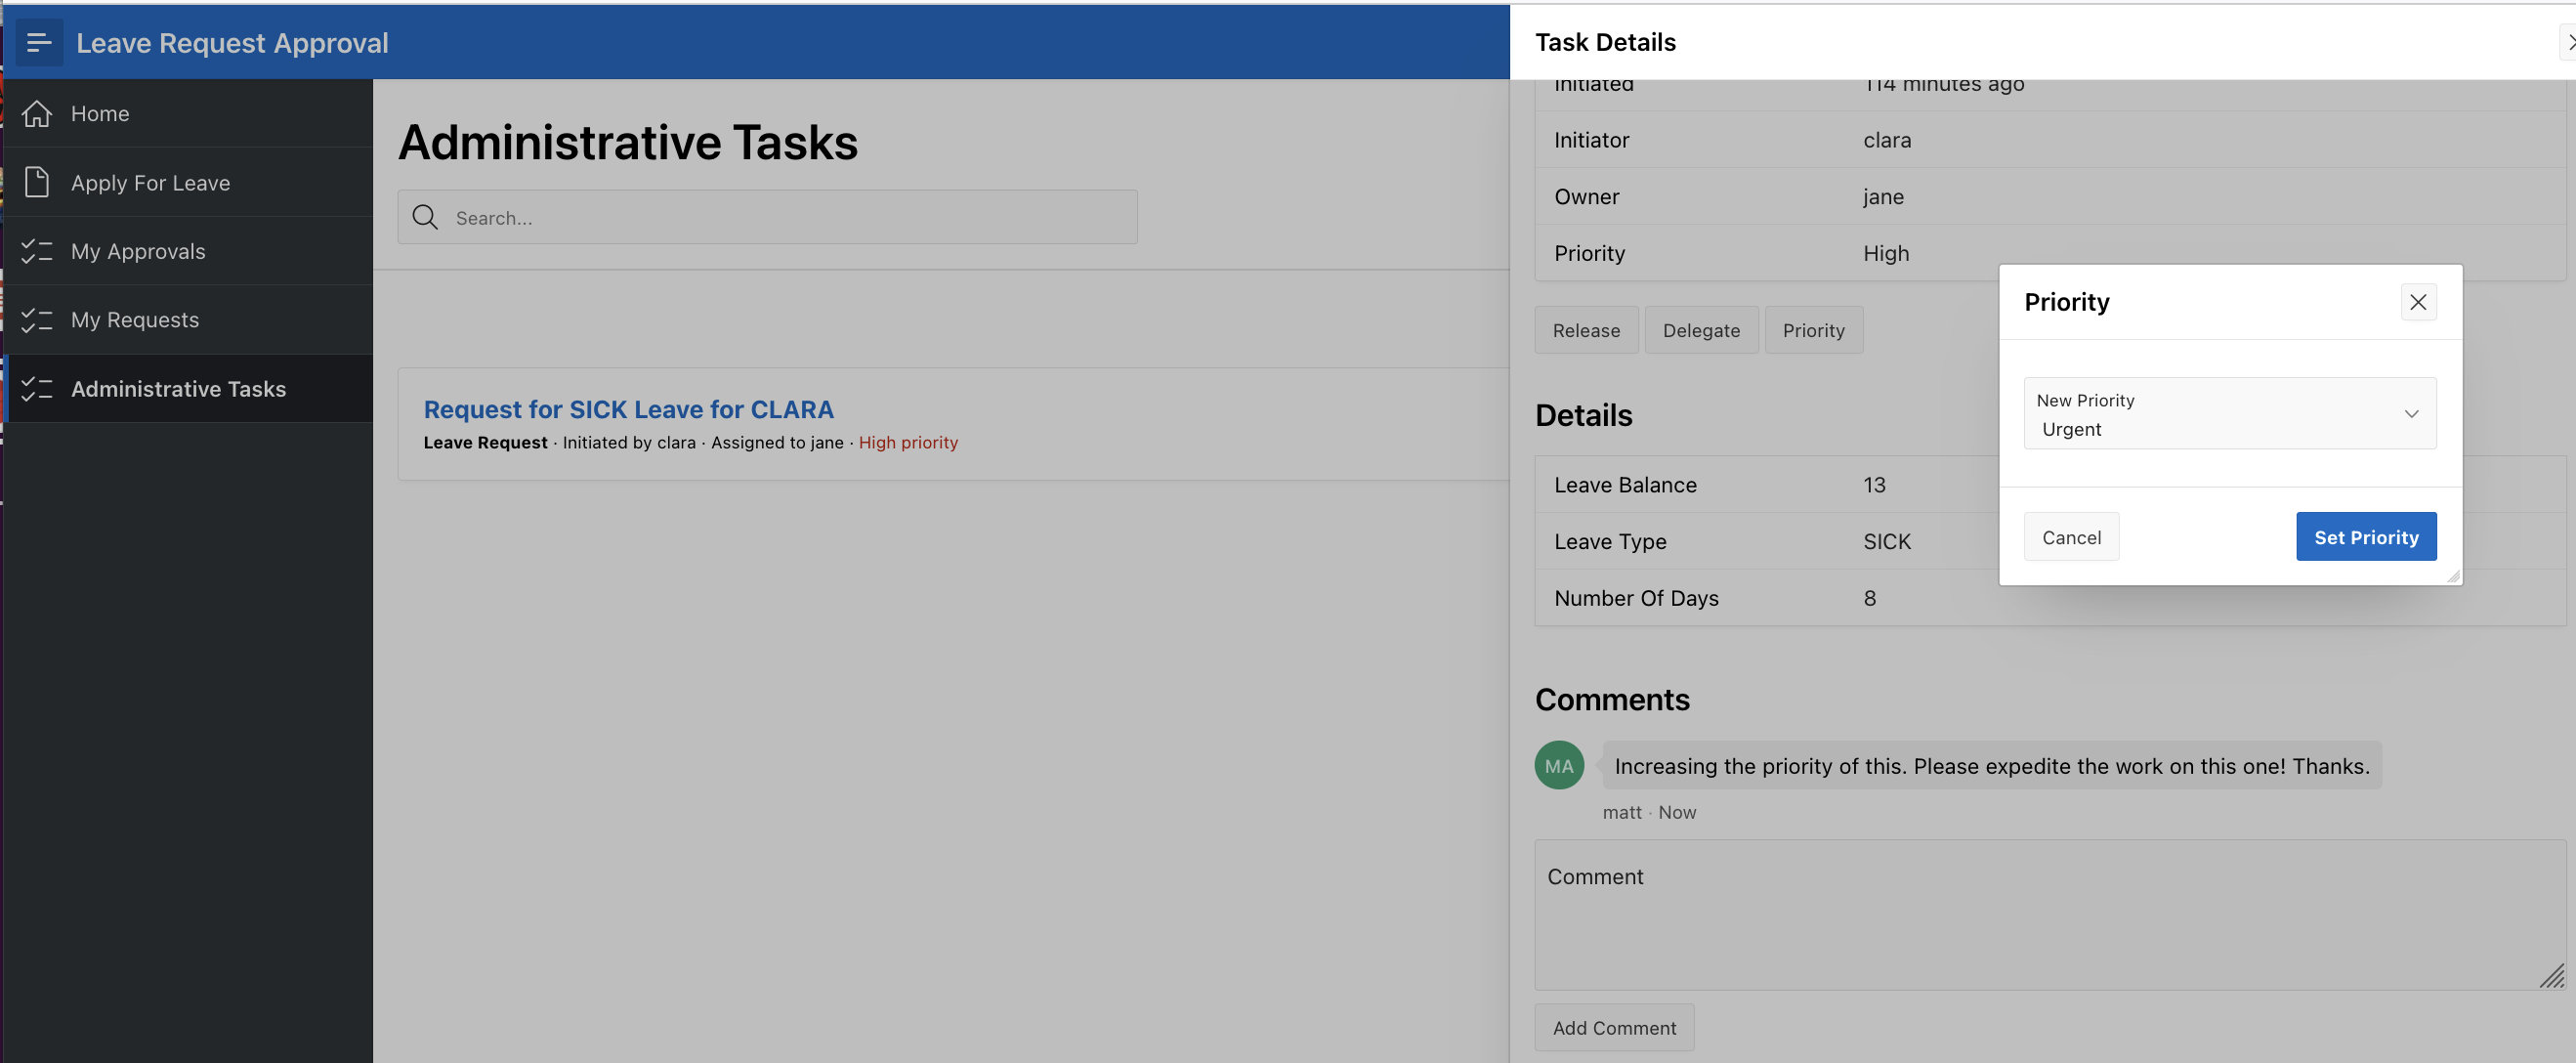
Click on the task to open the Task Details Page. Add a comment to the Comments section and click on the Priority Button as shown below.
Click on the Set Priority with Urgent as the New Priority.
Log Back In as Jane and navigate to My Approvals. The Leave Request Task is now shown to be Urgent .
Click on the Approve button to Approve this task from the My Approvals page itself, since it is urgent. Jane could also open the Task Details page to Approve the task from there.
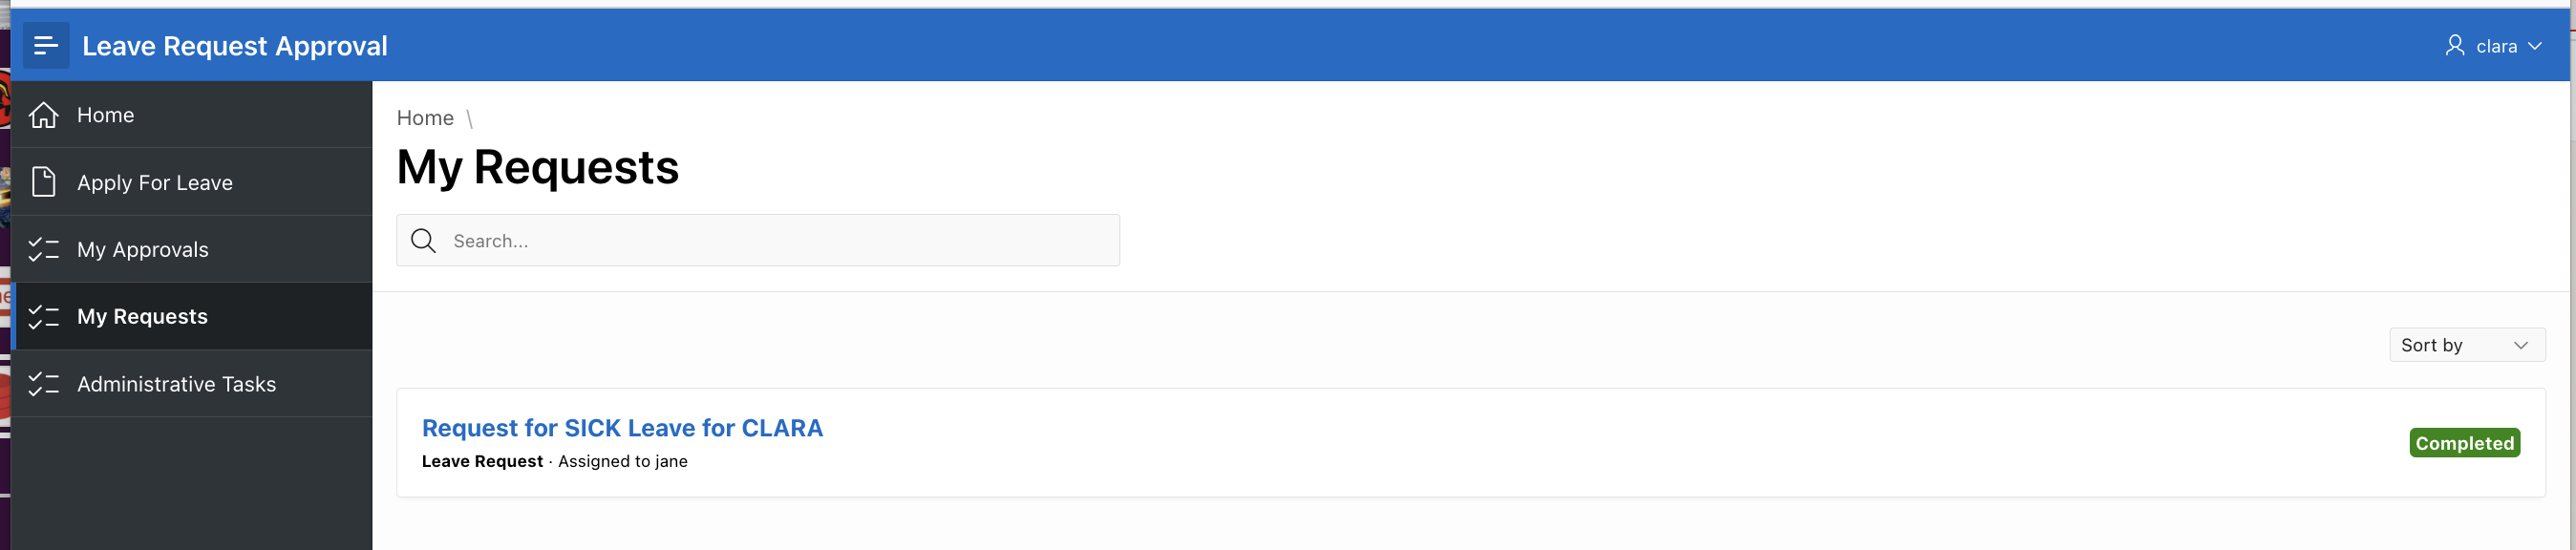
Log back in as Clara and navigate to the My Requests page . Her task now is in Completed state.
When Clara submits Apply For Leave the next time she requests for leave, the Leave Balance is shown to have deducted those 8 days that she had applied for earlier. So her Leave Balancenow shows 13 -8 = 5 days. This is due to the new Task Action “Update Balance” that we had configured on the Task Definition.
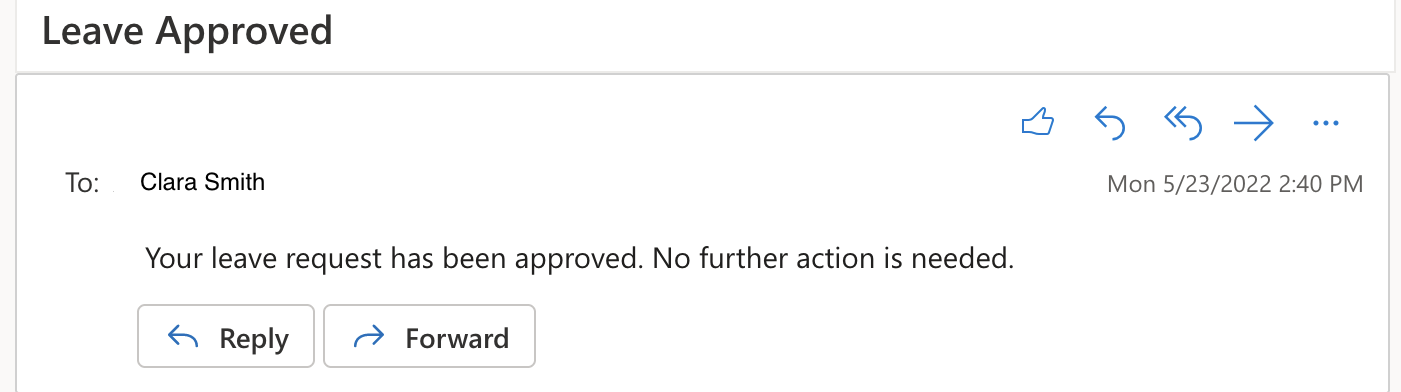
Like we had seen in the previous blog, Clara also receives an email saying that her leave got approved.
This completes the second part of the Approvals Component Blog series.
Summary
What we have learnt
1) How to Claim, Delegate and Release tasks with multiple potential owners.
2) How to create an Administrative Tasks page for the Business Administrator of a task using Unified Task List
3) How to Update Priority of a task to expedite its completion.
4) How to configure additional Task Actions to update a system of records when a task is completed.
What’s Next?
In the next blog of this series , we will further enhance this Application and learn how to
1) Use the Leave Application to demonstrate a multi-level (hierarchical) approval use case.
2) How to provide the initiator of task with an option to Cancel the Task he no longer wants approval for.
Stay Tuned!
Authors
Ananya Chatterjee
Consulting Member of Technical Staff
Ananya hails from Kolkata and has been associated with Oracle for the past 2 decades. For many years, she was working for Oracle Integration Cloud and Oracle Process Automation Service, leading multiple teams. She now works as part of the Oracle APEX team and has co-designed and developed the APEX Approvals Component and APEX Workflow features.
She is also a bilingual poet with five published poetry collections in English and Bengali.