Doctor Appointments Made Easy!
To implement an efficient system to schedule and manage doctor consultations, we will design an APEX Application titled Doctor Appointments Made Easy which will use the Workflow component. To design such an application, we need to
- break down the business logic into simple executable steps
- identify the sequences and conditions according to which these steps should be executed
- identify the participants in the organization that are involved in the business
Note: In APEX Workflow terminology – we refer to an executable step as an Activity and a sequence/condition as a Connection.
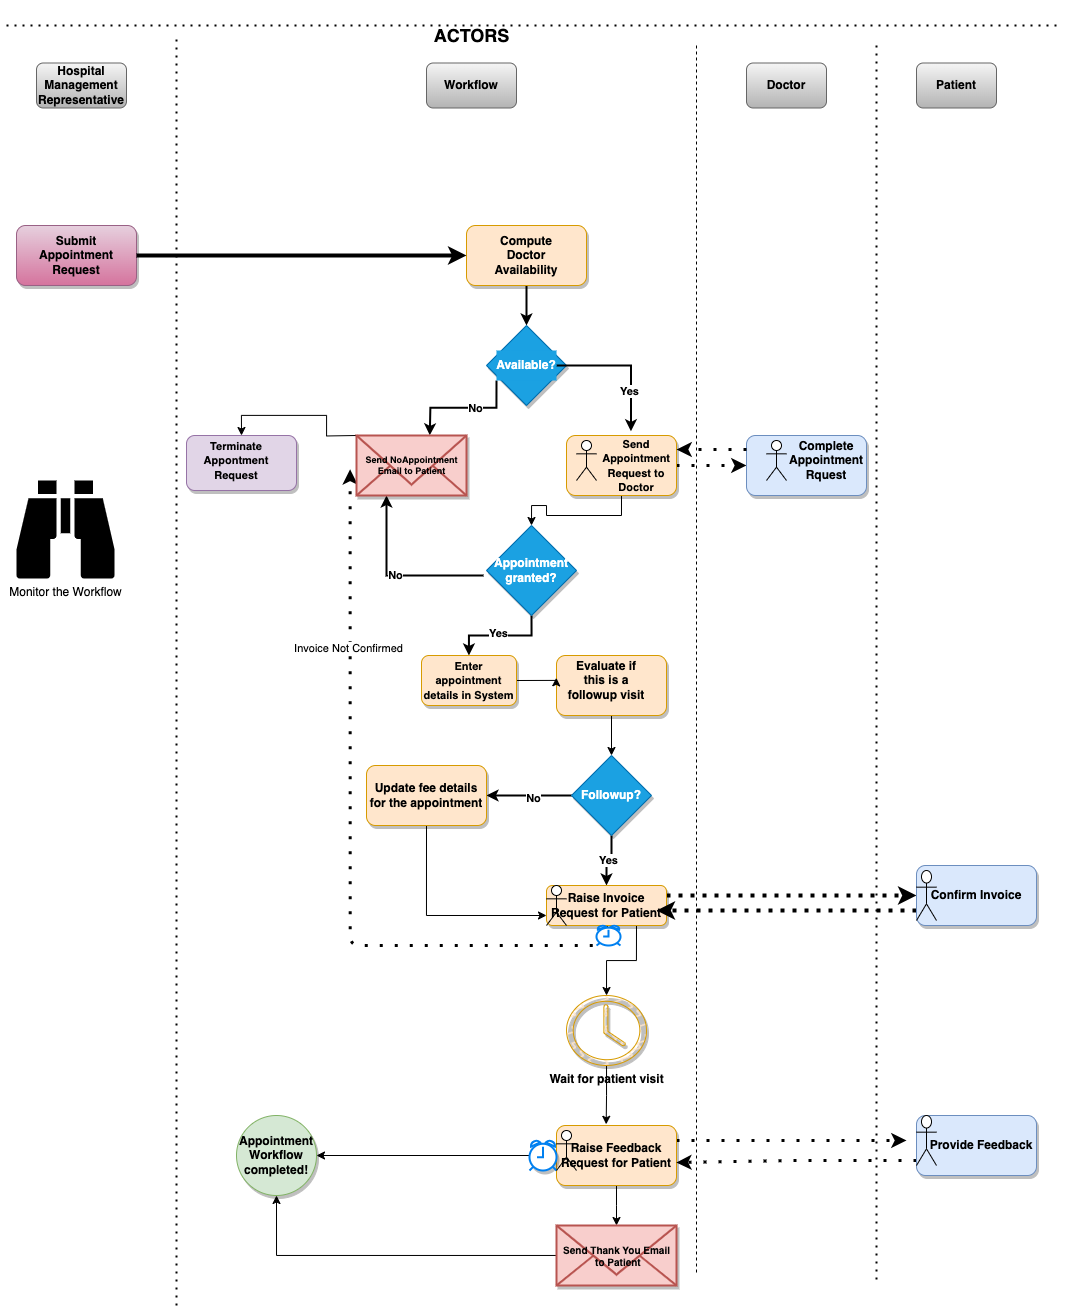
Breaking down the Business Logic
The following table shows the steps involved in scheduling and managing medical appointments. It also shows the actors for each step.
| Step No. | Step | Step Type | Actor |
|---|---|---|---|
| 1 | Call hospital for appointment with a doctor | Manual | Patient |
| 2 |
|
Manual | Hospital Management Representative/Staff |
| 3 | Check if the requested doctor is busy on the requested appointment date/time. | Automatic | Workflow |
| 4 | If the doctor is busy, send No-Appointment email to patient and close the appointment request. | Automatic | Workflow |
| 5 | If the doctor is available, raise an Approval Task for the Doctor to confirm the appointment request | Automatic | Workflow |
| 6 | Log in to the application to access the appointment request | Manual | Doctor |
| 7 | Approve the appointment request | Manual | Doctor |
| 8 | Reject the appointment request | Manual | Doctor |
| 9 | If the doctor rejects, send No-Appointment email to patient and close the appointment request. | Automatic | Workflow |
| 10 | If the doctor approves, enter Appointment details in the system with status ‘Confirmed’ | Automatic | Workflow |
| 11 | Check if the patient had a previous appointment with the same doctor in the last 7 days | Automatic | Workflow |
| 12 | If the above is true, mark this as a followup visit and donot charge fees and raise an invoice with zero payment request for the patient to confirm | Automatic | Workflow |
| 13 | If the above is false, mark this as a new visit and raise an invoice with fees and payment request for the patient to confirm | Automatic | Workflow |
| 14 | In both cases send email notifying the patient of the appointment confirmation and the invoice request | Automatic | Workflow |
| 15 | Login to the application to confirm the invoice | Manual | Patient |
| 16 | If the patient does not confirm the invoice within a specific period, send a No Appointment email and close the appointment request | Automatic | Workflow |
| 17 | If the patient confirms the invoice, update the appointment status to PAID in the system of records | Automatic | Workflow |
| 18 | Wait until the appointment is completed | Automatic | Workflow |
| 19 | Raise a feedback request to the patient | Automatic | Workflow |
| 20 | Login to the application and provide feedback | Manual | Patient |
| 21 | If the patient does not complete the feedback request within a specified period, close the appointment request. | Automatic | Workflow |
| 22 | If the patient provides a feedback, send a Thank You email to the patient and then close the appointment request. | Automatic | Workflow |
.
The no. of automated steps in the above use-case gives us an idea of the importance of workflow in business processes.
Next, we draw a flowchart based on the automated steps. Flow charts help us to visualize the flow of the business logic.
Flowchart
In the next section we will create the Doctor Appointments Made Easy Application.