

Installing Oracle Analytics Server (OAS) 2026 on an Azure Compute virtual machine brings enterprise-grade analytics closer to cloud-hosted data platforms. It provides a self-managed approach to visual analytics, dashboards, reporting, and governed data exploration while retaining control over the underlying infrastructure, network configuration, and security model.
This article provides step-by-step instructions for installing and configuring OAS 2026 on a Linux-based Azure VM. It also covers configuring the Repository Creation Utility (RCU) to use an Oracle Autonomous AI Database as the repository database, including the wallet-based connection required to establish secure database connectivity.
Note: The installation described in this article was performed on an Azure Standard_E8-2ads_v7 virtual machine configured with 2 vCPUs, 64 GB of memory, and 1,024 GB of storage, running Oracle Linux 8.10. Before beginning the installation, review the certification, system, and interoperability requirements in the Oracle Analytics Server installation documentation to verify that your environment meets the applicable requirements.
Prerequisites:
- Azure Cloud Account.
- Oracle Cloud Account.
- Licensing for Oracle Analytics Server.
- Downloads of the required Oracle Installation Files.
- Java Development Kit (JDK) – Version 21 (or later).
- Oracle Fusion Middleware Infrastructure – fmw_14.1.2.0.0_infrastructure.jar
- OAS Installation Binary Files
- Oracle_Analytics_Server_2026_Linux.jar
- Oracle_Analytics_Server_2026_Linux2.jar
Official documentation links can be found at the end of this article.
Step 2: Download and Install Fusion Middleware Infrastructure
Download the Oracle Fusion Middleware (FMW) 14c Infrastructure installer.
Once downloaded, run the installation for Fusion Middleware:
- Linux command: java -jar fmw_14.1.2.0.0_infrastructure.jar
- Follow the installation wizard:
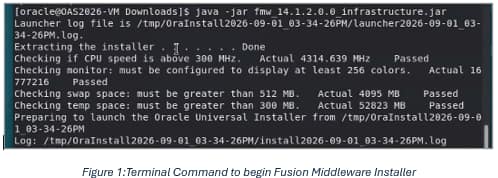
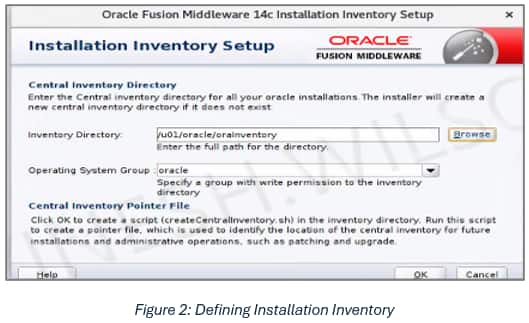
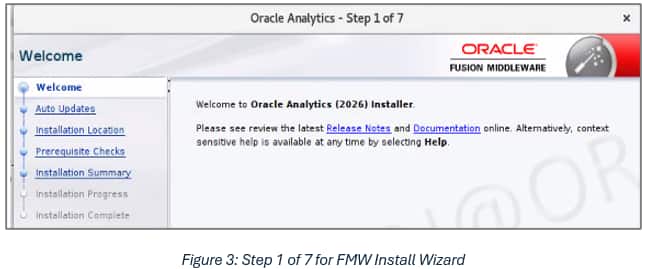
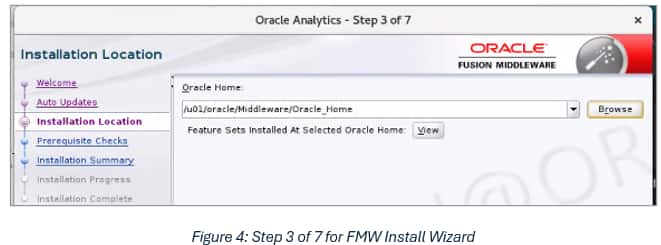
Note: If the installation fails during Prerequisite Check for missing operating system packages, cancel the setup. Install the missing packages and then restart the process. Common missing packages and install commands are:
- sudo dnf install -y gcc gcc-c++ make
- sudo dnf install -y sysstat
- sudo dnf install -y oracle-database-preinstall-19c
- sudo dnf install libnsl
Step 3: Provision an Oracle Autonomous AI Database
- Search for “Oracle AI Database@Azure” on the Azure Home Page
- Create an Oracle Autonomous AI Database
- Provide appropriate Subscription, Resource Group, Name and Region for the database on the Basics Tab.
- Within the Configuration tab, define the workload as Lakehouse with database version of 26ai, and select whether to accept the default ECP and Storage settings based on needs.
- Set the administrator Username and Password, with the appropriate license type.
- Continue with the remaining tabs of Networking, Maintenance, Consent, Tags and Review + Create based on needs.
- Once finished continue to the “Review + create” to begin the database provisioning.
- To download the wallet file, select your Autonomous AI Database, then Settings, then Connections.
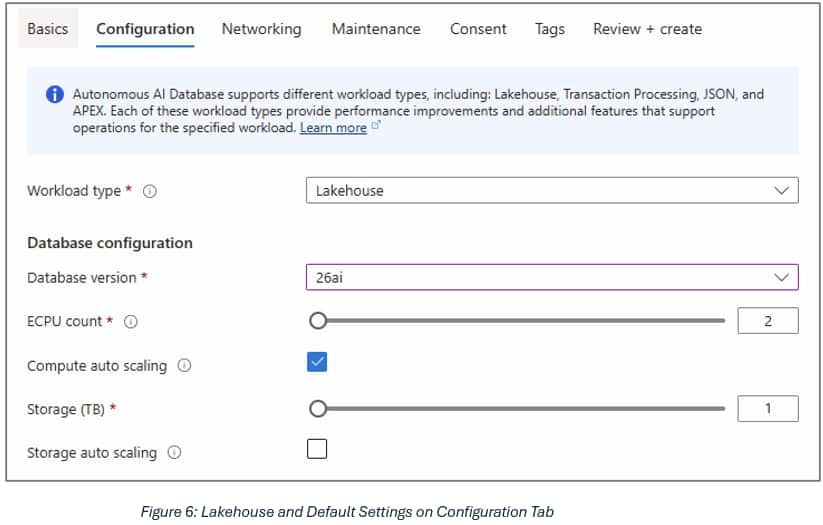
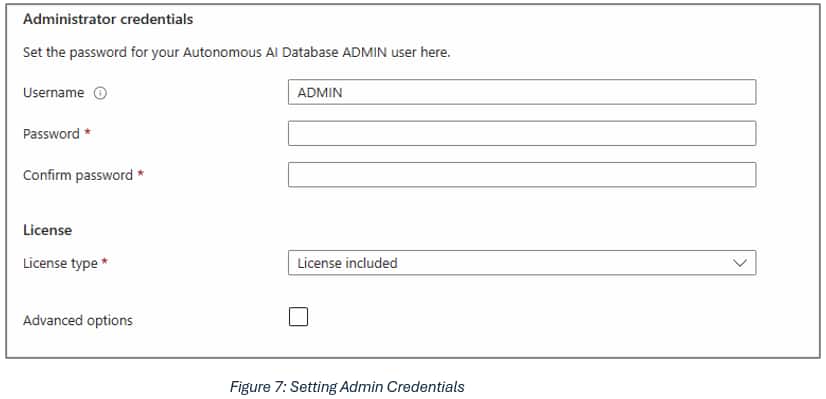
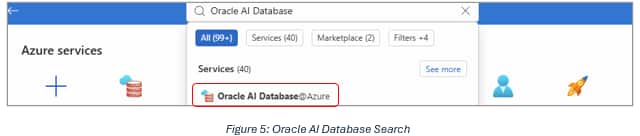
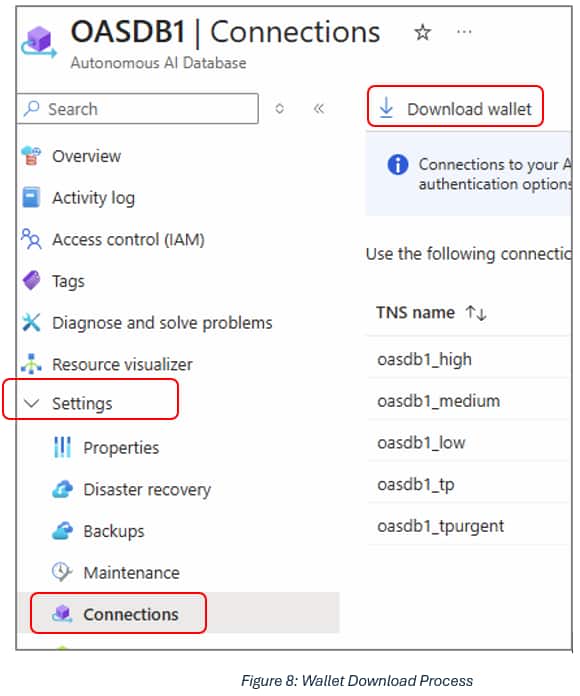
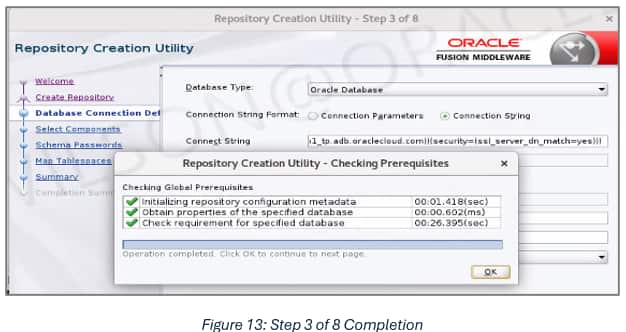
Step 4: Configuring the Repository Creation Utility (RCU).
- This installation step creates the Repository Schema for use during the OAS configuration.
- Navigate to: ORACLE_HOME/oracle_common/bin directory and run: ./rcu
- There are two ways to provide the connect string for Oracle Autonomous AI Database:
- jdbc:oracle:thin:@oas2026atp_tp?TNS_ADMIN=< wallet path>
- example: /u01/data/Wallet_OAS2026ATP
- jdbc:oracle:thin:@<Service name string from tnsnames.ora>
or
- jdbc:oracle:thin:@oas2026atp_tp?TNS_ADMIN=< wallet path>
- export RCU_SSL_MODE=true
- export TNS_ADMIN=<local directory where wallet file is extracted>
- example: /u01/data/Wallet_OAS2026ATP/
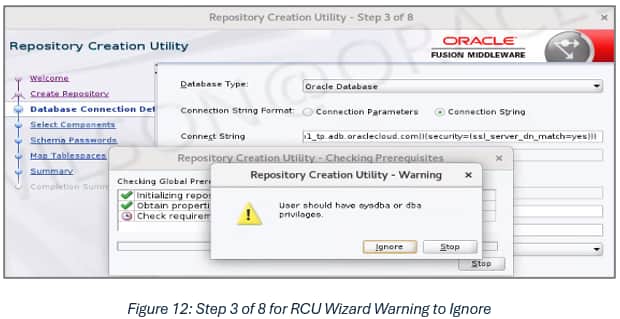
- Ignore the warning.
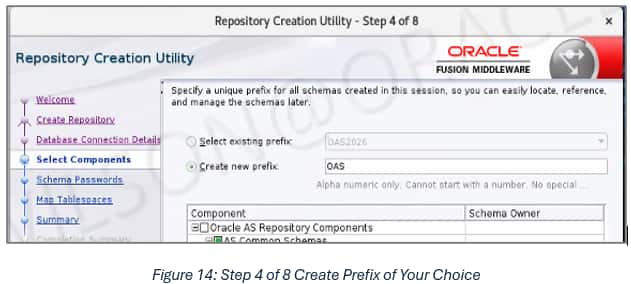
- Provide an Repository Schema prefix.
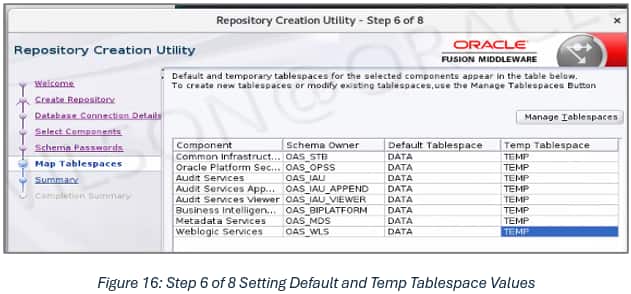
- Use the following values to override tablespace mappings in the Repository Schema.
- Default Tablespace: DATA
- Temp Tablespace: TEMP
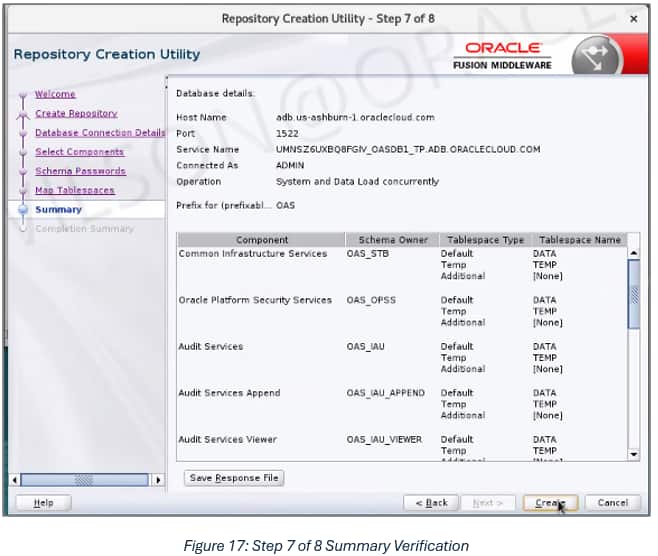
- After setting the tablespace names, the following is displayed; proceed with Create:
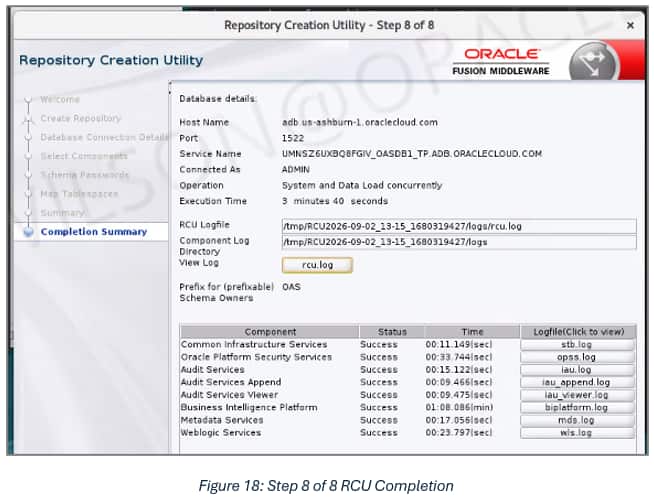
- This completes the creation of the Repository Schema.
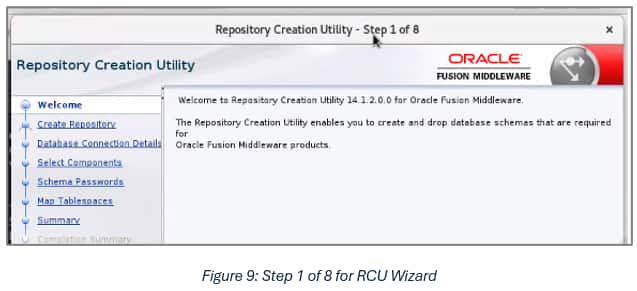
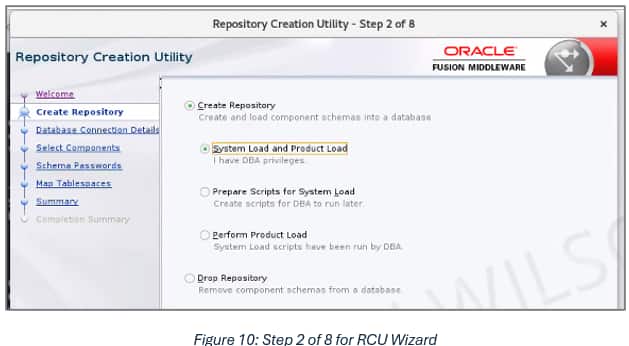
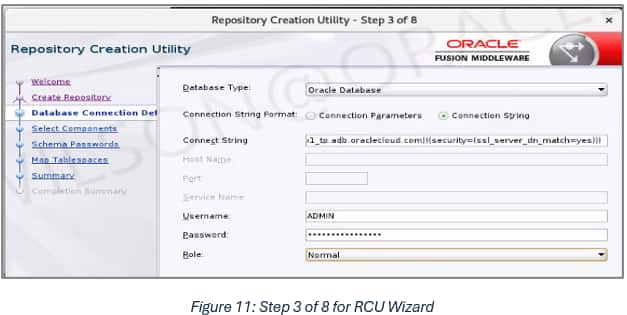
Note: Because Oracle Autonomous AI Database is being used for the RCU, extract the wallet file to a local directory on the server. Execute the following commands as the installation user:
Step 5: Installing Oracle Analytics Sever
- (Linux) $JAVA_HOME/bin/java -jar Oracle_Analytics_Server_2026_Linux64.jar
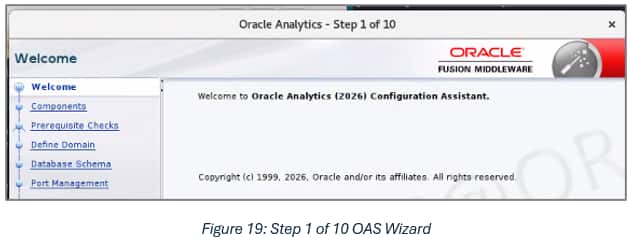
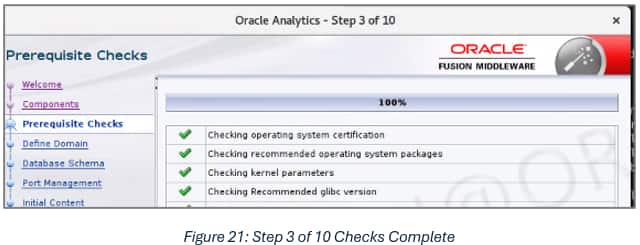
- Follow the installation wizard:
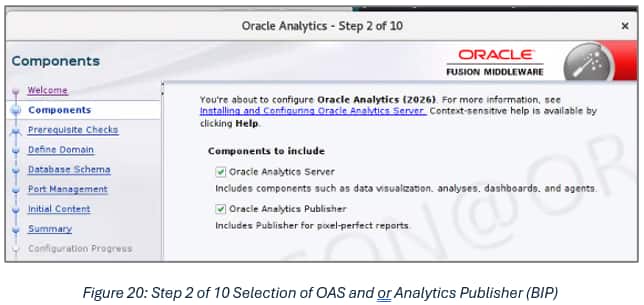
Note: This installation is for both the Oracle Analytics Server and Oracle Analytics Publisher. Each can be installed separately or jointly, depending on business need.
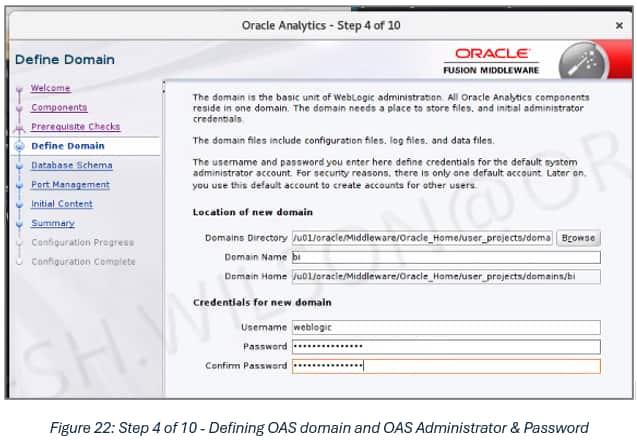
- When defining the Domain, the password does have requirements, where special characters aren’t permitted. Only alphanumeric values are accepted. Here, the administrator user name is defined for all components of Oracle Analytics Server.
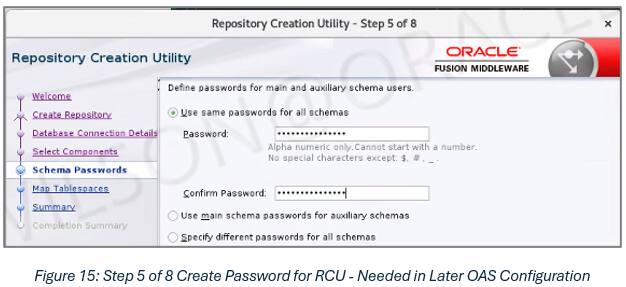
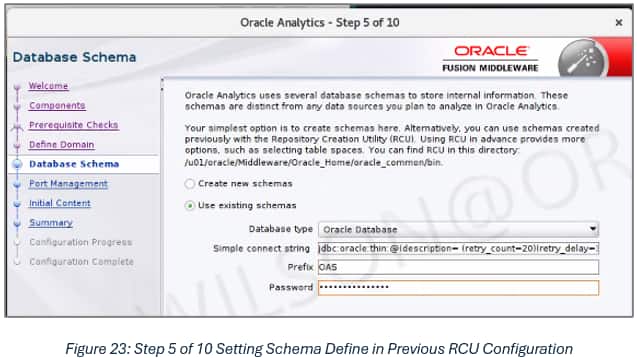
- Because the Repository Schema was previously created in the Repository Creation Utility – Step 5 of 8, select “Using existing schemas” and set the values as:
- Database type: Oracle Database.
- Simple connect string: Set using the same string to the database created in the Repository Schema.
- Prefix: is the table prefix set in the Repository Schema.
- Password: password defined when configuring the Repository Schema.
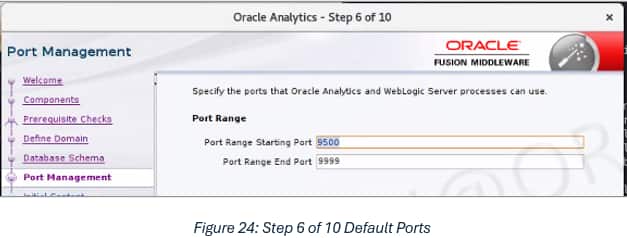
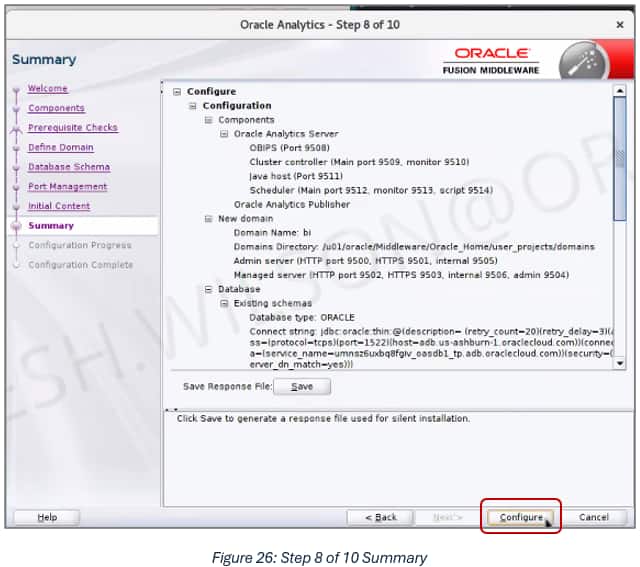
- Within Port Management, keep the default values.
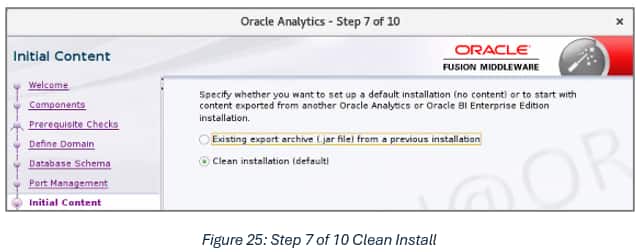
- Clean Installation is selected as this is a new installation of Oracle Analytics Server.
- Proceed with Configure to begin the installation.
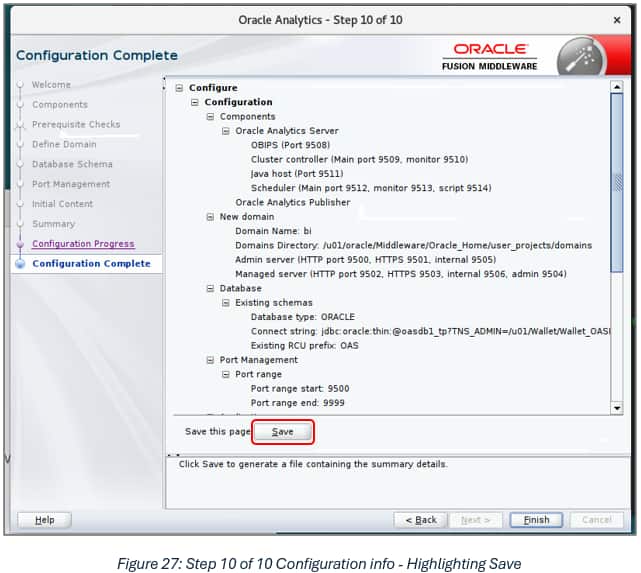
- If there are no errors, move to Step 10. Save before selecting Finish to allow the administrator to save the configuration for all components of Oracle Analytics Server. This contains the entry points for: WebLogic Console, Fusion Middleware Control, Publisher, Analytics, and Data Visualization.
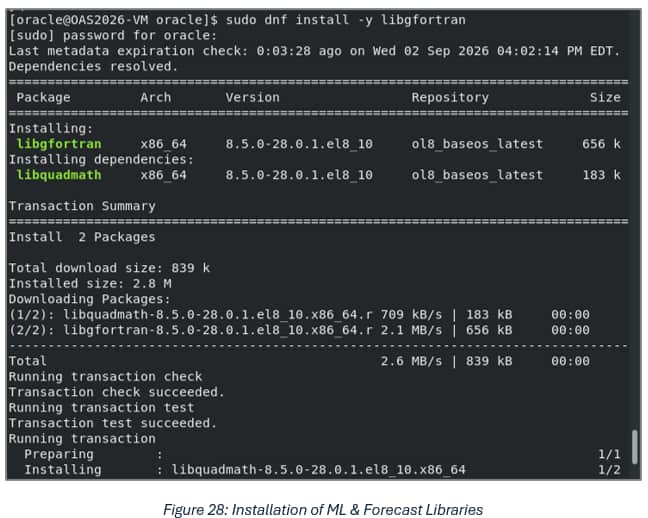
- After finishing Oracle Analytics Server, install the required libraries for Machine Learning and Forecasting to work within Oracle Analytics Server. Run the following command (operating system dependent; check the Oracle Analytics Server Installing and Configuring Oracle Analytics Server Link in the documentation link section of this article):
- sudo dnf install -y libgfortran
Step 6: Install critical patches for Oracle Analytics Server
- Navigate to the OAS installation path:
<PATH>/Oracle_Home/user_projects/domains/bi/bitools/bin and stop the OAS components via ./stop.sh
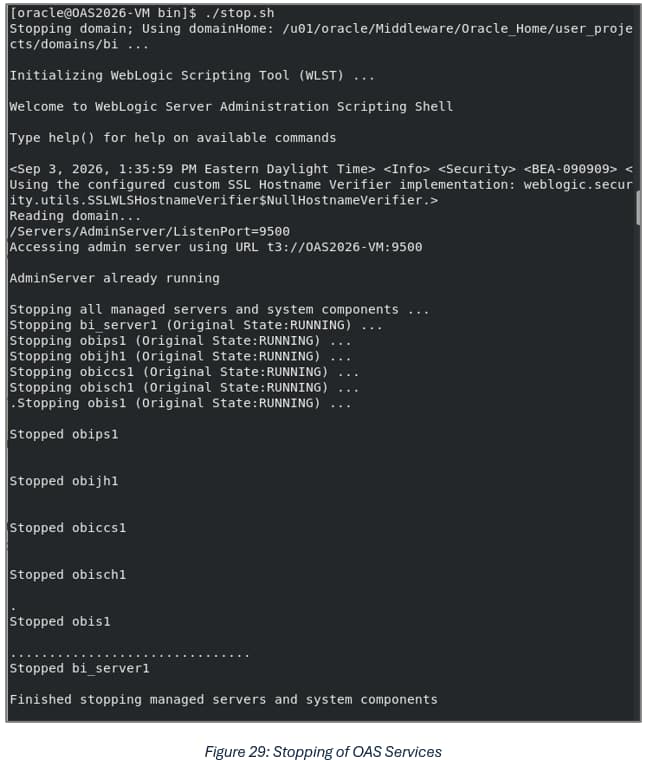
- With OAS stopped, apply the critical patch(s) to the system via SPBAT or with OPatch.
Find links to patches in the documentation link later in this article. - Once completed, in the terminal window where ./stop.sh was run, run ./start.sh to restart OAS. Once the script execution completes and OAS services are started, log in to all the entry points from the saved file, ensuring that the administrator account can log in to each entry point of OAS.
Common Errors and Troubleshooting:
- OAS Configuration Utility Can’t Connect to the Repository.
- If config.sh fails to connect to the repository schemas:
- Re-run the wallet export commands.
- Verify that the same connection string used during RCU is being used during configuration.
- Confirm that the schemas were successfully created in RCU.
- If config.sh fails to connect to the repository schemas:
- Incorrect File Permissions on Wallet Files.
- If the wallet files are owned by another user or have restricted permissions, the Repository Schema and OAS can fail to connect. Check and Verify:
- Wallet directory is accessible.
- Oracle user can read all wallet files.
- Unzip operations preserved the required file structure.
- If the wallet files are owned by another user or have restricted permissions, the Repository Schema and OAS can fail to connect. Check and Verify:
Documentation
- OAS 2026 Installation Documentation
- Oracle Fusion Middleware Supported System Configurations
- Prerequisites for FMW14c
- OAS Certification Matrix
- Oracle Analytics Server 2026 – Software Downloads (JDK, Fusion Middleware, OAS2026)
- OAS Patches – select Analytics Server (OAS) – to view required quarterly patches)
- Supported IaaS, Virtualization, or Container Implementations for Oracle Business Intelligence and Oracle Analytics Server KB346850
Call to Action
Try the installation process in your Microsoft Azure environment and share your results in the Oracle Analytics Community. You can also use the community to ask questions and provide feedback.