Published September 22, 2025.
This post is a member of the Real-World Performance Testing for Oracle Analytics Cloud with Apache JMeter blog series and guides in preparing an Apache JMeter performance test plan for Oracle Analytics Cloud. It includes architectural diagrams, component descriptions, deployment guidance, and links to other references.
Oracle Analytics CloudOAC (Oracle Analytics Cloud) is a scalable and secure Oracle Cloud service that provides a full set of capabilities to explore and perform collaborative analytics for you, your workgroup, and your enterprise. Features include:
- Data visualization and storytelling
- Machine learning
- Mobile analytics
- Open data source connectivity
- Data preparation and enrichment
- Enterprise data modeling
Apache JMeter
Apache JMeter is an open-source tool for performance testing that allows you to simulate real-world OAC user experiences and measure the performance of your reports.
Prerequisites
Following the guidance in this post requires:
- A device hosting the JMeter application with network access to OAC on port 443.
- An administrator with the authority to manage the JMeter device.
- An administrator with the authority to manage the OCI tenancy, identity domain, and OAC instance.
- An administrator with the authority to manage the OAC service.
- A developer with experience writing regular expressions (regex) for searching text and extracting data elements.
- A use case optimized for a single user, including:
- The navigation sequence for signing in, running a workbook, and signing out.
- The groups, roles, and responsibilities that allow access to the workbook and associated data sources.
- All queries associated with a workbook return results in less than 10 seconds.
Topics
This section contains the initial and prepared state diagrams.
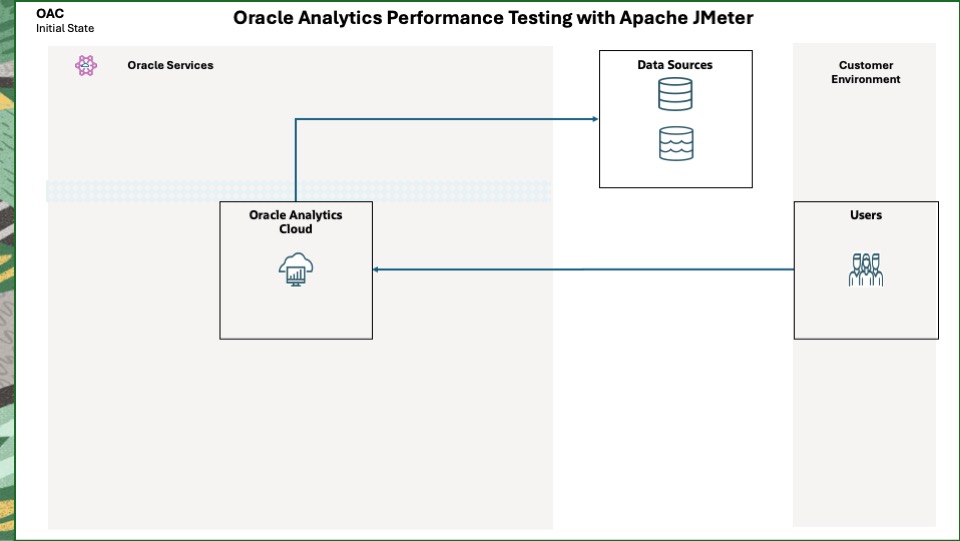
The initial state depicts users who can connect to OAC and OAC connections to data sources.
Prepared State

The prepared state depicts users’ connections to JMeter and JMeter connections to OAC.
This section describes the components found in the Component diagram.
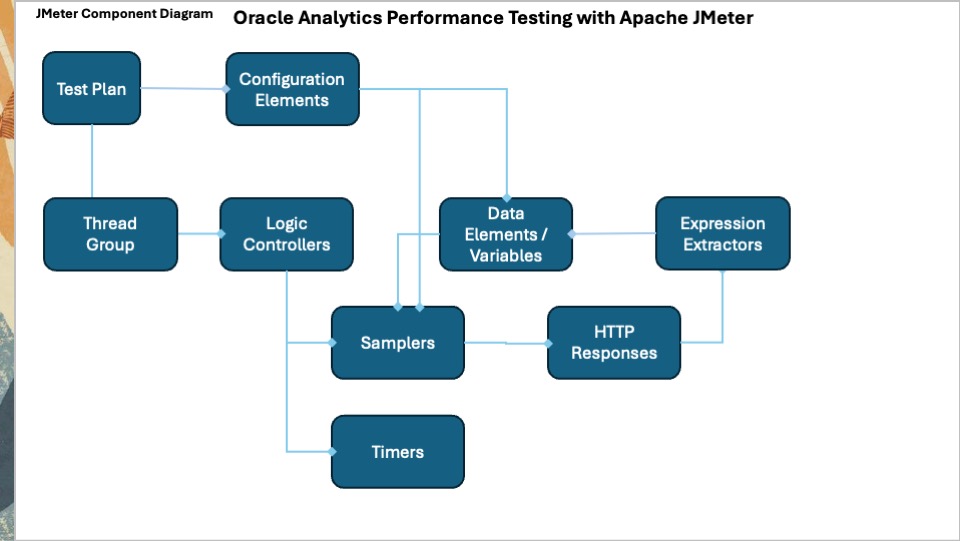
This diagram depicts the high-level JMeter components.
Component Descriptions
A JMeter application consists of components shown in the Component diagram. Apache JMeter – User’s Manual: Component Reference has a complete list of components and detailed descriptions. This post uses the following.
A JMeter Test Plan serves as the foundational container for defining and executing performance tests within the Apache JMeter application. It outlines the sequence of steps JMeter performs during a test run and encompasses all the necessary elements to simulate user load and gather performance metrics. It is saved as a .jmx file, allowing for easy sharing and reusability of test scripts. Refer to Building a Web Test Plan – Apache JMeter – User’s Manual for detailed guidance.
Thread Group
A Thread Group is the beginning point of any test plan. All controllers and samplers must be under the thread group. The thread group specifies the number of threads (concurrent users) used to execute the test. Each thread executes the test plan independently of other threads.
Configuration Elements
Configuration elements work closely with Samplers. Although they do not send requests (except for the HTTP(S) Test Script Recorder), they modify and add to existing requests. A configuration element’s scope is dependent on where in the test plan it is placed.
Best Practice: Add configuration elements below the test plan and above the thread group so the elements apply to the entire test plan.
User-defined variables comprise an initial set of variables that apply to a test plan, e.g., hostname, idcs_hostname.
HTTP Cache Manager
This element adds caching functionality to HTTP requests to simulate a browser’s cache feature. Each virtual user thread has a different cache.
HTTP Cookie Manager
This element stores and sends cookies just like a web browser. If a response to an HTTP request contains a cookie, it is stored and used for all future requests to that website. Each JMeter thread has its own cookie storage area.
Counter
A counter loops from a starting value and increments until a maximum value is reached.
For example, a while controller may run a poll request every 15 seconds until a query completes. Adding a counter value of 5 to the exit criteria ends the polling after 5 requests or 75 seconds.
CSV Data Set Config
This element is used to read lines from a file and split them into variables. A basic test plan uses a file containing the virtual usernames and passwords.
HTTP Request Defaults
This element sets default values that an HTTP Request sampler uses. Three examples are the protocol, port, and hostname.
HTTP Header Manager
The HTTP(S) test script recorder uses an HTTP header manager to record HTTP request headers for each HTTP request.
This element enables adding and overriding a sampler’s request headers.
Best practice: Use an occurrence of this element before a thread group to store a default set of request headers used by all samplers.
HTTP(S) Test Script Recorder
This element allows JMeter to intercept and record the actions performed for the OAC use case. It creates and stores HTTP Request samplers directly into specified recording controllers.
JMeter Plugins Manager
The JMeter Plugins Manager installs various plugins through a simple user interface. This removes the need to download, upload, and manage JAR files.
Browser Elements
Proxy Server
A proxy is used by the HTTP(S) test script recorder to intercept HTTP requests and save them to a recording controller.
JMeter Root Certificate
HTTPS uses certificates to authenticate connections between a browser and OAC.
The HTTP(S) test script recorder generates and uses its own certificate to intercept the HTTPS requests from a browser to OAC.
Listeners
Listeners perform several roles in addition to listening to the test results. They also provide means to view, save, and read saved test results.
Best Practice: To ensure the proper scope, add listeners directly below the thread group.
This element shows a tree of all sample responses, allowing you to view the start time, request, response, and elapsed time of each.
Warning : This element may be used for functional testing, debugging, and validation. Do not use it (disable it) during a load test, as it consumes a significant amount of resources (memory and CPU).
Samplers
Samplers perform the required tasks to simulate the use case being tested. They generate one or more sample results that can be viewed in the various listeners. A basic test plan may contain the following:
OAC performance testing relies on this sampler to send HTTPS requests and receive responses.
This sampler uses the Configuration Elements above for defaults, variable substitution, and cookie and cache management.
Debug Sampler
This sampler is used for functional testing, debugging, and validation. It is primarily used to display variable values used in requests and returned in responses.
Do not use it (disable it) during a load test, as it consumes resources (memory and CPU).
Logic Controllers
Logic Controllers determine the order in which Samplers are processed.
Recording ControllerThis controller is a placeholder indicating where the HTTP(S) Test Script Recorder should place recorded samples. Multiple occurrences of the controller are used to logically separate portions of the use-case, e.g., Sign-in, Workbook, and Sign-out.
Transaction Controller
This controller generates an additional sample that measures the overall time taken to perform the nested test elements and, optionally, the duration of nested timers and pre-post processors. The generated sample is regarded as successful if all of its sub-samples are successful.
Simple Controller
This controller organizes and nests samplers and other controllers. Unlike other controllers, it provides no additional functionality.
Parallel Controller
JMeter executes elements of a thread group sequentially. The parallel controller offered by Blazemeter simulates OAC executing workbook queries in parallel.
Limitation: Use nested Simple Controllers within this controller, as it does not support Transaction Controllers.
While Controller
This controller runs a set of nested elements until a condition is met.
Workbook queries run for various amounts of time. By default, a browser polls a query’s status every 15 seconds.
A recorded workbook query has the number of poll requests needed by the browser at the time of recording.
A change to the workbook, query, dataset, or subject area can cause a query’s runtime to increase.
To determine if a query has completed, the while controller runs a poll request until a pre-defined pattern is detected.
Timers Uniform Random Timer
Multiple occurrences of this element pause a test thread to simulate thinking and analysis time within the use case.
Post-Processors Regular Expression Extractor
An occurrence of this element extracts a value from a sample response and populates a variable for use by other samplers.
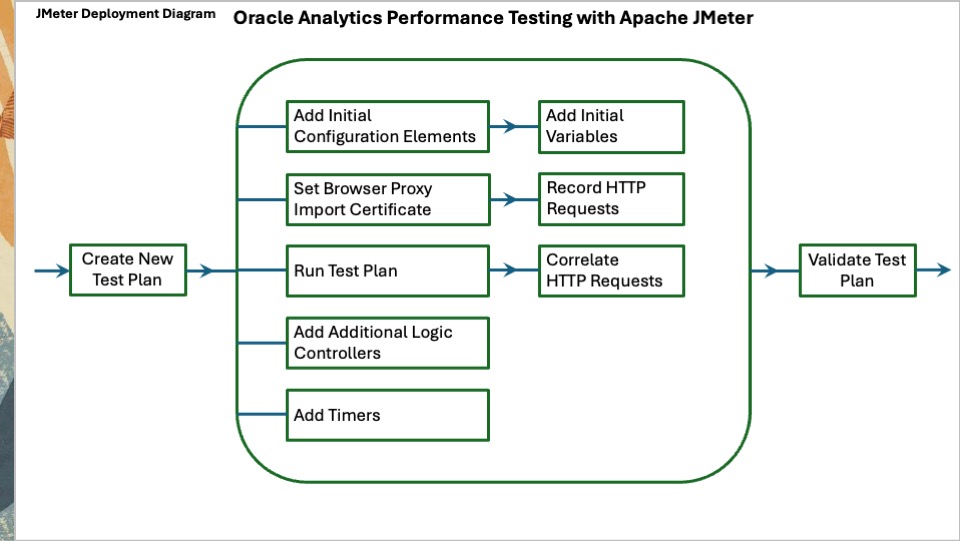
This diagram depicts the high-level JMeter deployment flow.
A typical workflow for developing a test plan is listed below. Refer to the preceding component descriptions as needed.
- Create a Test Plan
- Add Initial Components
- Configure a Browser
- Record a User Session
- Run the Test Plan
- Correlate the HTTP Requests
- Add Additional Logic Controllers
- Add Timers
Create a Test Plan
Perform the following tasks.
- Start the JMeter application.
- Navigate to File > New.
- Change the default test plan Name.
- Navigate to File > Save Test Plan as and save the plan.
Add Initial Components
Perform the following tasks:
- Add a Plugin Manager
- Add a Test Script Recorder
- Add Initial Configuration Elements
- Add a Thread Group
Add a Plugin Manager
Perform the following tasks.
- Stop JMeter
- Download the Plugins Manager JAR file from here and put it into the JMeter lib/ext directory.
- Start JMeter
- Navigate to the Options menu to view the Plugins Manager.
Add a Test Script Recorder
Perform the following tasks.
The Recorder must be started to generate the certificate needed for the browser.
- Select the Test Plan and navigate to Add > Non-Test Elements> HTTP(S) Test Script Recorder.
- On the Test Plan Creation tab, under HTTP Sampler Settings, check the box for Retrieve All Embedded Resources.
- On the Requests Filtering tab, under URL Patterns to Exclude, click Add suggested Excludes.
- Select the Test Plan and navigate to File > Save.
- Start the Recorder.
- Select the Recorder
- Under State, click Start.
- A message appears saying a certificate has been generated. Click OK.
- Click Stop.
- Under State, click Start.
- Select the Recorder
Add Initial Configuration Elements
For each element, select the Test Plan and navigate to Add > Config Element.
User-Defined VariablesAdd the following variables.
- host – the OAC hostname ending in .com
- idcs – the IDCS hostname ending in .com
- username – the initial user to test with
- pwd – the initial user’s password
HTTP Cache Manager
Check the following boxes.
- Clear cache each iteration?
- Use Cache-Control/Expires header when processing requests
HTTP Cookie Manager
Check the following box.
- Clear cookies each iteration?
HTTP Request Defaults
Enter the following on the Basic tab:
- Protocol – https
- Server Name –${host}
- Port Number – 443
Check the following box on the Advanced tab.
- Retrieve all Embedded Resources
Add a Thread Group
Divide the plan into logical units using recording controllers. This example uses Login, Workbook, and Logout.
- Select the Test Plan and navigate to Add > Threads> Thread Group
- Accept the defaults.
- Select the thread group and add a Results Tree
- Navigate to Thread Group>Add > Listener> View Results Tree
- Add three Recording Controllers named Login, Workbook, and Logout. For each:
- Select the Thread Group.
- Navigate to Add > Logic Controller> Recording Controller.
- Change the Name.
Configure a Browser
Choose a browser to use. Firefox and Chrome are the best choices. Firefox requires fewer system privileges than Chrome. This post uses Firefox.
Perform the following tasks.
- Start the browser and navigate to Settings.
- Search for proxy and click the result.
- Check the button for Manual proxy configuration.
- Enter localhost for the HTTP Proxy.
- Enter the Port specified in the Test Script Recorder, i.e., 8888.
- Check the box for Also use this proxy for HTTPS.
- Click OK.
- Check the button for Manual proxy configuration.
- Search for certificate and click View Certificates.
- Select Authorities.
- Click Import.
- Browse to the JMeter-home/bin directory, i.e., apache-jmeter-5.6.3/bin.
- Select the ApacheJMeterTemporaryRootCA.crt certificate.
- Click Open.
- Check the box for Trust this CA to identify websites.
- Click OK.
- Browse to the JMeter-home/bin directory, i.e., apache-jmeter-5.6.3/bin.
- Search for proxy and click the result.
Record a User Session
Best practice: Record the user session into the recording controllers, starting with the login and ending with the logout.
For each of the recording controllers, perform the following tasks.
- In JMeter:
- Select the HTTP(S) Test Script Recorder and click the Test Plan Creation tab.
- Under Test plan content, open the Target Controller dropdown.
- Select a controller, i.e., Login.
- Under State, click Start.
- Under Test plan content, open the Target Controller dropdown.
- Select the HTTP(S) Test Script Recorder and click the Test Plan Creation tab.
- In the browser:
- Start the browser’s web development tools to generate an HTTP Archive (HAR) file.
- Choose a tab:
- If this is the first recording:
- Navigate to a new tab and enter the OAC URL.
- Otherwise, select the tab used for a previous recording.
- If this is the first recording:
- Perform a user’s activities. For example, enter the login information if recording into the Login controller.
- Stop and keep the tab open after all the activities for the target controller are complete. For example, when the user’s home page has finished loading after a login.
- Optionally, save the HAR file created up to this point.
- In JMeter:
- Click Stop.
Run the Test Plan Running the test plan populates the View Results Tree listener with the HTTP requests and their responses.
Perform the following tasks.
- Select the Test Plan and navigate to Run > Start.
Correlate the HTTP Requests
JMeter correlation “is the process of capturing dynamic values from server responses and reusing them in subsequent requests.”1 Correlation is crucial for testing OAC, where values like session IDs, authentication tokens, or unique identifiers differ and expire for each concurrent user, and OAC instance.
Many tools and techniques exist to perform this task, and the subject is too broad to be covered in this post. Excellent articles exist on the internet.
Correlation must be considered for each HTTP request. Ensure that all dynamic values required by a request have been captured in the responses of preceding requests and placed in variables.
This post provides a single example to get you started.
The example used in this post captures a data element named nonce returned in a response header by the request in the Login controller that uses the path /ui/dv. This element is required in a subsequent request that uses the path/oauth2/v1/authorize.
Perform the following tasks.
- Update the /oauth2/v1/authorize request.
- Expand the Thread Group and the Login controller.
- Click the HTTP Request whose name begins with /oauth2/v1/authorize.
- On the Basic tab, view the parameter named nonce.
- Change the recorded Value to use the variable syntax ${nonce}.
- Update the /ui/dv request.
- Expand the HTTP Request whose name begins with /ui/dv.
- Navigate to Add > Post Processors > Regular Expression Extractor.
- Change the Name to nonce.
- In the Appy to: section, check the Main samples and sub-samples box.
- In the Field to check: section, check the Response Headers box.
- Enter nonce as the Name of created variable.
- Enter nonce=(.+?)& as the Regular Expression.
- Enter $1$ as the Template.
- Enter 1 as the Match No.
- Enter Null_nonce as the Default Value. This is the value of the variable if the Extractor fails to find the nonce value.
- Navigate to Add > Post Processors > Regular Expression Extractor.
- Expand the HTTP Request whose name begins with /ui/dv.
To complete the Test Plan, identify all required dynamic data elements and the requests that produce them. Then, perform the required correlations.
Once all correlations are complete, run the test plan again to ensure the workbook queries are returning data.
1Mastering Regular Expression Extractor in JMeter for Correlation
Add Additional Logic Controllers
Add additional controllers to provide aggregated metrics, run the workbook queries in parallel, and ensure that the queries complete successfully.
Perform the following tasks.
- Add Transaction Controllers
- Add a Parallel Controller
- Add Simple Controllers
- Add While Controllers
Perform the following tasks.
- Add four transaction controllers. For each:
- Select the Thread Group
- Navigate to Add > Logic Controller > Transaction Controller. They appear at the bottom of the thread group.
- Click each Transaction Controller and check the boxes for:
- Generate parent sample
- Include duration of timer and pre-post processors in generated sample
- Move the four Transaction Controllers directly under the View Results Tree listener.
- Collapse the Thread Group tasks. Navigate to Options > Collapse All.
- Select the first controller and change the Name to Use Case.
- Select the remaining three Transaction Controllers.
- Navigate to Edit > Cut.
- Select the Use Case controller and navigate to Edit > Paste.
- Expand the Use Case controller and change the Transaction Controller Names to Login, Workbook, and Logout.
- For each the three Transaction Controllers, perform the following.
- Expand the associated Recording Controller having the same name.
- Select the tasks and navigate to Edit > Cut.
- Select the Transaction Controller and navigate to Edit > Paste.
- Select the three Recording Controllers.
- Right-click, and then click Disable.
Add a Parallel Controller
Perform the following tasks.
- Select the Thread Group and navigate to Add > Logic Controller > bzm – Parallel Controller. It appears at the bottom of the thread group.
- Select the Parallel Controller and navigate to Edit > Cut.
- Select the Workbook Transaction Controller and navigate to Edit > Paste.
- Move the Parallel Controller above the first executeOrPoll request.
Add Simple Controllers
Perform the following tasks.
- In the Workbook Transaction Controller, add a Simple Controller for each executeOrPoll request.
- Select the Workbook Transaction Controller and navigate to Add > Logic Controller > Simple Controller.
- Move the Simple Controller above the executeOrPoll request but below the Parallel Controller.
Each executeOrPoll request is associated with one or more Poll requests. Clicking on the executeOrPoll and Poll requests displays their canvas and view name.
- For each executeOrPoll request:
- Move the first associated Poll request beneath it.
- Delete any additional associated Poll requests.
- Select the executeOrPoll request and associated Poll requests and navigate to Edit > Cut.
- Select the Simple Controller above the executeOrPoll request and navigate to Edit > Paste.
- Collapse and select the Simple Controllers and navigate to Edit > Cut.
- Select the Parallel Controller and navigate to Edit > Paste.
Add While Controllers
Run the workbook in OAC with the browser’s web development tools turned on. If using the browser used to record a use case, disable the proxy setting. Inspect the responses of each Poll request to determine a text string indicating the request completed successfully.
Perform the following tasks. The variables used are described below.
- Run the workbook in OAC with the browser’s web development tools turned on. If using the browser that recorded the use case, ensure the proxy setting is disabled.
- For each Poll request, inspect the response and determine a text string to use as success criteria.
- Add variables to the User Defined Variables element.
- Enter a unique Name for each, e.g., Poll_1_Success_Criteria.
- Enter the text string as the Value, e.g., Poll_1_Completed_Successfully.
- For each Simple Controller:
- Select it and navigate to Add > Logic Controller > While Controller.
- Assuming the Poll Request in the controller is named Poll_1, enter the following code into the Condition of the While Controller.
${__javaScript((‘${Poll_Response_1}’.indexOf(‘${Poll_1_Success_Criteria}’) == -1 && ${Counter_1}<5);)}
- Move the While Controller up above the Poll request.
- Assuming the Poll Request in the controller is named Poll_1, enter the following code into the Condition of the While Controller.
- Select the Poll request and navigate to Edit > Cut.
- Select the While Controller and navigate to Edit > Paste.
- Select the While Controller and navigate to Add > Config Element > Counter.
- Select the Counter and complete the following:
- Enter 1 as the Starting value.
- Enter 1 as the Increment.
- Enter 5 as the Maximum value.
- Enter a unique name for the Exported Variable Name, e.g., Counter_1.
- Check the boxes for Track counter independently for each user and Reset counter on each Thread Group Iteration.
- Select the Counter and complete the following:
- Select the Poll request within the While Controller.
- Navigate to Add > Post Processors > Regular Expression Extractor.
- Enter a unique Name for the Poll response.
- In the Appy to: section, check the Main sample only box.
- In the Field to check: section, check the Body box.
- Enter a unique Name for the Name of created variable, e.g., Poll_Response_1.
- Enter "a":"(.*?)" as the Regular Expression.
- Enter $1$ as the Template.
- Enter 1 as the Match No.
- Enter Null_<your unique name> as the Default Value. This is the value of the variable if the Extractor fails to find the response value.
- Navigate to Add > Post Processors > Regular Expression Extractor.
- Select it and navigate to Add > Logic Controller > While Controller.
Add Timers
Perform the following tasks.
- Determine the timer pause types required.
- Add a Unified Random Timer.
- Enter a Name, e.g., Think Time.
- Enter a value for Random Delay Maximum (in milliseconds).
- For each timer type, right-click the timer and click Duplicate.
- Change the Name.
- Adjust the Random Delay Maximum.
- Move the timers to the appropriate places in the test plan. For example, users may need to think when presented with a login screen, and analyze after being presented with a workbook.
![]()
Explore more about Oracle Analytics by visiting the community, blogs, and library.
Oracle Analytics Community
Oracle Analytics Blogs
Oracle Analytics Examples
Explore Analytics Platform Features
Oracle Analytics Cloud
Data visualization and storytelling
Machine learning
Mobile analytics
Open data source connectivity
Data preparation and enrichment
Enterprise data modeling
Explore Mozilla Firefox
Firefox Proxy Settings
How to Configure an HTTP JMeter Proxy Server
Firefox Certificate Authorities
Explore Apache JMeter
Apache JMeter Home Page
Real-World Performance Testing for Oracle Analytics Cloud with Apache JMeter
Prepare Apache JMeter on Windows for Oracle Analytics Performance Testing
Prepare Apache JMeter on Linux for Oracle Analytics Cloud Performance Testing
Prepare Oracle Analytics Cloud for Apache JMeter Performance Testing
JMeter Component Reference
Building a Test Plan
User Defined Variables
CSV Data Set Config
HTTP Request Defaults
HTTP Cookie Manager
HTTP(S) Test Script Recorder
Thread Group
View_Results_Tree
Recording Controller
HTTP Request
Regular Expression Extractor
HTTP Header Manager
Flow Control Action
Uniform Random Timer