Published May 16, 2025.
Introduction This post is a member of the Real-World Performance Testing for Oracle Analytics Cloud with Apache JMeter blog series and guides in preparing an Apache JMeter performance test plan for Oracle Analytics Cloud. It includes architectural diagrams, component descriptions, deployment guidance, and links to other references.
Oracle Analytics Cloud
OAC (Oracle Analytics Cloud) is a scalable and secure Oracle Cloud service that provides a full set of capabilities to explore and perform collaborative analytics for you, your workgroup, and your enterprise. Features include:
- Data visualization and storytelling
- Machine learning
- Mobile analytics
- Open data source connectivity
- Data preparation and enrichment
- Enterprise data modeling
Apache JMeter
Apache JMeter is an open-source tool for performance testing that allows you to simulate real-world OAC user experiences and measure the performance of your reports.
Prerequisites
Following the guidance in this post requires:
- A device hosting the JMeter application with network access to OAC on port 443.
- An administrator with the authority to manage the JMeter device.
- An administrator with the authority to manage the OCI tenancy, identity domain, and OAC instance.
- An administrator with the authority to manage the OAC service.
- A use case optimized for a single user including:
- The navigation sequence for signing in, running a workbook, and signing out.
- The groups, roles, and responsibilities allowing access to the workbook and associated data sources.
Topics
This section contains the initial and prepared state diagrams.
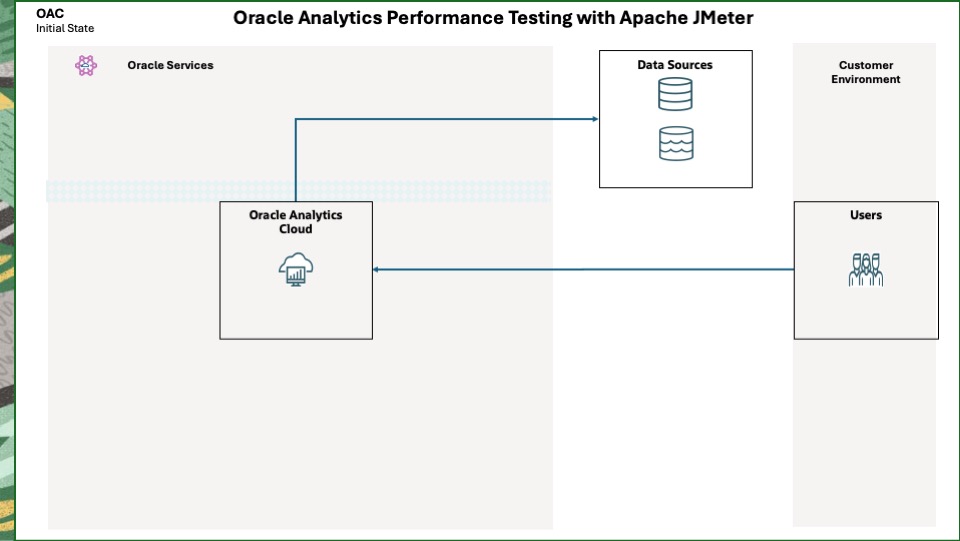
The initial state depicts users that are able to connect to OAC and OAC connections to data sources.
Prepared State
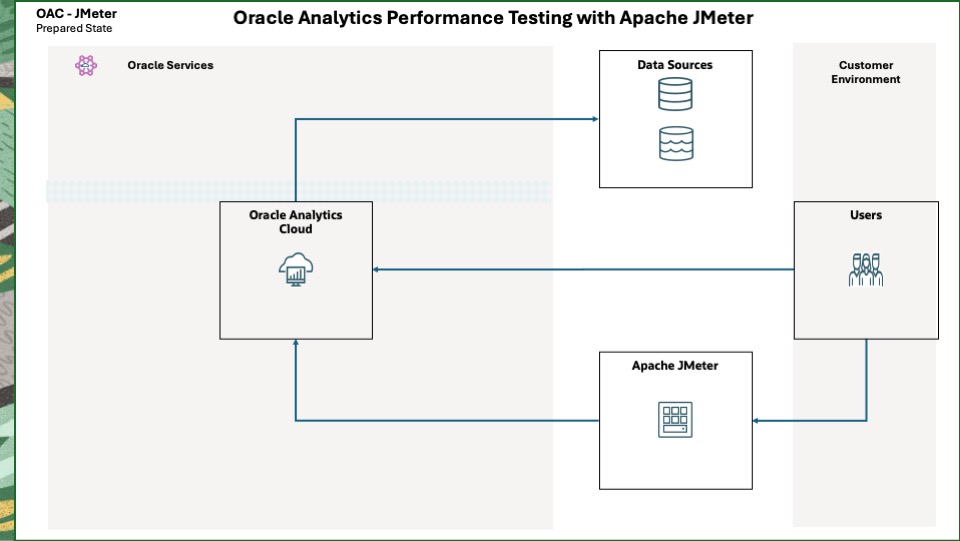
The prepared state depicts users connections to JMeter and JMeter connections to OAC.
This section describes the components found in the Component diagram.
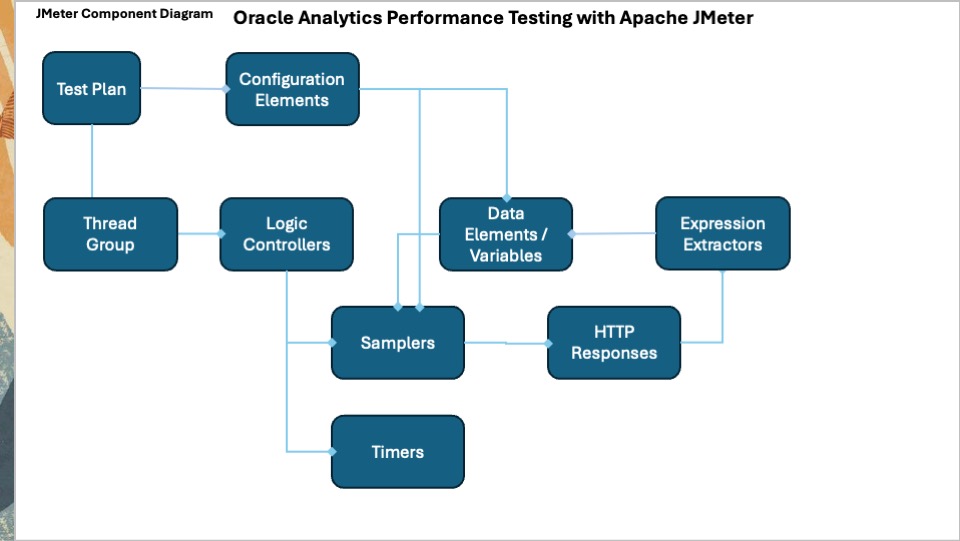
This diagram depicts the high-level JMeter components.
Component Descriptions
A JMeter applications consists components shown in the Component diagram. Apache JMeter – User’s Manual: Component Reference has a complete list of components and detailed descriptions. This post uses the following
A JMeter Test Plan serves as the foundational container for defining and executing performance tests within the Apache JMeter application. It outlines the sequence of steps JMeter will perform during a test run and encompasses all the necessary elements to simulate user load and gather performance metrics. It is saved as a .jmx file, allowing for easy sharing and reusability of test scripts. Refer to Building a Web Test Plan – Apache JMeter – User’s Manual for detailed guidance.
Thread Group
A Thread Group is the beginning point of any test plan. All controllers and samplers must be under the thread group. The thread group specifies the number of threads (concurrent users) used to execute the test. Each thread executes the test plan independently of other threads.
Configuration Elements
Configuration elements work closely with Samplers. Although they do not send requests (except for HTTP(S) Test Script Recorder),they add to and modify requests. A configuration element’s scope is dependant on where in the test plan it is placed.
Best Practice: Add configuration elements below the test plan and above the thread group so the elements apply to the entire test plan.
User-defined variables comprise an initial set of variables that apply to a test plan, e.g., hostname, idcs_hostname.
HTTP Cache Manager
This element adds caching functionality to HTTP requests to simulate a browser’s cache feature. Each virtual user thread has a different cache.
HTTP Cookie Manager
This element stores and sends cookies just like a web browser. If a response to an HTTP request contains a cookie, it is stored and used for all future requests to that website. Each JMeter thread has its own “cookie storage area”.
CSV Data Set Config
This element is used to read lines from a file and split them into variables.
A basic test plan uses a file containing the virtual usernames and passwords.
HTTP Request Defaults
This element sets default values that an HTTP Request sampler uses. Three examples are the protocol, i.e., https, the port, i.e., 443, and the hostname, which uses a user-defined variable.
HTTP Header Manager
The HTTP(S) test script recorder uses an HTTP header manager to record HTTP request headers for each HTTP request.
This element enables adding and overriding a sampler’s request headers.
Best practice: Use an occurrence of this element before a thread group to store a default set of request headers used by all samplers.
HTTP(S) Test Script Recorder
This element allows JMeter to intercept and record the actions performed for the OAC use case. It creates and stores HTTP Request samplers directly into specified recording controllers.
Browser Elements
A proxy is used by the HTTP(S) test script recorder to intercept HTTP requests and save them to a recording controller.
JMeter Root Certificate
HTTPS uses certificates to authenticate connections between a browser and OAC.
The HTTP(S) test script recorder generates and uses its own certificate to intercept the HTTPS requests from a browser to OAC.
Listeners
Listeners perform several roles in addition to “listening” to the test results. They also provide means to view, save, and read saved test results.
Best Practice: To ensure the proper scope, add listeners directly below the thread group.
This element shows a tree of all sample responses, allowing you to view the start time, request, response, and elapsed time of each.
Warning : This element may be used for functional testing, debugging, and validation. Do not use it (disable it) during a load test as it consumes a lot of resources (memory and CPU).
Samplers
cdesc
cdesc
cdesc
cdesc
cdesc
Logic Controllers
Logic Controllers determine the order in which Samplers are processed.
Timers
Multiple occurrences of this element pauses a test thread to simulate “think” and “analysis” times within the use case.
Post-Processors
An occurrence of this element extracts a value from a sampler response and populates a variable for use by other samplers.
5desc
A typical sequence for developing a test plan is shown in a video here and is listed below.
- Pre-recording development.
- Create a JMeter test plan.
- Firefox proxy and certificate enablement.
- Use-case recording.
- Post-recording development.
- Firefox proxy disablement.
- JMeter test plan configuration.
- Validation
Create a JMeter test plan, and configure Firefox with a proxy server and JMeter trusted certificate.
- Start the JMeter application. Change the default name and save the plan.
- Add components to the plan.
- A Config Element > User Defined Variables.
- A Config Element >CSV Data Set Config.
- A Config Element > HTTP Cookie Manager.
- A Config Element > HTTP Request Defaults.
- A Non-Test Element > HTTPs Test Script Recorder.
- A Thread (Users) > Thread Group.
- Configure the plan components.
- User Defined Variables
- Add the following variables.
- host – The OAC hostname ending in .com
- idcs – The IDCS hostname ending in .com
- pauseMinTime – Used in “think” times. Use a low value, such as 1000, as the default.
- pauseMaxTime – Use a low value, e.g., 2000, as a default.
- analyzeMinTime – Used in “analysis” times. Use a low value, such as 1000, as the default.
- analyzeMinTime – Use a low value, e.g., 2000, as a default.
- Add the following variables.
- CSV Data Set Config
- In a text editor, create a .csv file in the same directory as the test plan, e.g., testUserPw.csv.
- Add a line for the username and password delimited by a comma, e.g., testuser,testpassword.
- In JMeter:
- Browse for and enter the Filename.
- Enter the comma-delimited Variable Names, e.g., user,pw.
- In a text editor, create a .csv file in the same directory as the test plan, e.g., testUserPw.csv.
- HTTP Cookie Manager
- Ensure the box is checked for Clear cookies each iteration.
- HTTP Request Defaults
- Enter https for the Protocol.
- Enter the variable ${host} for the Server name or IP.
- Enter 443 for the Port Number.
- Thread Group
- Add a Listener > View Results Tree.
- Add four Logic Controller > Recording Controllers.
- Login
- Workbook
- Refresh
- Logout
- Add two Sampler > Flow Control Actions.
- One after Login and one after Workbook.
- Enter Think Time for the Name of each.
- One after Login and one after Workbook.
- Add one Sampler > Flow Control Action after Refresh.
- Enter Analyze Time for the Name.
- For each Flow Control Action, add a Timer > Uniform Random Timer.
- For the Think Timers:
- Enter ${pauseMaxTime} for the Random Delay Maximum.
Enter ${pauseMinTime} for the Constant Delay Offset.
- Enter ${pauseMaxTime} for the Random Delay Maximum.
- For the Analyze Timer:
- Enter ${analyzeMaxTime} for the Random Delay Maximum.
Enter ${analyzeMinTime} for the Constant Delay Offset.
- Enter ${analyzeMaxTime} for the Random Delay Maximum.
- For the Think Timers:
- HTTPs Test Script Recorder
- Click the Test Script Recorder.
- On the Test Plan Creation tab:
- Change the Target Controller to <TestPlan>Thread Group>Login.
- Note the Default Settings Port is 8888.
- Click Start to generate an HTTPs certificate named ApacheJMeterTemporaryRootCA.crt in the $JMETER_HOME/bin directory.
- Click Stop.
- On the Requests Filtering tab:
- Below is a starter list of patterns to exclude from the recording. Modify it as needed.
.*png.*
.*css.*
.*svg.*
.*js.*
*.gif.*
*.woff2.*
*.public.*
*.submit.*
*.wallpaper.*
*.static.*
incoming\.telemetry\.mozilla\.org
*.ico.*- Select the final list and copy it to the clipboard.
- Click Add from Clipboard to add the URL Patterns to Exclude.
- Below is a starter list of patterns to exclude from the recording. Modify it as needed.
- On the Test Plan Creation tab:
- Click the Test Script Recorder.
- User Defined Variables
- Click the Save icon to save the test plan.
Firefox Proxy and Certificate Enablement
Firefox is used because it is the simplest to configure. However, any browser can be used.
- Start the browser and navigate to Settings.
- Search for proxy and click the result.
- Check the button for Manual proxy configuration.
- Enter localhost for the HTTP Proxy.
- Enter 8888 for the Port.
- Check the box for Also use this proxy for HTTPS.
- Click OK.
- Check the button for Manual proxy configuration.
- Search for certificate and click View Certificates.
- Select Authorities.
- Click Import.
- Browse to the JMeter home/bin directory.
- Select the ApacheJMeterTemporaryRootCA.crt certificate.
- Click Open.
- Check the box for Trust this CA to identify websites.
- Click OK.
- Browse to the JMeter home/bin directory.
- Search for proxy and click the result.
- Close the browser.
Use-Case Recording
Start the JMeter application if necessary and open the test plan.
- Click the Test Script Recorder.
- Change the Target Controller to <TestPlan>Thread Group>Login.
- Click Start.
- Start the browser.
- Log in to OAC.
- Leave the browser open on the homepage.
- Log in to OAC.
- Return to JMeter and click Stop.
- Change the Target Controller to <TestPlan>Thread Group>Workbook.
- Click Start.
- Return to OAC.
- Navigate and start the workbook to be tested.
- Leave the browser open.
- Return to JMeter and click Stop.
- Change the Target Controller to <TestPlan>Thread Group>Refresh.
- Click Start.
- Return to OAC.
- Click the Refresh icon on the workbook.
- Leave the browser open.
- Return to JMeter and click Stop.
- Change the Target Controller to <TestPlan>Thread Group>Logout.
- Click Start.
- Return to OAC.
- Click the User icon.
- Click Sign Out.
- Leave the browser open.
- Return to JMeter and click Stop.
Post-Recording Configuration
Disable the Firefox proxy server and configure the recorded test plan components.
Firefox Proxy Disablement
- Start the browser and navigate to Settings.
- Search for proxy and click the result.
- Check the button for No Proxy.
- Click OK.
- Search for proxy and click the result.
JMeter Post-Recording Configuration
Review and remove unnecessary requests under each of the recording controllers.
Hide the recorded user credentials.
The username and password used to log into OAC were recorded. Hide the password and add flexibility to the plan.
- Search for the request under the Login controller starting with sso/v1/user/secure/login.
- Click the request to open it.
- Replace the username with ${user}, the variable specified in the CSV element.
- Replace the password with ${pw}, the variable specified in the CSV element.
- The portion of the body data should now look like this:
{“op”:”cred_submit”,”credentials”:{“username”:”${user}”,”password”:”${pw}”,”device” …
Extract the required tokens from the HTTP responses.
The recorded tokens expire. Extract tokens and place them in variables.
- Navigate to the Login > /ui/dv HTTP request.
- Add three Post Processors > Regular Expression Extractors. Name them:
- loginCtx
- signature
- state
- Edit the three extractors.
- Set the Name of created variable to the extractor name, e.g., loginCtx.
- Set the Regular Expression to: name=”<extractor name>” value=”(.+?)”/> e.g., name=”loginCtx” value=”(.+?)”/>
- Enter $1$ for the Template.
- Enter 1 for the Match No.
- Set the Default Value to: NULL_<extractor name> e.g., NULL_loginCtx.
- Navigate to the /ui/v1/signin HTTP request.
- Add a Post Processors > Regular Expression Extractor. Name it accessToken.
- Edit the extractor.
- Set the Regular Expression to: accessToken: ‘(.+?)’
- Set the Name of created variable, Template, Match No. and Default Value as performed for the first three.
- Navigate to the /ui/dv/ui/api/v1/sessioninfo/ext HTTP request.
- Add a Post Processors > Regular Expression Extractor. Name it csrfToken.
- Edit the extractor.
- Set the Regular Expression to: name=”csrfToken” value=”(.+?)”/>
- Set the Name of created variable, Template, Match No. and Default Value as performed for the first three.
- Add three Post Processors > Regular Expression Extractors. Name them:
Pass the variables to subsequent HTTP requests.
Evaluate and add variables for HTTP Request parameters HTTP Header Managers. Below are some examples.
- The /ui/v1/signin request requires variables for the following parameters:
- loginCtx
- signature
- state
- The /sso/v1/user/secure/login HTTP Header Manager requires:
- The accessToken variable for the Authorization header.
- The /ui/dv/ui/api/v1/homepage and many other requests require:
- The csrfToken variable for the X-CSRF-Token header.
Validation
An iterative approach is required to validate the test plan. The goal is error-free results. It is common to have a few the first few times a plan is run. They may be unnecessary recorded requests that can be removed.
- Save the Test Plan and exit JMeter. This creates a backup of the plan.
- Start JMeter.
- Open the test plan.
- Click to select the Test Plan.
- Click the Clear All icon.
- Click the Start icon.
- Wait for the plan to finish.
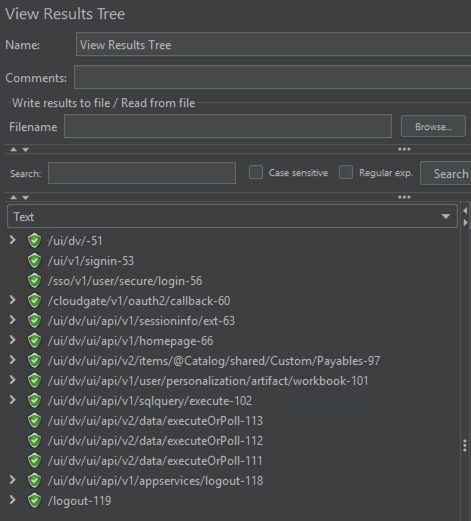
- Click the Thread Group > View Results Tree.
- A successful test has no errors.
![]()
Explore more about Oracle Analytics by visiting the community, blogs, and library.
Explore Analytics Platform Features
Oracle Analytics Cloud
Data visualization and storytelling
Machine learning
Mobile analytics
Open data source connectivity
Data preparation and enrichment
Enterprise data modeling
Explore Mozilla Firefox
Firefox Proxy Settings
How to Configure an HTTP JMeter Proxy Server
Firefox Certificate Authorities
Explore Apache JMeter
Apache JMeter Home Page
Real-World Performance Testing for Oracle Analytics Cloud with Apache JMeter
Prepare Apache JMeter on Windows for Oracle Analytics Performance Testing
Prepare Apache JMeter on Linux for Oracle Analytics Cloud Performance Testing
Prepare Oracle Analytics Cloud for Apache JMeter Performance Testing
Building a Test Plan
User Defined Variables
CSV Data Set Config
HTTP Request Defaults
HTTP Cookie Manager
HTTP(S) Test Script Recorder
Thread Group