
A customer-churn training workflow that works in development should also run perfectly in QA and production. The notebook and workflow logic should stay the same, but the compute requirements may differ. Do you need to rebuild the workflow for every environment?
With Bundles in Oracle AI Data Platform’s workbench, you can package one or many workflows and agents once and define the environment specific differences so that it can be promoted seamlessly into various environments. A Bundle is simply a folder that can be inspected with a pre-defined structure. You can create it anywhere in the workspace or add it to a Git-backed parent folder for team review and version control.
This is a practical way to use Infrastructure as Code: manage the resource definitions and environment settings as files, then publish the package through the Bundles UI, CLI, or AI plugins. You do not need to hand-write every definition to get started.
In this post, we will follow a classic customer-churn use case which contains a workflow through a common use case: using smaller compute sizes in Dev and QA, and reusing approved larger compute size in production. We will also explore few more examples. This customer –churn use case can be clearly seen in the image below.
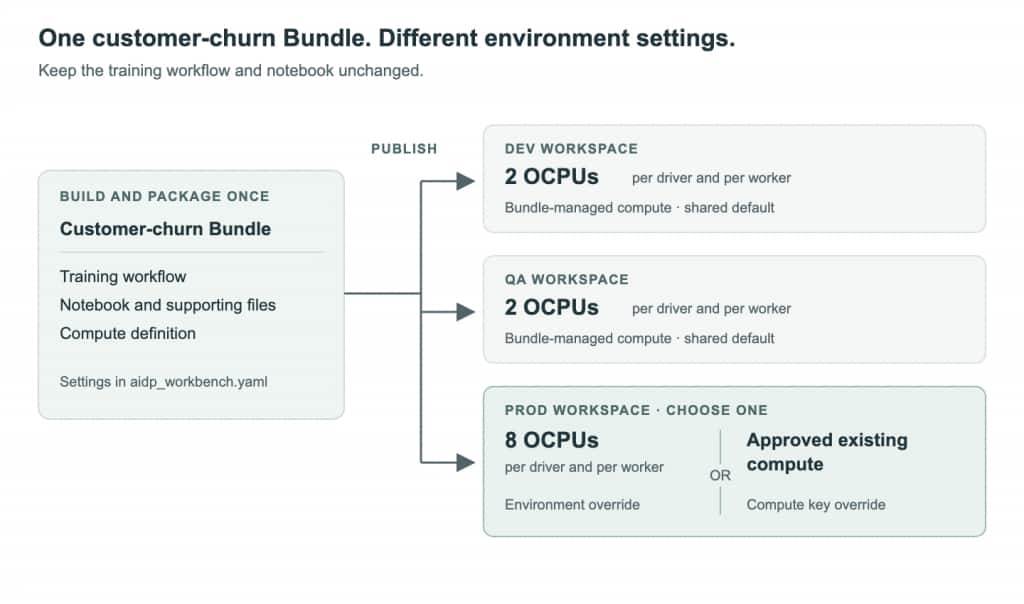
One Bundle, environment-specific configuration. The production choices are alternatives, not two resources to provision.
What is inside a Bundle
Before we deep dive into the customer churn use case, let us first understand what a Bundle even means. A Bundle is a folder, not a special binary package with a pre defined structure. Its YAML and JSON files describe the resources to publish, while its artifacts contain the code and supporting files those resources use. Therefore, Bundle folder as a whole is a single publish unit—not an individual notebook or file.
The contents of a Bundle have four distinct roles:
| Bundle component | Where it lives | What it describes |
| Manifest | aidp_workbench.yaml | Names the Bundle, lists its workflow jobs or agents, and holds shared configuration and environment-specific settings. |
| Resource descriptors | jobs/ or agentflows/ | Define the resources to publish. A workflow job descriptor describes tasks, notebook paths, parameters, and compute references. An agent descriptor captures the agent definition and its configuration. |
| Dependency descriptors | For example, jobs/dependencies/ | Define resources needed by a packaged job or agent. A compute descriptor records settings such as shape, OCPUs, memory, and worker count. The resource descriptor references that dependency rather than duplicating its configuration. |
| Artifacts | artifacts/ | Carry the notebook, scripts, libraries, or other files referenced by the packaged resources. These are the files the published resources use at runtime. |
Together, these files answer three practical questions: what should be published, what does it need, and which settings change by environment? You can review and edit them in an editor and manage the settings for various environment differences via configuration files.
Start with a minimal Bundle folder
For a Bundle that publishes a workflow job or agent, the minimum is a top-level aidp_workbench.yaml, a complete descriptor for each listed resource, and the artifacts and dependency definitions those descriptors require. Not every Bundle needs every directory so include the required artifacts and bundled dependencies only when the resources reference them.
For a generic notebook workflow with bundled compute, the Bundle folder has the following structure:
example_bundle/
  aidp_workbench.yaml
  artifacts/
    notebooks/
      example_notebook.ipynb
  jobs/
    example_workflow.job.json
    dependencies/
      test.compute.json
This same structure can be seen in AI Data Platform’s screenshot:
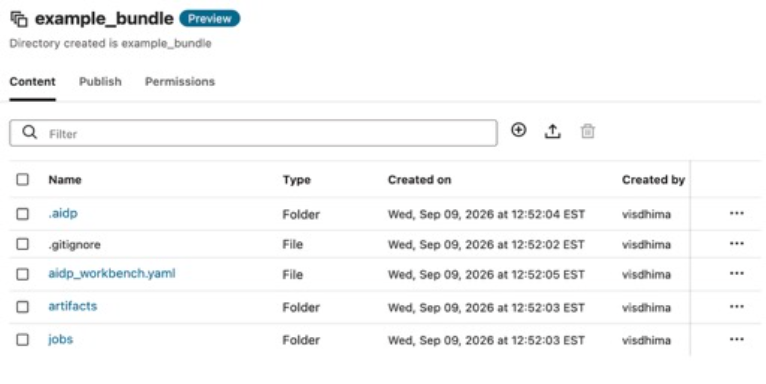
Note that neither .aidp nor .gitignore is mandatory for a minimal hand-authored Bundle. Workbench generates .aidp metadata for operations such as Sync; .gitignore is relevant only when you use Git.
Contents of File: aidp_workbench.yaml
bundle:
  name: example_bundle

resources:
  jobs:
    - example_workflow

defaults:
  publish:
    path: "/Workspace/Shared/example_bundle"
    overwrite_publish_artifacts: false
    preserve_resource_name: false
    resource_name_prefix: "${bundle.name}_"
Here, the resources.jobs entry corresponds to jobs/example_workflow.job.json. That descriptor defines the workflow’s notebook task, references artifacts/notebooks/example_notebook.ipynb through its published path, and uses ${jobs.dependencies.test.compute.key} to reference the compute defined in jobs/dependencies/test.compute.json. The notebook itself can have any python code.
The manifest above is a starting configuration, not the entire Bundle: the job and compute descriptors must also contain their required fields. Use the generated descriptors as working examples of the schema rather than replacing them with incomplete snippets.
Use Case 1: Size compute for each environment
With the structure established, let us return to the customer-churn scenario. Assume the generated Bundle is named customer_churn_bundle, its workflow is train_churn_model, and its compute dependency is training_compute. Keep the generated definitions; the following snippets show only the configuration changes, not complete replacement files.
During development, the team tests changes on a small workload. QA validates the workflow before release. Production needs more compute capacity. Instead of maintaining three workflow definitions, give the Bundle a named variable whose value changes by environment.
Here, “environment variables” means Bundle values resolved when publishing, not operating-system variables inside a notebook. To do this, we can define a value in the config YAML, reference it from JSON, and let the destination environment supply the appropriate setting as shown below.
Contents of aidp_workbench.yaml, retaining the generated bundle, resources, and publish settings:
defaults:
  variables:
    compute_ocpus: 2
    job_compute_key: "${jobs.dependencies.training_compute.compute.key}"

targets:
  dev:
    - aidp_ocid: "<dev_aidp_ocid>"
      workspace_key: "<dev_workspace_key>"
  qa:
    - aidp_ocid: "<qa_aidp_ocid>"
      workspace_key: "<qa_workspace_key>"
  prod:
    - aidp_ocid: "<prod_aidp_ocid>"
      workspace_key: "<prod_workspace_key>"
      variables:
        compute_ocpus: 8
Each named environment must include both aidp_ocid and workspace_key. Together, they identify the AIDP instance and destination workspace whose values apply. Replace the placeholders with your environment identifiers. In this example, Dev and QA inherit the default value of 2; whereas production overrides it with 8. The job_compute_key value points to the bundled compute dependency, which we will use in the second example.
In jobs/dependencies/training_compute.compute.json, replace the fixed OCPU values with the variable reference. The fragment below shows just the relavant configuration so we must retain the other generated fields in the json config file.
{
  "driverConfig": {
    "driverShapeConfig": {
      "ocpus": "${var.compute_ocpus}"
    }
  },
  "workerConfig": {
    "workerShapeConfig": {
      "ocpus": "${var.compute_ocpus}"
    }
  }
}
The same definition now produces different compute sizes:
| Publish destination | OCPUs per driver and per worker | Where the value comes from |
| Dev | 2 | Shared default |
| QA | 2 | Shared default |
| Prod | 8 | Production override |
Similar to this, if needed, we can keep the shape, memory, and worker settings compatible with the selected capacity. When the job references the bundled compute dependency, publishing can provision that compute in the destination workspace. The notebook and training logic do not change.
At publish time, each named variable is resolved using overrides > environment > defaults priority. That is, the highest-priority level that defines that variable supplies its value; if a level does not define it, resolution falls back to the next level.
Defaults come from defaults.variables in aidp_workbench.yaml and provide shared values. As mentioned earlier, Environment values come from the variables block of the target entry matching the destination’s aidp_ocid and workspace_key; these can replace defaults for the same variable. Overrides come from the variables block in the Bundle’s local .aidp/overrides.yaml and take precedence over both. You only need to specify the variables you want to change, not repeat all the defaults.
For example, ${var.compute_ocpus} resolves to 4 if the local override sets compute_ocpus: 4, even when publishing to production. Remove that override and production uses its environment value of 8. Dev and QA use the default of 2, because neither defines a different value. The JSON reference stays unchanged in every case. Review local overrides before publishing so a temporary value does not unintentionally take precedence. See the Bundle variables documentation for the general variable model.
Use Case 2: Reuse approved production compute
Now suppose the production platform team already provides a suitable compute resource. The workflow should use it instead of creating the bundled compute dependency. You can make that choice through configuration too.
First, in jobs/train_churn_model.job.json, set each compute reference for this dependency to "clusterKey": "${var.job_compute_key}". Update both the job-level jobClusters entry and the applicable task’s cluster entry if both are present. This makes the workflow use the named value declared in the previous example.
By default, that value resolves to the bundled trainingcompute dependency. To reuse existing compute, put its key in .aidp/aidp_workbench.yaml within the Bundle folder in the production workspace:
prod:
    - aidp_ocid: "<prod_aidp_ocid>"
      workspace_key: "<prod_workspace_key>"
      variables:
         job_compute_key: "<existing_production_compute_key>"
For this workflow, the supplied key replaces the reference to the bundled dependency, so the existing resource is used instead of provisioning that dependency. Note that you must ensure the workflow has permission to use the selected compute cluster.
Configure published artifacts and resource names
Bundles also allow users to fully customize the naming of the published resources. Let us use the same customer-churn Bundle and see how its published workflow is named. Let’s assume the following aidp_workbench.yaml configuration, retaining the variables and target identifiers from the earlier example. Please note that these settings are defined under publish, not variables:
defaults:
  publish:
    path: "/Workspace/Shared/customer_churn_bundle"
    overwrite_publish_artifacts: false
    preserve_resource_name: false
    resource_name_prefix: "${bundle.name}_"

targets:
  prod:
    - aidp_ocid: "<prod_aidp_ocid>"
      workspace_key: "<prod_workspace_key>"
      publish:
        path: "/Workspace/Production/customer_churn_bundle"
        overwrite_publish_artifacts: true
        resource_name_suffix: "_prod"
The table below explains the built-in publish settings from template placeholders. Neither needs to be declared under variables. Table below describe these implicit variables:
| Setting or placeholder | Default | Description | Example value |
| path | /Workspace/Shared/<bundle_name> | Publish root; files go in its artifacts subfolder. Referenced as ${publish.path}. | “/Workspace/Shared/churn” |
| overwrite_publish_artifacts | false | Allows replacement of artifact contents. false still permits updates to the same Bundle’s managed artifacts. | true to intentionally replace artifacts. |
| preserve_resource_name | true | Retains original workflow names. With false, configure a prefix, suffix, or both. | false to customize names for each workflow |
| resource_name_prefix | None configured with preserved names. | Adds text where the descriptor’s prefix token appears. Omit when preservation is true. | “${bundle.name}_” |
| resource_name_suffix | None configured with preserved names. | Adds text where the descriptor’s suffix token appears. Omit when preservation is true. | “_prod” |
| ${bundle.name} | From bundle.name. | Built-in Bundle-name placeholder, usable in prefixes and suffixes. | churn when bundle.name: churn. |
| ${bundle.uuid} | Platform-assigned Bundle identifier. | Built-in unique identifier, usable in prefixes and suffixes. | “_${bundle.uuid}” as a suffix. |
In this example, we change the new-Bundle naming default to preserve_resource_name: false. So existing or migrated Bundles can retain different naming settings, so we need to specify the workflow name as we show in the next section by adding prefix, suffix and custom naming scheme.
How to add a prefix and suffix to the workflow names
In jobs/train_churn_model.job.json, use this name field while retaining the rest of the descriptor:
{
  "name":  "${publish.resource_name_prefix}train_churn_model${publish.resource_name_suffix}"
}
For customer_churn_bundle in production, the resolved name is customer_churn_bundle_train_churn_model_prod. Keep only the prefix token for customer_churn_bundle_train_churn_model, or only the suffix token for train_churn_model_prod.
Use a predefined name for one workflow
If a downstream integration expects customer_churn_training, replace the same descriptor field with a literal name:
{
  "name": "customer_churn_training"
}
Without either token, this workflow keeps that fixed name even when other resources use the configured prefix and suffix. The name must meet the resource’s naming rules and not conflict with an unrelated resource in the target workspace. Note that Sync function can regenerate the descriptor’s standard prefix and suffix tokens, so review and reapply individual naming customizations afterward.
To retain descriptor names for all resources, use this alternative publish setting in aidp_workbench.yaml and remove prefix and suffix settings from the applicable configuration:
defaults:
  publish:
    preserve_resource_name: true
Publish settings can also be set in an environment’s publish block or the top-level publish block in .aidp/overrides.yaml, with precedence overrides > environment > defaults.
Choose when to overwrite artifacts
With preserve_resource_name: false, publishing can fail when the destination already contains artifact data not owned by the Bundle; it does not prevent updates to artifacts already managed by that Bundle. Use true when you intentionally want publishing to replace the artifact contents at the configured destination. In the production example, those files live under /Workspace/Production/customer_churn_bundle/artifacts. Other files and folders alongside artifacts under the publish root are preserved. Review the destination before enabling overwrite, since manual edits within the replaced artifacts can be lost.
Use Case 3: Disable automatic compute provisioning when you need to define it later
Sometimes you may have a use case where you want to migrate all the workflows or agents without provisioning any compute cluster. For example, a user may want to just publish the workflows but create and attach the compute clusters to it at a later time.
To do this, create a variable say job_compute_key variable in the default or target workspace and give it any string value such as below:
# Define in overrides or default or target workspace
variables:
  job_compute_key: "select_compute"
Then in the *.job.json file, change the compute key to use this variable
"clusterKey": "${var.job_compute_key}" Once such a Bundle is published, you will see all your worklfows and agents but the cluster attachment will just show the string value “select_compute”. Therefore, keep in mind that before running this workflow/agent, you must first attach a compute cluster to it and then execute it.
Common environment-variable use cases
Use Bundle variables for values that legitimately change by target while the workflow-job or agent logic stays the same. Common examples are:
| Use case | Typical Dev / QA / Prod values | Where the variable is used |
| Compute capacity | 2 / 4 / 8 OCPUs | Compute dependency descriptor |
| Data destination | CHURN_DEV / CHURN_QA / CHURN | Job or notebook parameter |
| Input volume of dataset | A small sample / a larger QA sample / the full production population | Job or notebook parameter |
| Runtime behavior | Debug logging / standard logging / stricter retries and timeouts | Supported job-task fields or parameters |
| Agent context and response style | New subscribers / recently renewed subscribers / high-value subscribers at risk | Supported agent prompt or tool fields |
| Credential reference | Target Credential Store entry and key | Supported agent HTTP or MCP tool fields |
Comparing Bundles for Databricks users
Databricks Declarative Automation Bundles use custom variables and target-level overrides for many of the same problems: selecting a catalog or schema, pointing a job at existing compute, and setting environment-specific job defaults. Its documentation also draws a helpful boundary: use Bundle variables for publish-time configuration, and use job parameters for values that can change on each run. Databricks’ variables guide and job-parameter guidance are useful reference points for developers coming from that model.
The corresponding AIDP Bundle patterns are:
| Familiar Databricks pattern | AIDP Bundle equivalent |
| Define a default variable and override it under targets.dev or targets.prod | Define a value under defaults.variables; under targets.<name>, add a list entry with both aidp_ocid and workspace_key, and put overrides in that entry’s variables mapping. |
| Use ${var.catalog} as a job parameter default | Use ${var.target_schema} or another named variable in the generated workflow-job descriptor |
| Point a task to an existing cluster ID in one target | Override job_compute_key in .aidp/overrides.yaml so the job uses existing target compute instead of provisioning the bundled dependency |
| Pass a processing date or source table at job run time | Define a workflow-job parameter and provide its value when the job is run; keep its target-specific default in the Bundle if needed |
| Inspect resolved configuration before publishing | Review the generated AIDP Bundle folder and the selected target or local override before running the CLI publish command |
The configuration formats and commands are different, so do not copy a Databricks Bundle file into AIDP. The transferable idea is the discipline: keep the resource definition stable, keep target differences in declared variables, and use run parameters for values that truly vary from run to run.
Start with one configuration change
You do not need to learn every Bundle file or setting before using Bundles. Start with a working workflow, generate its Bundle via UI, parameterize the compute size, and publish to QA. If production requires existing compute, supply its key. The same approach applies to Bundles that package agents.
The essential idea is simple: keep the application logic together, express environment differences as configuration, and publish the same package wherever it needs to run.
A small change in practice, a large change in reliability
Bundles give AI and data teams a way to move from “it works in my workspace” to a reviewed, repeatable promotion path. More importantly, they are approachable: an inspectable folder, generated from the workflow jobs and agents you choose, that developers can manage through either the UI or the AIDP CLI. Environment variables keep one package portable.
For more information: