Overview
Everyone wants to know how their applications perform once deployed in the cloud. Monitoring application metrics helps avoid any outages and loss of revenue due to downtime. Oracle WebLogic Server for OCI marketplace stack supports monitoring and autoscaling WebLogic Server domains. You can learn more about the feature in this blog, Auto-scaling in Oracle WebLogic Server for OCI.
If you use the domain and cluster created by the Oracle WebLogic for the OCI marketplace stack, the auto-scaling feature works out of the box. However, there are scenarios where you would like to customize the domain, add a new cluster, or add multiple managed servers. In that case, the auto-scaling feature does not work since it cannot recognize these domain changes during scaling.
What is the alternative solution?
This article explores an alternative solution for the use cases highlighted above using the auto-scaling framework provided through Oracle WebLogic Server for OCI marketplace offering. Users can provision or scale the stack to the number of nodes necessary to support the maximum expected workload if they can predict the number of nodes required for higher workloads. For handling standard workloads, you can keep a sufficient number of nodes running while shutting down the extra nodes needed for high-load conditions. Since OCI compute instances provisioned in the stack are charged per OCPU per hour only while those run, users can stop the additional instances created for expected high-load conditions. When OCI scaling alarms are triggered, these additional instances can be restarted or shut down.
In the next few steps, you will be able to learn how to re-configure auto-scaling for your WebLogic Server for OCI stack to achieve the solution mentioned above.
Prerequisites
An OCI tenancy administrator should execute the instructions below. If you are not a part of the tenancy administrators group, please look at the required policies and permissions section in WebLogic For OCI documentation to create an Oracle WebLogic Server for the OCI marketplace stack and OCI functions.
The following marketplace listings for Oracle WebLogic Server for OCI support the monitoring and auto-scaling features:
- Oracle WebLogic Suite UCM
- Oracle WebLogic Server Enterprise Edition UCM
- Oracle WebLogic Server Enterprise Edition BYOL
- Oracle WebLogic Suite BYOL
For this article, you will create a stack using Oracle WebLogic Server Enterprise Edition BYOL with two nodes weblogic cluster using OCI load balancer and autoscaling configured for CPU load metrics. Please refer to Configure Application Performance Monitoring and Configure Autoscaling sections in the Oracle WebLogic Server for OCI documentation.
Preparing Your WebLogic Server Stack
Once the stack has been configured, follow the instructions below to re-configure auto-scaling using the new OCI functions listed below:
- Disabling Monitoring Alarms: To configure the auto-scaling feature, disable the monitoring alarms created during provisioning to avoid triggering scaling events. The alarms can be found in the OCI console under Observability & Management > Alarm Definitions.

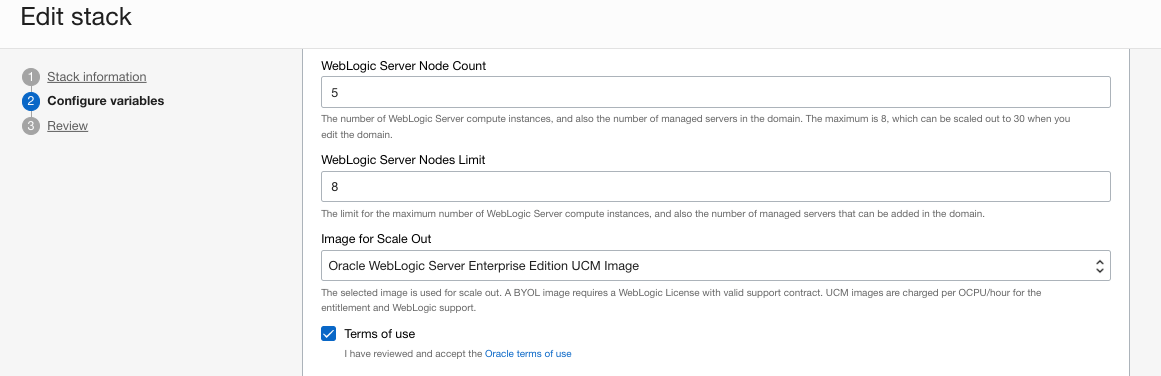
- Scale out for peak loads: Now scale out the stack by adding new nodes to handle anticipated higher workloads. Since the stack created earlier is BYOL, it can be scaled out using either BYOL or UCM images by editing the stack and reapplying. Scale-out to 5 nodes using UCM images for the new nodes.
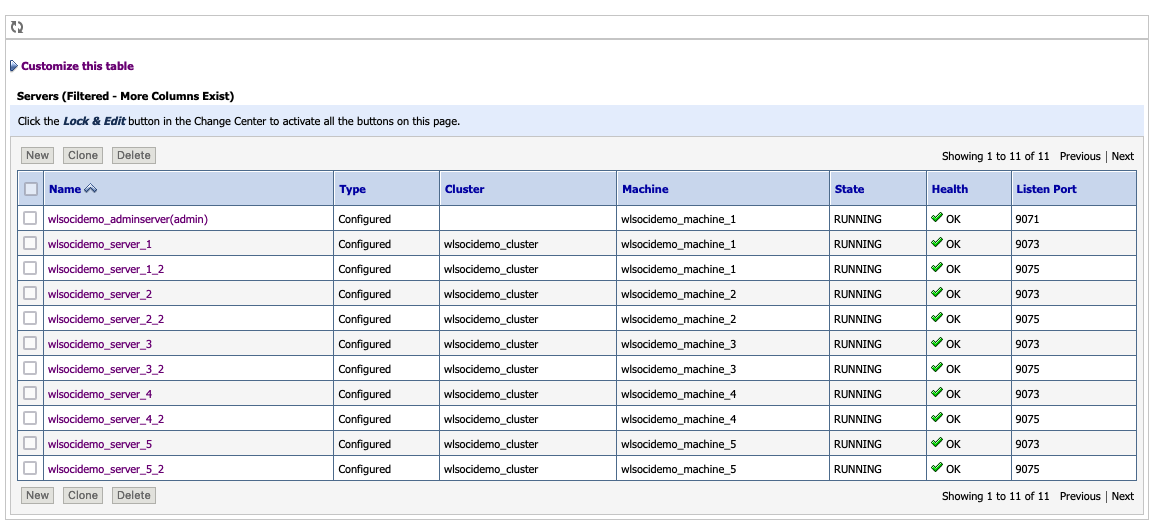
- Domain Customizations: Follow the steps below to customize your domain by creating an additional managed server per node in the existing stack created at the time of provisioning. Use the WebLogic console for configuration changes.
- Create an additional managed server with a 9075 listen port in the existing wlsocidemo_cluster cluster. Note that the Machine name should be as same as the one used by the existing server on that node.
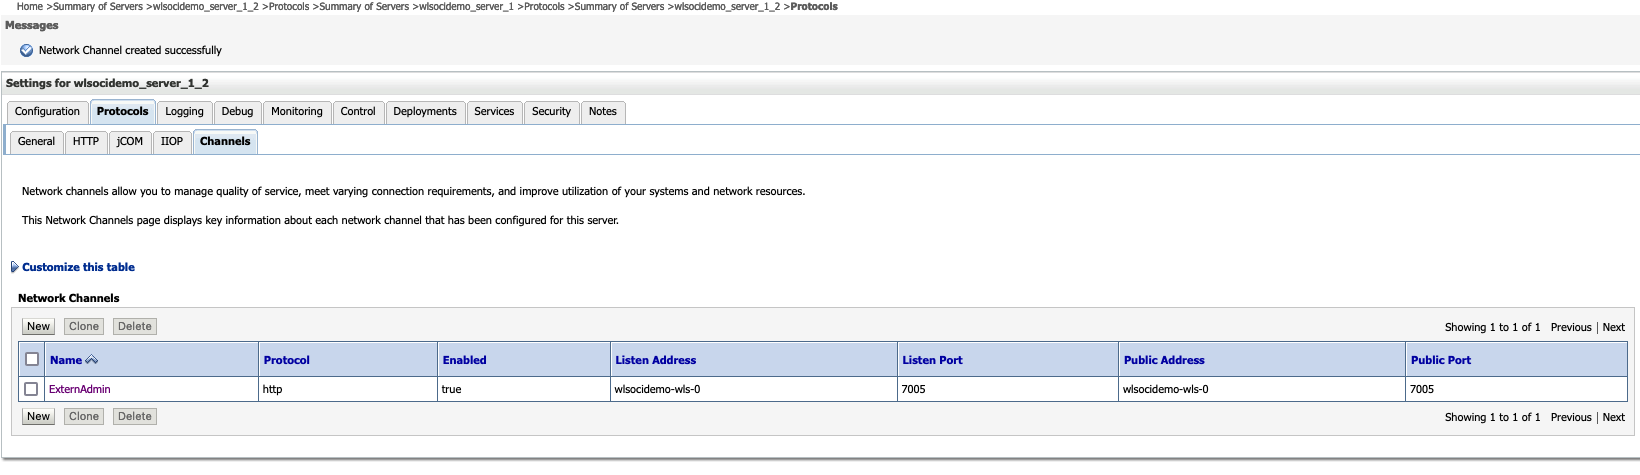
- Create http channel ports under server_name > Protocols > Channels with 7005 as listen port.
- Ensure that all newly added managed servers are started.
- With the additional server added in the previous step, we need to update the script to start and stop the new managed server created in the earlier steps. Replace /opt/scripts/start_stop_mserver.sh on the VM with the WebLogic Admin Server running (VM with index 0) with the custom script available here. You can replace this script with your custom scripts based on your domain customizations. Note that the script’s name is used in the OCI Functions we’ll create later in this article.
- Create an additional managed server with a 9075 listen port in the existing wlsocidemo_cluster cluster. Note that the Machine name should be as same as the one used by the existing server on that node.
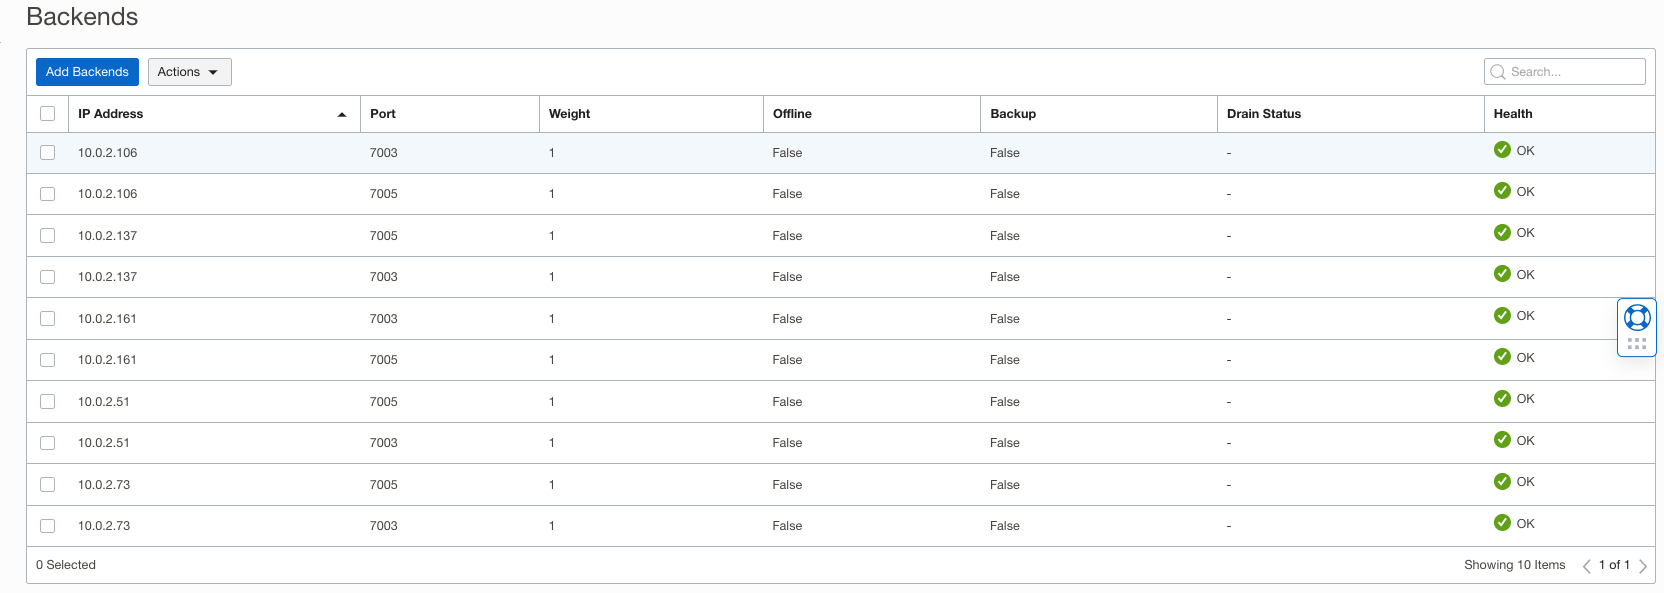
- Update Load Balancer Backends: Add the newly added managed servers to the existing Load Balancer Backend set created during the stack’s provisioning. The stack should have two backends per VM node for the two managed servers created in the earlier step.
- Test Application Deployment: Deploy a test application to simulate CPU load conditions on the cluster in the customized domain. Verify the test application deployment by accessing the application using url https://<loadbalancer_ip>/testWebApp/CpuTime.
- Stop additional VM nodes: Stop all three additional nodes created using the UCM image. The scaled-out nodes that were earlier are needed only for peak loads. Also, remove the corresponding load balancer backends for the stopped nodes.

Creating new OCI Functions
The auto-scaling functions created by the Oracle WebLogic Server for the OCI stack need to be replaced by new OCI Functions to handle the scale in/out events generated by the OCI monitoring alarms. The new scale-out function will start the stopped OCI compute instances and manage servers on the instances in the stack. It will also add the new node to the OCI Load balancer backend so that the new node can share the workload in the WebLogic cluster. Similarly, the new scale-in function will gracefully stop the managed server and the OCI compute instance hosting that server. It will also edit the OCI load balancer backend to remove the stopped node. The functions send email notifications for success and failures if the notification email is configured for the stack.
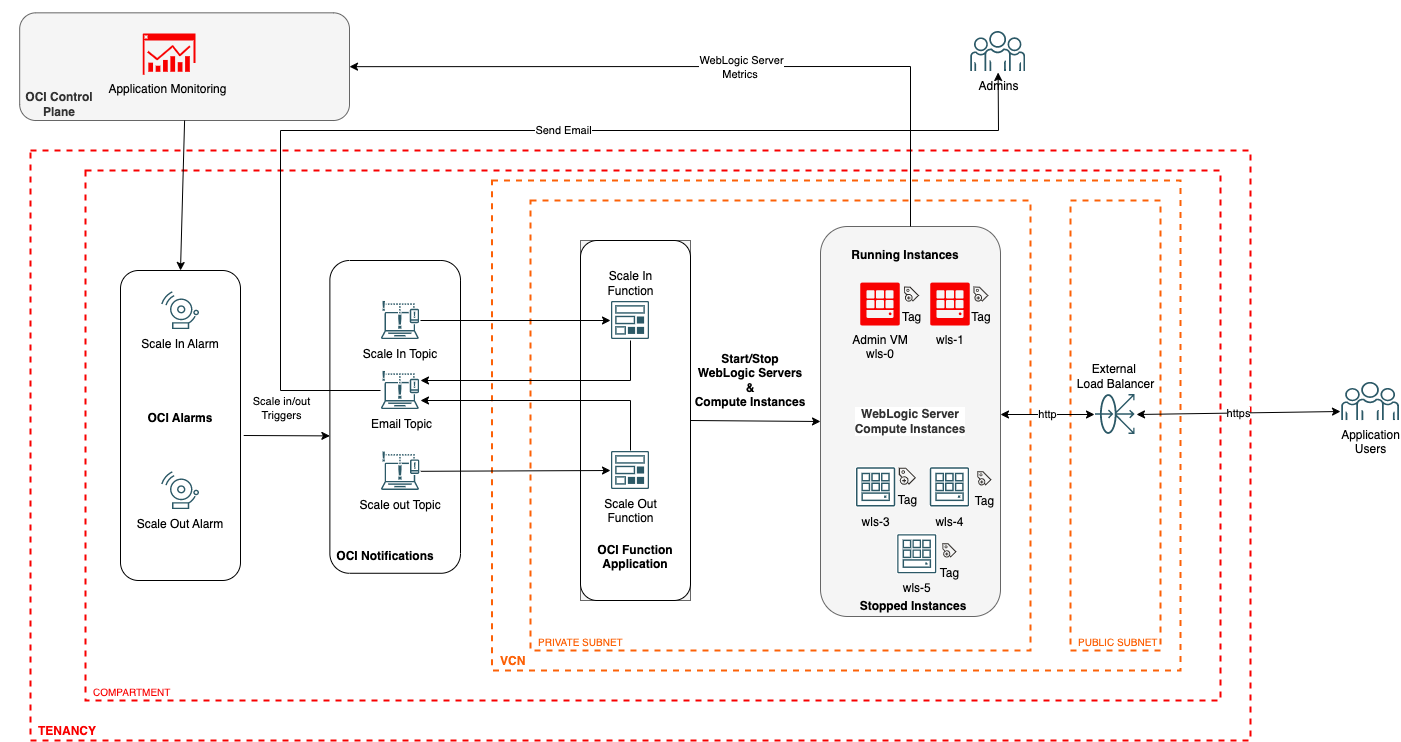
OCI Functions Application
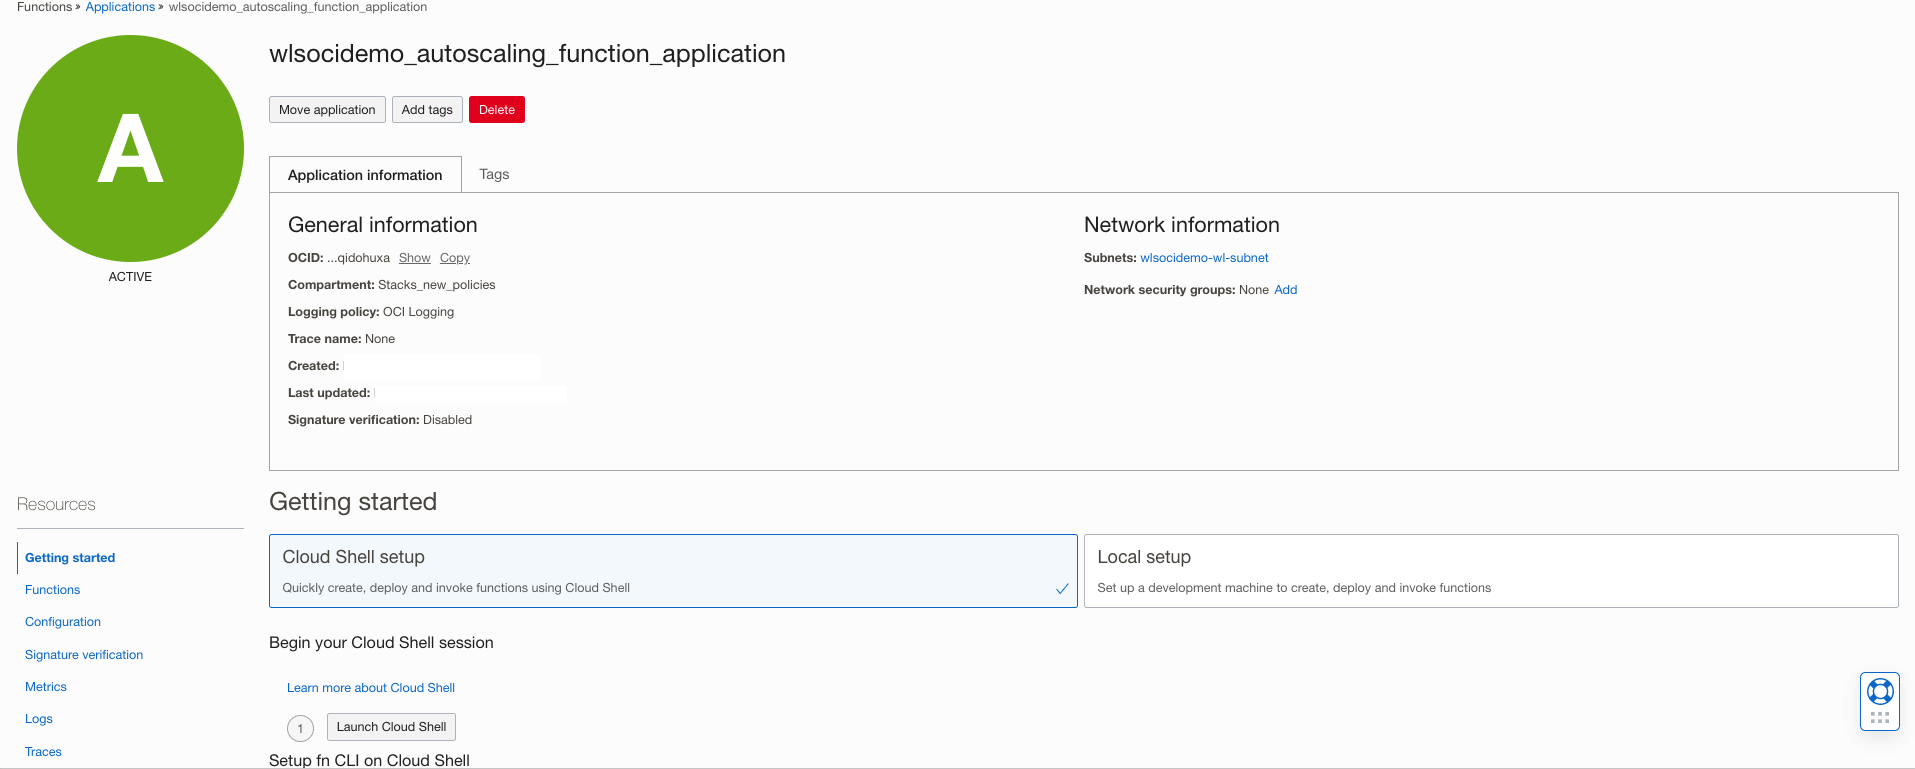
Locate the OCI Functions application at Developer Services > Functions > Applications > wlsocidemo_autoscaling_function_application. Select the same compartment as the stack compartment. The OCI Functions application has three functions configured to support the out-of-box auto-scaling features. We will replace these functions with new scaling functions to start and stop managed servers based on metric-based alarms.
Next, we’ll gather the following stack information required for configuration parameters of the new scalings functions, as shown below.
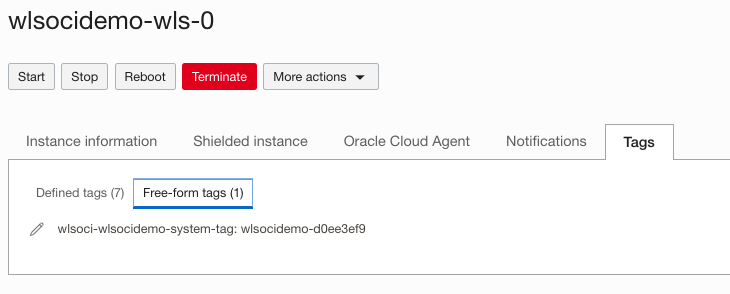
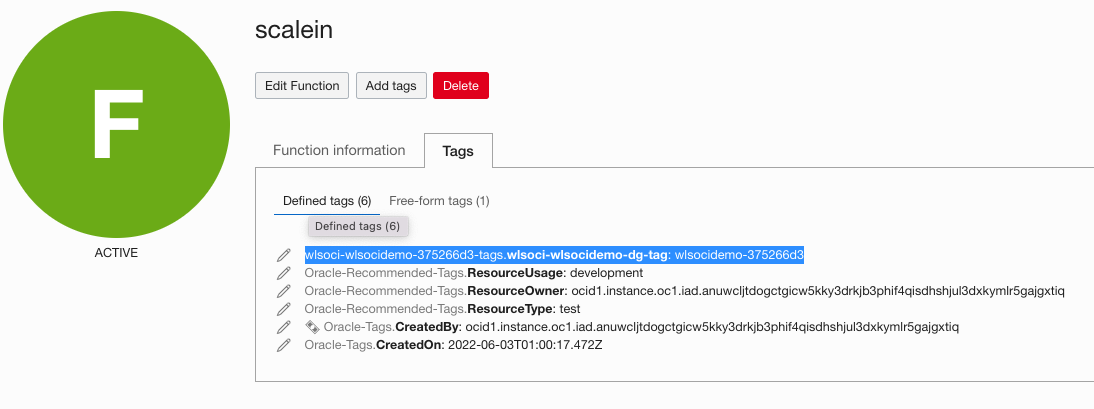
- Stack Free Form Tag and Tag Value: Locate the compute instances created for the stack under Compute > Instances. Select the stack compartment. Each compute instance has a free-form tag generated by the stack, as shown below. Note the tag name and value.
- OCI Load Balancer Information: Locate the load balancer for the stack under Networking > Load Balancers. Select the start compartment to list the Load Balancer instance. Note the details listed below.
- Load Balancer ID: The OCID value of the load balancer created by the stack.

- Load Balancer Backend Set Name: Name of the load balancer backend set created by the stack. It can be found in the Load Balancer configuration, as shown below.

-
Load Balancer Backend Ports: The ports used by the load balancer backends. These are configured with http channel ports of managed servers on each node. For this setup, we have two managed servers per node using http ports 7003 and 7005, as shown above.
- Load Balancer ID: The OCID value of the load balancer created by the stack.
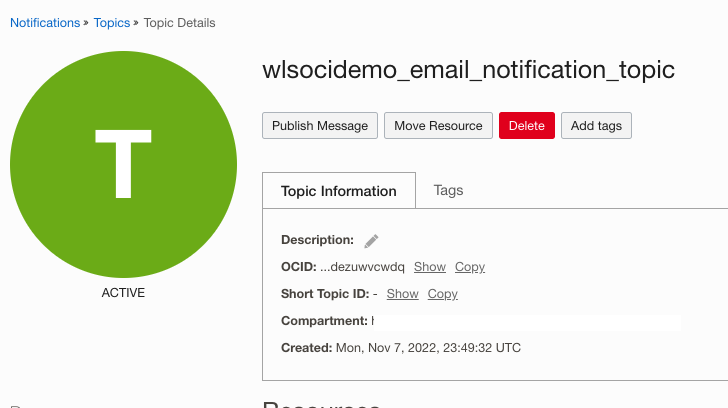
- Email Notification Topic: The email notification topic for the stack can be found at Developer Services > Application Integrations > Notifications. Select the stack compartment to location notification topics. If scaling notifications are configured, the stack optionally creates the notification topic with the name <stack_name>_email_notification_topic. Note the OCID of the email notification topic.
New OCI Functions For Autoscaling
Create Scale-out Function
When the scale-out alarm fires, the new a scale-out function will restarts the stopped nodes. You can download the scale-out function script from here.
The function script achieves scale-out by:
- Identifying the stopped compute instances in the stack using unique free-form tags generated by the stack. Note the function starts the stopped node with the lowest index first.
- Starting the compute instance followed by restarting the managed server on that instance using /opt/scripts/start_stop_mservers.sh on the admin server node (node with a name ending in wls-0).
- Adding the newly started node to the load balancer backend set.
- Sending an auto-scale out notification if configured in the stack.
Setting up Scale Out Function
Follow the steps below to setup new OCI function scripts for scale-out in your environment:
- Create a folder ~/wlsoci-scale-out in your cloud shell or local setup.
- Download the scale-out function scripts zip file.
- Unzip func.py, func.yaml, and requirements.txt scripts from the downloaded zip to ~/wlsoci-scale-out.
- If you use your custom, start and stop script, replace that script name in the variable startup_command of OCI function script func.py.
- Before creating the functions, replace the placeholder values gathered in the earlier step in the configuration parameters listed below in func.yaml.
- stack_freeform_tag and stack_freeform_tag_value: Free form tag and value generated by the stack for compute resources
- scaling_size: (Optional) Number of instances that need to be scaled out for each invocation of the scaling event. The default value is 1.
- load_balancer_id: The ocid value of the load balancer created by the stack.
- lb_backend_set_name: Name of the load balancer backend set for the stack.
- lb_backend_ports: Set the value for this field as “7003,7005” for the two managed servers per node.
- wlsc_email_notification_topic_id: The ocid of the email notification topic created by the stack. Optional, as the default value is inherited from the function application configuration.
Scale-out func.yaml:
name: wlsoci-scale-out
version: 1.0.0
runtime: python
build_image: fnproject/python:3.9-dev
run_image: fnproject/python:3.9
entrypoint: /python/bin/fdk /function/func.py handler
memory: 256
timeout: 300
config:
lb_backend_ports: 7003,7005
lb_backend_set_name: wlsocidemo-lb-backendset
load_balancer_id: ocid1.loadbalancer......d6ryhpwx6ef4674hjuq
scaling_size: "1"
stack_freeform_tag: wlsoci-wlsocidemo-system-tag
stack_freeform_tag_value: wlsocidemo-d0eef3e9
wlsc_email_notification_topic_id: ocid1.onstopic.........qjlsyrtvbrmji3has4fyp3a
Create Scale in Function
Next, we’ll deploy a scale-in function that stops the nodes started for the previous scale-out alarms. You can download the scale-in function script from here.
The function script achieves scale-in by:
- Identifying the running compute instances in the stack using unique free-form tags generated by the stack. Note that the function stops the running node with the highest index first.
- Gracefully shutting down the managed server on that instance, followed by that compute instance shut down. The script /opt/scripts/start_stop_mservers.sh that we replaced earlier on the admin server node ( node with a name ending in wls-0) does the graceful shutdown of managed servers.
- Removing the stopped compute instance from the load balancer backend set.
- Sending an auto-scale in notification if configured in the stack.
Setting up Scale in Function
Follow the steps below to setup new OCI function scripts for scale-in in your environment:
- Create a folder ~/wlsoci-scale-in in your cloud shell or local setup.
- Download the scale in the function scripts zip file.
- Unzip func.py, func.yaml, and requirements.txt scripts from the downloaded zip to ~/wlsoci-scale-in.
- If you use your custom, start and stop script, replace that script name in the variable stop_command of OCI function script func.py.
- Replace the configuration parameters listed below in func.yaml.
- min_wls_node_count: Minimum number of running nodes in the stack. Optional as the default value is inherited from the OCI Function application configuration. It is set to the initial node count during the provisioning of the stack.
- stack_freeform_tag: Free form tag generated by the stack for compute instances.
- stack_freeform_tag_value: Free Tag value generated by the stack for compute instances.
- scaling_size: (Optional) Number of instances that need to be scaled out for each invocation of the scaling event. The default value is 1.
- load_balancer_id: The ocid value of the load balancer created by the stack.
- lb_backend_set_name: Name of the load balancer backend set for the stack.
- wlsc_email_notification_topic_id: The ocid of the email notification topic created by the stack. Optional, as the default value is inherited from the function application configuration.
Scale-in func.yaml:
name: wlsoci-scale-in
version: 1.0.0
runtime: python
build_image: fnproject/python:3.9-dev
run_image: fnproject/python:3.9
entrypoint: /python/bin/fdk /function/func.py handler
memory: 256
timeout: 300
config:
lb_backend_set_name: wlsocidemo-lb-backendset
load_balancer_id: ocid1.loadbalancer........6ryhpwx6ef4674hjuq
min_wls_node_count: "2"
scaling_size: "1"
stack_freeform_tag: wlsoci-wlsocidemo-system-tag
stack_freeform_tag_value: wlsocidemo-d0eef3e9
wlsc_email_notification_topic_id: ocid1.onstopic..........syrtvbrmji3has4fyp3a
Deploying Functions From Cloud Shell
To create OCI Functions, you must set up your cloud shell or create a local development setup. The OCI Function application Getting Started guide lists the instructions for creating new functions. Locate the OCI Functions application under Developer Services > Functions > Applications > wlsocidemo_autoscaling_function_application. Follow the latest instructions in the Getting Started link to set up your cloud shell or local setup, as shown below. For this article, we’ll be using cloud shell to deploy OCI Functions.
Run the commands from the cloud shell to setup and deploy the function:
- Use the context for your region.
- Update the context with the function’s compartment ID.
- Provide a unique repository name prefix to distinguish your function images from others. For example, with ‘jdoe’ as the prefix, the image path for a ‘hello’ function image is ‘<region-key>.ocir.io/<tenancy-namespace>/jdoe/hello:0.0.1‘
- Generate OCIR authorization token and Log into the Registry using the Auth Token as your password.
>> docker login -u '<tenancy namespace>/<user id>' <your region>.ocir.io
- Verify your setup by listing applications in the compartment.
- Navigate to the functions directory created in the previous step and deploy the scaling functions.
Add defined tags to Scaling Functions
The OCI dynamic group for functions created by the stack uses unique defined tags for creating dynamic groups. Functions tagged with the defined tags will have instance principal access as defined in the policy. The newly deployed scaling functions described above need similar access to start and stop operations on the OCI compute instance. The new functions need to be tagged with the same tags as functions created by stacks.
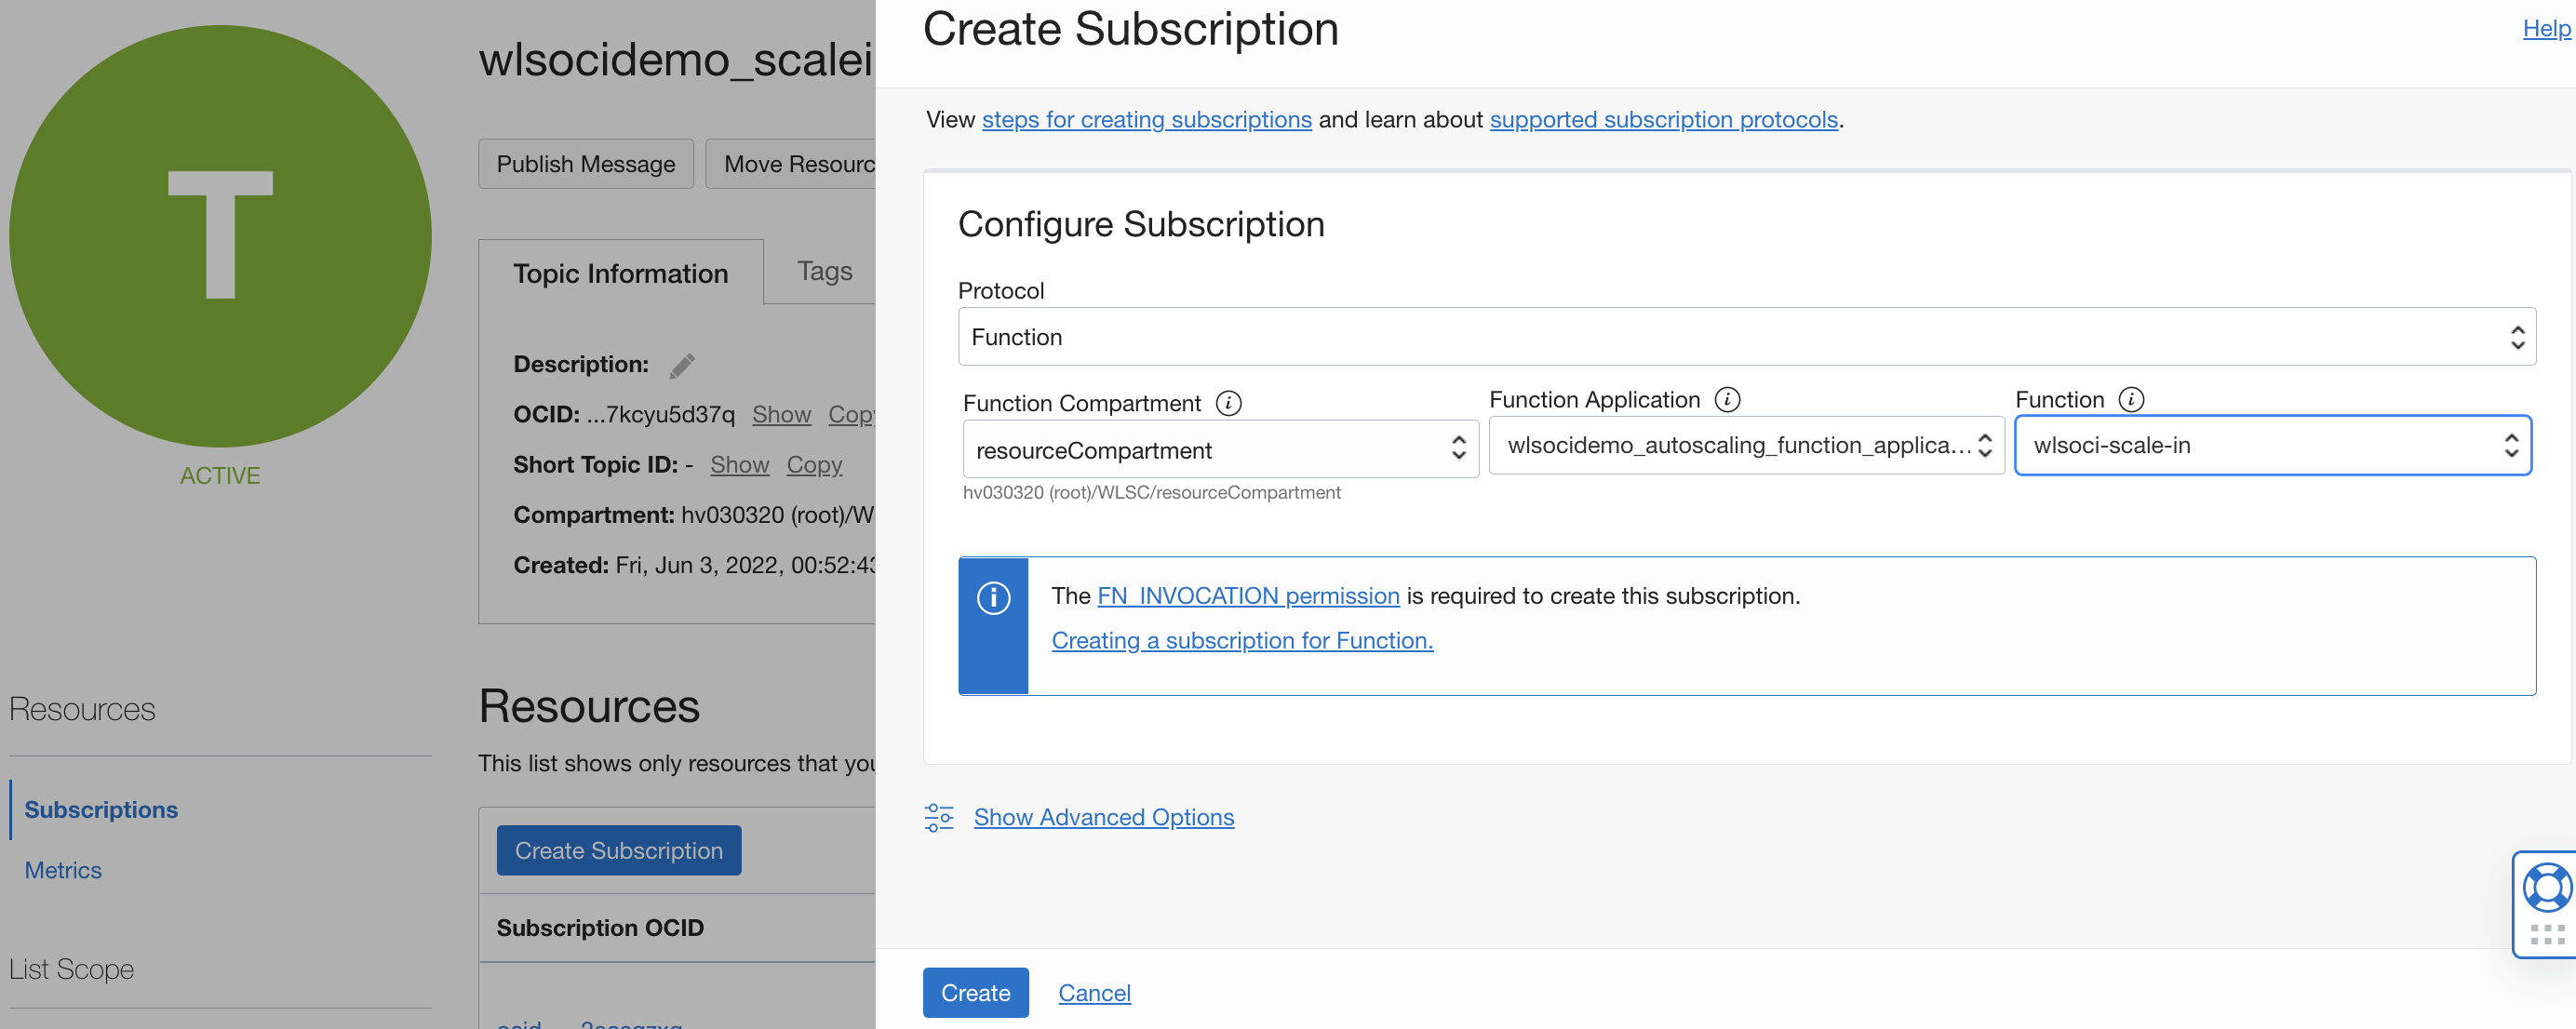
- Locate the dynamic group tag for the existing function by accessing the function from Developer Services > Functions> Applications. Open the scale-in or scale-out function from the function application created by the stack and note the defined tags as shown below:
- Open the new scale-in or scale-out application created earlier and assign the same defined tag and tag value.

Create New Notification Topic Subscriptions
The notification topic to which monitoring alarms send notifications is using the existing functions in its subscriptions. You will create a new subscription for the above functions and remove the existing ones.
The scale-in and scale-out notification topics are under Developer Services> Application Integration > Notifications. The stack creates three notification topics for scale-out, scale-in, and, optionally, email notification. Add new subscriptions to scale in and scale out the topic, as shown below. Also, ensure that existing subscriptions are deleted so alarm events are not sent to original functions.
Verify your setup
For this article, we will use JMeter to load test the test application deployed to the cluster in earlier steps in Preparing Your WebLogic Stack.
Follow the steps below to test your environment using JMeter:
- Enable the scale-out and scale-in alarms using oci console under the Alarm Definitions of OCI Observability & Management section.
- Download the JMeter test file in your local environment.
- Locate the HTTPSampler.domain property field in the JMeter file downloaded to update your setup’s load balancer IP address in the file below.
<stringProp name="HTTPSampler.domain">129.x.x.x</stringProp>
- Run Jmeter test in non GUI mode. You can import and run the test through the GUI mode.
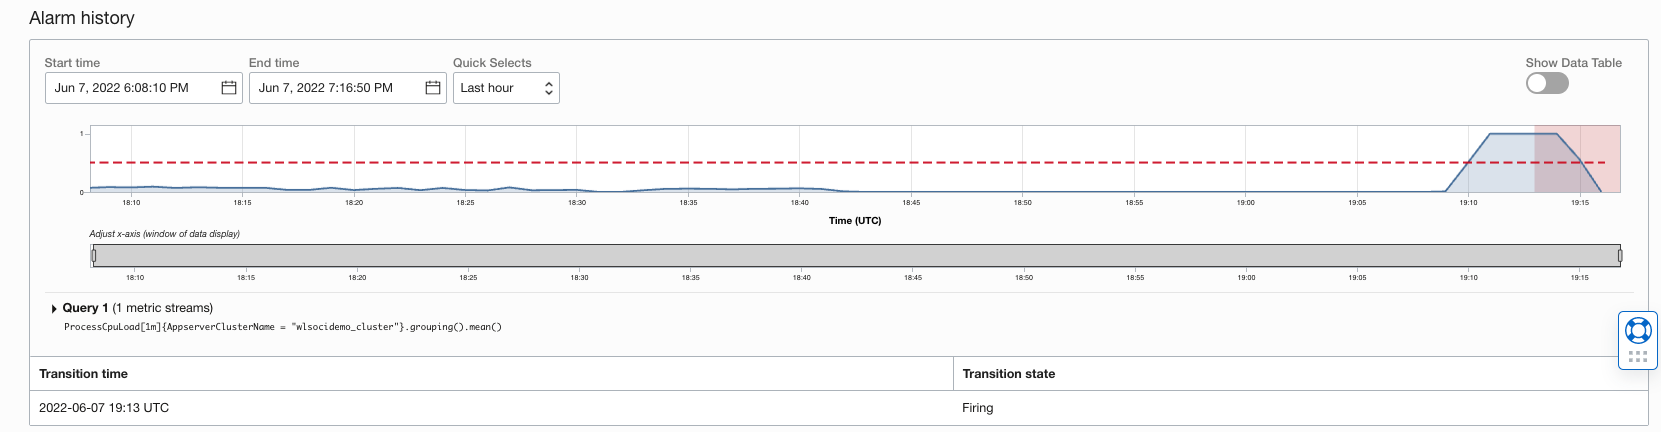
- Verify that scale-out and scale-in alarms are triggered when the max and min thresholds are breached.
- Verify the stopped compute instances and managed servers on those nodes are started using OCI and WebLogic consoles.
- Scale-in can be verified by shutting the JMeter test to reduce the CPU load.
- Verify that newly started nodes are gracefully shut down, and load balancer backends are updated for the stopped nodes.
Summary
In this article, you saw how to make the auto-scaling feature of WebLogic for the OCI marketplace efficiently work with custom WebLogic domains by swapping OCI functions. This procedure offers predictable billing due to pre-created compute instances and provides the reliability of your deployment by quickly scaling the stack to handle peak loads.