The seamless migration of Siebel CRM from on-premises to Oracle Cloud Infrastructure (OCI) has been made possible by the introduction of Siebel Cloud Manager (SCM). A current Siebel CRM environment can be lifted and shifted from an on-premises location to OCI in addition to being created from scratch and managed on OCI. We developed a workshop titled “Use Siebel Cloud Manager to deploy Siebel CRM on OCI” on Oracle Livelabs that demonstrates how to create a new Siebel CRM environment using the Siebel Cloud Manager on OCI, with Siebel CRM running as containers in Oracle Kubernetes Engine (OKE). The workshop’s webpage can be accessed here.
In order to move the Siebel database and application-related artefacts from on-premises to OCI Object Storage, this blog post will focus on using the Siebel Lift Utility, a feature of the Siebel Cloud Manager. The artefacts are stored in a staging area and archived as TAR files. The Siebel Cloud Manager will later deploy the target environment using them.
Refer to the support article “Using Siebel Cloud Manager to Deploy Siebel CRM on OCI (Doc ID 2828904.1)” for the complete documentation on Siebel Cloud Manager, as well as the pdf file that is attached.
Let’s first discuss what these objects are. Both the Siebel database and the application servers in Siebel have customizations. Application servers’ artefacts are,
- SMC configuration
- Siebel File System
- Custom Web files
- Encryption key file (keyfile.bin)
- Other artifacts like custom scripts, backups, etc.
To create a SCM instance from the OCI Marketplace, follow Lab 2 of the workshop. The stack job output provides the URL for downloading the Siebel Lift Utility at the conclusion of SCM provisioning. There are two operating modes for this utility: container mode and non-container mode. On Linux, container mode is the default setting; however, only non-container mode is supported on the Windows platform. We will discuss the non-container mode on a Windows platform in this blog. Although all of the approaches are fully described in the official documentation.
Limitations and Requirements
There are a few requirements that must be met for the Siebel Lift Utility to function flawlessly.
- From the Siebel Cloud Manager, download and extract the Siebel Lift Utility zip file to one of the Siebel servers in the on-premises system.
- Assure connectivity to the Siebel Application Interface, Siebel Gateway server, Siebel File System, and Siebel Database from the Siebel server from which the utility will be run.
- Install Python 3.9.6 and 7-zip for Windows from https://www.python.org/downloads.
- Follow the instructions on this page to install OCI Command Line Interface (CLI): https://docs.oracle.com/en-us/iaas/Content/API/SDKDocs/cliinstall.htm
- Use the Python command below to install the necessary modules. All the modules are listed in the requirements.txt file found in the utility’s zip package.
pip install -f <Path_to_utility_folder> -r requirements.txt
- Use the commands listed below in a command prompt window to confirm that Python, 7z, and OCI CLI are configured correctly.
python –version
7z
oci -v
- By altering the utility_responsefile_template.resp response file located in the utility folder, you can also execute this utility in silent mode. The official documentation has further information.
- The staging location for database artifacts you create must be mounted on the computer where Oracle Database is installed.
- Pre-Authenticated Requests can be created in OCI by using the instructions at https://docs.oracle.com/en-us/iaas/Content/Object/Tasks/usingpreauthenticatedrequests.htm.
Run the Utility
- Open a Command Prompt window, then navigate to the folder to which the Siebel Lift Utility contents were extracted.
- Run the following command.
python siebel_lift_utility.py
- The utility would initially present us with three major tasks to select from.
- The first choice is to create deployment kits; the second is to upload them to OCI; and the third is to carry out both tasks. Type 3 and Hit Enter.
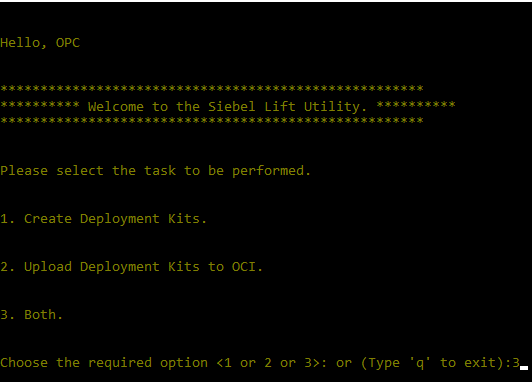
We have the ability to carry out one or more of the tasks either separately or collectively, thanks to the Siebel Lift Utility’s flexibility. We can make the right decision based on the requirement and our level of readiness.
- Select option 3 on the following screen to execute the Application Tier and Database export simultaneously.
- To choose every option for the application artefacts, type 1,2,3,4,5. Hit Enter.
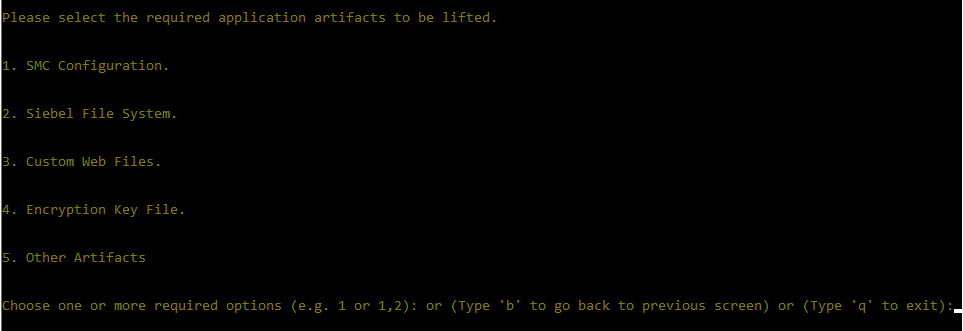
- When requested, provide all applicable values for the configuration of the Siebel Management Console (SMC), the Siebel File System, Custom Web Files, the location of the keyfile.bin file, and Other Artifacts.
- To extract all Siebel users, select Y for “Application user extraction flag” in the database configuration settings. To only extract SADMIN and GUESTUSER, enter N.
- When requested, enter the OCI region name, OCI tenancy name, OCI tenancy ID, OCI compartment ID, OCI user ID, OCI private key file location, OCI passphrase, OCI fingerprint, and OCI bucket name in order to upload the artefacts to object storage.
The application and database artefacts will be extracted to the staging folder and uploaded to the OCI’s object storage after the Siebel Lift Utility has finished running. The database export generates an export.log file that we may use to confirm the status and huge EXPORT 0*.DMP files depending upon the size of the database. You can also choose to manually upload the artefacts to OCI Object Storage using the OCI CLI or console.
We must build a JSON Payload and send it to the Siebel Cloud Manager in order to deploy the Siebel CRM environment on the destination using these on-premises artefacts.
Here is a payload for your reference. In the workshop, there is an example payload that will show you how to construct a new Siebel environment. The same payload has been transformed to become this.
{
“name”: “SiebelLab”,
“siebel”: {
“registry_url”: “{Available_Endpoints_In_Your_Region}”,
“registry_user”: “{User_Id_To_Connect_To_Container_Registry}”,
“registry_password”: “{User_Auth_Token}”,
“bucket_url”: “{Pre-Authenticated_Request_Link_Containing_On-Prem_Artifacts},
},
“infrastructure”: {
“gitlab_url”: “https://{Public IP of Gitlab Instance}”,
“gitlab_accesstoken”: “{Gitlab_Access_Token}”,
“gitlab_user”: “root”,
“gitlab_selfsigned_cacert”: “/home/opc/certs/rootCA.crt”
},
“database”: {
“db_type”: “ATP”,
“atp”: {
“admin_password”: “WElcome123###”,
“storage_in_tbs”: 1,
“cpu_cores”: 2
}
},
“size”: {
“kubernetes_node_shape”: “VM.Standard.E4.Flex”,
“kubernetes_node_count”: 3,
“node_shape_config”: {
“memory_in_gbs”: 20,
“ocpus”: 2
},
“ses_resource_limits”: {
“cpu”: 2,
“memory”: “15Gi”
},
“cgw_resource_limits”: {
“cpu”: 2,
“memory”: “15Gi”
},
“sai_resource_limits”: {
“cpu”: 1,
“memory”: “15Gi”
}
}
}
Information for executing and monitoring the payload is provided in Lab 4 of the workshop. Depending on how big the environment is, it takes a few hours after the payload is executed to get the environment up and running. Keep an eye out for provisioning failures on a regular basis.
Exporting Siebel customizations from on-premises could be a laborious operation without the Siebel Lift Utility. To obtain a sense of how Siebel Cloud Manager can be used to easily deploy Siebel, we encourage you to view the Siebel Cloud Manager livelab in its entirety.
We look forward to welcoming your Siebel workload to OCI.