The PeopleSoft Chatbot client rendered by Oracle Digital Assistant’s WebSDK comes with a default behavior and styling. Default behavior and look and feel of the Chatbot client can be modified to an extent, with the branding options provided by Oracle WebSDK. Please refer to the ODA WebSDK user guide for a detailed list of properties available to customize chat client. This document helps PeopleSoft administrator/developer with steps to incorporate these branding options on the chatbot Client through PeopleSoft configuration pages.

Chatbot client on PeopleSoft page (Collapsed & Expanded)
Although plenty of options are available with Oracle WebSDK for branding the chat client, throughout this blog post we will try out a few of those as listed below.
- Modify the Chatbot Widget Icon.
- Modify the position where the chat widget appears by when page loads.
- Change the Default Theme.
- Override the default input place holder message text.
Now let us jump into the configuration steps required to incorporate these changes:
1. Login to PeopleSoft as a Chatbot Administrator.
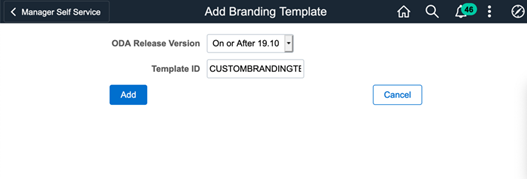
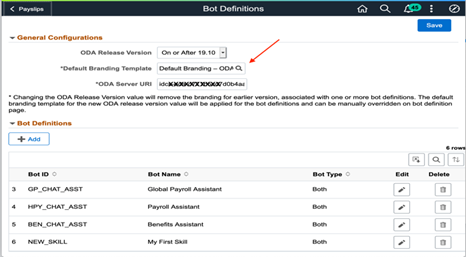
2. Navigate to Enterprise Components ⇒ Chatbot Configuration ⇒ Branding Template

3. Click on the Add button to add a new branding template
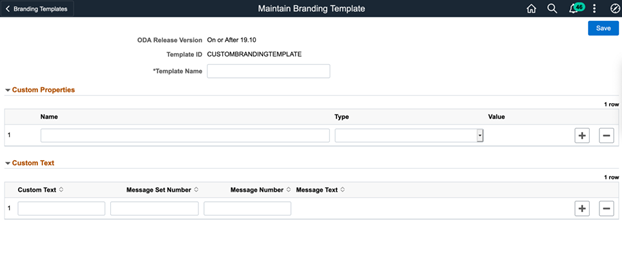
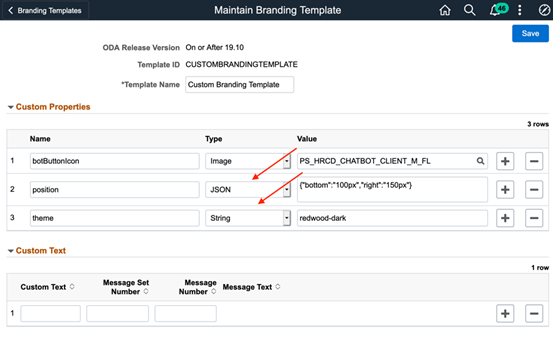
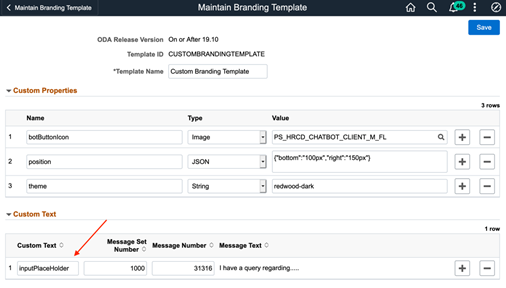
4. This shows a blank branding template page. Properties related to the behavior/ look & feel of the chat client can be added under Custom Properties. Similarly, texts properties such as chat title, tool tip text, Input Place Holder, labels, etc can be added under custom texts. The values of custom texts are assigned through the message catalog.
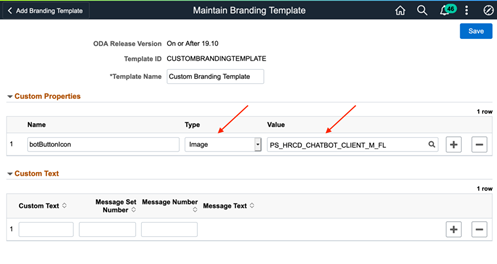
5. In order to change the Chat widget icon, add a Property “botButtonIcon” under custom properties. Set the type as Image. Click on the Prompt to choose an image and save it
6. Having Created a new branding template, the Bot Definition has to be updated to use the newly created branding template.
7. Navigate to Enterprise Component ⇒ Chatbot Configuration ⇒ Bot Definition. The New Branding template can be updated here (in the Default Branding Template field). However, doing so would get the changes applied on the system level for all the Bots available in the application. In order to restrict the customization changes to one individual Bot (say My First Skill), the Branding template has to be updated for that particular Bot.
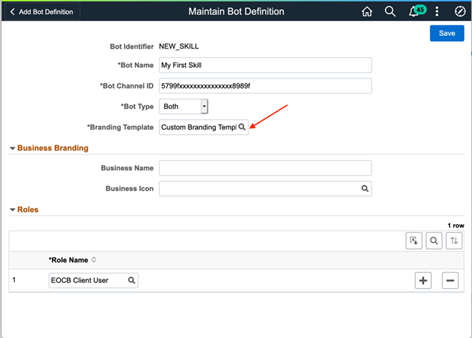
8. Edit the bot- New_Skill and update the new Branding template.
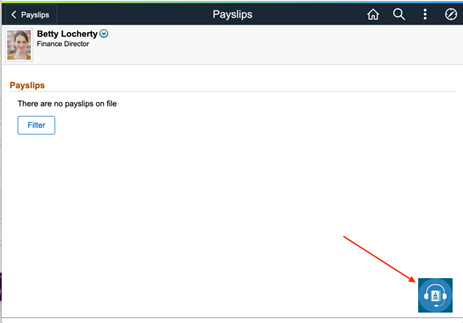
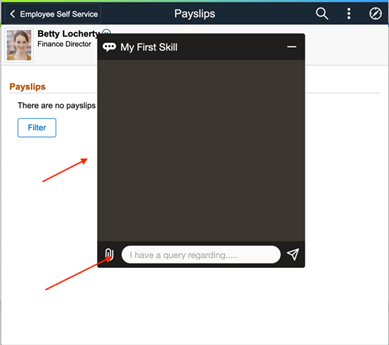
9. In order to view the updated chatbot widget icon, Let’s navigate to the payslip component or any other component where the bot is tagged to. Homepage ⇒ Employee Self Service ⇒ Payslip. Notice that the new widget icon image is updated here.
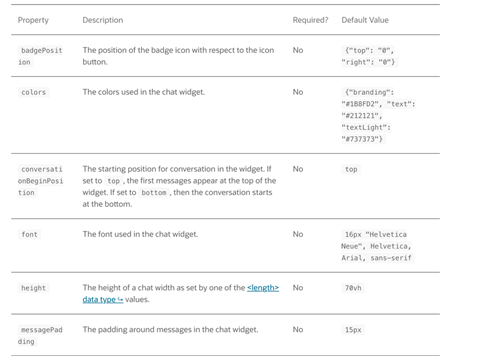
10 . Now, let’s add a few more properties to modify the position of the chat widget, theme, and input placeholder text. Refer Oracle Websdk User Guide to check the details about the property, its type, and possible values.
11. As the values of the custom text properties are referred from message catalogue, create a message with a text stating, “I have a query regarding ….”
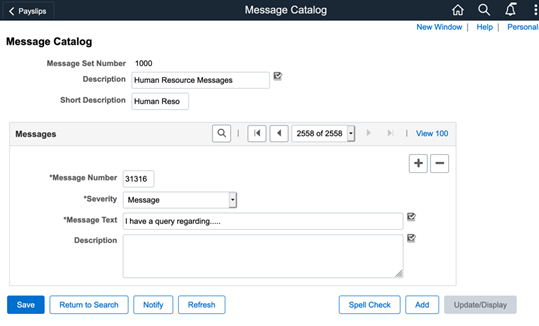
12. Go Back to the Branding Template page and Add the property “inputPlaceHolder” under custom and enter the Message number and set number created above and save it.
13. In order to view the customization changes, let us navigate to the payslip component where the bot is tagged to. It is observed that the position of the widget is moved little towards the center of the page as specified in the branding template

14. Click on the Bot icon to expand the chat client. It is noted that the new theme and the modified input text place holder is reflected here.
The Configuration pages used in the above setup are available for HCM customers in Image 34 and Image 35 for FSCM customers. For more details about the Chatbot Installation guide, Technical Implementation of Integration between PeopleSoft and ODA, and other recent updates refer PeopleSoft Chatbot Infoportal
This blog post has been authored by Mohamed Ismail, Principal Applications Engineer at Oracle.