We’ve heard from many customers who are trying the new Oracle Enterprise Manager App in the Oracle Cloud Marketplace that they would like more information on how to set up the networking between their newly-installed, cloud-hosted EM and their on-premises assets. This blog post will use an example explain how to set up the networking and to ensure the connection is efficient and secure.
Let’s use an example: Reference Architecture
First off, let’s define a simple example. Let’s say you have an OCI tenant called eminfra, and it is deployed in the OCI-Phoenix region. In that tenant you’ve installed an Enterprise Manager instance, either manually in a Virtual Machine you’ve configured yourself or using the EM marketplace app. That VM probably has a Internet Gateway so that you can access your EM instance from over the Internet.
Now you want to manage some targets in another data center. It could be perhaps in your own on-premises data center, or another IaaS provider, or even something deployed in a different OCI region. For the purposes of this example, we will call this the “Target Data Center” and we will be standing up an OCI VM with a single-instance Database in the OCI-Ashburn region, and the instance name is oradbclouducm.
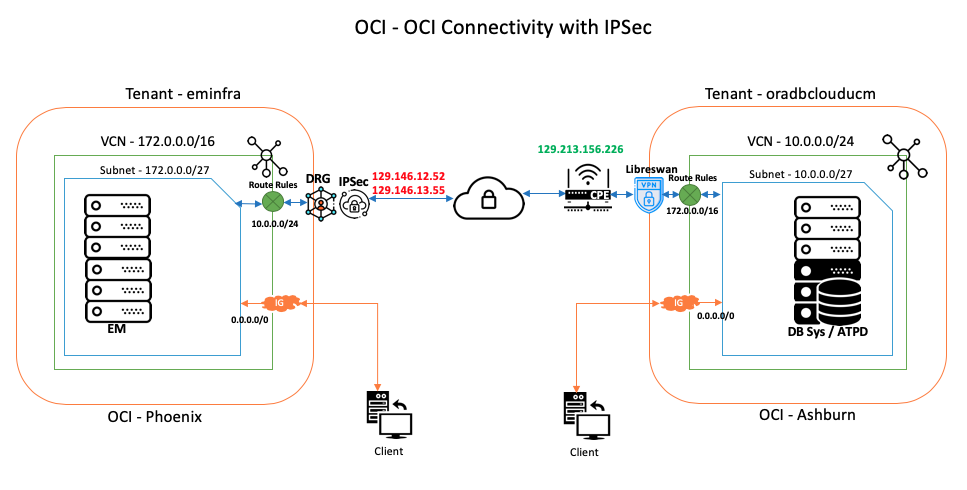
You can see both of these environments in the image below. The “left” host is the EM-in-OCI network, and the “right” host is the Target network.

Deciding What Networking Option to Use: FastConnect or IPSec VPN?
Our goal is to establish secure, reliable networking connectivity between eminfra and oradbclouducm so that an EM agent installed on the Database in oradbclouducm can talk to the EM OMS installed on eminfra. There are two options to do this.
The first, and simplest option is to make use of Oracle Cloud FastConnect, which provides a dedicated, secure VPN connection between your site and Oracle Cloud. If you are making use of FastConnect, no additional work is needed as these two hosts can communicate with each other just like they are in your local network, so we won’t go into that option any further here (note that subscribing to FastConnect carries an additional cost).
The second option is to make use of a secure and encrypted site-to-site IPSec VPN that you set up on your own using an Open Source IPSec client such as LibreSwan. This setup requires a bit more work on your end, but carries no additional cost. We’ll show you the steps required to do this on both the EM and Target sides.
The image below shows the end state — the same reference architecture with the IPSec VPN networking enabled.
Right/Target-Side: Installing and Configuring the Networking for Libreswan; Installing Libreswan Software
For the purposes of this example, we are going to assume that you have already have an on-premises “Target Data Center” network and it has a connection to the Internet.
IMPORTANT note about the Right/Target-Side networking: Our example is using a different OCI Data Center for our “Right/Target-side Data Center,” but that is just an example…if your Right/Target-side is your traditional on-premises network, then some the networking actions/terminology we discuss in this section might be different for you. For example, in an on-premises network, you might be dealing with the administrators of your network’s DMZ, bastion hosts and firewall rules instead of (in our example) OCI’s Internet Gateways, Ingress Rules and similar. However, the basic information you’ll need to gather from the Right/Target-side network to use in the Left/EM-side still apply, so hopefully this information will help you understand what you would need from your on-premises network as well.
In our example where the Database Target is in OCI-Ashburn, let’s assume you already set up an OCI Compartment called EnterpriseManager inside the (OCI-Ashburn) oradbclouducm OCI instance, and that EnterpriseManager Compartment has a VCN called EM-Demo with the CIDR 10.0.0.0/24 and a Subnet called em with the CIDR 10.0.0.0/27 that has an Internet Gateway enabled (if you don’t know what any of this means, visit the OCI Networking site to learn more).
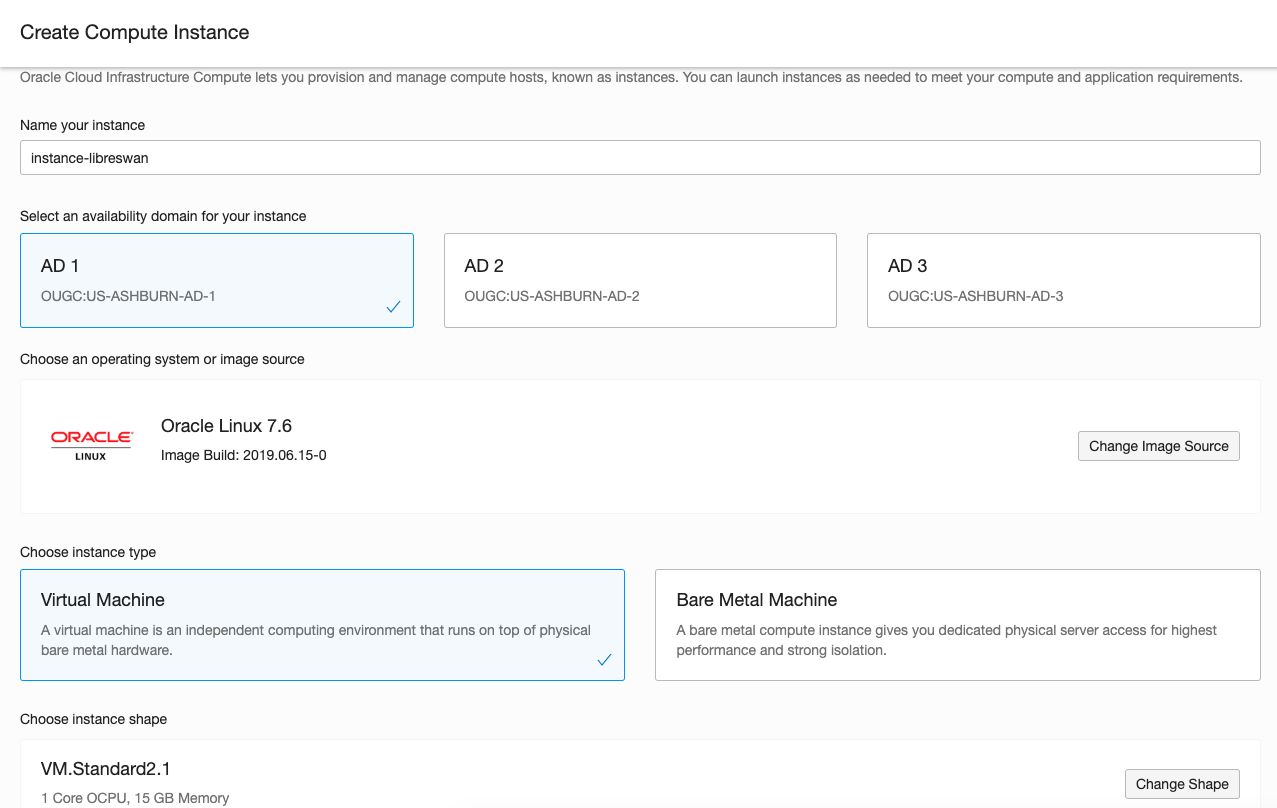
You then need to spin up a new VM in the em Subnet of the EM-Demo VCN into which you will install Libreswan. We are going to call this VM instance-libreswan, and it will use a VM.Standard.2.1 Shape.

Note the Private IP address of the instance-libreswan VM, which in this example is 10.0.0.4 .
Note the Public IP address of the instance-libreswan VM, which in this example is 129.213.156.226 .
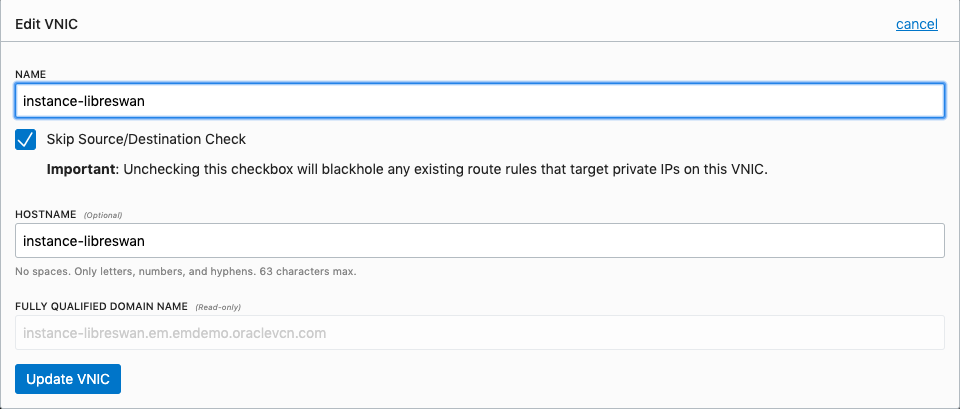
Once the instance-libreswan VM is up, navigate to the new instance in OCI Console, choose the Attached VNIC setting, edit it and Disable the Source/Destination check on the network (since Libreswan is going to be taking care of that for us).
Then add Ingress Rules to the VM to open up ports 500, 4500, UDP and TCP ports.

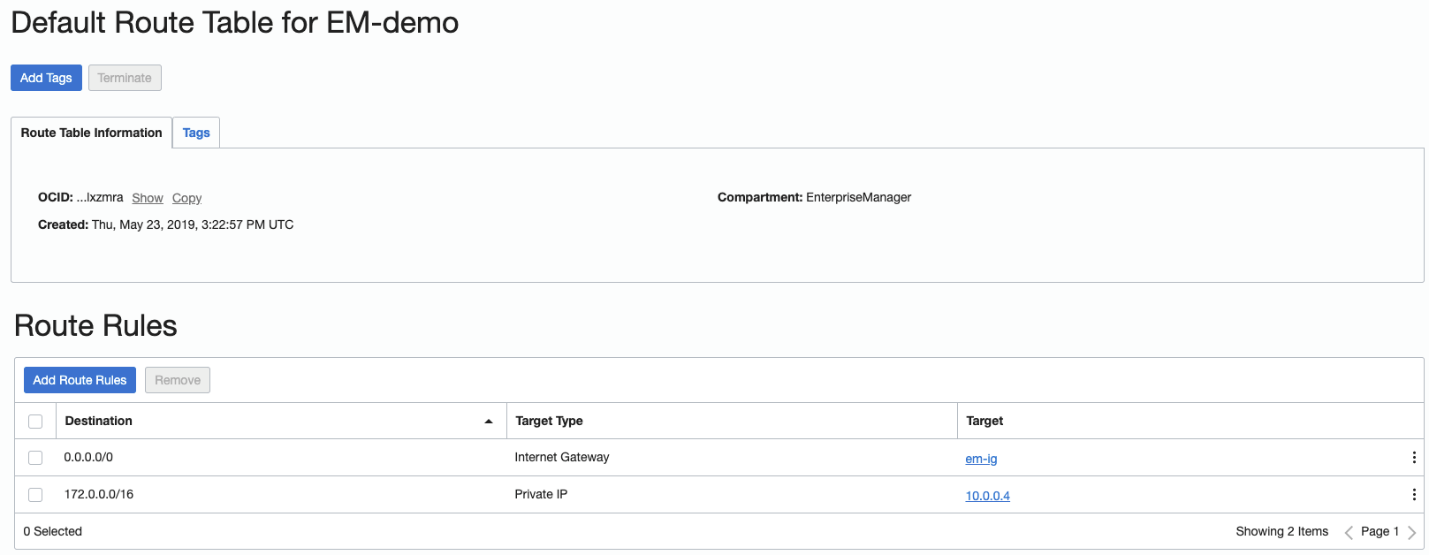
Then add a route rule to the Route Table in the EM-Demo network to send all incoming traffic to the instance-libreswan machine, using the Private IP address you noted above (in our case, 10.0.0.4).
Then, as root user in the instance-libreswan VM, install the Libreswan package by running the command
yum install libreswan -y |
Left/EM-Side: Networking to Communicate with Right/Target-Side Libreswan
We now need to create a VCN on the Enterprise Manager side of the equation that will allow the EM instance to communicate with our Libreswan IPsec endpoint.
In our eminfra OCI instance, create a Compartment called EM-MP and in that compartment create a VCN called hybrid_con with CIDR 172.0.0.0/16.
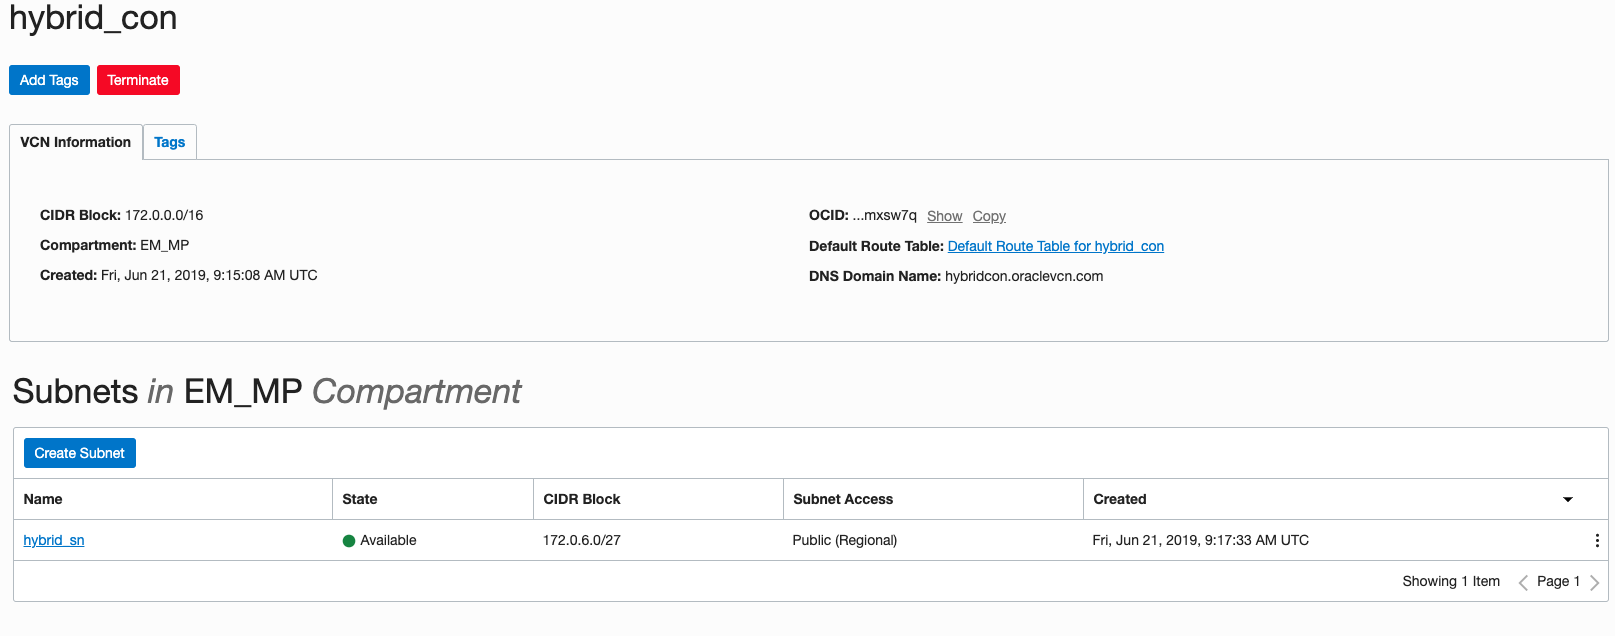
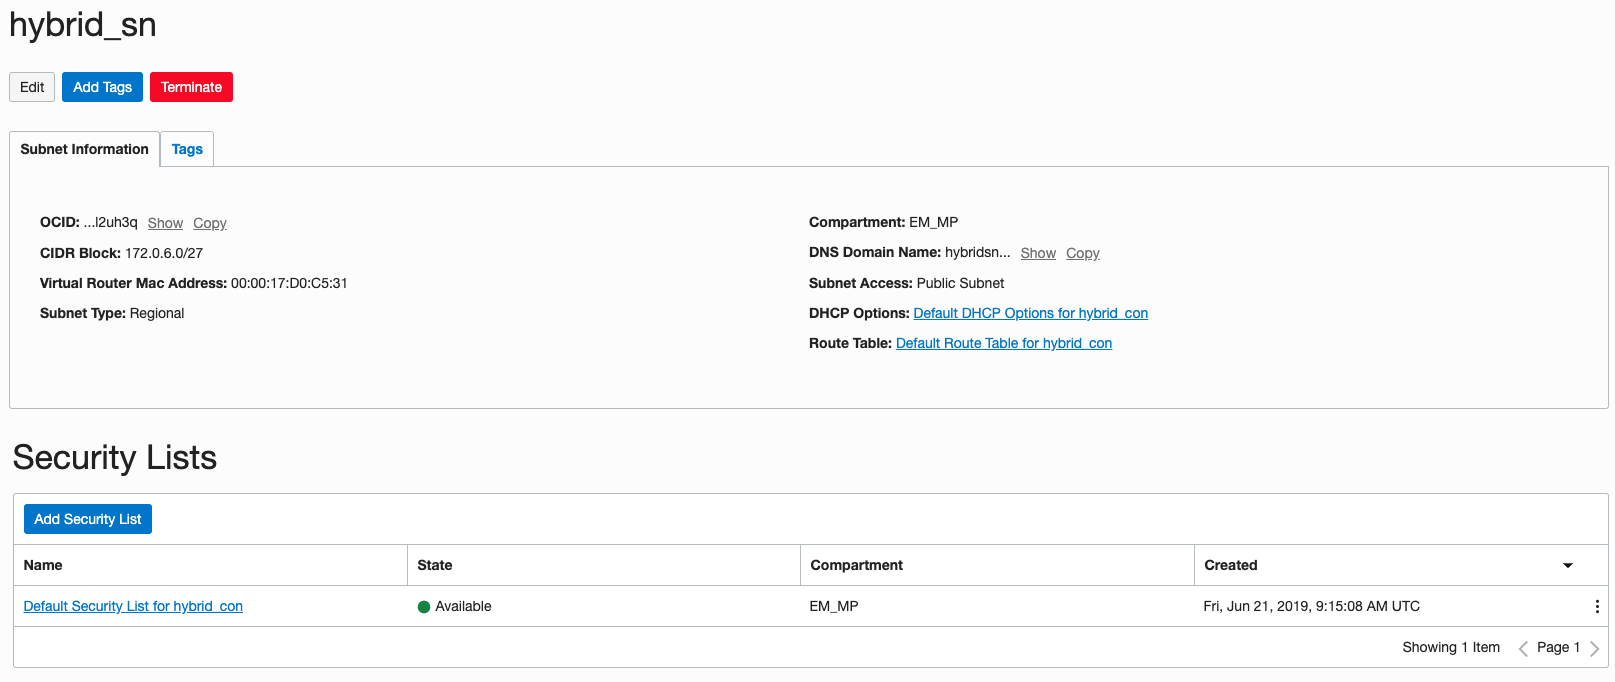
Then create a Subnet in the EM-MP Compartment called hybrid_sn with CIDR 172.0.0.0/27 .
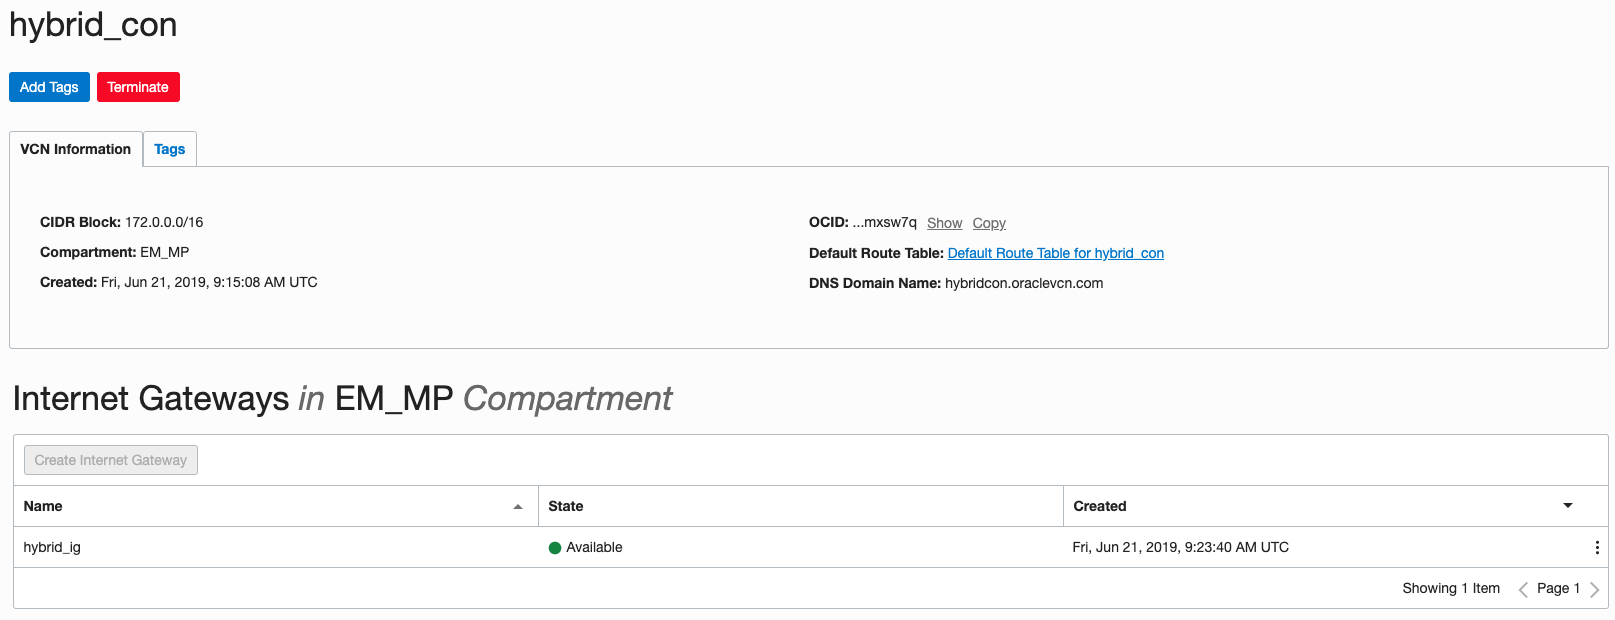
Add an Internet Gateway called hybrid_ig to the hybrid_con VCN.
Now we need to add a Dynamic Routing Gateway (we’ll call it hybrid_drg) and attach to the hybrid_con VCN. This will allow us to instantiate a (you guessed it!) IPSec connection to Customer-Premise Equipment (like the LibreSwan instance we configured above).
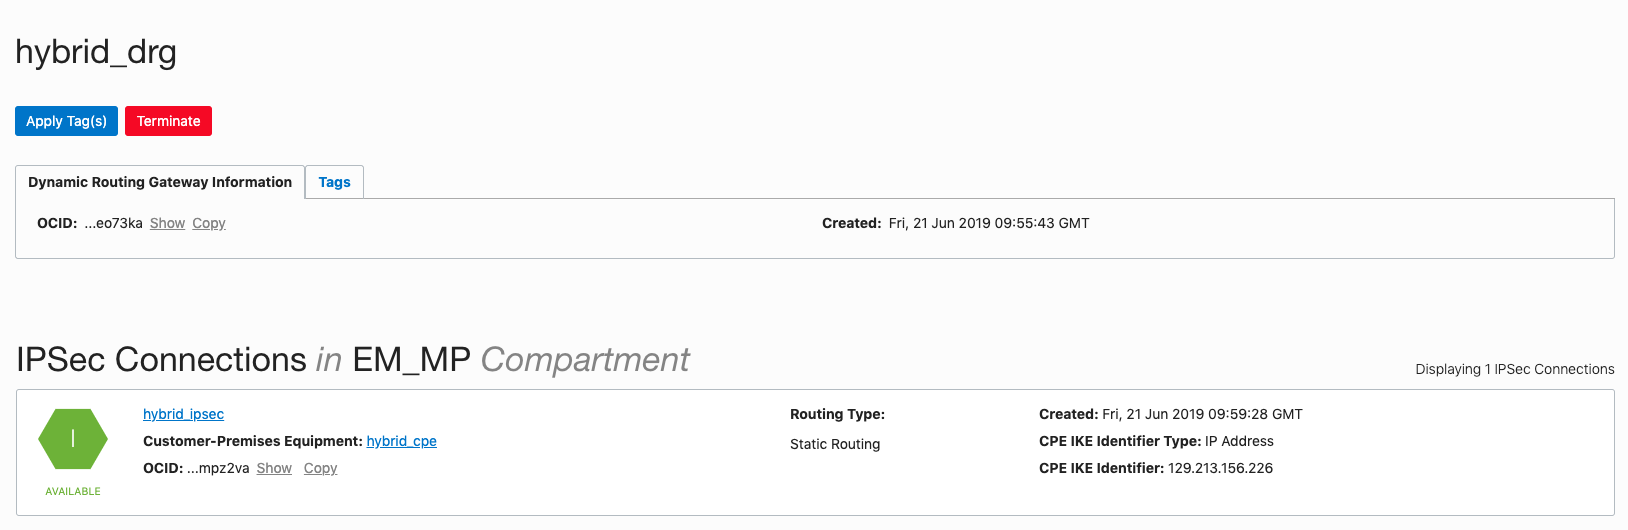
Create a Customer Premise Equipment with the Public IP address of the Libreswan host. (In this example, 129.213.156.226). We will call this hybrid_cpe .
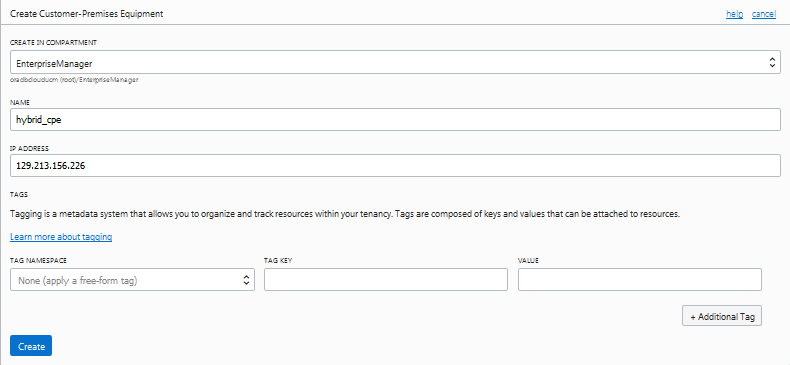
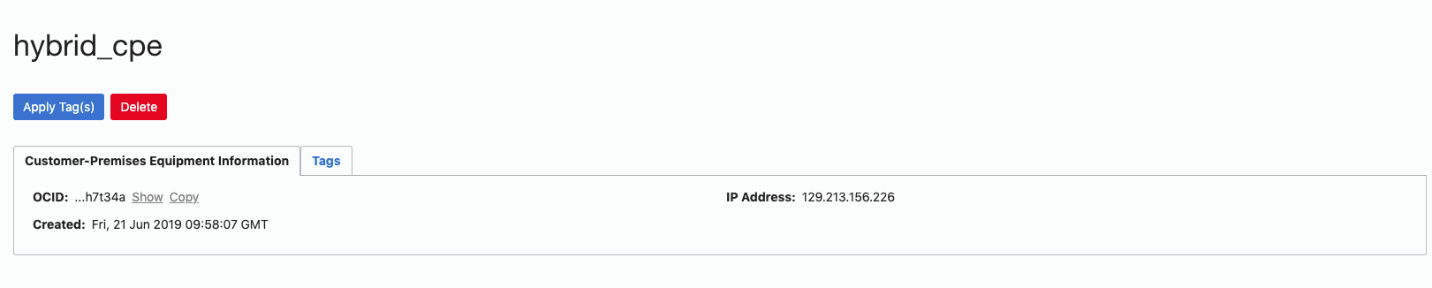
Figures 12 and 13. Creating Customer Premise Equipment with the Public IP address of the Libreswan host.
Create a new IPSec Connection to the the CIDR from the Target-Side VCN EM-Demo (in this example, 10.0.0.0/24). You will have to select the name of your Dynamic Routing Gateway (hybrid_drg), and your Customer Premises Equipment (hybrid_cpe) and make sure that the CPE IP Address is the Public IP address of the Libreswan VPN Machine. (In this example, 129.213.156.226).
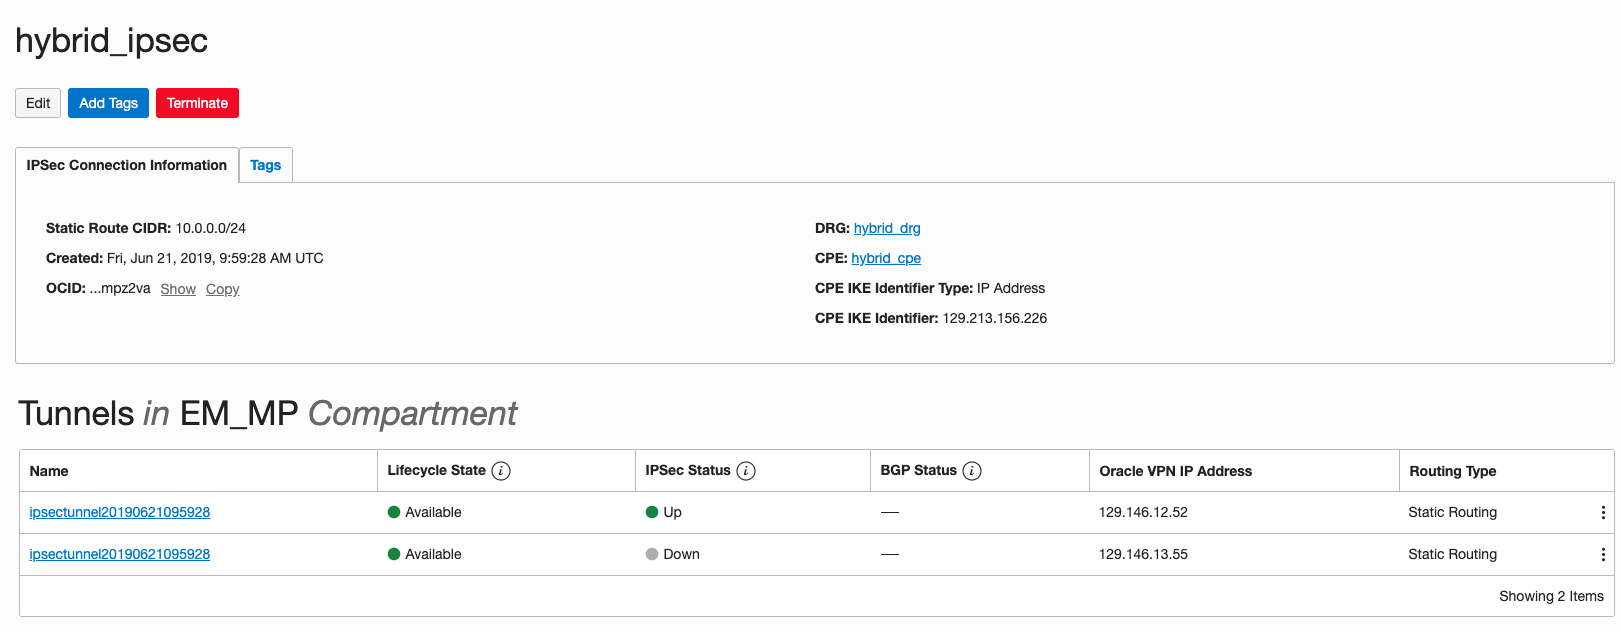
Figure 14. Creating a new IPSec Connection from our OCI-Phoenix VCN to our “on-premises” Target network.
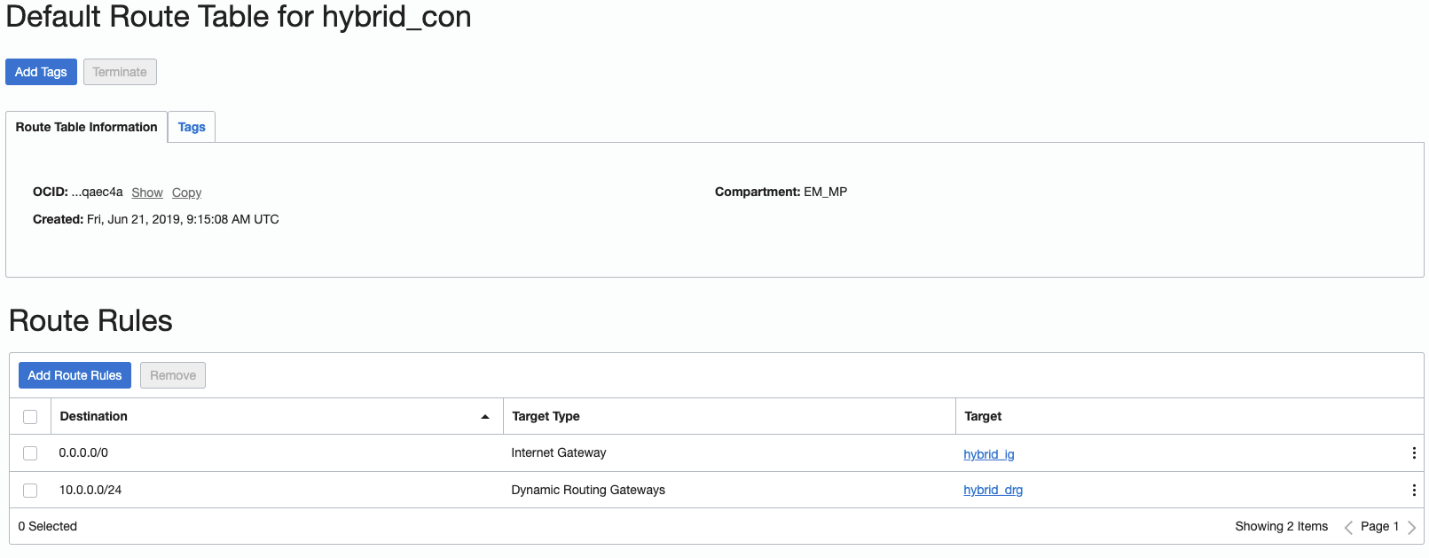
Add a Route Rule to ensure traffic goes through the Dynamic Routing Gateway, using the destination of the CIDR from the Target-Side VCN EM-Demo (in this example, 10.0.0.0/24).
As you did on the Right/Target/Libreswan side, update the Left/EM-side hybrid_con VCN’s Ingress Rules to open ports 500 and 4500 – TCP & UDP.
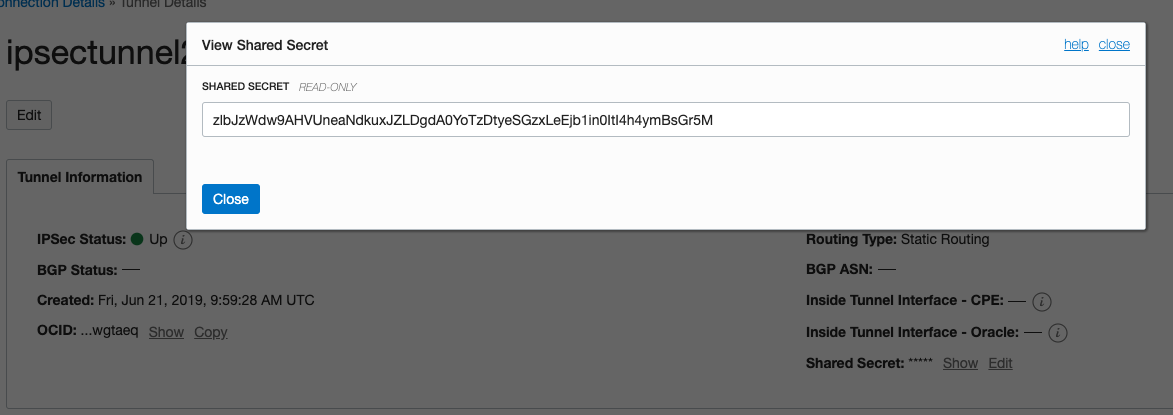
Copy the IP Address and Shared Secret from the IPSec connection. You’re going to need these in a minute back on the Right/Target/Libreswan side.
Back on the Right/Target/Libreswan Side — Completing the IPSec Connection
First, on the Libreswan host VM (instance-libreswan), add the following config into the file /etc/sysctl.conf
net.ipv4.conf.default.rp_filter = 0
net.ipv4.icmp_ignore_bogus_error_responses = 1
net.ipv4.conf.default.log_martians = 0
net.ipv4.ip_forward=1
net.ipv4.conf.all.accept_redirects = 0
net.ipv4.conf.all.send_redirects = 0
net.ipv4.conf.default.send_redirects = 0
net.ipv4.conf.default.accept_redirects = 0
net.ipv4.conf.ens3.send_redirects = 0
net.ipv4.conf.ens3.accept_redirects = 0
|
Then populate the config with command sysctl -p
On the same host, add the following entries into the file /etc/ipsec.conf
# /etc/ipsec.conf - Libreswan IPsec configuration file
#
# see 'man ipsec.conf' and 'man pluto' for more information
#
# For example configurations and documentation, see https://libreswan.org/wiki/
config setup
include /etc/ipsec.d/*.conf
|
On the same host, create a file under /etc/ipsec.d/oci.conf with the following info (using the public IP addresses and VCN CIDRs from earlier steps):
conn oci1
authby=secret
auto=start
pfs=yes
salifetime=2500s
leftid=129.146.12.52 #OCI LEFT DRG IPSec Public IP
left=129.146.12.52 #OCI LEFT DRG IPSec Public IP
leftsubnets=172.0.0.0/16 #OCI LEFT VCN CIDR
right=10.0.0.4 #OCI RIGHT local VCN internal address
rightid=129.213.156.226 #OCI RIGHT Libreswan Public IP address
rightsubnet=10.0.0.0/24 #OCI RIGHT VCN CIDR
|
On the same host, create a new secret file on /etc/ipsec.d/oci.secret, in which you place the Shared Secret from the EM host you noted down earlier.
129.146.12.52 129.213.156.226 : PSK "zlbJzWdw9AHVUneaNdkuxJZLDgdA0YoTzDtyeSGzxLeEjb1in0ItI4h4ymBsGr5M"
|
On the same host, disable the Linux firewall & Disable the SELinux so there are no conflicts with the IPSec networking.
sysctl stop firewalld
sysctl disable firewalld
|
setenforce 0
|
Verify and Start the IPSec connection.
[root@instance-libreswan opc]# ipsec verify
Verifying installed system and configuration files
Version check and ipsec on-path [OK]
Libreswan 3.25 (netkey) on 4.14.35-1902.2.0.el7uek.x86_64
Checking for IPsec support in kernel [OK]
NETKEY: Testing XFRM related proc values
ICMP default/send_redirects [OK]
ICMP default/accept_redirects [OK]
XFRM larval drop [OK]
Pluto ipsec.conf syntax [OK]
Two or more interfaces found, checking IP forwarding [OK]
Checking rp_filter [OK]
Checking that pluto is running [OK]
Pluto listening for IKE on udp 500 [OK]
Pluto listening for IKE/NAT-T on udp 4500 [OK]
Pluto ipsec.secret syntax [OK]
Checking 'ip' command [OK]
Checking 'iptables' command [OK]
Checking 'prelink' command does not interfere with FIPS [OK]
Checking for obsolete ipsec.conf options [OK]
|
sysctl start ipsec
|
And finally, verify the connection by the following the command
[root@instance-libreswan opc]# ipsec auto --status |grep "==="
000 "oci1/1x0": 10.0.0.0/24===10.0.0.4<10.0.0.4>[129.213.156.226]...129.146.12.52<129.146.12.52>===172.0.0.0/16; erouted; eroute owner: #247
|
Congratulations! You’ve now created an IPSec VPN tunnel between your OCI-hosted EM instance on the “left” side and your on-premises/other IaaS data center on the “right” side. You can make sure the IPSec connection is up by checking to see if one of the IPSec connections shows as “Up” in the hybrid_ipsec host console.
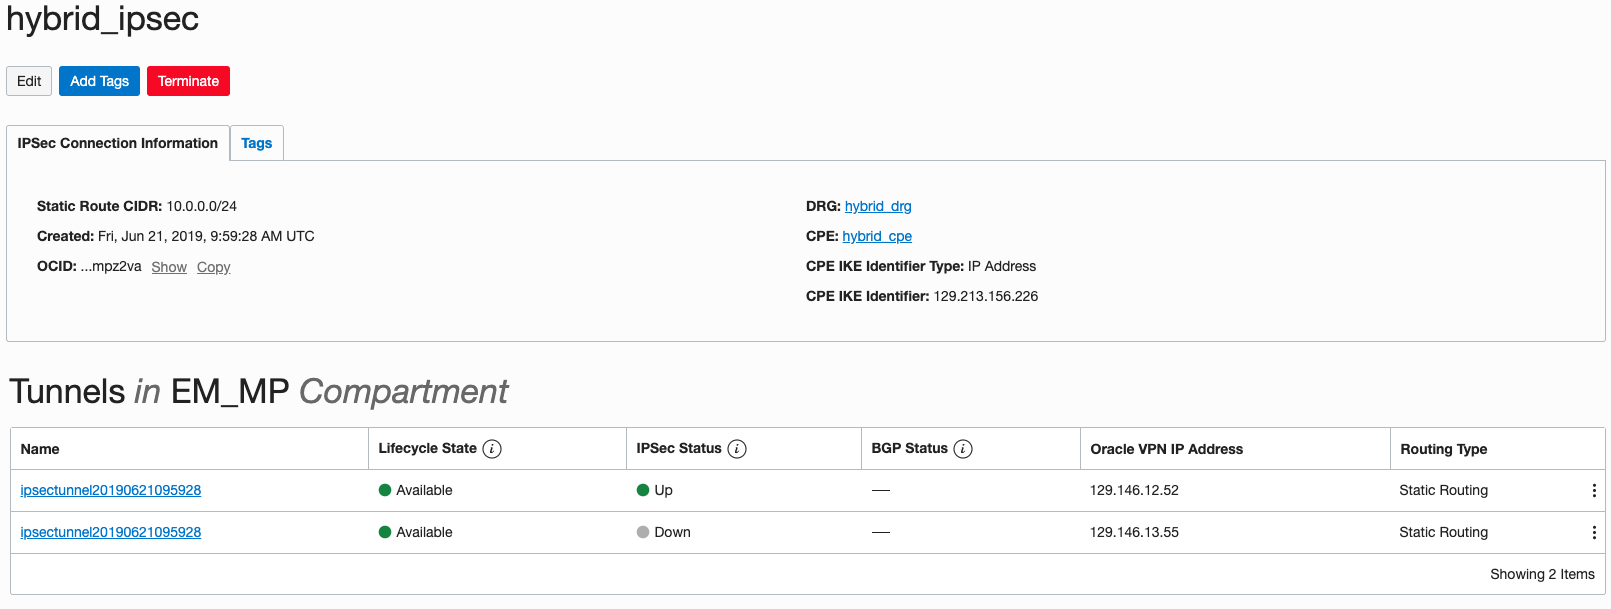
Figure 18. Verifying the IPSec Connection is up-and-running.
Connecting to a Database Target in the on-premises Data Center
Now that we have the IPSec Connection, we can connect to a database installed on a host that is reachable from the Libreswan host (in the same VCN Subnet in OCI, or on the same LAN if your Libreswan host is in a physical data center). You’re going to manually install an EM Agent via SSH, then discover the Database and associated components normally.
Let’s say your Database is on a host called dbonpremise. First, generate SSH keys on both the EM host and the Database host, with the command:
ssh-keygen -r rsa |
Make sure you save the key values to a text file so you can paste them in later.
Now, add the DB machine’s public key to the EM machine’s authorized_keys and vise versa (code example below shows adding the EM key to the DB machine’s key store).
[oracle@dbonpremise ~]$ cat .ssh/authorized_keys
ssh-rsa AAAAB3NzaC1yc2EAAAABIwAAAQEA5GY57xT9wi7HZ/XS7wHFokmQ/LbBzLbWN2fVaUtBhKo4aiqCW2dNeRTa3FGygox2rY3frBgSz+VxQJhl8rZY5I5xQ0Tel05mpw8ckcxk2n5jLxJjbsEyPlbM6q1qcAKwxo/1x0ld0afieRn1fLZBlmwloiq5YF6Zx+zjfJ/eVDtGm5gyz4tN76OwljT+3494//ZSWnwFwvxN6AM1GMVJQ5zP4j6qtb/IvyEvQcvZDMlrCtGp59sNwfjwtrlsb96cLcCFdkyBb8ogf8UoY78OhEWABn9X74BDpgtwpPznlg2XOfOlzzzKf1Rjd09vfuEUXcpLyaDH7B9h5Jq+B8niIw== oracle@dbonpremise
|
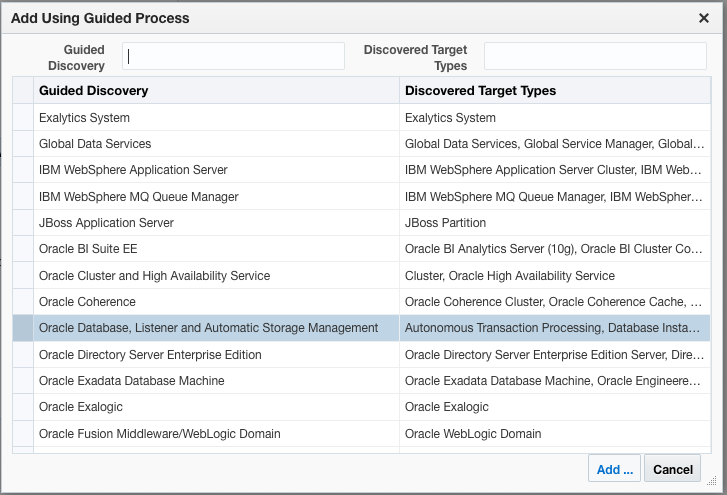
Now, from Enterprise Manager, use the standard “Add target” workflow to manually install an EM Agent on the DB System. You’ll need to enter the DB machine’s private key in the “SSH Credentials” field.

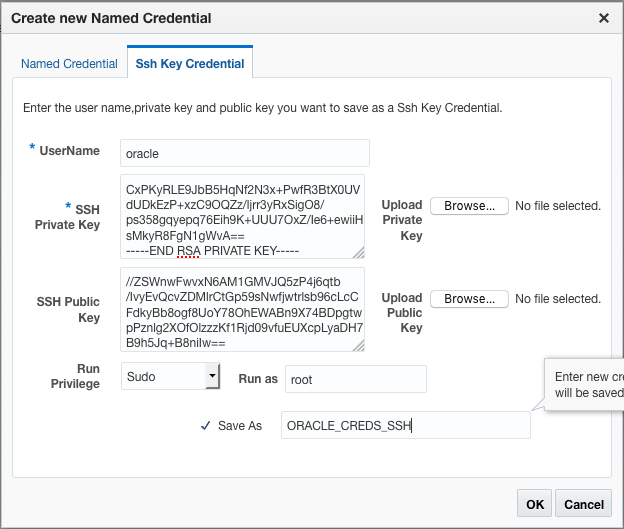
Figures 19, 20 and 21. Using the IPSec Connection, manually adding the Database Target from the Right/Target/Libreswan-side to the Left/EM-side Enterprise Manager, followed by Installing the EM Agent on the Right/Target/Libreswan-side Target.
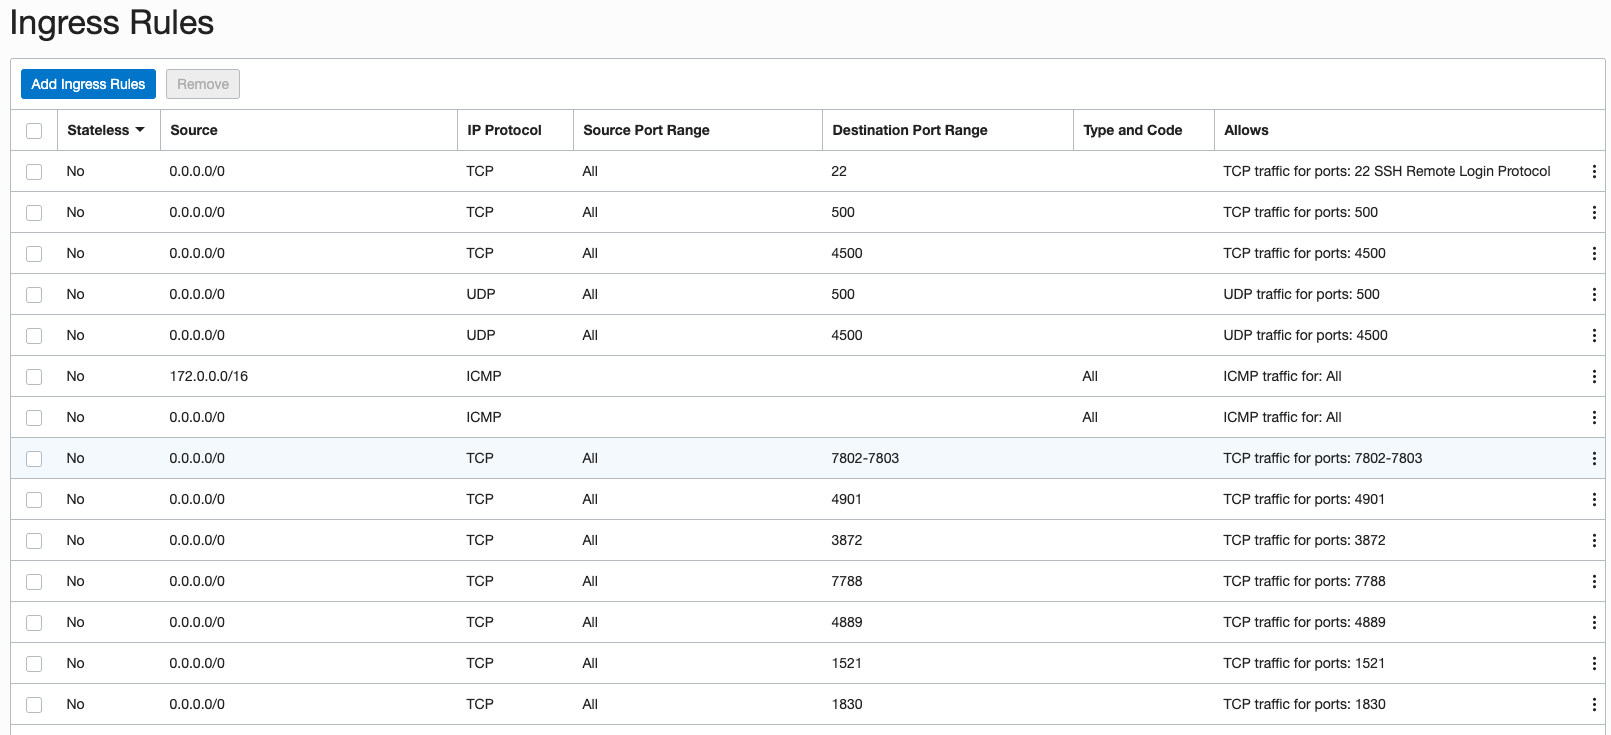
You’ll also want to make sure the Ingress Rules on both hosts allow for open ports 1521,1830 and 4903.
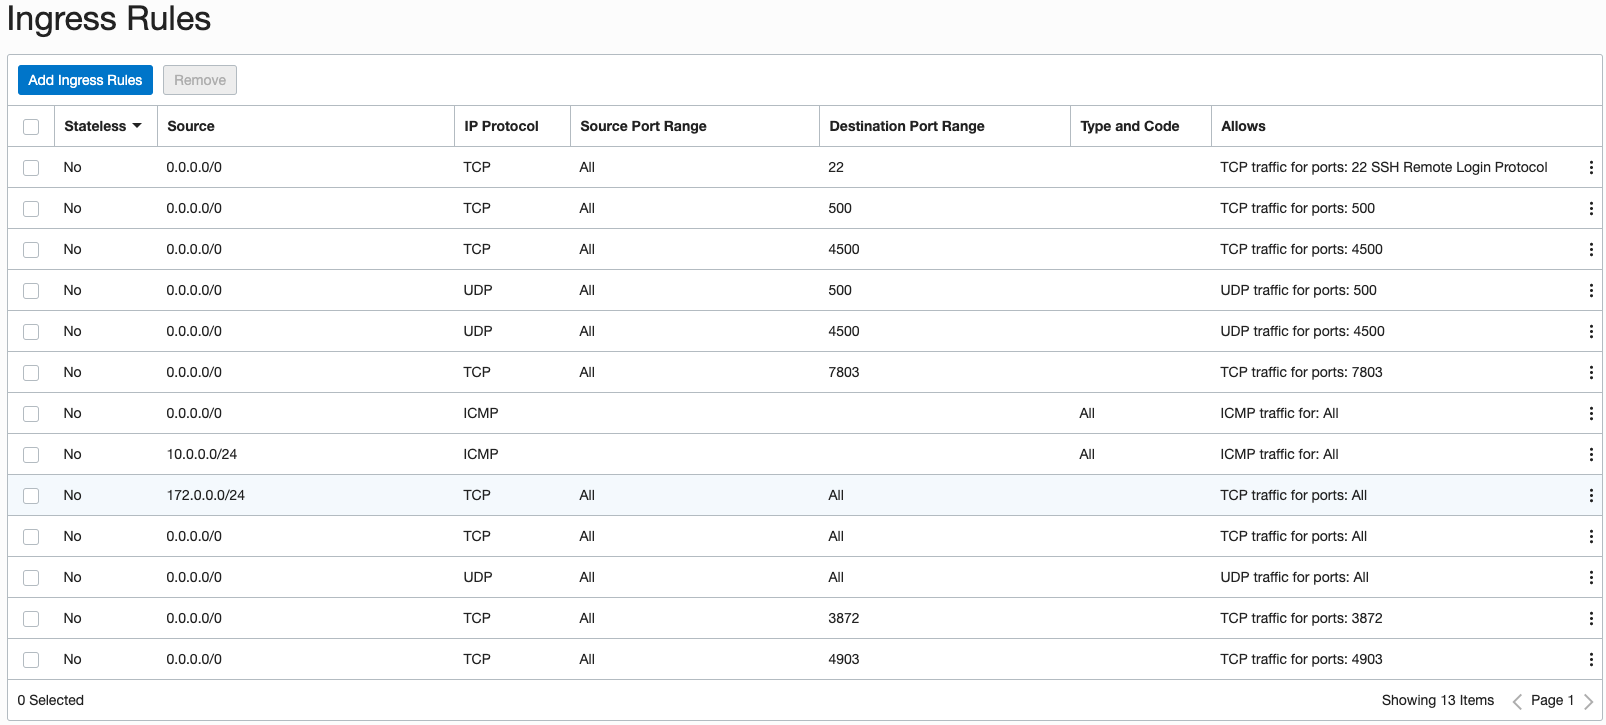
Figure 22. Verifying the host Ingress Rules allow for EM OMS-Agent Communication.
From this point, you can use standard EM Database Discovery workflows to discover the Database system and all its components. You should use the IP address of the Database host where the workflow asks you for the Database “Listener Machine Name” since only the IP address is visible over the IPSec network connection.
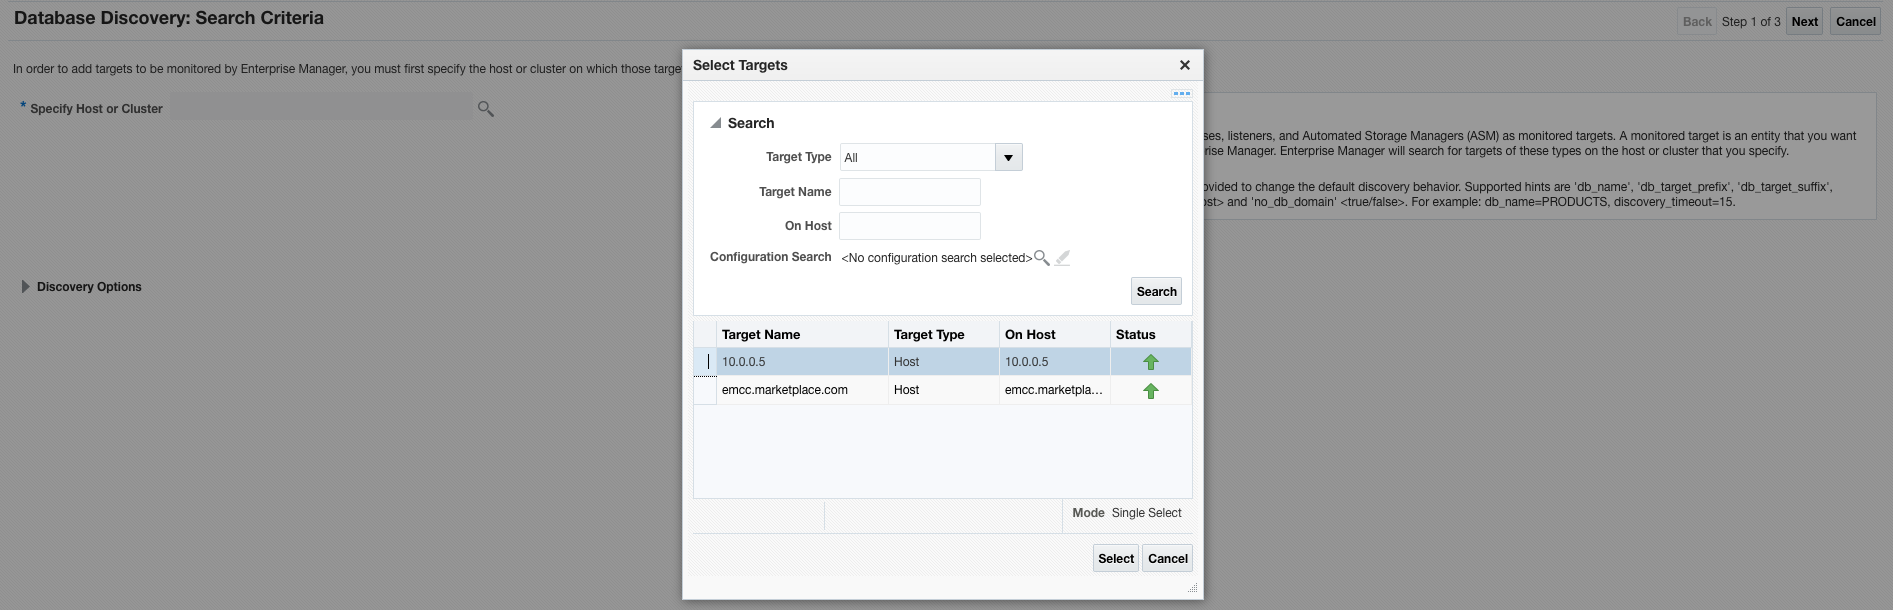

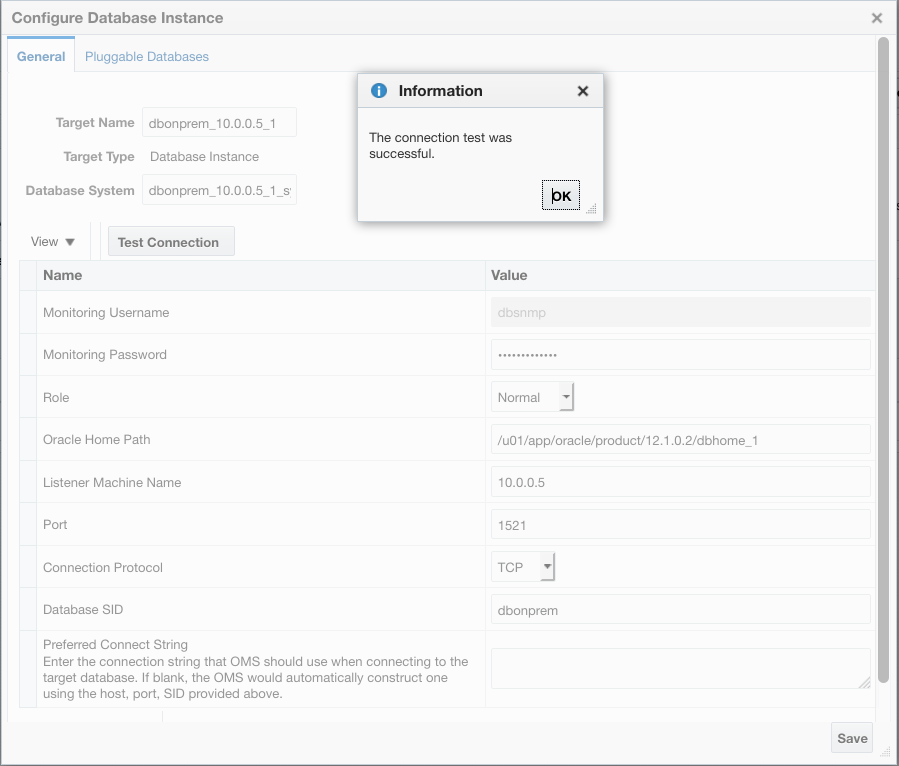
Figures 23, 24, 25 and 26. Discovering the Database/Listener using standard EM processes.
Congratulations! Your Database target and Listener should now appear in the EM “All Targets” page.