As organizations adopt to Cloud Infrastructure, most customers are moving towards a hybrid cloud strategy that involves multiple clouds. While this gives flexibility of deploying workloads on Infrastructure that best meets the application requirements, it also add to the complexity of integrating services.
In this blog we will review integration of Oracle Cloud Infrastructure (OCI) Alarms and Notifications with Splunk. For OCI Customers that use ServiceNow integration through Splunk platform for creating Incidents and Support Tickets, feeding Alarms and Notifications from OCI to Splunk will allow creation of incidents through the same framework.
Architecture

Solution Objective
There are two alternatives for data export in real-time from OCI to Splunk:
- Push-based method: Data is sent to Splunk HTTP Event Collector (HEC). This supports OCI Logs, Events and Alarms.
- Pull-based method: Data is fetched from OCI through the Splunk Add-on (Oracle Cloud Infrastructure (OCI) Logging Addon – https://splunkbase.splunk.com/app/5222) for OCI. This method supports OCI Logs and Events only. OCI Alarms/Notifications are not supported.
There are circumstances where pull-based method is the only feasible option to ingest data as your Splunk deployment does not offer a Splunk HEC endpoint or other reasons that prevent use of HEC. Since the Oracle Cloud Infrastructure (OCI) Logging Addon for Splunk does not support ingestion of OCI Alarm, the solution discussed in this article is an ideal mechanism for this type of integration.
This solution can be extended to any use-case that has a similar limitation of data ingestion from OCI to other third-party tools.
Getting Started
To integrate OCI Alarms/Notifications into Splunk using the PULL method for data ingestion, a combination of OCI Object Storage, Custom script (using OCI Serverless Functions) and a rclone like command-line utility to copy data from OCI Object Storage to a Splunk accessible directory can be used.
Here is a high-level overview of this implementation:
- Create OCI Object Storage Bucket to store OCI Alarm JSON messages
- Create OCI Serverless Function to publish OCI Alarm JSON messages to Object Storage
- Configure OCI Alarm/Notification Subscription to OCI Serverless Function
- Install rclone and Create OCI Object Storage Remote Connection
- Create a Windows Task to run rclone copy
- Ingest OCI Alarm/Notification JSON message files from local directory to Splunk
- Create ServiceNow Incident using Splunk to ServiceNow Integration Framework
- Configure a Lifecycle Policy to Purge files in Object Storage
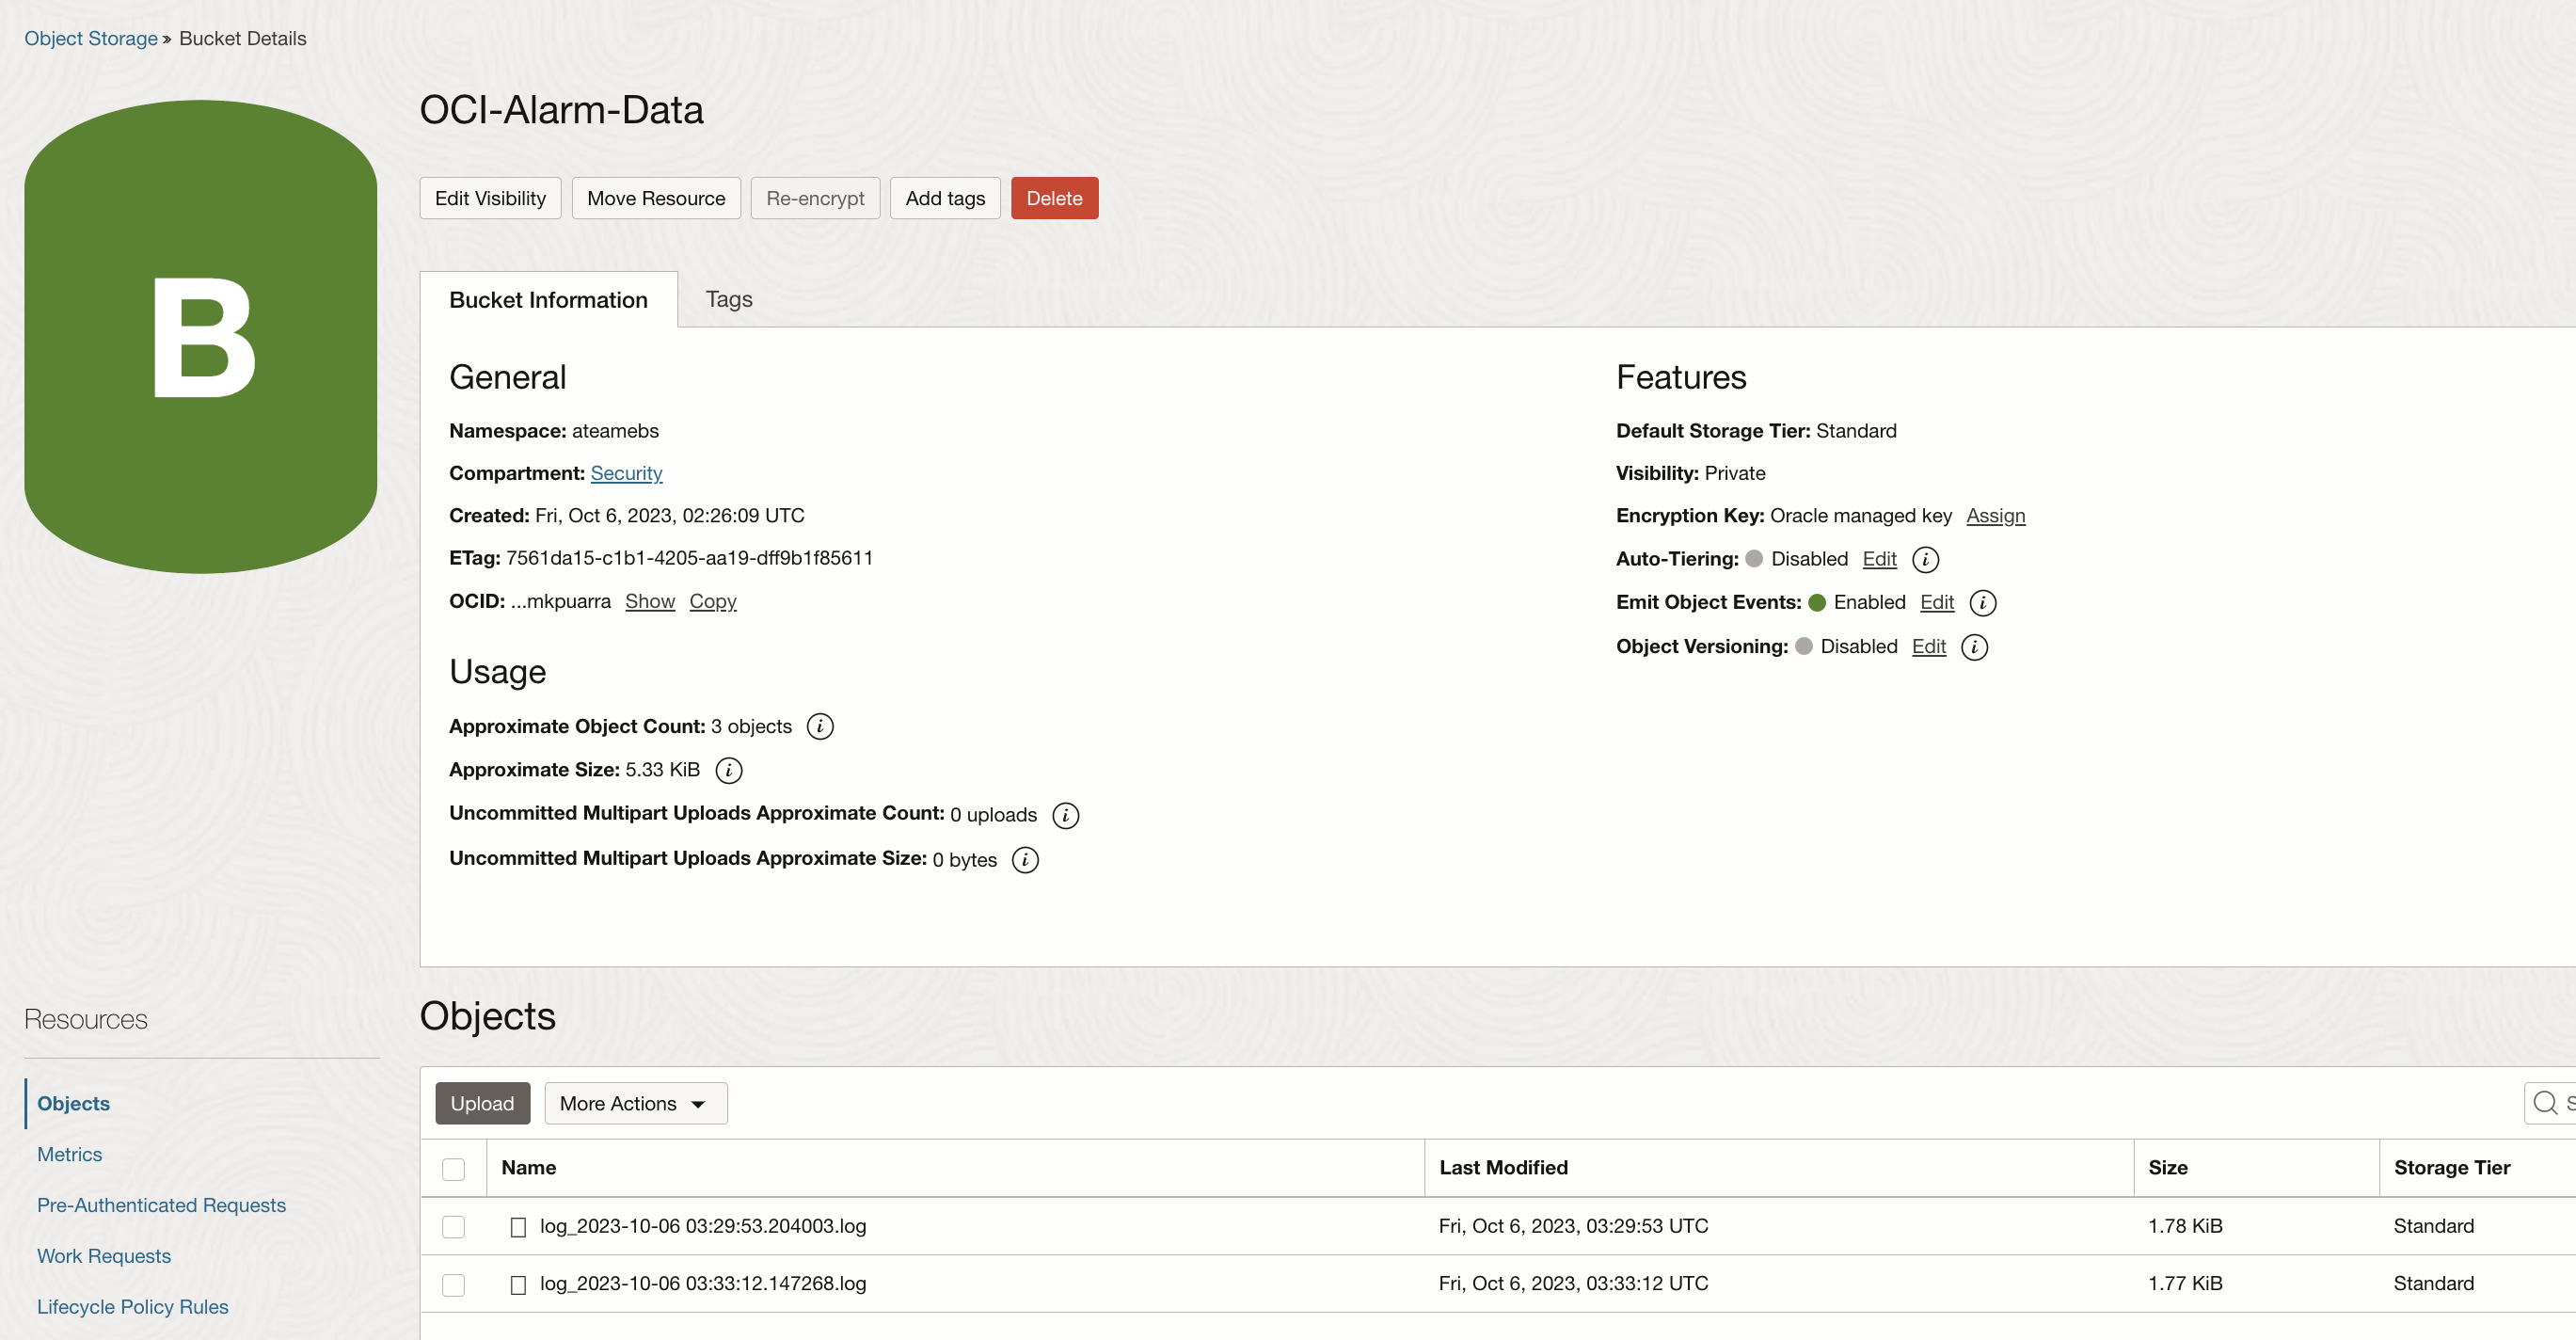
Create OCI Object Storage Bucket to store OCI Alarm JSON messages
Create a private Bucket to store OCI Alarm/Notification JSON messages. The messages will be published as log files using an OCI Serverless Function. Note the Namespace and Bucket name as these will be needed in the configuration of the OCI Function.
Create OCI Serverless Function to publish OCI Alarm JSON messages to Object Storage
Quick Start Guide for developing and deploying OCI Functions
Create an OCI Function Application
Functions Code Specification –
Language: Python
Application Name: OCIAlarmObjectStorageApp
Function name: oci-alarms-to-objectstorage

Add requisite IAM policies for Function and Dynamic Group:
Allow group <group-name> to manage functions-family in compartment <compartment-name>
Allow group <group-name> to manage logging-family in compartment <compartment-name>
Allow group <group-name> to use virtual-network-family in compartment <compartment-name>
Allow group <group-name> to manage repos in tenancy
Allow dynamic-group <func-dyn-grp-name> to manage objects in compartment <compartment-name> where all {target.bucket.name=<object-storage-bucket-name>’}
For Function to be able to write data to Object Storage Bucket, include the function in a dynamic group with the following rules:
ALL {resource.type = ‘fnfunc’, resource.compartment.id = ‘<compartment-ocid>’}
or
ALL {resource.type = ‘fnfunc’, resource.id = ‘<function-ocid>’}
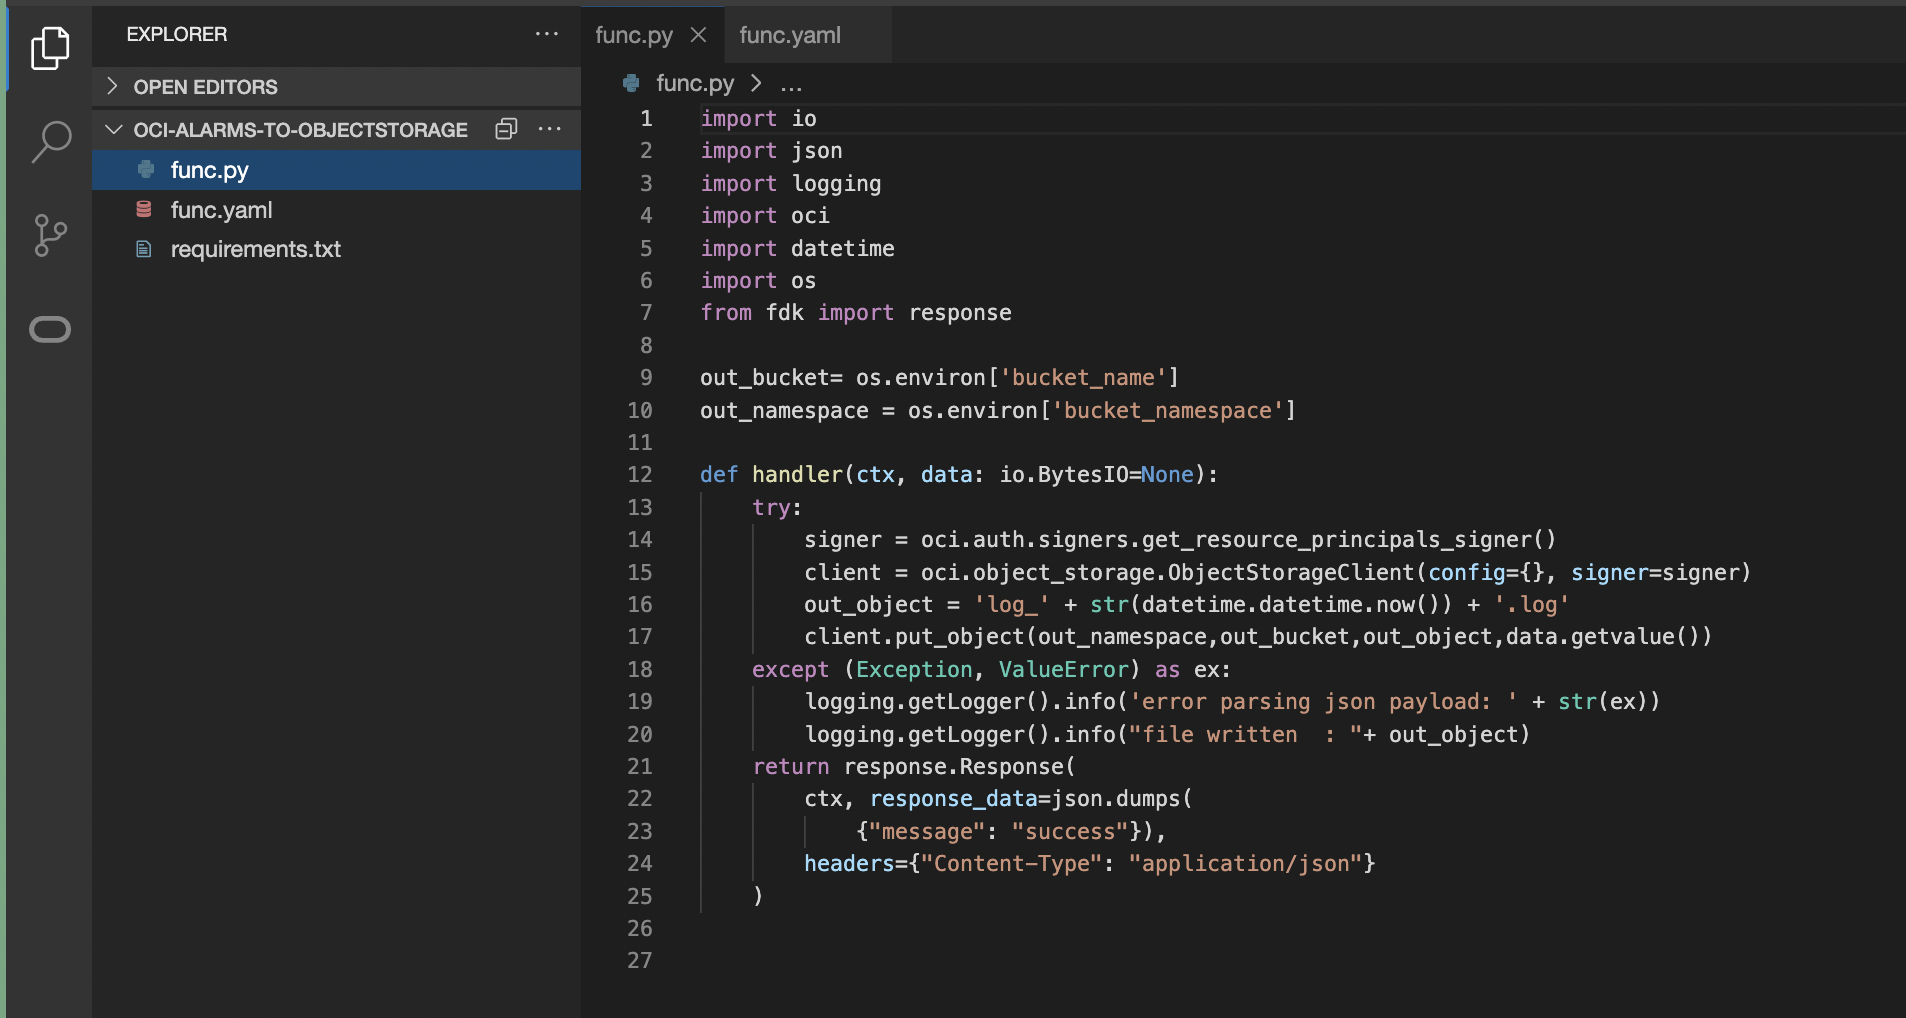
After the function creation, “oci-alarms-to-objectstorage” function code will contain the below 3 files with a template Hello-world code, replace code with your custom code:
- func.py
- func.yaml
- requirements.txt
Deploy the Function App – If successfully deployed a docker image registry will exist in OCI Container Registry

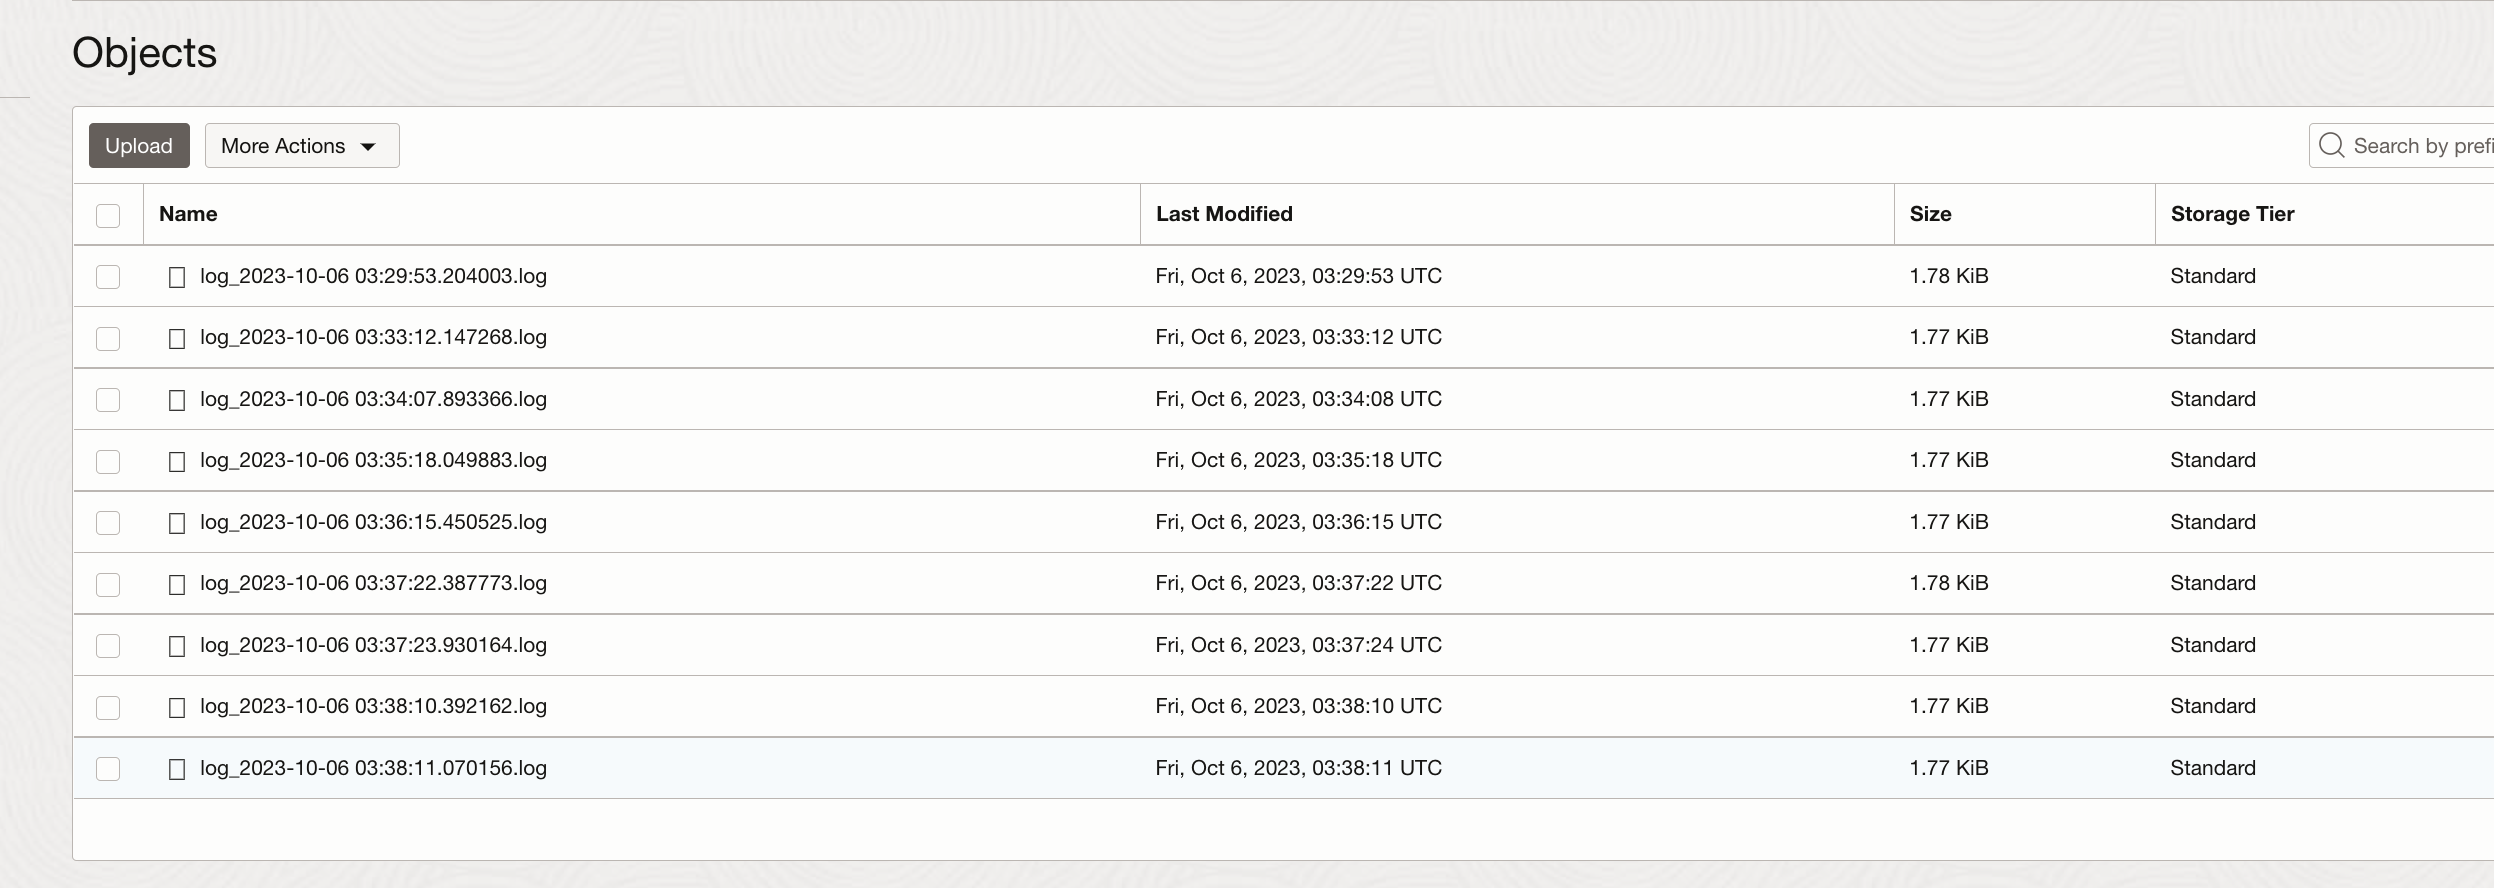
func.py – Python code to write alarms as log files to object storage, each log file is appended with a current timestamp.
Resource principal Authentication method is used for OCI Functions to access Object Storage
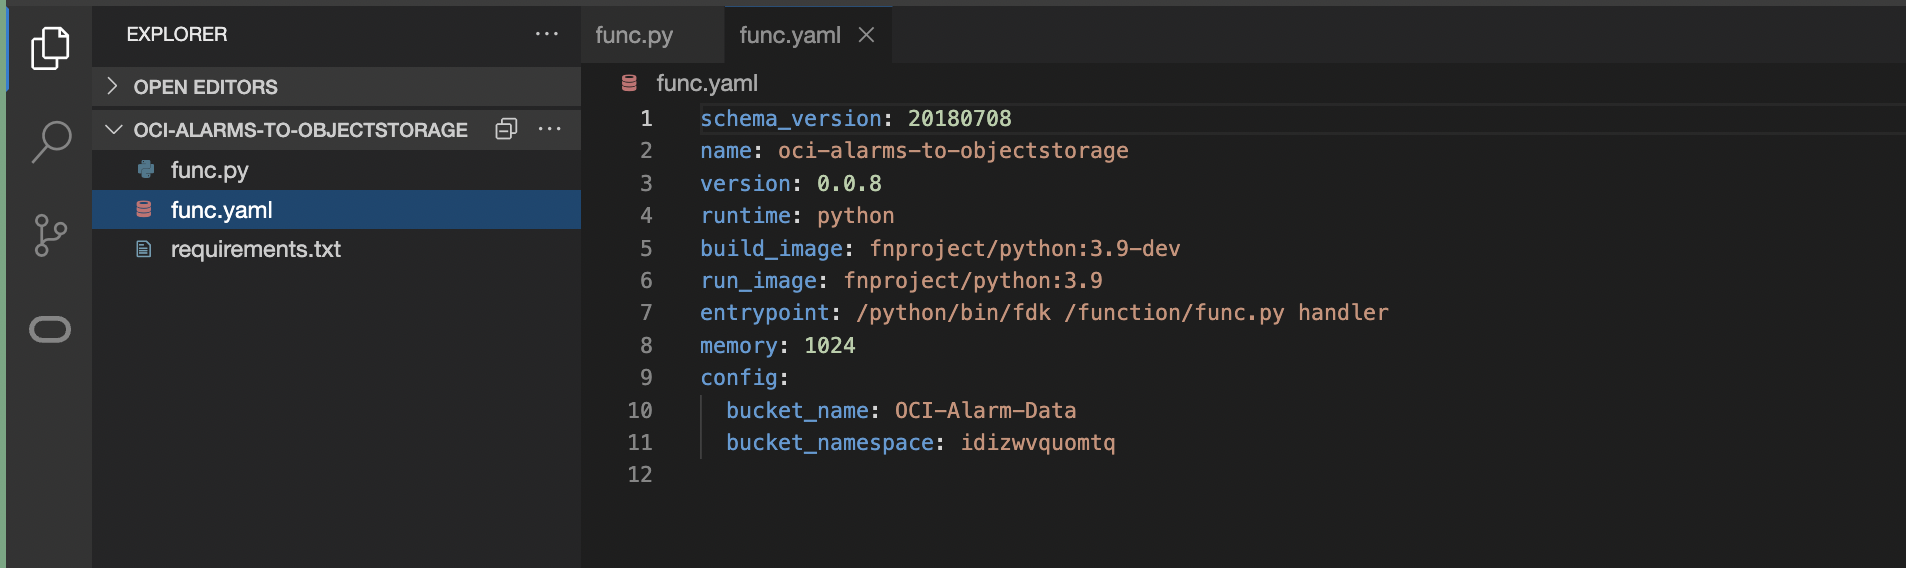
func.yaml – Function definition file
Config parameters, bucket_namespace and bucket_name are set to the Object Storage Bucket namespace and Object Storage Bucket Name created in previous Step.
requirements.txt – Lists library dependencies

Troubleshooting OCI Functions/Object Storage
- Enable OCI Function Application and OCI Object Storage Service logs
- For issues with Functions
– Check OCIAlarmObjectStorageApp_invoke logs, navigate to logs from Applications page or from Logging service.
– Use the link (https://docs.oracle.com/en-us/iaas/Content/Functions/Tasks/functionstroubleshooting_topic-Miscellaneous-issues-when-using-Oracle-Functions.htm ) to search for specific issue, follow instructions to debug further.
– If function is not invoked for any reason, re-deploy code
– Verify Function App logs for any authentication errors
- For issues with Object storage
– Check object storage logs
Configure OCI Alarm/Notification Subscription to OCI Serverless Function
Create an OCI alarm and add Function as the subscription. When an OCI Alarm is triggered and a Notification is sent, the OCI Function will be invoked to publish the JSON data to Object Storage. The same process can be also used for OCI Events.

Install rclone and Create OCI Object Storage Remote Connection
rclone is an open-source, command-line utility for managing files. In this scenario, rclone is used to copy or sync files from OCI cloud storage to a local storage that will allow data ingestion to Splunk.
rclone config command is used to configure OCI Object Storage as a remote repository and rclone copy command to copy/mirror data from source OCI Object Storage Bucket to a destination local folder.
This destination folder serves as data source for Splunk, Rapid7 or other third-party tools.
rclone is compatible with Windows and Linux VMs. This blog demonstrates the setup in a Windows VM provisioned in OCI.
High Level steps for Installing and Using rclone
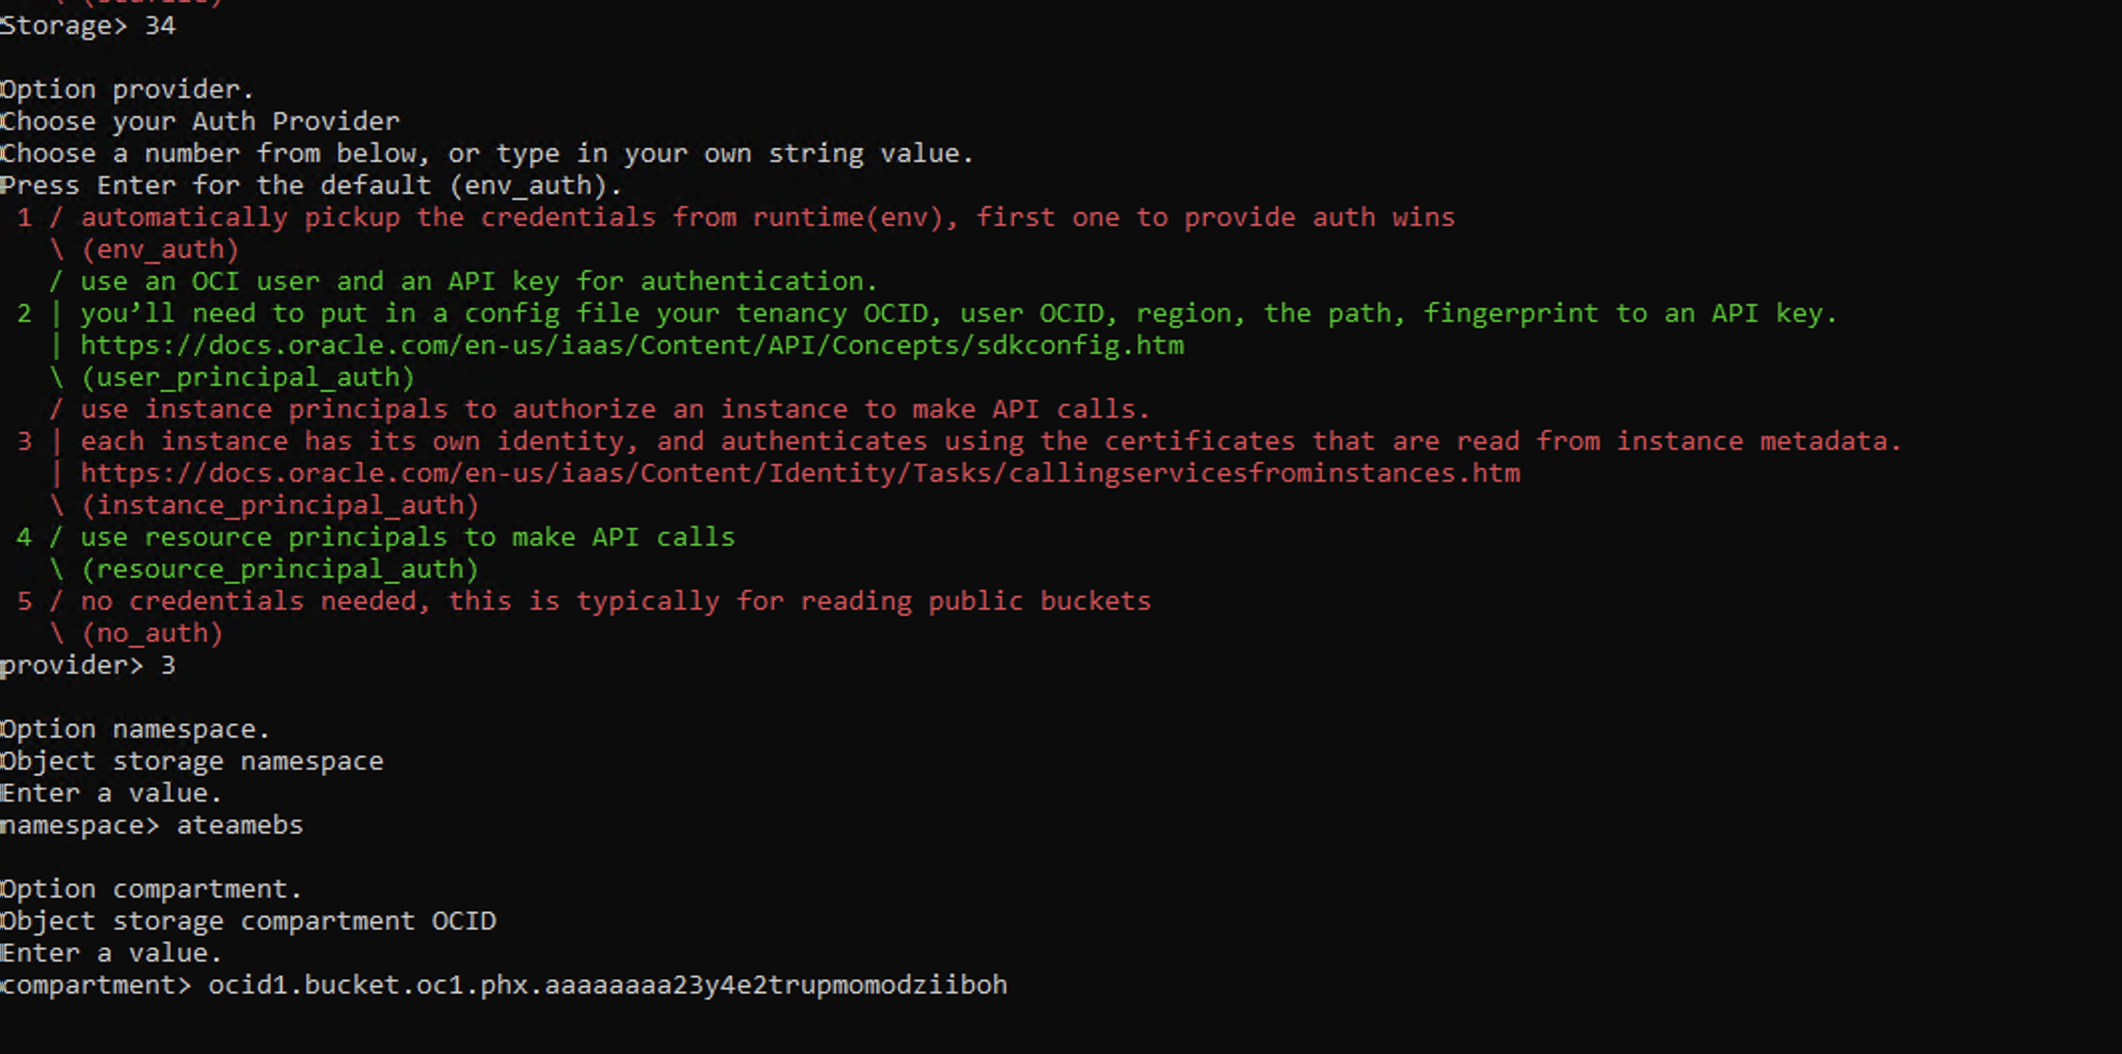
- Pre-requisite: Instructions for rclone configuration specifies four OCI Authentication methods that rclone supports. For this deployment, Instance Principal authentication is used. Dynamic Group and IAM policy will be created for this purpose:
Create Dynamic Group with a rule to include OCI Windows VM as member:
Any {instance.id = ‘<compute-instance-ocid>’}
And requisite IAM policy for the dynamic group to be able to read object-storage:
Allow dynamic-group rclone-dg to manage object-family in <compartment-name>
- Install rclone and winfsp on the Windows VM
- After the installation, all rclone commands will be accessible. Execute ‘rclone config’ (Follow instructions in https://rclone.org/oracleobjectstorage/) to create a new remote connection to OCI Object Storage providing relevant information at each prompt as below:
Note: Do not create a OCI object-storage bucket here as this was already created in a previous step


List all Buckets:

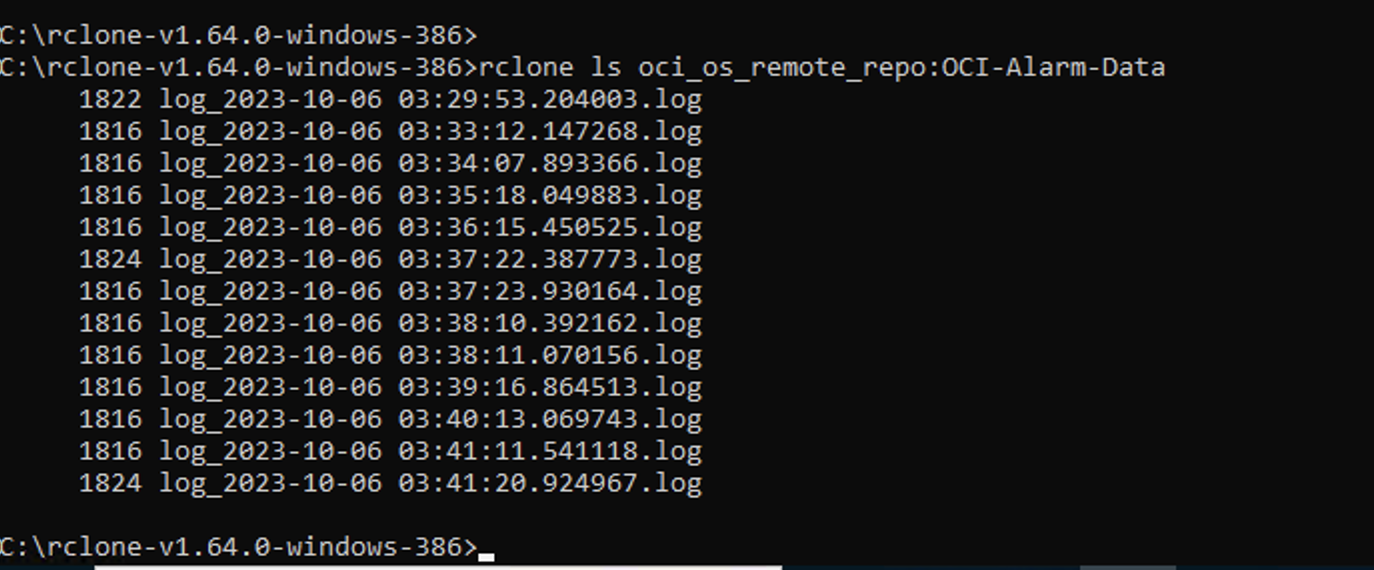
List objects in Bucket – All the files in the OCI Bucket is now visible
- Execute rclone copy command, this copies all the files skipping files that already exist in the destination.
The copy command takes the form of:
rclone copy “source:sourcepath” “destination:destinationpath”
<rclone_path>\rclone.exe copy <rclone remote repo name>:<OCI Object Storage Bucket> <local path where the directory should be created> –no-console
Example: This command copies and also creates the local directory C:\oci_alarms
C:\rclone-v1.64.0-windows-386\rclone.exe copy oci_os_remote_repo:OCI-Alarm-Data C:\oci_alarms
- After completion of the above steps, the local folder in Windows VM will mirror data from OCI Object Storage Bucket. Configure Splunk Agent in Windows to read data from this local directory.
Files in local directory

Create a Windows Task to run rclone copy
rclone copy process stops when system/instance is shutdown, to keep this process on-going and working seamlessly after reboots, rclone copy command needs to be executed every-time a system boot-up happens.
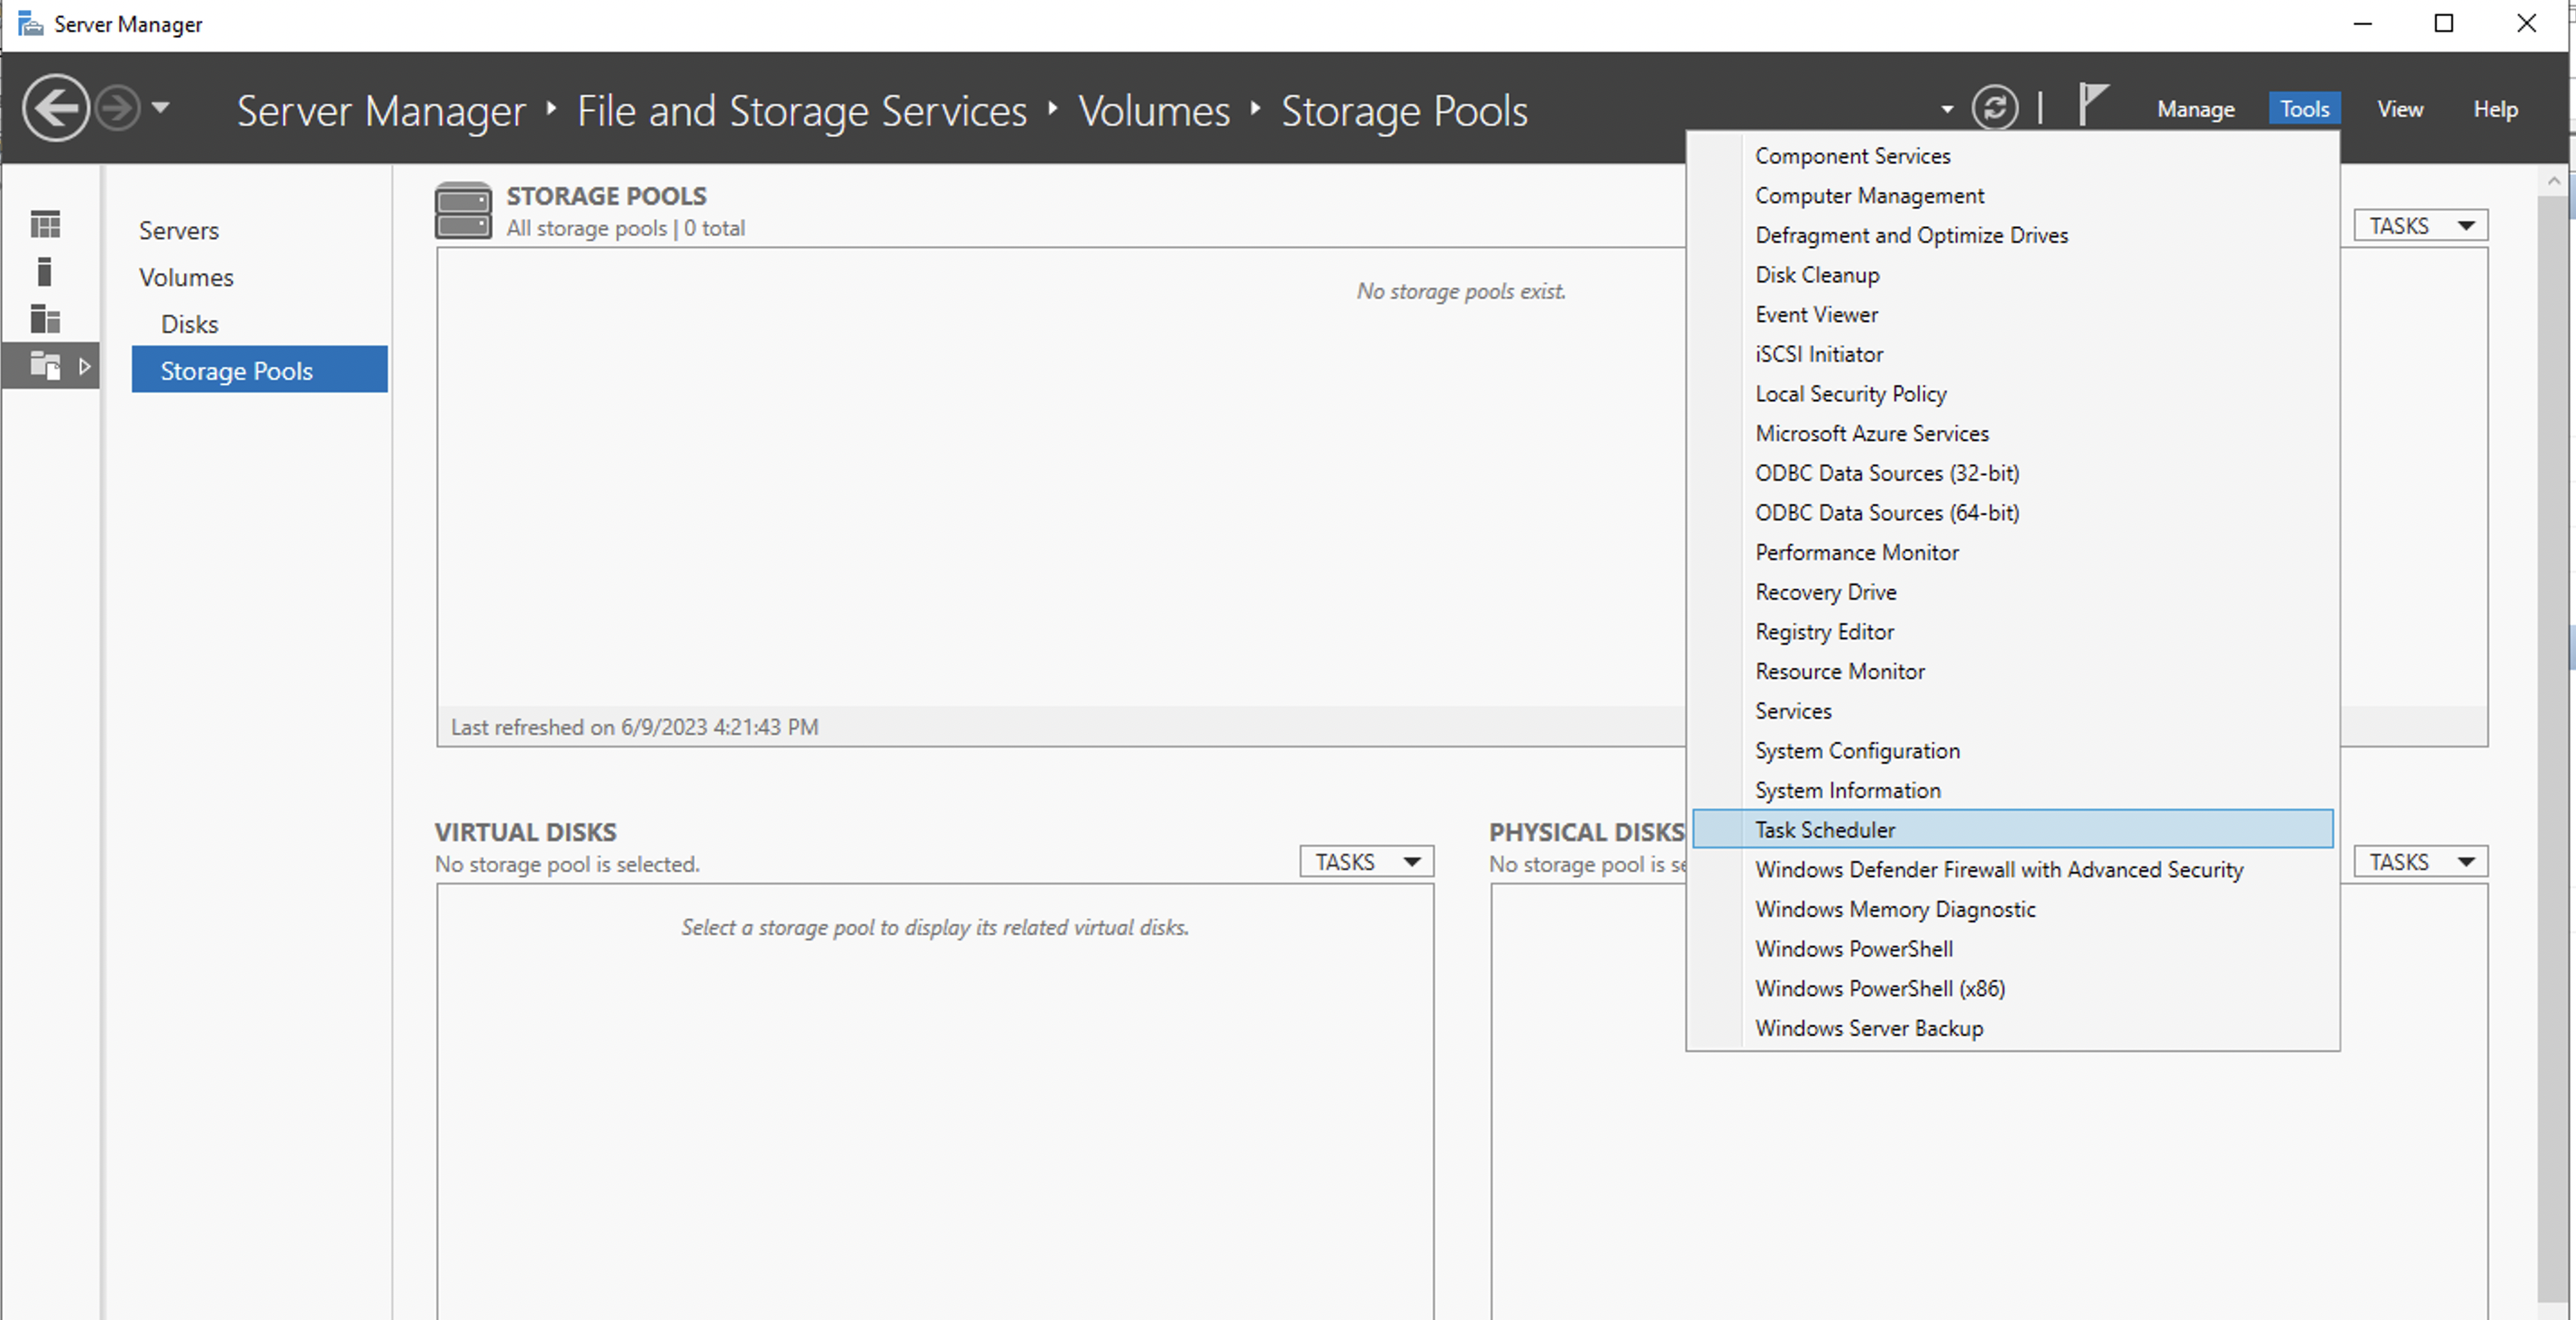
This can be achieved in windows by creating a task using Task Scheduler to execute rclone copy command on event of a system boot. Follow steps below in snapshots to create this task.
- Create a batch .cmd file with rclone copy command as below. Provide this file location in the task actions section.
Rclone.cmd
<rclone_path>\rclone.exe copy <rclone remote repo name>:<OCI Object Storage Bucket> <local path where the directory should be created> –no-console
Example:
C:\rclone-v1.64.0-windows-386\rclone.exe copy oci_os_remote_repo:OCI-Alarm-Data C:\oci_alarms –no-console


Ingest OCI Alarm/Notification JSON message files from local directory to Splunk
rclone copy continuously copes/syncs files to local directory. For this data to be available in Splunk, install Splunk agent in windows instance to ingest data to Splunk.
If Splunk is on-prem, network connectivity needs to be established between Windows instance (where local directory exists) and Splunk on-prem.
Create ServiceNow Incident using Splunk to ServiceNow Integration Framework
After successful ingestion, OCI Alarm data will appear in Splunk. Using this JSON data, identity fields/attributes that can form a Unique key for Incident creation. Follow your organization’s process for creating ServiceNow Incidents and assignment to relevant group/team.
{
  "dedupeKey": "3c5ebd51-992e-4a66-b57e-8fc98c9c8caa--7808025763705296615",
  "title": "CPU Usage Events Alarm",
  "body": "CPU Usage Alarm. Trigger will fire if the mean value is >80 and Notification will be sent if this  threshold is breached for 5 minutes. Notification will be repeated after 60 minutes if the issue Continues.",
  "type": "FIRING",
  "severity": "CRITICAL",
  "timestampEpochMillis": 1689177540000,
  "timestamp": "2023-07-12T15:59:00Z",
  "alarmMetaData": [
    {
      "id": "ocid1.alarm.oc1.iad.aaaaaaaaeuao4nwziq2yhnpnoezr6n74jlk7",
      "status": "FIRING",
      "severity": "CRITICAL",
      "namespace": "oci_compute_agent",
      "query": "CpuUtilization[1m].groupby(resourceDisplayname).mean() > 80",
      "totalMetricsFiring": 0,
      "dimensions": [
        {
          " resourceDisplayname ": "mycompute"
        }
      ],
      "alarmUrl": "https://urldefense.com/v3/__https://cloud.oracle.com/monitoring/alarms/ocid1.alarm.oc1.iad.aaaaaaaaeuao4nwziq2yhnpnoezr6n74jlk7efp3zzyvkyinqjgyl7mfv3zq?region=us-ashburn-1__;!!NlL3gfXN!9bNFo-teB3bFWMcTCu9Zw1F9WnVy6HqHOHzlFYvvlm9hZKj8CG1EGkizytkmqLGpNkIyG0qyu2oYeo7b7kiklVse_fJPchgfgj2UL9AuxqWngjBZjbuHSA$",
      "alarmSummary": "Alarm \" CPU Usage Events Alarm \" is in a \"FIRING\" state; because the resources with dimensions listed below meet the trigger rule: \" CpuUtilization[1m].groupby(resourceDisplayname).mean() > 80\", with a trigger delay of 5 minutes"
    }
  ],
  "notificationType": "Split messages per metric stream",
  "version": 1.4
}
In the example data, a combination of the fields highlighted can be used as a unique combination to identity different error scenarios and create related incidents in ServiceNow
Configure a Lifecycle Policy to Purge files in Object Storage
Lifecycle management is generally used to manage Object Storage data that can help reduce storage costs and the amount of time you spend manually managing data.
Keep these benefits in mind, we can setup a Lifecycle rule to delete Object Storage files after their ingestion to Splunk is completed.
Below IAM policy is needed for Lifecycle management for Object storage, this is regional.
Allow service objectstorage-us-ashburn-1 to manage object-family in compartment cmp
Sample Lifecycle Policy rule to delete all data in the Bucket after a day: