Contributors: Avi Huber, Observability and Management Product Management, and Daniela Hansell, User Assistance Development
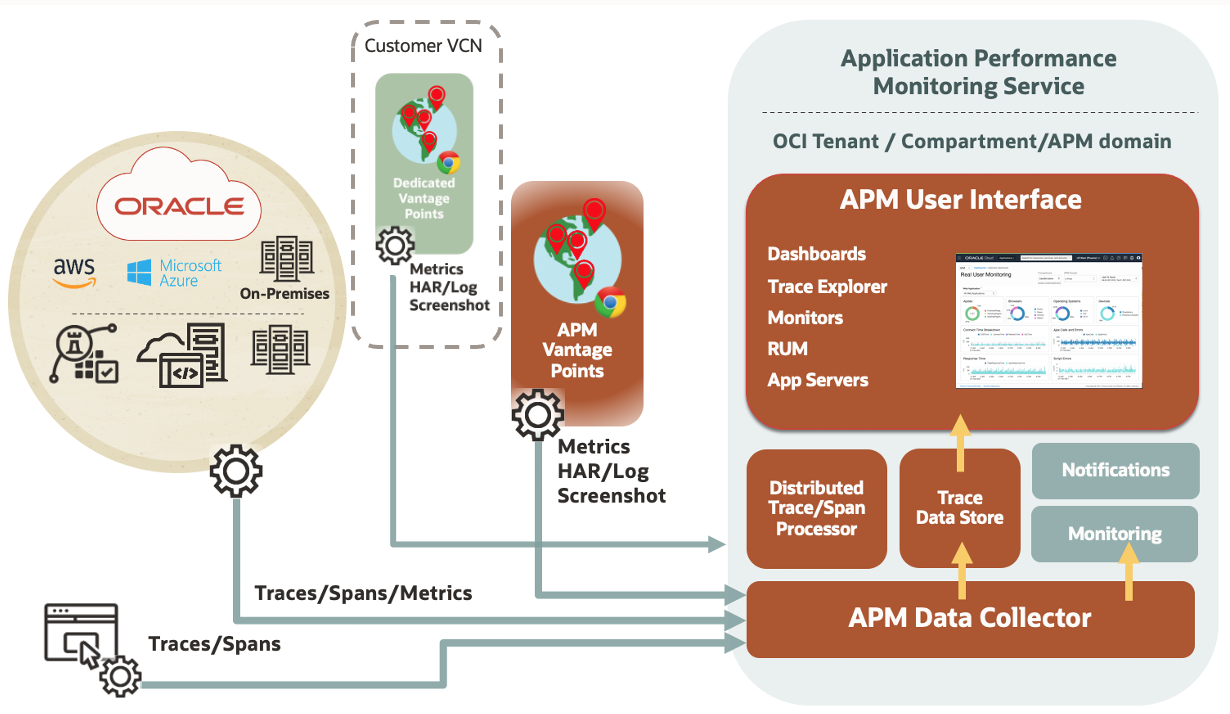
Oracle Application Performance Monitoring (APM), an Oracle Cloud Infrastructure (OCI) native service, enables DevOps engineers and application administrators to monitor end-user experience and application performance by tracing and correlating transactions through multiple components and application logic distributed across various clients, third-party services, and backend tiers, in the cloud or on-premises.
It also allows for proactive monitoring of any application and endpoint using our availability monitoring capabilities from any Oracle data center around the globe.
Dedicated Vantage Points for Monitoring Needs
With applications running behind a firewall, inside your corporate network environment a public synthetic Vantage Point cannot access these applications.
For those monitoring needs, we have introduced Dedicated Vantage Points (DVP). In this blog, we demonstrate an example deployment of DVP and its architecture.
Quick architecture Review of Targeted Applications Tested Within the Secured Network that Includes VCN
In a very simplistic explanation, we need to build another Vantage Point that is yours to control, automatically gets updated, and can be part of the secured network via VCN. So in essence we want to create something like the green box in this picture.
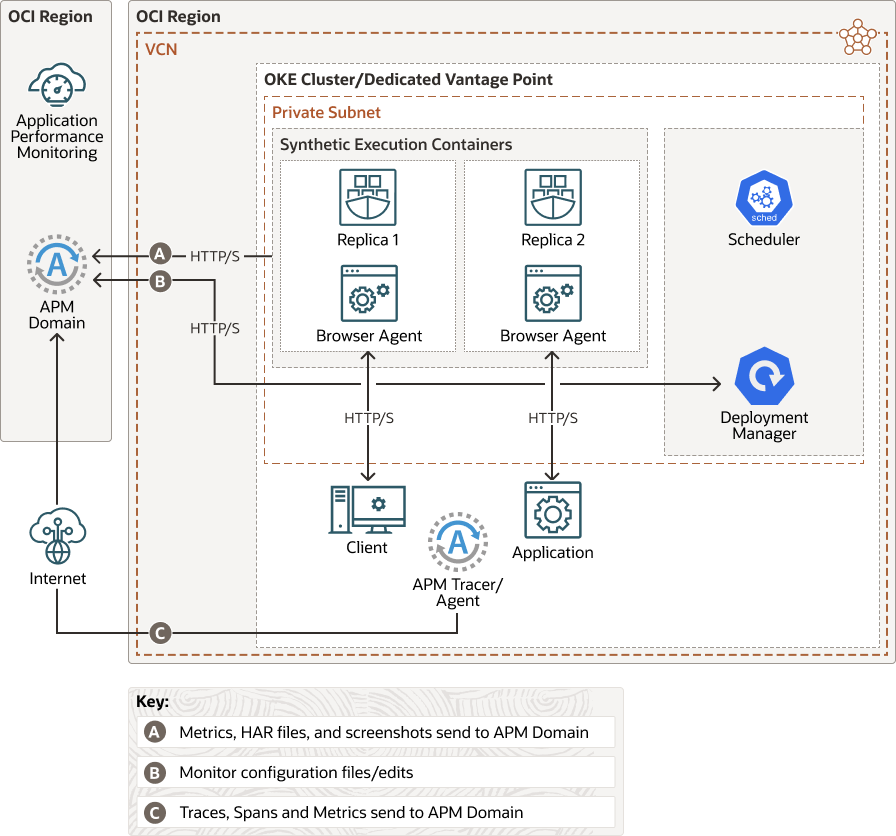
A detailed architecture follows, including potential applications you want to be tested within the secured network that includes the VCN. You can see the OKE cluster that will be automatically deployed, the Vantage Point components that are deployed, and how the Vantage Point connects to APM to send data from Monitor executions and receive new instructions to run new monitors, update settings, etc.
There’s also an 8-minute end-to-end demo of this deployment that provides all the details.
Deploy a DVP with Required Configuration Steps
How do you deploy such an architecture? We developed a resource template that makes the deployment very easy to do and ensures DVP can automatically be updated so it always uses the latest version of the Synthetic components.
Before starting the deployment wizard note down the following items:
- VCN details of the VCN the DVP is using
- Authentication token (to be found on the user profile page of the OCI account)
- APM Domain OCID (to be found on the APM domain administration page)
- APM domain private data key (to be found on the APM domain administration page)
The following is a summary of the required Configuration steps:
- Launch the wizard from the Dedicated Vantage Point page.
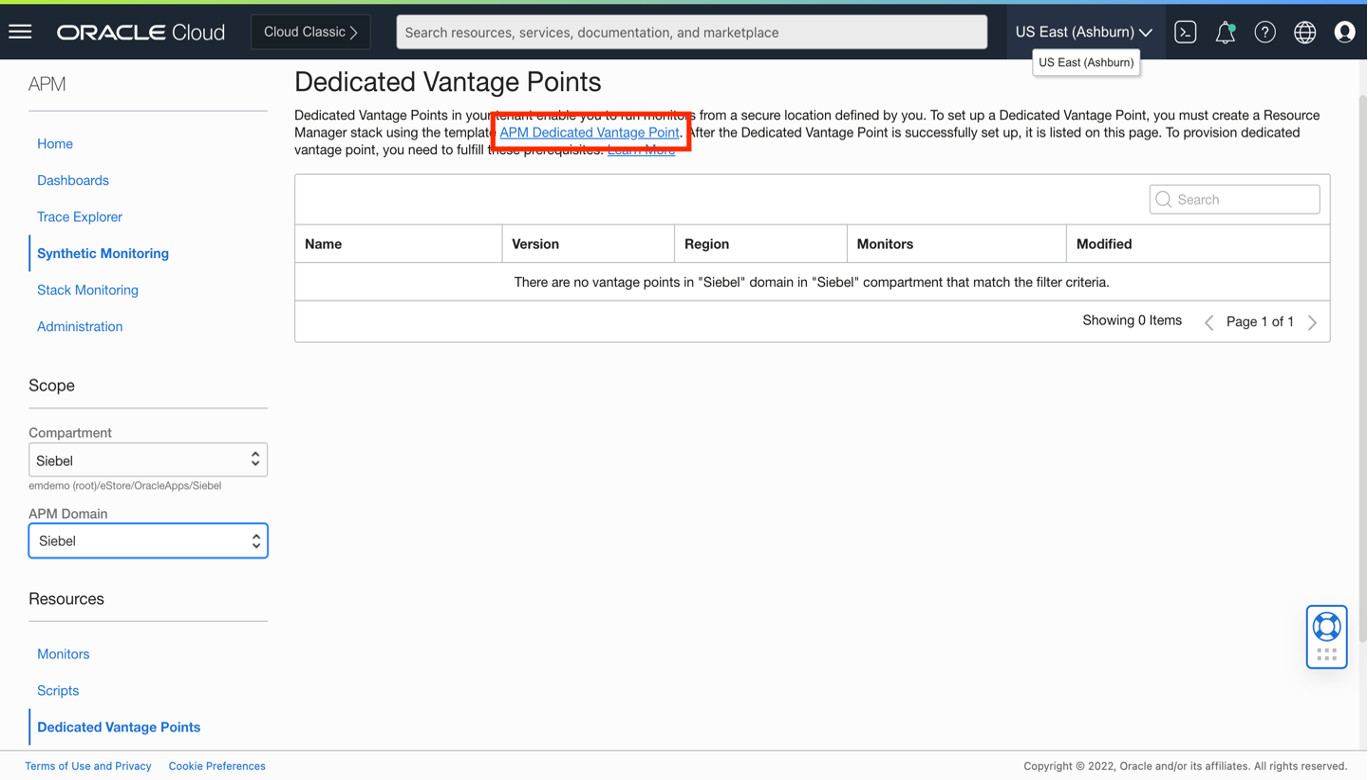
Figure 3: Launching the DVP Wizard -
Automatically, the Resource Manager Create Stack wizard is opened. Simply, the correct template (Oracle DVP instance) is pre-selected. Optionally, the template can be customized with a specific name and description. Click Next.
-
Now, configure variables. On this page:
-
Provide a name for the DVP; this is the name that will show up in the list of Vantage Points when creating or editing a monitor
-
Choose the compartment where the VCN is defined
-
Select VCN and choose subnets from the options provided
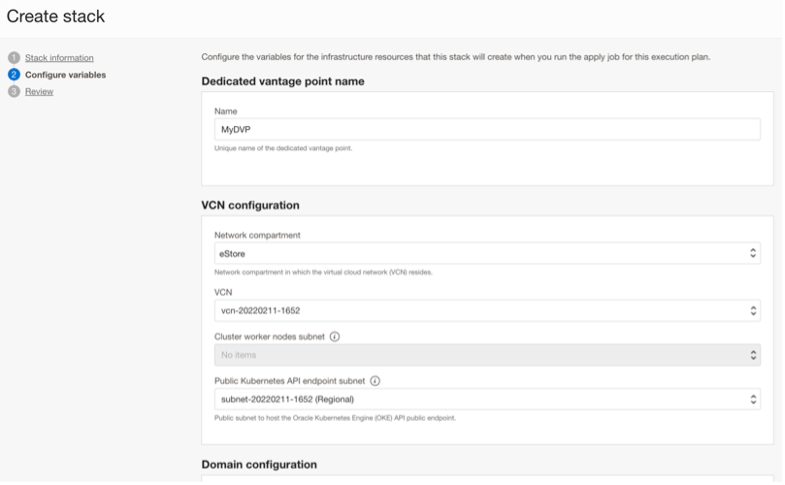
Figure 4: Configure variables
-
-
Continue with page 2 of the wizard: the domain configuration is simple. Use the details noted before starting the wizard. The domain private key is a combination of the APM domain ocid, its private key, and the region to which the APM domain is deployed. Below the input box is an example displayed, copy that and replace the ocid details with your own and change the region if needed. Important to note, paste the combined string, and hit the (Add) text to save the value (shown in Figure 5).
Tip: for the DVP to handle monitor executions for multiple APM domains, additional values can be added.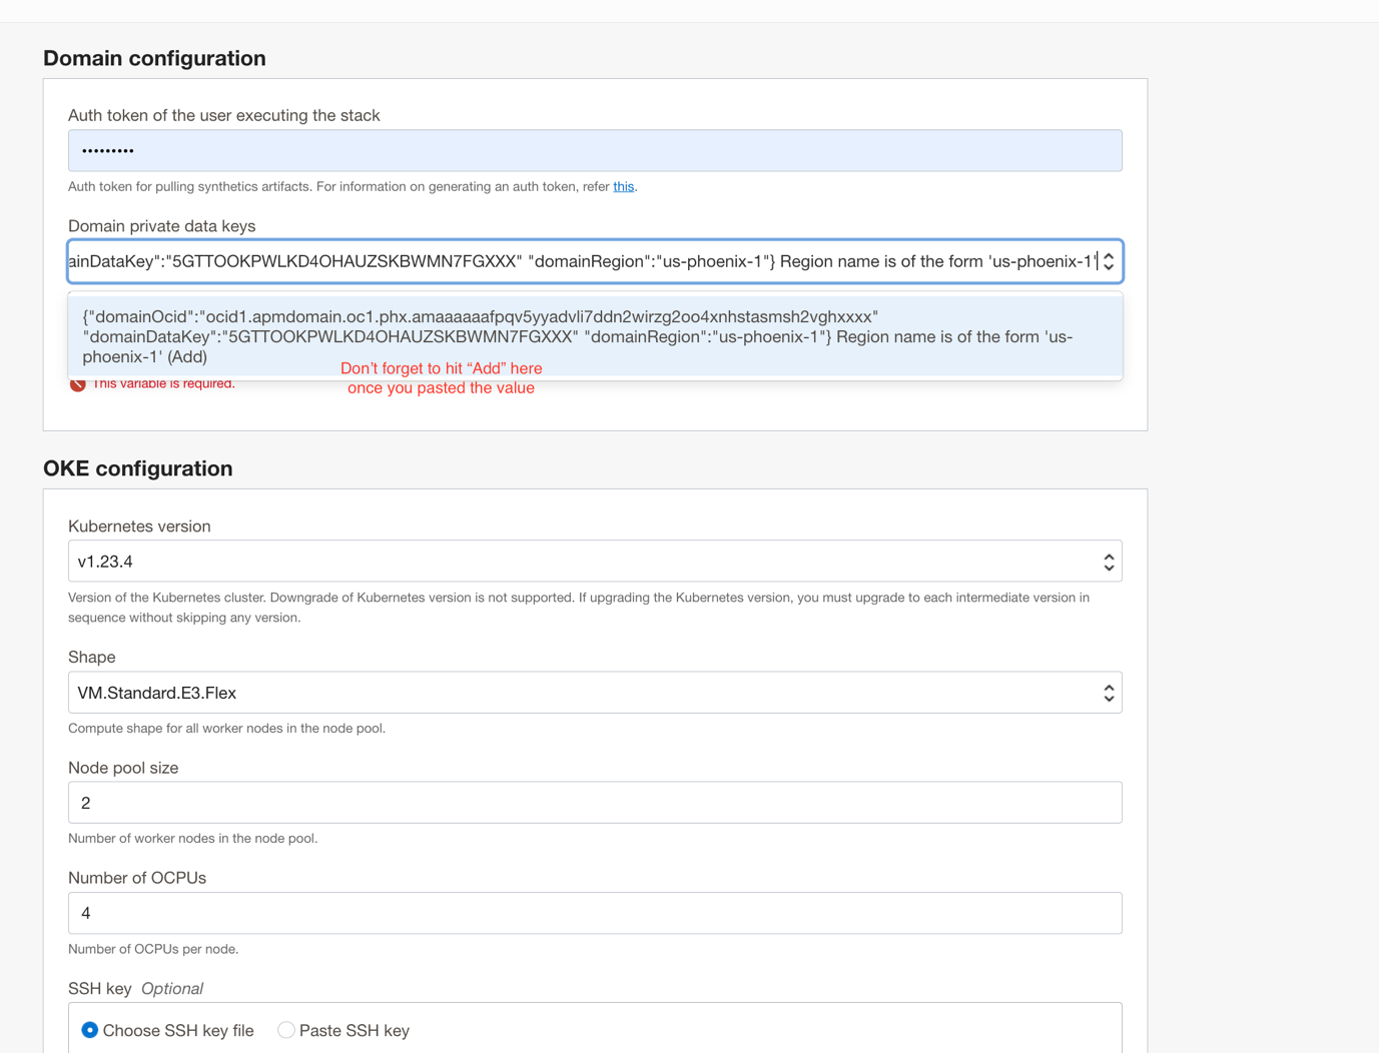
Figure 5: Domain configuration The OKE configuration is preselected and optimized for simple monitoring. If you are planning to run more than 30-50 monitors, then the configuration can be adjusted to have more nodes or use more CPU’s. The other option provided in this section of the configuration is to upload an SSH key.
-
Complete page 2 of the wizard: Deploy the APM Java Agent by providing the agent information to both microservices. Review the settings and click “Create”.
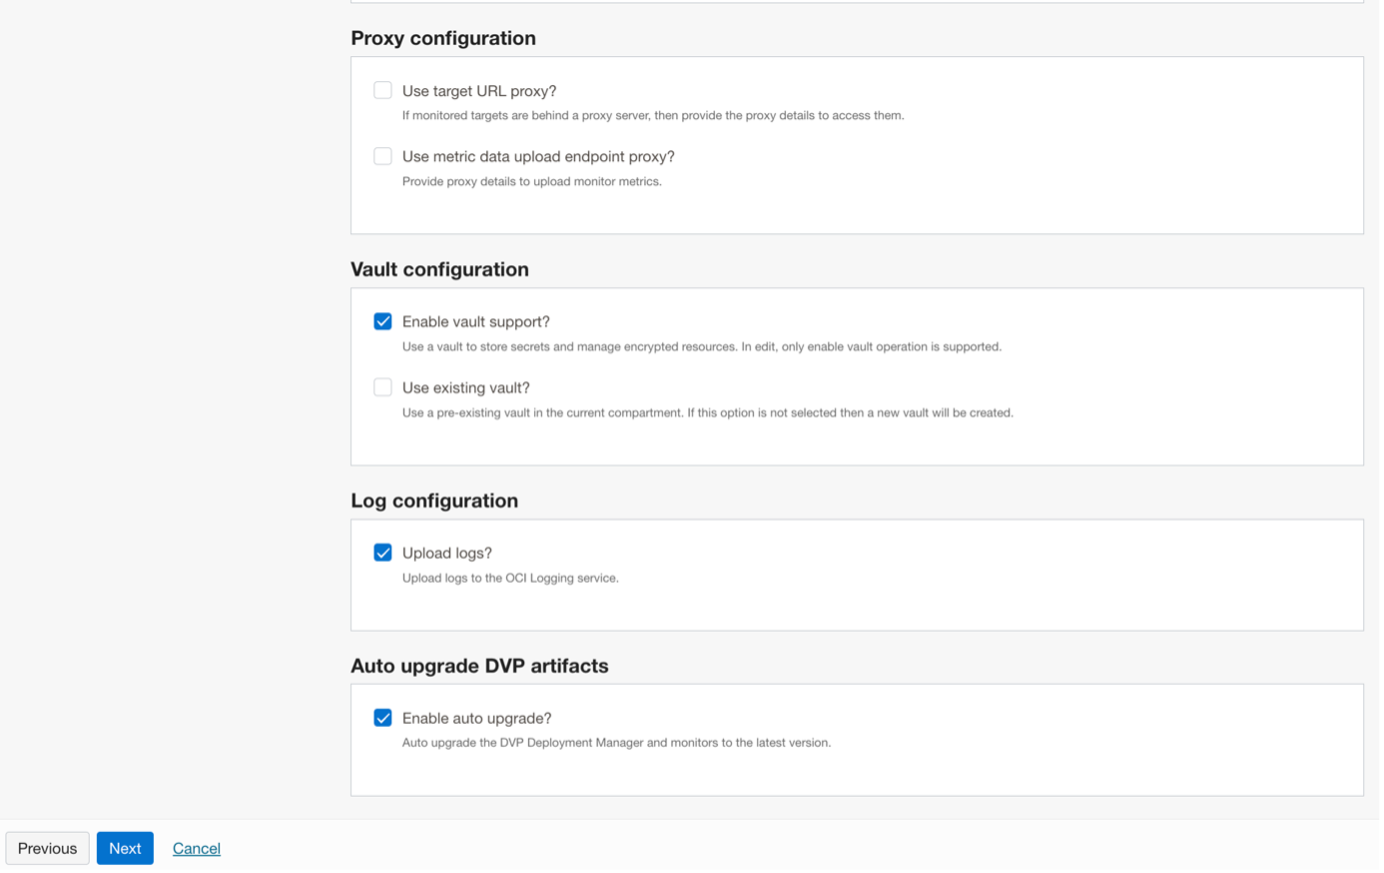
Figure 6: Completing page 2 of the wizard - Review inputs and, make changes, if needed. Click “Create”. Once done, the UI changes to display the Resource Stack Manager detail page. This allows you to track the deployment jobs. The expected deployment time is around 45-50 minutes.
- Start using the new DVP: Once the deployment process is done, deploy monitors to the newly created DVP. It will show up in the list of vantage points to choose from (as provided in the name in the first section of step 2 of the wizard). Use it to test endpoints within the corporate/secured network and keep tabs on the availability and performance of these applications and interfaces.
For more details, see this end-to-end demo captured in this video.