Having your data in the Oracle Cloud Infrastructure (OCI) and using the secure storage of MySQL HeatWave is a sound investment for any organization. However, sometimes, you need access to the data from another MySQL HeatWave DB system within OCI. You can accomplish this in various ways, including exporting the data, but what if you need real-time data updates?
Outbound replication allows you to use your MySQL HeatWave DB system as a source and another MySQL HeatWave DB system as a replica. Fortunately, OCI provides a mechanism that makes setting up replication easier by using a Replication Channel for outbound replication. Once the replication channel is configured, your replica accepts transactions duplicating the source data.
This blog will examine how to set up outbound replication from a MySQL HeatWave DB system to another MySQL HeatWave DB system. We will use a backup feature to create a new replica DB system from a source backup. As you will see, this dramatically simplifies creating new replicas. Nice.
The demonstration is written as a tutorial that you can follow to set up outbound replication yourself. The demonstration assumes you have a DB system that you want to use for the source and no replica. If you do not have a DB system for use as the source and want to follow along, please create the source DB system first.
Tip: If you want to set up outbound replication to an on-premises MySQL server, [see this blog LINK GOES HERE].
The process we will use includes the following high-level steps.
- Create the replication user on the source.
- Create a manual backup of the source.
- Create the replica DB system using the backup.
- Create and start a replication channel.
We begin by configuring our source for replication by creating the replication user.
Create the Replication User on the Source DB System
Next, we will create a replication user and password on the source. We use the typical commands to do so, including using MySQL Shell to connect to our DB system. If this is your first time doing this, see the blog Using Cloud Shell with MySQL HeatWave Database Service in OCI for more details.
One detail you will need is the private IP address of your source DB system. As shown in Figure 1, you can find this on the DB system details page on the Connections tab.

Figure 1. DB system Private IP (DB system details)
Once you have connected to your DB system, create the replication user and grant the user the REPLICATION SLAVE privilege. Listing 1 demonstrates the commands to create the replication user. Be sure to specify a password that you will remember.
Listing 1. Create the Replication User
> CREATE USER rpl_admin@'%' IDENTIFIED BY '**********' REQUIRE SSL;
Query OK, 0 rows affected (0.0295 sec)
> GRANT REPLICATION SLAVE ON *.* TO rpl_admin@'%';
Query OK, 0 rows affected (0.0295 sec)
Notice that we also added the REQUIRE SSL option to the CREATE USER command, which is required to connect to the MySQL HeatWave DB system.
Now, we will create a manual backup of our source MySQL HeatWave DB system so that all the data and user accounts will be copied to the new replica.
Create a Manual Backup of the Source DB System
The source in this demonstration is an existing MySQL HeatWave DB system. However, if you want to experiment with outbound replication using a new MySQL HeatWave DB system to protect any data on your existing system, you can create one now.
To create a manual backup, visit the source DB system details page, click on the Backups section in the Resources list on the left, and then click the Create manual backup button, as shown in Figure 2.

Figure 2. Create Manual Backup (DB system details)
In the backup dialog, complete the dialog selecting a full backup, the number of days to store the backup (there is a small fee for saving backups), and tick the Navigate to… option as shown in Figure 3, then click Create manual backup.
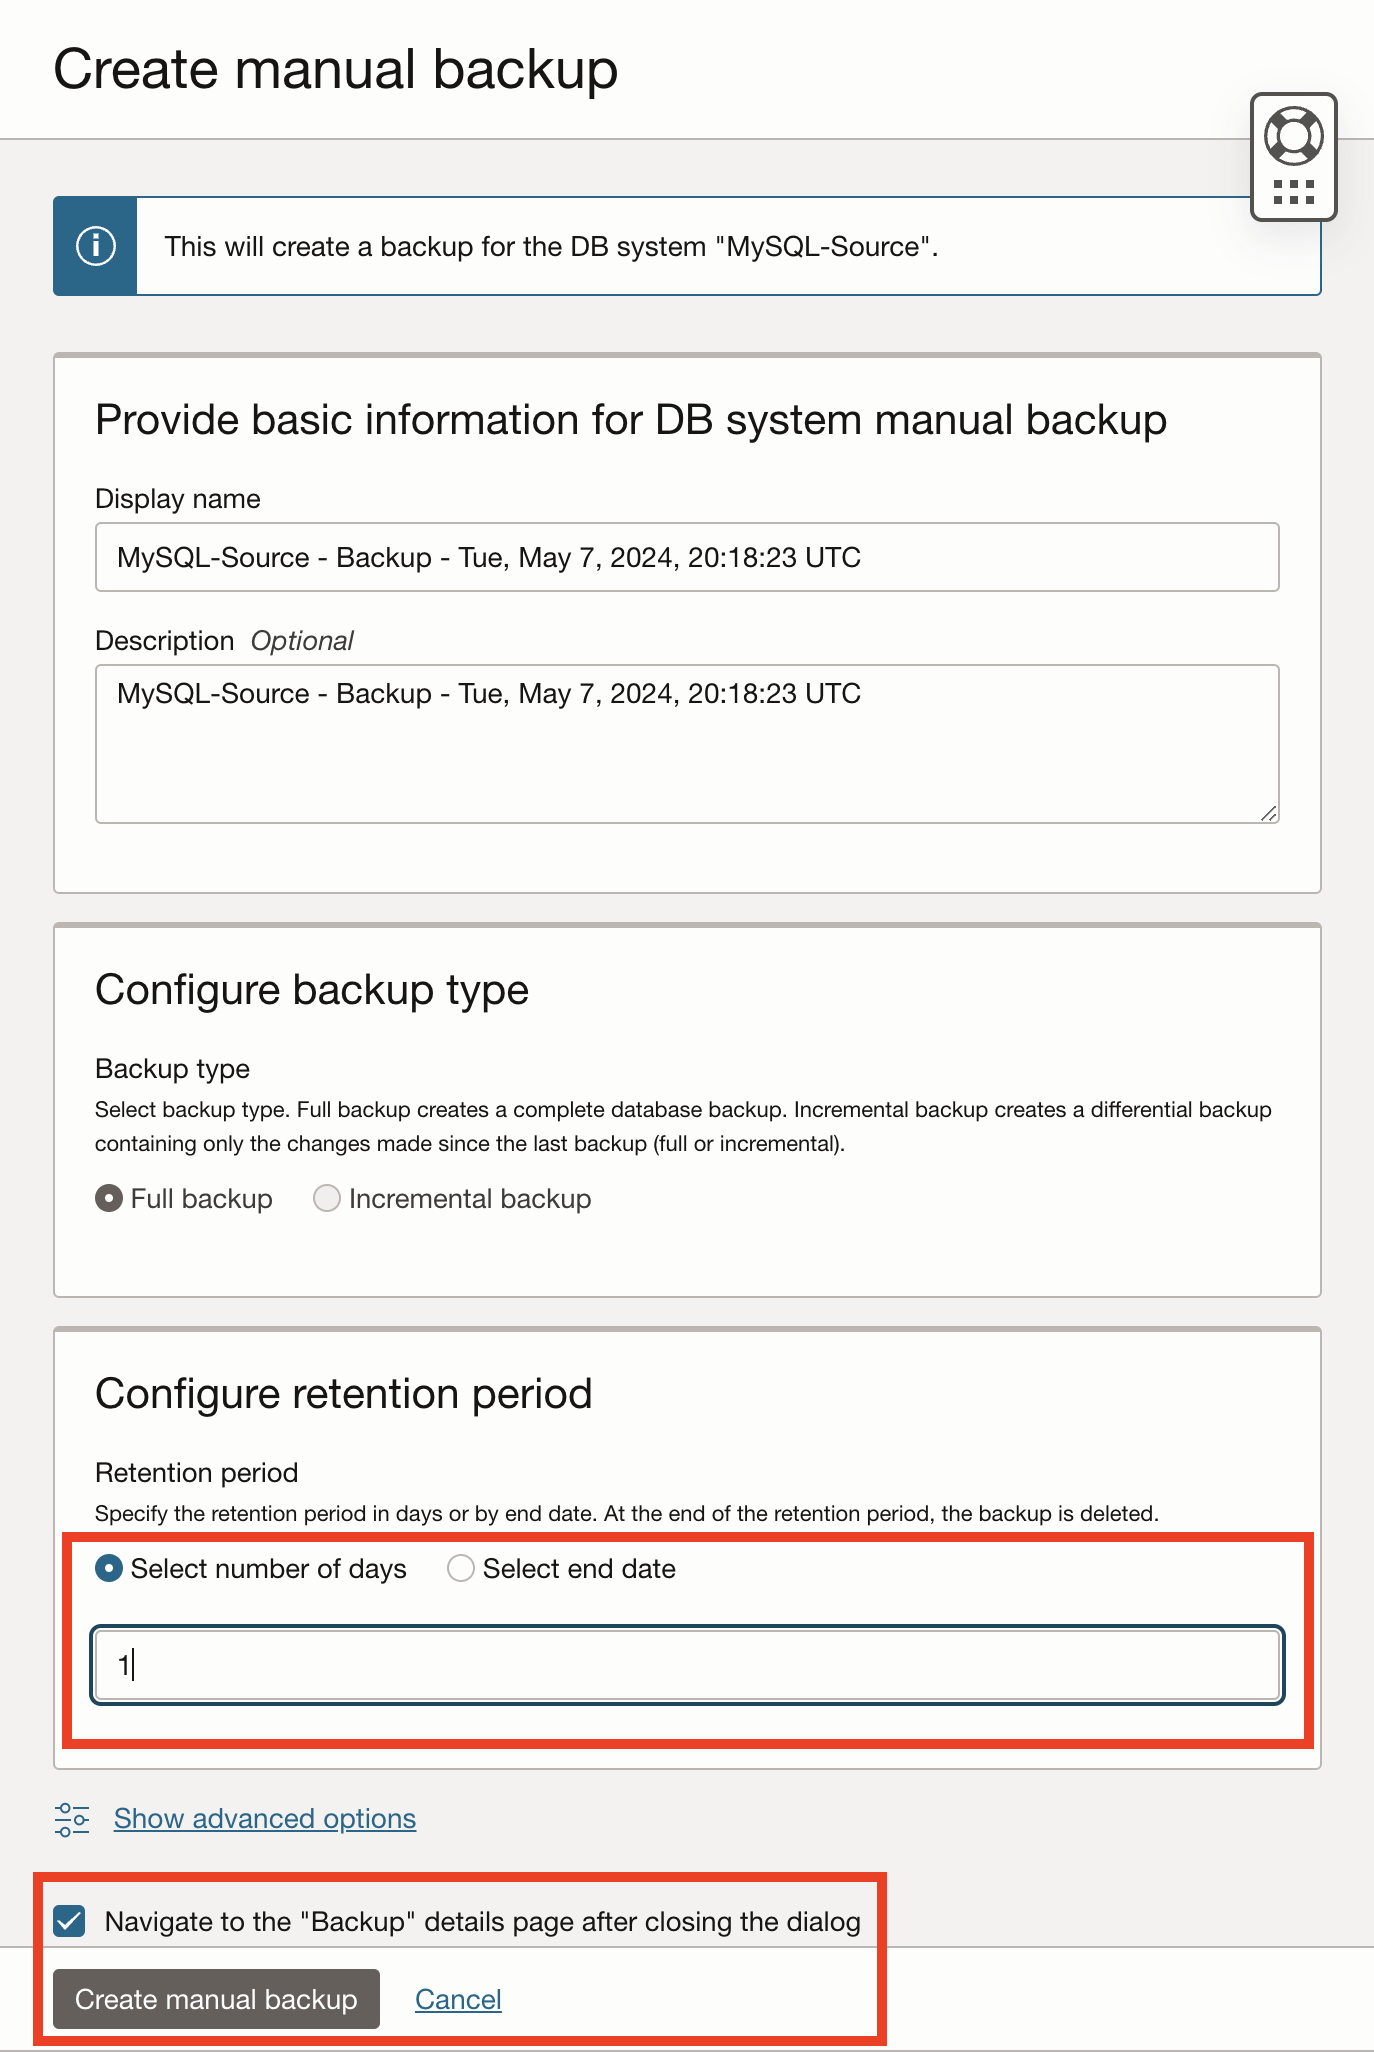
Figure 3. Create Manual Backup (backup dialog)
Once the backup is complete, we can create a replica from the backup.
Create the Replica DB System using a Backup
Click the Restore to new DB system button from the backup details page, as shown in Figure 4, to start restoring a new DB system from the backup. This will create a DB system that contains the same data as the source except for the name, IP address, and similar elastic resources. Thus, this is a perfect way to create a new replica.
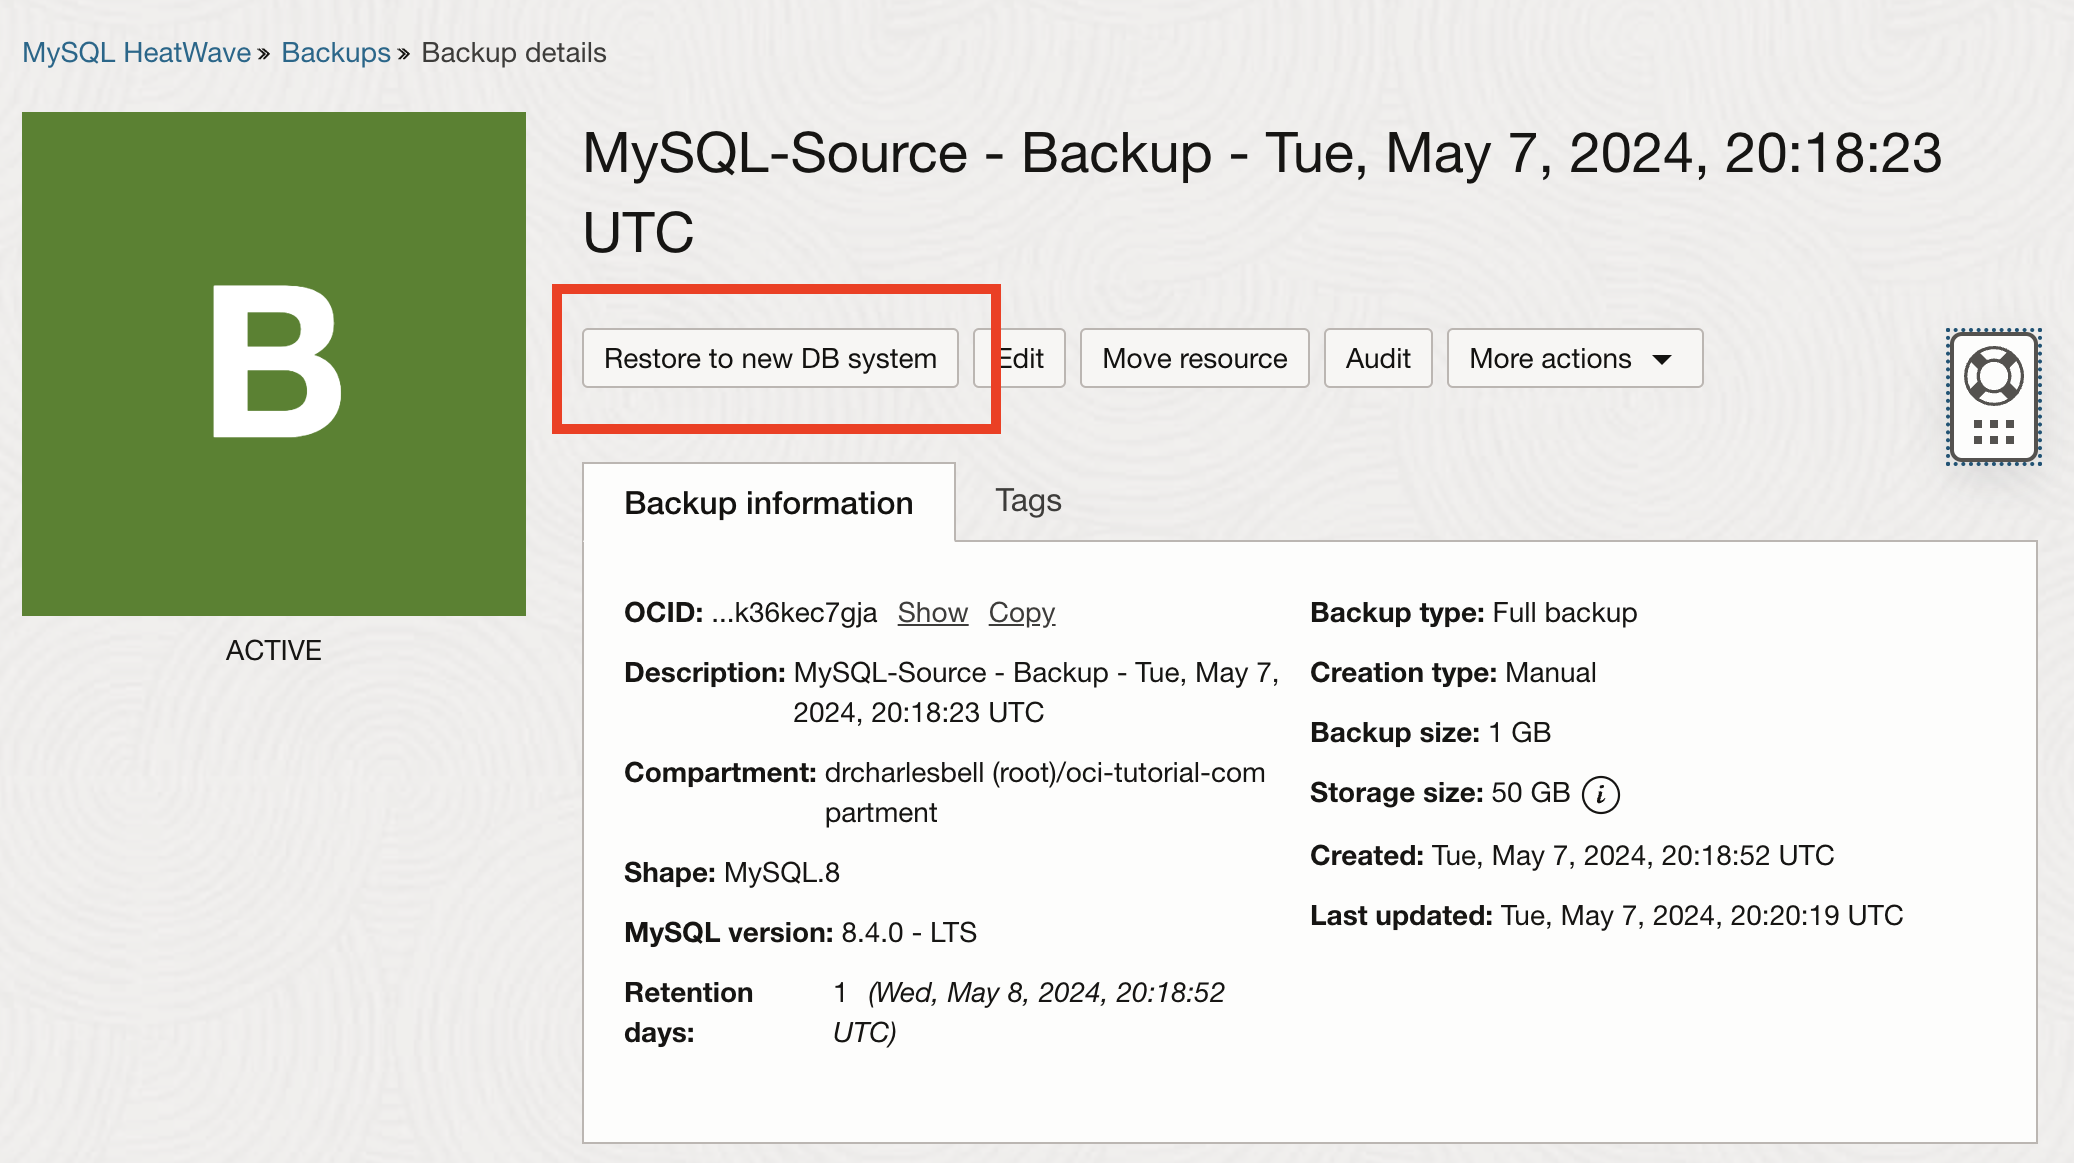
Figure 4. Restore Backup (backup details)
This will open a new dialog to create a new DB system. You can use all the defaults for the new DB system, except you should rename it to something else, such as Mysql-Replica, as shown in Figure 5.
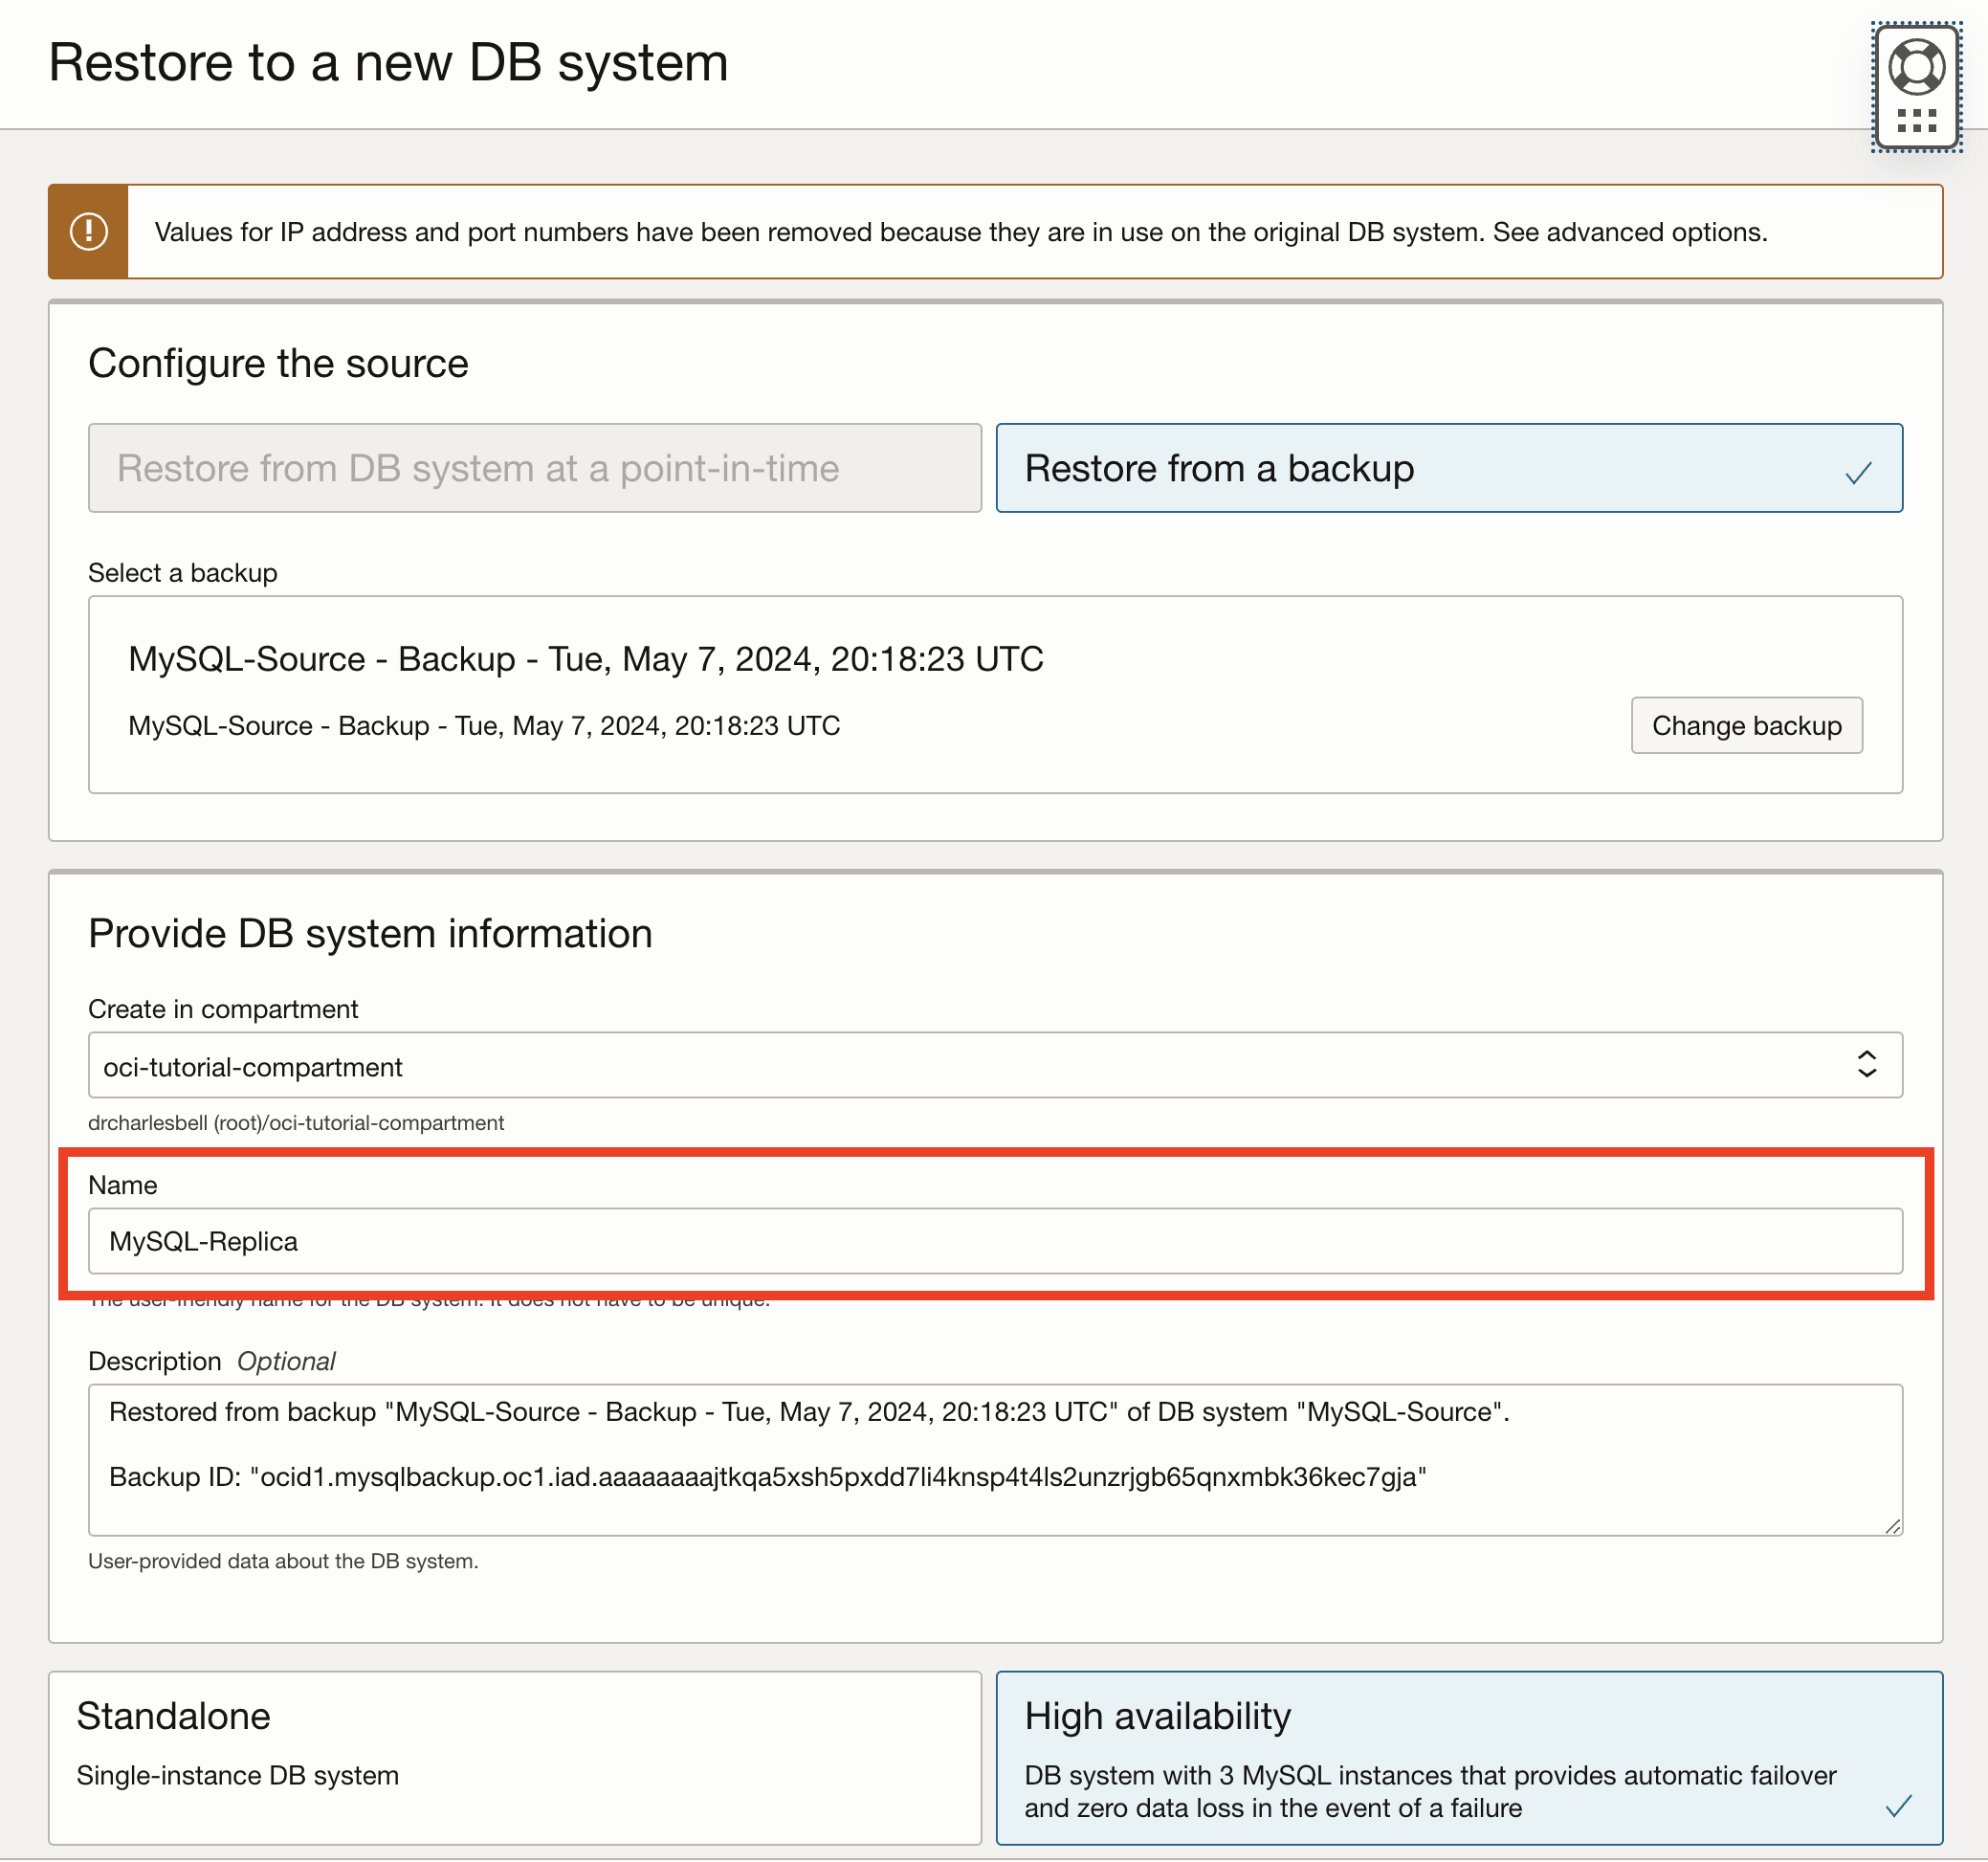
Figure 5. Create DB system (from backup – change name)
Once you are ready and satisfied with the settings, click Restore, as shown in Figure 6. Notice the backup options. If you use this replica for production, you may consider turning on automated backups to help preserve your data and take the backup load off your source.
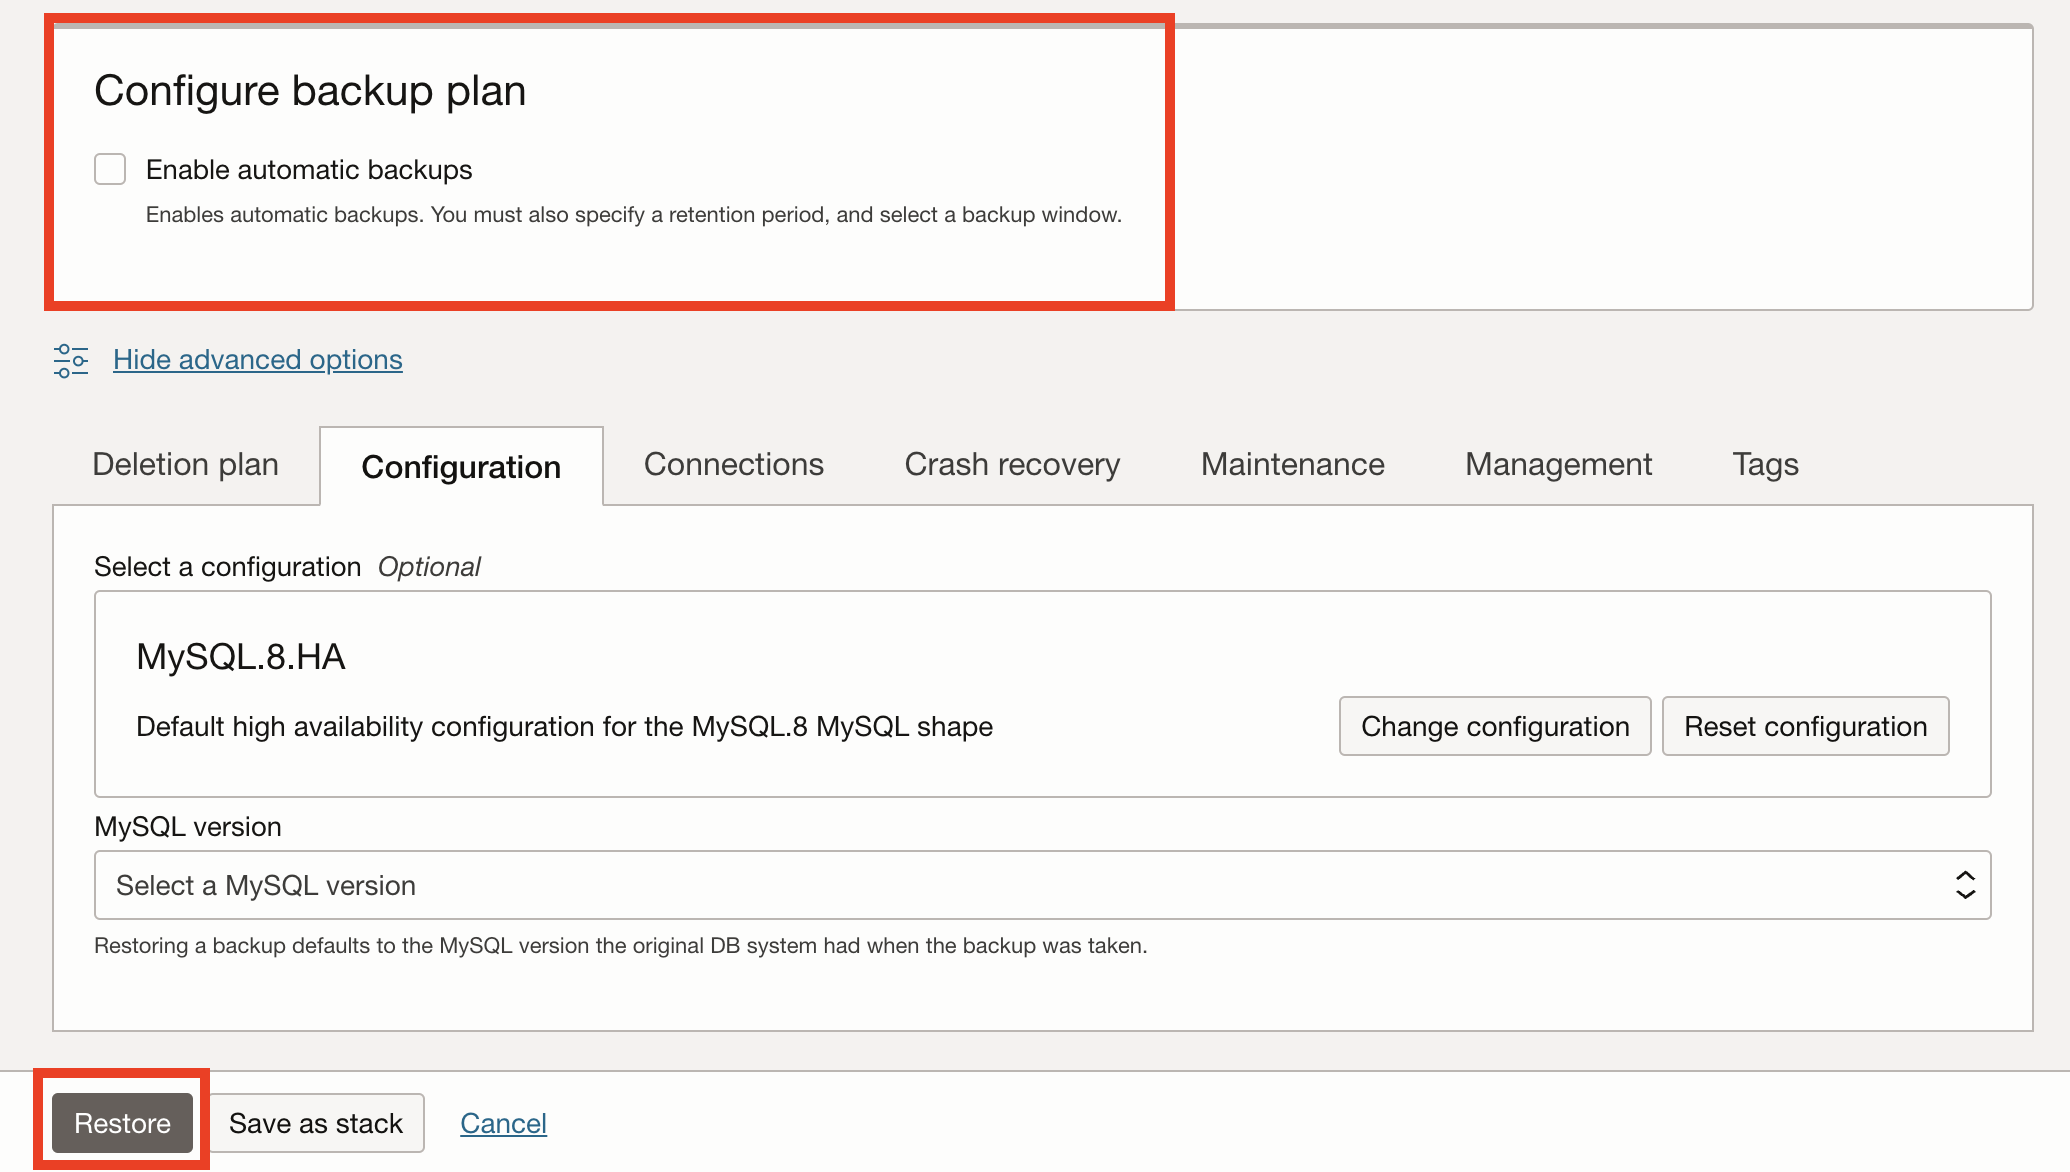
Figure 6. Create a DB system (from backup)
Note: Before proceeding, you must wait until the DB system is in an ACTIVE state.
Now that we have our data from the source loaded onto the replica, we can create a replication channel and start outbound replication.
Create a Replication Channel
A replication channel represents a path through which changes produced by transactions on a source MySQL server or DB system are replicated to a target (replica) DB system. Channels have their lifecycle and can be enabled/disabled, reset, and resumed.
To create a replication channel, navigate to the DB system details page of your new replica then click on More Actions | Create Channel as shown in Figure 7.
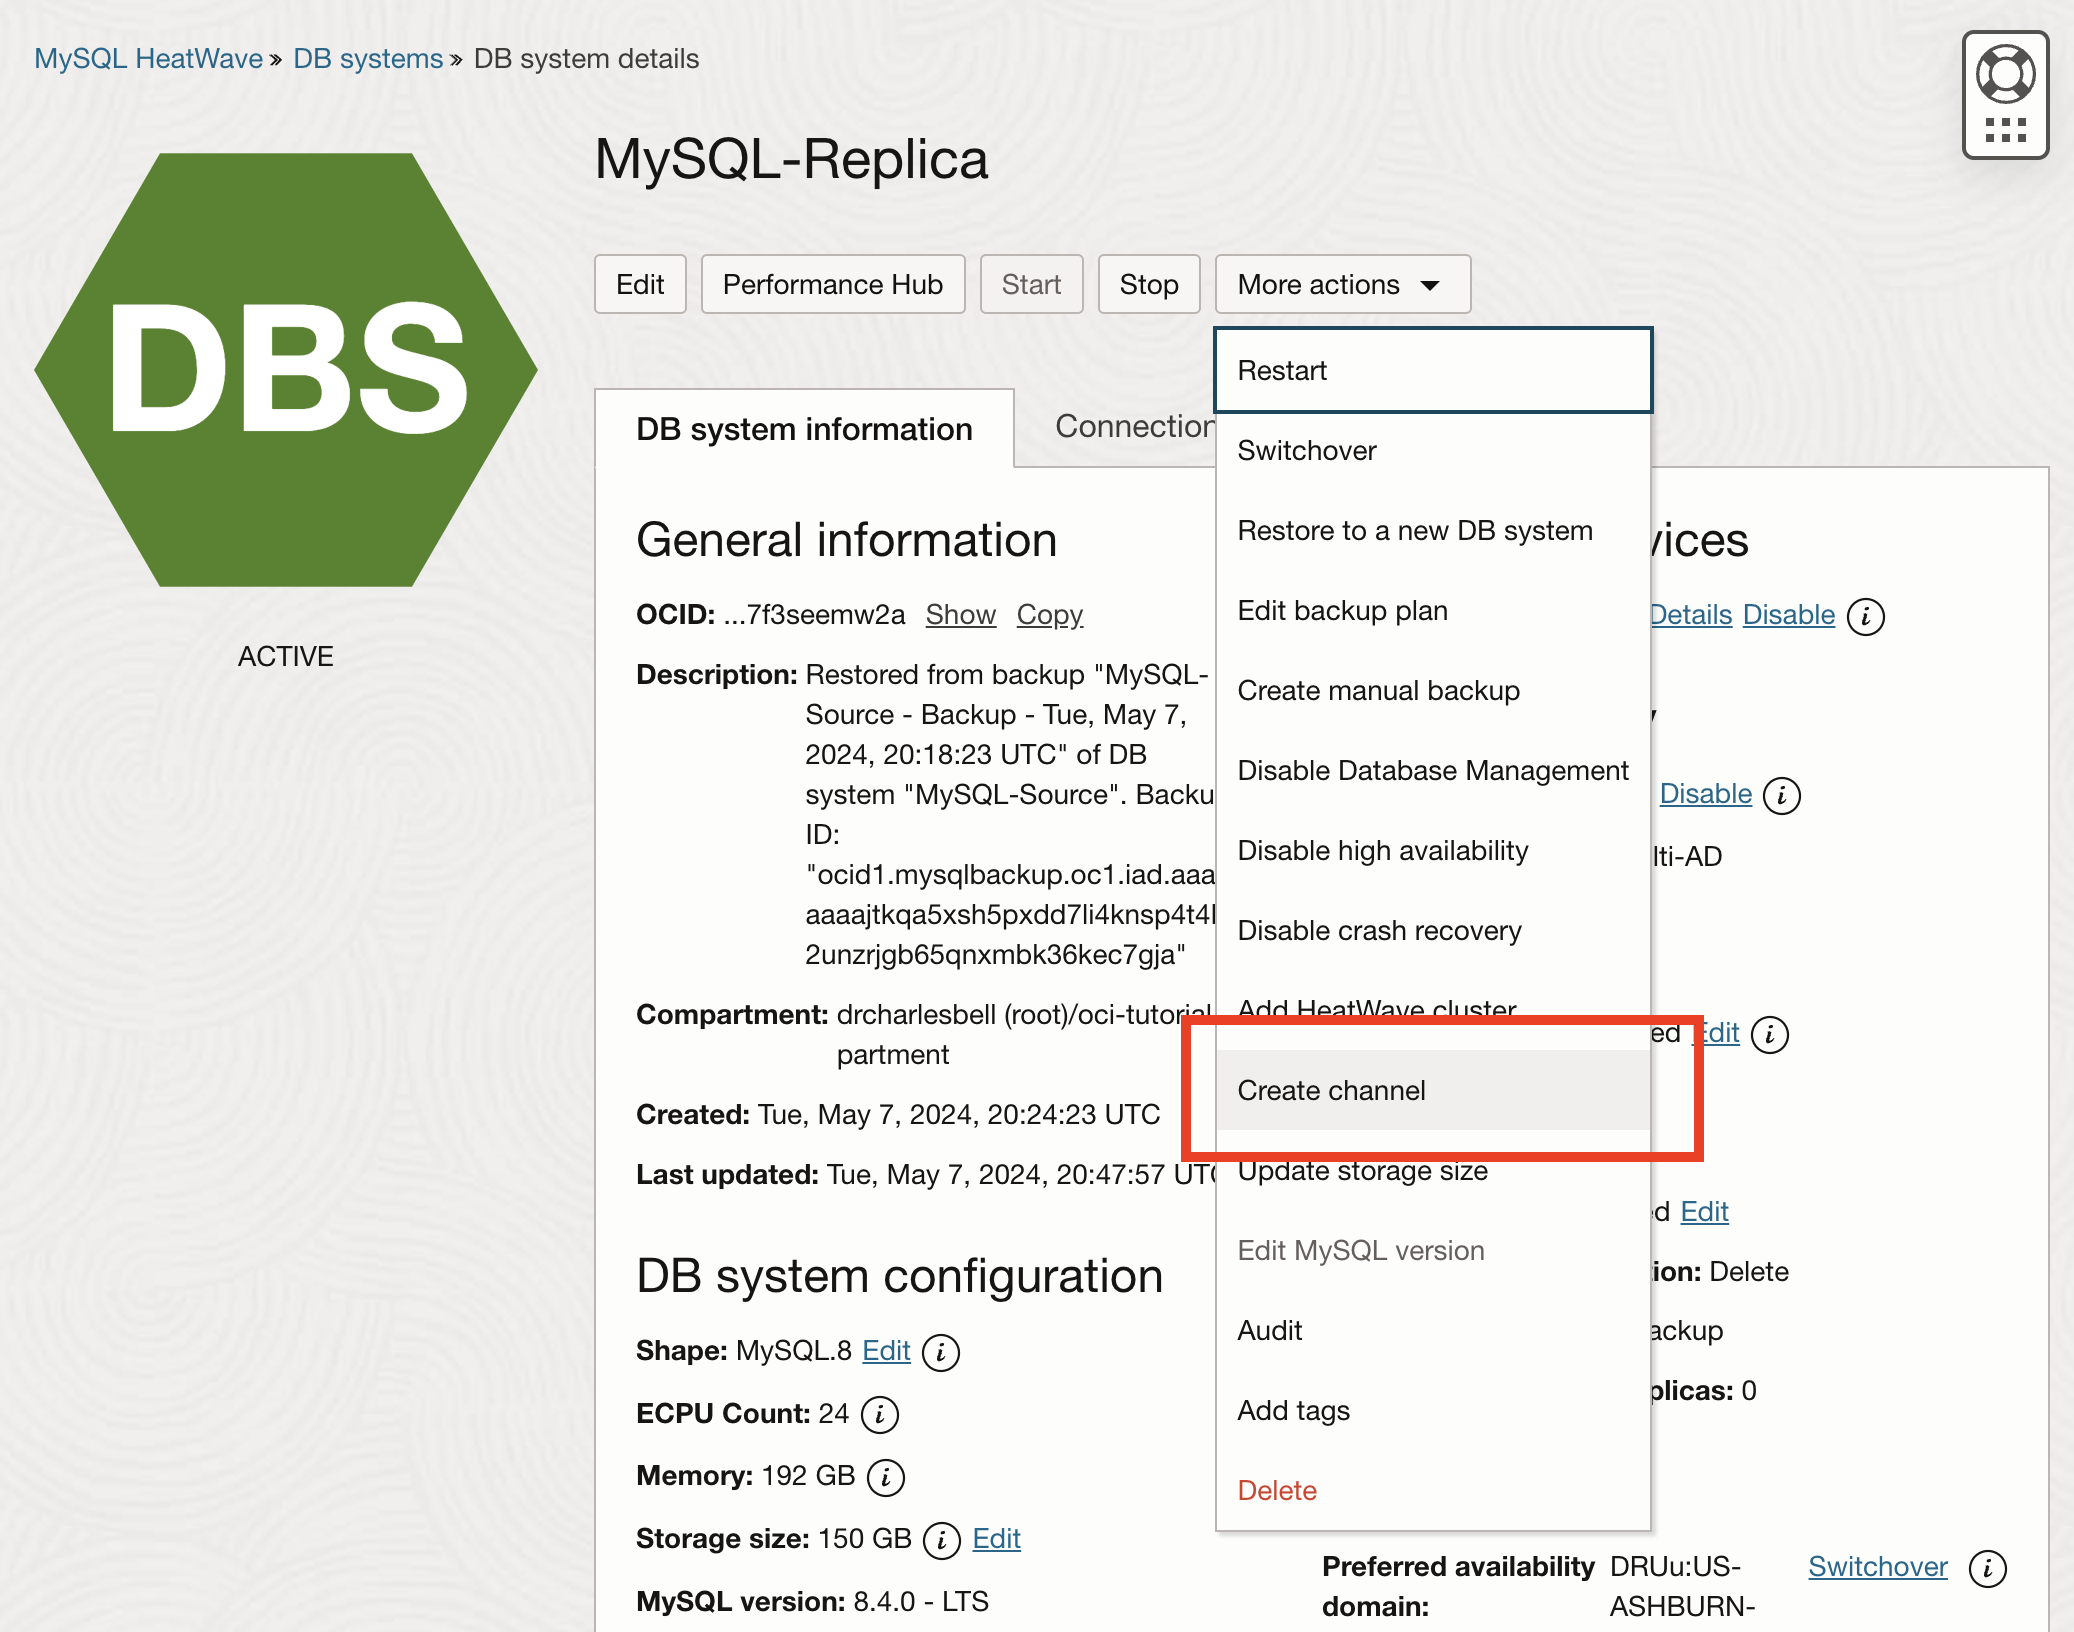
Figure 7. Create a channel (DB system details)
On the create channel dialog, you must provide the IP address that your on-premises MySQL server is listening to (the static IP address assigned to your VPN client), the replication user, and the password (you must enter it twice) that you created on the source. Figure 8 shows the top part of the Create Channel dialog, including the optional name and description entries.
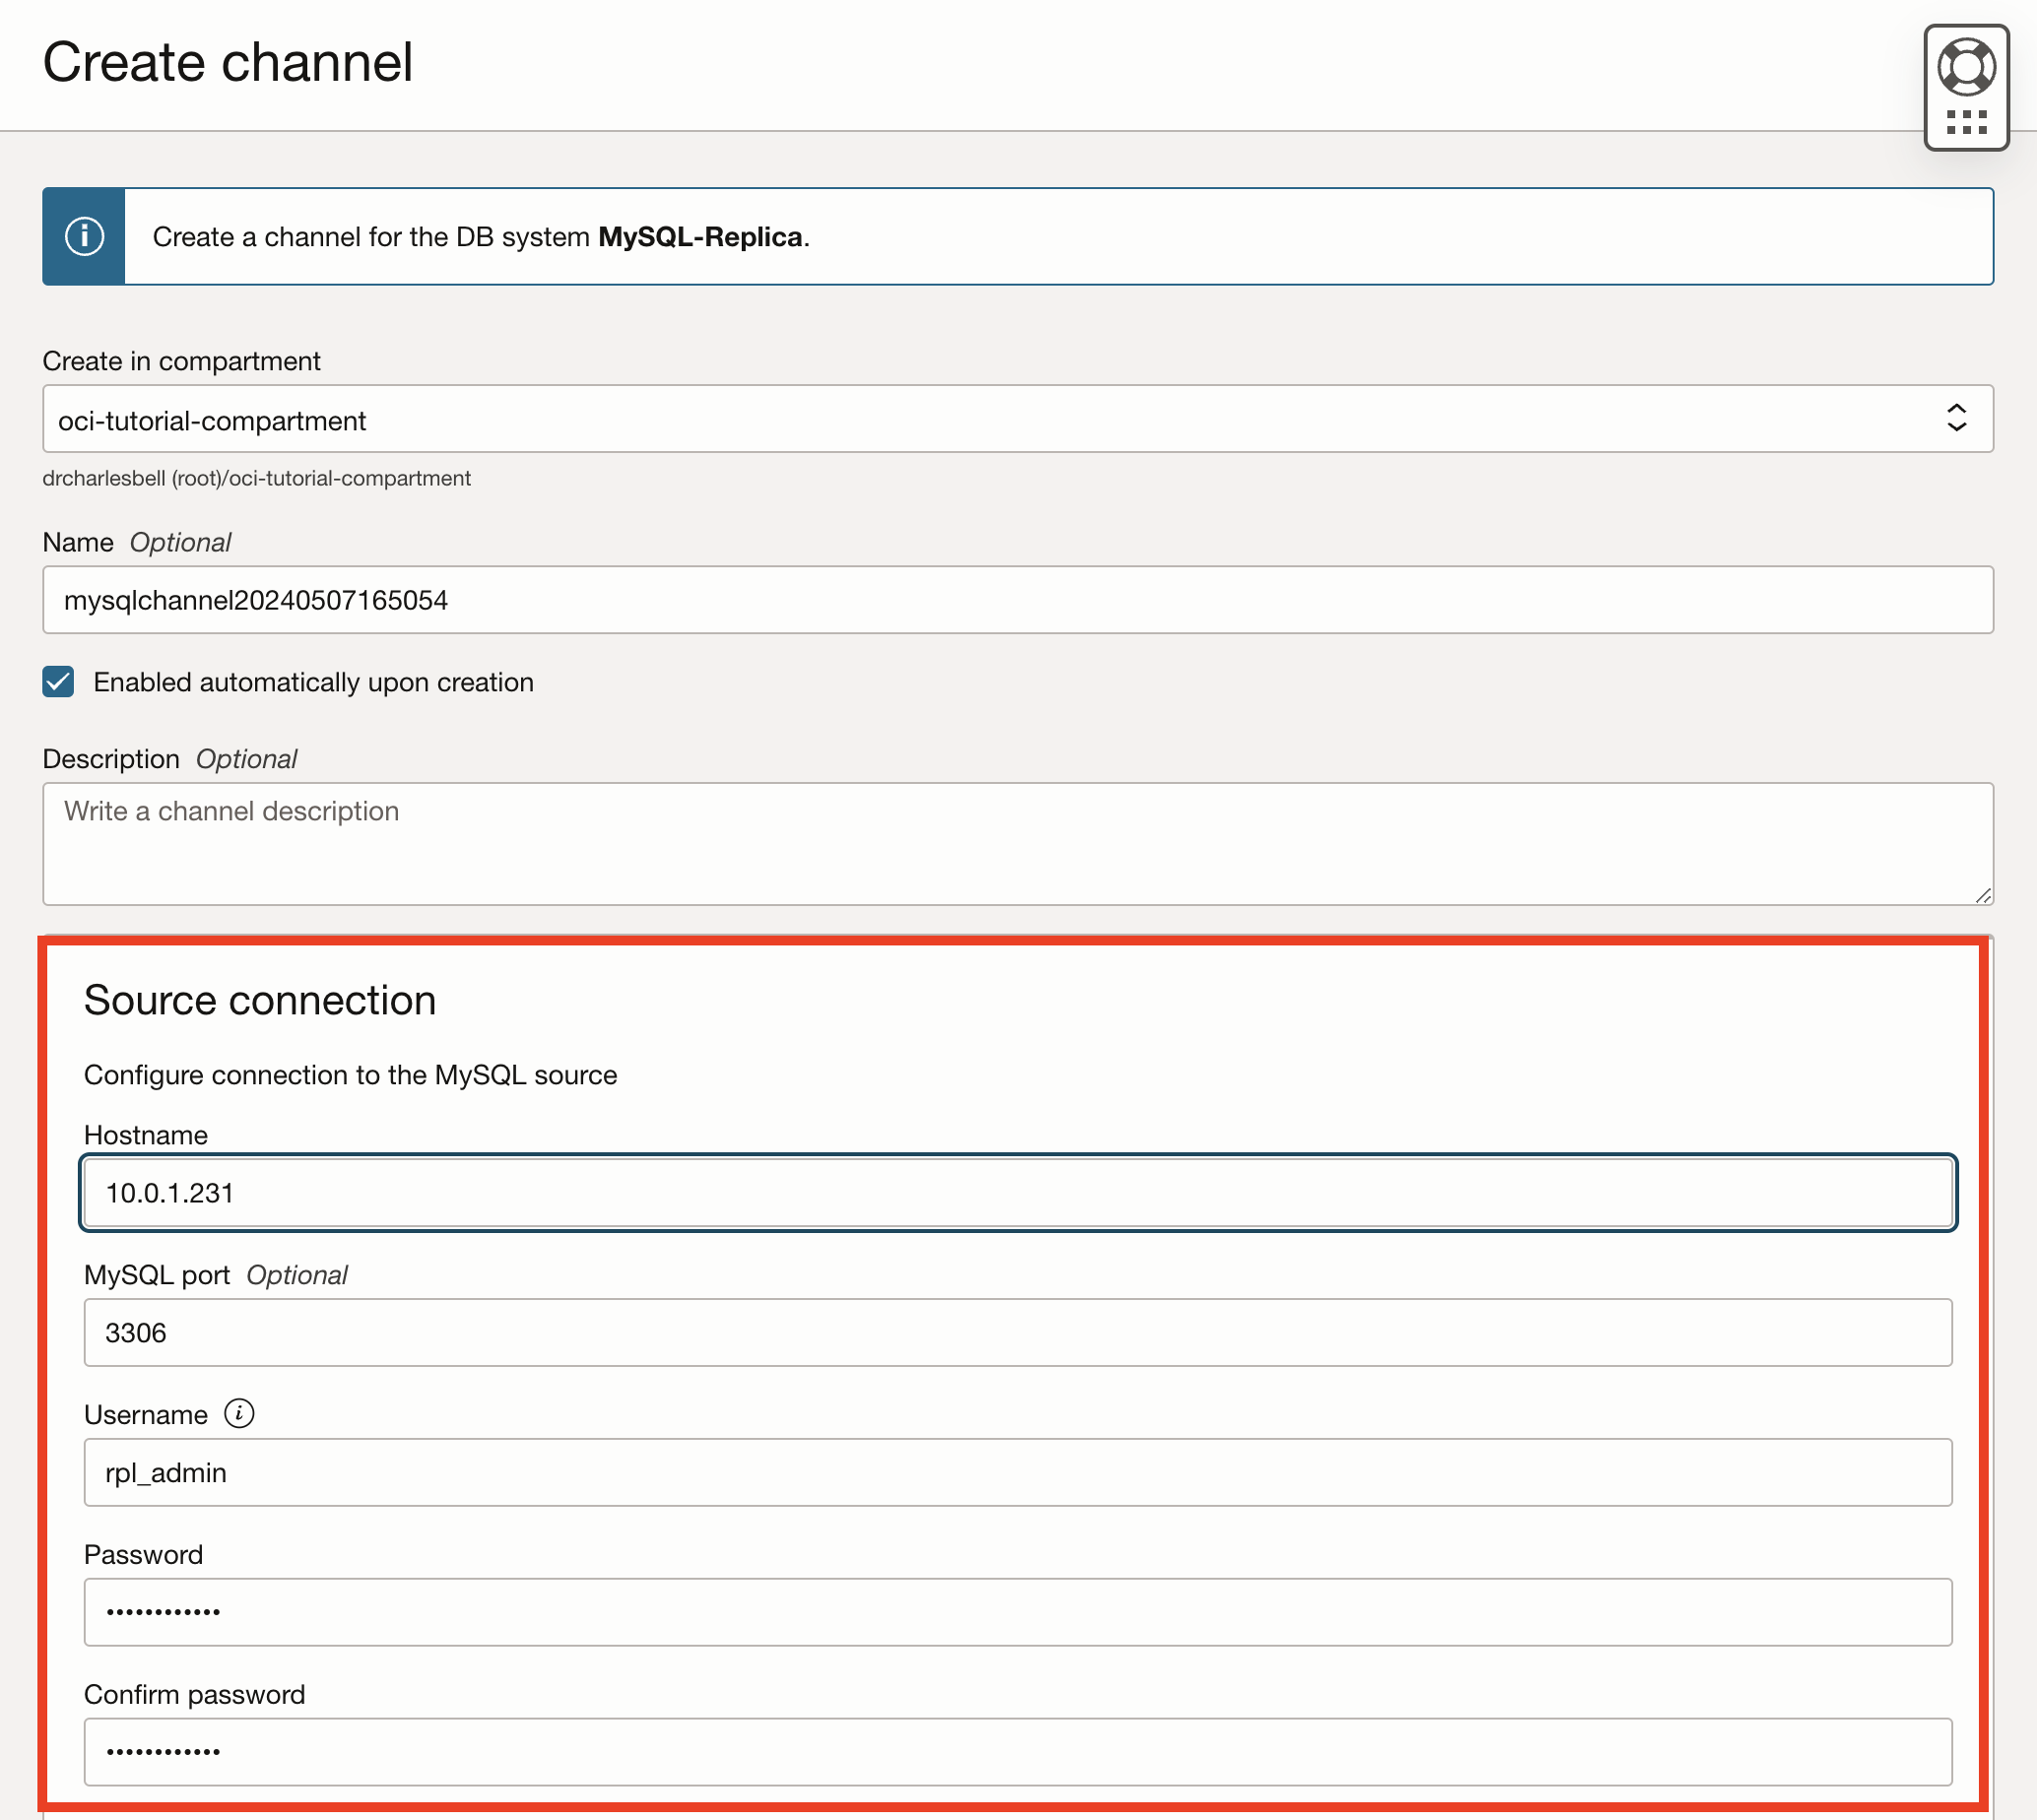
Figure 8. Channel details page
Since we initiated the channel from our replica, all the correct information has been provided for us for the replica. Once the information is added, click Create, as shown in Figure 9.
Note: The default setting for tables without primary key is Allow, however, if you want to use high availability feature, you will need to choose the Generate Primary Key option.
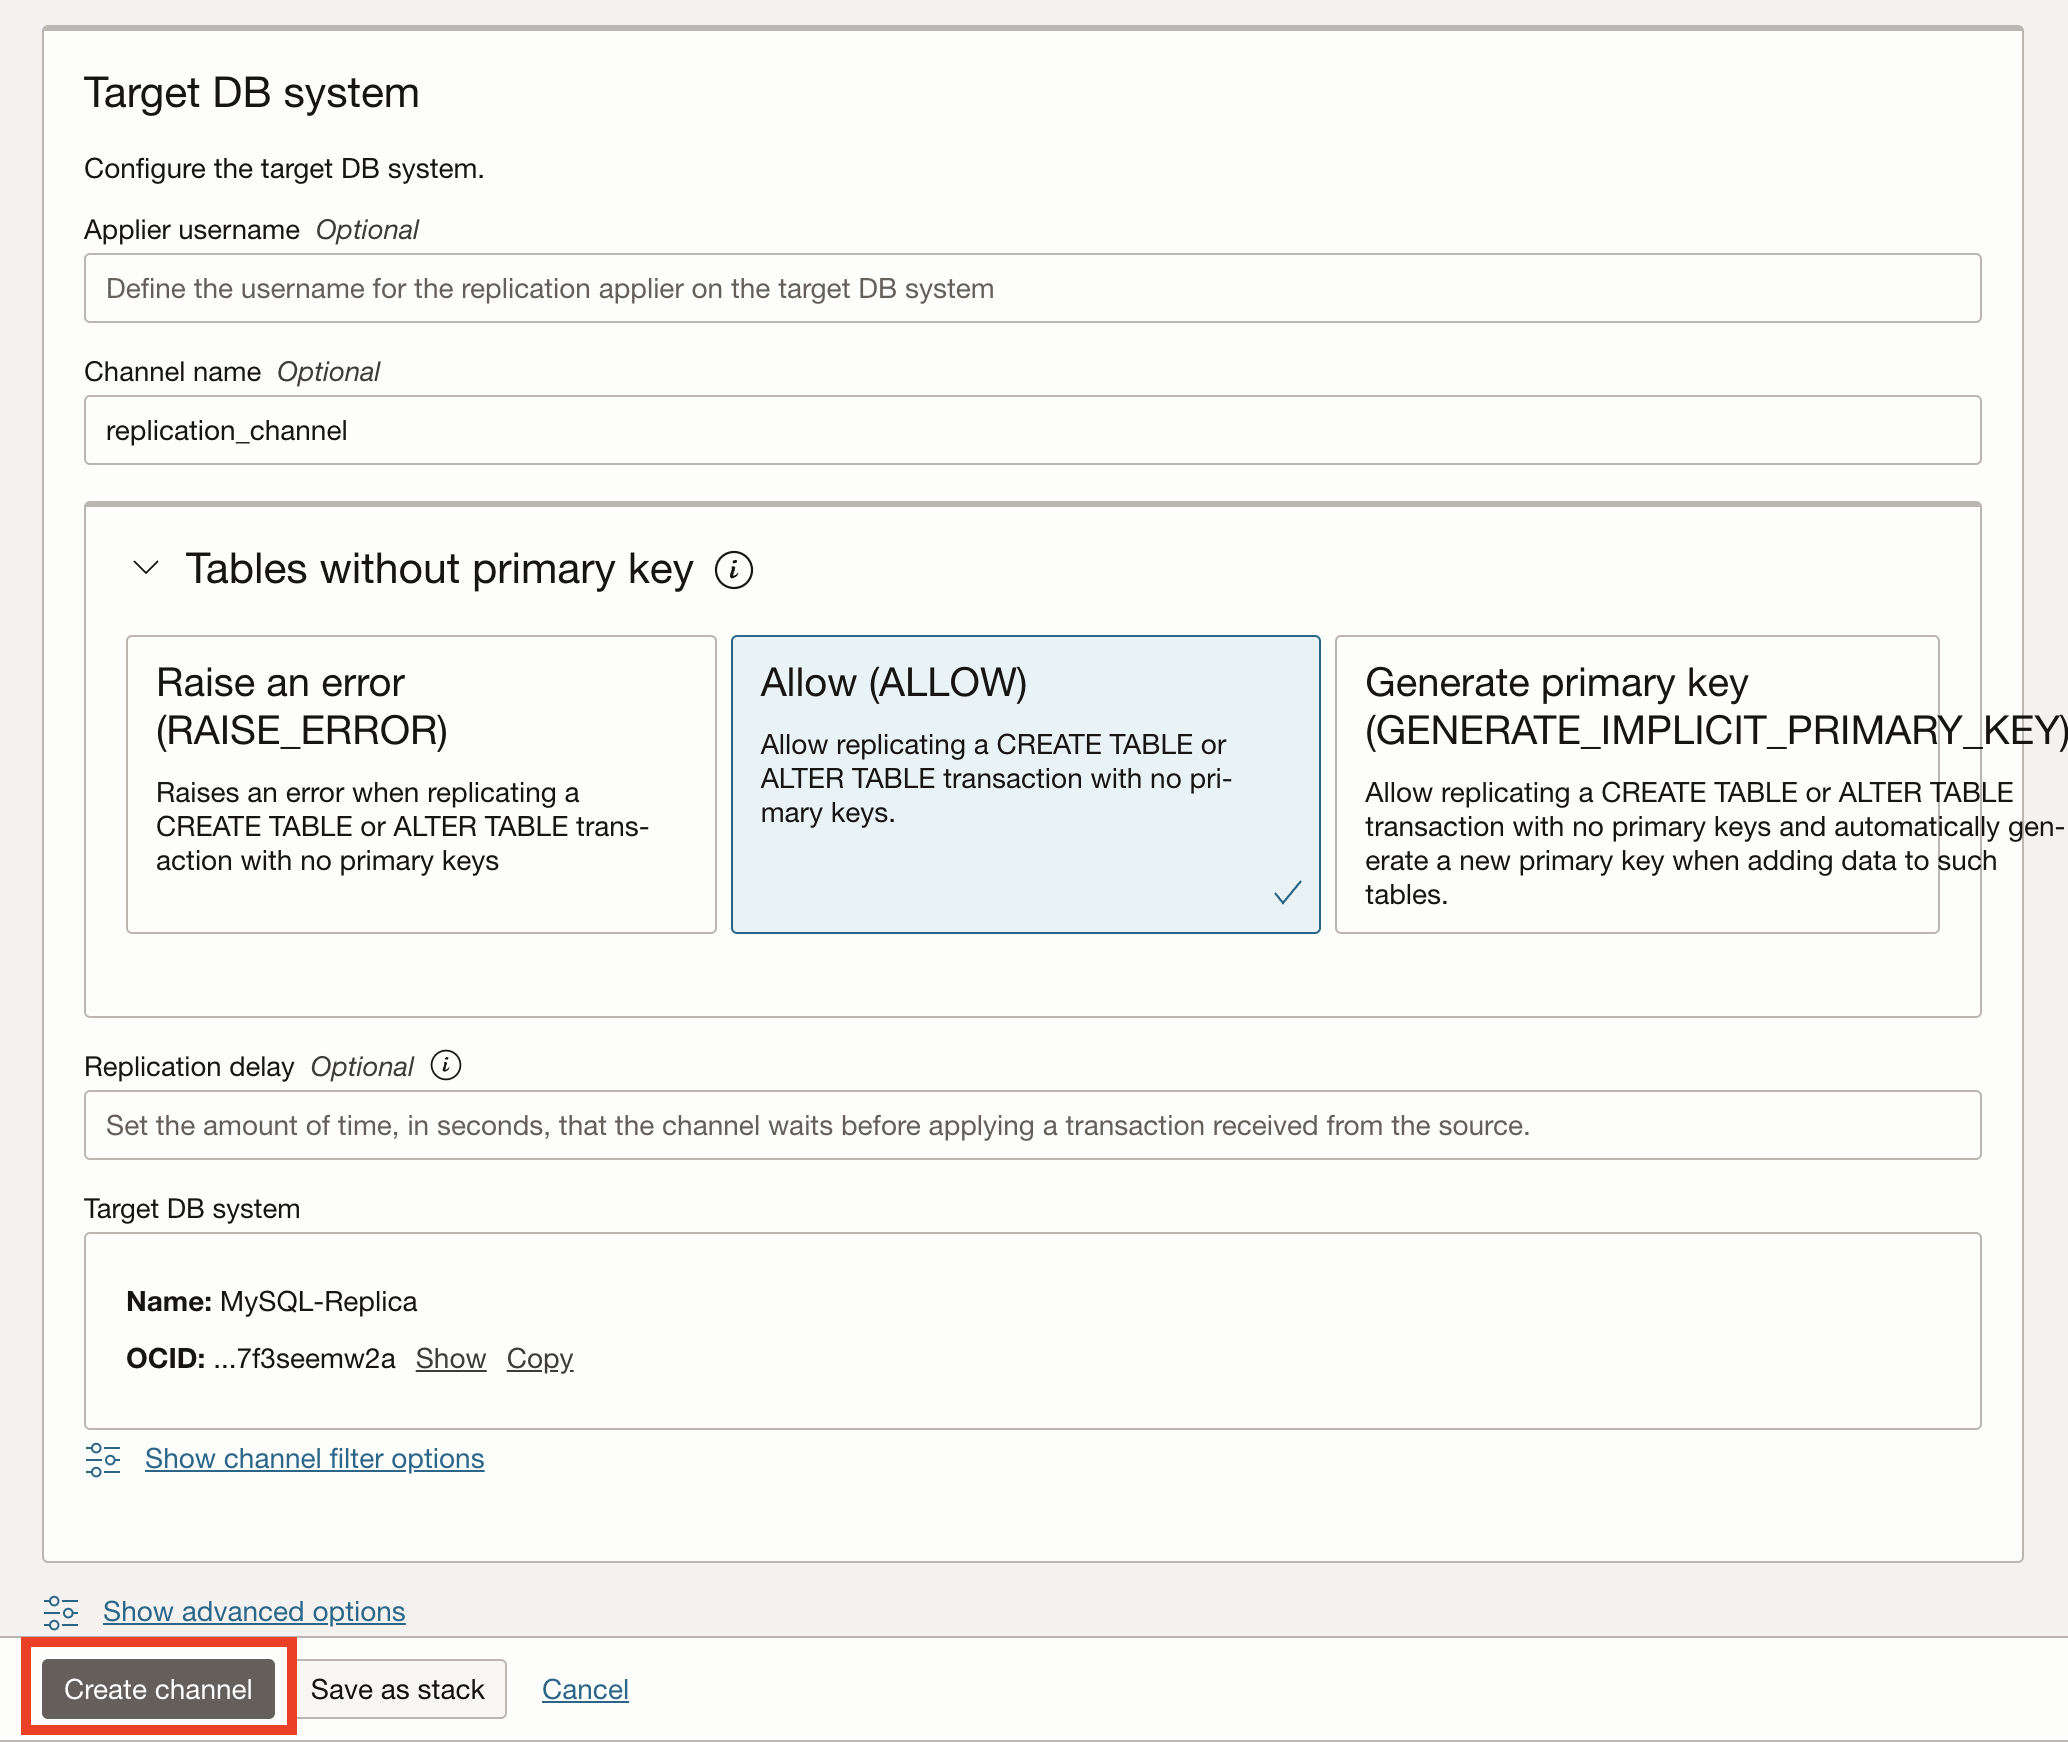
Figure 9. Create Channel
The channel will take some time to set up, and when it is complete, you should see the status set to ACTIVE, as shown in Figure 10.
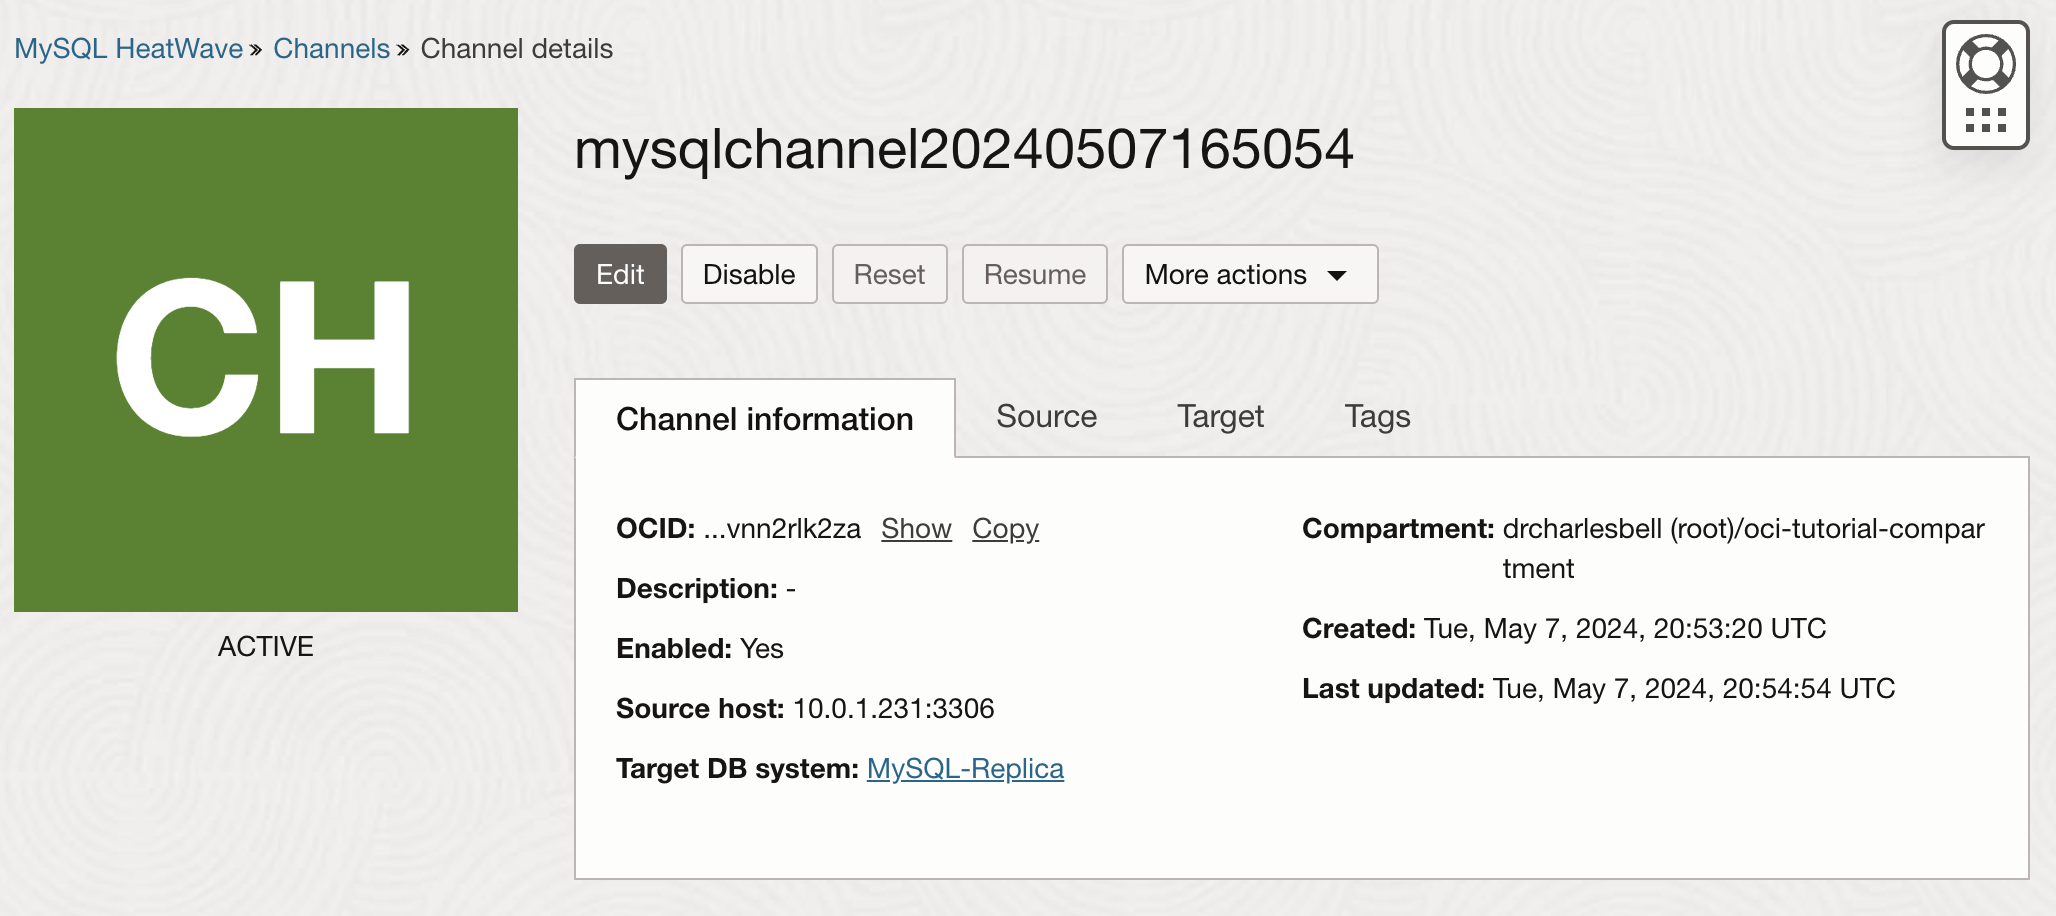
Figure 10. Channel Ready (channel details page)
Once the channel is Active, we’re done. You now have outbound replication working from one MHS DB system to another. Huzzah!
If you want to explore more, click on the tabs in the dialog to explore the channel details page, which contains information about the source and target. To stop a channel, click Disable, and to start it, click Enable. To restart an enabled channel that stopped due to errors, click Resume.
Tip: See Managing a Replication Channel for more details on working with disabled or failed channels.
If you see the state NEEDS ATTENTION, you may have a problem connecting to your on-premises MySQL server or transactions in the binary log that cannot be executed on the DB system. To check the replica state, connect to and log into the DB system with MySQL Shell and examine the Performance Schema Replication Tables as discussed in the online documentation.
To diagnose the problem, you can check the error messages, resolve those issues, and resume the channel from the channel details page.
Tip: For more details about using inbound replication in OCI, see. See the replication channels documentation for more information about configuring and using channels in MySQL server.
