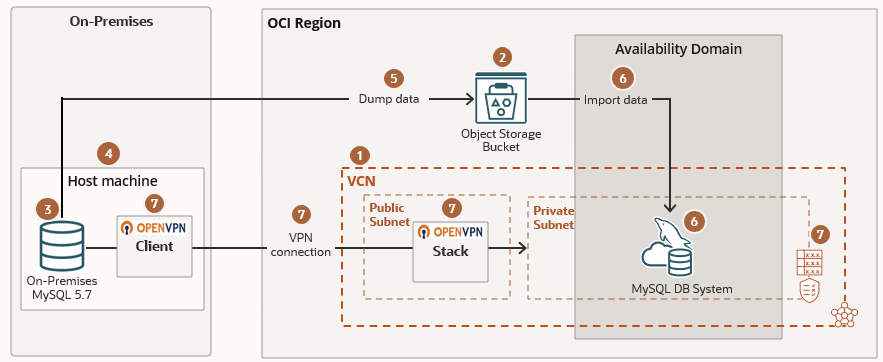
MySQL Database Service supports migrations from a live on-premises MySQL 5.7 database to a MySQL DB system on Oracle Cloud Infrastructure (OCI) in almost real-time using replication. Migrating the data in real time helps you achieve minimal downtime and verify that your live production data is all good. If you have not migrated to MySQL Database Service, it is high time to do so before MySQL 5.7 reaches its end of life in October 2023.
Here is an overview of steps you need to perform to migrate a live on-premises MySQL 5.7 database to MySQL Database Service:
- Create a virtual cloud network.
- Create an Object Storage bucket.
- Enable row-based binary log and GTID-based logging.
- Generate a configuration file and an API key.
- Dump the data from the on-premises MySQL 5.7 database to the Object Storage bucket.
- Create a DB system in MySQL Database Service and import data from the Object Storage bucket.
- Enable inbound replication.
- Create an OpenVPN Connection.
- Configure security lists and route tables in the Oracle Cloud Infrastructure VCN.
- Create a replication user on the on-premises MySQL 5.7 database.
- Create a replication channel.
Create a Virtual Cloud Network
A virtual cloud network is a software-defined network that you set up in the Oracle Cloud Infrastructure data centers.
Use the Console to create a virtual cloud network (VCN).
- Log in to your Oracle Cloud account. If you are a first time user, see Sign In for the First Time.
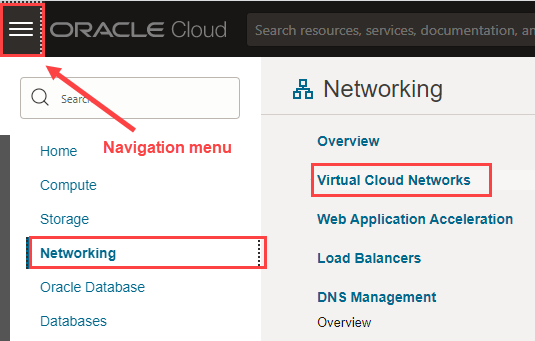
- Open the navigation menu, click Networking, and then click Virtual Cloud Networks.
- Click Start VCN Wizard.
- In the Start VCN Wizard dialog box, select Create VCN with Internet Connectivity, and then click Start VCN Wizard.
- In the Create a VCN with Internet Connectivity panel, enter a VCN Name, such as MyVCN, and for all other fields, accept the default values.
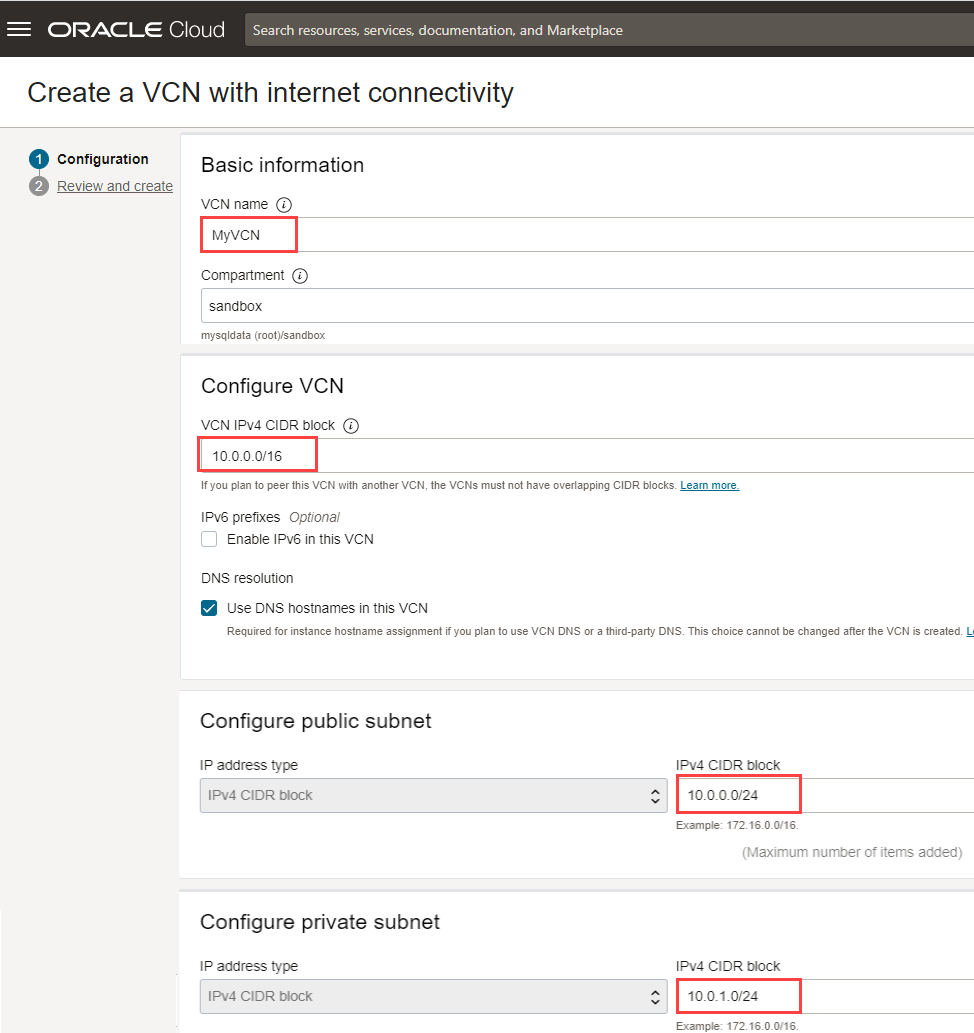
- Click Next, and then click Create.
- Click View Virtual Cloud Network.
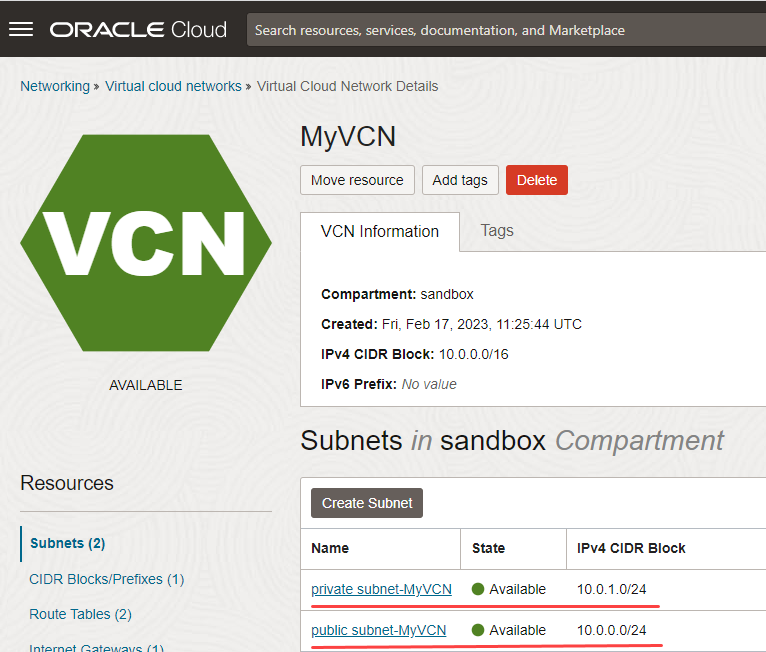
A virtual cloud network, MyVCN, is created. The VCN has a public subnet with IPv4 CIDR Block, 10.0.0.0/24, and a private subnet with IPv4 CIDR Block 10.0.1.0/24. We will configure the security lists and route tables of the VCN later.
Create an Object Storage Bucket
An Object Storage bucket is a logical container for storing data in a compartment. You will temporarily store the data from the on-premises MySQL 5.7 database in an Object Storage bucket before transferring it to a MySQL DB system.
Use the Console to create an Object Storage bucket.
- Log in to your Oracle Cloud account.
- Open the navigation menu, click Storage, and then click Buckets.
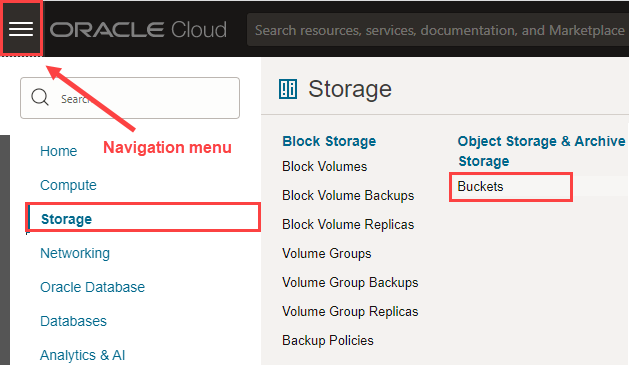
- Click Create Bucket.
- In the Create Bucket panel, enter a bucket name such as MySQLBucket, and for all other fields, accept the default values.
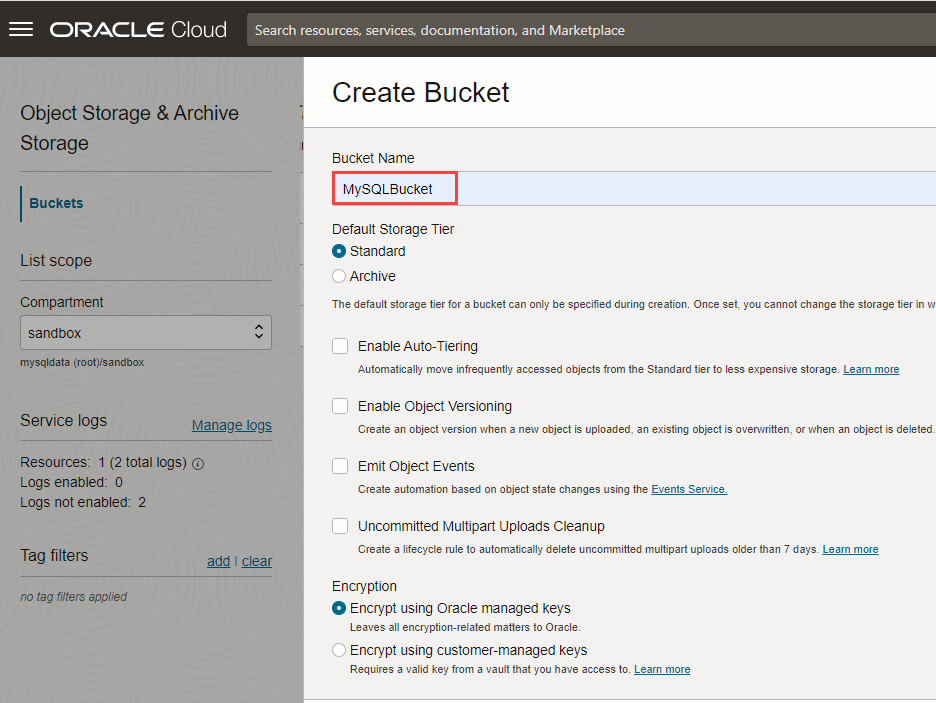
- Click Create.
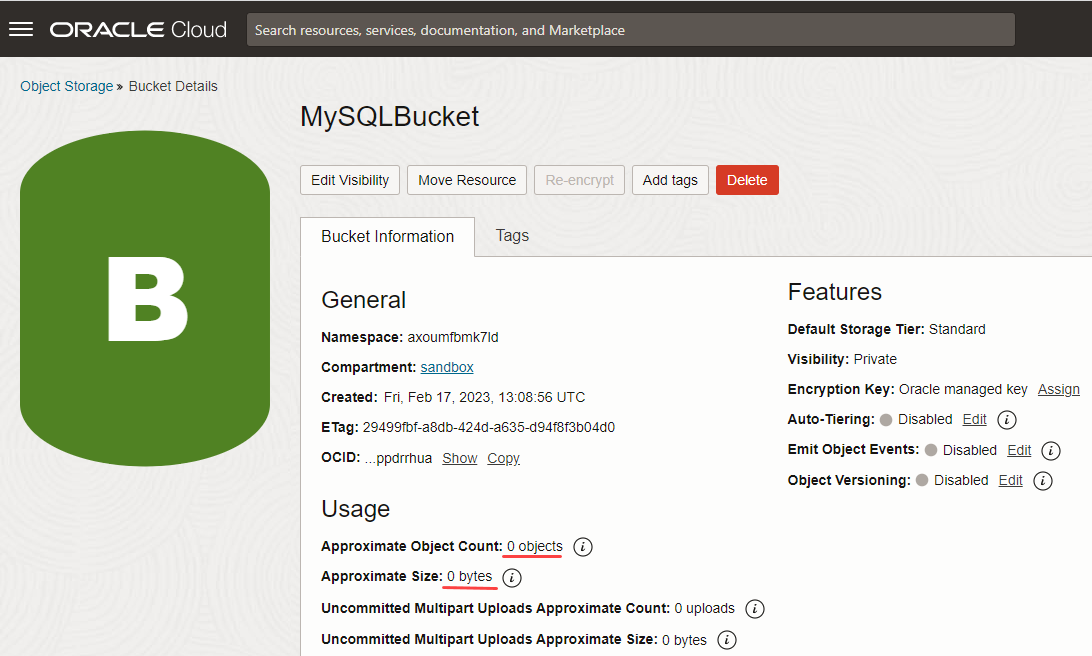
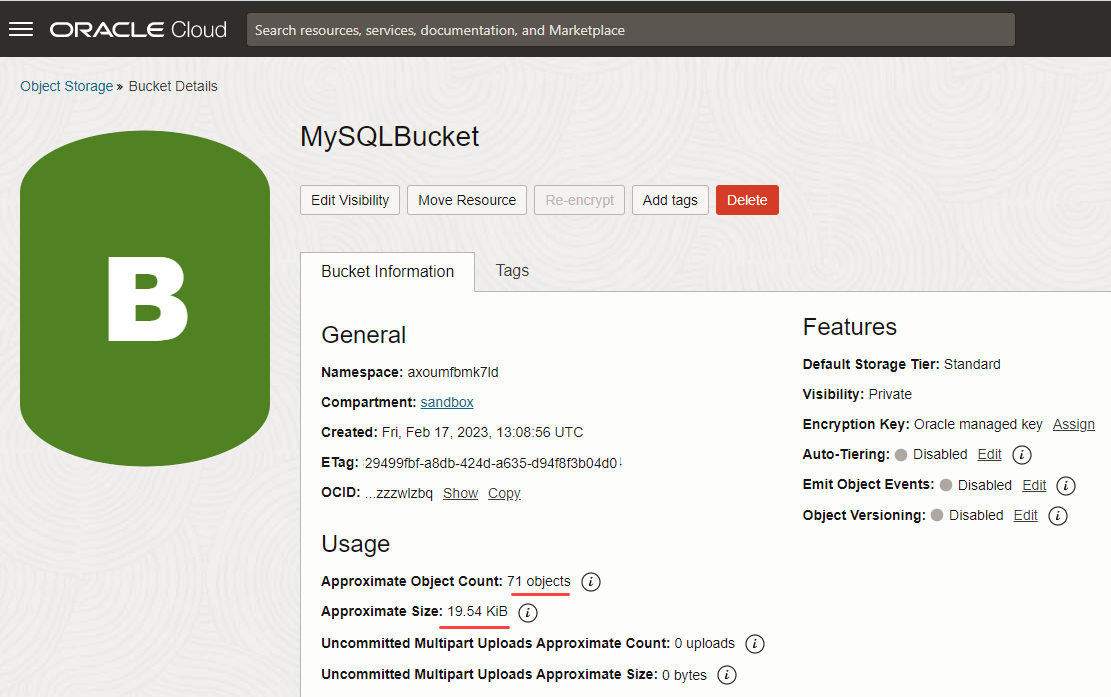
The bucket, MySQLBucket, is created, and you can see that there is no data in the bucket.
Enable Row-Based Binary Log and GTID-Based Logging
You need to enable row-based binary log and GTID-based logging on the on-premises MySQL 5.7 database for enabling inbound replication. Please note that MySQL Database Service allows inbound replication from a MySQL 5.7 database without GTIDs. See the Replication Positioning section in Creating a Replication Channel.
- Binary logs: A binary log on an on-premises MySQL 5.7 database provides a record of the data changes to be sent to MySQL Database Service. A binary log is required for replication. The on-premises MySQL 5.7 sends the events contained in its binary log to MySQL Database Service, which executes those events to make the same data changes that were made on the source.
- GTIDs: A global transaction identifier (GTID) is a unique identifier created and associated with each transaction committed on the server of origin (source). This identifier is unique not only to the server on which it originated, but is unique across all servers in a given replication setup. There is a 1-to-1 mapping between all transactions and all GTIDs. Enabling GTID-based logging on MySQL databases enables you to replicate MySQL databases that are live, that is, in production. (By default, GTID-based logging is disabled).
Use a terminal or command prompt on your host machine to enable row-based binary log and GTID-based logging.
- Open a terminal or command prompt on your host machine where you have the on-premises MySQL 5.7 database.
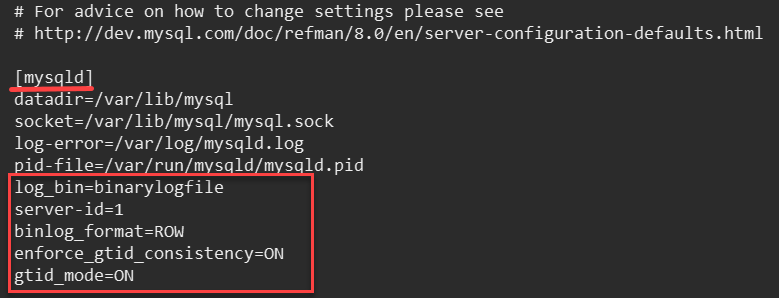
- Open the configuration file, my.cnf:
- Include the following statement in the configuration file, my.cnf, under [mysqld], and specify the name of the binary log file such as binarylogfile.
server-id=1
binlog_format=ROW
enforce_gtid_consistency=ON
gtid_mode=ON
- Save the configuration file.
- Restart the on-premises MySQL 5.7 database:
- Log in to the on-premises MySQL 5.7 database using MySQL Shell:
In case you do not have MySQL Shell installed, see Installing MySQL Shell.
- Switch to SQL mode:
- Check the value of the binary logs:
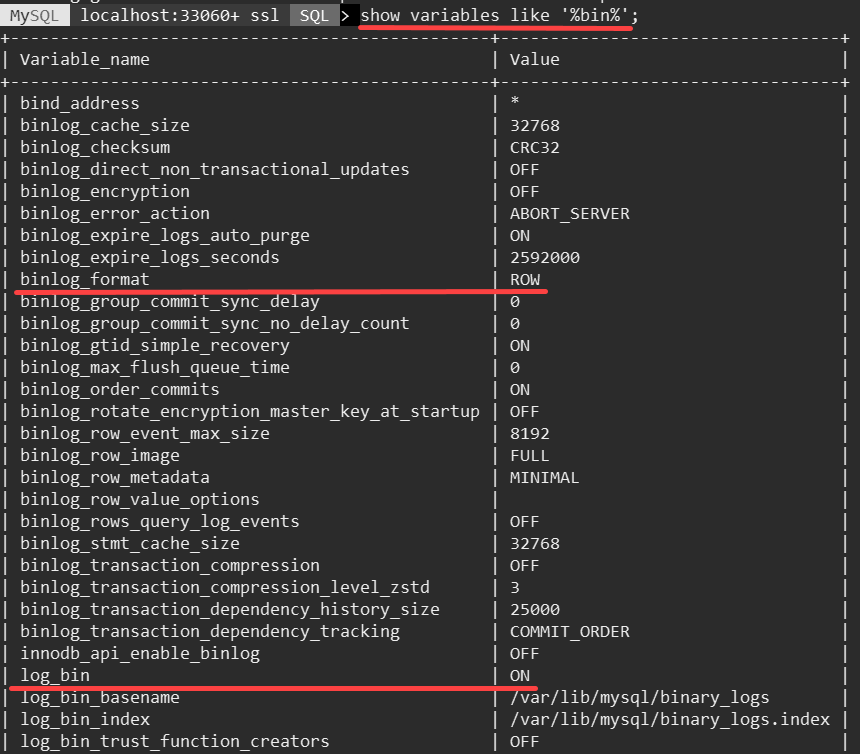
Binary logs are enabled, and the format is set to ROW on the on-premises MySQL 5.7 database.
- Check the GTID status:
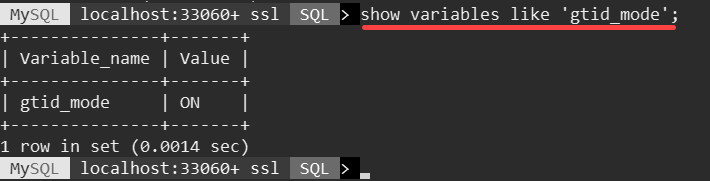
GTID-based logging is enabled on the on-premises MySQL 5.7 database.
Generate a Configuration File and an API Key
After configuring the on-premises MySQL 5.7 database, let us now configure Oracle Cloud Infrastructure. You need the following to connect to the Oracle Cloud Infrastructure.
- Configuration file: The default file name and location of the configuration file is ~/.oci/config. It contains the user, fingerprint, tenancy, region, and key_file details.
- RSA key pair: The RSA key pair is a private key and public key that is in PEM format. It is not the SSH key. Store the generated RSA private key in the ~/.oci/ directory.
Use the Console to generate a configuration file and an API key.
- Log in to your Oracle Cloud account.
- Open the navigation menu, click Identity & Security, and then under Identity, click Users.
- From the list of users, click your username to open the User Details page.
- Under Resources, click API Keys, and then click Add API Key.
- Select Generate API Key Pair.
- Click Download Private Key. A oracleidentitycloudservice_<user_details>.pem key file is downloaded on your host machine.
- Click Add.
- Copy the configuration file details by clicking Copy.

- Open a terminal or a command prompt on your host machine.
- Create a folder, .oci, in the home directory:
- Create a configuration file, config, in the .oci directory:
- Paste the configuration file details, which you copied in step 8, in the configuration file.
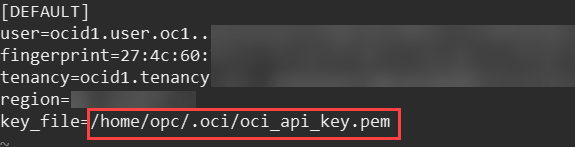
- Update the full path of the key_file to the location where you want to store the API key:
- Open the downloaded key file in step 6, oracleidentitycloudservice_<user_details>.pem, using any text editor.
- Copy the contents of the key file.
- Create a new API key file, oci_api_key.pem, in the location you specified in step 13:
- Paste the contents of the key file, which you copied in step 15, in the oci_api_key.pem file.
- Save and close the oci_api_key.pem file.
You have created a configuration file, config, and an API key file, oci_api_key.pem, at ~/.oci/ directory.
Dump the Data From the On-premises MySQL 5.7 Database to the Object Storage Bucket
Use MySQL Shell to dump the data from the on-premises MySQL 5.7 database to the Object Storage bucket, MySQLBucket.
- Open a terminal or a command prompt on your host machine.
- Log in to the MySQL Server using MySQL Shell:
- In case you are not in the JavaScript (JS) mode, switch to JS mode:
- (Optional) Run the upgrade checker utility to verify whether MySQL server instances are ready for upgrade to the latest version:
For more information, see Upgrade Checker Utility.
- Dump the data from the on-premises MySQL 5.7 database to the Object Storage bucket using the instance dump utility. To learn more about the utility, see Instance Dump Utility.
For example:
Here, the bucket prefix is MySQL, and the bucket name is MySQLBucket. To learn more about the options, see Options for MySQL Database Service and Oracle Cloud Infrastructure.
The data is dumped from the on-premises MySQL 5.7 database to the Object Storage bucket.
Create a MySQL DB system and Import Data
Use the Console to create a MySQL DB system and import data from the Object Storage bucket, MySQLBucket. While creating a DB system, configure the fields specified below, and for all other fields, accept the default values. To learn more about the fields, see Creating a DB System.
- Open the navigation menu, and select Databases. Under MySQL, click DB Systems.
- Click Create DB System.
- Select Development or testing.
- Enter the following information in the Provide DB System information section:
- Name: Specify a display name for the DB system, such as MyDBSystem.
- Select the type of the DB system: Standalone.
- Enter the following information in Create Administrator credentials to create an administrator for the DB system:
- Username: Specify the administrator username
- Password: Specify the administrator password.
- Confirm Password: Confirm the administrator password.
Note the username and password as you need them when you connect to the DB system.
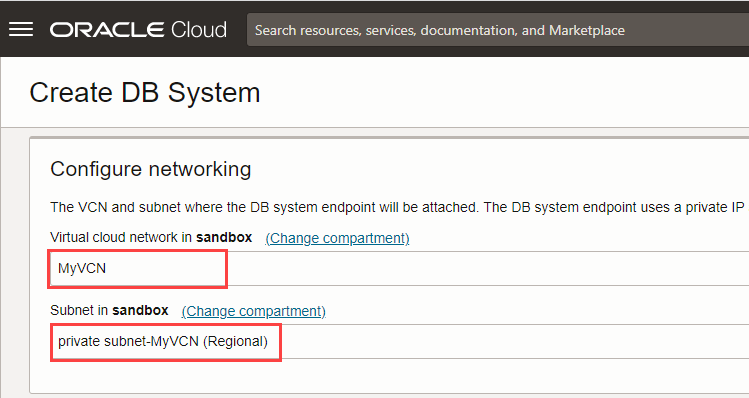
- Select the following in the Configure networking section:
- Virtual cloud network: Select the VCN that you created earlier, MyVCN.
- Subnet: Select the private subnet of the VCN.
- Select the following in the Configure hardware section:
- Select a shape: Select a shape. For example, MySQL.VM.Standard.E3.1.8GB. To learn more about shapes, see Supported Shapes.
- Data storage size: Specify storage for all data and log files.
- Under Advanced Options, click Data Import tab, and then click Click here to create a PAR URL for an existing bucket.
- In the Create PAR for existing bucket panel, select the bucket that you earlier created, MySQLBucket, and the Prefix, MySQL.

- Click Create and set PAR URL.
- Click Create.
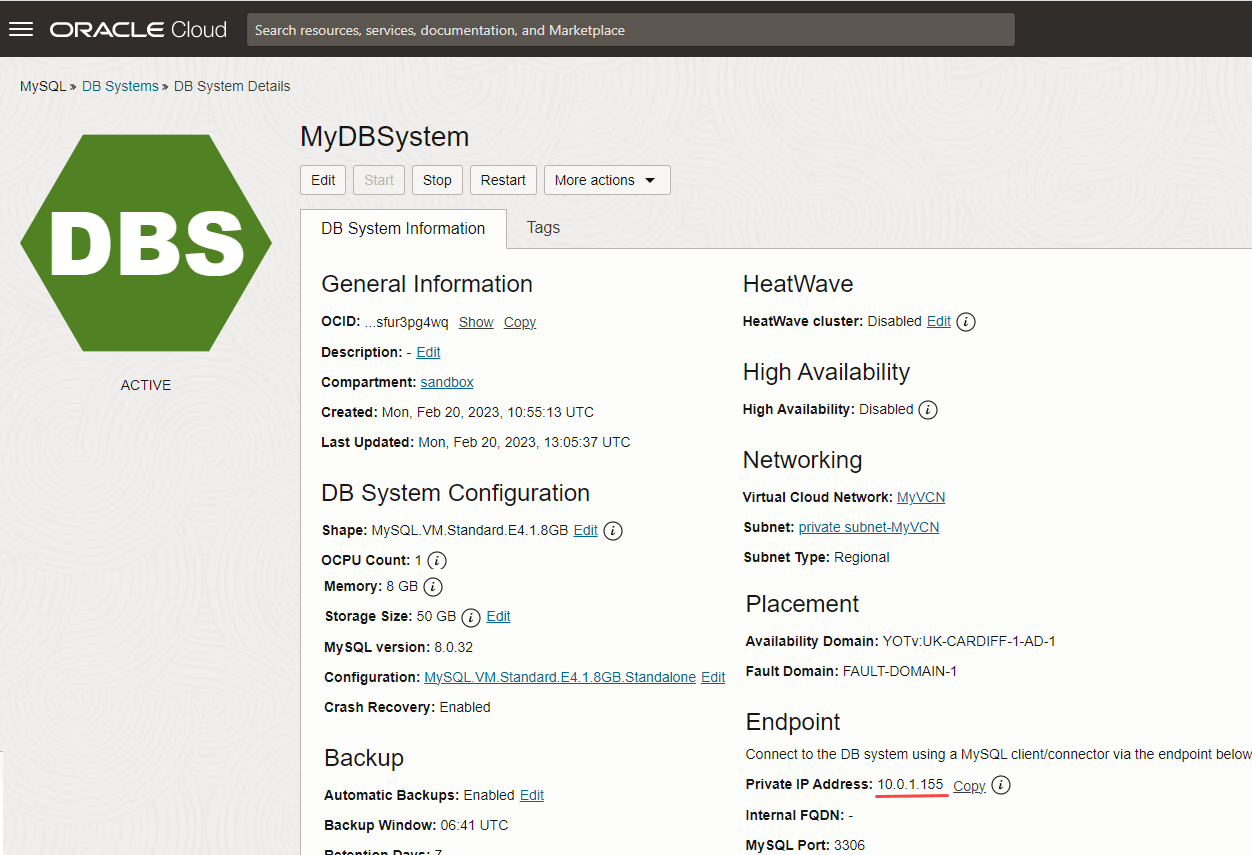
You have created the DB system, MyDBSystem, on the private subnet, and data is imported from the Object Storage bucket.
Note the Private IP Address of the DB system.
Enable Inbound Replication
You now need to enable inbound replication to copy transactions from the on-premises MySQL 5.7 to the MySQL DB system.
Here is an overview of steps you need to perform to enable inbound replication.
- Create an OpenVPN connection.
- Configure security lists and route tables in the Oracle Cloud Infrastructure VCN.
- Create a replication user on the on-premises MySQL 5.7 database.
- Create a replication channel.
Create an OpenVPN Connection
You need an additional network to bridge the local network and the VCN to which the DB system is attached. Create and configure an OpenVPN Access Server to establish a connection between your on-premises MySQL 5.7 database and Oracle Cloud Infrastructure.
Here is an overview of steps you need to perform to create the OpenVPN connection:
- Create an OpenVPN Access Server.
- Configure the OpenVPN Access Server.
- Establish an OpenVPN Connection.
Create an OpenVPN Access Server
Use the Console to create an OpenVPN Access Server.
- Log in to your Oracle Cloud account.
- Open the navigation menu, click Networking, and then under Customer Connectivity, click Site-to-Site VPN.
- In the Site-to-Site VPN page, click Marketplace solution.

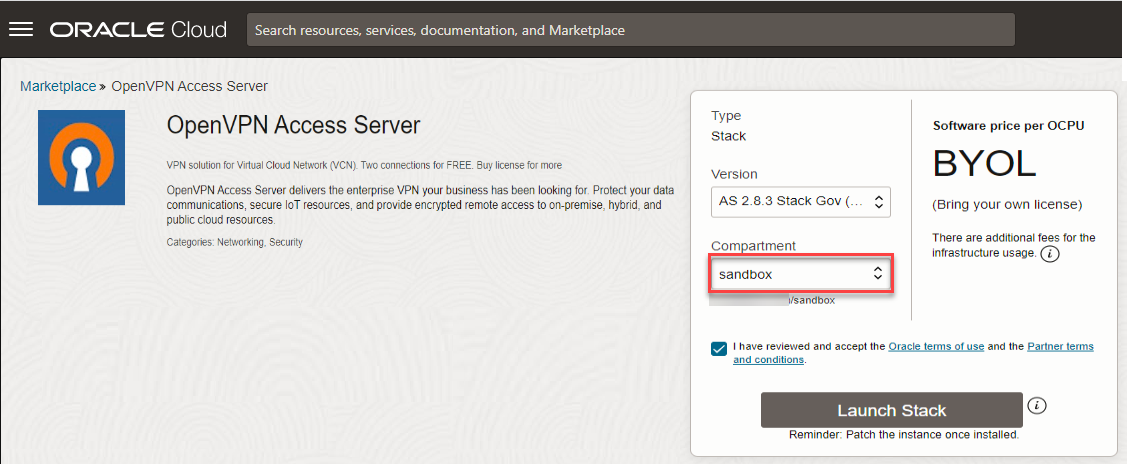
- In the OpenVPN Access Server page, select the compartment where your resources such as VCN and Object Storage bucket are present, and click Launch Stack.
- In the Stack Information panel, accept the default values, and click Next.
- In the Configure variables panel, under Compute Configuration, select any Compute Shape.
- Under Application Configuration, enter an Administrator Username and Administrator Password.
Note the Administrator Username and Administrator Password for the OpenVPN connection.

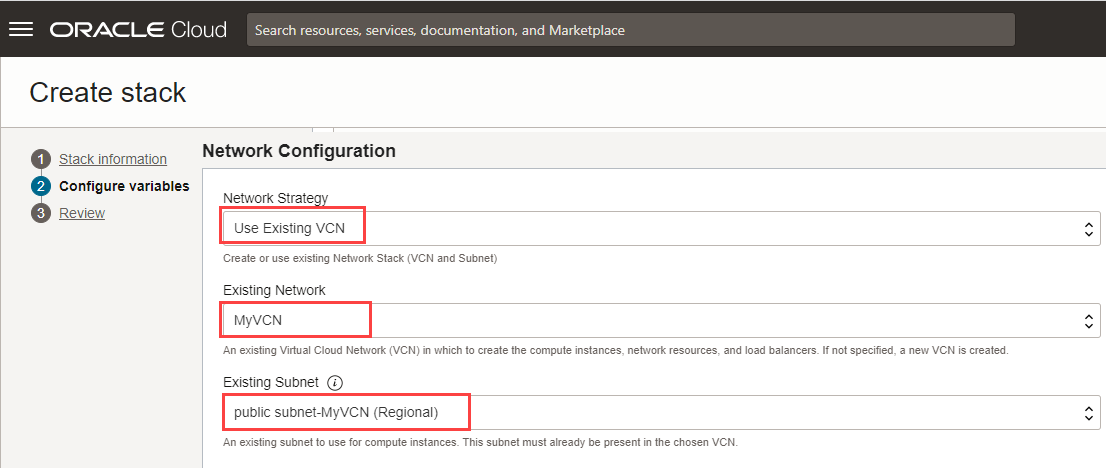
- Under Network Configuration, select the following:
- Network Strategy: Select Use Existing VCN.
- Existing Network: Select the VCN you created earlier, MyVCN.
- Existing Subnet: Select the public subnet, Public Subnet- MyVCN.
- Under Additional Configuration, select the Compartment in which your resources lie.
- Click Next.
- Click Create.
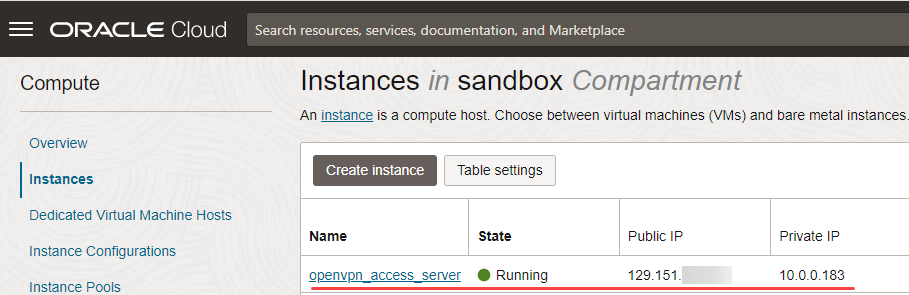
You have created an OpenVPN Access Server. To view the OpenVPN Access Server details, open the navigation menu, click Compute, and under Compute, click Instances.
Note the Public and Private IP of the OpenVPN Access Server.
Configure the OpenVPN Access Server
Configure the OpenVPN Access Server to route traffic to the DB system. It includes configuring static IP addresses, routing instead of NAT, and creating and configuring a VPN user.
Use a web browser to configure the OpenVPN Access Server.
- Enter the public IP of the OpenVPN Access Server in a web browser:
For example, the public IP of my OpenVPN Access Server is 129.151.xx.xxx, hence I enter the following:
- Enter the Administrator Username and Administrator Password, which you had created in step 7 in the Create an OpenVPN Access Server section.
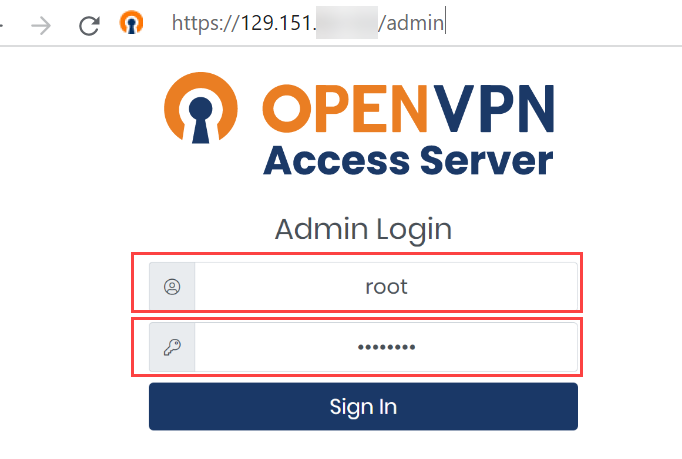
- Click Agree to accept the OpenVPN Access Server End User License Agreement.
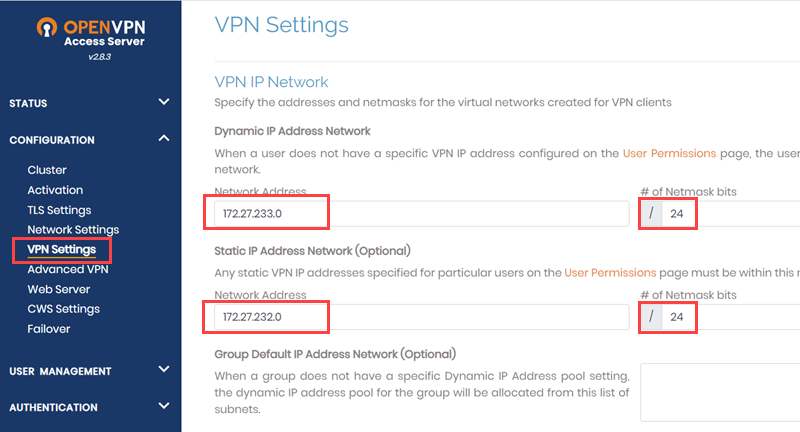
- In the OpenVPN Access Server page, click CONFIGURATION, and then click VPN Settings.
- Under VPN IP Network, enter the following values:
- Dynamic IP Address Network:
- Network Address: Specify 172.27.233.0
- # of Netmask bits: Specify 24.
- Static IP Address Network:
- Network Address: Specify 172.27.232.0
- # of Netmask bits: Specify 24.
- Under Routing, enter the following values:
- Select Yes, using routing, and specify the IP address of your public and private subnets, 10.0.0.0/24 and 10.0.1.0/24.
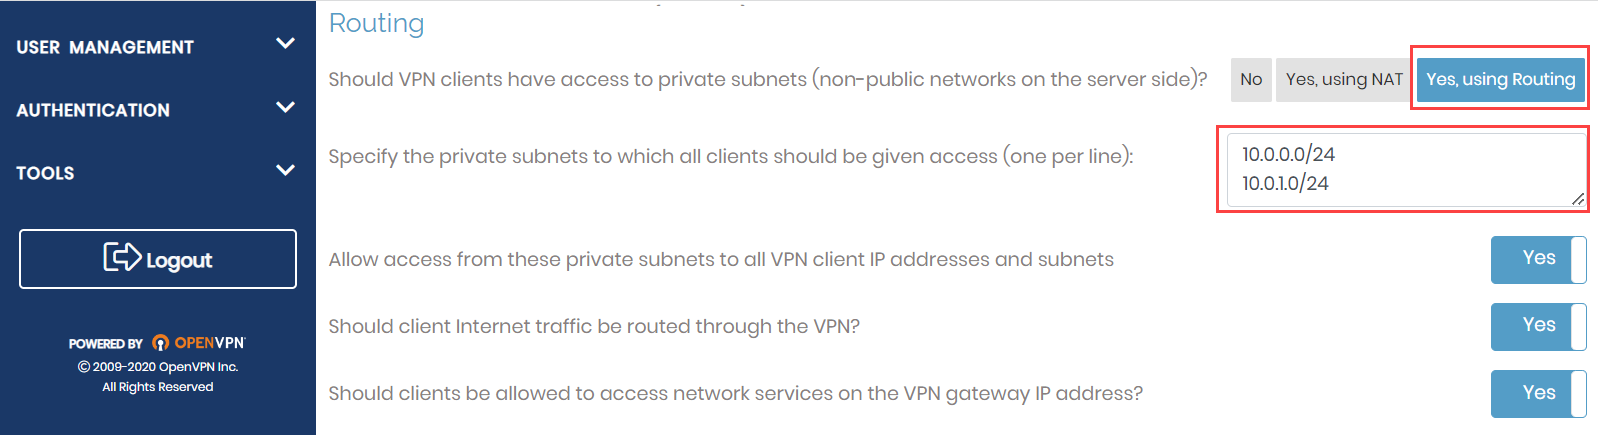
- Click Save Settings.
- Click USER MANAGEMENT, and then click User Permissions.
- Under Username, enter a new username, and click More Settings icon.
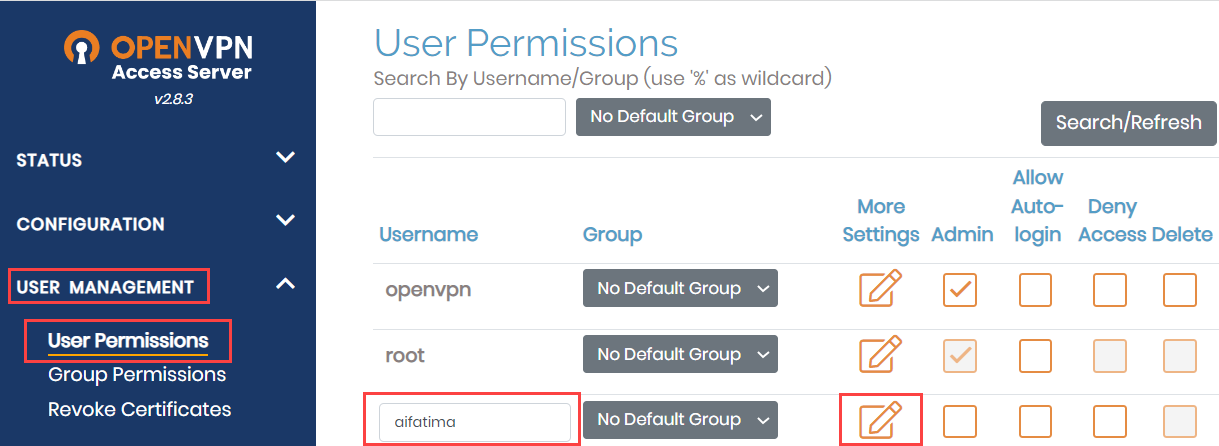
- Enter the following information, and accept the default values in other fields:
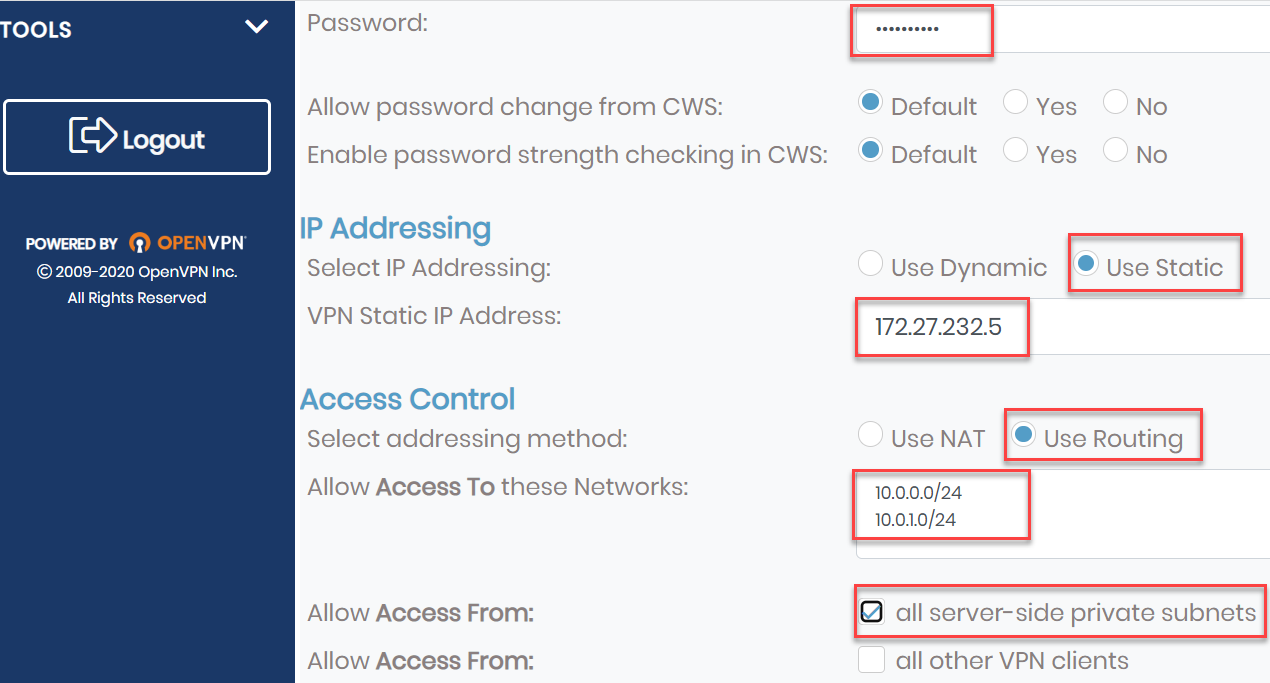
- Password: Enter a password for the username you created in step 9.
- IP Addressing: Select Use Static and provide a VPN Static IP Address in the range 172.27.232.2 – 172.27.232.254. For example, I have specified 172.27.232.5.
- Access Control: Select Use Routing addressing method, and provide the public and private subnet of the VCN you created earlier, that is, 10.0.0.0/24 and 10.0.1.0/24.
- Allow Access From: Select all server-side private subnets.
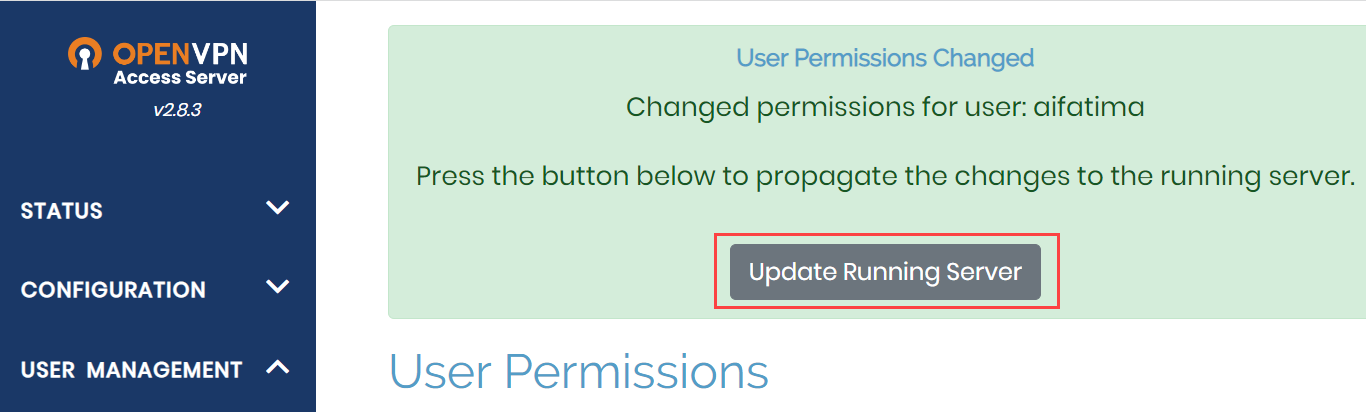
- Click Save Settings.
- Click Update Running Server to propagate the changes to the running server.
You have now configured the OpenVPN Access Server.
Establish an OpenVPN Connection
To establish an OpenVPN connection, you first have to download the client configuration file and then use a terminal or command prompt to establish the connection between your on-premises MySQL and Oracle Cloud Infrastructure.
- In a web browser, enter the following:
For example, the public IP of my OpenVPN Access Server is 129.151.xx.xxx, hence I enter the following:
- Enter the username and password you created in step 9 and 10 in the Configure the OpenVPN Access Server section.
- Click Yourself (user-locked profile). The client configuration file, client.ovpn, gets downloaded.

- Open a terminal or command prompt on your host machine.
- Install OpenVPN client:
- Copy the client configuration file, client.ovpn, in /etc/openvpn/client/, and call it client.conf:
- Start the OpenVPN client:
- Enter the username and password, which you created in step 9 and 10 in the Configure the OpenVPN Access Server section.
- Verify that the VPN connection is established:
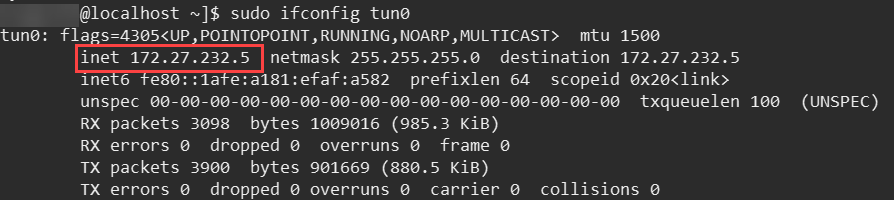
The IP address, 172.27.232.5, is the IP address of the OpenVPN Client, which you specified in step 10 in the Configure the OpenVPN Access Server section.
You have now established an OpenVPN connection between the on-premises MySQL 5.7 database and Oracle Cloud Infrastructure.
Configure Security Lists and Route Tables in the VCN
After you have established an OpenVPN connection, you need to configure security lists and route tables in the VCN to allow traffic from the OpenVPN network.
- Route Tables: Create route tables to allow the DB system to connect to the on-premise MySQL 5.7 database through the OpenVPN stack that is running on the public subnet.
- Security Lists: A security list acts as a virtual firewall at the subnet level. The security lists have ingress and egress rules that specify the types of traffic allowed in and out of the subnet.
- Security List for Private Subnet-<VCN> – Configure this list to allow traffic from the MySQL client applications running on your on-premises OpenVPN network to connect to the MySQL DB system in the private subnet.
- Default Security List for <VCN> – Configure this list to allow traffic from the MySQL DB system on the private subnet to connect to the on-premises MySQL 5.7 database using the OpenVPN network.
Use the Console to configure security lists and route tables in the VCN.
- Open the navigation menu, select Networking, and then select Virtual Cloud Networks.
- Select your compartment from the List Scope.
- From the list of VCNs, click the name of the VCN, MyVCN, to open the Virtual Cloud Network Details page.
- Click Security Lists.
- Create route tables:
- Under Resources, click Route Tables.
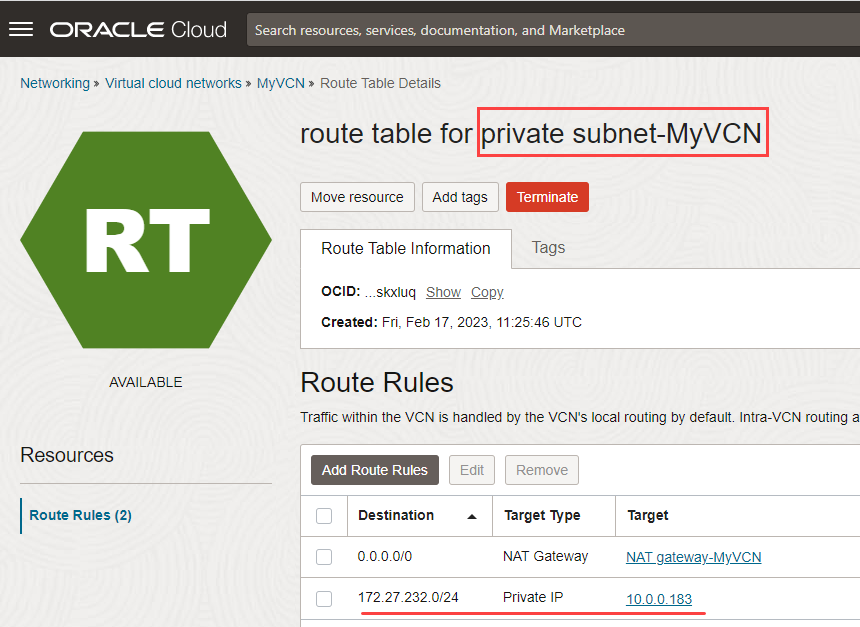
- Click Route Table for Private Subnet-MyVCN.
- Click Add Route Rules.
- In the Add Route Rules panel, add the following information:
- Target Type: Select Private IP.
- Destination Type: Select CIDR Block.
- Destination CIDR Block: Enter the IP address of your OpenVPN client, 172.27.232.0/24.
- Target Selection: Enter the Private IP of the OpenVPN Access Server, in my case it is 10.0.0.183.
- Click Add Route Rules.
-
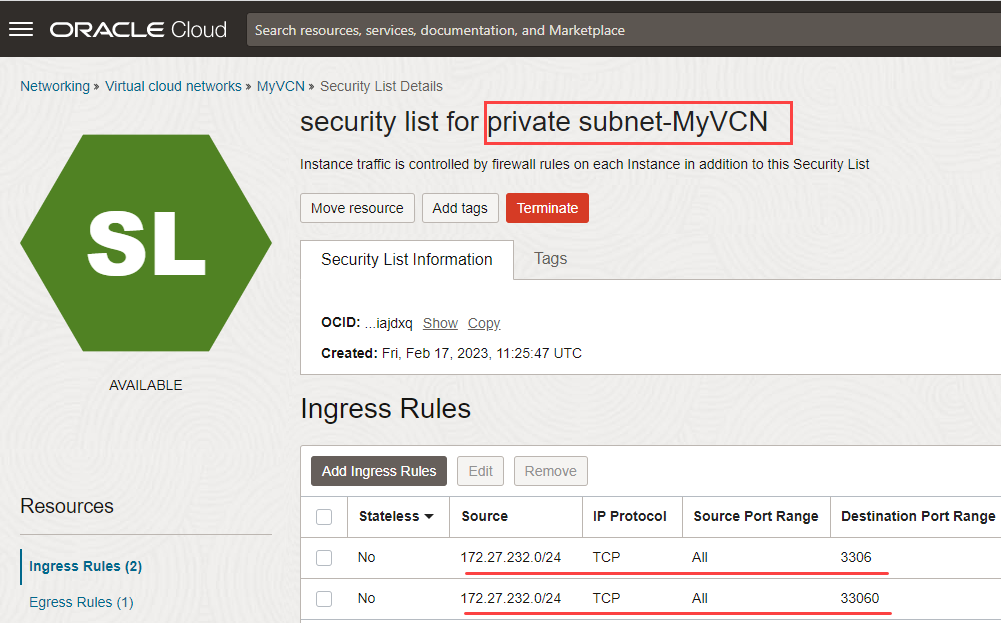
Add ingress rules to the private subnet:
- Click Security List for Private Subnet-MyVCN.
- Click Add Ingress Rules to add ingress rules for destination ports 3306 and 33060.
- In the Add Ingress Rules panel, specify the following:
- Source CIDR: Specify the IP address of your OpenVPN client, 172.27.232.0/24.
- IP Protocol: Select TCP.
- Destination Port range: Enter the destination ports 3306,33060 (without spaces).
- Click Add Ingress Rules.
- Add ingress rules to the public subnet:
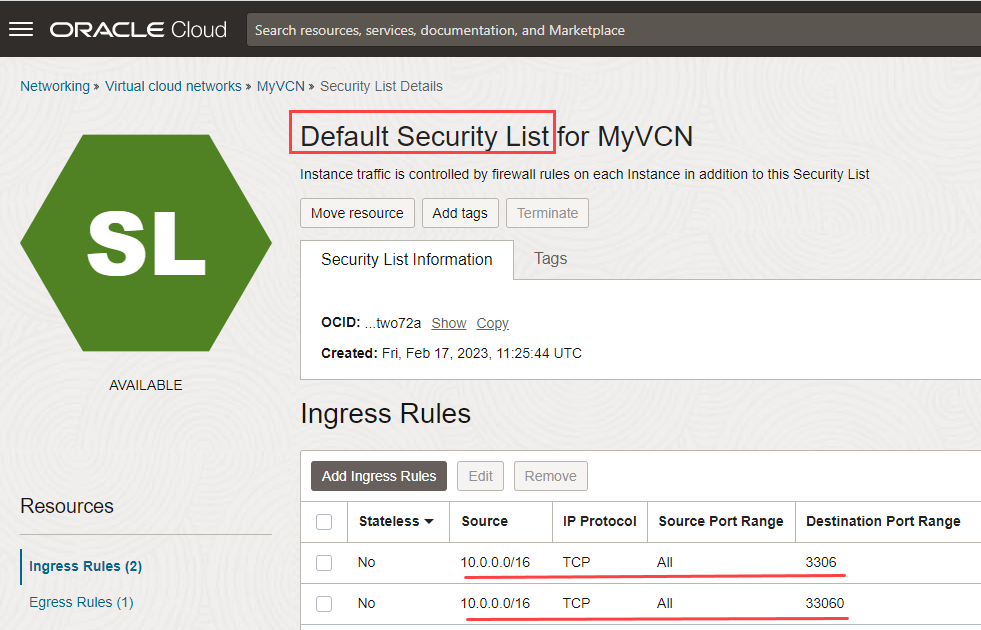
- Under Security Lists, click Default Security List for MyVCN.
- Click Add Ingress Rules to add ingress rules for destination ports 3306 and 33060.
- In the Add Ingress Rules panel, specify the following:
- Source CIDR: Specify the IP address of the IPv4 CIDR Block of the VCN, 10.0.0.0/16.
- IP Protocol: Select TCP.
- Destination Port range: Enter the destination ports 3306,33060 (without spaces).
- Click Add Ingress Rules.
You have now configured the private and public security lists and route tables of the VCN to allow traffic from the OpenVPN network to the Oracle Cloud Infrastructure and vice versa.
Create a Replication User on the On-premises MySQL 5.7 Database
Create a replication user on the source server with the required privileges. The DB system uses this user account to communicate with the on-premises MySQL 5.7 database.
- Open a terminal or command prompt on your host machine where you have the on-premises MySQL 5.7 database.
- Log in to the on-premises MySQL 5.7 database using MySQL Shell:
- Switch to SQL mode
- Create a user dedicated for replication, repluser:
- Grant the REPLICATION SLAVE privilege to the new replication user, repluser:
You have created a replication user, repluser, with the required privileges.
Create a Replication Channel
A replication channel connects the on-premises MySQL 5.7 database to the DB system and copies data from the source to the replica.
- Log in to your Oracle Cloud account.
- Click the navigation menu, click Databases, and then click Channels.
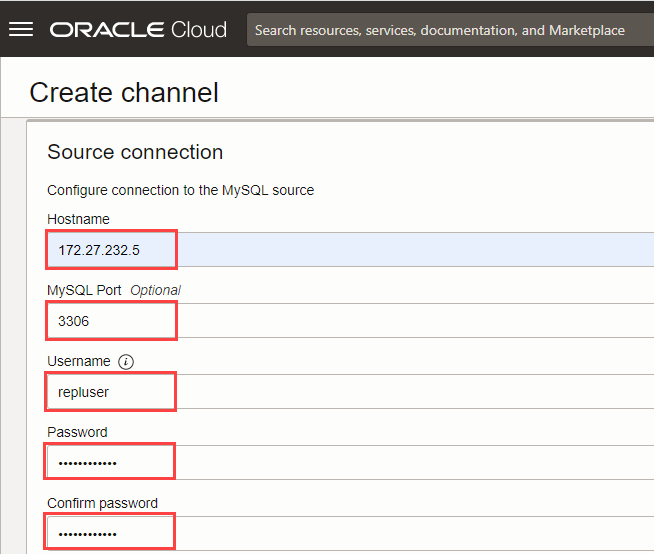
- Click Create channel.
- In Source Connection, specify the following details:
- Hostname: Specify the IP address of the OpenVPN client, 172.27.232.5. See step 8 in the Establish an OpenVPN Connection section.
- MySQL Port: Specify the default value, 3306.
- Username: Specify the replication user, repluser, which you created in the Create a Replication User on the On-premises MySQL 5.7 Database section.
- Password: Specify the same password you have specified while creating the replication user.
- In the SSL mode, select REQUIRED.
- In Replication positioning, select Source can use GTID auto-positioning.
- In Target DB system, click Select DB system, and select the DB system you created earlier, MyDBSystem.
- Click Create channel.
A replication channel from the on-premises MySQL 5.7 database to the DB system is created. In case you come across any error while creating a replication channel, refer to the blog by my colleague, Frederic Descamps: MySQL HeatWave Database Service inbound replication channel troubleshooting guide.
Conclusion
MySQL Database Service provides you a highly flexible, scalable, and secure environment with unmatched performance. Migrate your on-premises MySQL 5.7 database to MySQL Database Service with almost zero downtime and get these benefits now!