Deploying MySQL InnoDB ClusterSet across multiple Kubernetes clusters is a complex challenge. While the MySQL Operator for Kubernetes can manage a MySQL InnoDB Cluster within a single Kubernetes cluster, deploying an InnoDB ClusterSet across multiple clusters requires cross-cluster communication, which is not yet supported by the current MySQL Operator release.
This is where Cilium comes into play. Cilium offers a powerful solution by utilizing its advanced networking capabilities to enable secure and efficient cross-cluster communication. By integrating Cilium, you benefit from native Kubernetes support, simplified management, and enhanced performance for stateful applications like MySQL.
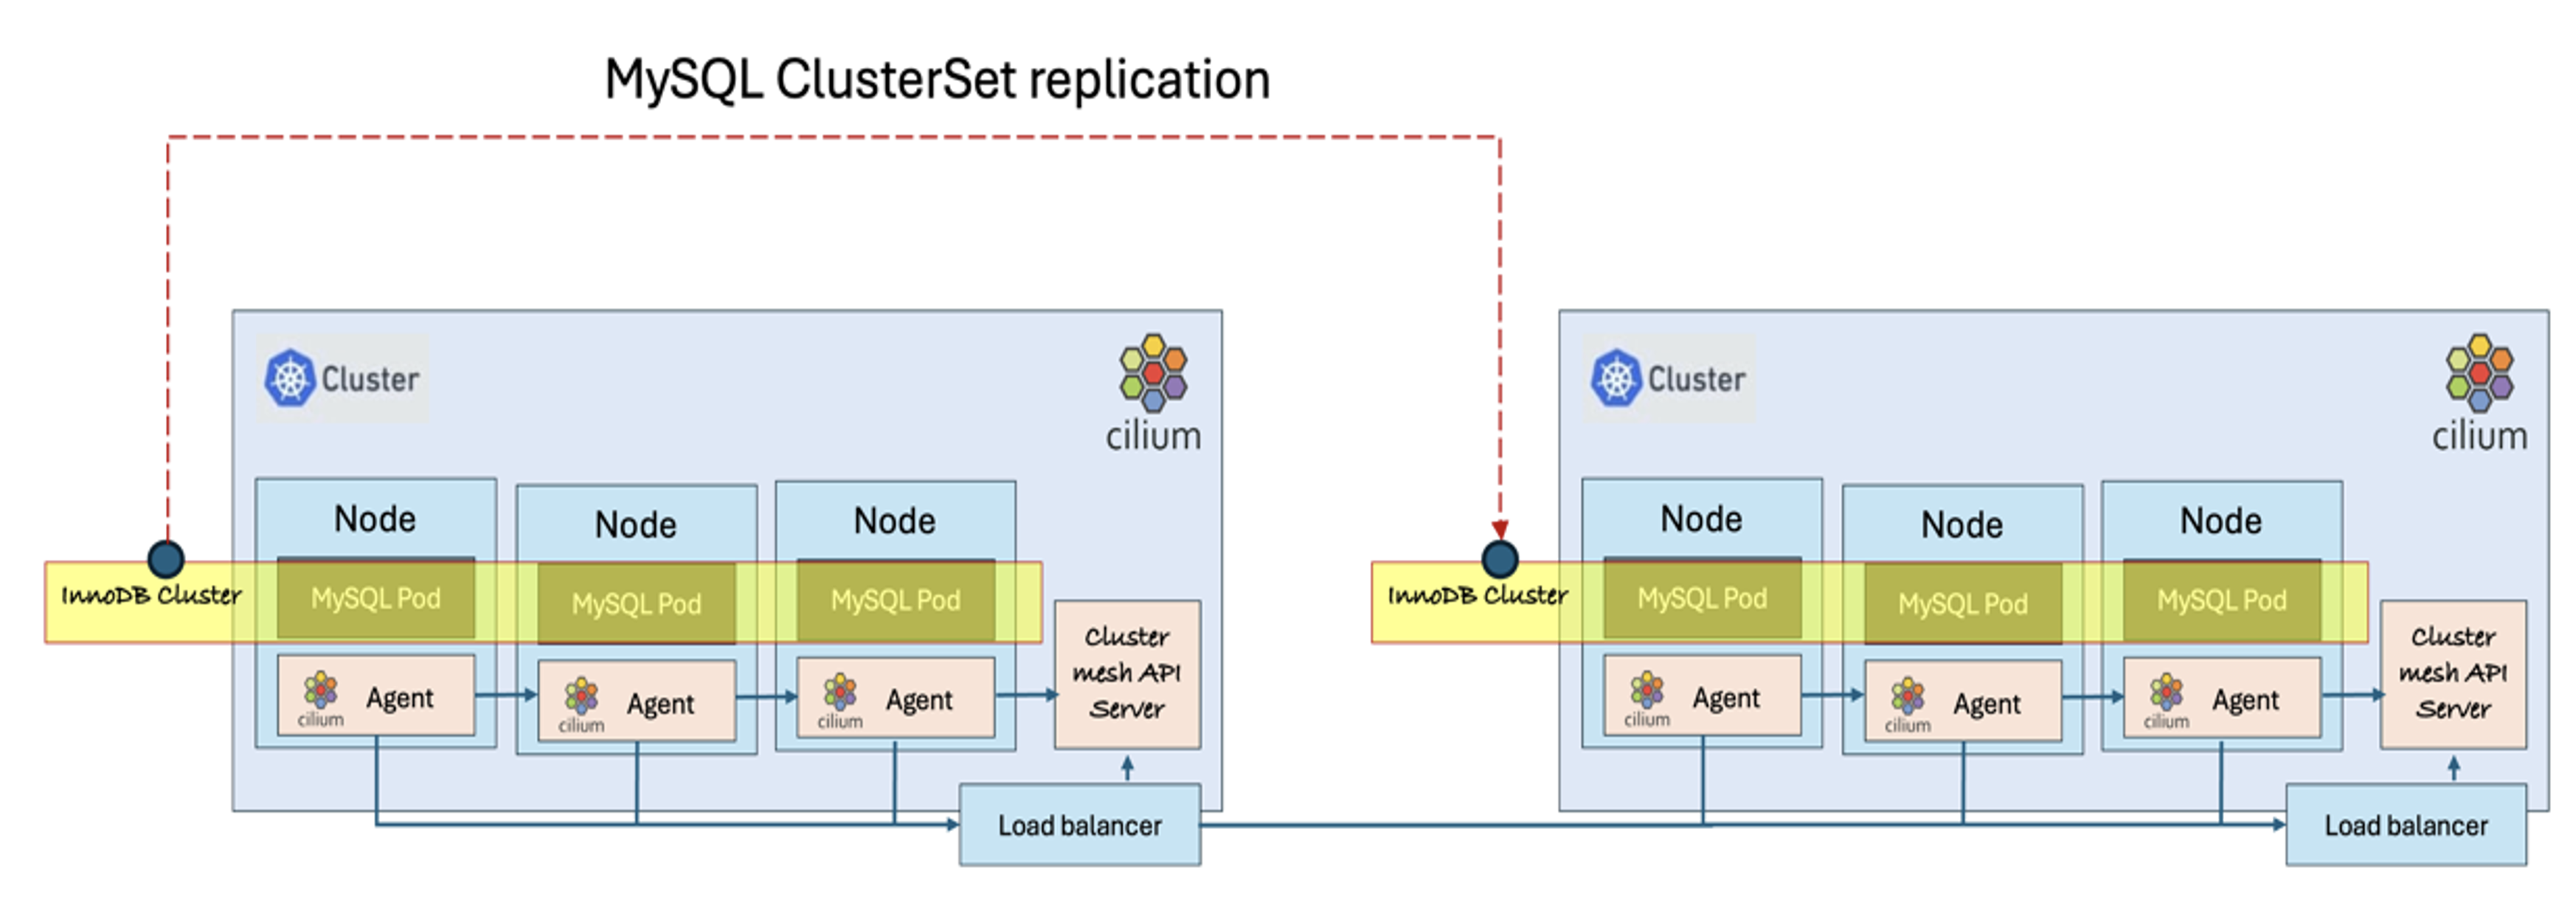
Deploying a MySQL InnoDB ClusterSet across multi-cluster Kubernetes environments improves scalability, minimizes downtime, ensures data consistency, and provides business continuity in the event of a Primary Cluster failure. It also strengthens the resilience of InnoDB Cluster deployments managed by the MySQL Operator. The diagram below illustrates a MySQL InnoDB ClusterSet, consisting of a Primary Cluster and a Replica Cluster, deployed across two Kubernetes clusters, with Cilium facilitating cross-cluster communication.
Setting up an InnoDB ClusterSet across multiple Kubernetes clusters is currently a manual process, as outlined below. This setup can be configured for MySQL InnoDB ClusterSet running on on-premise Kubernetes Clusters or any fully-managed Kubernetes service on public cloud using MySQL container image. However, this process can be scripted and automated using CI/CD tools.
Deployment of Cilium Cluster Mesh
Skip this section if it’s already installed. Get Context to distinguish PROD cluster with DR Cluster.
CURRENT NAME CLUSTER AUTHINFO NAMESPACE
context-cabqjcrx6nq cluster-cabqjcrx6nq user-cabqjcrx6nq
* context-che34bk2roa cluster-che34bk2roa user-che34bk2roa
Replace context-cabqjcrx6nq and context-che34bk2roa values with the corresponding context names in your environment. For ease of reference, let’s store kubeconfig context for PROD cluster in $CONTEXT1, and DR Cluster in $CONTEXT2.
$ export CONTEXT2=context-cabqjcrx6nq
To install Cilium using Helm, add the Cilium helm repo and generate the manifest locally for editing:
$ helm show values cilium/cilium > prod-cilium.yaml
$ helm show values cilium/cilium > dr-cilium.yaml
Modify the prod-cilium.yaml and change the default to the following values.
name: prod
id: 1
hubble:
tls:
enabled: false
hubble:
relay:
enabled: true
hubble:
ui:
enabled: true
ipam:
mode: “kubernetes”
Then apply to PROD Kubernetes Cluster using helm
Modify the dr-cilium.yaml file to match the settings in prod-cilium.yaml, except for setting the cluster name to “dr” and the cluster ID to “2.” Then, apply it to the DR Kubernetes cluster using Helm.
And on each clusters, delete all pods that are unmanaged by Cilium.
kubectl delete pod –namespace kube-system -l k8s-app=kube-dns
kubectl delete pod –namespace kube-system -l k8s-app=hubble-relay
kubectl delete pod –namespace kube-system -l k8s-app=hubble-ui
kubectl delete pod –namespace kube-system -l k8s-app=kube-dns-autoscaler
kubectl config use-context $CONTEXT2
kubectl delete pod –namespace kube-system -l k8s-app=kube-dns
kubectl delete pod –namespace kube-system -l k8s-app=hubble-relay
kubectl delete pod –namespace kube-system -l k8s-app=hubble-ui
kubectl delete pod –namespace kube-system -l k8s-app=kube-dns-autoscaler
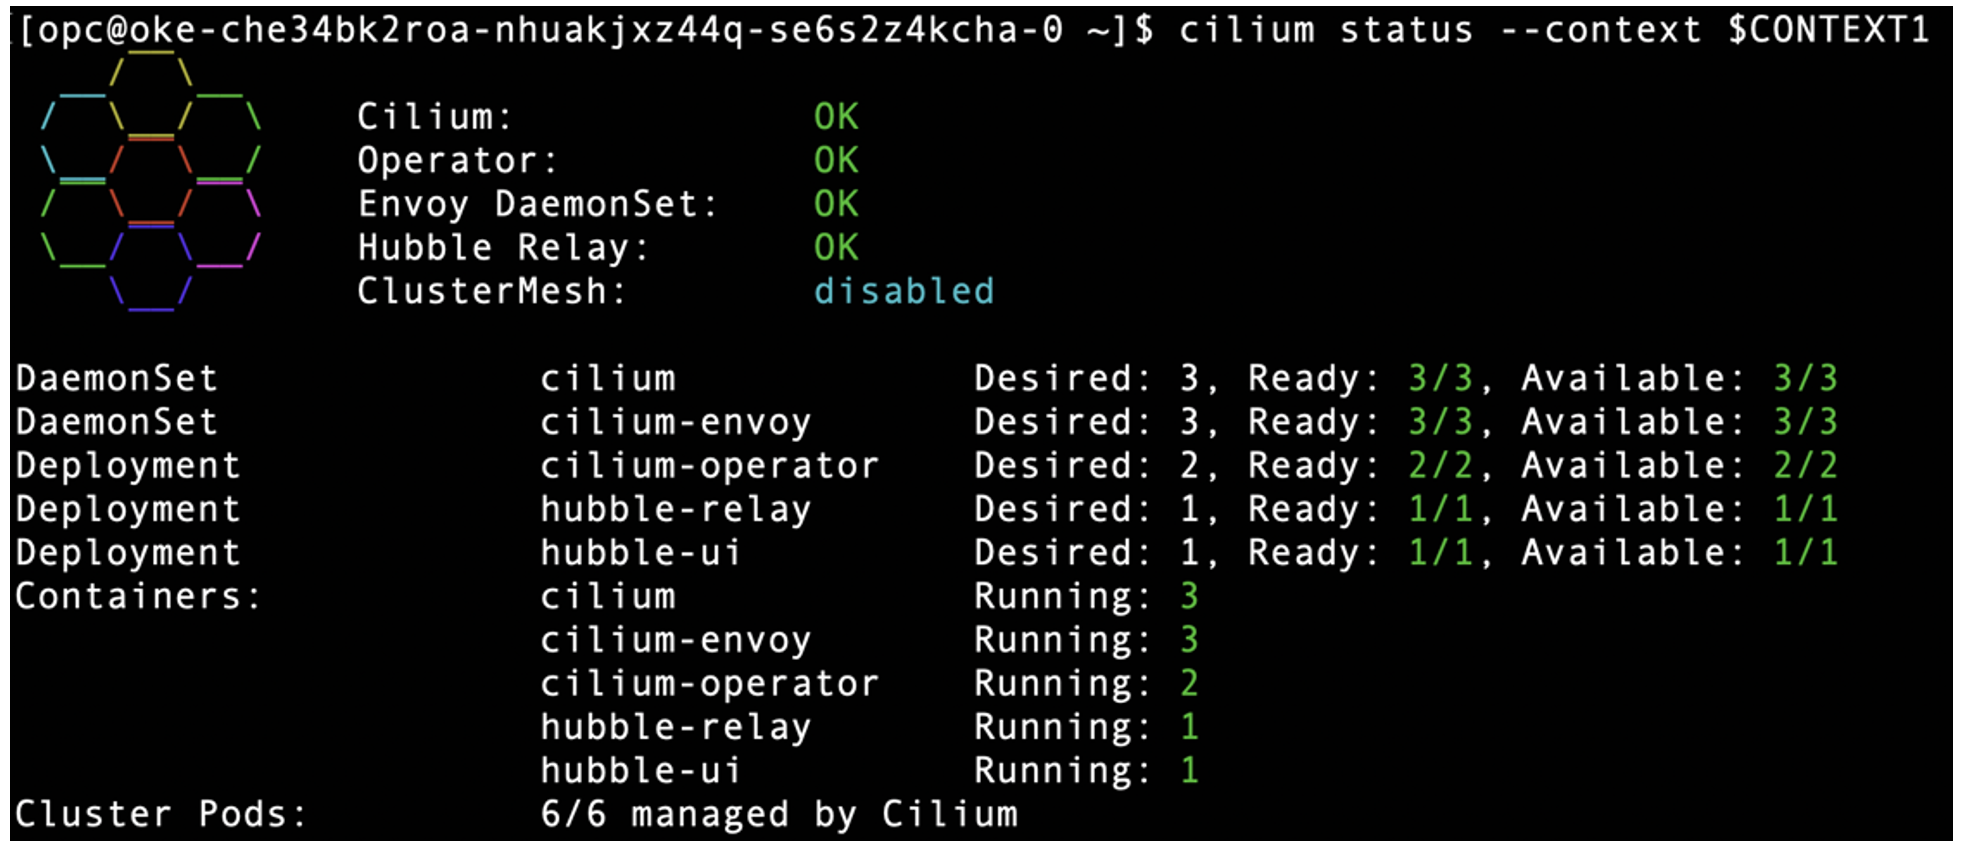
Run “cilium status” on each cluster to check Cilium deployment. A successful Cilium deployment will look like this in PROD cluster:
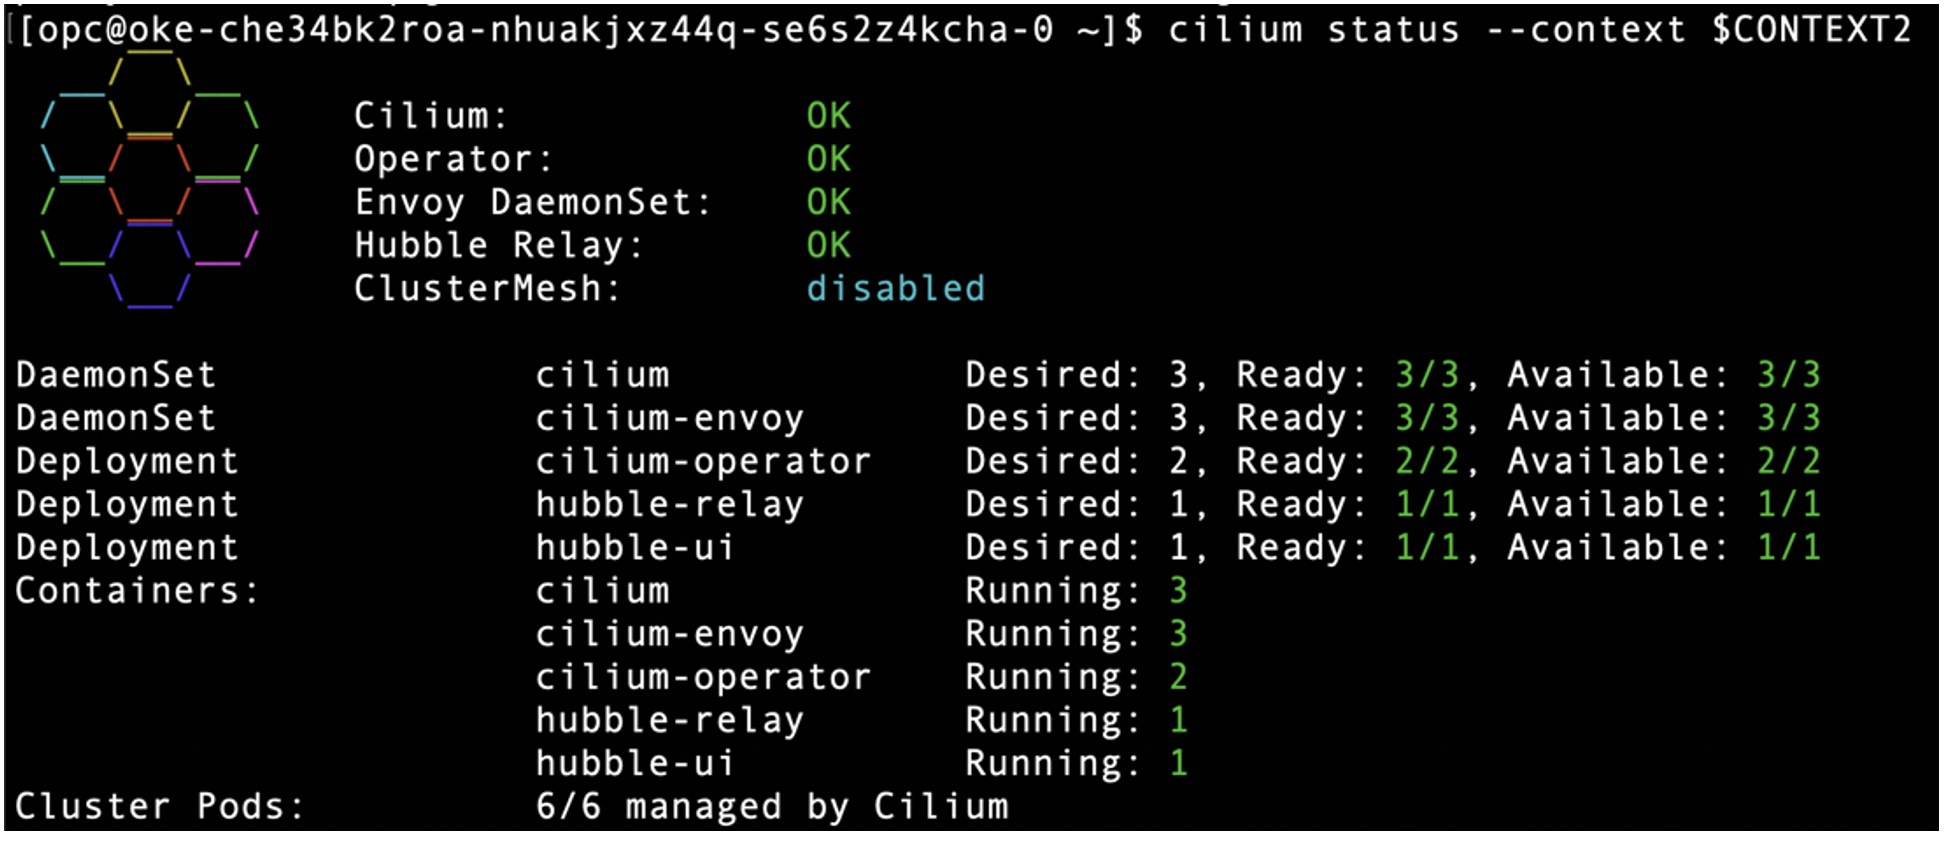
And it will look like this in DR Cluster:
Cluster mesh is currently disabled in PROD cluster. To enable it, modify the prod-cilium.yaml file as follows:
useAPIServer: true
ciliumEndpointSlice:
enabled: true
And re-deploy Cilium using Helm.
Check Cluster Mesh status in PROD cluster and it’s now enabled.
⚠️ Service type NodePort detected! Service may fail when nodes are removed from the cluster!
✅ Service “clustermesh-apiserver” of type “NodePort” found
✅ Cluster access information is available:
– 158.178.237.122:32379
✅ Deployment clustermesh-apiserver is ready
ℹ️ KVStoreMesh is enabled
🔌 No cluster connected
🔀 Global services: [ min:0 / avg:0.0 / max:0 ]
Repeat the same step to DR Cluster. Modify the dr-cilium.yaml file with the same as prod-cilium.yaml to enable cluster mesh and run the following:
$ cilium clustermesh status –context $CONTEXT2
To enable cross-cluster communication, connect PROD cluster to DR cluster using the following command:
Check Cluster Mesh status from PROD Cluster. A successful cluster mesh will look like this.
⚠️ Service type NodePort detected! Service may fail when nodes are removed from the cluster!
✅ Service “clustermesh-apiserver” of type “NodePort” found
✅ Cluster access information is available:
– 158.178.237.122:32379
✅ Deployment clustermesh-apiserver is ready
ℹ️ KVStoreMesh is enabled
✅ All 3 nodes are connected to all clusters [min:1 / avg:1.0 / max:1]
✅ All 1 KVStoreMesh replicas are connected to all clusters [min:1 / avg:1.0 / max:1]
🔌 Cluster Connections:
– dr: 3/3 configured, 3/3 connected – KVStoreMesh: 1/1 configured, 1/1 connected
Similarly, check Cluster Mesh status from DR Cluster.
⚠️ Service type NodePort detected! Service may fail when nodes are removed from the cluster!
✅ Service “clustermesh-apiserver” of type “NodePort” found
✅ Cluster access information is available:
– 134.185.86.75:32379
✅ Deployment clustermesh-apiserver is ready
ℹ️ KVStoreMesh is enabled
✅ All 3 nodes are connected to all clusters [min:1 / avg:1.0 / max:1]
✅ All 1 KVStoreMesh replicas are connected to all clusters [min:1 / avg:1.0 / max:1]
🔌 Cluster Connections:
– prod: 3/3 configured, 3/3 connected – KVStoreMesh: 1/1 configured, 1/1 connected
🔀 Global services: [ min:0 / avg:0.0 / max:0 ]
MySQL InnoDB ClusterSet requires FQDN of each Pods to be recognize by each Clusters. Apply the following manifest to PROD-cluster and DR-cluster using kubectl to expose coreDNS as NodePort.
kind: Service
metadata:
labels:
k8s-app: core-dns-nodeport
kubernetes.io/name: CoreDNS
name: core-dns-nodeport
namespace: kube-system
spec:
ports:
– name: dns
port: 53
protocol: UDP
targetPort: 53
nodePort: 30053
– name: dns-tcp
port: 53
protocol: TCP
targetPort: 53
nodePort: 30053
selector:
k8s-app: kube-dns
sessionAffinity: None
type: NodePort
Assuming the manifest above is saved as coreDNS_nodeport.yaml, apply it to both clusters using the following command:
$ kubectl apply -f coreDNS_nodeport.yaml –context=$CONTEXT2
Prepare Environment to run InnoDB Clusters on PROD and DR
Skip this section if it’s done
Create a namespace and secret on the PROD cluster for the InnoDB Cluster. Each InnoDB Cluster within a ClusterSet must have a unique namespace name. Below, we are using mysql-prod as the namespace for the PROD InnoDB Cluster (named as “PRD” cluster) and setting the MySQL root password to root.
$ kubectl -n mysql-prod create secret generic mypwds –from-literal=rootUser=root –from-literal=rootHost=% –from-literal=rootPassword=”root” –context=$CONTEXT1
We are using mysql-dr as the namespace for the DR InnoDB Cluster (named as “DR” cluster) and setting the MySQL root password to root, same as PROD InnoDB Cluster.
$ kubectl -n mysql-dr create secret generic mypwds –from-literal=rootUser=root –from-literal=rootHost=% –from-literal=rootPassword=”root” –context=$CONTEXT2
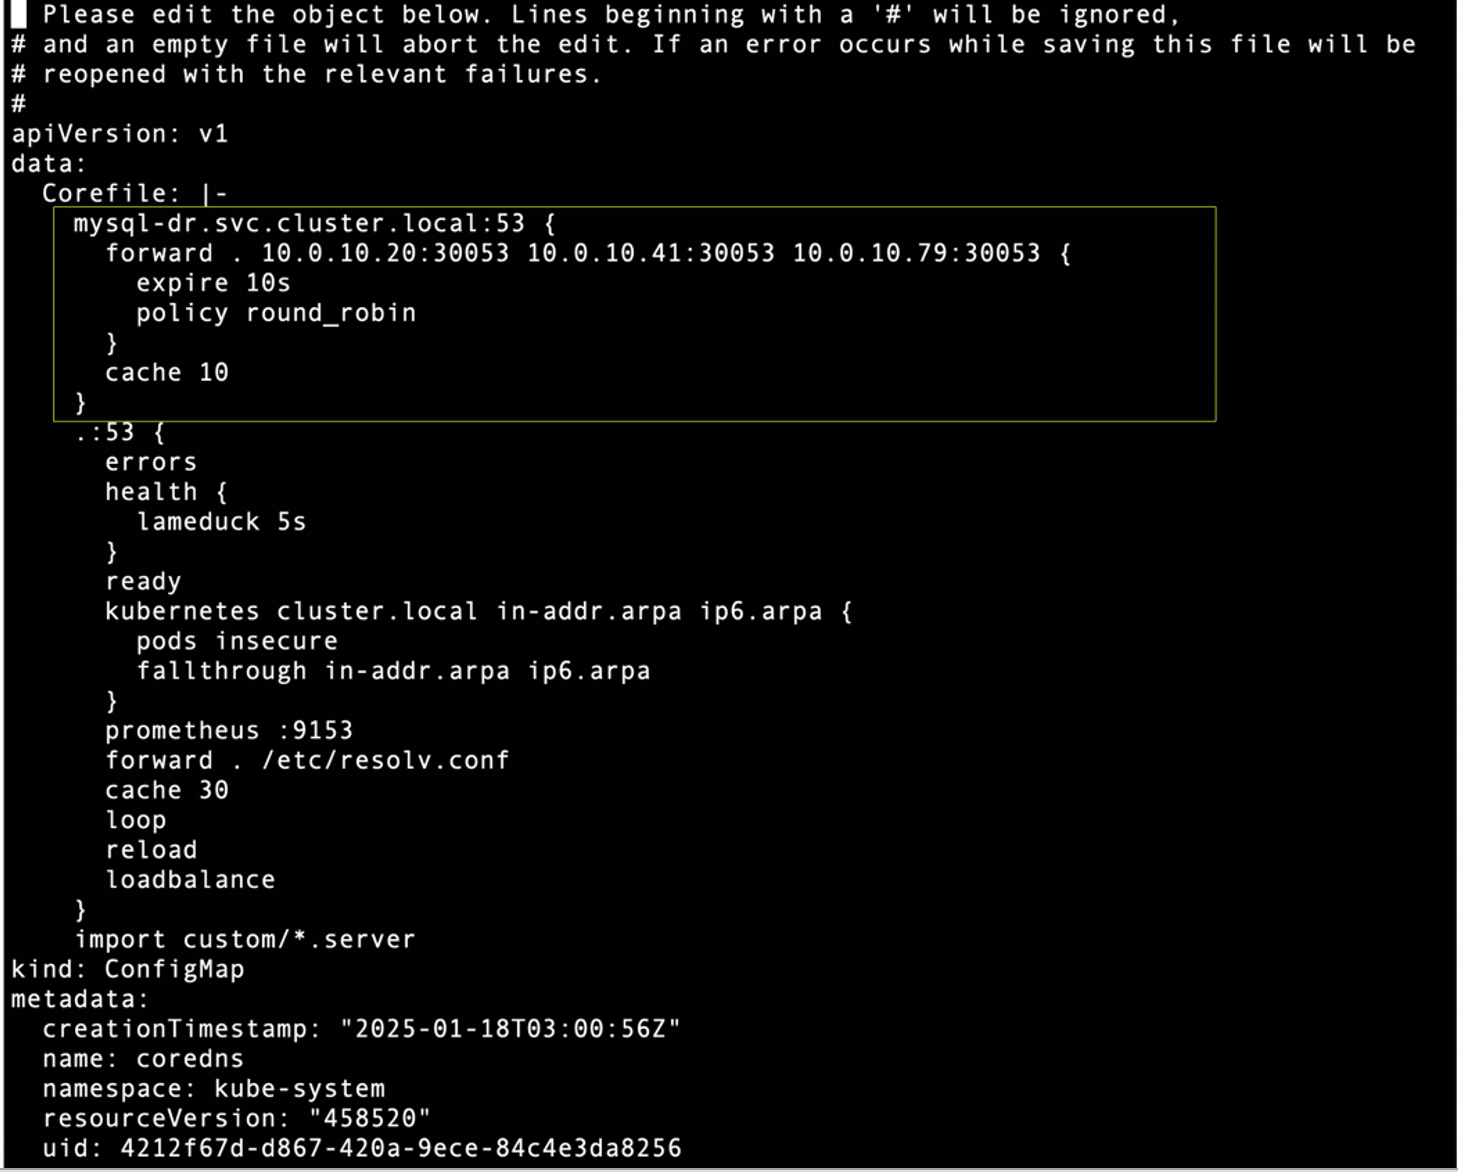
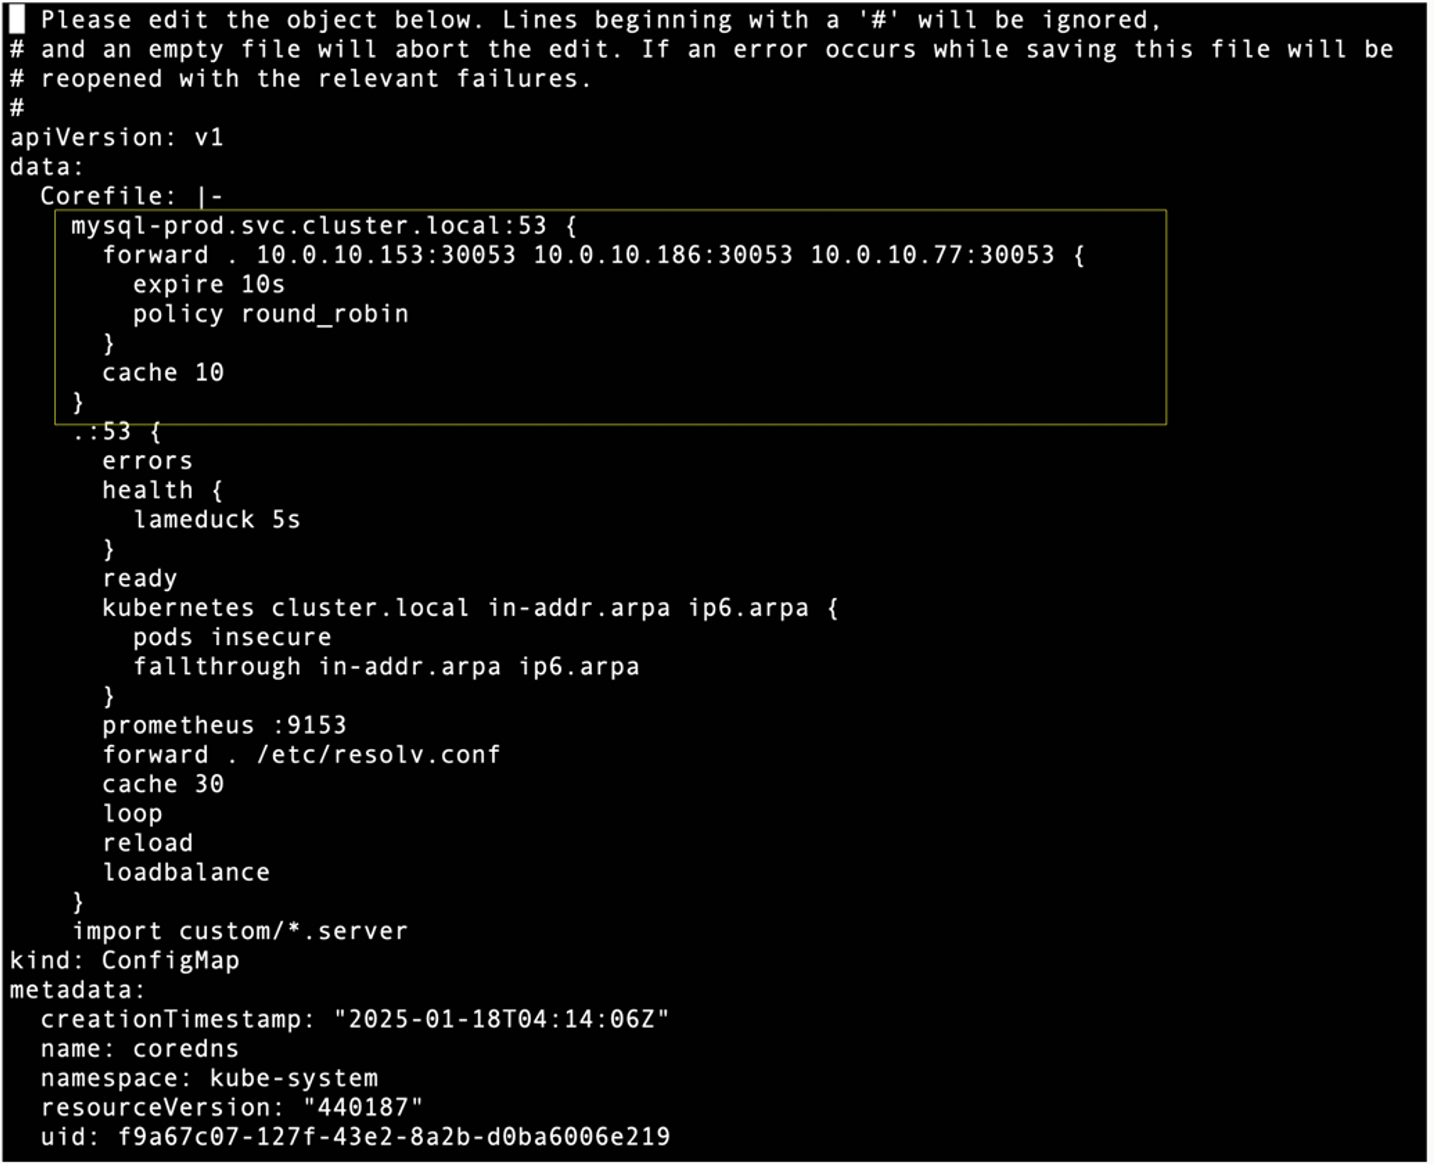
On PROD cluster, edit core DNS configuration in the kube-system namespace to forward connection traffic to all DR-Cluster worker nodes IP Address and port 30053 when target DNS is mysql-dr.svc.cluster.local
$ kubectl -n kube-system edit configmap coredns –context=$CONTEXT1
Similarly on DR cluster, edit core DNS configuration in the kube-system namespace to forward connection traffic to all PROD Cluster worker nodes IP Address and port 30053 when target DNS is mysql-prd.svc.cluster.local
$ kubectl -n kube-system edit configmap coredns –context=$CONTEXT2
Deployment of MySQL Operator
Skip this section if it’s already installed. Install CRD used by the operator on both clusters
$ kubectl apply -f https://raw.githubusercontent.com/mysql/mysql-operator/trunk/deploy/deploy-crds.yaml –context=$CONTEXT2
Download manifest file: deploy-operator.yaml using wget
Update the deploy-operator.yaml by adding the MYSQL_OPERATOR_K8S_CLUSTER_DOMAIN environment variable and setting it to the default Cilium cluster domain. See below.
– name: MYSQLSH_USER_CONFIG_HOME
value: /mysqlsh
– name: MYSQLSH_CREDENTIAL_STORE_SAVE_PASSWORDS
value: never
– name: MYSQL_OPERATOR_K8S_CLUSTER_DOMAIN
value: cluster.local
Apply deploy-operator.yaml to each cluster:
$ kubectl apply -f deploy-operator.yaml –context=$CONTEXT2
Check MySQL Operator deployment on PROD Cluster:
NAME READY STATUS RESTARTS AGE
mysql-operator-7f84cb7784-x2cjg 1/1 Running 0 41s
Check MySQL Operator deployment on DR Cluster:
NAME READY STATUS RESTARTS AGE
mysql-operator-79bccbddcd-wj96l 1/1 Running 0 51s
Deploying MySQL InnoDB Cluster With MySQL Operator
Prepare a manifest file (named PRD_cluster.yaml) to deploy the InnoDB Cluster on the PROD cluster, using mysql-prod as the namespace, as shown below:
kind: InnoDBCluster
metadata:
name: prd
namespace: mysql-prod
spec:
secretName: mypwds
baseServerId: 100
tlsUseSelfSigned: true
instances: 3
router:
instances: 1
Similarly, prepare another manifest file (named DR_cluster.yaml) to deploy the InnoDB Cluster on the DR cluster, using mysql-dr as the namespace, as shown below:
kind: InnoDBCluster
metadata:
name: dr
namespace: mysql-dr
spec:
secretName: mypwds
baseServerId: 200
tlsUseSelfSigned: true
instances: 3
router:
instances: 1
In InnoDB ClusterSet, each instance must have a unique server_id. Therefore, the baseServerId parameter in the YAML configuration must be different for each cluster. Apply both YAML on each respective clusters using the following commands:
$ kubectl apply -f DR_cluster.yaml –context=$CONTEXT2
Wait about 2-3 minutes and check InnoDB Cluster deployment status on PROD cluster using the following command.
NAME STATUS ONLINE INSTANCES ROUTERS AGE
prd ONLINE 3 3 1 3m40s
Check InnoDB Cluster deployment status on DR cluster using the following command.
NAME STATUS ONLINE INSTANCES ROUTERS AGE
dr ONLINE 3 3 1 3m40s
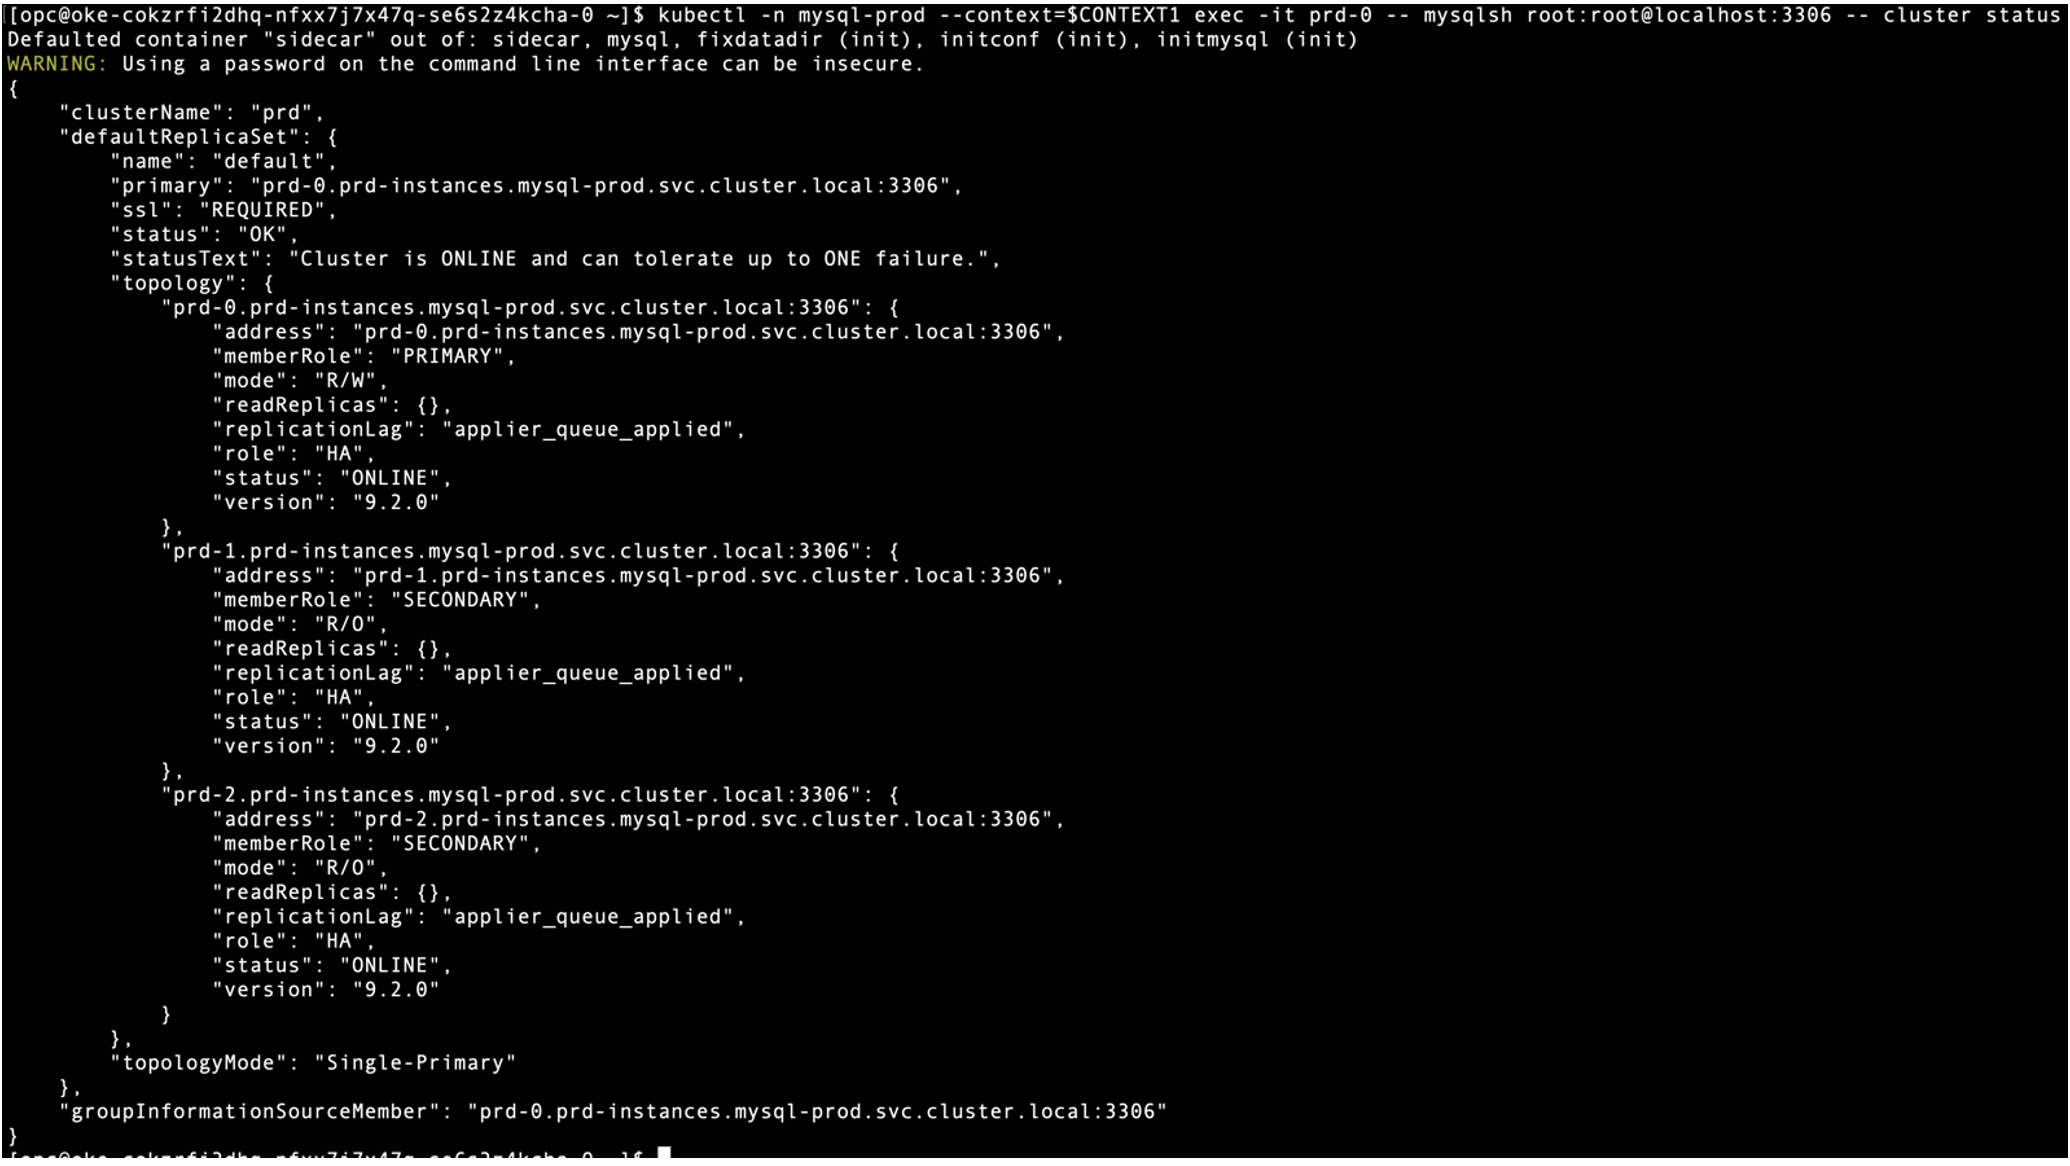
Both InnoDB Clusters are running with 3 Pods for MySQL instances and 1 Pod for MySQL Router. Let’s check InnoDB Cluster status with MySQL Shell using the following command:
$ kubectl -n mysql-prod –-context=$CONTEXT1 exec -it prd-0 –- mysqlsh root:root@localhost:3306 –- cluster status
$ kubectl -n mysql-dr –context=$CONTEXT2 exec -it dr-0 — mysqlsh root:root@localhost:3306 — cluster status
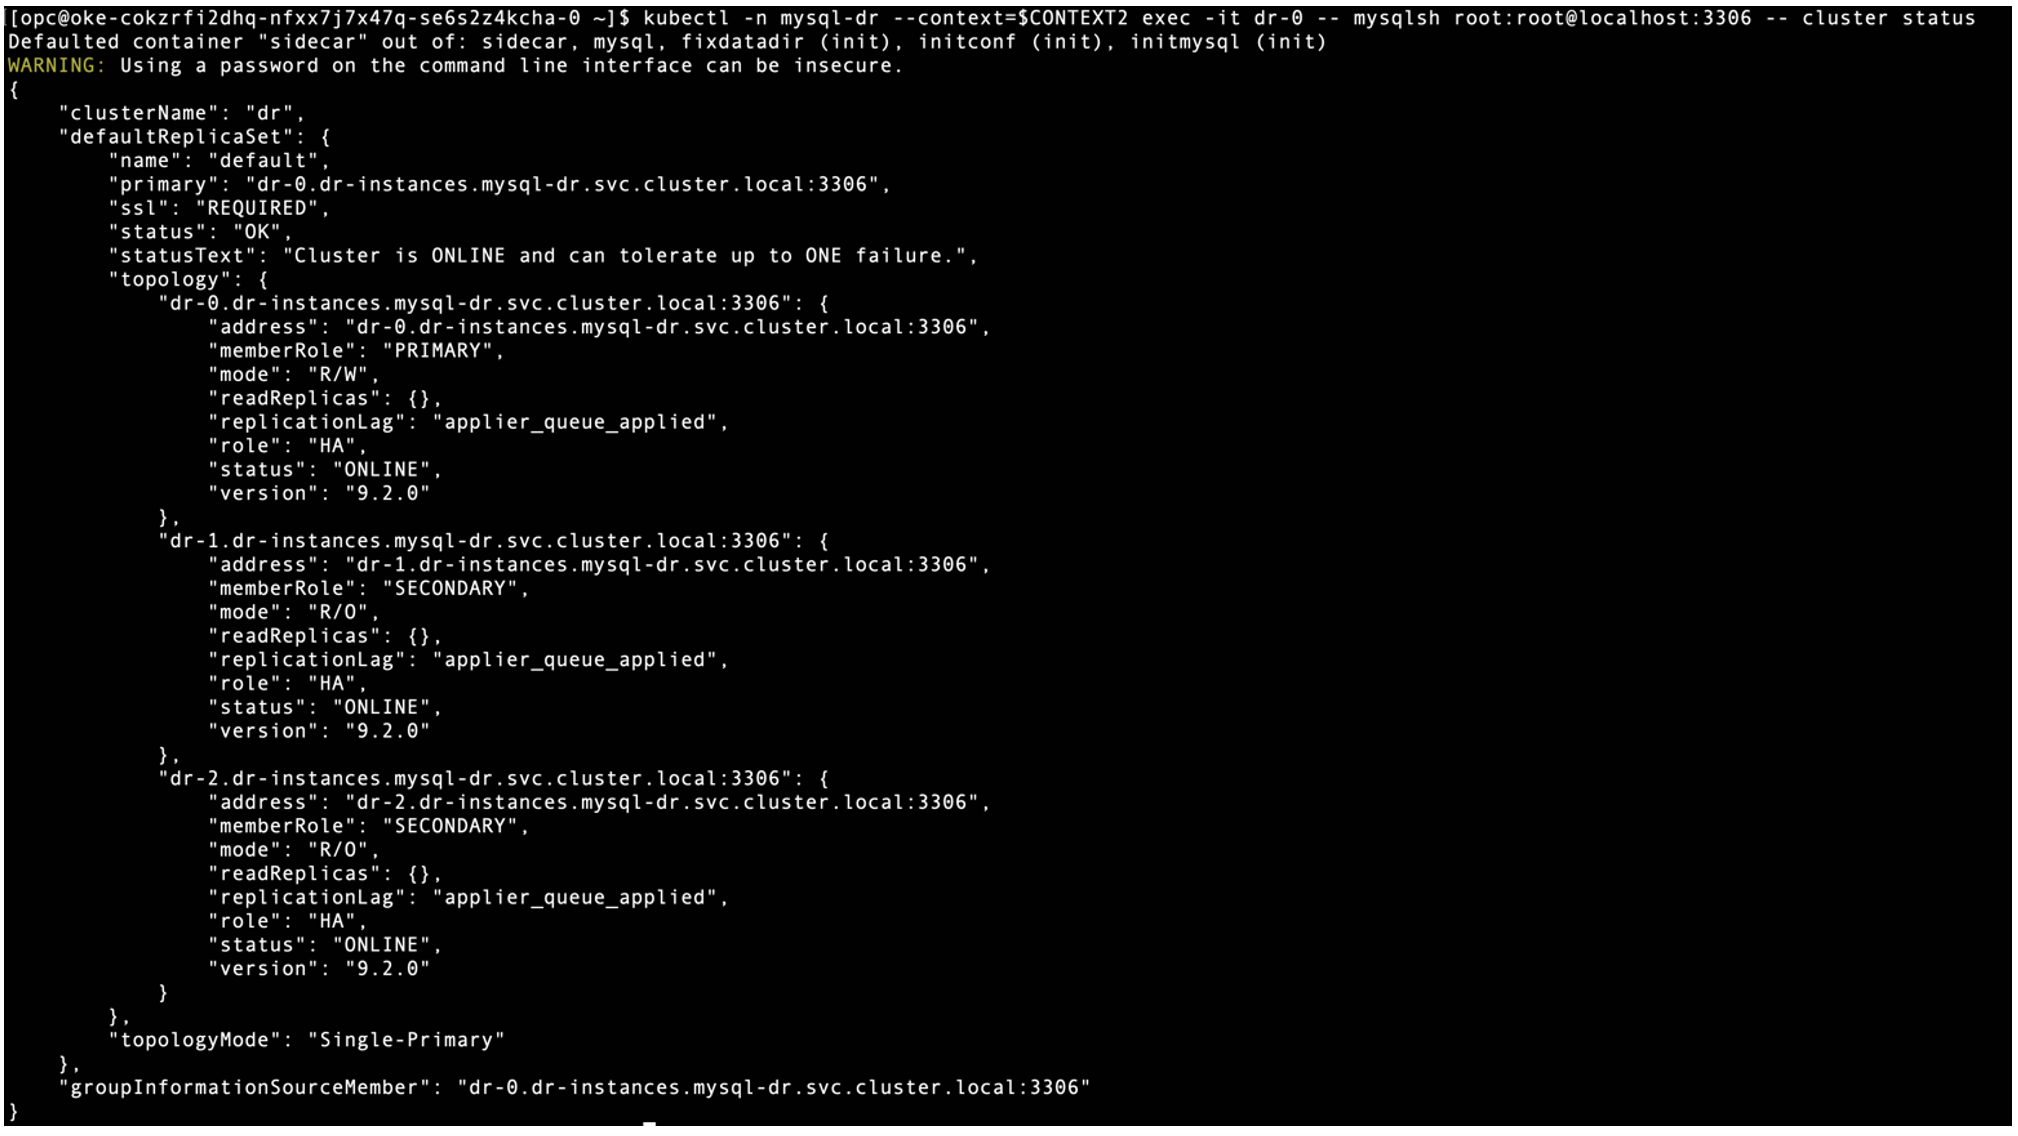
Both InnoDB Clusters are running and healthy.
For cross-cluster communication, the global service affinity must be enabled on MySQL Pods. Use the following commands to enable on PROD cluster.
$ kubectl -n mysql-prod annotate svc prd-instances service.cilium.io/global=”true” –context=$CONTEXT1
$ kubectl -n mysql-prod annotate svc prd-instances service.cilium.io/global-sync-endpoint-slices=”true” –context=$CONTEXT1
$ kubectl -n mysql-prod annotate svc prd-instances service.cilium.io/shared=”true” –context=$CONTEXT1
Subsequently, use the following commands to enable the global service affinity on MySQL Pods running on DR Cluster.
$ kubectl -n mysql-dr annotate svc dr-instances service.cilium.io/global=”true” –context=$CONTEXT2
$ kubectl -n mysql-dr annotate svc dr-instances service.cilium.io/global-sync-endpoint-slices=”true” –context=$CONTEXT2
$ kubectl -n mysql-dr annotate svc dr-instances service.cilium.io/shared=”true” –context=$CONTEXT2
Let’s test login to MySQL Pods on DR cluster from MySQL Pods on PROD cluster using FQDN
Similarly on DR cluster, try to login to MySQL Pods on PROD cluster from MySQL Pods on DR cluster using FQDN
InnoDB Clusters on both the PROD and DR clusters are accessible from the remote Kubernetes cluster using FQDN, which is required by InnoDB ClusterSet setup. This is because we edit coreDNS to forward remote FQDN traffic to remote coreDNS exposed as NodePort.
Configure InnoDB ClusterSet on PROD cluster
Use the following command to create InnoDB ClusterSet on PROD cluster and named it as “mycs”.
Re-deploy MySQL Router on PROD cluster to adopt changes on cluster metadata
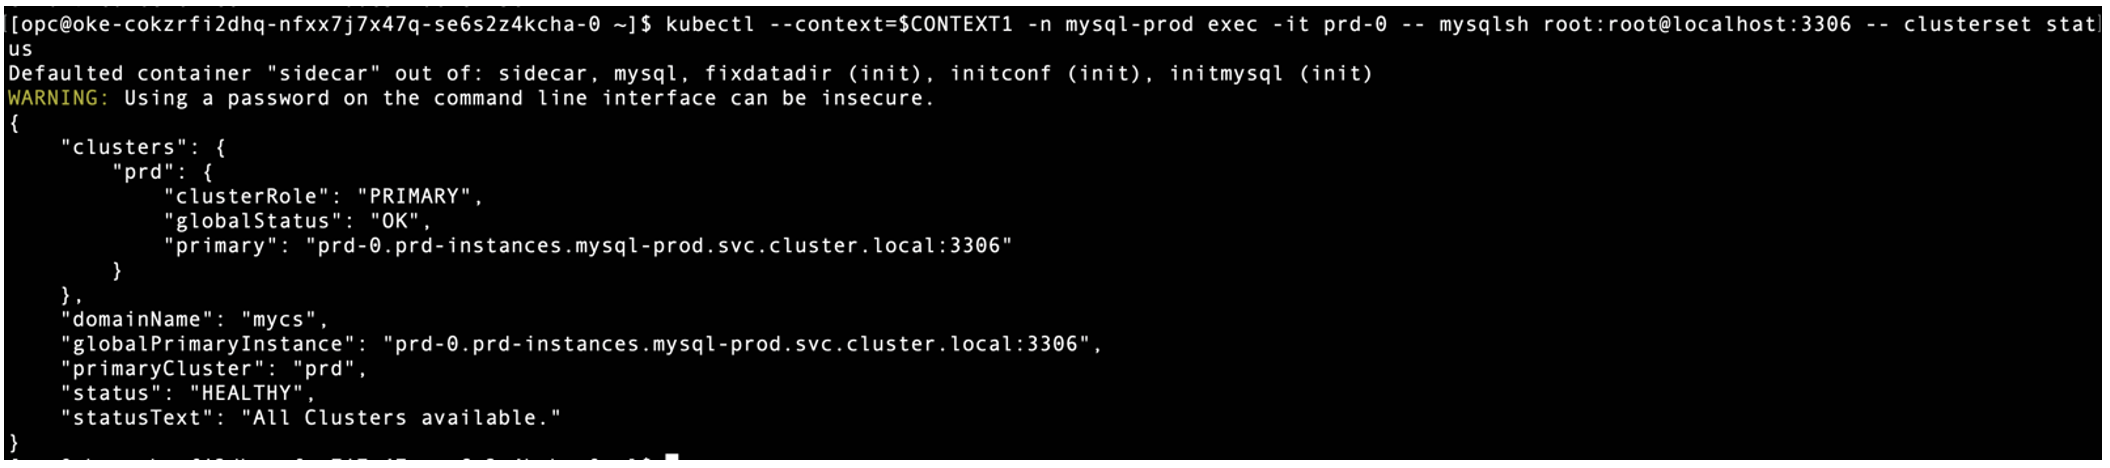
Check InnoDB ClusterSet status on PROD cluster, only 1 InnoDB Cluster is found as a member.
$ kubectl –context=$CONTEXT1 -n mysql-prod exec -it prd-0 — mysqlsh root:root@localhost:3306 — clusterset status
Adding Replica Cluster to The InnoDB ClusterSet from DR cluster
First, dissolve the existing InnoDB Cluster on the DR cluster and create a replica cluster named “myreplica” using the primary node of the DR cluster as the first member of the replica cluster.
Dissolve DR cluster:
Create replica cluster:
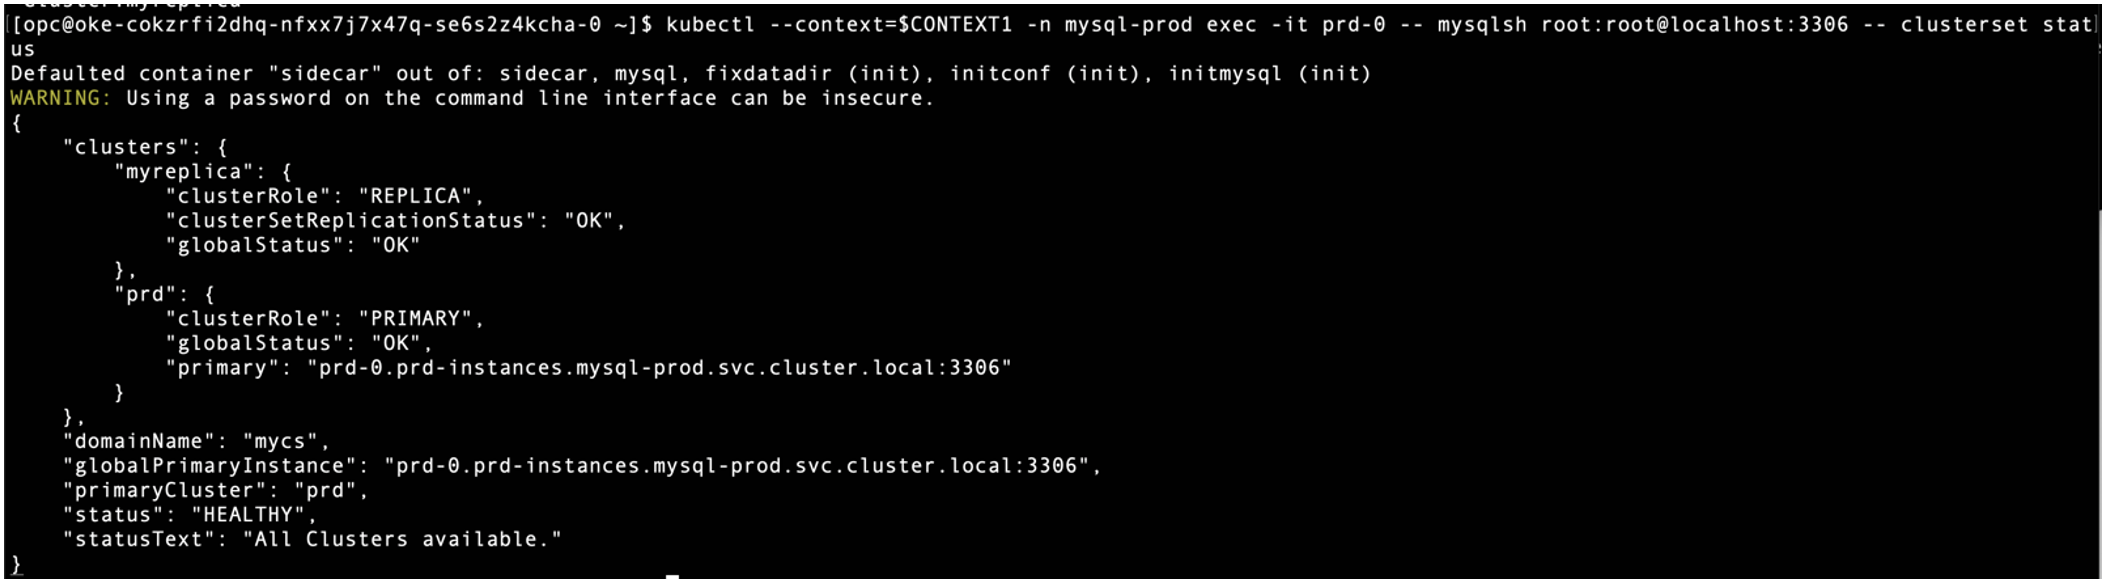
Check InnoDB ClusterSet status on PROD cluster, now two InnoDB Clusters are found in the ClusterSet.
$ kubectl –context=$CONTEXT1 -n mysql-prod exec -it prd-0 — mysqlsh root:root@localhost:3306 — clusterset status
Second, export backup password, cluster admin password, and router password that’s kept in the Kubernetes secrets on PROD cluster and apply those to DR cluster.
Export InnoDB Cluster’s user passwords from PROD cluster:
$ export clusterAdminPassword=`kubectl –context=$CONTEXT1 -n mysql-prod get secret prd-privsecrets -o json | jq -r ‘.data[“clusterAdminPassword”]’`
$ export backupPassword=`kubectl –context=$CONTEXT1 -n mysql-prod get secret prd-backup -o json | jq -r ‘.data[“backupPassword”]’`
Import InnoDB Cluster’s user passwords into DR cluster:
$ kubectl –context=$CONTEXT2 -n mysql-dr get secret dr-privsecrets -o json | jq –arg x `echo $clusterAdminPassword` ‘.data[“clusterAdminPassword”]=$x’ | kubectl –context=$CONTEXT2 apply -f –
$ kubectl –context=$CONTEXT2 -n mysql-dr get secret dr-router -o json | jq –arg x `echo $routerPassword` ‘.data[“routerPassword”]=$x’ | kubectl –context=$CONTEXT2 apply -f –
Third, adding back all Secondary nodes into replica cluster on DR cluster
$ kubectl –context=$CONTEXT2 -n mysql-dr exec -it dr-0 — mysqlsh root:root@localhost:3306 — cluster add-instance root:root@dr-2.dr-instances.mysql-dr.svc.cluster.local:3306 –recoveryMethod=clone
Re-deploy MySQL Router on DR cluster to adopt changes on cluster metadata
Conclusion
Congratulations! You’ve successfully deployed a MySQL InnoDB ClusterSet across multiple Kubernetes clusters. With Cilium deployed, you can now take advantage of its ability to seamlessly connect two or more Kubernetes clusters, making them function as if they were part of the same Kubernetes cluster. This allows an InnoDB Cluster running in one Kubernetes cluster to discover and connect to another InnoDB Cluster in a remote Kubernetes cluster. As a result, you can set up an InnoDB ClusterSet to replicate data between two or more InnoDB Clusters across multiple Kubernetes clusters.