Introduction
In this blog series we previously discussed the archtectural concepts and the steps to install an FPP server, I would now like for you to join me to dive a bit deeper in how to create gold images.
Gold images are stored centrally on the FPP Server and deployed as working copies to the FPP Clients and Targets. In this blog post, we will show you how to create gold images efficiently and how to create them in zipped format. Future blog posts will show how to import gold images into FPP from a zipfile or a patched ORACLE_HOME.
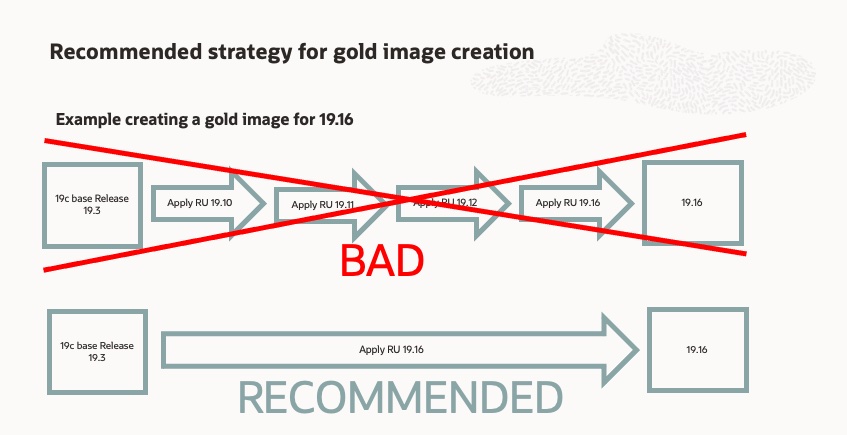
The purpose of this blog post is to show that when creating gold images incorrectly, they can quickly explode in size. When gold images are unnecessarily large, the patching process goes slower than necessary and unrequired space is wasted on your FPP Clients and Targets. Oracle RU patches are, as you know, cumulative, meaning that 19.14 will have all the patches since the base release 19.3. Please join me in my journey to create gold images.
ORACLE_HOME patching and gold image creation
Database home patching
As an example, we started with two db homes.
This is what the /etc/oratab looks like :
db19home1:/u01/app/oracle/product/19.0.0.0/dbhome_1:N
db19home2:/u01/app/oracle/product/19.0.0.0/dbhome_2:N
Both homes have the base release of 19c installed 19.3, with the latest OPatch installed.
On the first home(db19home1), we applied following patches:
32218454 aka 19.10
32545013 aka 19.11
32904851 aka 19.12
33192793 aka 19.13
and at last patch 33515361 aka 19.14
On the second home (db19home2) since RU’s are cumulative, we only applied 19.14
Checkout the blog post of Mike Dietrich if you want to do this in one go.
You can find the post-patch output of both homes here :
| . oraenv ORACLE_SID = [oracle] ? db19home1 The Oracle base has been set to /u01/app/oracle [oracle@fppt01 19.0.0.0]$ export PATH=$ORACLE_HOME/OPatch:$PATH
33515361;Database Release Update : 19.14.0.0.220118 (33515361) 29585399;OCW RELEASE UPDATE 19.3.0.0.0 (29585399) OPatch succeeded. |
| . oraenv ORACLE_SID = [db19home1] ? db19home2 The Oracle base remains unchanged with value /u01/app/oracle [oracle@fppt01 19.0.0.0]$ export PATH=$ORACLE_HOME/OPatch:$PATH
33515361;Database Release Update : 19.14.0.0.220118 (33515361) 29585399;OCW RELEASE UPDATE 19.3.0.0.0 (29585399) |
As you can see, patchwise, the contents of both ORACLE_HOMEs are identical. Is this also the case with the size taken?
|
|
Quite significant, isn’t it?
We see that the homes are almost double in size. Note that this is just for the last 4 RU’s; imagine the size of the home after applying every patch since 19.3!
The difference comes mainly from the size of the hidden directory (.patch_storage) in the ORACLE_HOME, which contains the backup of overwritten files by patches in the ORACLE_HOME.
How to make a gold image from existing an ORACLE_HOME
The database homes we prepared earlier are ready; we can now use them to create zipped gold images.
The process shown here is external to Fleet Patching & Provisioning; we will cover the different options for creating gold images in FPP in a future installment of this series.
For db homes we use the runInstaller for GI Homes gridSetup
|
|
and for the second home
|
|
Unsurprisingly also zipped, the gold images are almost double in size.
|
|
Grid Infrastructure home gold image creation
To create a gold image of the Grid Infrastructure (GI) we need to proceed as follows :
- Download the base release for 19c GI, which is version 19.3
- Download the Release Update (RU) and other patches
- Download the opatch version that is required for the RU, the version needed can be found in the RU readme.
- Unzip the base release to the future ORACLE_HOME location of your Grid Infrastructure
- Unzip the opatch version also in this ORACLE_HOME
- Unzip the RU, and one-offs in my case that were unzipped in following locations :
|
|
Using both patches above we will now create a patched Grid Infrastructure home. Note that we need to specify the groups, inventory and the ORACLE_BASE location and more importantly, specify that this is a software-only installation (CRS_SWONLY) :
| ./gridSetup.sh -applyRU /orastage/GI_1915/1915/33803476 -applyOneOffs /orastage/GI_1915/oneoff/33988339 -silent oracle.install.option=CRS_SWONLY oracle.install.asm.OSDBA=asmdba oracle.install.asm.OSOPER=asmadmin oracle.install.asm.OSASM=asmadmin INVENTORY_LOCATION=/u01/app/oraInventory/ ORACLE_BASE=/u01/app/grid
[WARNING] [INS-41812] OSOPER and OSASM are the same OS group. You can find the log of this install session at: As a root user, execute the following script(s): Execute /u01/app/19.15.0.0_one/grid/root.sh on the following nodes: Successfully Setup Software. |
Execute the root.sh script as indicated above.
We can now check if the patches are applied to the Grid Infrastructure binaries.
| opatch lspatches 33988339;PERFORMANCE ISSUE AFTER SINGLE FLASH DISK WENT INTO CONFINEMENT 33911149;TOMCAT RELEASE UPDATE 19.0.0.0.0 ( ) 33815607;ACFS RELEASE UPDATE 19.15.0.0.0 (33815607) 33815596;OCW RELEASE UPDATE 19.15.0.0.0 (33815596) 33806152;Database Release Update : 19.15.0.0.220419 (33806152) 33575402;DBWLM RELEASE UPDATE 19.0.0.0.0 (33575402) |
If all required patches are installed we can proceed with the creation of the gold image
| $ORACLE_HOME/gridSetup.sh -createGoldImage -destinationlocation /orastage -silent Launching Oracle Grid Infrastructure Setup Wizard... Successfully Setup Software. Gold Image location: /orastage/grid_home_2022-07-08_09-36-41AM.zip |
Congratulations you just created a Database and Grid gold image!
Conclusion :
Always start from the base release and then apply the RU (and other patches) of your choice; it will save time deploying and lots of space in your fleet.

Further Reading :
Fleet Patching & Provisioning by Example Intro
Fleet Patching & Provisioning by Example Part 1 : Architecture – Concepts
Fleet Patching & Provisioning by Example Part 2 : FPP Server Installation
Fleet Patching & Provisioning by Example Part 3 : Creating Gold Images

