In this blog post, Oracle Linux kernel developer William Roche presents a method to mirror a running system into a ramdisk.
A RAM mirrored System ?
There are cases where a system can boot correctly but after some time, can lose its system disk access – for example an iSCSI system disk configuration that has network issues, or any other disk driver problem. Once the system disk is no longer accessible, we rapidly face a hang situation followed by I/O failures, without the possibility of local investigation on this machine. I/O errors can be reported on the console:
XFS (dm-0): Log I/O Error Detected....
Or losing access to basic commands like:
# ls
-bash: /bin/ls: Input/output error
The approach presented here allows a small system disk space to be mirrored in memory to avoid the above I/O failures situation, which provides the ability to investigate the reasons for the disk loss. The system disk loss will be noticed as an I/O hang, at which point there will be a transition to use only the ram-disk.
To enable this, the Oracle Linux developer Philip “Bryce” Copeland created the following method (more details will follow):
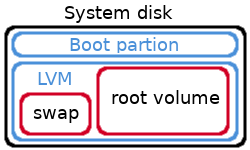
- Create a “small enough” system disk image using LVM (a minimized Oracle Linux installation does that)
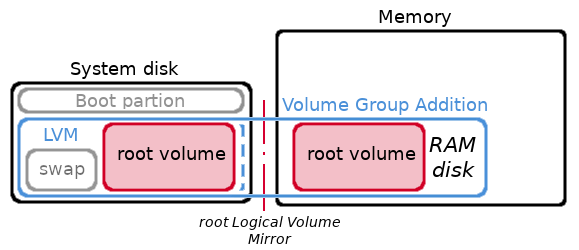
- After the system is started, create a ramdisk and use it as a mirror for the system volume
- when/if the (primary) system disk access is lost, the ramdisk continues to provide all necessary system functions.
Disk and memory sizes:
As we are going to mirror the entire system installation to the memory, this system installation image has to fit in a fraction of the memory – giving enough memory room to hold the mirror image and necessary running space.
Of course this is a trade-off between the memory available to the server and the minimal disk size needed to run the system. For example a 12GB disk space can be used for a minimal system installation on a 16GB memory machine.
A standard Oracle Linux installation uses XFS as root fs, which (currently) can’t be shrunk. In order to generate a usable “small enough” system, it is recommended to proceed to the OS installation on a correctly sized disk space. Of course, a correctly sized installation location can be created using partitions of large physical disk. Then, the needed application filesystems can be mounted from their current installation disk(s). Some system adjustments may also be required (services added, configuration changes, etc…).
This configuration phase should not be underestimated as it can be difficult to separate the system from the needed applications, and keeping both on the same space could be too large for a RAM disk mirroring.
The idea is not to keep an entire system load active when losing disks access, but to be able to have enough system to avoid system commands access failure and analyze the situation.
We are also going to avoid the use of swap. When the system disk access is lost, we don’t want to require it for swap data. Also, we don’t want to use more memory space to hold a swap space mirror. The memory is better used directly by the system itself.
The system installation can have a swap space (for example a 1.2GB space on our 12GB disk example) but we are neither going to mirror it nor use it.
Our 12GB disk example could be used with: 1GB /boot space, 11GB LVM Space (1.2GB swap volume, 9.8 GB root volume).
Ramdisk memory footprint:
The ramdisk size has to be a little larger (8M) than the root volume size that we are going to mirror, making room for metadata. But we can deal with 2 types of ramdisk:
- A classical Block Ram Disk (brd) device
- A memory compressed Ram Block Device (zram)
We can expect roughly 30% to 50% memory space gain from zram compared to brd, but zram must use 4k I/O blocks only. This means that the filesystem used for root has to only deal with a multiple of 4k I/Os.
Basic commands:
Here is a simple list of commands to manually create and use a ramdisk and mirror the root filesystem space. We create a temporary configuration that needs to be undone or the subsequent reboot will not work. But we also provide below a way of automating at startup and shutdown.
Note the root volume size (considered to be ol/root in this example):
# lvs --units k -o lv_size ol/root
  LSize
  10268672.00k
Create a ramdisk a little larger than that (at least 8M larger):
# modprobe brd rd_nr=1 rd_size=$((10268672 + 8*1024))
Verify the created disk:
# lsblk /dev/ram0
NAME MAJ:MIN RM  SIZE RO TYPE MOUNTPOINT
ram0   1:0     0 9.8G  0 disk
Put the disk under lvm control
# pvcreate /dev/ram0
  Physical volume "/dev/ram0" successfully created.
# vgextend ol /dev/ram0
  Volume group "ol" successfully extended
# vgscan --cache
  Reading volume groups from cache.
  Found volume group "ol" using metadata type lvm2
# lvconvert -y -m 1 ol/root /dev/ram0
  Logical volume ol/root successfully converted.
We now have ol/root mirror to our /dev/ram0 disk.
# lvs -a -o +devices
  LV              VG Attr       LSize  Pool Origin Data%  Meta%  Move Log Cpy%Sync Convert Devices
  root            ol rwi-aor---  9.79g                                    40.70            root_rimage_0(0),root_rimage_1(0)
  [root_rimage_0] ol iwi-aor---  9.79g                                                     /dev/sda2(307)
  [root_rimage_1] ol Iwi-aor---  9.79g                                                     /dev/ram0(1)
  [root_rmeta_0]  ol ewi-aor---  4.00m                                                     /dev/sda2(2814)
  [root_rmeta_1]  ol ewi-aor---  4.00m                                                     /dev/ram0(0)
  swap            ol -wi-ao---- <1.20g                                                     /dev/sda2(0)
A few minutes (or seconds) later, the synchronization is completed:
# lvs -a -o +devices
 LV              VG Attr       LSize  Pool Origin Data%  Meta%  Move Log Cpy%Sync Convert Devices
  root            ol rwi-aor---  9.79g                                    100.00           root_rimage_0(0),root_rimage_1(0)
  [root_rimage_0] ol iwi-aor---  9.79g                                                     /dev/sda2(307)
  [root_rimage_1] ol iwi-aor---  9.79g                                                     /dev/ram0(1)
  [root_rmeta_0]  ol ewi-aor---  4.00m                                                     /dev/sda2(2814)
  [root_rmeta_1]  ol ewi-aor---  4.00m                                                     /dev/ram0(0)
  swap            ol -wi-ao---- <1.20g                                                     /dev/sda2(0)
We have our mirrored configuration running !
For security, we can also remove the swap and /boot, /boot/efi(if it exists) mount points:
# swapoff -a
# umount /boot/efi
# umount /boot
Stopping the system also requires some actions as you need to cleanup the configuration so that it will not be looking for a gone ramdisk on reboot.
# lvconvert -y -m 0 ol/root /dev/ram0
  Logical volume ol/root successfully converted.
# vgreduce ol /dev/ram0
  Removed "/dev/ram0" from volume group "ol"
# mount /boot
# mount /boot/efi
# swapon -a
What about in-memory compression ?
As indicated above, zRAM devices can compress data in-memory, but 2 main problems need to be fixed:
- LVM does take into account zRAM devices by default
- zRAM only works with 4K I/Os
Make lvm work with zram:
The lvm configuration file has to be changed to take into account the “zram” type of devices. Including the following “types” entry to the /etc/lvm/lvm.conf file in its “devices” section:
devices {
        types = [ "zram", 16 ]
}
Root file system I/Os:
A standard Oracle Linux installation uses XFS, and we can check the sector size used (depending on the disk type used) with
# xfs_info /
meta-data=/dev/mapper/ol-root    isize=256    agcount=4, agsize=641792 blks
         =                       sectsz=512   attr=2, projid32bit=1
         =                       crc=0        finobt=0 spinodes=0
data     =                       bsize=4096   blocks=2567168, imaxpct=25
         =                       sunit=0      swidth=0 blks
naming   =version 2              bsize=4096   ascii-ci=0 ftype=1
log      =internal               bsize=4096   blocks=2560, version=2
         =                       sectsz=512   sunit=0 blks, lazy-count=1
realtime =none                   extsz=4096   blocks=0, rtextents=0
We can notice here that the sector size (sectsz) used on this root fs is a standard 512 bytes. This fs type cannot be mirrored with a zRAM device, and needs to be recreated with 4k sector sizes.
Transforming the root file system to 4k sector size:
This is simply a backup (to a zram disk) and restore procedure after recreating the root FS. To do so, the system has to be booted from another system image. Booting from an installation DVD image can be a good possibility.
- Boot from an OL installation DVD [Choose “Troubleshooting”, “Rescue a Oracle Linux system”, “3) Skip to shell”]
- Activate and mount the root volume
sh-4.2# vgchange -a y ol
  2 logical volume(s) in volume group "ol" now active
sh-4.2# mount /dev/mapper/ol-root /mnt
- create a zram to store our disk backup
sh-4.2# modprobe zram
sh-4.2# echo 10G > /sys/block/zram0/disksize
sh-4.2# mkfs.xfs /dev/zram0
meta-data=/dev/zram0             isize=256    agcount=4, agsize=655360 blks
         =                       sectsz=4096  attr=2, projid32bit=1
         =                       crc=0        finobt=0, sparse=0
data     =                       bsize=4096   blocks=2621440, imaxpct=25
         =                       sunit=0      swidth=0 blks
naming   =version 2              bsize=4096   ascii-ci=0 ftype=1
log      =internal log           bsize=4096   blocks=2560, version=2
         =                       sectsz=4096  sunit=1 blks, lazy-count=1
realtime =none                   extsz=4096   blocks=0, rtextents=0
sh-4.2# mkdir /mnt2
sh-4.2# mount /dev/zram0 /mnt2

sh-4.2# xfsdump -L BckUp -M dump -f /mnt2/ROOT /mnt
xfsdump: using file dump (drive_simple) strategy
xfsdump: version 3.1.7 (dump format 3.0) - type ^C for status and control
xfsdump: level 0 dump of localhost:/mnt
...
xfsdump: dump complete: 130 seconds elapsed
xfsdump: Dump Summary:
xfsdump:   stream 0 /mnt2/ROOT OK (success)
xfsdump: Dump Status: SUCCESS

sh-4.2# umount /mnt
- recreate the xfs on the disk with a 4k sector size
sh-4.2# mkfs.xfs -f -s size=4096 /dev/mapper/ol-root
meta-data=/dev/mapper/ol-root    isize=256    agcount=4, agsize=641792 blks
         =                       sectsz=4096  attr=2, projid32bit=1
         =                       crc=0        finobt=0, sparse=0
data     =                       bsize=4096   blocks=2567168, imaxpct=25
         =                       sunit=0      swidth=0 blks
naming   =version 2              bsize=4096   ascii-ci=0 ftype=1
log      =internal log           bsize=4096   blocks=2560, version=2
         =                       sectsz=4096  sunit=1 blks, lazy-count=1
realtime =none                   extsz=4096   blocks=0, rtextents=0

sh-4.2# mount /dev/mapper/ol-root /mnt
- restore the backup
sh-4.2# xfsrestore -f /mnt2/ROOT /mnt
xfsrestore: using file dump (drive_simple) strategy
xfsrestore: version 3.1.7 (dump format 3.0) - type ^C for status and control
xfsrestore: searching media for dump
...
xfsrestore: restore complete: 337 seconds elapsed
xfsrestore: Restore Summary:
xfsrestore:   stream 0 /mnt2/ROOT OK (success)
xfsrestore: Restore Status: SUCCESS
sh-4.2# umount /mnt
sh-4.2# umount /mnt2
- reboot the machine on its disk (may need to remove the DVD)
sh-4.2# reboot
- login and verify the root filesystem
$ xfs_info /
meta-data=/dev/mapper/ol-root    isize=256    agcount=4, agsize=641792 blks
         =                       sectsz=4096  attr=2, projid32bit=1
         =                       crc=0        finobt=0 spinodes=0
data     =                       bsize=4096   blocks=2567168, imaxpct=25
         =                       sunit=0      swidth=0 blks
naming   =version 2              bsize=4096   ascii-ci=0 ftype=1
log      =internal               bsize=4096   blocks=2560, version=2
         =                       sectsz=4096  sunit=1 blks, lazy-count=1
realtime =none                   extsz=4096   blocks=0, rtextents=0
With sectsz=4096, our system is now ready for zRAM mirroring.
Basic commands with a zRAM device:
# modprobe zram
# zramctl --find --size 10G
/dev/zram0
# pvcreate /dev/zram0
  Physical volume "/dev/zram0" successfully created.
# vgextend ol /dev/zram0
  Volume group "ol" successfully extended
# vgscan --cache
  Reading volume groups from cache.
  Found volume group "ol" using metadata type lvm2
# lvconvert -y -m 1 ol/root /dev/zram0
  Logical volume ol/root successfully converted.
# lvs -a -o +devices
  LV              VG Attr       LSize  Pool Origin Data%  Meta%  Move Log Cpy%Sync Convert Devices
  root            ol rwi-aor---  9.79g                                    12.38            root_rimage_0(0),root_rimage_1(0)
  [root_rimage_0] ol iwi-aor---  9.79g                                                     /dev/sda2(307)
  [root_rimage_1] ol Iwi-aor---  9.79g                                                     /dev/zram0(1)
  [root_rmeta_0]  ol ewi-aor---  4.00m                                                     /dev/sda2(2814)
  [root_rmeta_1]  ol ewi-aor---  4.00m                                                     /dev/zram0(0)
  swap            ol -wi-ao---- <1.20g                                                     /dev/sda2(0)
# lvs -a -o +devices
  LV              VG Attr       LSize  Pool Origin Data%  Meta%  Move Log Cpy%Sync Convert Devices
  root            ol rwi-aor---  9.79g                                    100.00           root_rimage_0(0),root_rimage_1(0)
  [root_rimage_0] ol iwi-aor---  9.79g                                                     /dev/sda2(307)
  [root_rimage_1] ol iwi-aor---  9.79g                                                     /dev/zram0(1)
  [root_rmeta_0]  ol ewi-aor---  4.00m                                                     /dev/sda2(2814)
  [root_rmeta_1]  ol ewi-aor---  4.00m                                                     /dev/zram0(0)
  swap            ol -wi-ao---- <1.20g                                                     /dev/sda2(0)
# zramctl
NAME       ALGORITHM DISKSIZE  DATA COMPR TOTAL STREAMS MOUNTPOINT
/dev/zram0 lzo            10G  9.8G  5.3G  5.5G       1
The compressed disk uses a total of 5.5GB of memory to mirror a 9.8G volume size (using in this case 8.5G).
Removal is performed the same way as brd, except that the device is /dev/zram0 instead of /dev/ram0.
Automating the process:
Fortunately, the procedure can be automated on system boot and shutdown with the following scripts (given as examples).
The start method: /usr/sbin/start-raid1-ramdisk: [https://github.com/oracle/linux-blog-sample-code/blob/ramdisk-system-image/start-raid1-ramdisk]
After a chmod 555 /usr/sbin/start-raid1-ramdisk, running this script on a 4k xfs root file system should show something like:
# /usr/sbin/start-raid1-ramdisk
  Volume group "ol" is already consistent.
RAID1 ramdisk: intending to use 10276864 K of memory for facilitation of [ / ]
  Physical volume "/dev/zram0" successfully created.
  Volume group "ol" successfully extended
  Logical volume ol/root successfully converted.
Waiting for mirror to synchronize...
LVM RAID1 sync of [ / ] took 00:01:53 sec
  Logical volume ol/root changed.
NAME       ALGORITHM DISKSIZE  DATA COMPR TOTAL STREAMS MOUNTPOINT
/dev/zram0 lz4           9.8G  9.8G  5.5G  5.8G       1
The stop method: /usr/sbin/stop-raid1-ramdisk: [https://github.com/oracle/linux-blog-sample-code/blob/ramdisk-system-image/stop-raid1-ramdisk]
After a chmod 555 /usr/sbin/stop-raid1-ramdisk, running this script should show something like:
# /usr/sbin/stop-raid1-ramdisk
  Volume group "ol" is already consistent.
  Logical volume ol/root changed.
  Logical volume ol/root successfully converted.
  Removed "/dev/zram0" from volume group "ol"
  Labels on physical volume "/dev/zram0" successfully wiped.
A service Unit file can also be created: /etc/systemd/system/raid1-ramdisk.service [https://github.com/oracle/linux-blog-sample-code/blob/ramdisk-system-image/raid1-ramdisk.service]
[Unit]
Description=Enable RAMdisk RAID 1 on LVM
After=local-fs.target
Before=shutdown.target reboot.target halt.target

[Service]
ExecStart=/usr/sbin/start-raid1-ramdisk
ExecStop=/usr/sbin/stop-raid1-ramdisk
Type=oneshot
RemainAfterExit=yes
TimeoutSec=0

[Install]
WantedBy=multi-user.target
Conclusion:
When the system disk access problem manifests itself, the ramdisk mirror branch will provide the possibility to investigate the situation. This procedure goal is not to keep the system running on this memory mirror configuration, but help investigate a bad situation.
When the problem is identified and fixed, I really recommend to come back to a standard configuration — enjoying the entire memory of the system, a standard system disk, a possible swap space etc.
Hoping the method described here can help. I also want to thank for their reviews Philip “Bryce” Copeland who also created the first prototype of the above scripts, and Mark Kanda who also helped testing many aspects of this work.