Introduction
GPUs offer unparalleled computing power and are the backbone of today’s computations at scale. Organizations leverage GPUs to train their models, run simulations and perform data analysis. These computations might utilize sensitive and top-secret data, which require special protection at each step. Data must be encrypted when sent across the network (in-transit) and in storage (at-rest). Confidential Computing adds protection of data during computations (in-use) by creating an isolated and trusted environment where data cannot be read or altered by the third party. Enabling Confidential Computing requires a couple of configuration steps but no code changes to the compute workload.
This post guides you through the process of configuring a Confidential Computing environment suitable for processing sensitive data with GPUs using a Tech Preview of the latest Linux kernel running on Oracle Linux 9.
What is Confidential Computing?
Confidential Computing (CC) is a solution in which processed data is isolated in a special context called a Trusted Execution Environment (TEE). A TEE is a virtualized encrypted space created by a combination of hardware and software security mechanisms. Trusted applications run within hardware-isolated virtual machines that are shielded from untrusted host software, BIOS and firmware. These Confidential Virtual Machines (CVMs) are enabled by technologies such as AMD Secure Encrypted Virtualization – Secure Nested Paging (SEV-SNP) and Intel Trusted Domain Extensions (TDX). The private memory of a CVM is encrypted and its CPU state is scrubbed on every VM exit to protect it from any other software, including the hypervisor.
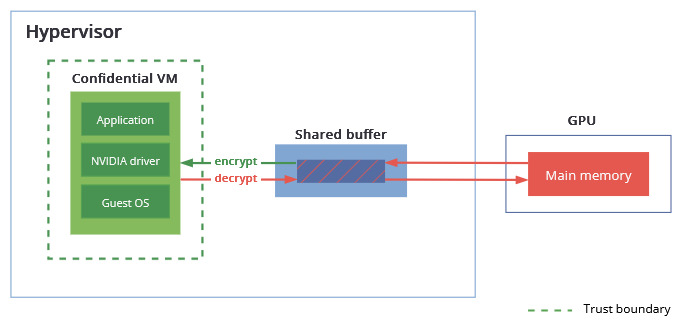
With the increase in GPU-accelerated workloads, there’s a growing need of extending Confidential Computing to include GPU processing. The CPU solution only focuses on computations happening in main memory and provides no security guarantees for I/O communications. Peripheral devices are considered untrusted; the data exchanged with them resides in a shared insecure buffer outside of TEE. The information coming from there has to be checked for malicious content and validated before use. Memory contents of the GPU are in the open and can be read and written without restrictions, meaning no protection of data in-use (Figure 1).
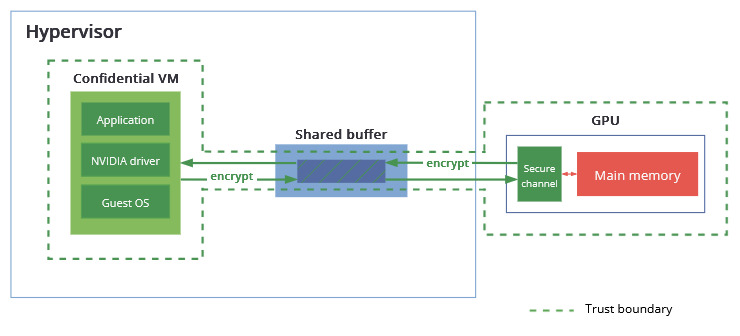
Workloads that deal with sensitive data, such as patient data, financial records and proprietary information have to employ strong security measures to reduce the risk of data breaches and to meet regulatory requirements. This also means steering away from solutions that take advantage of the parallelization provided by GPUs. Even with a CPU-CC solution in place, the GPU data is protected only when going from the shared buffer to the Confidential VM, but not when it is in memory or sent over the bus. To broaden the trust boundary to include I/O operations, NVIDIA introduced a Confidential Computing mode in their Hopper and Blackwell GPU architectures. Here, any data transferred between the Confidential VM and GPU is first encrypted with a negotiated key and then placed in the shared buffer. Although the host software has access to this memory space, the data is unintelligible and cannot be decrypted by an unauthorized party. In addition to this, a GPU in Confidential Computing mode restricts access to its memory to a small portion of registers. The private data goes through a controlled interface, and direct memory access is blocked (Figure 2).
Why enable it?
- Protection from unauthorized users – the Confidential VM is shielded from unauthorized users gaining access to information in memory and CPU registers, even if those users have administrative access to the system, such as a company’s own IT administrators or Cloud System Providers (CSP).
- Meeting compliance requirements – Confidential Computing provides an environment for processing sensitive data requiring special protection, such as medical or financial records, ensuring regulatory compliance.
- No code changes required – existing applications can be run in secure, isolated contexts without modifications.
- Confidential data sharing – multiple parties can collaborate on learning solutions without exposing raw data they contribute to the dataset.
Hardware Requirements
Confidential Compute Capable Host/CPU
The first building block is a Confidential Computing capable bare-metal host with CPUs that provide TEE capabilities.
Intel introduced Trust Domain Extensions (TDX) capable Xeon CPUs with Emerald Rapids (5th gen.) and followed with Granite Rapids (6th gen.). As part of preparing this article, we used a system running Intel Xeon 8592+ (Emerald Rapids) CPUs.
On Intel CPUs, Confidential Computing is enabled by a new CPU mode called Secure-Arbitration Mode (SEAM) which hosts a digitally signed, secure TDX module running in a reserved memory space which sits between the host and the Confidential VM (also know as a Trust Domains (TD) in Intel parlance) and manages the guest/host separation. This TDX module can be trusted by the TD as it is isolated from the Virtual Machine Manager (VMM) – QEMU, host/hypervisor, and other non-TD software.
The operation of the TDX module provides memory encryption and integrity protection (i.e. preventing adversaries from modifying memory or register state of the VM) and hardware-measurement registers are used to control the access. Additional information on how the data is securely segregated is available in the Trust Domain Extensions White Paper (PDF) on the Intel documentation site.
Confidential Compute Capable GPUs
NVIDIA introduced a Confidential Compute mode with Hopper GPUs and extended it with the Blackwell generation of GPUs. For this article, we used NVIDIA Blackwell HGX B200 GPUs.
Configuring the Host
NOTE: The gpu-admin-tools package below also provides some sample scripts to configure a host to support TDX guests. Executing /usr/share/gpu-admin-tools/sample/coco/coco-setup-host.sh –tdx runs the instructions listed in the rest of this section of the blog.
Installing Software Components
This example of Confidential Computing requires:
- Oracle Linux 9
- A kernel with TDX host functionality (UEK-next in this article)
- A QEMU with TDX functionality (QEMU 10.1 in this article)
- The gpu-admin-tools package to set/query CC mode for the GPUs
Some software components used in this article are hosted in developer yum repos (intended as technical previews and not recommended for production environments). Those repos should be enabled before executing the dnf install commands below.
sudo dnf install yum-utils oraclelinux-developer-release-el9 oraclelinux-release-el9
sudo dnf config-manager --enable ol9_developer
sudo dnf config-manager --enable ol9_developer_kvm_utils
sudo dnf config-manager --enable ol9_kvm_utils

sudo rpm --import https://yum.oracle.com/RPM-GPG-KEY-oracle-development
sudo dnf config-manager --add-repo https://yum.oracle.com/repo/OracleLinux/OL9/developer/UEKnext/x86_64
gpu-admin-tools
In order to run the GPU hardware in Confidential Compute mode (CC-mode), the GPU hardware needs to be programmed to enable it using /usr/sbin/nvidia_gpu_tools provided by the gpu-admin-tools RPM (enabling CC-mode will be covered in the Configure GPU hardware section).
sudo dnf install gpu-admin-toolsHost Operating System and kernel
The bare-metal host must run Oracle Linux 9 with a TDX-capable kernel. This article uses the UEK-next kernel based on v6.16; the contents of the UEK-next repository are intended for development purposes only. Oracle recommends that this kernel not be used in production environments. We’ll update this blog when a production UEK release supports this functionality.
sudo dnf install kernel-ueknext-6.16.0QEMU
To create the guest VMs we need to install QEMU, a Virtual Machine Manager (VMM), with TDX support. QEMU 10.1 is available for non-production use in the ol9_developer_kvm_utils yum repo.
sudo dnf install qemu-kvm-10.1.2OVMF
The OVMF version must be 20250102 or later (the package versions are based on dates in the format yyyymmdd so anything newer than this date is sufficient):
sudo dnf install edk2-ovmfConfigure BIOS settings
Consult your hardware manufacturer’s documentation to update the BIOS settings to enable Trusted Domain Extensions (TDX).
Configure GRUB settings
Set the TDX capable kernel as the default in GRUB.
sudo grubby --set-default=/boot/vmlinuz-6.16.0-1.el9ueknext.x86_64In order to pass though the GPU to a TDX capable guest VM, the following host kernel settings need to be enabled in GRUB.
sudo grubby --update-kernel=$(sudo grubby --default-kernel) --args="kvm_intel.tdx=on kvm.enable_virt_at_load=1 nohibernate"
sudo grubby --update-kernel=$(sudo grubby --default-kernel) --args="intel_iommu=on iommu=pt"
sudo grubby --update-kernel=$(sudo grubby --default-kernel) --args="modprobe.blacklist=nouveau"
Host capability verification
Reboot the host and verify that TDX is enabled by checking that the following command returns ‘Y’.
cat /sys/module/kvm_intel/parameters/tdxand that sudo dmesg | grep "tdx" includes the output virt/tdx: module initialized
Configure GPU hardware
The Confidential Compute mode of each GPU can be toggled on or off by running the following command on the host. The nvidia_gpu_tools command can also select a specific GPU.
sudo nvidia_gpu_tools --set-cc-mode=on --devices gpus --reset-after-cc-mode-switchThe current CC mode can be queried via
sudo nvidia_gpu_tools --query-cc-mode --devices gpus
(...)
2025-10-24,06:23:59.868 INFO     GPU 0000:0f:00.0 B200 0x2901 BAR0 0x11c000000000 CC mode is on
2025-10-24,06:23:59.868 WARNING  GPU 0000:0f:00.0 B200 0x2901 BAR0 0x11c000000000 has CC mode on, some functionality may not work
2025-10-24,06:23:59.868 INFO     GPU 0000:5b:00.0 B200 0x2901 BAR0 0x15c000000000 CC mode is on
2025-10-24,06:23:59.868 WARNING  GPU 0000:5b:00.0 B200 0x2901 BAR0 0x15c000000000 has CC mode on, some functionality may not work
2025-10-24,06:23:59.868 INFO     GPU 0000:a8:00.0 B200 0x2901 BAR0 0x1dc000000000 CC mode is on
2025-10-24,06:23:59.868 WARNING  GPU 0000:a8:00.0 B200 0x2901 BAR0 0x1dc000000000 has CC mode on, some functionality may not work
2025-10-24,06:23:59.868 INFO     GPU 0000:d8:00.0 B200 0x2901 BAR0 0x1fc000000000 CC mode is on
2025-10-24,06:23:59.868 WARNING  GPU 0000:d8:00.0 B200 0x2901 BAR0 0x1fc000000000 has CC mode on, some functionality may not work
The system as a whole does not need resetting or rebooting to enable/disable CC-mode. The CC-mode setting persists across host reboots and power cycles.
Note that it will not be possible to query or set CC-mode using nvidia_gpu_tools while any kernel module is bound to the GPU.
You can check this by running lspci -d 10de: -k and checking if a driver is explicitly listed after “Kernel driver in use:”. If present, you will need to unload the driver. For the NVIDIA drivers, you will need to unload all dependent modules.
sudo modprobe -r nvidia_drm nvidia_modeset nvidia_uvm nvidiaAfter successfully setting up the CC-mode on the GPUs, load the vfio-pci device driver to enable VFIO passthrough.
sudo modprobe vfio-pciIdentify NVIDIA GPUs in the system and get their device/vendor IDs.
lspci -nn | grep NVIDIA
0f:00.0 3D controller [0302]: NVIDIA Corporation Device [10de:2901] (rev a1)
5b:00.0 3D controller [0302]: NVIDIA Corporation Device [10de:2901] (rev a1)
(...)
Use that information to bind the devices to vfio and confirm the operation was successful.
ls /dev/vfio
vfio

echo "10de 2901" | tee -a /sys/bus/pci/drivers/vfio-pci/new_id
10de 2901

ls /dev/vfio/
129  150  171  20  204  41  62  95  devices  vfio
Launching a TDX-capable guest
To create a TDX-capable guest and to pass through a GPU, there are two extra QEMU command line configuration sections needed.
To enable the TDX functionality (e.g. for a VM with 64G of memory):
-machine q35,accel=kvm,confidential-guest-support=tdx
-object memory-backend-memfd,id=ram1,size=64G,share=true,reserve=false
-object '{"qom-type":"tdx-guest","id":"tdx","quote-generation-socket":{"type":"vsock","cid":"2","port":"4050"}}'
To pass through the GPU to the guest VM (e.g. for a GPU with a PCI BDF of 5b:00.0):
-object iommufd,id=iommufd0
-device pcie-root-port,id=pci.0,bus=pcie.0,chassis=0
-device vfio-pci,host=5b:00.0,bus=pci.0,iommufd=iommufd0
NOTE: The gpu-admin-tools package also provides a sample script to launch a TDX guest: /usr/share/gpu-admin-tools/sample/coco/coco-launch-guest.sh
–image is used to specify a QCOW2 disk image
–gpus is used to specify a GPU (PCI BDF obtained from first column inlspci -d 10de:output)
Configuring the guest
To run workloads in an environment secured by Confidential Computing, the guest requires a TDX-capable kernel, NVIDIA kernel modules, and a configured CUDA environment. While it’s possible to run a different distribution than the host, this guide discusses the configuration of Oracle Linux 9 as the guest system. Consult the documentation for the distribution of your choice to see what is needed to enable Confidential Computing there.
Installing Software Components
The guest must run Oracle Linux 9 with a TDX-capable kernel and use NVIDIA GPU drivers. This article uses the v6.16-based UEK-next kernel and drivers provided by open-gpu-kernel-modules package, which are not for production use.
Guest kernel and NVIDIA driver
Enable the repo for UEK-next kernel and NVIDIA driver. Install the kernel and open-gpu-kernel-modules packages.
sudo dnf install yum-utils
sudo rpm --import https://yum.oracle.com/RPM-GPG-KEY-oracle-development
sudo dnf config-manager --add-repo https://yum.oracle.com/repo/OracleLinux/OL9/developer/UEKnext/x86_64
sudo dnf install kernel-ueknext-6.16.0 open-gpu-kernel-modules
To ensure there are no driver conflicts, disable the Nouveau kernel driver. Once this is done, you can generate initramfs for the new kernel.
sudo grubby --update-kernel=/boot/vmlinuz-6.16.0-1.el9ueknext.x86_64 --args='rd.driver.blacklist=nouveau'
sudo dracut --force
To finalize the installation of the GPU driver, run the NVIDIA-provided installer NVIDIA-Linux-x86_64-<ver>.run. Go to https://download.nvidia.com/XFree86/Linux-x86_64/<ver> to download it, where <ver> is the version of the NVIDIA module. To find out the version of the driver, run modinfo command.
$ modinfo -k 6.16.0-1.el9ueknext.x86_64 nvidia
filename:       /lib/modules/6.16.0-1.el9ueknext.x86_64/kernel/drivers/video/nvidia.ko
import_ns:      DMA_BUF
alias:          char-major-195-*
version:        580.95.05
(...)
Make sure to review license.txt document on the NVIDIA’s website before continuing the installation.
Run the script with --no-kernel-modules to install the userspace driver and required libraries.
sudo sh ./NVIDIA-Linux-x86_64-580.95.05.run --no-kernel-modulesnvidia-persistenced Service and CUDA
To complete the configuration of the environment for Confidential Computing, you have to install nvidia-persistenced software and the CUDA runtime. nvidia-persistenced is a utility that maintains the state of the device even when the driver doesn’t use it. NVIDIA CUDA is a computing platform that allows programmers to use GPUs for general purpose computations and is required to run GPU-accelerated workloads.
To obtain NVIDIA software, enable the official CUDA repository:
sudo rpm --import https://developer.download.nvidia.com/compute/cuda/repos/rhel9/x86_64/D42D0685.pub
sudo dnf config-manager --add-repo https://developer.download.nvidia.com/compute/cuda/repos/rhel9/x86_64/cuda-rhel9.repo
Install nvidia-persistenced package:
sudo dnf install nvidia-persistenced-580.95.05 libnvidia-cfg-580.95.05The nvidia-persistenced service configuration has to be modified to work properly with a GPU in Confidential Computing mode. Run the following command to open an editor to modify the service
sudo systemctl edit --full nvidia-persistencedChange the “ExecStart” line to the following to automatically launch nvidia-persistenced in the persistenced mode:
ExecStart=/usr/bin/nvidia-persistenced --user nvidia-persistenced --uvm-persistence-mode --verboseReload systemd services for the change to take effect and enable the nvidia-persistenced service.
sudo systemctl daemon-reload
sudo systemctl enable nvidia-persistenced.service
Finally, install the CUDA toolkit package:
sudo dnf install cuda-toolkit-13-0Follow official NVIDIA documentation for detailed and up-to-date instructions on how to configure the CUDA environment.
Verification
Once you have configured the guest, reboot the virtual machine and select the TDX-capable kernel. Confirm that the nvidia-persistenced started without issues and is running.
sudo systemctl status nvidia-persistenced | grep Active:
     Active: active (running) since Wed 2025-10-15 09:49:28 EDT; 1min 30s ago
Verify that the guest is running in Confidential Computing mode.
sudo dmesg | grep -i tdx
[    0.000000] tdx: Guest detected

nvidia-smi conf-compute -f
CC status: ON
After confirming that the environment is ready for running secure computations, mark the GPU as CC-ready. Make sure the operation was successful.
nvidia-smi conf-compute -srs 1

nvidia-smi conf-compute -q

==============NVSMI CONF-COMPUTE LOG==============

    CC State                   : OFF
    Multi-GPU Mode             : None
    CPU CC Capabilities        : None
    GPU CC Capabilities        : CC Capable
    CC GPUs Ready State        : Ready
The system is now ready to run applications in the Confidential Computing mode.
Conclusion
GPU Confidential Computing protects data by creating an isolated and encrypted environment, building on the top of CPU-CC solutions, such as TDX. This tutorial presented the steps required to configure Confidential Computing on the Oracle Linux 9 host, accompanied by a guide for a secure, Oracle Linux-based virtual machine. As it could be seen here, enabling Confidential Computing mode does not require code changes. This means that already existing applications can benefit from hardware-based protection in a straightforward manner with minimal performance impact.