or Learning not to hate conflict resolution
If you’re a developer working on new features, you may never have to deal with backporting patches in your day-to-day work. However, you may occasionally find yourself in a situation where you need to backport a patch to an older version, maybe a security fix that needs to be applied to older versions that are still in use. You may thus find yourself in a position where you have expert-level knowledge of hardware or a subsystem but don’t necessarily have a lot of experience with the practical process of backporting patches. In my opinion, backporting of non-trivial patches is a completely separate skill from development, and needs practice and experience to be done well. Luckily, there are a number of things you can do to make the process easier.
When we create Ksplice updates at Oracle, being able to backport patches is an essential skill. The reason is that we don’t just prepare updates for the second most-recently released kernel to get it up to scratch with the most recently released kernel; we need to backport each patch all the way back to the earliest kernel that Ksplice supports.
Applying the patch to a tree
Sometimes the patch you are backporting already exists as a git commit, in which case you just cherry-pick it directly using git cherry-pick. However, if the patch comes from an email, as it often does for the Linux kernel, you will need to apply it to a tree using git am.
If you’ve ever used git am, you probably already know that it is quite picky about the patch applying perfectly to your source tree. In fact, you’ve probably had nightmares about .rej files and trying to edit the patch to make it apply.
What I strongly recommend doing instead is to find an appropriate base version where the patch applies cleanly and then cherry-pick it over to your destination tree, as this will make git output conflict markers and let you resolve conflicts with the help of git and any other conflict resolution tools you might prefer to use.
It’s generally better to use the exact same base as the one the patch was generated from, but it doesn’t really matter that much as long as it applies cleanly and isn’t too far from the original base. The only problem with applying the patch to the “wrong” base is that it may pull in more unrelated changes in the context of the diff when cherry-picking it to the older branch.
If you are using b4 and you are applying the patch directly from an email, you can use b4 am with the options -g/--guess-base and -3/--prep-3way to do some of this automatically (see this presentation for more information). However, the rest of this post will assume that you are doing a plain git cherry-pick.
Once you have the patch in git, you can go ahead and cherry-pick it into your source tree. Don’t forget to cherry-pick with -x if you want a written record of where the patch came from!
Conflicts
Uh-oh; the cherry-pick failed with a vaguely threatening message:
CONFLICT (content): Merge conflict
What to do now?
In general, conflicts appear when the context of the patch (i.e., the lines being changed and/or the lines surrounding the changes) doesn’t match what’s in the tree you are trying to apply the patch to.
For backports in particular, what likely happened was that your (older) branch is missing a patch compared to the branch you are backporting from – however, it is also possible that your older branch has some commit that doesn’t exist in the newer branch. In any case, the result is a conflict that needs to be resolved.
If your attempted cherry-pick fails with a conflict, git automatically edits the files to include so-called conflict markers showing you where the conflict is and how the two branches have diverged. Resolving the conflict typically means editing the end result in such a way that it takes into account these other commits.
Resolving the conflict can be done either by hand in a regular text editor or using a dedicated conflict resolution tool. I personally prefer to use an editor and edit the conflict directly, as I feel it’s easier to understand what I’m doing and also to control the final result. There are definitely pros and cons to each method, and sometimes there’s value in using both.
We will not cover using dedicated merge tools here beyond providing some pointers to various tools that you could use:
To configure git to work with these, see git mergetool --help or the official documentation.
Prerequisite patches
Most conflicts happen because the branch you are backporting to is missing some patches compared to the branch you are backporting from. In the more general case (such as merging two independent branches), development could have happened on either branch, or the branches have simply diverged – perhaps your older branch had some other backports applied to it that themselves needed conflict resolutions, causing a divergence.
I think it’s important to always identify the commit or commits that caused the conflict, as otherwise you cannot be confident in the correctness of your resolution. As an added bonus, especially if the patch is in an area you’re not that famliar with, the changelogs of these commits will often give you the context to understand the code and potential problems or pitfalls with your conflict resolution.
git log
A good first step is to look at git log for the file that has the conflict – this is usually sufficient when there aren’t a lot of patches to the file, but may get confusing if the file is big and frequently patched. You should run git log on the range of commits between your currently checked-out branch and the parent of the patch you are picking, i.e.:
git log HEAD..COMMIT^ -- PATH

Even better, if you want to restrict this output to a single function (because that’s where the conflict appears), you can use the following syntax:
git log -L:'\<function\>':PATH HEAD..COMMIT^
Note the \< and \> around the function name – these ensure that the matches are anchored on a word boundary. This is important, as this part is actually a regex and git only follows the first match, so if you use -L:thread_stack:kernel/fork.c it may only give you results for the function try_release_thread_stack_to_cache even though there are many other functions in that file containing the string thread_stack in their names.
Another useful option for git log is -G, which allows you to filter on certain strings appearing in the diffs of the commits you are listing:
git log -G'regex' HEAD..COMMIT^ -- PATH
This can also be a handy way to quickly find when something (e.g. a function call or a variable) was changed, added, or removed. The search string is a regular expression, which means you can potentially search for more specific things like assignments to a specific struct member.
git blame
Another way to find prerequisite commits (albeit only the most recent one for a given conflict) is to run git blame. In this case, you need to run it against the parent commit of the patch you are cherry-picking and the file where the conflict appared, i.e.:
git blame COMMIT^ -- PATH
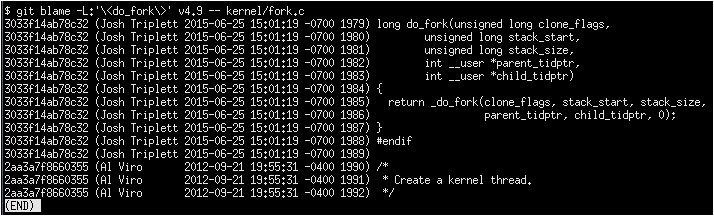
This command also accepts the -L argument, but in this case you specify the filename at the end of the command as usual:
git blame -L:'\<function\>' COMMIT^ -- PATH
Navigate to the place where the conflict occurred. The first column of the blame output is the commit ID of the patch that added a given line of code. What I would typically do would be to git show these commits and see if they look like they might be the source of the conflict. Sometimes there will be more than one of these commits, either because multiple commits changed different lines of the same conflict area or because multiple subsequent patches changed the same line (or lines) multiple times. In the latter case, you may have to run git blame again, this time with the parent commit of the current blame iteration.
Prerequisite vs. incidental patches
Having found the patch that caused the conflict, you need to determine whether it is a prerequisite for the patch you are backporting or whether it is just incidental and can be skipped. An incidental patch would be one that touches the same code as the patch you are backporting, but does not change the semantics of the code in any material way. For example, a whitespace cleanup patch is completely incidental – likewise, a patch that simply renames a function or a variable would be incidental as well. On the other hand, if the function being changed does not even exist in your current branch then this would not be incidental at all and you need to carefully consider whether the patch adding the function should be cherry-picked first.
If you find that there is a necessary prerequisite patch, then you need to stop and cherry-pick that instead. If you’ve already resolved some conflicts in a different file and don’t want to do it again, you can create a temporary copy of that file.
To abort the current cherry-pick, go ahead and run git cherry-pick --abort, then restart the cherry-picking process with the commit ID of the prerequisite patch instead.
Understanding conflict markers
Let’s say you’ve decided against picking (or reverting) additional patches and you just want to resolve the conflict.
Combined diffs
Git will have inserted conflict markers into your file. Out of the box, this will look something like:
<<<<<<< HEAD
this is what's in your current tree before cherry-picking
=======
this is what the patch wants it to be after cherry-picking
>>>>>>> COMMIT... title
This is what you would see if you opened the file in your editor.
Important: When you are resolving a conflict, the behavior of git diff is different from its normal behavior. If you just run git diff without any arguments, the output would look something like this:
$ git diff
[...]
++<<<<<<<< HEAD
 +this is what's in your current tree before cherry-picking
++========
+ this is what the patch wants it to be after cherry-picking
++>>>>>>>> COMMIT... title
Notice the two columns of diff markers instead of the usual one; this is a so-called “combined diff”, here showing the 3-way diff (or diff-of-diffs) between 1) the current branch (before cherry-picking) and the current working directory and 2) the current branch (before cherry-picking) and the file as it looks after the original patch has been applied.
Better diffs
These 3-way diffs include all the other changes that happened to the file between your current branch and the branch you are cherry-picking from. While this is useful for spotting other changes that you need to take into account, this also makes the output of git diff somewhat intimidating and difficult to read. I instead prefer to run git diff HEAD (or git diff --ours) which shows only the diff between the current branch before cherry-picking and the current working directory. It looks like this:
$ git diff HEAD
[...]
+<<<<<<<< HEAD
 this is what's in your current tree before cherry-picking
+========
+this is what the patch wants it to be after cherry-picking
+>>>>>>>> COMMIT... title
As you can see, this reads just like any other diff and makes it clear which lines are in the current branch and which lines are being added because they are part of the merge conflict or the patch being cherry-picked.
Merge styles and diff3
The default conflict marker style shown above is known as the merge style. There is also another style available, known as the diff3 style, which looks like this:
<<<<<<< HEAD
this is what is in your current tree before cherry-picking
||||||| parent of COMMIT (title)
this is what the patch expected to find there
=======
this is what the patch wants it to be after being applied
>>>>>>> COMMIT (title)
As you can see, this has 3 parts instead of 2, and includes what git expected to find there but didn’t. I personally vastly prefer this style as it makes it much clearer what the patch actually changed; i.e., it allows you to compare the before-and-after versions of the file for the commit you are cherry-picking. This allows me to make better decisions about how to resolve the conflict.
To change conflict marker styles, you can use the following command:
git config merge.conflictStyle diff3
There is a third option, zdiff3, introduced in Git 2.35, which has the same 3 sections as diff3, but where common lines have been trimmed off, making the conflict area smaller in some cases.
Iterating on conflict resolutions
The first step in any conflict resolution process is to understand the patch you are backporting. For the Linux kernel this is especially important, since an incorrect change can lead to the whole system crashing – or worse, an undetectable security vulnerability.
Understanding the patch can be easy or difficult depending on the patch itself, the changelog, and your familiarity with the code being changed. However, a good question for every change (or every hunk of the patch) might be: “Why is this hunk in the patch?” The answers to these questions will inform your conflict resolution.
Screen layout
One thing that I like to do is to keep one window open on the left-hand side of my screen, simply displaying as much as possible of the original patch. This shows you what had to change, and can serve as a guide for what your backported patch needs to do. (You can also see this from the conflict markers, but you may prefer to read these changes in the normal “unified diff” format.) Then, on the right, I have my editor:
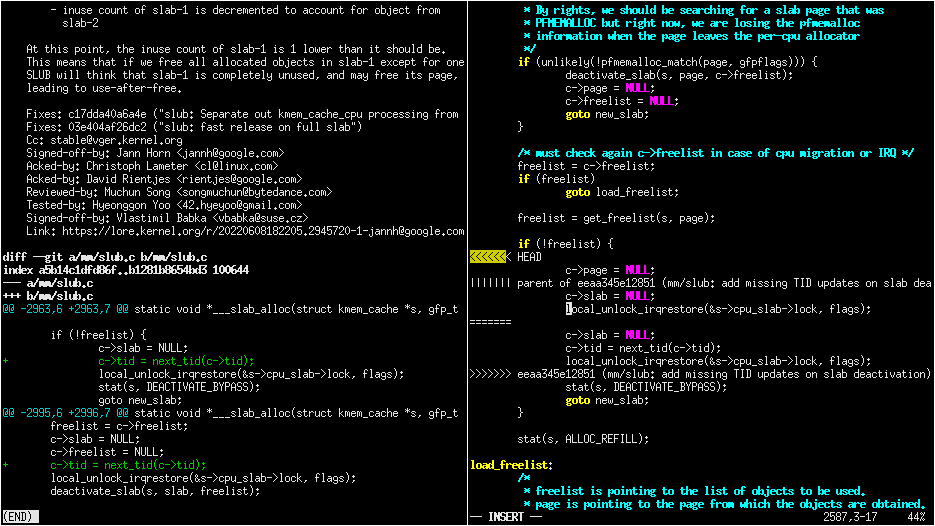
This is by no means the only way to do things, the important thing is being able to easily use the original patch as a reference and a guide for the changes you make.
Resolution process
Sometimes the easiest thing to do is to just remove all but the first part of the conflict, leaving the file essentially unchanged, and apply the changes by hand. Perhaps the patch is changing a function call argument from 0 to 1 while a conflicting change added an entirely new (and insignificant) parameter to the end of the parameter list; in that case, it’s easy enough to change the argument from 0 to 1 by hand and leave the rest of the arguments alone. This technique of manually applying changes is mostly useful if the conflict pulled in a lot of unrelated context that you don’t really need to care about.
For particularly nasty conflicts with many conflict markers, you can use git add or git add -i to selectively stage your resolutions to get them out of the way; this also lets you use git diff HEAD to always see what remains to be resolved or git diff --cached to see what your patch looks like so far.
Function arguments
Pay attention to changing function arguments! It’s easy to gloss over details and think that two lines are the same but actually they differ in some small detail like which variable was passed as an argument (especially if the two variables are both a single character that look the same, like i and j).
Error handling
If you cherry-pick a patch that includes a goto statement (typically for error handling), it is absolutely imperative that you double check that the target label is still correct on the target branch. Error handling is typically located at the bottom of the function, so it may not be part of the conflict, but could have been changed by other patches.
Dealing with file renames
One of the most annoying things that can happen while backporting a patch is discovering that one of the files being patched has been renamed, as that typically means git won’t even put in conflict markers, but will just throw up its hands and say (paraphrased): “Unmerged path! You do the work…”
There are generally a few ways to deal with this. If the patch to the renamed file is small, like a one-line change, the easiest thing is to just go ahead and apply the change by hand and be done with it. On the other hand, if the change is big or complicated, you definitely don’t want to do it by hand.
Sometimes the right thing to do will be to also backport the patch that did the rename, but that’s definitely not the most common case. Instead, what I would do would be to temporarily rename the file in the branch you’re backporting to (using git mv and committing the result), restart the attempt to cherry-pick the patch, rename the file back (git mv and committing again), and finally squash the result using git rebase -i so it appears as a single commit when you are done.
Verifying the result
colordiff
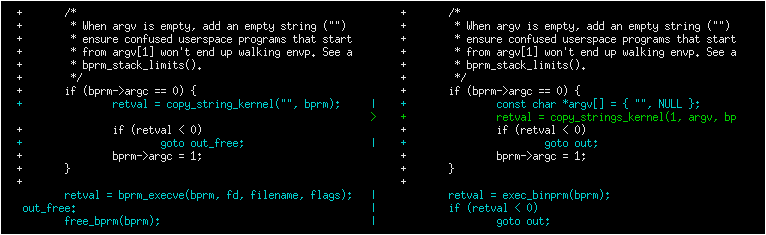
Having committed our conflict-free new patch, we can now compare our patch to the original patch. I like to use colordiff, a tool that can show two files side by side and color them according to the changes between them:
colordiff -yw -W 200 <(git diff -W UPSTREAM_COMMIT^-) <(git diff -W HEAD^-) | less -SR
Here, -y means to do a side-by-side comparison; -w ignores whitespace, and -W 200 sets the width of the output (as otherwise it will use 130 by default, which is often a bit too little).
The rev^- syntax is a handy shorthand for rev^..rev, essentially giving you just the diff for that single commit.
One incredibly important thing that colordiff does is to highlight lines that are different. In the example above, you can see that it placed the error-handling goto lines side by side, but with a blue highlight. Thus, it is easy to see that the two goto statements are jumping to different labels! Likewise, lines that were not modified by either patch but differ in the context will also be highlighted and thus stand out during a manual inspection.
Note the inclusion of -W for git diff; for C code, this will show you the whole function that’s being changed in a patch. One of the things that often go wrong during backports is that something else in the function changed on either of the branches that you’re backporting from or to. By including the whole function you get more context and can more easily spot problems that might otherwise go unnoticed. In the example above, it would allow you to verify that the error handling is correct (despite changing the target of the goto statement) by also including the rest of the function.
Of course, this is just a visual inspection; the real test is building and running the patched kernel (or program).
Build testing
We won’t cover runtime testing here, but it can be a good idea to build just the files touched by the patch as a quick sanity check. For the Linux kernel you can build single files like this, assuming you have the .config and build environment set up correctly:
make path/to/file.o
Note that this won’t discover linker errors, so you should still do a full build after verifying that the single file compiles. By compiling the single file first you can avoid having to wait for a full build in case there are compiler errors in any of the files you’ve changed.
Runtime testing
Even a successful build or boot test is not necessarily enough to rule out a missing dependency somewhere. Even though the chances are small, there could be code changes where two independent changes to the same file result in no conflicts, no compile-time errors, and runtime errors only in exceptional cases.
I remember one instance of this where a patch to the Linux kernel system call entry code saved/restored a register and a later patch made use of the saved register somewhere in the middle – since there was no conflict, one could backport the second patch and believe that everything was fine, but in fact the code was now scribbling over an unsaved register.
Although the vast majority of errors will be caught during compilation or by superficially exercising the code, the only way to really verify a backport is to review the final patch with the same level of scrutiny as you would (or should) give to any other patch. Having unit tests and regression tests or other types of automatic testing can help increase the confidence in the correctness of a backport.
Examples
The above shows roughly the idealized process of backporting a patch, but it is sometimes hard to apply a process if you haven’t seen it in action. It is also somewhat difficult to follow an example of this in textual form, so we’ve also recorded a video showing some concrete examples of the backporting process:
Conclusion
Hopefully this has given you a good overview of the backporting process using git and some practical tips that will make the experience less frustrating. If you have other tips, let us know in the comments below!
Thanks to Harshit Mogalapalli for many great suggestions and feedback on this article.
Finally, Ksplice is hiring ! Check out our open positions or email Quentin Casanovas at quentin.casanovas@oracle.com.