Introduction
Upgrading an OKE cluster is a critical task for a cloud based environment, and is essential for security, performance improvement and to get the latest features that the orchestrator could offer. However, upgrading the cluster without impacting the availability of services requires careful planning and execution.
In this blog, we will learn how to accomplish zero downtime upgrades taking advantage of OCI Load Balancer service and the Kubernetes node draining capabilities.
Note: Kubernetes release frequency is about monthly for patch versions and about every four months for minor versions (1). OKE release date is around three months after upstream is released (2).
Key concepts
- Oracle Kubernetes Engine (OKE) (3): Is the managed Kubernetes service offered by Oracle Cloud, it simplifies deployment, scaling and operations of Kubernetes clusters.
- Control Plane: Manages the cluster including scheduling, scaling and networking. It’s fully managed by the OCI team, ensuring high availability.
- Node Pool: Is the group of worked nodes with the same configuration, assigned to a Control Plane. It’s automatically scalable and helps to improve resource management efficiency.
- Node: Is a worker machine (i.e. an OCI compute instance) part of a node pool that runs Kubernetes workloads.
- Node draining: Is the process of safely evicting workloads from a node before performing a maintenance process moving workloads to other nodes without service disruption.
- OCI Load Balancer (LB) (4): Is a Layer 7 based load balancer service managed by OCI that distributes traffic accross multiple servers to ensure high availability and scalability.
- Listener: Is the resource that accepts incoming traffic. It’s configured with a protocol (HTTP, HTTPS, TCP) and a port that determines how traffic is processed and forwarded to backend servers.
- Backend Set (BS): Is a logical grouping of backend servers that receive traffic from the load balancer through a Listener.
- Backend: Refers to an individual compute instance or endpoint within a backend set.
Example Environment
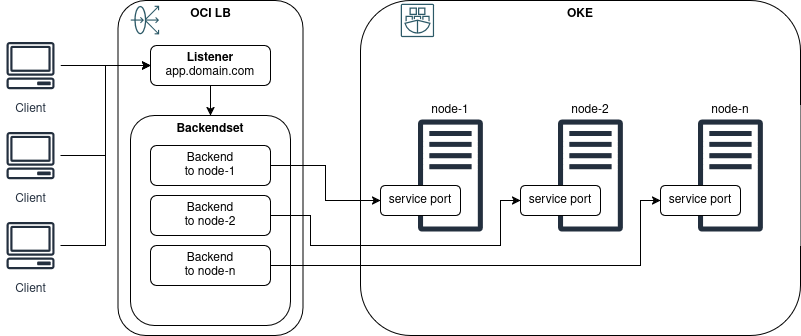
Review OCI Load Balancer listener and backend set to use the cluster nodes
Get the list of backends in the load balancer backend set, it should be the same addresses as in the OKE cluster.
oci lb backend list --load-balancer-id <LB OCID> --backend-set-name <BS NAME>
Upgrade procedure
1. Prepare for the upgrade
Before upgrading the cluster, we should take note of the current state of the nodes and the involved load balancer.
-
Verify cluster state.
kubectl get nodewill provide us the current version for each of the nodes and their status,kubectl get pod -Aprovides the state of all the pods running on cluster (we expectRunningorCompleted).# kubectl get node NAME STATUS ROLES AGE VERSION node-1 Ready node 32d v1.31.1 node-2 Ready node 32d v1.31.1 node-3 Ready node 32d v1.31.1 # kubectl get pod -A NAMESPACE NAME READY STATUS RESTARTS AGE kube-system coredns-5dd78655d5-mck5k 1/1 Running 0 32d kube-system coredns-5dd78655d5-pvsm9 1/1 Running 0 32d kube-system coredns-5dd78655d5-vb9v4 1/1 Running 0 32d kube-system csi-oci-node-6md29 1/1 Running 0 27d kube-system csi-oci-node-hx5qk 1/1 Running 0 27d kube-system csi-oci-node-lfn8l 1/1 Running 0 27d kube-system ingress-nginx-ingress-5hlzh 1/1 Running 0 32d kube-system ingress-nginx-ingress-gk7t8 1/1 Running 0 32d kube-system ingress-nginx-ingress-mp7gh 1/1 Running 0 32d kube-system kube-dns-autoscaler-5bbbc59b9-mh4nw 1/1 Running 0 32d kube-system kube-flannel-ds-5hp6j 1/1 Running 0 32d kube-system kube-flannel-ds-fc9gl 1/1 Running 0 32d kube-system kube-flannel-ds-hx2hj 1/1 Running 0 32d kube-system kube-proxy-24mz5 1/1 Running 0 32d kube-system kube-proxy-4729r 1/1 Running 0 32d kube-system kube-proxy-gxg5l 1/1 Running 0 32d kube-system proxymux-client-4g97s 1/1 Running 0 32d kube-system proxymux-client-8fgfk 1/1 Running 0 32d kube-system proxymux-client-bxlf9 1/1 Running 0 32d
-
Review the OCI Load Balancer configuration, the backend set should have the list of the nodes in the cluster (Go to Networking > Select compartment > Select LB > Backend sets section). It’s important to have present the backend sets which use OKE nodes, since new nodes will get spun up during upgrade and will need to be added manually.
-
Ensure there is sufficient capacity on the cluster to handle workloads during upgrade, since nodes will be drained one by one hence workloads will bounce between nodes.
kubectl describe node <node-name>could help us with this step.Took special attention to the following sections of the command
kubectl describe node <node-name>output- Conditions: Display the current status of the node according to the following conditions:
- NetworkUnavailable: True (network is unavailable) or False (no issues)
- MemoryPressure: True (node is under memory pressure) or False (no issues)
- DiskPressure: True (disk space is low) or False (no issues)
- PIDPressure: True (too many processes running) or False (no issues)
- Ready: True (node is healthy) or False (node is unhealthy)
- Capacity: The total amount of resources available on the node (CPU, memory, ephemeral storage, pods)
- Allocatable: The actual amount of resources available for scheduling workloads after system reservation.
- Non-terminated pods: The list of pods running on the cluster and the resources they are using
- Allocated resources: The amount of resources used and assigned to the workloads
- Events: A list of recent events related to the node (Network issues, OOM issues, node joining the cluster)
...

Conditions:
  Type                 Status  LastHeartbeatTime                 LastTransitionTime                Reason                       Message
  ----                 ------  -----------------                 ------------------                ------                       -------
  NetworkUnavailable   False   Thu, 23 Jan 2025 09:47:57 -0700   Thu, 23 Jan 2025 09:47:57 -0700   FlannelIsUp                  Flannel is running on this node
  MemoryPressure       False   Mon, 24 Feb 2025 17:14:48 -0700   Thu, 23 Jan 2025 09:46:29 -0700   KubeletHasSufficientMemory   kubelet has sufficient memory available
  DiskPressure         False   Mon, 24 Feb 2025 17:14:48 -0700   Thu, 23 Jan 2025 09:46:29 -0700   KubeletHasNoDiskPressure     kubelet has no disk pressure
  PIDPressure          False   Mon, 24 Feb 2025 17:14:48 -0700   Thu, 23 Jan 2025 09:46:29 -0700   KubeletHasSufficientPID      kubelet has sufficient PID available
  Ready                True    Mon, 24 Feb 2025 17:14:48 -0700   Thu, 23 Jan 2025 09:47:54 -0700   KubeletReady                 kubelet is posting ready status

...

Capacity:
  cpu:                6
  ephemeral-storage:  37206272Ki
  hugepages-1Gi:      0
  hugepages-2Mi:      0
  memory:             16074572Ki
  pods:               110
Allocatable:
  cpu:                5808m
  ephemeral-storage:  34289300219
  hugepages-1Gi:      0
  hugepages-2Mi:      0
  memory:             13772620Ki
  pods:               110

...

Non-terminated Pods:          (13 in total)
  Namespace                   Name                                                         CPU Requests  CPU Limits  Memory Requests  Memory Limits  Age
  ---------                   ----                                                         ------------  ----------  ---------------  -------------  ---
  kube-system                 coredns-5dd78655d5-pvsm9                                     100m (1%)     0 (0%)      70Mi (0%)        170Mi (1%)     32d
  kube-system                 csi-oci-node-hx5qk                                           30m (0%)      500m (8%)   70Mi (0%)        300Mi (2%)     27d
  kube-system                 ingress-nginx-ingress-gk7t8                                  0 (0%)        0 (0%)      0 (0%)           0 (0%)         32d
  kube-system                 kube-dns-autoscaler-5bbbc59b9-mh4nw                          20m (0%)      0 (0%)      10Mi (0%)        0 (0%)         32d
  kube-system                 kube-flannel-ds-hx2hj                                        100m (1%)     1 (17%)     50Mi (0%)        500Mi (3%)     32d
  kube-system                 kube-proxy-gxg5l                                             0 (0%)        0 (0%)      0 (0%)           0 (0%)         32d
  kube-system                 proxymux-client-bxlf9                                        50m (0%)      500m (8%)   64Mi (0%)        256Mi (1%)     32d
  logs                        loki-0                                                       0 (0%)        0 (0%)      0 (0%)           0 (0%)         32d
  logs                        loki-promtail-d66tw                                          0 (0%)        0 (0%)      0 (0%)           0 (0%)         32d
  monitoring                  kube-prometheus-stack-kube-state-metrics-557869cb6c-4m82n    0 (0%)        0 (0%)      0 (0%)           0 (0%)         32d
  monitoring                  kube-prometheus-stack-operator-679d567bfd-wrmr4              0 (0%)        0 (0%)      0 (0%)           0 (0%)         32d
  monitoring                  kube-prometheus-stack-prometheus-node-exporter-nhntl         0 (0%)        0 (0%)      0 (0%)           0 (0%)         32d
  monitoring                  pushgateway-prometheus-pushgateway-f8c5c7785-dn886           0 (0%)        0 (0%)      0 (0%)           0 (0%)         32d
Allocated resources:
  (Total limits may be over 100 percent, i.e., overcommitted.)
  Resource           Requests    Limits
  --------           --------    ------
  cpu                300m (5%)   2 (34%)
  memory             264Mi (1%)  1226Mi (9%)
  ephemeral-storage  0 (0%)      0 (0%)
  hugepages-1Gi      0 (0%)      0 (0%)
  hugepages-2Mi      0 (0%)      0 (0%)
Events:              <none>
- Conditions: Display the current status of the node according to the following conditions:
2. Upgrade Controlplane and Node Pool
- In OCI, go to the “Cluster Details” section for the desired cluster and click on “New Kubernetes version available” message, then select the desired version. The controlplane should start the upgrade process.
- Once the controlplane is upgraded, go to Node pools section, click on the pool that is going to be upgraded and select the edit button. Then select the desired version.
3. Drain nodes one by one
For each node undergoing an upgrade:
-
Drain the backend to prevent the LB from sending new requests to the OKE node and gracefully finish current requests
oci lb backend update --drain yes --offline no --weight 1 --load-balancer-id <LB OCID> --backend-set-name <BS NAME> --backend-name <IP ADDRESS:PORT>
-
Cordon the node to prevent new workloads from being scheduled
kubectl cordon <node-name>
-
Drain the node to gracefully evict running pods
kubectl drain <node-name> --ignore-daemonsets --delete-emptydir-data
--ignore-daemonsets: Ensures that daemonsets are not removed. i.e. networking and monitoring agents.--delete-emptydir-data: Ensures ephemeral storage does not block the draining.
4. Delete the node to let the nodepool spin up a new instance
-
Go to the cluster in Developer Services > Kubernetes Clusters (OKE) > Select cluster > Node Pools > Select Node pool.
-
Expand node details and click Actions > Delete node
-
Wait the node to be deleted and the creation of the new node, use the following command to monitor status in the engine.
kubectl get node
5. Update LB backendset with the IP address of the new node
This step can be completed either directly in the OCI console or using the OCI cli tool.
Example using OCI cli
-
Delete the old node
oci lb backend delete --load-balancer-id <LB OCID> --backend-set-name <BS NAME> --backend-name <IP ADDRESS:PORT>
-
Add the new node
oci lb backend create --load-balancer-id <LB OCID> --backend-set-name <BS NAME> --ip-address <IP ADDRESS> --port <PORT>
6. Repeat for remaining nodes
Perform the same steps (From 3 to 5) for all remaining nodes. Ensure that the LB state is correct.
7. Verify applications availability
- Monitor all endpoints involved during the upgrade to confirm all services remain available during the process.
- Validate service continuity by using health checks.
Conclusion
By strategically and carefuly draining nodes and using the OCI Load Balancer, Kubernetes upgrades can be performed seamlessly without impacting the service availability. This approach ensures rolling updates while maintaining reliability and uptime.