In this blog we will explore the File Manager component in OCI Process Automation (OCIPA).
The File Manager component allows end users to upload one or more documents using a process form to an external system. The component can also be optionally configured to list the already uploaded files and to provide end users with the ability to download and delete them. This is a powerful capability to bring to your process forms whenever you need to capture any documents from end users.
We will begin this blog with a definition of the component and its capabilities. We will then demonstrate how it can be configured with an external system using Oracle HCM Cloud Document of Records.
The File Manager Component
You will find the File Manager component in the Advanced pallet of your OCIPA form designer:

When you drag this component to a web form, you will be presented with the following widget, which you can configure as needed to meet your file upload requirements:
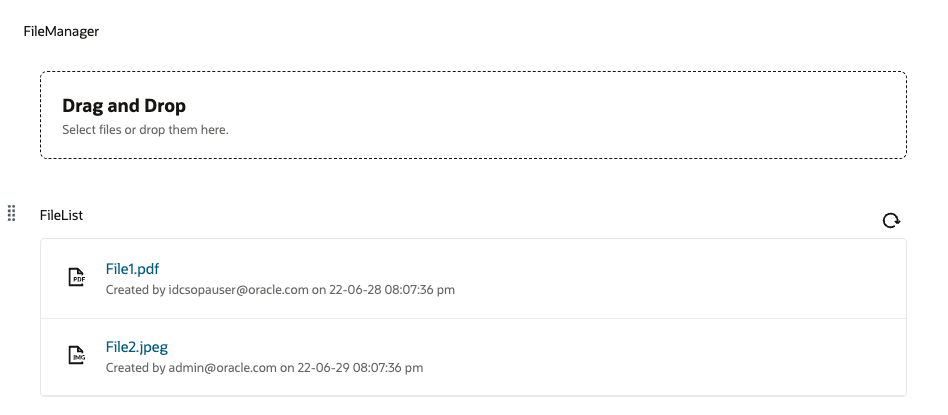
The File Manager component serves as our primary mechanism to allow end users to attach contextual documents to web-forms. The component allows end users to:
- Upload one or more files (currently we support up to 5 files with a maximum aggregate size of 2MB)
- List a file repository (allowing us to echo a confirmation of the uploaded files)
- Download a file from the List component
- Delete a file from the List component
To successfully use this component, you must ensure that the target system supports the following:
- Provides an API that expects the attached document inline (passed in the request body) in a base64 encoded format.
- Note: An Oracle Integration (OIC) wrapper service can be used to support other file formats.
- Provides an API that is supported by one of the existing authentication policies available in OCIPA’s REST connector. You can find the list of authentication mechanisms that we support here.
Now that we have defined what the component is, let’s also spend a moment defining what it is not:
- The File Manager component is not a replacement for the process or task document attachment feature. Any document that you attach through the File Manager component is directly sent to target document service. This means that it is not persisted as part of the process or task, nor can it be referenced after the fact.
You can find out more about this component in our documentation.
At this point, we should all be on the same page as far as what the File Manager component is and what it can do. Now let’s take a look at a use case in which it can be applied.
Oracle HCM Cloud – Document Records
Document Records provides a repository for document storage against a person’s record in Oracle HCM Cloud, allowing employees to upload electronic copies of documents such as birth certificates, passports, driver’s license documents, visas, degrees, professional certificates, and so on. Learn more about the capabilities of this feature in Oracle HCM Cloud here.
The primary use case for leveraging Document Records through OCIPA comes from our integration with Oracle Journeys. Using Journeys, HCM administrators can configure a guided experience for employees and embed Process Automation extensions within the steps of a guided process.
Let’s take a look at a sample scenario:
Imagine that a new employee has just joined a supermarket company as a delivery driver. They are given access to the Oracle HCM Cloud application and upon logging in they see a guided Journey that can assist them with their onboarding experience. In this Journey, the employee can see a series of tasks that they need to complete, like a checklist. One of these tasks is focused on verifying their ability to drive different types of trucks and this task is provided by a Process Automation extension. The employee can click on this task to navigate to an OCIPA form where they can upload their driver’s license and provide information about their driving experience. All this information will be sent to a manager for review. To achieve this scenario, the OCIPA process designer will need to design a form, that:
- Allows the new employee to upload an image that will need to be persisted in Oracle HCM Cloud Document of Records.
- Provides a confirmation to the employee that their file was uploaded, by listing the existing attachments in Oracle HCM Cloud Document of Records for this employee.
- Allows the employee to ensure that the document they uploaded was the correct one, by providing them with the ability to download the document.
- Allows the employee to correct an errant upload by deleting an already uploaded file.
Oracle HCM Cloud Document of Records provide APIs to perform the above actions. You can learn about these APIs here.
OCI Process Automation Setup
Let’s take a look at the OCIPA setup required to accomplish the above scenario.
- Create a Connector to HCM Cloud
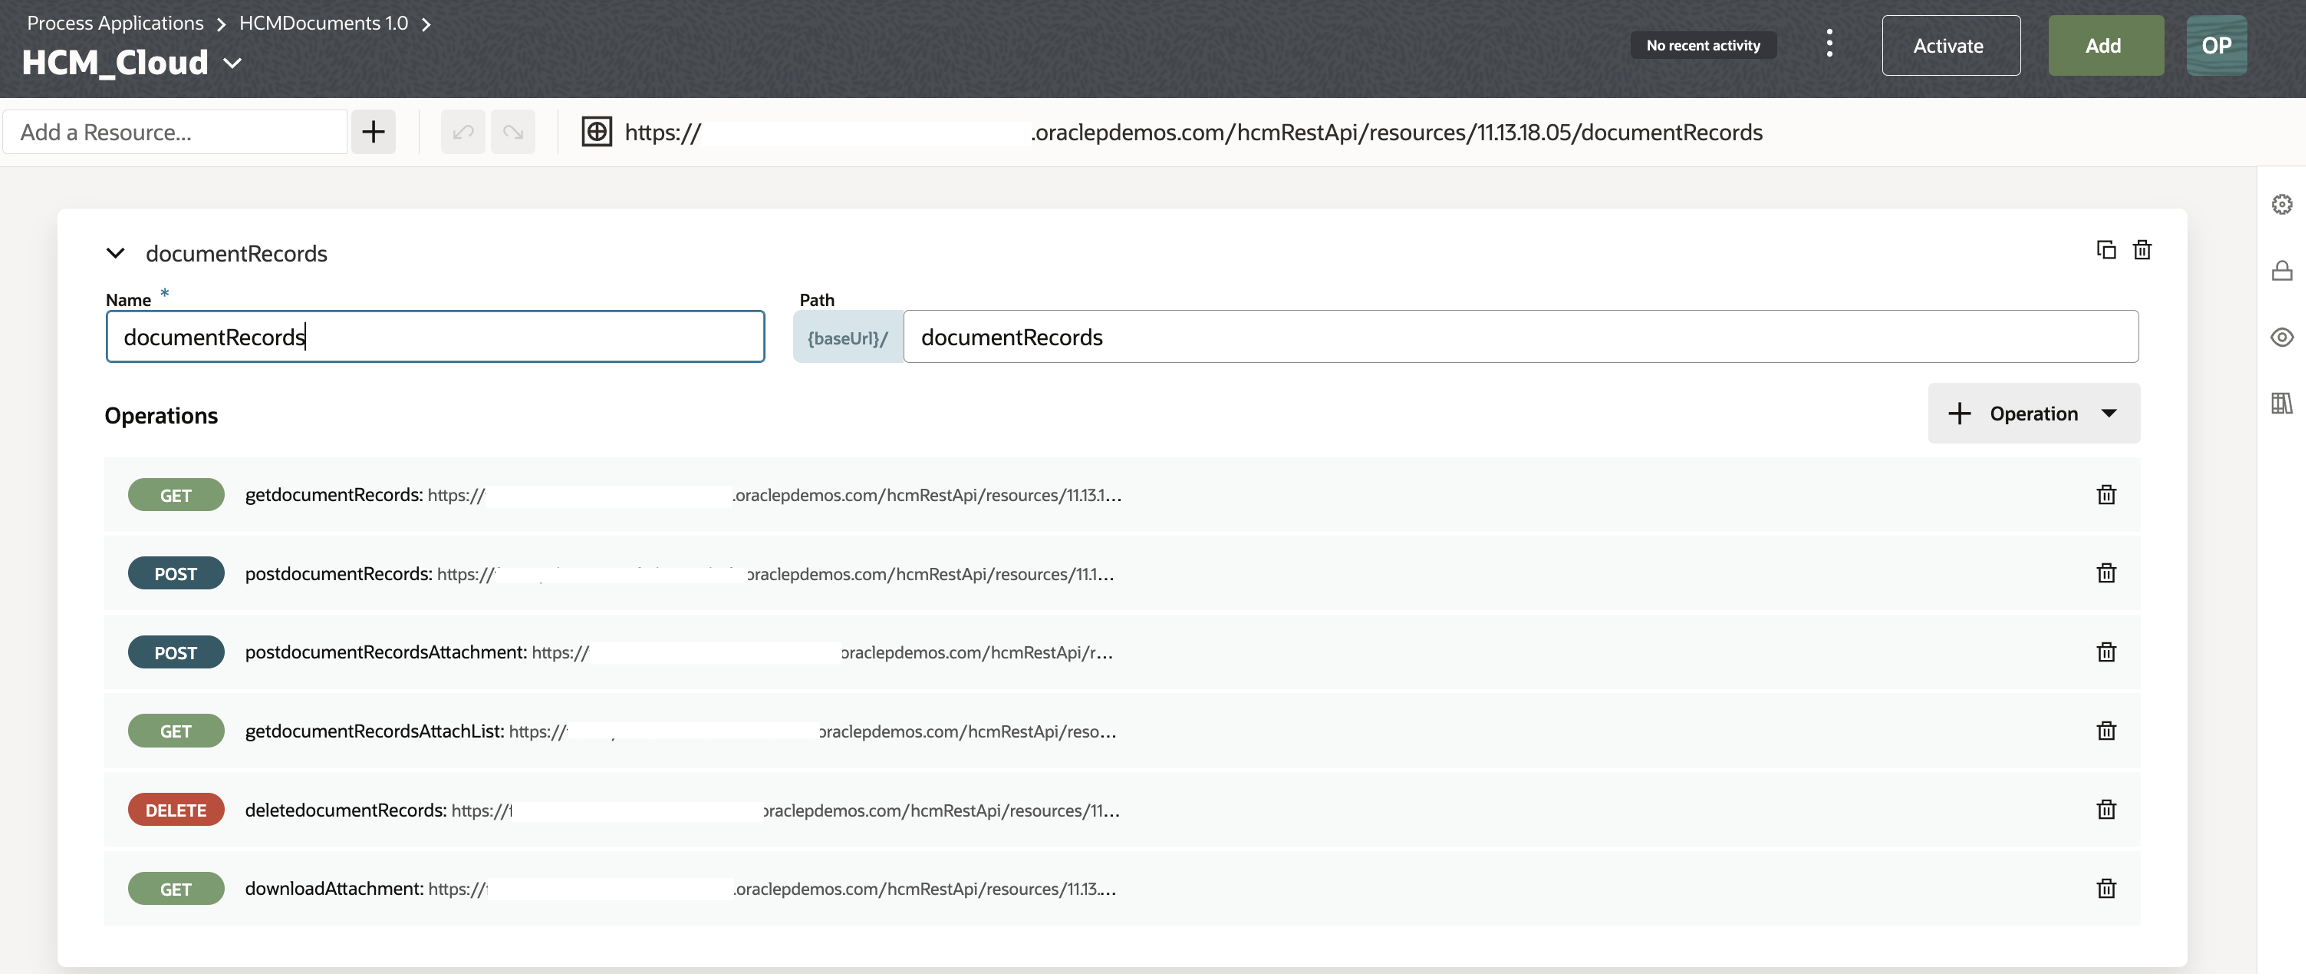
We will start by defining a connector to Oracle HCM Document of Records.
Note: If you are just getting started with OCI Process Automation, review our working with connectors documentation.
Depending on the operations you want to enable through your File Manager component you will need to create an operation in OCIPA for the following:
The above file attachment APIs are children of a Document of Record parent object. It is in this parent object that you will define the type of file attached and related metadata. Therefore, you may want to let your end users:
- Browse through the existing Document of Records against and employee before displaying the attachments against each one.
- Or, allow them to create a new Document of Record before adding an attachment.
To meet the above use cases, you may also want to create an operation for the following HCM APIs:
When creating these operations in OCIPA, you will need to provide the appropriate request and response definition. This is something you can either copy from the examples in the above HCM API documentation, or simply try these APIs in your REST client and then replicate the setup in the OCIPA connector. The below image depicts my specific setup:
- Upload a File:
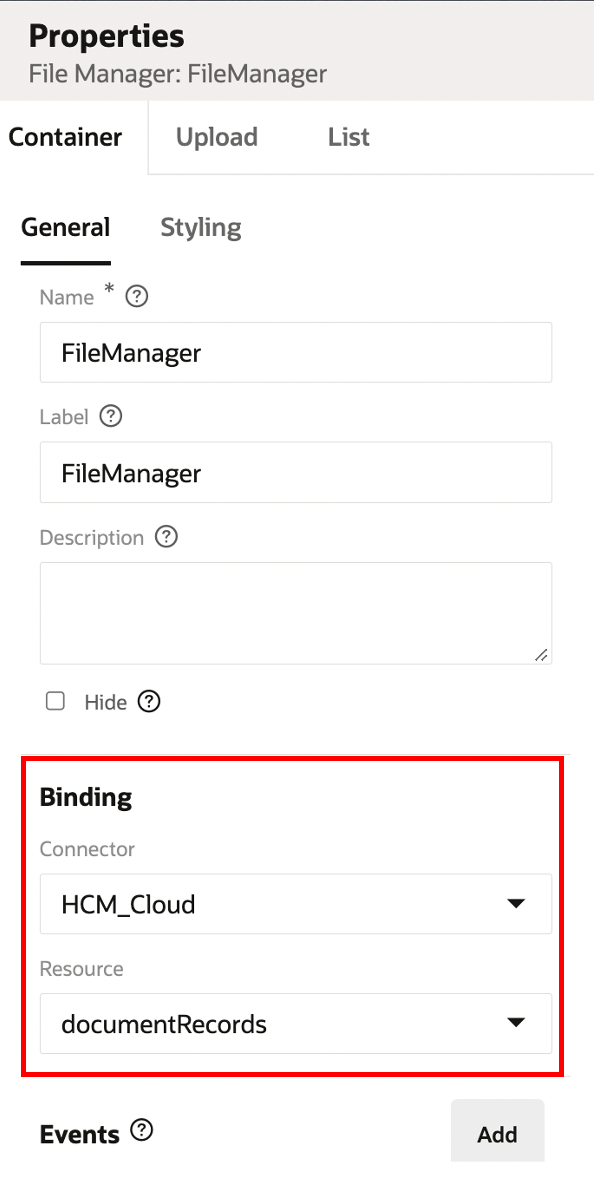
With the connector defined, we can navigate to the desired OCIPA form and drag the File Manager component onto the canvas, which brings up the Properties menu. Here we need to select the new connector in the Binding section on the Container tab:
Now, you can click on the Upload tab and optionally configure the general properties for the upload, including the file type(s) you want to accept, the default display text and max file size:

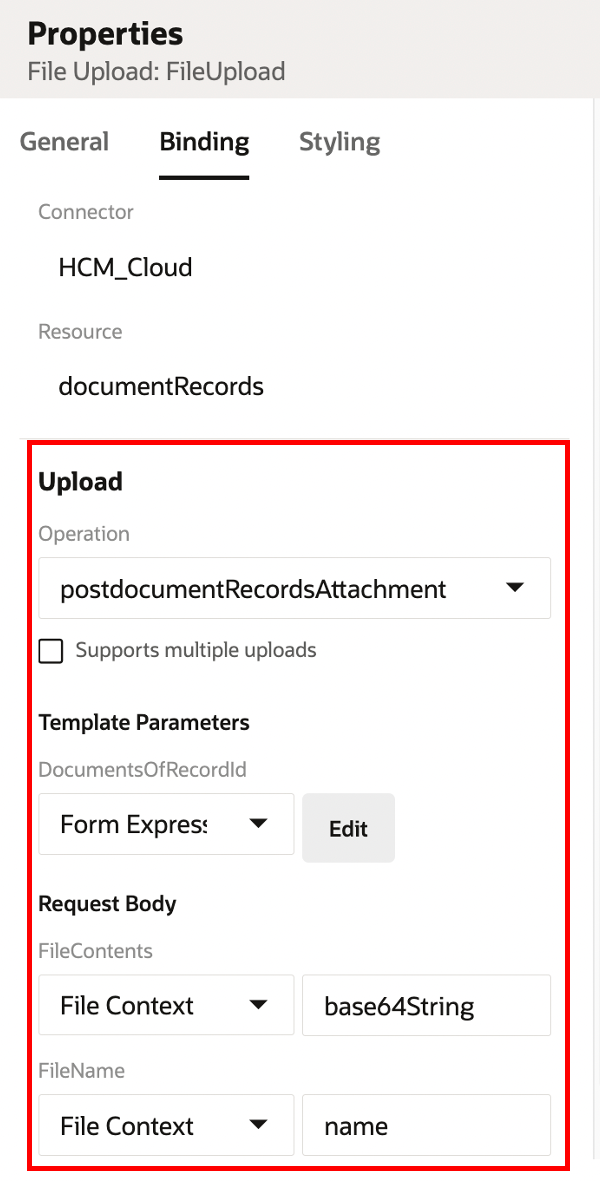
Finally, click on the Binding section of File Upload so we can associate the upload operation of the component with the connector. Here you will need to:
- Select the specific Connector operation, which is pointing to the Oracle HCM Cloud Document of Records Create an attachment API.
- Pass the specific DocumentsOfRecordID template parameter to which the attachment will be added. In this case, I am deriving that from a previous section of my form where I offer users the ability to see (list all Document of Records against an employee) or add a new Document of Record and the attach the uploaded file.
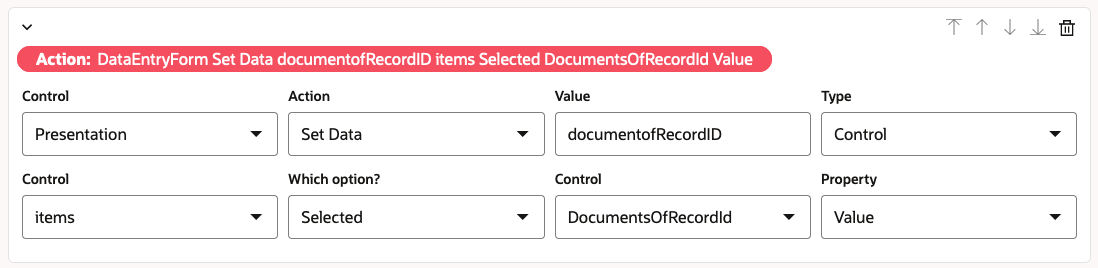
Above: an example of persisting the DocumentsOfRecordID variable based on a selection of a row in a list all Document of Records section
- Pass FileContents, based on the File Context (base64string)
- Pass FileName, based on File Context (name)
That should do it! If you activate the application and test it, you should see a successful file upload and be able to verify the uploaded record in Oracle HCM Cloud:
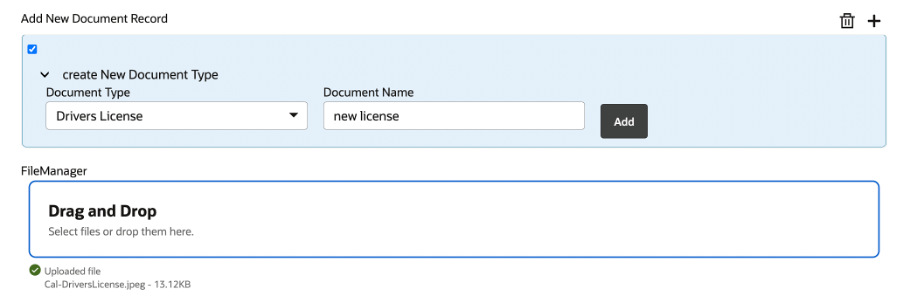
Above: the OPA File Upload component embedded in our custom process form
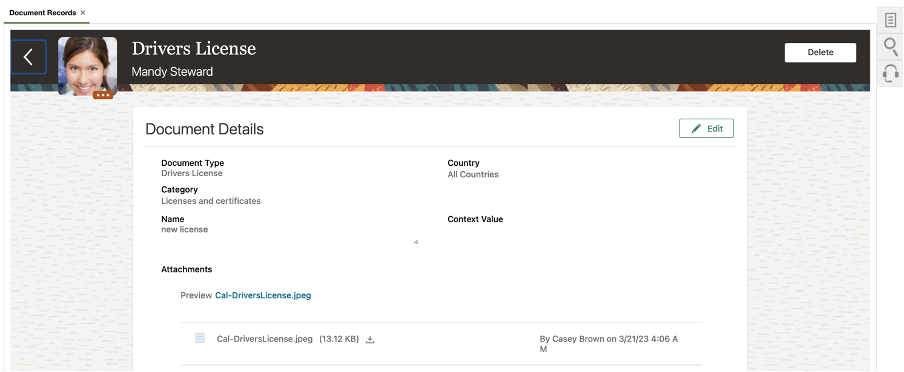
Above: the uploaded attachment in Oracle HCM Cloud
- List Files:
Now that we have configured the component to upload file(s) let’s see how we can configure it to list the uploaded files. This functionality serves as an echo to provide the end user assurance that their upload file has been committed to the target system. If you do not want the list functionality you can simply remove it from the File Manager component, effectively leaving you with a file upload only.
As we have already configured the connector, go back to the OCIPA form and select the File List component.
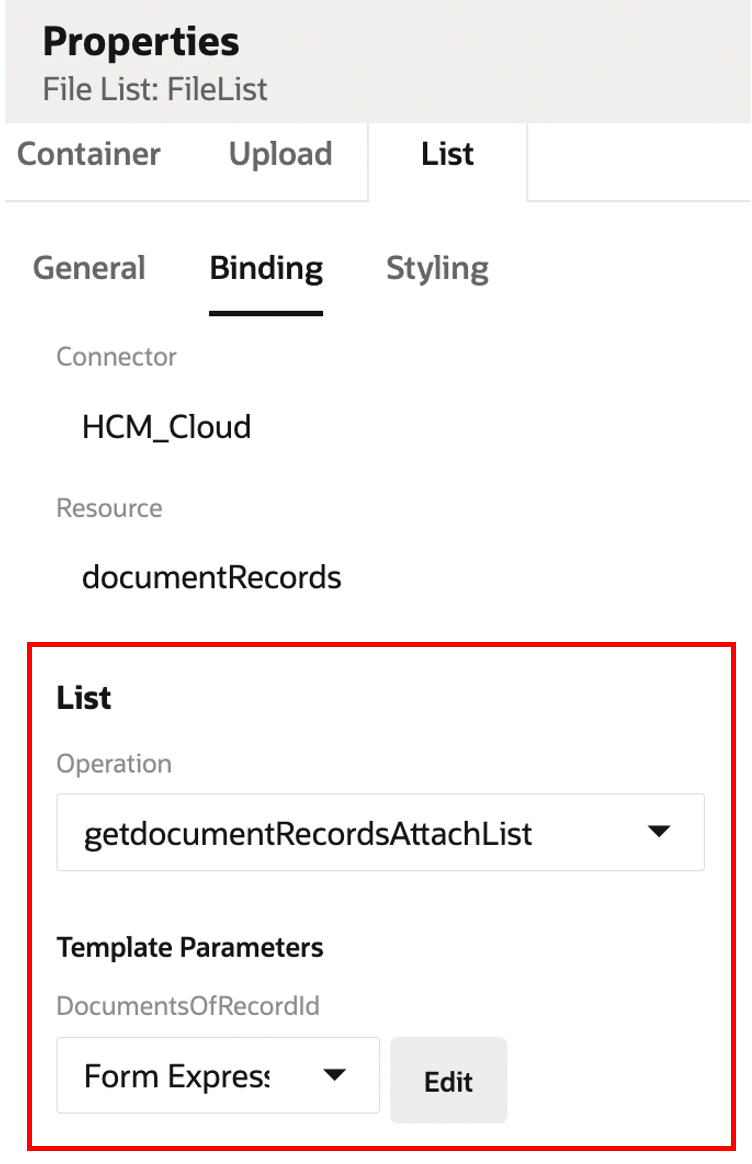
- Navigate to the component’s property and select Binding. Once again here you will need to associate the list operation to the correct operation in the HCM Connector (Get all attachments). We also need to pass in the template parameter expected by the API (DocumentsOfRecordID).
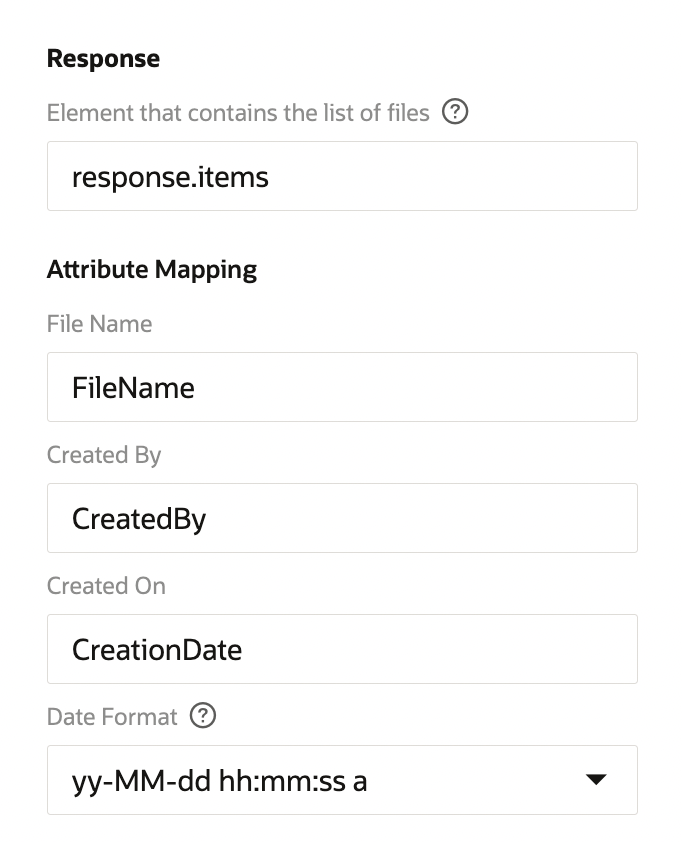
Finally, you will need to associate the response of the API call to the component. Here I am selecting the repeating element in the response that will list the file objects (response.items). I am then mapping the values of each object to the default fields of the component as per below:
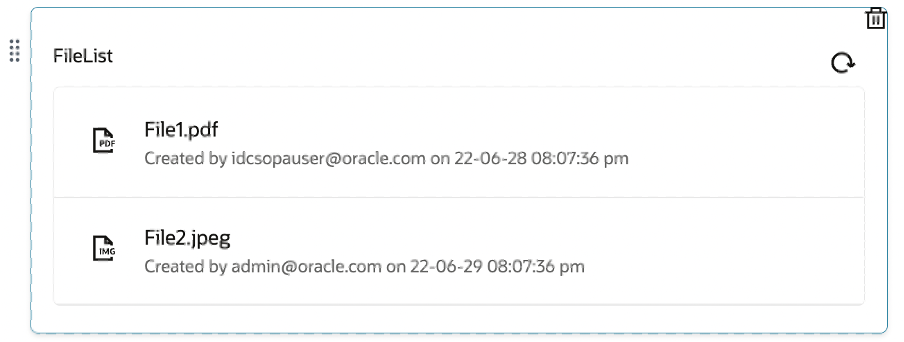
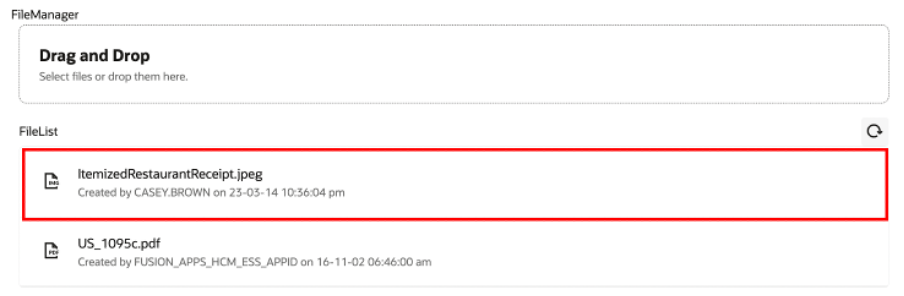
With the list component configured, the OCIPA Form will now list out the uploaded files. This means that every time an end user adds a new file, they will instantly see it in the system alongside previously uploaded files:
- Download a File:
With the List component configured we can now (optionally) configure a download operation for each file. This will allow end users to browse through the list file view and select a file to download to their local device. The intention of this feature is to allow end users to verify uploaded files and browse through previous uploads to ensure that the correct documents exist for them.
Assuming you have already configured the Get a FileContents operation in your HCM connector, go to the Form and once again select the File List component. Once there, select the Binding tab and scroll down until you see the Download section.
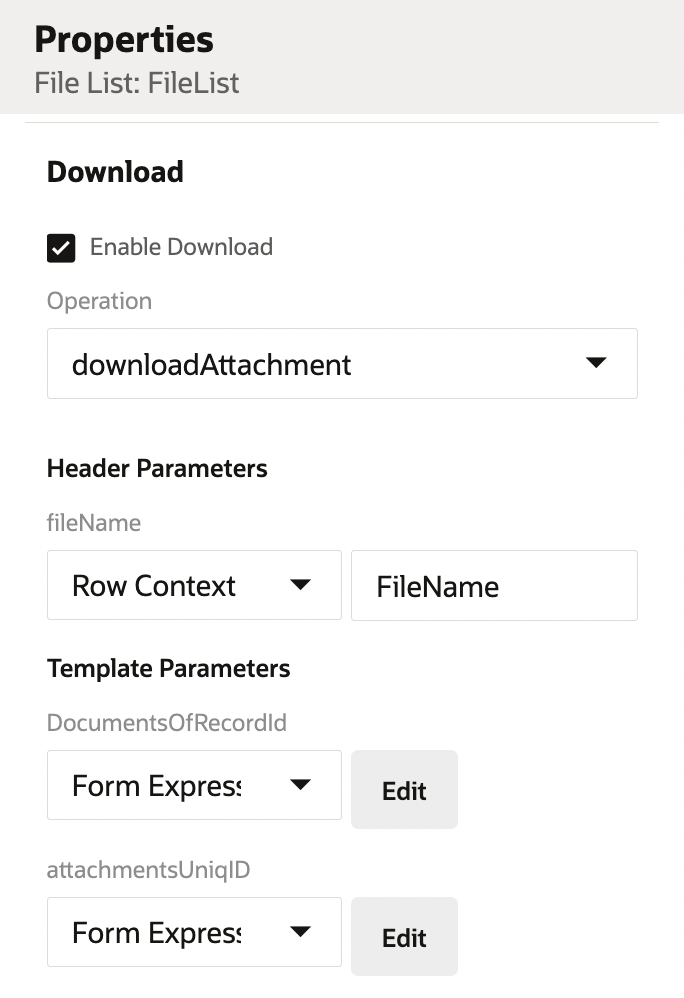
Here you will need to:
- Enable download.
- Associate the download component to the download operation in your HCM connector (here you will need to add a header parameter of file name, which will be used to name the downloaded file).
- Set the File Name header parameter to the File Name from your returned row context.
- Pass the specific DocumentsOfRecordID template parameter (this is driving your list anyway, so you should have this handy).
- Set attachmentsUniqID. To determine this, I am using the following function which effectively extracts the very long attachments ID for the file you want to download, from the file list response:
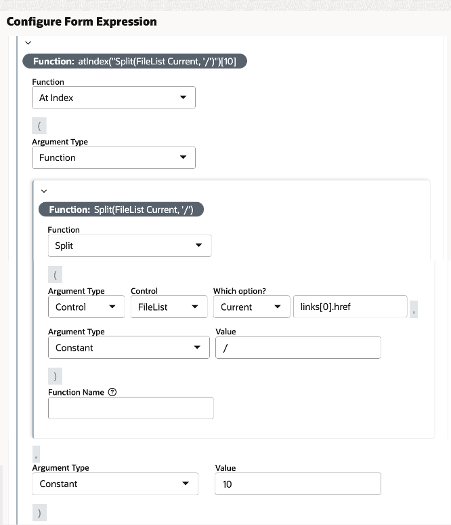
The result of the above configuration is:
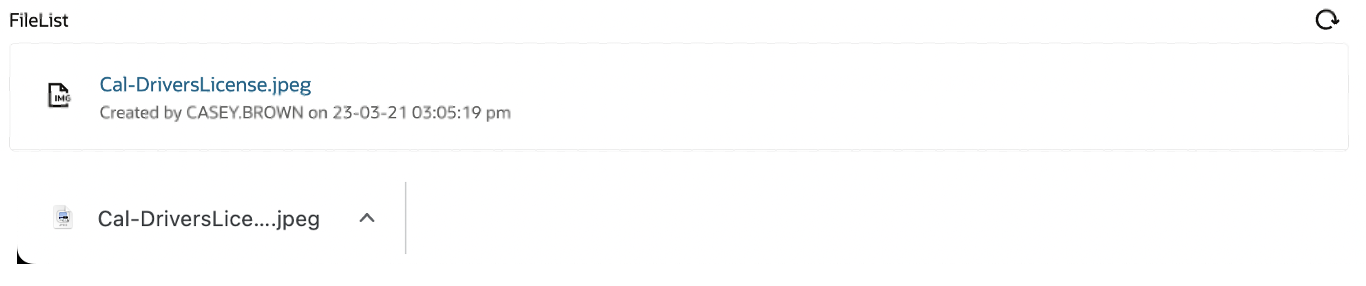
The result of the download config is that you will see File Names appear with a hyperlink in your list file view. Once clicked, the file will be downloaded to your local device:
- Delete a File:
Once again, this step is optional and is intended for use cases where you would like users to be able to delete an uploaded file. This could be because they made a mistake during the upload process or perhaps because they need to remove prior files that were uploaded in error. To follow along with the steps below, you should have the list operation already working and the HCM connector configured with an operation to support deleting attachments. As part of this setup, you should also be storing the DocumentsOfRecordID variable that you will need to call here.
Go to the OCIPA Form and select the List Files component. Here, click the Bindings tab and scroll down to find the configuration paraments for delete:
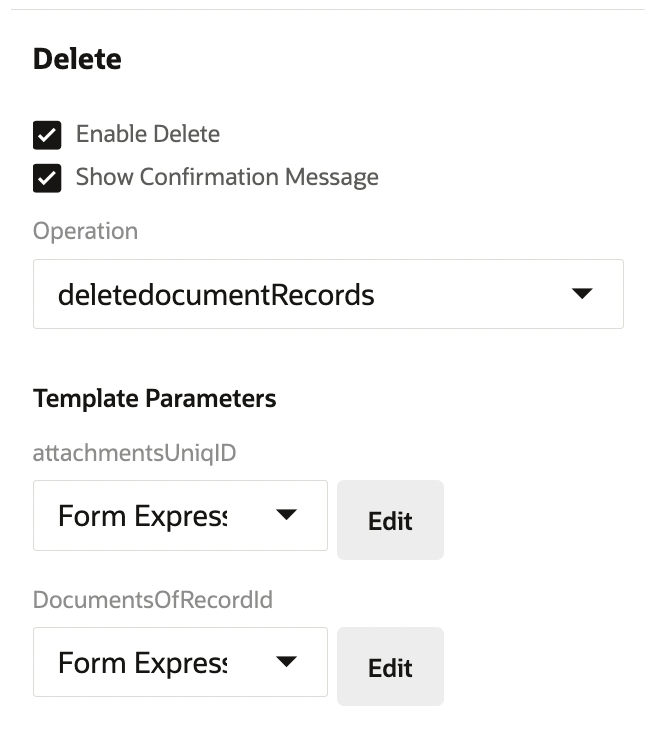
Here you will need to:
- Enable delete.
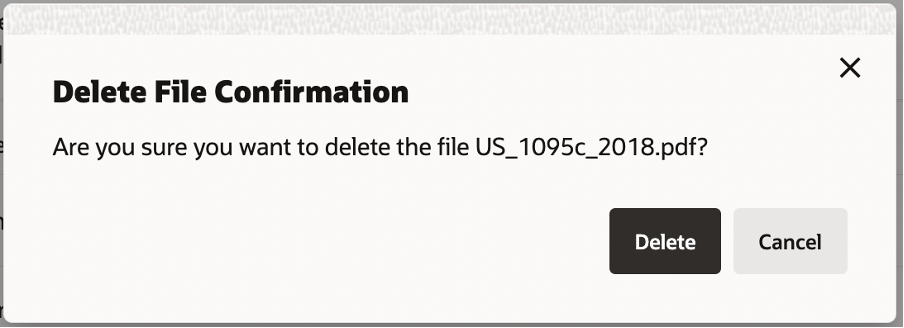
- Decide whether you want the end user to see a confirmation box on delete.
- Associate the delete action to the API operation you defined in the connector (Delete an attachment).
- Pass the specific DocumentsOfRecordID template parameter.
- Set attachmentsUniqID. To determine this, I am using the following function, which effectively extracts the very long attachments ID for the file you want to delete from the file list response:
The result of the above configuration is:
Once configured correctly, you will see a Delete icon next to each item in your file list component, and upon clicking it you may receive a confirmation box (depending on whether you configured it that way).

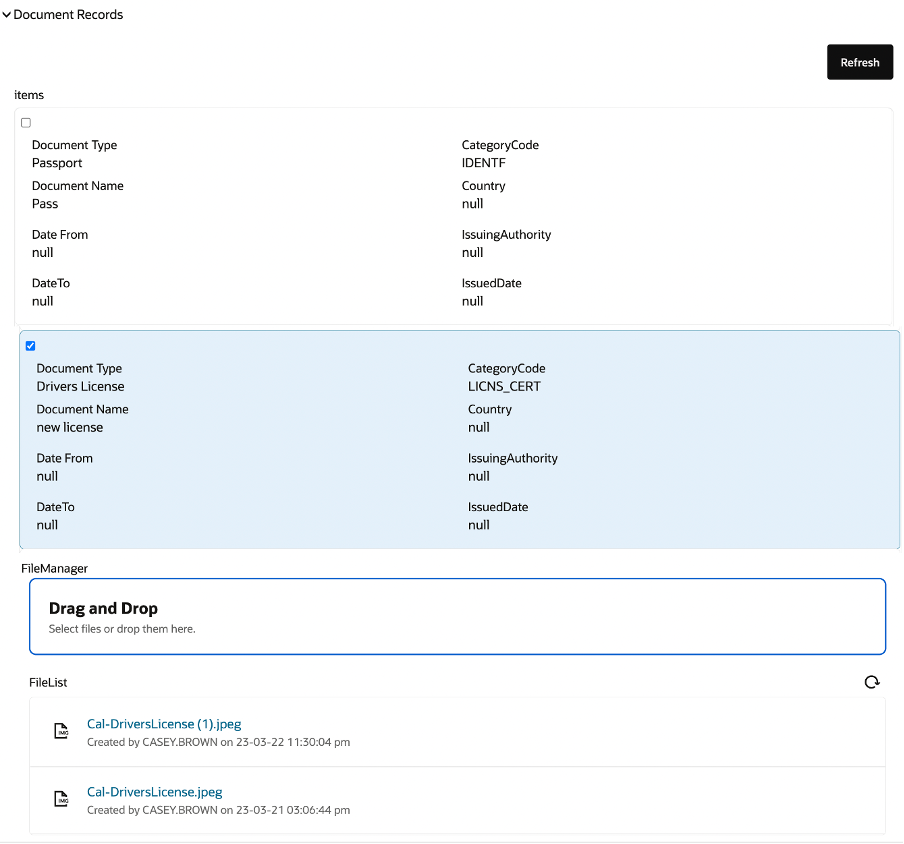
In the previous section, I defined how you can configure the File Manager Component to interact with Attachments in Oracle HCM Cloud Document of Records. It is important to reiterate that depending on your use case, you may want to display the parent Document of Records object first. This allows you to browse through these records against a person, select one, and then interact with associate attachments. This approach is depicted below:
Summary
In this blog, we have explored the File Manager component in OCI Process Automation (OCIPA). We defined what the component can do and how it can be used in your forms to offer an elevated file upload capability for end users. We also went through a sample implementation of the component with Oracle HCM Cloud.