This post is the work of Nolan Trouvé and Jerry Mbamo. Thanks to you both for sharing this with the wider Oracle integration community.
Oracle Integration Cloud (OIC) works seamlessly with other OCI Cloud Services to provide the business solutions you need. This post discusses how one can implement intelligent document processing with OIC and OCI AI Vision Service.
Now over to Nolan and Jerry -
Imagine you have a series of unstructured documents, such as invoice PDFs , that you need to process in an automated fashion. These documents might look something like this:
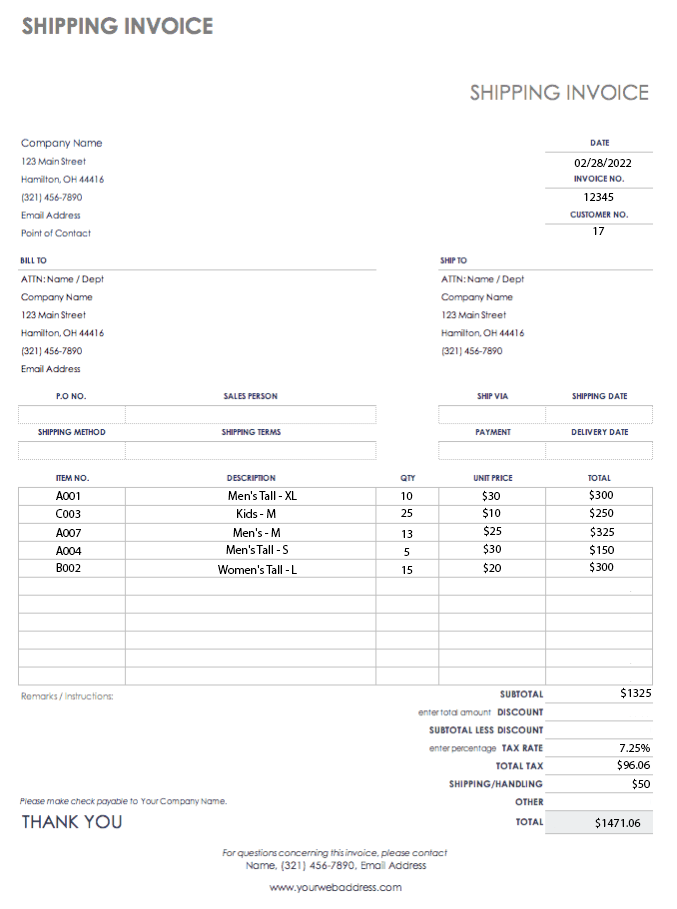
This blog post describes how to create a scheduled process that will grab these unstructured documents from OCI Object Storage and run them through a pre-built AI model to extract key pieces of information for each line item, information such as item number, description, quantity, unit price, and total price. Once this data has been extracted, we will insert this data into a target database. Oracle Integration allows us to orchestrate the entire process without the need for any human intervention.
What is OCI Vision?
OCI Vision is a serverless, cloud native service that provides deep learning-based, prebuilt, and custom computer vision models exposed as REST APIs. It can help you identify and locate objects, extract text, and identify tables, document types, and key-value pairs from images and business documents like receipts and invoices.
Creating the connections in OIC
In this example, we will first be creating three OIC connections:
- Object Storage
- Autonomous Data Warehouse (ADW)
- OCI Vision
Bucket connection:
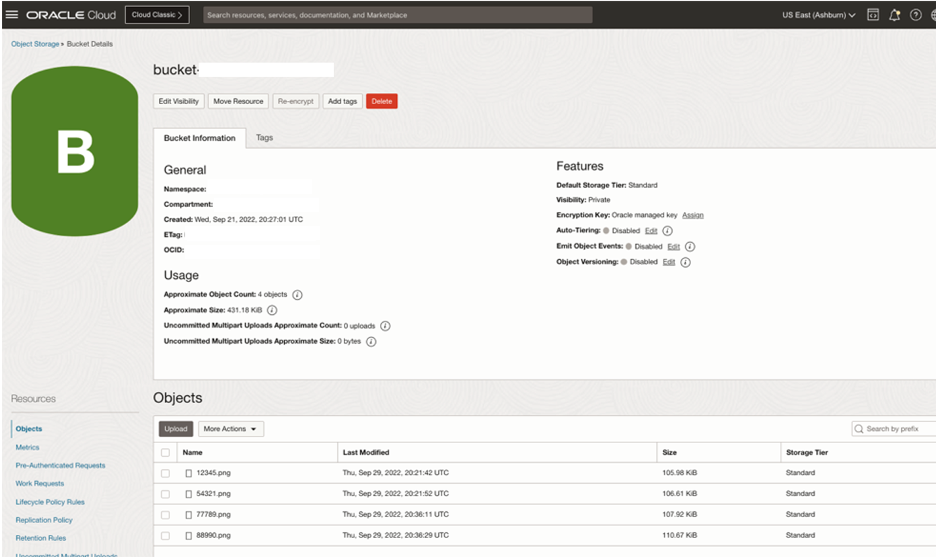
We'll be using an Object Storage bucket to store the invoices prior to processing.
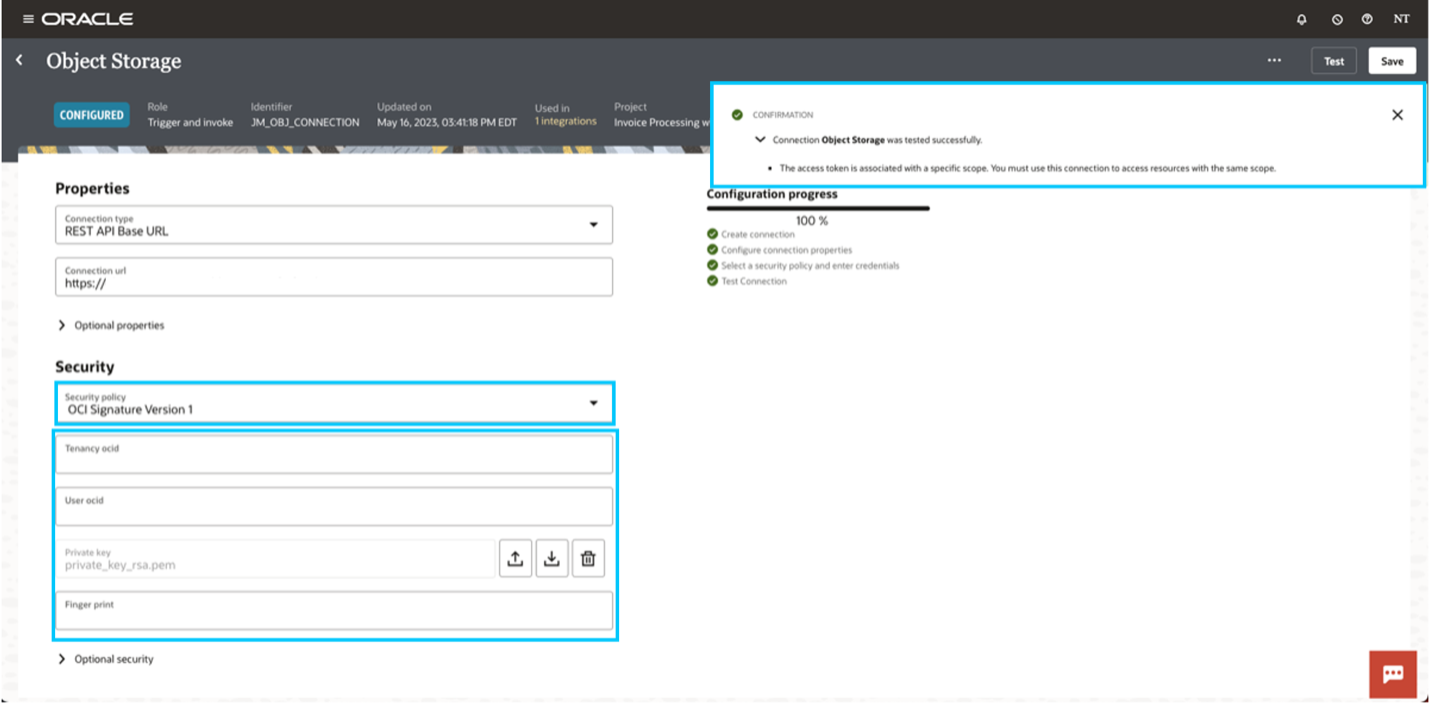
To connect to the bucket, we will create a connection leveraging the REST adapter.
Here is the information that we will need:
- Connection URL - This can be found in the OCI documentation under API reference and endpoints here.
- Security Policy - Select OCI Signature Version 1 and provide the required information. If you aren’t familiar with this, more information can be found here.
With the above information filled in, you can test the connection. If the test is successful, save it.
ADW Connection:
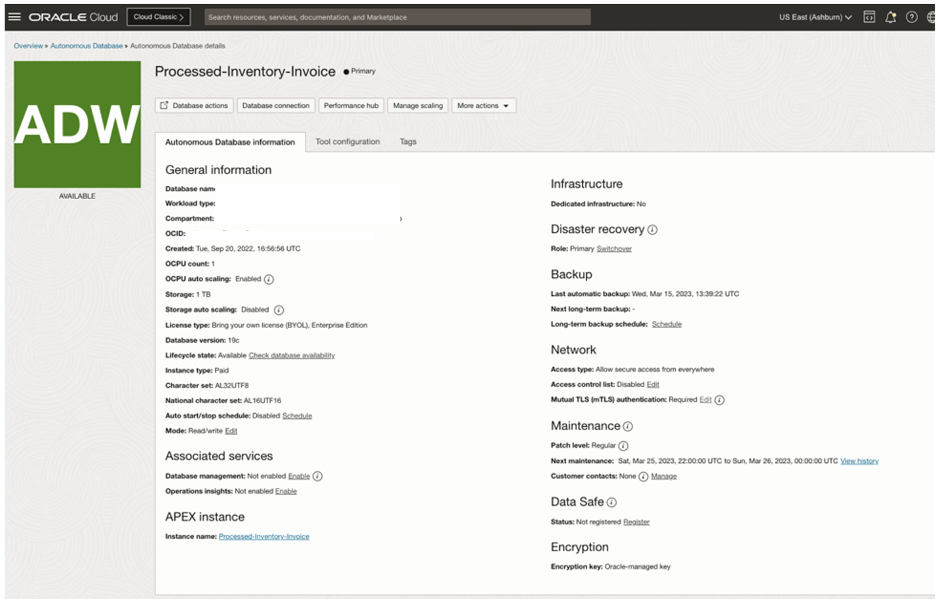
We will be using an Autonomous Data Warehouse as a target database for the processed invoice data.
Here is the information we will need to create a connection via the ADW adapter:
- Connection Properties – We will be providing the service name that dictates how the traffic sent to the DB will be treated. For an ADW, the options are low, medium, and high. The low service name represents the least resources with the highest concurrency whereas the high service name will execute a query with the highest resources and lowest concurrency. More information can be found here. The service name for your ADW is constructed based off the database name. To find this string, navigate to your DB via the OCI Console and click on Database connection.
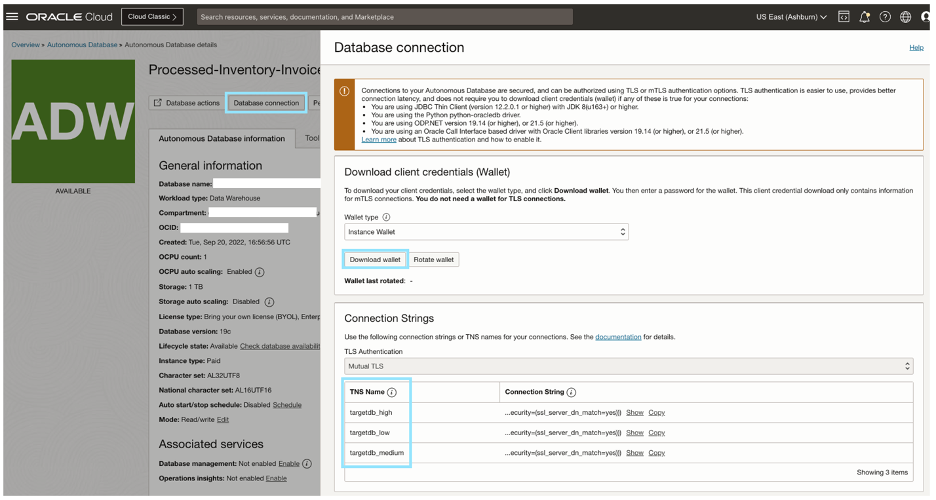
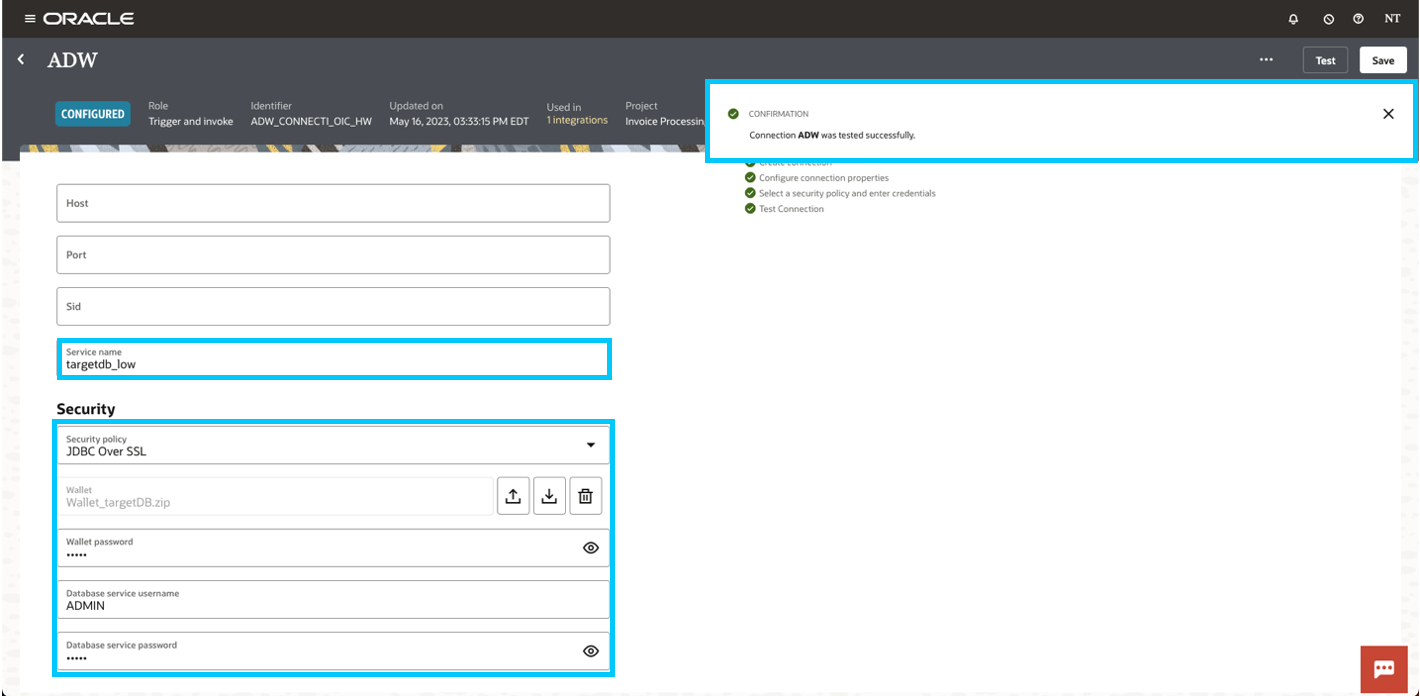
- Security Policy - We will be using the JDBC Over SSL security policy. The wallet can be obtained from the same Database connection page in the OCI Console. You will be required to create a password for the wallet when downloading it to your local machine. Back in the OIC connection, upload the wallet and enter the password. After that, you will input the credentials of the database user that will be running the queries sent from OIC Make sure that this user has sufficient access to the schema that the target table falls into.
With the above filled out, test and save the connection.
Vision Connection:
We'll be creating a second REST connection to connect to OCI's Vision service.
Here is the information needed:
- Connection URL - This can be found in the OCI documentation under API reference and endpoints here.
- Security Policy - Select OCI Signature Version 1 and provide the required information. You can copy what was done for the Object Storage connection so long as the user has policy-based access to both Object Storage and the OCI Vision service in your tenancy.
Now with all that information filled in, test and save the connection.

Building the Integration
We’ll start by building an integration to process a single invoice. Here is an example of what that might look like:
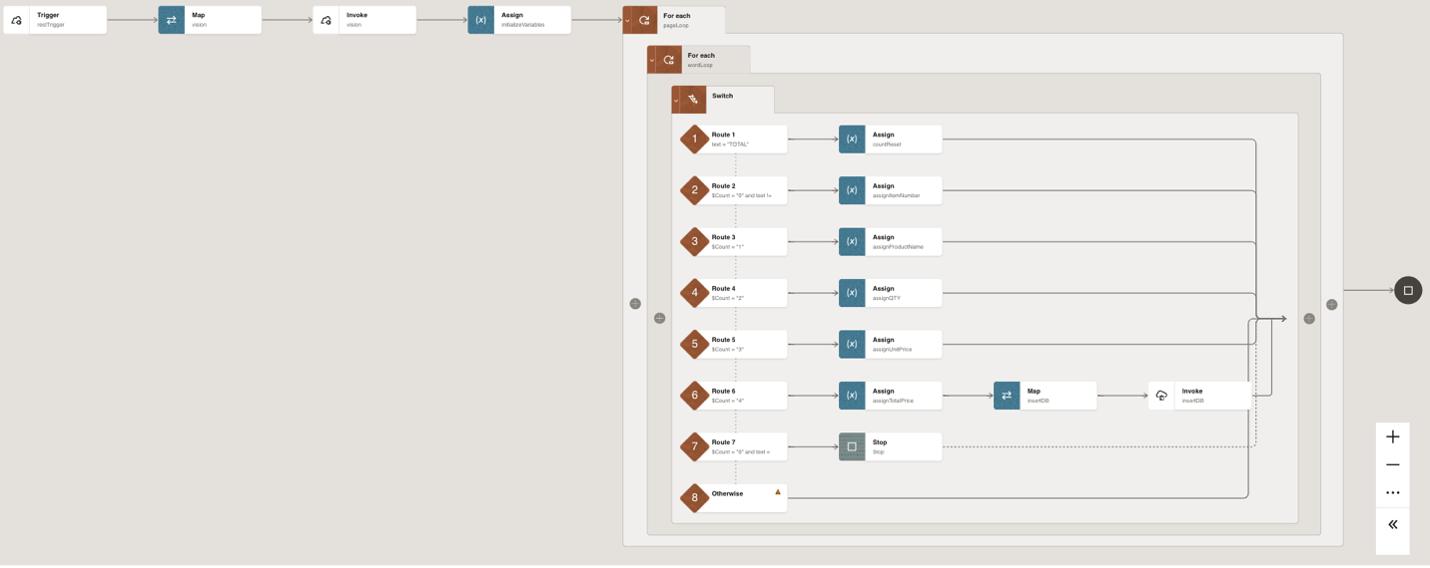
This app-driven integration has been designed as a custom API exposed via a REST endpoint. The first component after the trigger uses the Vision connection to extract the text from the target invoice. The rest of the logic is all about parsing the response from the Vision service to identify the target data, and finally inserting that data into the ADW.
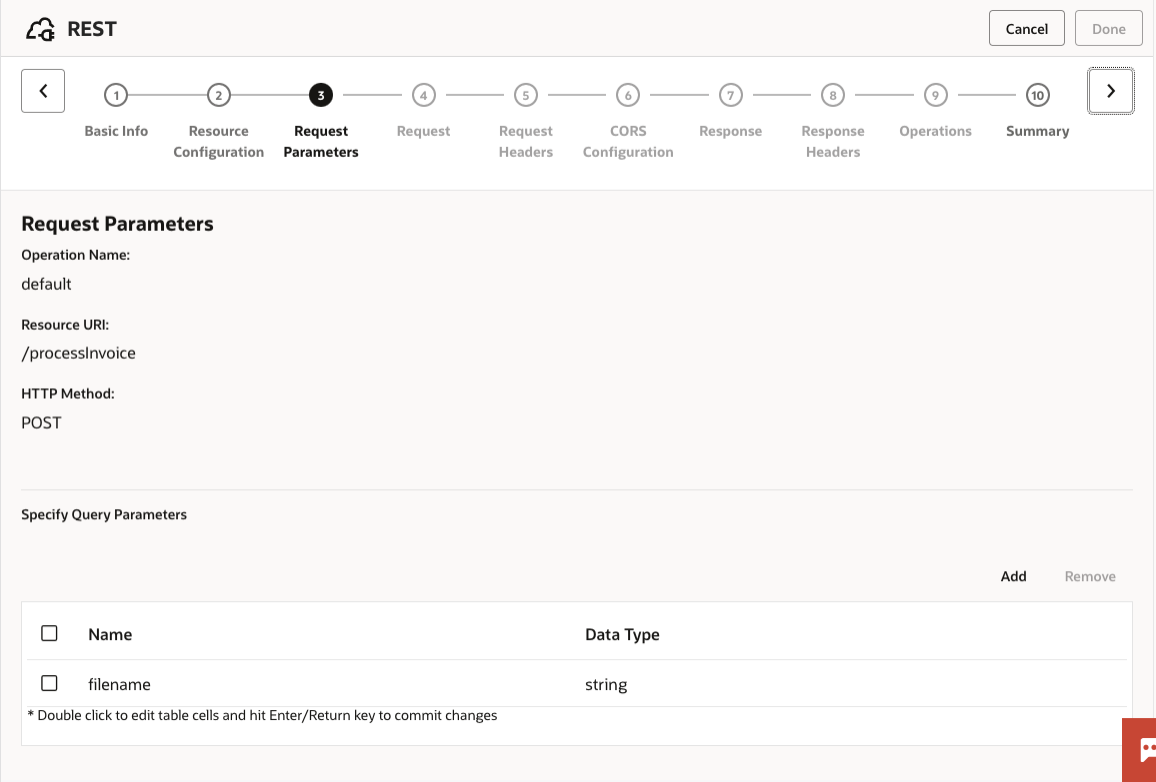
REST Trigger Configuration
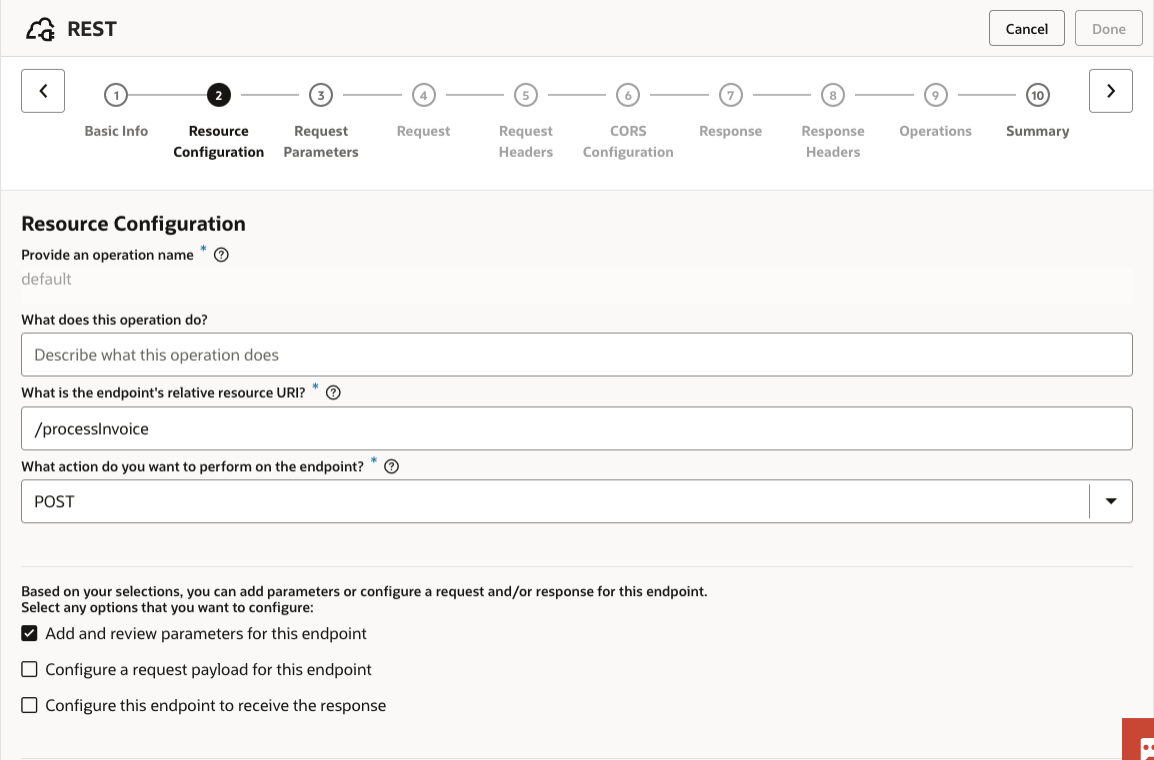
The configuration of the REST trigger is where we specify the structure of the request that initiates the integration, including any data that will be passed in. You can provide a meaningful relative URI like “processInvoice” and define it as a POST request. You will also want to indicate that we are expecting an input parameter for the target invoice’s filename that will be processed.
Defining input parameters for REST-triggered integrations is easy. Just add a new query parameter named “filename” and select string as the data type.
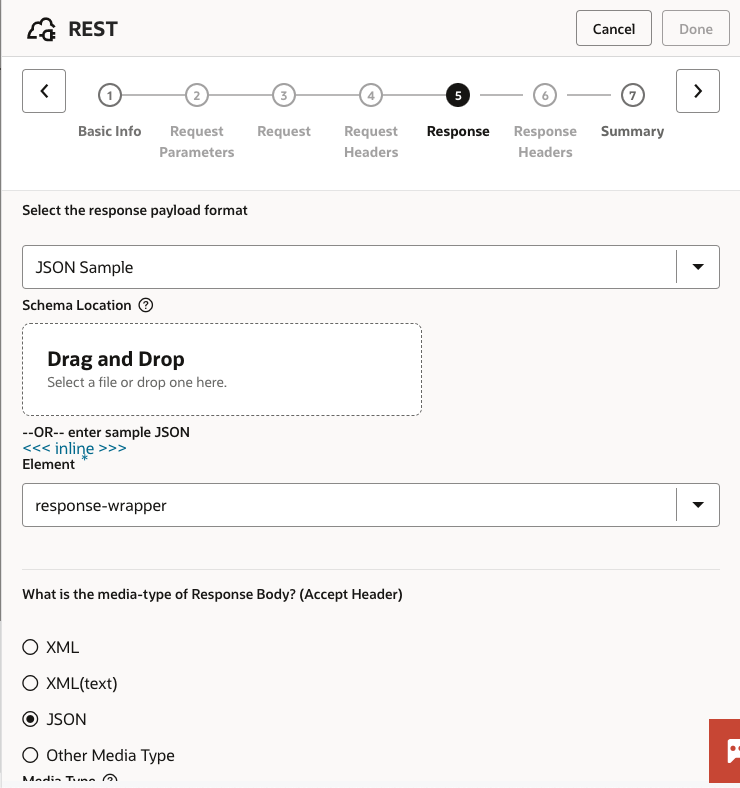
Vision Configuration
The next step is to drag and drop the Vision connection into the design canvas. Specify the relative URI that will be tacked onto the end of the base URL that you previously defined in the connection and select the POST operation. The last step is to check the boxes for both the request and response payload definitions. From there you can provide a sample JSON request and response for the Vision service’s analyzeDocument endpoint that OIC will validate for you. These request and response samples can be obtained by making API calls to the Vision service before building the integration in OIC.
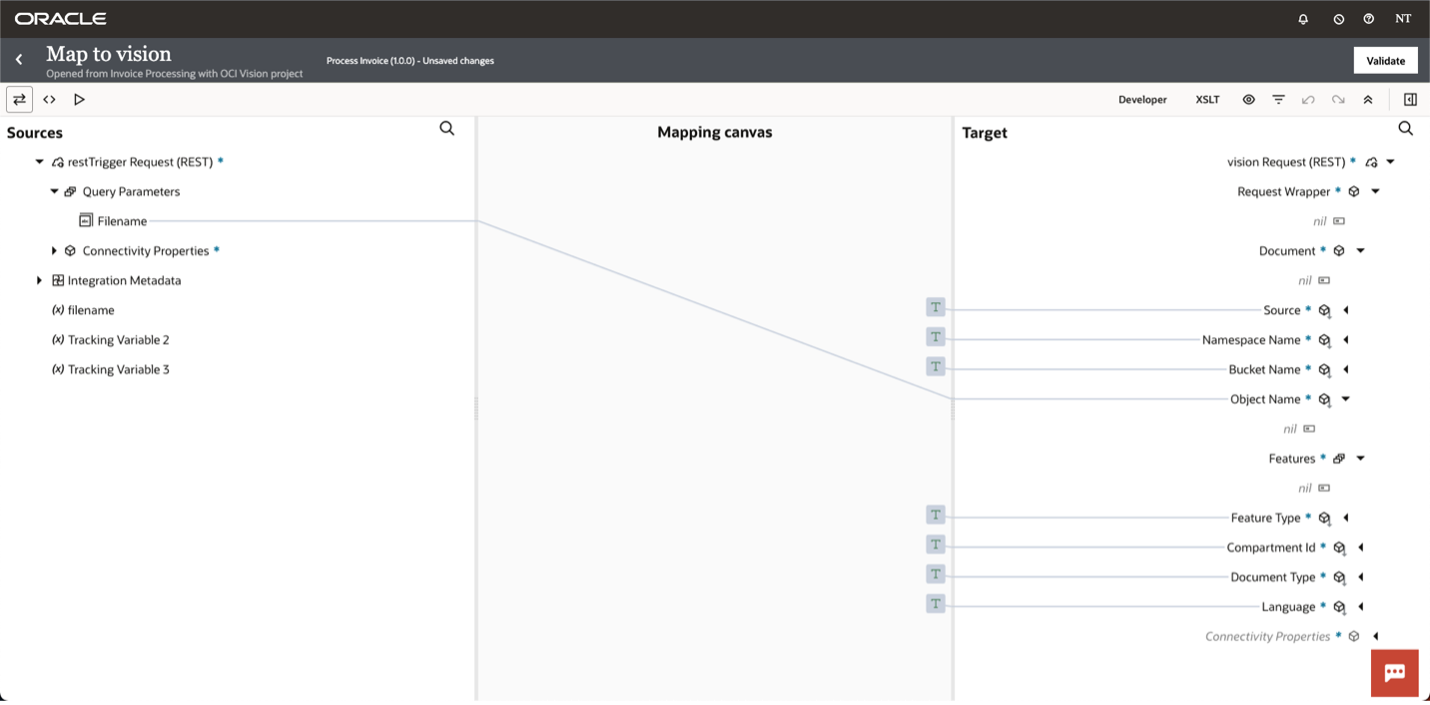
Data Mapping into the Vision Request
Below is an example data mapping into the Vision service. The only element mapped from the source is the filename for the target invoice that was taken in as an input parameter to the REST trigger. All the other elements on the target side have been hardcoded by creating target nodes.
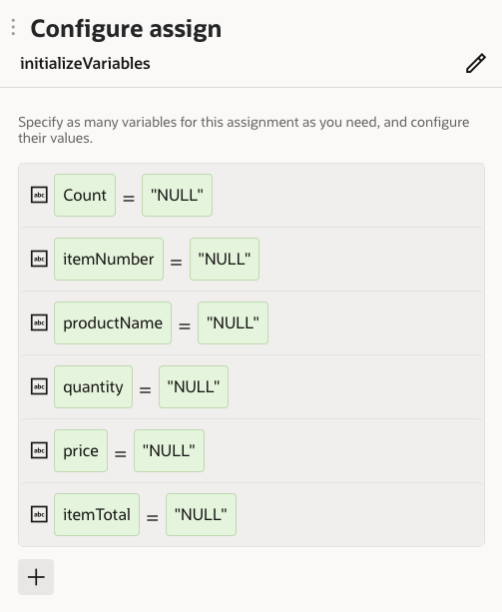
Initialize Your Variables
Below you can see the local variables that we have defined to help us parse the response from the Vision service. You can create variables by dragging the Assign action into the design canvas. They will be updated iteratively as the nested for-each loop runs to extract the key pieces of information that we are looking for out of the invoice. The “count” variable represents the current word that has been extracted whereas all the other variables represent individual elements that we are looking to insert into the database.
The parsing logic that you define will vary based off the structure of the document that you are working with. You can use nested loops to iterate through each page of the document and the words within each page. In our case, we have identified the word that precedes the information that we are looking for and are starting the count once we have seen that word in the response from Vision.
ADW Configuration
Once you have extracted all the target elements from the current line item, the final step is to insert these as a new row into the ADW. Drag the ADW connection into the design canvas and select “Perform an Operation On a Table” from the drop down menu. From there select “Insert”.
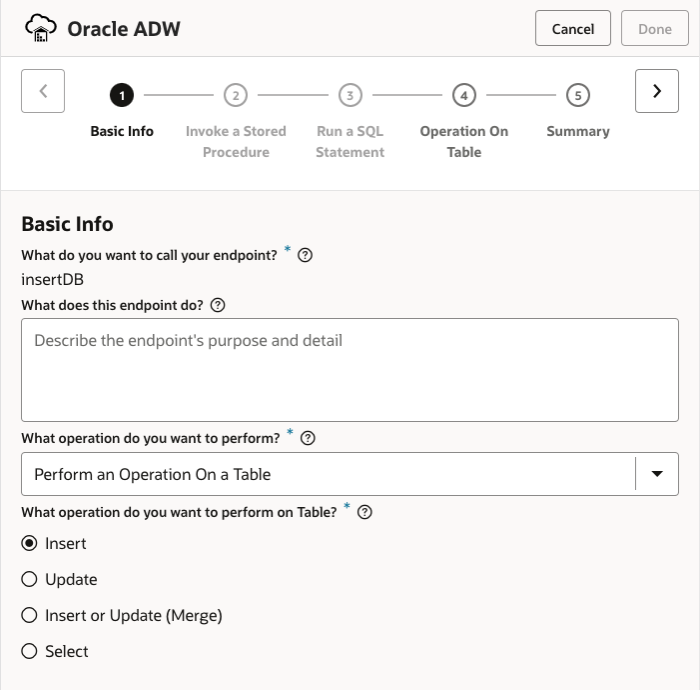
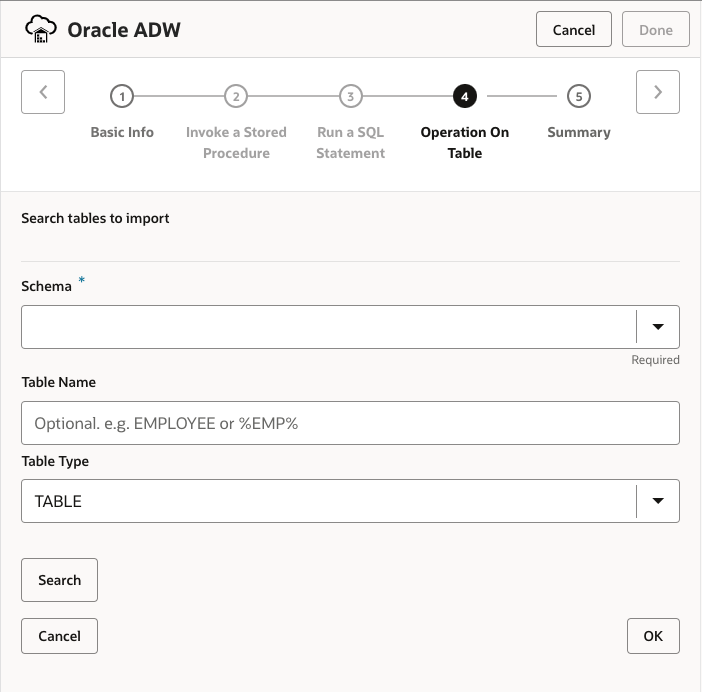
To indicate which schema and table within the database you wish to insert into, first select the schema from the drop-down menu and then search for the target table.
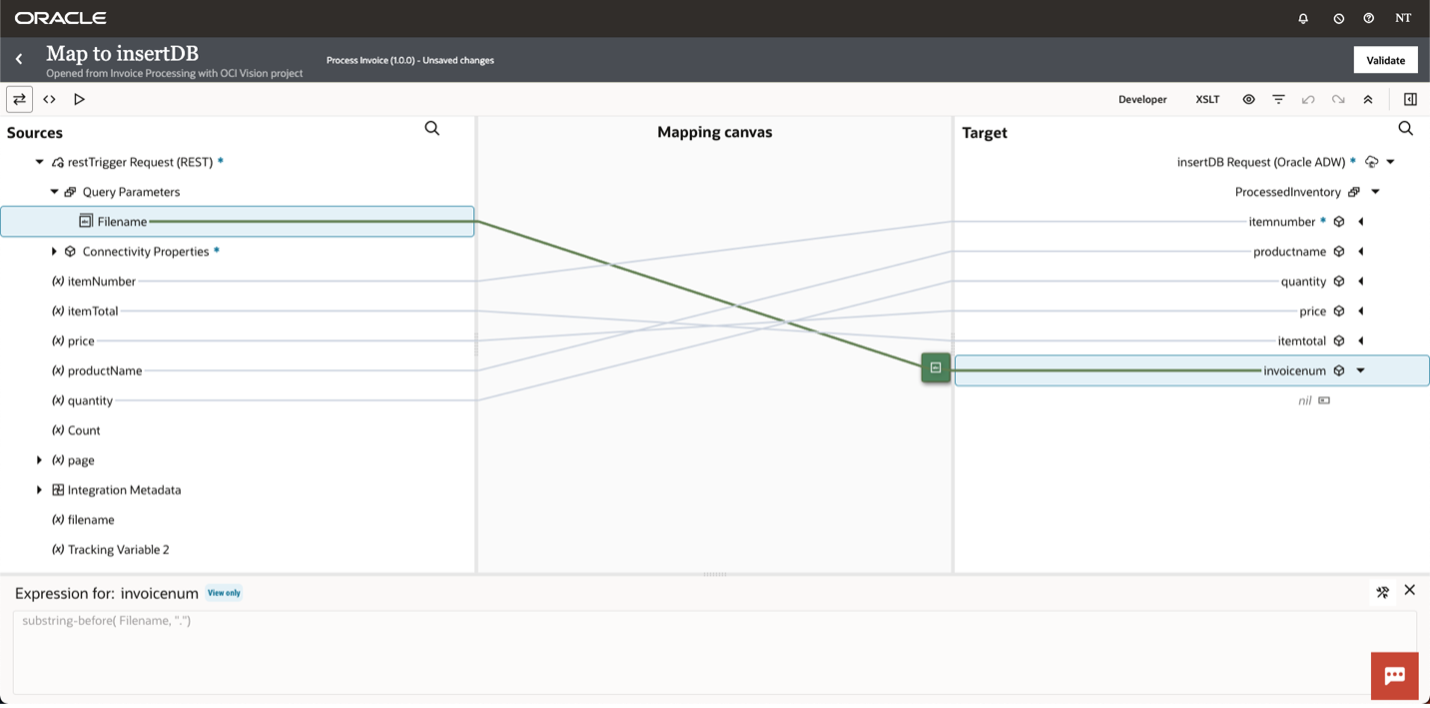
Data Mapping Into the ADW
Now that the ADW adapter has been configured, map the data from each of the local variables that you have defined into the columns of the target database table. You can map the elements directly from source to target, or you can leverage any one of OIC’s transformation functions. In this case we used a substring function to extract the invoice number from the name of the invoice PDF.
Processing Multiple Invoices at a Time
To improve on the integration that we just built, we can design a second integration that will allow us to process multiple invoices in a single integration run. Here is what that might look like:

Above you can see the overall design of this second flow. It is triggered either by a predefined schedule or can be run as an ad-hoc request. The first component leverages the Object Storage connection to fetch a list of all the invoices stored in the target bucket. From there you can run a for-each loop in parallel to iterate through each of the invoices, passing each one over to the first integration that we built asynchronously. You can think of this new integration as a parent flow that is calling the first integration as a child. In OIC, this is called a local invocation.
Object Storage Configuration
After dragging the Object Storage connection into the design canvas, we will first provide the relative URI that will be tacked onto the base URL that was defined in the connection. This will be the namespace followed by the bucket name as seen in the screenshot below. To fetch a list of objects in the bucket, we will be performing a GET request. The final step is to configure a response schema so that OIC can understand how to parse the JSON that it will get back from Object Storage.
To define the response schema, you can again provide a JSON sample that OIC will automatically validate. An error will appear and prevent you from continuing if your JSON is invalid.
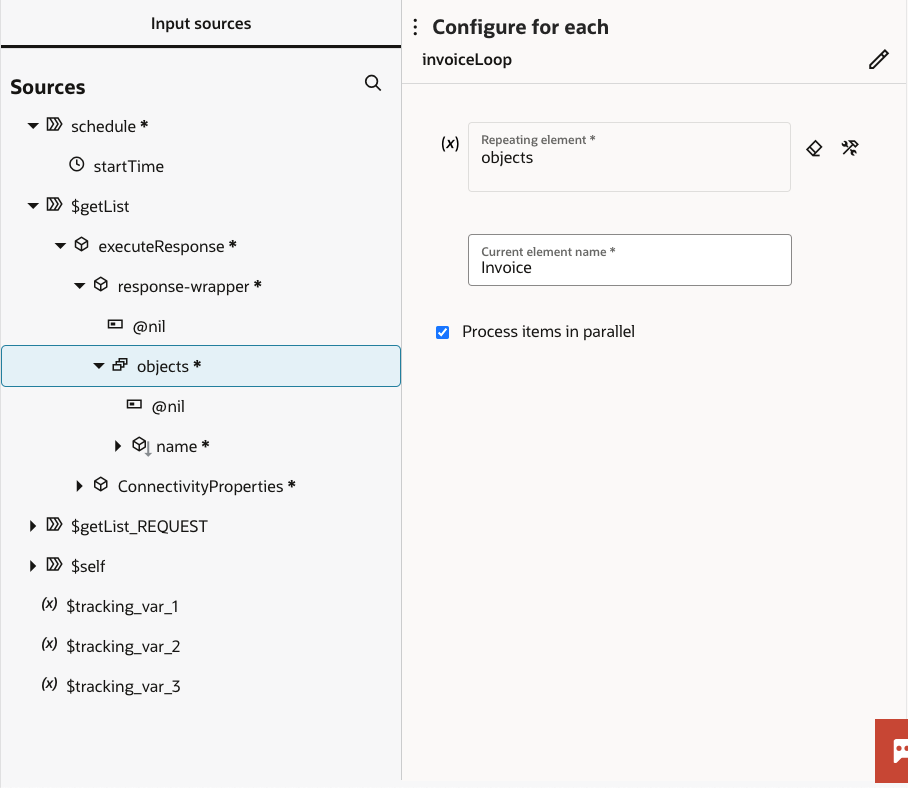
For Each Loop Configuration
To iterate through each of the invoices returned by Object Storage, you can create a for-each loop. The first step is selecting a source element that tells OIC what collection to iterate through. As seen in the screenshot below, you will select the child element under the response wrapper from Object Storage. The final step is to enable parallel processing of each invoice by clicking the checkbox at the bottom. This will allow each invoice to be processed simultaneously by the child integration – much faster than processing them one after the other.
Invoking the Child Integration
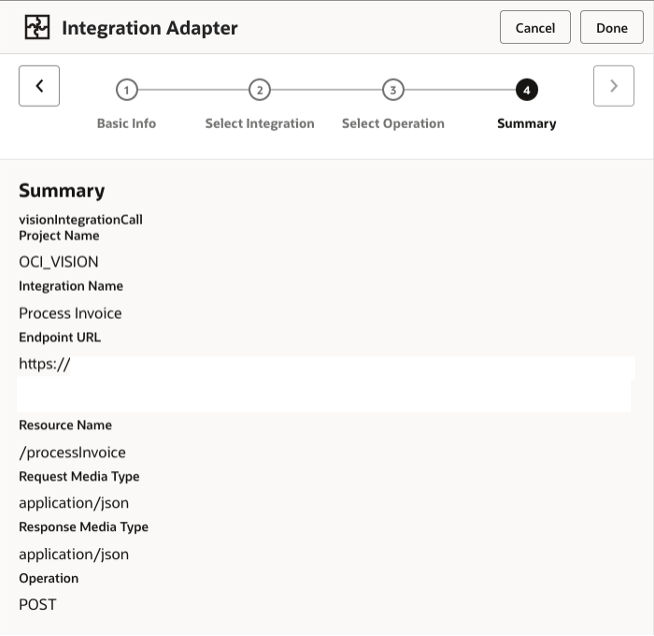
Calling another OIC integration as a subprocess is easy to configure. Just drag the Integration action into the design canvas and select an active integration from the drop-down list. The metadata for the child integration such as the resource name and operation type will automatically be populated.
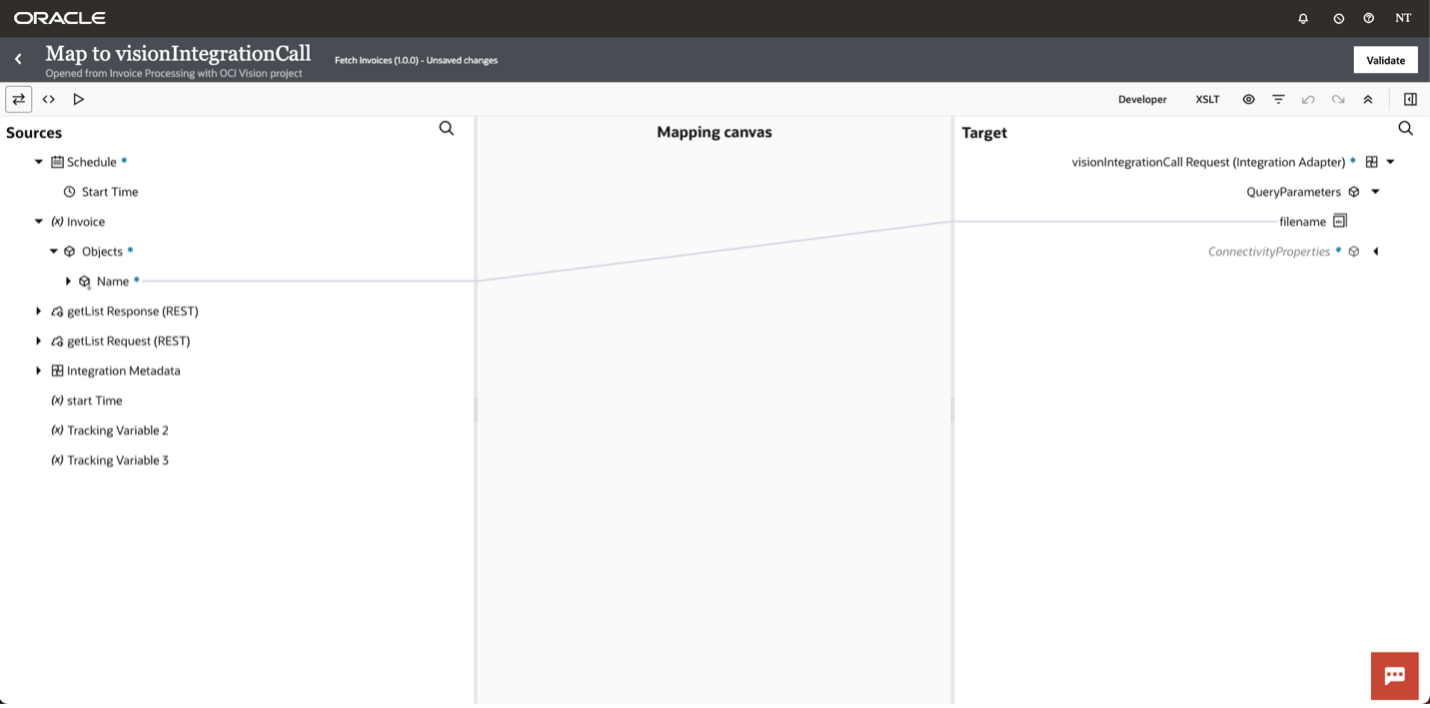
Data Mapping into the Child Integration
The final step in the parent integration is to complete the data mapping into the child integration within the loop. You will only need to map one element – the name of the current invoice into the filename parameter on the target side. This will allow our child integration to identify a single invoice within the Object Storage bucket for further processing.
Monitoring an Integration Run
Before an integration can be monitored, it needs to be triggered for a run to take place. By clicking “Run” on the active parent integration, we can submit a request for an ad hoc run of this integration.

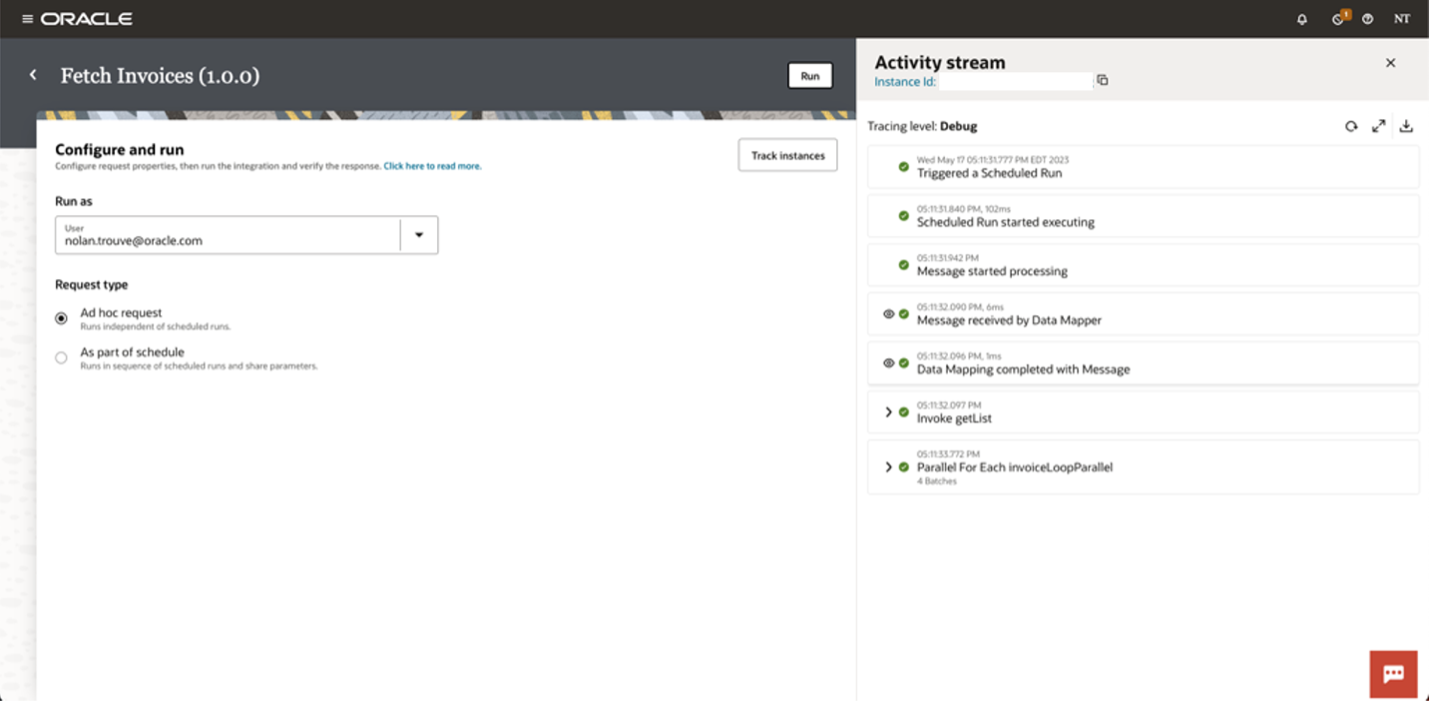
Clicking on Track Instances will take you to the Observability section of OIC where you can get more information. Once there, you can see the integrations that are currently running, have ran, and what the statuses of those runs were. You should see a single run of the parent integration and multiple concurrent runs of the child integration.
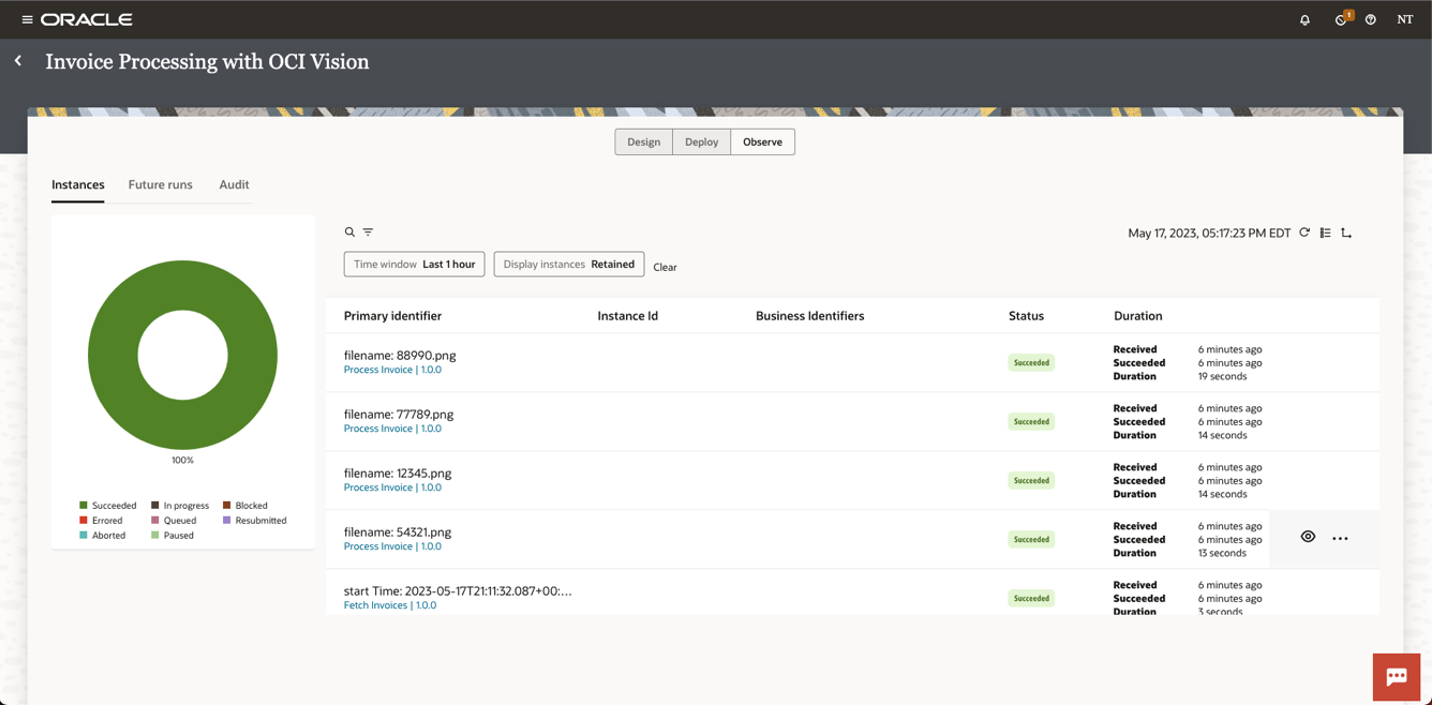
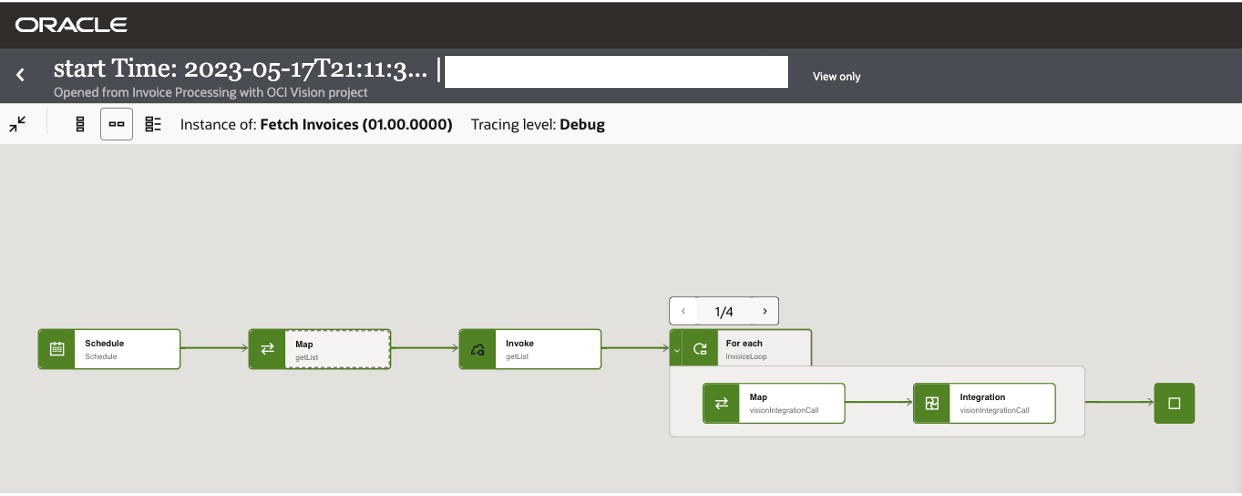
From there, you have a few different ways to monitor the integrations. In the case of an error, you can get a high-level view of your integration and quickly see where the problem could be. In general, problem areas will be associated with the use of the color red. You can also see the number of times the loop ran, depicted by the number in the box above the loop’s beginning. This number directly corresponds to the number of invoices that were in the bucket.
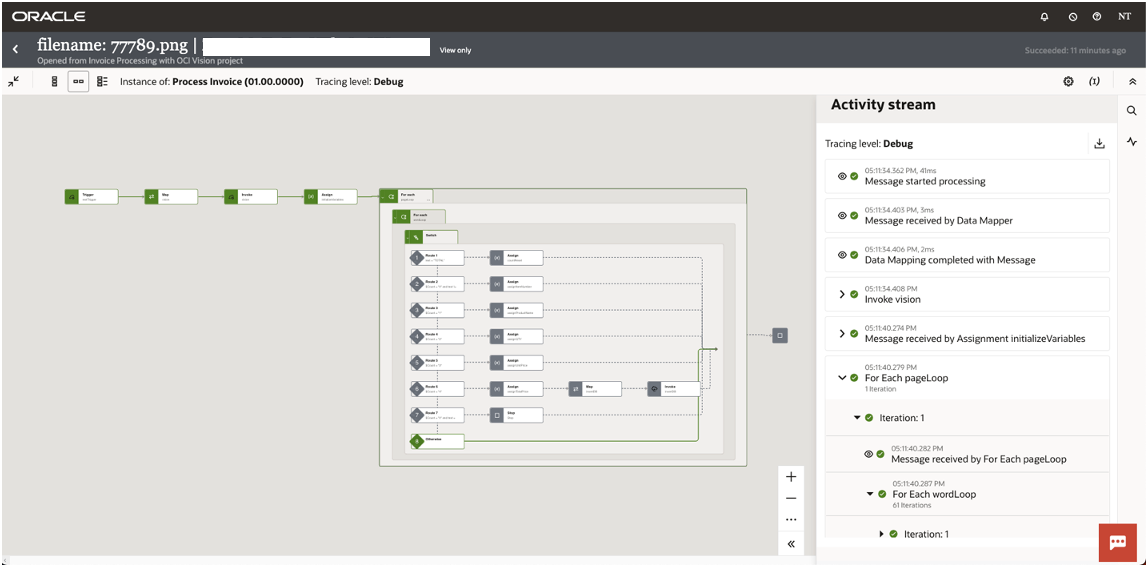
On the right-hand side, you can also view the activity stream which is essentially OIC’s version of a debugger. From there you get detailed information on each step of the integration.
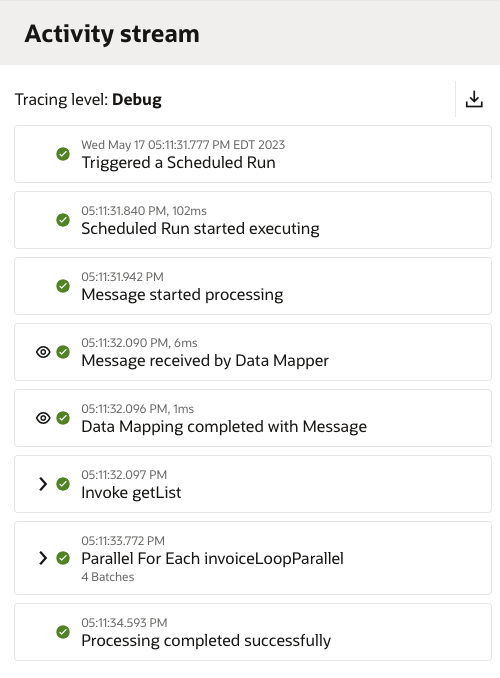
Looking at the child integration, we have access to the same information for every invoice processed. As you can see from the Activity Stream in the bottom right, one of the example invoices included a single page with 61 words extracted.
Conclusion
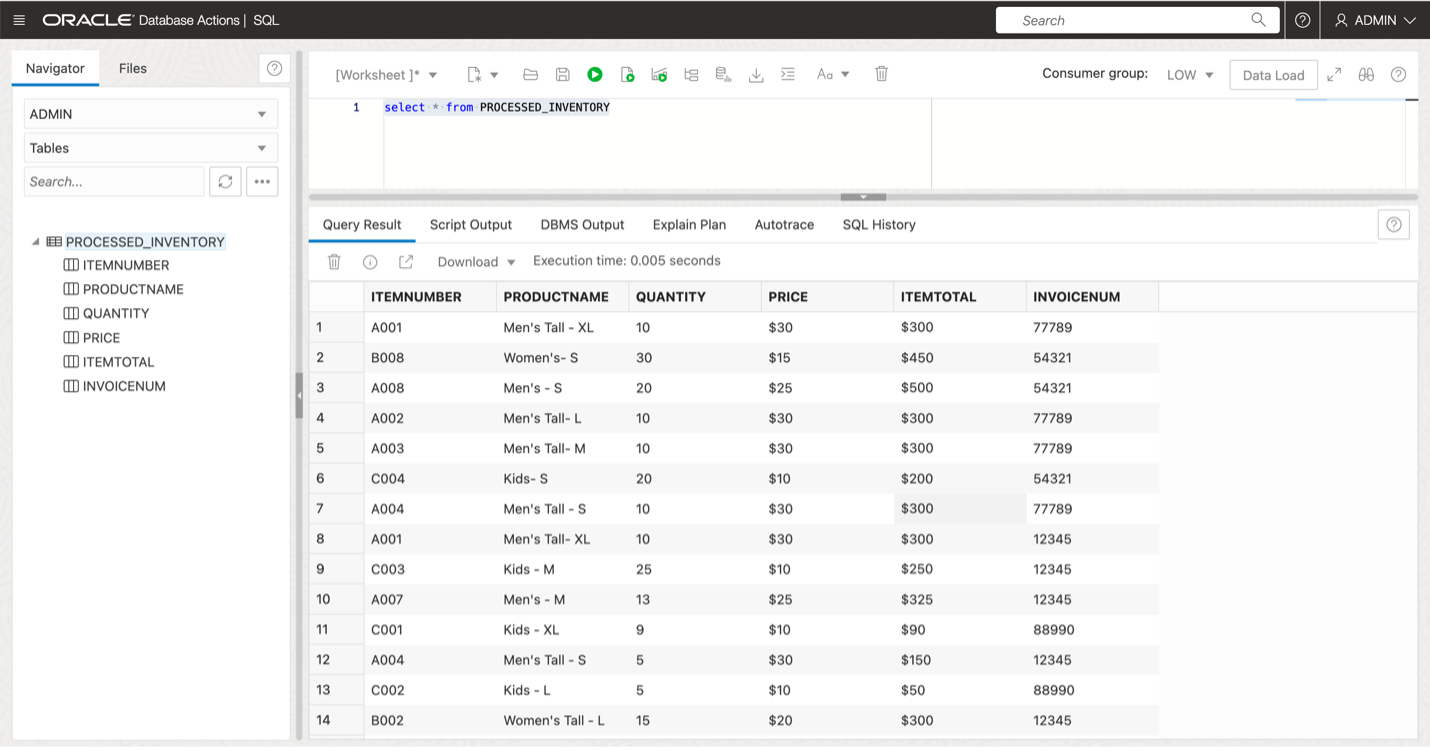
Based on the monitoring data, we can conclude that nothing went wrong during the run. The last thing would be to check the ADW, which should now have data from all the processed invoices.
I hope this blog helped you understand a little bit more about OCI Vision’s capabilities and how together with OIC the possibilities only get better.