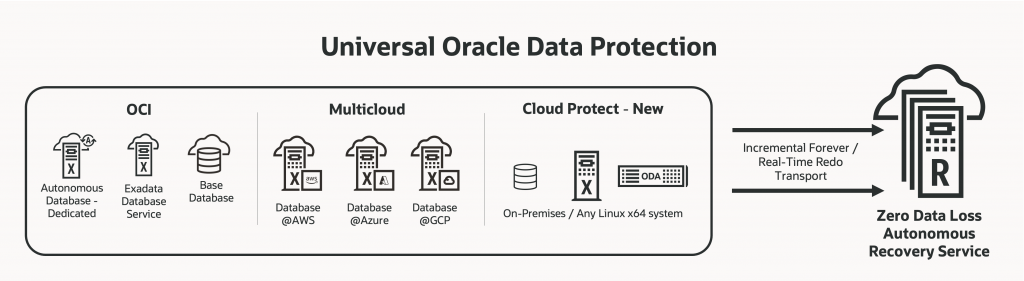
One of the latest additions to Oracle’s Live Labs is the Autonomous Recovery Service. This lab allows you to discover how to utilize the Autonomous Recovery Service Service for backing up your Oracle database in the cloud, even in a multicloud environment.
If you haven’t used it, Live Labs is Oracle’s free, hands-on platform which allows you to go though a workshop or lab to learn more about Oracle’s products.
You can find the lab here.
This lab utilizes Oracle’s sandbox to learn about the Autonomous Recovery Service (RCV) without the requirement of needing an OCI/Multicloud tenancy.
Also, the features that are demonstrated in this lab are the same regardless of using the Autonomous Recovery Service in OCI, or in a multcloud environment.
NOTE:
Keep in mind that it does take time to configure your lab for you to use since the provisioning process performs an initial backup. In my case it took about 60 minutes. You can view the status of building your lab environment on the “My Reservations” page to follow the progress. Once completed, this makes the environment immediately available once the lab environment is configured.
Setup:
Once your tenancy is configured for the lab you need to log in using the supplied credentials, and change the log in. Be sure to follow the directions and screenshots in the setup portion of the lab before beginning.
Also be sure to note the region and compartment that you will be using, and change the region after logging into the tenancy to the correct region.
Lab 1: Onboarding a database
One you log into the tenancy and region, you can now go through the steps to configure a database to use the Autonomous Recovery Service.
NOTE: The lab uses the “Base DB service” for the demo but the steps would be the same regardless if the Oracle Database server utilized or the location (OCI, AWS, GCP, Azure, etc.).
In this section you will
Create a protection policy – There are default protection policies policies you can use, but most customers chose to create their own for the following reasons.
- You can chose the exact retention period between 14 and 95 days. Since the service is incremental forever, the retention is not dependent on a weekly full backup.
- You can chose the backup location for the backups if using multicloud. The default is OCI, and you need to create a protection policy if you want to change the location from the default.
- You can configure a retention lock. Setting a retention lock is only available when creating your own protection policy.
Configure backups for the existing database – In this section you will view the backup configuration for the database. When the lab environment was provisioned, backups were configured, and in this step you will change the protection policy and enable real-time data protection.
Once the configuration changes are saved, you will monitor the update progress.
Lastly you will view the backup information for this database.
Lab 2: Perform point-in-time restores
The next section of the lab will walk through a point-in-time restore.
You will be guided through connecting to the Database directly through “Cloud Shell” and in cloud shell you will
- Create a new table and insert data into it.
- Determine the current SCN at this point (with the new table).
- Delete the table
- Abort the database (demonstrating real-time data protection)
- Delete the database files
- Restore the database to the SCN in the second step
This does take a bit and you are encouraged to continue to lab 3 while this occurs.
Lab 3: Create an on-demand backup
This lab walks you through the process to dynamically create an on-demand.
On-demand backups can be either
- Kept for the current retention period. This is useful when upgrading, or rolling out a new release and you want to create a known restore point. This type of backup is stored in the recovery service and will age out with the retention period.
- Long-Term backup retention period. This type of backup goes to Oracle managed infrequent object storage, and you specify how long the backups are kept for. This is the typical “keep” backups that the DBA will create to satisfy regulatory requirements (for example).
Lab 4: Monitor & Create Alarms
This section of lab walks you through two additional features that are available with the Autonomous Recovery Service.
Observability – In this section of the lab you explore the metrics that available to view. The lab demonstrates viewing the data loss exposure in either a chart or table
Alarms – This section shows you how to create an alarm that will sent out an alert on data loss exposure (for example).
Summary:
This lab is a great way to learn more about the Autonomous Recovery Service by going through the features in Oracle’s tenancy.