This post explores using a desktop agent like OpenAI Codex or Claude Cowork to download projects and deployments from an Intelligent Advisor Hub and explore what’s in them. This could be used, for example, to:
- Understand what data mappings have been created (eg. for all RightNow connected deployments)
- Create a list of deployments that contain forms
- Create a list of projects that have URLs in screen labels
Set up
- Create an API Client in Intelligent Advisor Hub using the role, or roles, with the least permissions needed in the relevant workspaces for the projects/deployments. In our case, we’ll use the following two roles: Manager and Author. For more information, see Create an API Client Account for Integration and Role Permissions for Intelligent Advisor REST APIs.
- Obtain a Bearer token from the Hub, using the client created above.
TIP! One way to do this is to use this command in a Window Command Prompt:curl --location "https://{your_Hub_site_interface}/opa-hub/api/latest/auth" --header "Content-Type: application/x-www-form-urlencoded" --data-urlencode "grant_type=client_credentials" --data-urlencode "client_id={your_api_client_identifier}" --data-urlencode "client_secret={your api_client_secret}"
Note that Bearer tokens expire after 30 minutes so obtain your Bearer token right before you are ready to use it to perform the tasks below. For more information, see step 2 in Authentication and Authorization. - Create an .env file that contains:
- the Hub URL (url= https://{your_Hub_site_interface}/opa-hub)
- the Bearer token (token={your Bearer token})
- Put this file in a folder that your desktop agent can access.
Important notes
The pattern of using an .env file containing the token is simplistic in nature for this demo only. This approach is acceptable for local development when:
- the token is short-lived
- the .env file is gitignored
- the token is scoped minimally
- the token is never inserted into prompts
- the model cannot read arbitrary local files
The process should take less than 30 minutes. If you have a large amount of data, this may take longer. For large amounts of data, you could use the Client ID and Secret in the .env file instead and have the tool use those with an additional condition to refresh the token if a 401 error is encountered midway through the process.
Use your desktop agent to download and analyze Hub projects/deployments
In your desktop agent:
- Choose the existing folder where you’ve placed the .env file. The agent will use that folder as the place to read, edit, and create files for this task.
- Add your prompt. Examples of prompts to use for different purposes are given below.
Example 1: Generate a report of forms used in downloaded deployments
To download deployments from a Hub and use an LLM to list all deployments that contain forms, including the details of those forms, use a prompt like this in your desktop agent:
Given the local .env file containing the Hub URL and access token, download every active deployment snapshot from the Hub into a local directory named "Deployments" under the current working directory.
Use the Hub /api/latest endpoint for all Hub API calls. If a snapshot download is returned as JSON with a Base64 value, decode that value into a ZIP file before extracting it.
For each deployment, extract the snapshot and inspect the extracted project files. A deployment contains Forms only if its interview definition includes generated document/form entries; do not count deployments that only contain an empty/default FormTemplates folder.
For deployments that contain Forms, analyze:
- form name
- template file
- entity name
- attributes used by the form, using the form template and project data model. In the report, show only attribute public-name values in the attributes used column.
Output a Markdown file named "Deployment-Forms.md" in the current working directory with this exact structure:
# Forms Report
Deployments containing forms: <count>
Then create one section per deployment that contains forms:
## <Deployment name>
- Collection:
- Interview URL:
- Downloaded snapshot location:
### Forms
Table: name | template | entity name | attributes used |
## Errors
If any deployment or file fails, record the deployment, stage, and error message here, then continue with the next deployment.
—
The generated file should look similar to:

TIP! This shows the markdown file open in Visual Studio Code in Preview mode (rather than as a source file).
Example 2: Generate a report of downloaded deployments with RightNow connections
To download deployments from a Hub and use an LLM to list all deployments that have RightNow connection, including the details of the data mappings, use a prompt like this in your desktop agent:
Given the local .env file containing the Hub URL and access token, download every active deployment snapshot from the Hub into a local directory named "Deployments" under the current working directory.
Use the Hub /api/latest endpoint for all Hub API calls. If a snapshot download is returned as JSON with a Base64 value, decode that value into a ZIP file before extracting it.
For each downloaded deployment:
1. Extract the snapshot.
2. Identify the extracted project root.
3. Determine whether the deployment has a RightNow connection by checking hubModel.xml for endpoint metadata whose type or endpoint attribute equals "RightNow", case-insensitively. Use this value as the connection type. Use the project .xprj external-data-interface name as the connection name.
Analyze only deployments that have a RightNow type connection. Skip all other deployments.
For each RightNow deployment, extract:
Entity mappings:
- Include only entities that contain mapped attributes or mapped relationships.
- For top-level attributes outside an entity, use entity ID "global" and public name "global".
- Include entity ID and public name.
Attribute mappings:
- Find attribute elements in projectDataModel.xml that contain bound-input or bound-output children.
- For each mapped attribute, include:
- direction: Input for bound-input, Output for bound-output
- entity ID
- entity public name
- attribute ID
- attribute public name
- RightNow table
- RightNow field
Relationship/table links:
- Find relationship elements in projectDataModel.xml that contain bound-link children.
- Include:
- relationship ID
- public name/text
- source table
- target table
- field/link name
Important mapping rule:
Use projectDataModel.xml as the only source for mapped tables and fields. Include only project-specific table/field values referenced directly by bound-input, bound-output, or bound-link elements. Ignore hubModel.xml, WSDL/schema files, connector catalogs, and Hub metadata mappings for table/field reporting, and never list available RightNow schema tables or fields unless they are referenced by those bindings.
Output a Markdown file named "RightNow-Mapping-Report.md" in the current working directory with this structure:
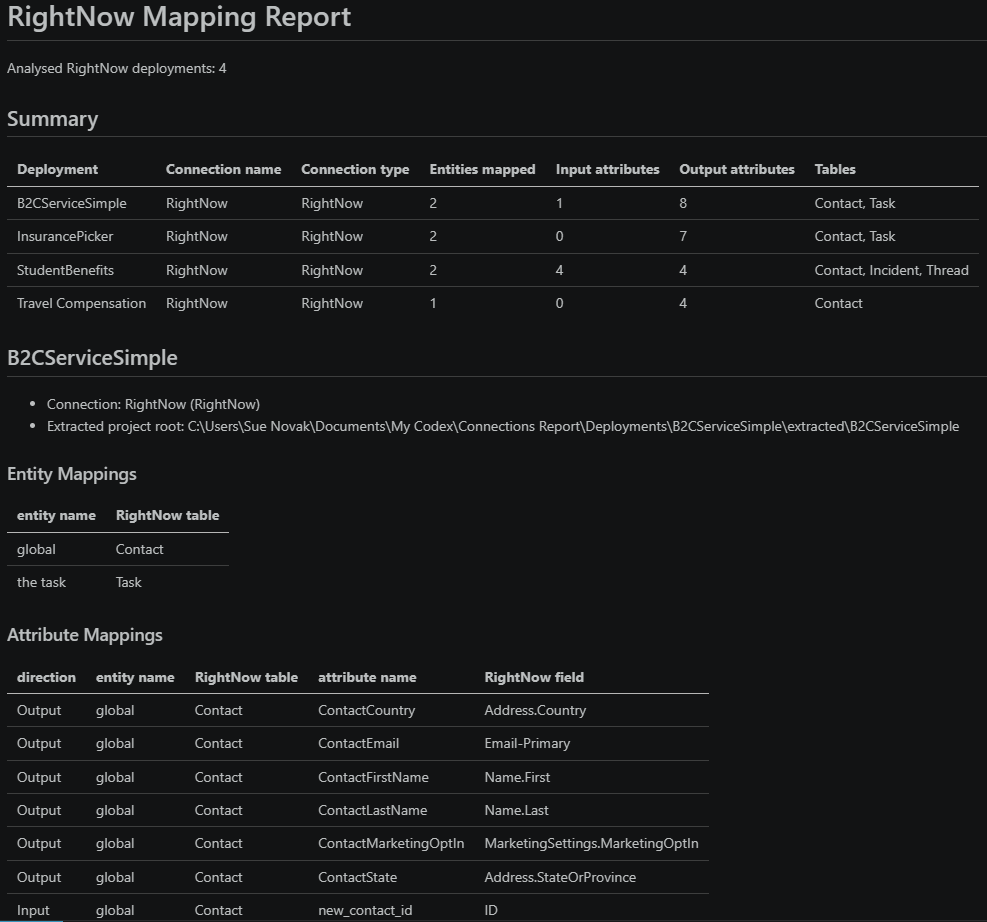
# RightNow Mapping Report
Analysed RightNow deployments: <count>
## Summary
Create a table with columns:
Deployment | Connection name | Connection type | Entities mapped | Input attrs | Output attrs | Tables | Fields
Then create one section per RightNow deployment:
## <Deployment name>
- Connection: <connection name> (<connection type>)
- Extracted project root:
### Entity Mappings
Table:
entity_id | public_name
Use "_No mapped entities._" if none.
### Attribute Mappings
Table:
direction | entity_id | entity_public | attribute_id | attribute_public | table | field
Use "_No mapped attributes._" if none.
### Relationship/Table Links
Table:
relationship_id | public_name | source_table | target_table | field
Use "_No relationship/table links found._" if none.
## Errors
If any deployment or file fails, record the deployment, stage, and error message here, then continue with the next deployment.
—
The generated file should look similar to:
Example 3: Generate a report of URLs used in screen text in downloaded projects
Use a prompt like this in your desktop agent to download projects from a Hub and generate a report of projects that contain URLs in screen text, including the screen name, link text, URL, and link check result:
Given the local .env file containing the Hub URL and access token, download every Policy Modeling project in the Projects repository in the Hub into a local directory named "Projects" under the current working directory. Ignore the Deployments repository in the Hub entirely.
For each downloaded project:
1. Extract the snapshot.
2. Identify the extracted project root.
3. Determine whether the project has any URLs in screen text by checking the Interview.int file for hrefs.
For each project containing URLs in screen text, extract the screen name, link text, and URL. Then run a HTTP status check on each URL.
Output a Markdown file named "Projects-Screen URLs.md" in the current working directory with this exact structure:
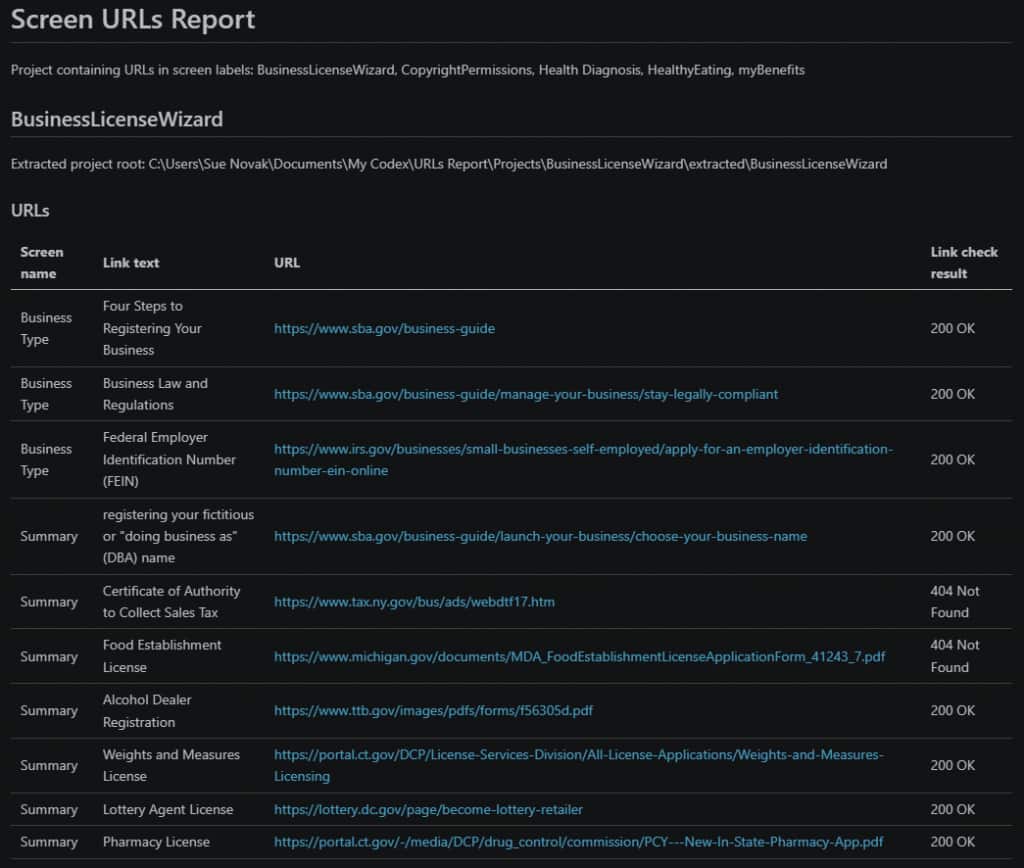
# Screen URLs Report
Project containing URLs in screen labels: <list of project names>
Then create one section per project that contains URLs in screen labels:
## <Project name>
Extracted project root:
### URLs
Table: Screen name | Link text | URL | Link check result |
## Errors
If any project or file fails, record the project, stage, and error message here, then continue with the next project.
—
The generated file should look similar to:
Title image credit: Alex Knight via Unsplash