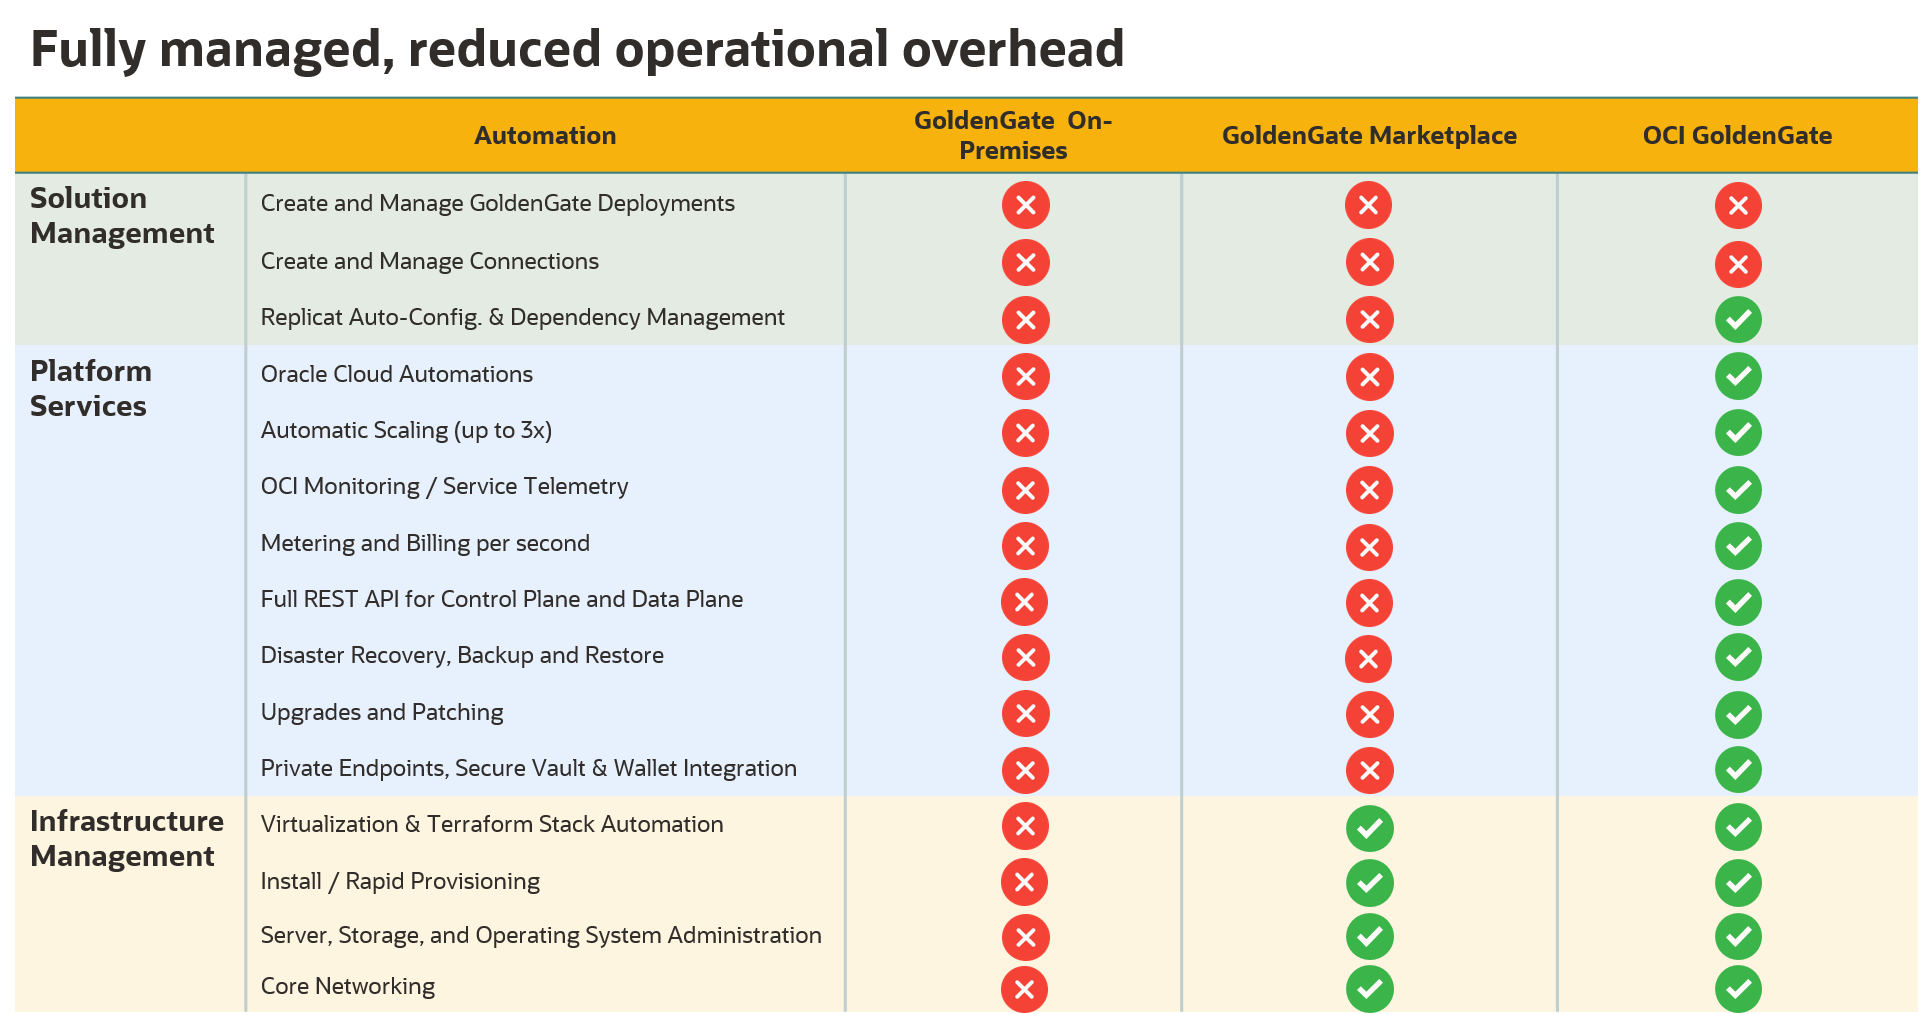
Oracle Cloud Infrastructure (OCI) GoldenGate is a fully managed, native cloud service that moves data in real-time, at scale. To reduce business costs and maintenance, OCI GoldenGate is an ideal option for database realtime migration and Disaster Recovery (DR) setup. Enterprise data is typically distributed across the enterprise in heterogeneous databases. To get data between different data sources, we can use OCI GoldenGate to load, distribute, and filter transactions within your enterprise in real-time, and enable migrations between different databases in near zero-downtime. The columns below give a brief overview of how this works.
This post is a step-by-step guide demonstrating a simple migration from GoldenGate Marketplace to OCI GoldenGate. No administrative tasks are required for the databases involved with the replication and no downtime is required of the source business application.
Oracle Cloud Infrastructure (OCI) GoldenGate
OCI GoldenGate processes data as it moves from one or more data management systems to target databases. You can also design, run, orchestrate, and monitor data replication tasks without having to allocate or manage any compute environments.
Pre-Migration Preparation
Before migrating GoldenGate Marketplace classic instance to GoldenGate Cloud Service (GGCS), ensure that you consider the downtime requirements of your current environment and carefully plan and create resources required for GGCS.
Downtime Requirements
This migration approach will have minimal impact on the availability of your existing GoldenGate instance. As per the migration workflow, existing GoldenGate instance’s processes will be stopped. When the migration completes, the replication process resumes from where it was stopped. For smooth completion of the migration, ensure that there are no active transactions in the production database.
This migration will not impact your current Oracle GoldenGate instance’s files, such as configuration files, report files, and trail files.
After the migration completes successfully, reroute all clients to GGCS.
Create Cloud Resources
Before you migrate to OCI GoldenGate, you must create the required OCI resources, including:
- Compartment
- Virtual Cloud Network (VCN) and subnet
- Users and Groups
- Policies
For more information, please refer to Getting Started with GoldenGate.
Backup and secure data
Complete the following steps before starting your migration:
- Backup and secure the data (configuration files and trail file data) on cloud storage for the Oracle GoldenGate instance you are migrating. Default data location is /u02/trails.
Perform Migration Tasks
Since OCI GoldenGate is a fully managed cloud service, you can’t migrate Trail and other Oracle GoldenGate configuration files (like Param files) to the OCI GoldenGate deployment. You’ll start fresh with OCI GoldenGate. You can, however, work in sync with the Oracle GoldenGate instance you are migrating and the new OCI GoldenGate deployment, so that no data is lost during migration. To migrate Oracle Market place GoldenGate to OCI GoldenGate, drain all active open transactions from your source database to the Trail file using the Oracle GoldenGate instance you are migrating, and then switch to the new OCI GoldenGate deployment.
Creating a Deployment
OCI GoldenGate deployments are similar to your full on-premise Oracle GoldenGate Microservices or Classic architecture installation’s deployments.
For every one Oracle GoldenGate instance that you are migrating, create an equivalent OCI GoldenGate deployment. You may also choose to create OCI GoldenGate deployments for each replication environment architecture needed.
For more information, see Deployments.
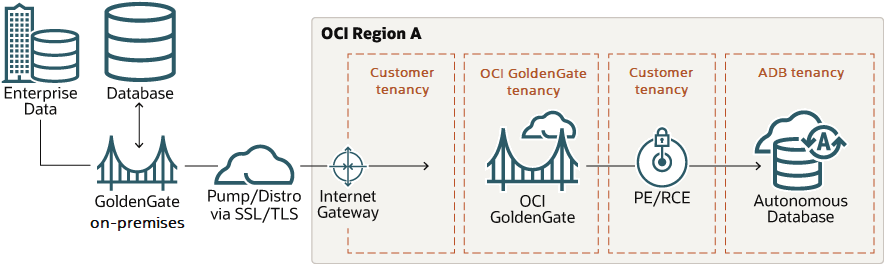
Registering the Database
A database registration is an OCI resource that OCI GoldenGate uses to establish networking and connectivity to a source or target database. When you register a database, OCI GoldenGate creates a private network connection between OCI GoldenGate and your tenancy VCN (where your database resides). Database registrations also capture and synchronize database credentials to the OCI GoldenGate deployment. Any changes made to the credentials, such as updating or deleting, is synchronized to OCI GoldenGate.
Ensure that you register all your source and target databases in OCI GoldenGate using the same credentials used with the Oracle GoldenGate instance you’re migrating.
For more information, see Database Registrations.
Migrating Extracts
After you register databases and create the necessary OCI GoldenGate deployments, the next important step is to migrate the Extracts from the Oracle GoldenGate instance that you’re migrating.
As a fully managed service, OCI GoldenGate is inaccessible by a root user. Trail files and configuration files can’t simply be copied into the OCI GoldenGate deployment. To migrate these files, you must first drain all active open transactions in the Trail file of the Oracle GoldenGate instance you are migrating, and then replicate these transactions into the target database.
Perform the following steps for each Change Data Capture (CDC) Extract that you have in the Oracle GoldenGate instance you are migrating. Ensure that you perform the migration steps for all Extracts and Replicat in the same application or database.
- Add and run a new Extract in the OCI GoldenGate Deployment Console to capture the same tables that you are capturing with the Oracle GoldenGate instance you are migrating.
- Ensure that you copy the Extract file parameters to the new Extract in the OCI GoldenGate Deployment Console.
- Ensure the Extract is running and capturing data, and that the Trail file is filled with data.
- Force the source database to archive logs:
alter system archive log current;
- Query the source database to determine the current SCN and take note of the number
select current_scn from v$database;
- In the Oracle GoldenGate instance that you’re migrating, run the following commands:
info extract [name], showch
Review the timestamps displayed under “Recovery Checkpoint” and “Current Checkpoint” and check that the time difference is less than one minute.
send extract [name] showtrans
This command returns the oldest open transaction tracked by Extract. Take note of the SCN returned. If the result is empty, repeat step 5 and take note of the recovery checkpoint SCN.
- Stop the Oracle GoldenGate instance using below GG command
stop extract [name], force
- Check and take note of the Extract of the Oracle GoldenGate instance you’re migrating’s current checkpoint SCN:
info extract [name], showch
Migrating Data Pump Extracts
Optionally, if you are using Data Pump Extract in the Oracle GoldenGate instance that you’re migrating, perform following tasks in the source instance:
- When the Data Pump Extract is at end of file, enter the following command:
send extract [name], status
- Stop the Data Pump Extract
Migrating Replicats
Perform the following steps for each Change Data Capture Replicat in the Oracle GoldenGate instance that you’re migrating:
- Run the following command to check if Replicat process is at end of file
send replicat [name], status
- After the Replicat process reaches end of file, stop the Replicat. Ensure that it stops gracefully. If it doesn’t stop gracefully, you must run the synchronize replicat command.
- Add a new Replicat process in the OCI GoldenGate Deployment Console. Ensure that it reads from the new Trail file generated by the OCI GoldenGate Extract or Data Pump Extract. Don’t run the Replicat yet.
- In the OCI GoldenGate Deployment Console, position the Replicat to the SCN retrieved from the Extract current checkpoint obtained in Step of Migrating Extracts, and then start the Replicat.
start replicat [name], aftercsn <scn>
Note: If you have multiple Extract/Replicat pairs, ensure that you use the correct corresponding SCN.
Perform Post-Migration Tasks
Now that you have successfully migrated from Oracle GoldenGate to OCI GoldenGate, you can test your deployments and migration scenarios, and then perform clean up tasks.
Validation
Verify that your new OCI GoldenGate deployment is accessible and capturing all change data capture transactions without any data loss during the migration process.
Cleanup the Oracle GoldenGate Marketplace Instance
To delete the Oracle GoldenGate Marketplace instance:
- Log in to the Oracle Cloud Infrastructure Console and then select your region.
- Open the Navigation menu (hamburger icon), click Developer Services, and then under Resource Manager, click Stacks.
- On the Stacks page, click the Oracle GoldenGate Marketplace stack that you migrated to OCI GoldenGate, and then click Destroy.
This releases all the resources the stack used, such as block storage, compute instances, IP addresses, and so on.
This step-by-step guide demonstrated a simple migration method for moving from GoldenGate Marketplace to OCI GoldenGate service on Oracle Cloud Infrastructure. The example uses GoldenGate Marketplace running on OCI Compute, but is also applicable to GoldenGate running on-premises. We hope this blog will be helpful if you are considering migrating GoldenGate Marketplace (or on-premises) to OCI GoldenGate.