Introduction
So, you’re a new (or) an exising Oracle HCM Cloud Customer wondering where to start first on reinforcing organizational identity while sending emails to new hires, workflow approval notifications to employees or personalized notifications for various tasks, Take my word: You’ve clicked the right link.
This post focuses on configuring email sender domains, setting up vanity email addresses to avoid spam filters and improving email delivery.
As an Oracle HCM SaaS customer, you may want to modify the “From” addresses in emails sent from Fusion Applications. For instance, when sending emails to new hires or notifications to employees, you might prefer using your organization’s identity instead of the default Oracle email address delivered
How to achieve this?
Detailed Steps:
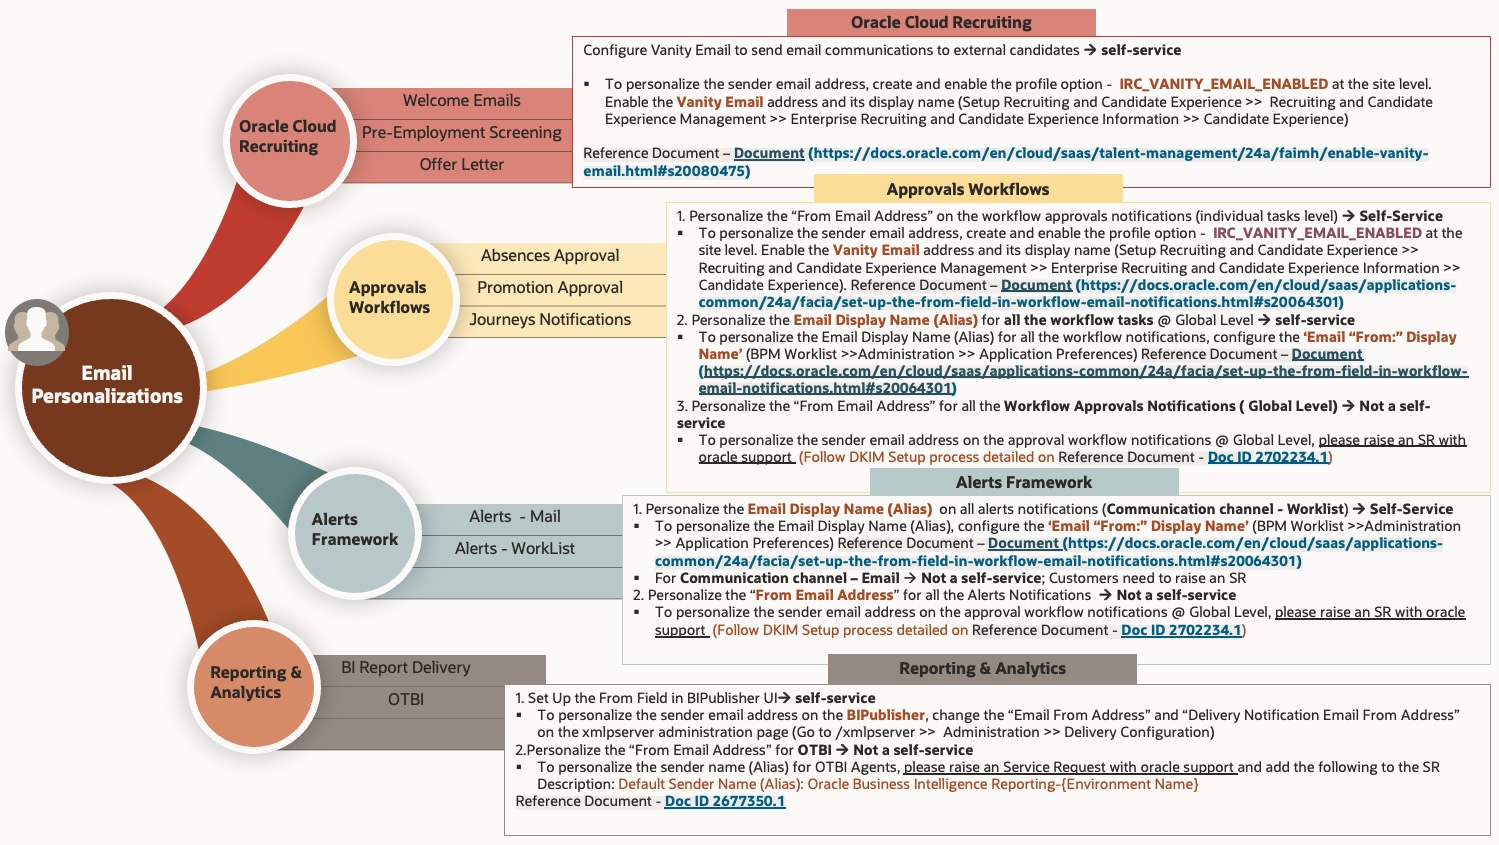
| Oracle Cloud Recruiting | Workflow Approvals Notifications |
| Use Case 1: Personalize the “From Email Address” (Welcome emails, pre-employment screening, offer letter etc.,) | Use Case 1: Personalize the “From Email Address” on the Workflow Approvals Notifications (Individual Tasks Level) |
| Default Sender Email – <your pod>.fa.sender@workflow.mail.<your data center>.cloud.oracle.com | Default Sender Email – <your pod>.fa.sender@workflow.mail.<your data center>.cloud.oracle.com |
| Steps to do: | Steps to do: |
| Configure Vanity Email to send email communications to external candidates | There is a self service capability available to customers. |
| Step 1: Create and enable the Profile Option @ site level – IRC_VANITY_EMAIL_ENABLED | Step 1: Enable the profile option @ site level – ORA_FND_BPM_FROM_EMAIL_ADDRESS_ENABLED |
| 1.In the Setup and Maintenance work area, search for the task Manage Profile Options. | 1.In the Setup and Maintenance work area, go to the Manage Applications Core Administrator Profile Values task in the Application Extensions functional area. |
| 2.On the Manage Profile Options page, click the Create icon. | 2.Set the From and Reply To Email Address Configuration Enabled (ORA_FND_BPM_FROM_EMAIL_ADDRESS_ENABLED) profile option to Yes at the Site level. This setting will take effect after about an hour. |
| 3.On the Create Profile Option page, create the profile by entering these values: | Step 2: Change the From and Reply-To Address – |
| •Profile Option Code: IRC_VANITY_EMAIL_ENABLED | 1.In the Setup and Maintenance work area, go to the Manage Task Configurations task in the Application Extensions functional area. Or, depending on your offering, you might use a different functional area or another approval setup task. |
| •Profile Display Name: Vanity Email | 2.In BPM Worklist, on the Task Configuration tab, search for the workflow task in the Tasks to be configured pane. |
| •Application: Recruiting | 3.Select the task from the search results and click the Edit task icon in the toolbar. |
| •Module: Recruiting Common | 4.Open the Notifications subtab. |
| •Description: Enable the vanity email feature in the Setup and Maintenance work area. | 5.On the Notifications subtab, click the Expand More icon. |
| •Start Date: Today’s date | 6.Select Email: From and Reply To address options |
| 4.Click Save and Close. | •Select Default email address to use the default from address. The address that you see for this option is the default from address. The default reply-to address is separate and could be a different predefined value. |
| Step 2: Enable the Vanity Email – | •Select Submitter to show the task submitter’s email address. If that address can't be determined for a specific notification, the default email address is used. |
| You must define the vanity email address and its display name. | •Select the last option to show a specific email address. Enter the address in quotes, for example – Human-Resources@customer.com |
| 1.In the Setup and Maintenance work area, go to: | 7.Click the Save icon in the Tasks to be configured toolbar |
| •Offering: Recruiting and Candidate Experience | |
| •Functional Area: Recruiting and Candidate Experience Management |
|
| •Task: Enterprise Recruiting and Candidate Experience Inform |
|
| 2.Under the ‘Candidate Experience’ , edit and provide the display name, Vanity Email. |
|
|
| |
| 3.Click Save and Close. |
|
|
| |
|
| Use Case 2: Personalize the Email Display Name (Alias) for all the Workflow Approvals Notifications (Global Level) |
| How to achieve this? | |
| There is a self service capability available to customers. | |
| 1.If you're not in BPM Worklist: | |
| •Click the Notifications icon in the global header. | |
| •Click Show All. | |
| •On the Notifications page, click the Worklist button. | |
| •In BPM Worklist, click your user name and select Administration. | |
| If you’re already in BPM Worklist, just open the Administration tab. | |
| 2.On the Application Preferences page that's on the Administration tab, select one of the Email "From:" Display Name options. | |
| •Select to specify the text to display. Enter your value or leave blank if you want nothing to appear in the From field. | |
| •Select Submitter to show the person who created the task. | |
| •Select Previous Approver to show the previous assignee in the approval chain. When the notification is sent to the first assignee in the approval chain, the From field shows the person who created the task. | |
| 3.Click Save. | |
|
| Use Case 3: Personalize the “From Email Address” for all the Workflow Approvals Notifications (Global Level) |
| How to achieve this? | |
| To personalize the sender email address on the approval workflow notifications @ Global Level, please raise an Service Request with oracle support (Follow DKIM Setup process detailed on) | |
Alert Notifications |
Reporting & Analytics |
Use Case 1: Personalize the “From Email Address” on the Alerts Notifications (Individual Tasks Level) |
Use Case 1: Personalize the “From Email Address” on BIPublisher UI |
Default Sender Email – <your pod>.fa.sender@workflow.mail.<your data center>.cloud.oracle.com |
Default Sender Email – <your pod>.bi.sender@workflow.mail.<your data center>.cloud.oracle.com |
Communication channel – Worklist à self-service |
Steps to do: |
Steps to do: |
|
There is a self service capability available to customers. |
Step 1: Change the Email From Address – |
1.If you're not in BPM Worklist: |
|
•Click the Notifications icon in the global header and Click Show All. On the Notifications page, click the Worklist button. In BPM Worklist, click your user name and select Administration. |
1.Go to/xmlpserver → Administration → Delivery Configuration |
If you’re already in BPM Worklist, just open the Administration tab. |
2.Under the Delivery Configuration, change the Email From Address and Delivery Notification Email From Address |
2.On the Application Preferences page that's on the Administration tab, select one of the Email "From:" Display Name options. |
For Example – hr-reporting-hub@customer.com |
•Select to specify the text to display. Enter your value or leave blank if you want nothing to appear in the From field. Select Submitter to show the person who created the task. Select Previous Approver to show the previous assignee in the approval chain. When the notification is sent to the first assignee in the approval chain, the From field shows the person who created the task. |
3.Click Apply |
3.Click Save. |
|
Communication channel – Email à Not a self-service; |
|
Customers need to raise an SR |
|
| |
|
Use Case 2: Personalize the “From Email Address” for all Alert Notifications (Global Level) |
Use Case 2: Personalize the “From Email Address” for OTBI |
How to achieve this? |
How to achieve this? |
To personalize the sender email address on the alert notifications @ Global Level, please raise an Service Request with oracle support (Follow DKIM Setup process detailed on |
To personalize the sender name (Alias) for OTBI Agents, please raise an Service Request with oracle support and add the following to the SR Description: |
Reference Document - Doc ID 2702234.1) |
Default Sender Name (Alias): Oracle Business Intelligence Reporting-{Environment Name} |
| |
Reference Document - Doc ID 2677350.1 |
| |
|
You’re Still only 50% done….
SPF (Sender Policy Framework)
If you send an email from Oracle Applications Cloud and want the email to use your domain, you must set up Sender Policy Framework (SPF). Setting up the framework ensures that your domain is protected, and your messages are delivered correctly.
By updating the SPF record, you authorize the Oracle email servers to send emails on behalf of your domain. When the recipient receives your email, the SPF record of your domain is validated to determine if it’s a valid email. Only after validation, your message is delivered.
To enable Oracle to send out an email on your behalf, you must set up an SPF policy on your domain as an authentication mechanism. The exact method of setting up an SPF policy varies from one domain provider to another. Have your IT Administrator update your SPF record with master SPF record for Oracle Cloud : spf_c.oraclecloud.com
| Add SPF Record |
| Step 1: Add Oracle’s master SPF record spf_c.oraclecloud.com to your domain’s SPF DNS record. This is the TXT record whose value starts with “v=spf1”. |
| Entry to include in your SPF record |
| “include:spf_c.oraclecloud.com” |
 SPF record would remain the same for both OCI and OPC
- Validate your SPF record by using an SPF record checker tool
DKIM (DomainKeys Identified Mail) Setup Process
DomainKeys Identified Mail (DKIM) is a protocol that allows an organization to take responsibility for transmitting a message by signing it in a way that mailbox providers can verify. DKIM record verification is made possible through cryptographic authentication. Implementing email authentication technology like DKIM is one of the best ways to protect employees and customers from targeted email attacks. Use DKIM to verify the authenticity of email messages sent from Oracle Fusion Cloud Applications.
| Enable DKIM |
| Step 1: Create a service request. Include the following information in the SR: 1. Reference the MOS Note: DKIM Support for Fusion Cloud on OCI (Doc ID 2702234.1) . Explicitly specify which pod you want to set up and enable DKIM. These settings are per pod. If there are five pods, then DKIM must be enabled for all five pods individually. To avoid confusion, raise one SR for each pod. |
| 2.The Customer “from” email address ( abc@customerdomain.com) is required. ( The default From Address to be used in Fusion ). Provide Each DKIM enabled email domain |
| 1.Optional – The key-size to use for the DKIM registration |
| 2.Optional – The selector name according to RFC. |
| Step 2: Submit the service request |
| Step 3: Add DKIM DNS record to your domain DNS |
| In return, Oracle Support will – Provide the DKIM DNS record (For Each DKIM enabled email domain) that must be added by the customer’s email administrator into the customer’s domain DNS as a txt record. |
| Step 4: Verify email delivery |
| When prompted by the support engineer, verify that the signed email messages are delivered successfully, and then update the SR along with the approved bounce window (~2 Hours) for the BI services including BI Components. Oracle Support changes the From email address in your Fusion Applications environment to the new DKIM-enabled address. |
Now you are all set – Complete the testing and go-live!!