How an agent team becomes an interactive participant in an agentic app — the message hint routing pattern, the App Experience Tab in Agent Studio, and the Agent Editor in the App Builder
Introduction
This blog walks through the full configuration journey of an Agent Team for an agentic app. It starts with the message hint — the signaling protocol your workflow must respond to. Then it moves to Oracle AI Agent Studio, where you license what the agent is capable of producing. Finally it ends in the Agentic App Builder, where you decide what that team should actually contribute inside one specific app.
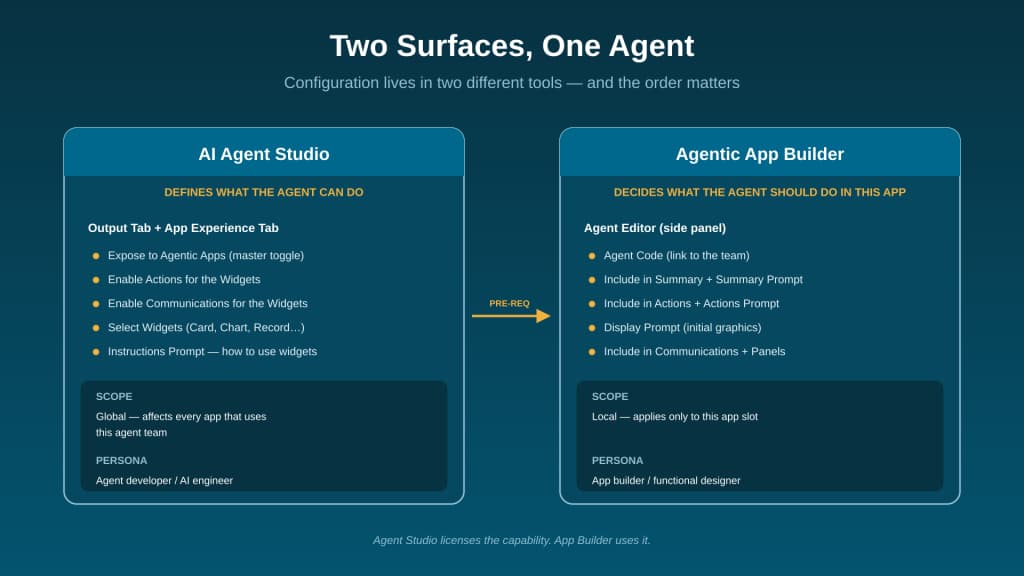
Two surfaces, one agent. Agent Studio defines what an agent team is capable of producing. The App Builder decides what that team should contribute inside a specific app. The same team can be reused across many apps; each app exposes a different subset of its capabilities through its own Agent Editor. Configuration in Agent Studio is global — a change ripples to every app using that team. Configuration in the App Builder is local — it applies only to one app slot.
Part 1 — The Message Hint: The App’s Signaling Protocol
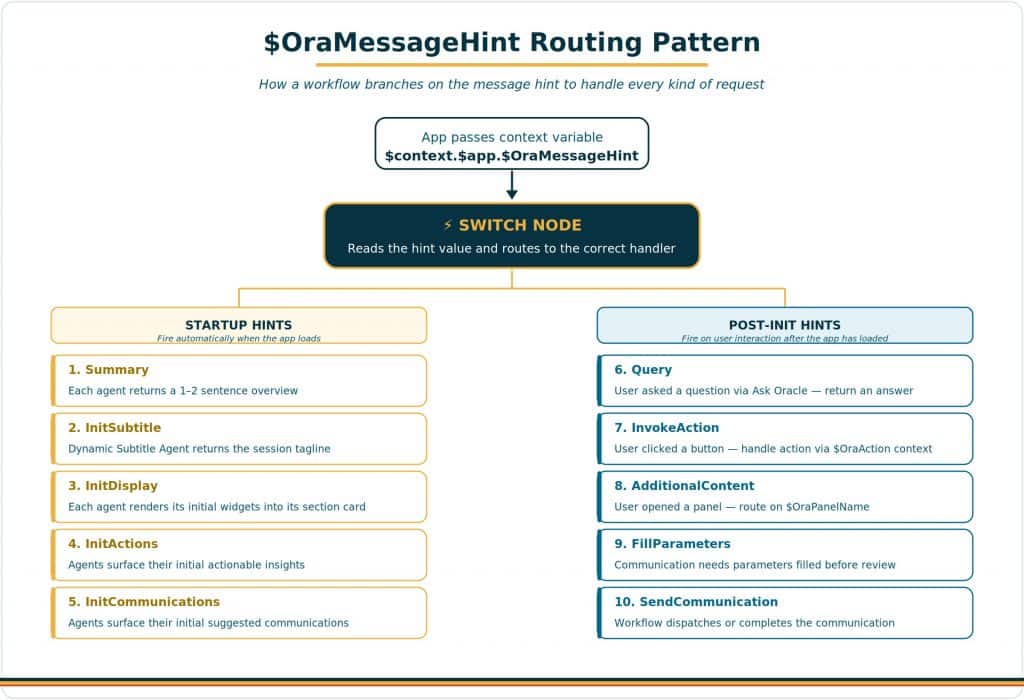
Every time the app calls an agent, it passes a message hint in $context.$app.$OraMessageHint. This single variable tells the agent whether the app is asking for a summary, an initial display, a set of actions, an answer to a user question, or any of the other request types. Your workflow’s job is to read this variable, branch on its value, and route the request to the right node.
| Workflow type — quick note For agentic apps, the recommended team type is Workflow. Workflows give you structured input, per-request prompts, and predictable latency — all of which matter for the 60-second response budget. Supervisor teams work as a fallback, but require very careful prompting to stay within the limit. This was covered in detail in earlier posts in the series. |
The App Lifecycle — What Fires When
When an agentic app first loads, the framework runs through a predictable startup sequence. Each step sends a different message hint to the appropriate agents.
- Summary — fires first. Each agent marked “Include in Summary” returns a 1–2 sentence overview.
- InitSubtitle — fires once, on the nominated Dynamic Subtitle Agent. Returns the tagline for the session.
- InitDisplay — each agent renders its initial widgets and state into its section card.
- InitActions — agents marked “Include in Actions” surface their initial actionable insights.
- InitCommunications — agents marked “Include in Communications” surface their initial suggested communications.
After initialization, the app waits for user interaction. Every interaction triggers another message hint:
- Query — fires when the user asks a question via Ask Oracle. The workflow handles the query and returns a response that may include displays, actions, or communications.
- InvokeAction — fires when the user clicks an action button. The action’s context is available in $context.$app.$OraAction.
- FillParameters — fires when an agent needs to fill in communication parameters before the user reviews and sends.
- SendCommunication — fires when the communication is being dispatched by the designated agent.
- AdditionalContent — fires when the user expands a panel. The panel’s identifier arrives in $OraPanelName.
Complete Hint Reference
| Hint Value | When It Fires | What to Return |
| Summary | App is asking for summary text from each agent | Short summary text reflecting that agent’s contribution |
| InitSubtitle | App is asking for the dynamic subtitle | The subtitle text itself |
| InitDisplay | App startup — load initial displays | One or more <oraInfoDisplay> blocks (may include actions, oraComms) |
| InitActions | App startup — load priority actions | Zero or more action suggestions |
| InitCommunications | App startup — load communication suggestions | Zero or more <oraComms> blocks |
| Query | User asked something through Ask Oracle | Use input message to answer; may include displays, actions, comms |
| InvokeAction | A UI click sent work back to the workflow | Follow-up handling after a widget command triggers an action path |
| AdditionalContent | App is loading an extra panel under a focused agent | Use $OraPanelName to determine which panel is requested |
| FillParameters | App is asking agents to fill communication parameters | Fill in the requested parameters before generation/send |
| SendCommunication | App is asking the workflow to send/complete a communication | Send or complete the communication flow |
The Routing Pattern in Practice
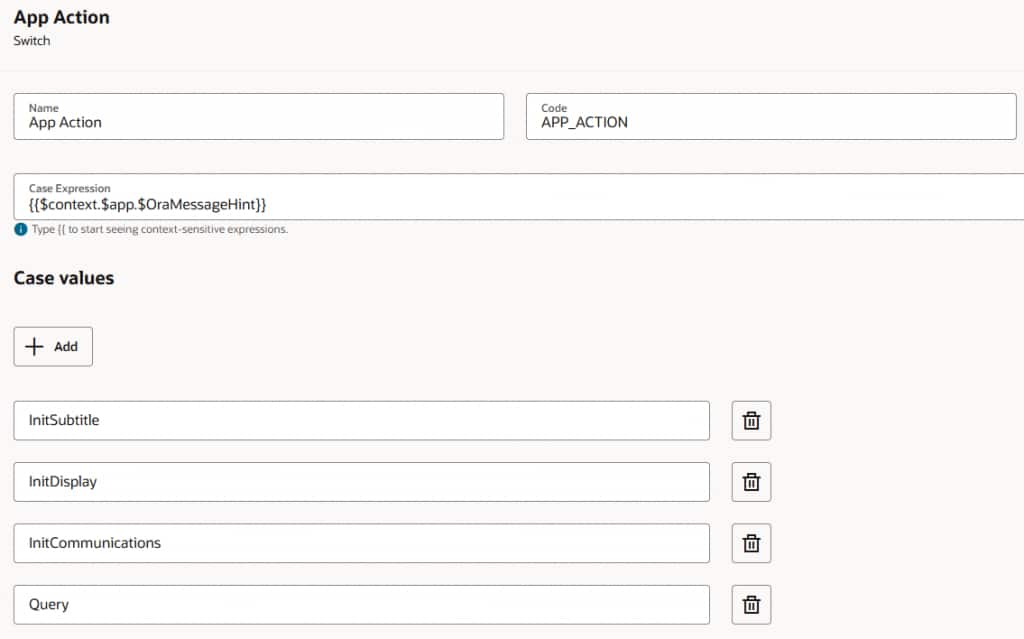
The canonical workflow pattern is a Switch node that reads $context.$app.$OraMessageHint and routes to a dedicated handler node for each hint value you care about. Each handler is then a focused Agent or LLM node with a prompt tuned for that specific kind of request.

This pattern keeps each path simple and predictable, which is exactly what you need to stay inside the 60-second response budget.
| Context passing inside a workflow Conversation history and user input are NOT automatically passed to internal nodes. If a downstream node needs to see the user’s message or chat history, you must pass it explicitly using $context.$system.$inputMessage or $context.$system.$chatHistory. This is one of the most common sources of confusion when a workflow appears to ignore what the user said. |
| Terminal paths — end on Agent or LLM nodes Design your workflow so every terminal path ends on an Agent or LLM node, rather than a Code or Output node. This keeps the door open for streaming responses in the future, which improves perceived latency. Terminating on a Code node returns the response in a single block. |
Part 2 — The App Experience Tab in Agent Studio
Once your workflow has the right routing logic, you need to license the agent’s capabilities for use in agentic apps. This happens in the App Experience Tab on each Agent or LLM node inside your workflow. This is where the agent is granted the right to participate in agentic apps and where you decide which output features it can produce.
Step 1: Expose to Agentic Apps — The Master Toggle
At the bottom of the agent team’s Details panel, you’ll find the Expose to Agentic Apps toggle. This is the master switch.
- When it is ON: the agent team becomes discoverable to the App Builder and a new App Experience Tab appears on every Agent and LLM node in the workflow.
- When it is OFF: the agent will not appear properly in the App Builder’s agent dropdown, no matter what else you configure.
Step 2: Configure the App Experience Tab on Each Node
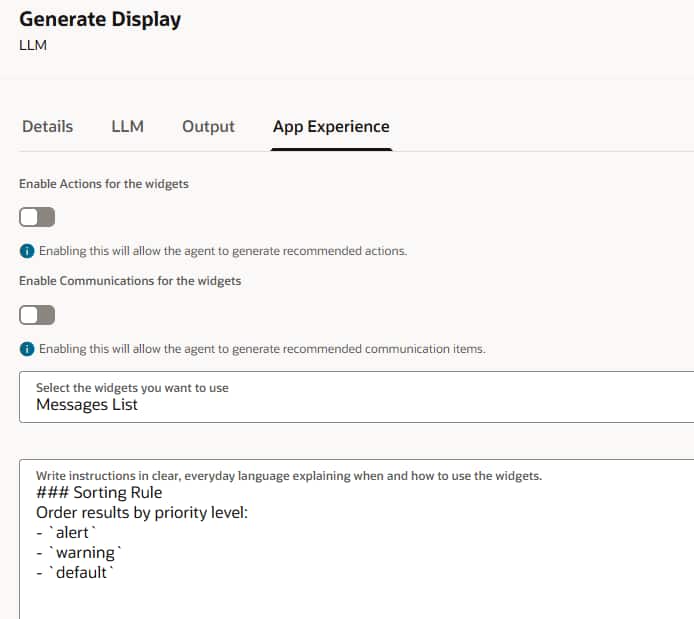
Open any Agent or LLM node inside the workflow and navigate to the App Experience Tab. Inside, you control what kinds of output the agent is licensed to produce when it runs inside an agentic app.
- Enable Actions for the Widgets — Turns on the Actionable Insights feature for this node. With this on, the agent can generate <oraInsight> blocks — the actions that show up as buttons in the app’s actions panel. With this off, no amount of prompting will produce actions.
- Enable Communications for the Widgets — Lets the agent generate recommended communication items — the <oraComms> blocks that become suggested emails, messages, or notifications in the app.
- Select Widgets — Choose which of the seven widgets the agent is allowed to render: Card, Messages List, Change List, Chart, Record, Multi Record, Sankey. Each widget you select expands the set of <oraInfoDisplay> outputs the agent can produce.
- Instructions Prompt Box — A free-form prompt that captures general formatting rules and guidance on when and how to use each selected widget. Think of this as the agent’s house style for outputs across every app it participates in. Per-app specifics belong in the App Builder, not here.
| Best practice — clear team descriptions The agent team’s description is what the framework uses for filtering and routing decisions. Spell out the team’s capabilities clearly and in plain language. A vague description (“handles requests”) leads to unpredictable routing; a precise one (“analyzes spend variance against budget and surfaces anomalies for approver review”) gives the framework the signal it needs to route correctly. |
Part 3 — Configuring the Agent in the App Builder
With the agent team properly configured and exposed in Agent Studio, you can now drop it into an agentic app. Open the App Builder, navigate to your app, and click any agent card on the page pattern. The Agent Editor opens as a side panel — this is where you decide what this specific agent contributes to this specific app.
Think of the Agent Editor as the app-level steering wheel. The capabilities are already defined in Agent Studio; here you decide which of those capabilities to surface, how to prompt the agent for each kind of output, and what supplementary content to organize into panels.
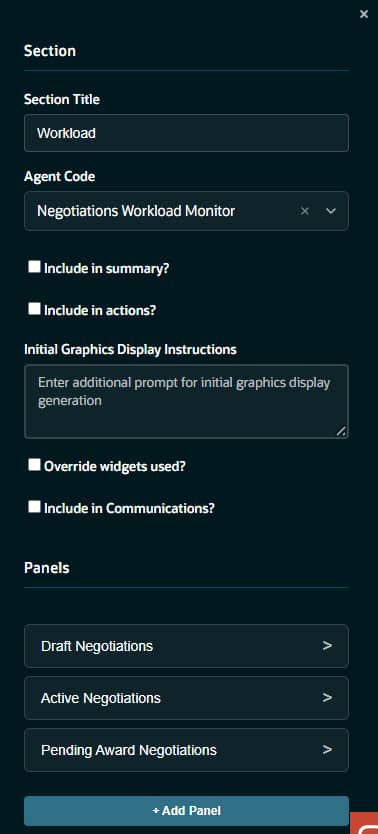
Agent Code — The Link to the Team
The first control in the editor is the Agent Code dropdown. Type to search and select the agent team you want to bind to this slot. Only teams that have Expose to Agentic Apps turned on in Agent Studio will appear here. Once selected, the team’s description appears below the dropdown — a quick sanity check that you picked the right one.
Include in Summary
Tick this checkbox to include this agent’s output in the app’s summary view at the top of the page. When checked, an Initial Summary Prompt textarea appears. Write a concise instruction for what this agent should contribute to the overall summary.
Example: “Summarize the key spend variance metrics and any anomalies detected in 1–2 sentences.”
Include in Actions
Tick this checkbox to allow this agent to surface actionable insights. When checked, an Initial Actions Prompt textarea appears. This is where you tell the agent what conditions warrant an action and how to phrase the suggestion.
Example: “Suggest actions when budget variance exceeds 10% or when a milestone is at risk of slipping. Keep titles short and lead with the verb.”
| This control only works if Actions are enabled upstream The Include in Actions checkbox in the App Builder relies on “Enable Actions for the Widgets” being on in the App Experience Tab in Agent Studio. If that upstream toggle is off, ticking the checkbox here has no effect — the agent simply will not emit oraInsight blocks. This is the most common cross-product configuration mistake. |
Initial Graphics Display Instructions
This is the prompt that drives the agent’s main display output — what it renders into the section card the first time the app loads. Write instructions that name the widget you want and constrain the output to a manageable shape.
Example: “Focus on the top 5 most critical items by impact score and display them using the message list widget. Each row should show the item name, the impact value, and a one-line reason.”
Include in Communications
Tick this checkbox to allow the agent to suggest communication templates — pre-written emails, messages, or notifications that the user can review and send. The agent’s ability to emit <oraComms> blocks must also be licensed in Agent Studio (“Enable Communications for the Widgets”) for this to work end to end.
Panels — Additional Content Sections
Beyond the main display, an agent can have supplementary content panels. Each panel has its own name, heading, and prompt, and is loaded on demand when the user focuses on the agent’s section.
- Click + Add Panel at the bottom of the Agent Editor.
- Name — internal identifier, snake_case (e.g. variance_details).
- Heading — the display title users see in the panel header.
- Prompt — instructions for what content this panel should generate.
When the panel is loaded at runtime, the agent receives the AdditionalContent message hint along with the panel’s Name in $OraPanelName, so the workflow can route to the right handler.
Dynamic Subtitle Agent
Configured at the app level rather than per agent, but worth mentioning here: the Dynamic Subtitle Agent setting in the App Editor lets you nominate an agent whose output drives the app’s subtitle. The agent receives the InitSubtitle message hint at startup and is expected to return a short string that the app uses as its tagline for the session.
Part 4 — The End-to-End Configuration Checklist
When you build a new agentic app, work through these steps in order. Skipping ahead — particularly skipping the Agent Studio step — is the source of almost every “why isn’t this working” issue.
In Agent Studio
- Open the agent team. Confirm Type is Workflow. Write a clear, capability-focused team description.
- Turn on Expose to Agentic Apps at the team level. Confirm the App Experience Tab now appears on the LLM nodes.
- For each Agent or LLM node that needs to produce app content, open the App Experience Tab:
- • Turn on Enable Actions if this node should produce actions.
- • Turn on Enable Communications if this node should produce communications.
- • Under Select Widgets, check every widget type this node may render.
- • Fill in the Instructions Prompt with general formatting rules and widget guidance.
- Build the workflow routing on $OraMessageHint with a dedicated handler node for each hint your app will trigger.
- Confirm context passing — pass $context.$system.$inputMessage and $chatHistory explicitly to nodes that need them.
- Confirm terminal paths end on Agent or LLM nodes, not Code nodes, for future streaming.
In the App Builder
- Open the app, add the agent to the right page-pattern slot.
- Open the Agent Editor on that slot. Select the team in Agent Code.
- Tick Include in Summary if appropriate; write the Summary Prompt for this app.
- Tick Include in Actions if appropriate; write the Actions Prompt with the specific triggers for this app.
- Write the Initial Graphics Display Instructions — name the widget, constrain the output.
- Tick Include in Communications if the agent should surface communication suggestions in this app.
- Add Panels for any supplementary content sections this app needs.
- If this agent should drive the dynamic subtitle, set it as the Dynamic Subtitle Agent in the App Editor (gear icon next to the app title).
- Save and run the app. Watch the section card light up at startup, verify actions appear, and click through to confirm InvokeAction handling.
Quick Troubleshooting
| Symptom | Likely Cause |
| Agent doesn’t appear in the App Builder dropdown | Expose to Agentic Apps is off in Agent Studio. |
| Section card is empty at runtime | No widgets selected in App Experience Tab, or InitDisplay handler not wired in the workflow. |
| Actions panel is always empty | Enable Actions is off in App Experience Tab, or no InitActions branch in the workflow. |
| Agent ignores what the user typed in Ask Oracle | Workflow’s Query handler isn’t passing $context.$system.$inputMessage. |
| Workflow times out | Too many LLM calls per path; consider tighter prompts or move logic out of Supervisor-style chains. |
| Communication suggestions never appear | Enable Communications is off in App Experience Tab, or Include in Communications is unchecked in the Agent Editor. |
Key Takeaways
- Branch on the hint. The message hint is the framework’s signaling protocol. Every workflow you build for an agentic app should have a Switch node that branches on $OraMessageHint.
- Two surfaces, one agent. Agent Studio defines capability; the App Builder defines participation. Both are required, and they happen in different products.
- Order matters. Always configure Agent Studio first. The App Builder relies on what you enabled in the App Experience Tab.
- App Experience Tab, not Output Tab. This is where you grant the agent the right to participate in agentic apps and select widgets, actions, and communications it can emit.
- Prompts are layered. The Instructions Prompt in Agent Studio holds general rules; the prompts in the App Builder hold app-specific behavior. Don’t duplicate.
New to Oracle Fusion AI Agents?
Explore AI Agent Studio Learning Path — blog series to help build from zero to production-grade AI agents, with deep dives on every agent pattern, node type, and tool integration.
Explore AI Agentic Apps Learning Path — blog series on everything you need to build Oracle Fusion AI Agentic Apps using AI Agent Studio.