A hands-on walkthrough of the primary interface for creating, configuring, and publishing agentic applications
Introduction
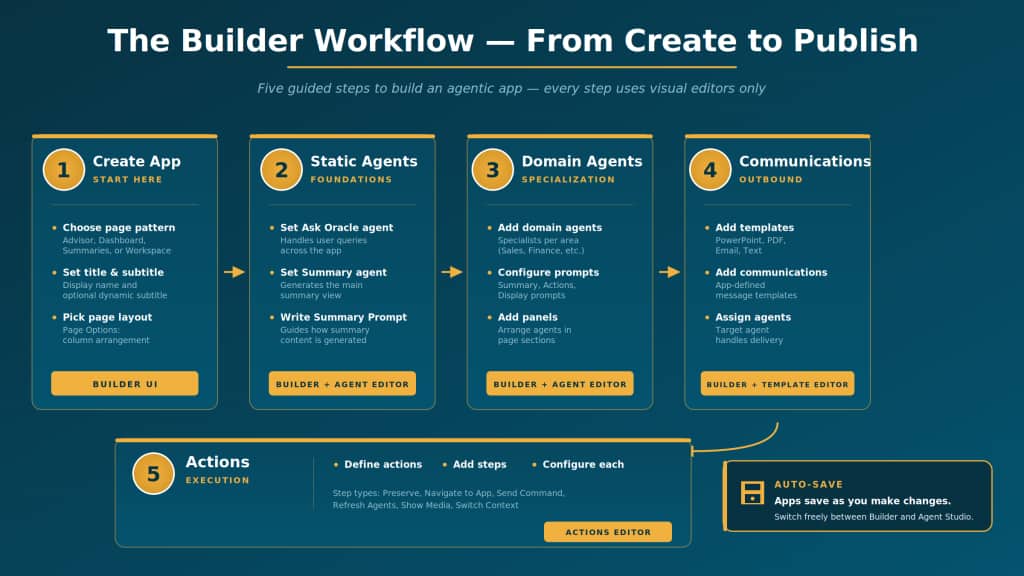
We have covered the theory—design philosophy, anatomy, architecture, and core concepts. Now it is time to open the tool. The Builder UI is your primary workspace for creating and configuring agentic applications. It is where you choose your app’s pattern, arrange agents on the page, configure prompts, set up communications, and ultimately preview and publish your app. Everything starts here.
This post is a hands-on walkthrough. We will go step by step through the entire Builder interface: from creating a new app and selecting a pattern, through configuring app settings and static agents, to adding domain agents and their prompts, setting up communications, and finally previewing and publishing. If you have AI Agent Studio open in one tab, you can follow along in real time.
Step 1: Create a New App
AI Agent Studio
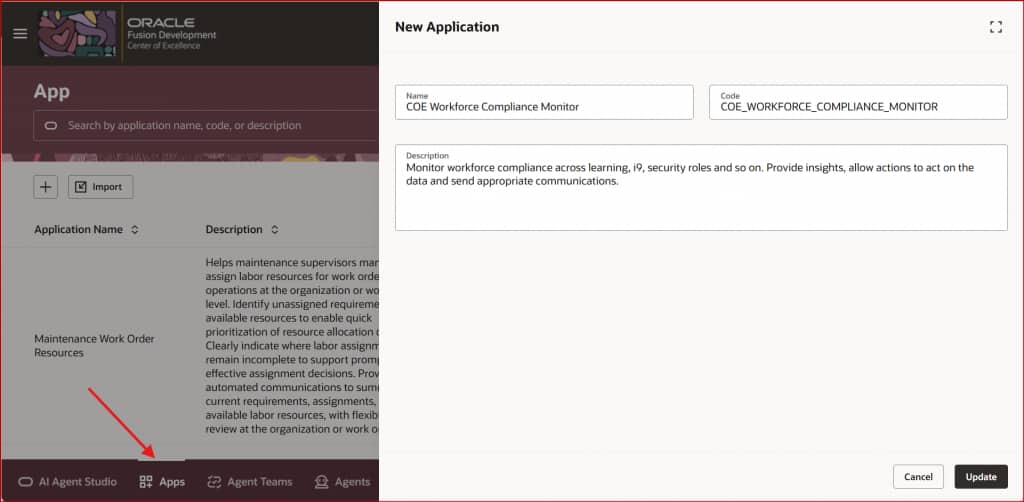
Navigate to the Apps menu under AI Agent Studio, provide basic details of the app and click Update.
The Builder UI
You will land on a new page with some suggestions for application structure. You can click Start from scratch here to get to the Builder UI to build your own custom app with custom agents.

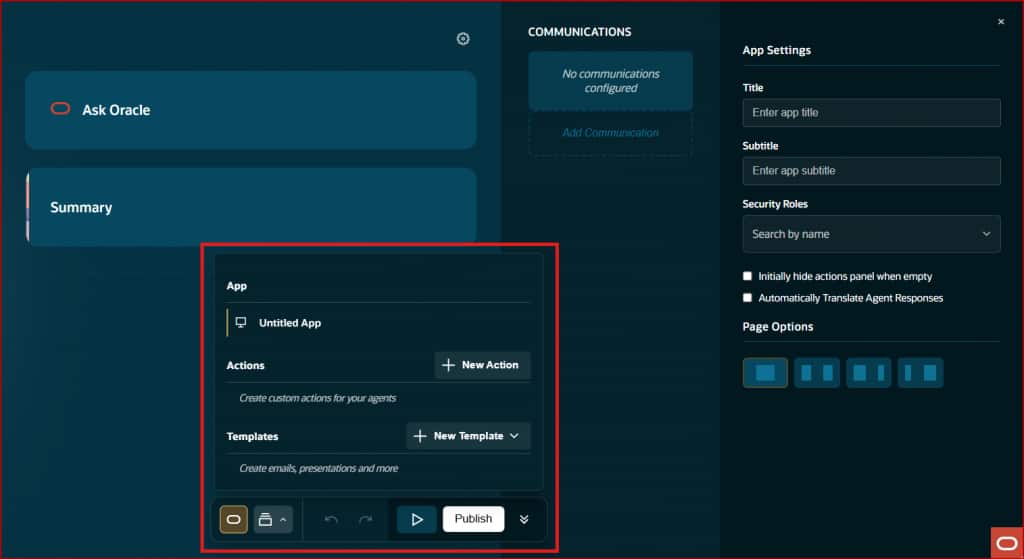
The Builder Toolbar
The Builder toolbar provides the controls you need to manage your app throughout the build process:
- Undo (↶): Reverse the last change.
- Redo/Reverse (↷): Redo the last undo.
- Preview (▶): Opens the app in Preview mode so you can test it with live agent responses. Use this constantly during development to verify that your prompts, displays, and actions work as expected.
- Publish: Publishes the app to production. Once published, users with the appropriate security roles can access it. You can continue editing after publishing—changes require re-publishing to go live.
- App Builder Menu: Access the Actions Editor and Templates Editor from the bottom toolbar. These panels open within the Builder context, so you can switch between app configuration and action/template editing seamlessly.
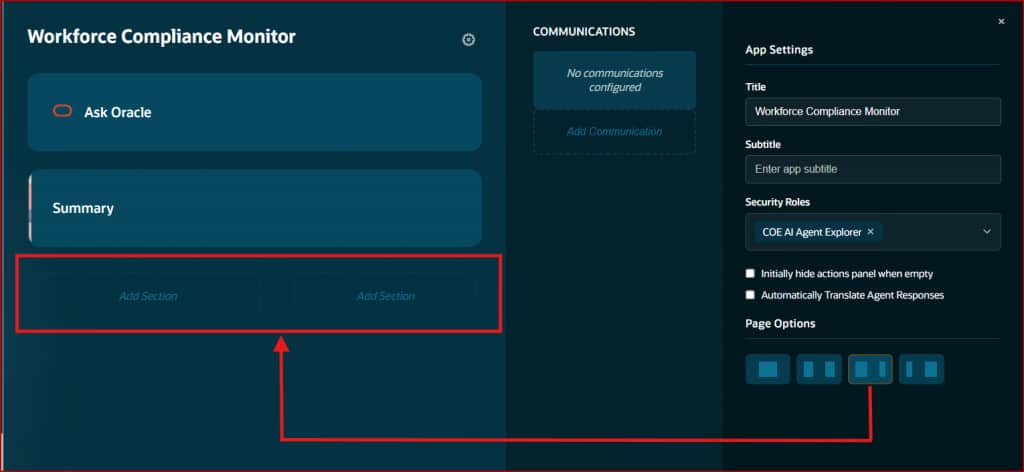
Configure App Settings
The next step is configuring the app’s core settings in the App Editor. Here you will configure:
- Title: The application’s display name. This appears in the header bar and in the app catalog. Choose something descriptive and concise.
- Subtitle: Optional descriptive text shown below the title. Can be a static tagline.
- Security Roles: Users with role(s) configured here can access the app.
- Initially hide hide actions panel when empty: Check this to initially hide the actions panel from users. They can still reveal it manually. Useful when your app is primarily advisory and actions are secondary.
- Automatically Translate Agent Responses: Check this to translate app content into user’s preferred language.
- Page Options: This is where you adjust how many columns agents are arranged in. The layout determines how agent panels are arranged on the page. Options include single-column, two-column, and asymmetric layouts.
Step 2: Set Up Static Agents
The Builder panel shows two static agent containers at the top of the layout. These are special agents that exist in every agentic app:
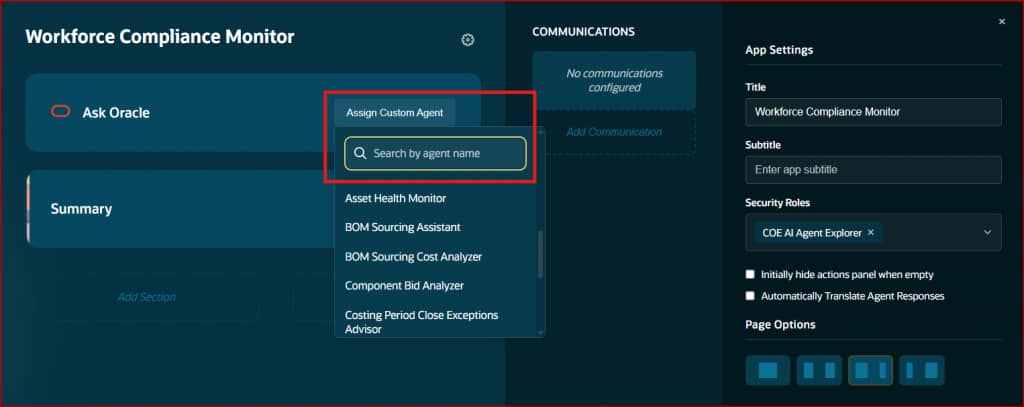
The Ask Oracle Agent
Click the Ask Oracle container, then click Assign Custom Agent if no agent is configured. Select an agent from the searchable dropdown. This agent will handle all user queries through the Ask Oracle conversational interface. In Summary View, queries go to all agents. In Section Focus View, queries are scoped to section-specific agents—but the Ask Oracle agent is the entry point that routes the conversation.
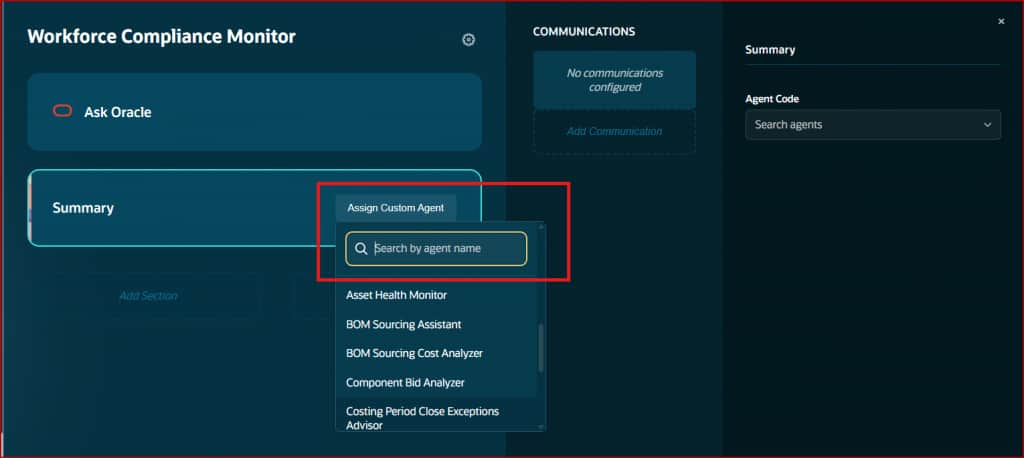
The Summary Agent
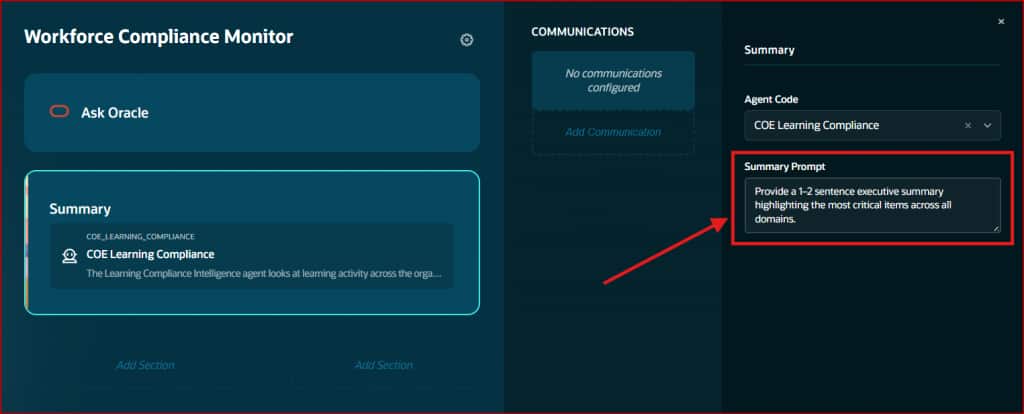
Click the Summary container, then click Assign Custom Agent. Select your summary agent. This agent generates the main summary view that users see first when the app loads.
In the editor, you can configure a Summary Prompt that customizes how the summary is generated. Example: “Provide a 1–2 sentence executive summary highlighting the most critical items across all domains.”
| Static Agent Rule You can rely on agentic app orchestrator to generate the summary or answer questions as part of Ask Oracle feature. This is done dynamically based on agents used in your agentic app. For e.g. You are using 5 agents in your app, 3 agents are supporting summary section. Then orchestrator will collect the summary from the 3 agents and provide you with consolidated output. Configure static agents only if you need to do something specific than what is done by the orchestrator. |
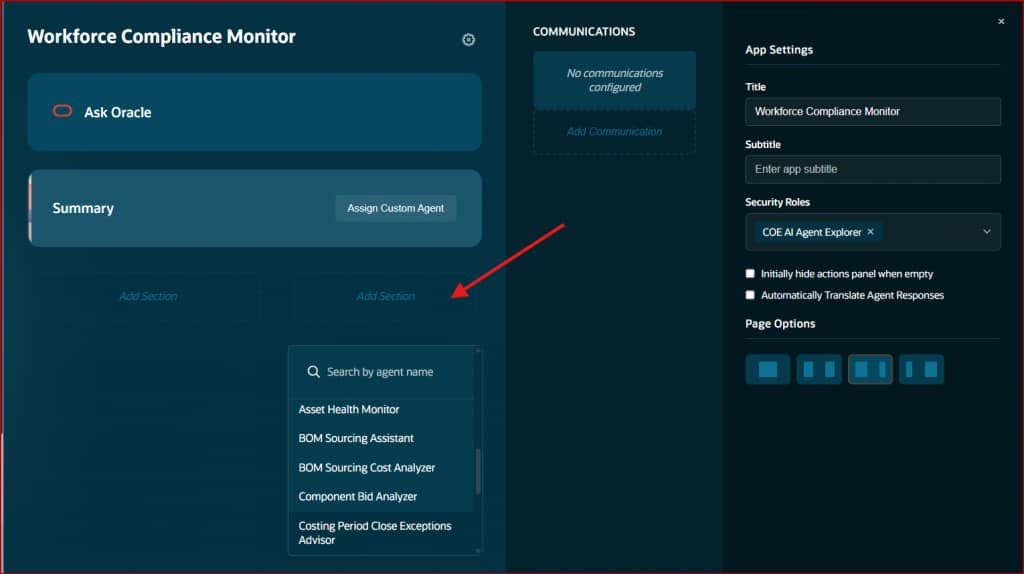
Step 3: Set Up Domain Agents
The central area of the Builder shows your page pattern with slots for domain agents. Agents are displayed as cards within the pattern. Click any agent card to edit it, use the controls to add or rearrange agents, and changes are saved automatically.
Select Domain Agent
When you click an agent card, the Agent Editor opens. This is where you control everything about how the agent behaves within your app.
Search and select from available agent teams. This links the app slot to your Agent Team in AI Agent Studio. The agent’s description appears when selected—this description is also used for routing, so make sure it clearly describes the agent’s capabilities.
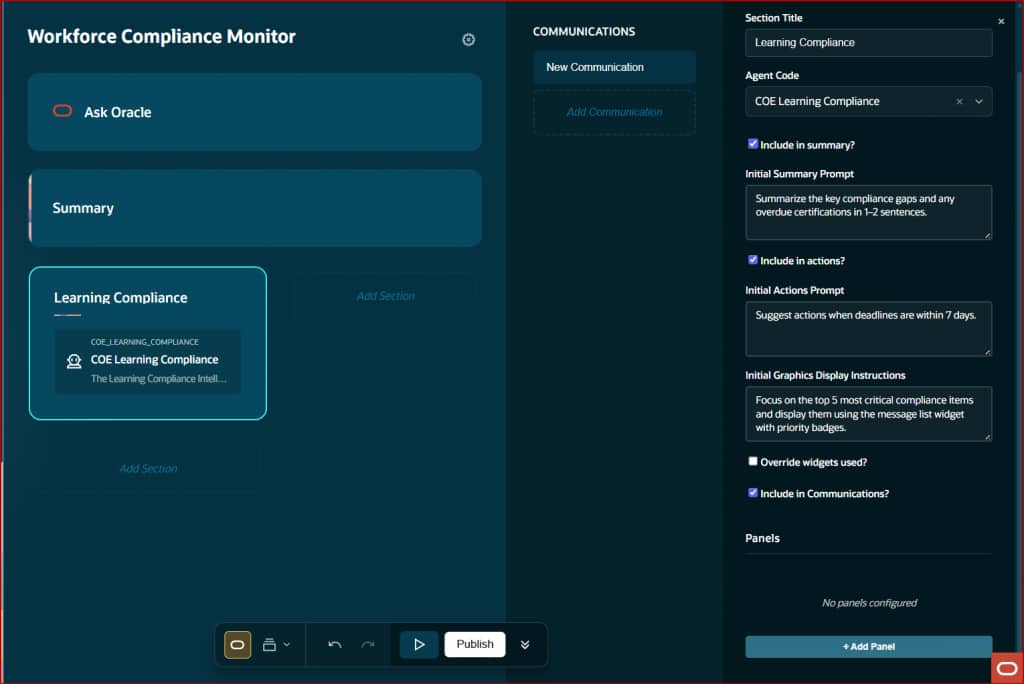
Domain Agent Settings
Each agent can be configured with below settings that control its contributions to the app:
- Section Title: Name of the agent that appears as agent card title.
- Include in summary + Initial Summary Prompt: When checked, a Summary Prompt text-area appears. Enter instructions for how this agent contributes to the summary. Example: “Summarize the key compliance gaps and any overdue certifications in 1–2 sentences.” This is sent to the agent with Summary message hint.
- Include in actions + Initial Actions Prompt: When checked, an Actions Prompt text-area appears. Enter instructions for what actions the agent should suggest. Example: “Suggest actions when deadlines are within 7 days.” This is sent to the agent with InitActions message hint.
- Initial Graphics Display Instructions: Enter instructions for the agent’s initial visual output. Example: “Focus on the top 5 most critical compliance items and display them using the message list widget with priority badges.” This is sent to the agent with InitDisplay message hint.
- Override widgets used?: Overrides widget styles configured in agent with styles selected in the app.
- Include in Communications: When checked, allows the agent to suggest communication templates from the app’s communications list. The agent can then recommend relevant outreach during initialization or in response to queries. This is sent to the agent with InitCommunications message hint.
Additional Panels
Agents can have supplementary content sections beyond their main display. Click “+ Add Panel” at the bottom of the Agent Editor in Panels section to create a new panel. Each panel has its own Name (snake_case identifier), Header (display title), and Prompt (instructions for content generation). When the user zooms into an agent, additional panels appear beneath the main content. The framework requests panel content via the message hint AdditionalContent with $OraPanelName identifying which panel.
Step 4: Set Up Communications
The right side of the Builder panel shows the Communications list. Each communication is displayed as a clickable button. Click a communication to edit it, or click “+ Add Communication” to create a new one.
But before communications can be set, template should be created to be used in this communication.
Configure a Communication Template
From the Builder Toolbar, Click “+ New Template” that shows available template types (PowerPoint, PDF, Email, or Text). Select one of them to start building the communication template.
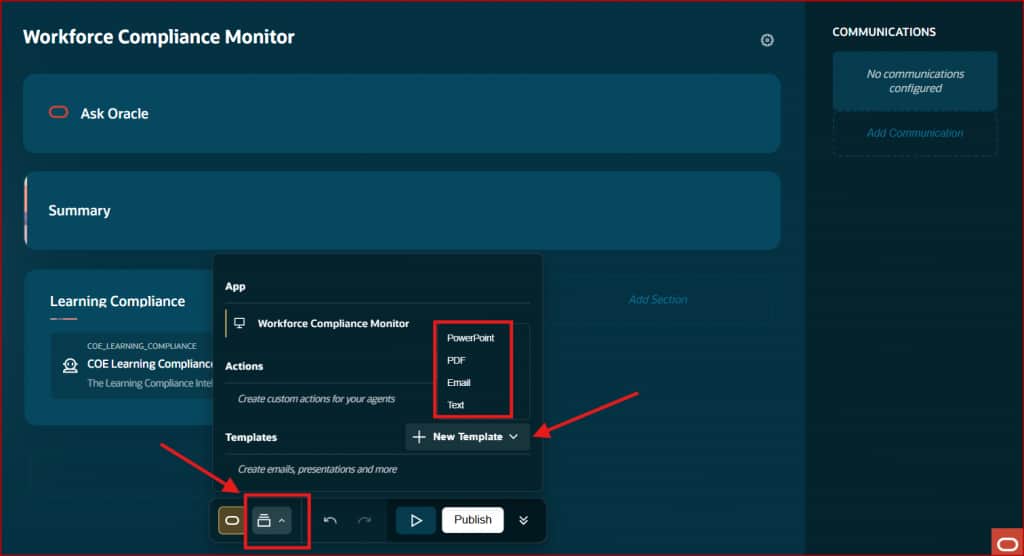
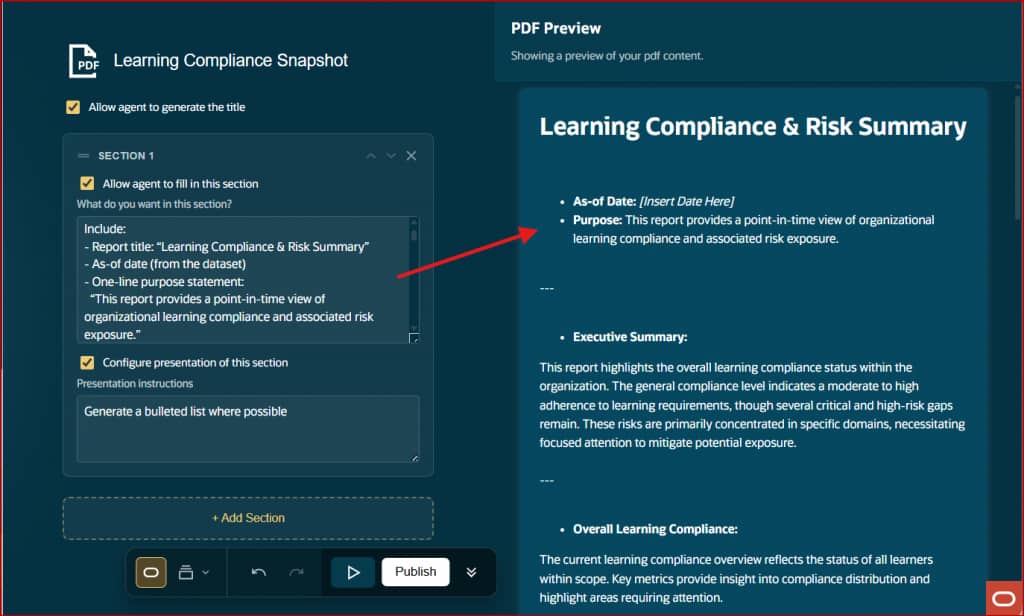
After selecting a template type, for example PDF, editor opens a panel to setup the template. Provide the relevant template details and prompts to setup how the communication will display.
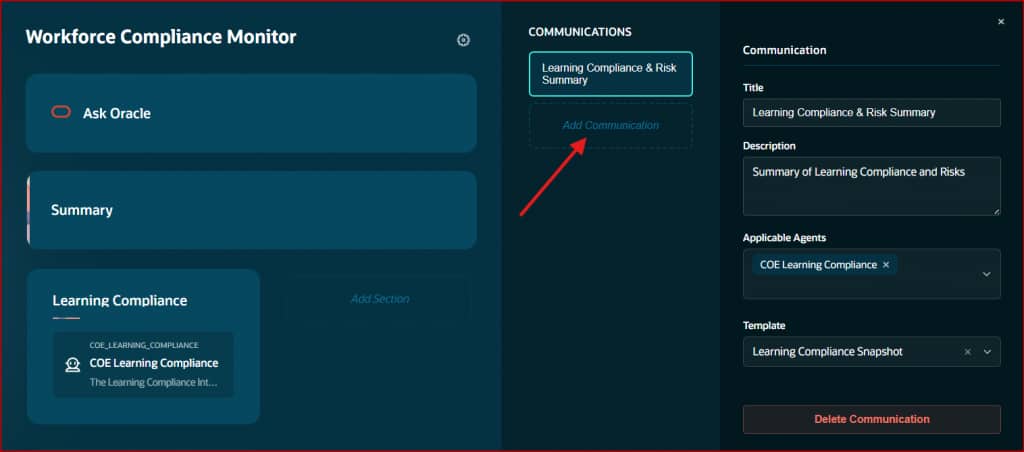
Configure a Communication
When you create or edit a communication, the Communication Editor opens with these fields:
- Title: A descriptive name that users see in the communications panel. Example: “Learning Compliance & Risk Summary”
- Description: When this communication should be suggested. This helps agents decide when to recommend it. Example: “Summary of Learning Compliance and Risks”
- Applicable Agents: Multi-select which agents can suggest this communication. Only selected agents will include it in their communication suggestions.
- Template: Select from the dropdown. Templates must be created in the Template Editor first (PowerPoint, PDF, Email, or Text).
- For Email and Text templates only—
- Action Text: Button label users see. Examples: “Send Email,” “Generate Report,” “Alert Team.”
- Target Agent (optional): Specifies which agent handles delivery. Email templates use the configured mail client.
Step 5: Set Up Actions
Add an Action
Actions allow users to act on the data displayed to them. From the Builder Toolbar, Click “+ New Action” to create a new action that can be used across agents in the app.
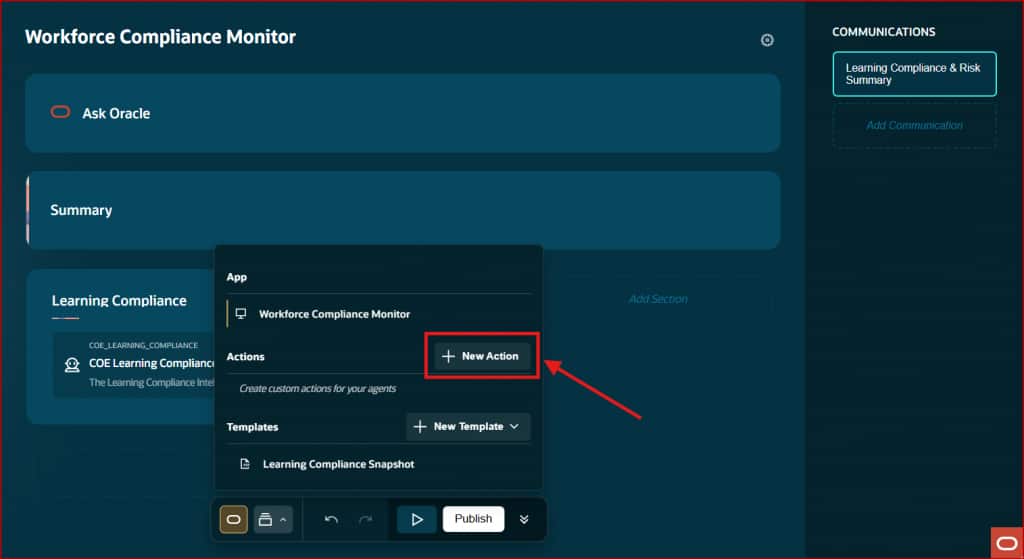
Configure an Action
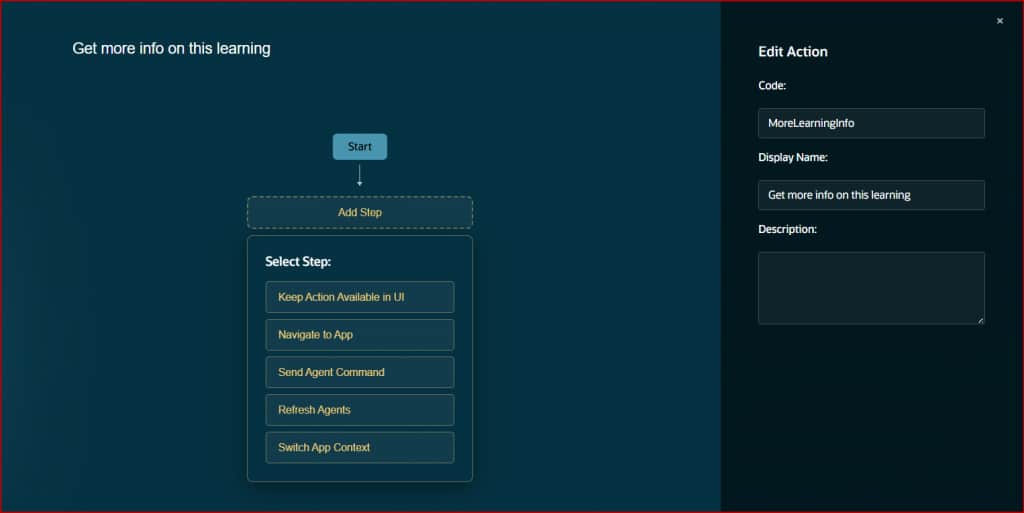
When you create or edit an action, the Action Editor opens with these fields:
- Code: A unique code that is sent to the agent with InvokeAction message hint. Using this code, underlying agent can perform relative action.
- Display Name: A descriptive name that users see on action.
- Description: Optional description about this action which can have multiple steps.
Add Step
Add steps to this action from available options, these steps are executed one after the other in cofngiured sequence when user clicks on this action.
- Keep Action Available in UI: It ensures that action doesn’t disappear after click.
- Navigate to App: Allows user to navigate to a different app by providing App Code. It allows to pass static Context to the target app or current app Payload as context.
- Send Agent Command: Invoke the underlying agent with InvokeAction message hint. It allows to pass static Command to the agent or app Payload as context.
- Refresh Agents: Refreshes content of all the agents selected in this setting.
- Switch App Context: Allows user to change the context of the app. It allows to pass static Context Value to the app or app Payload as context. It can also be configured to Reload App.
Preview & Publish
After all the required domain agents are added and configured in the app, communications and actions are setup, you are ready to test the app and if everything looks good, publish it to the end users with appropriate roles to access this app.
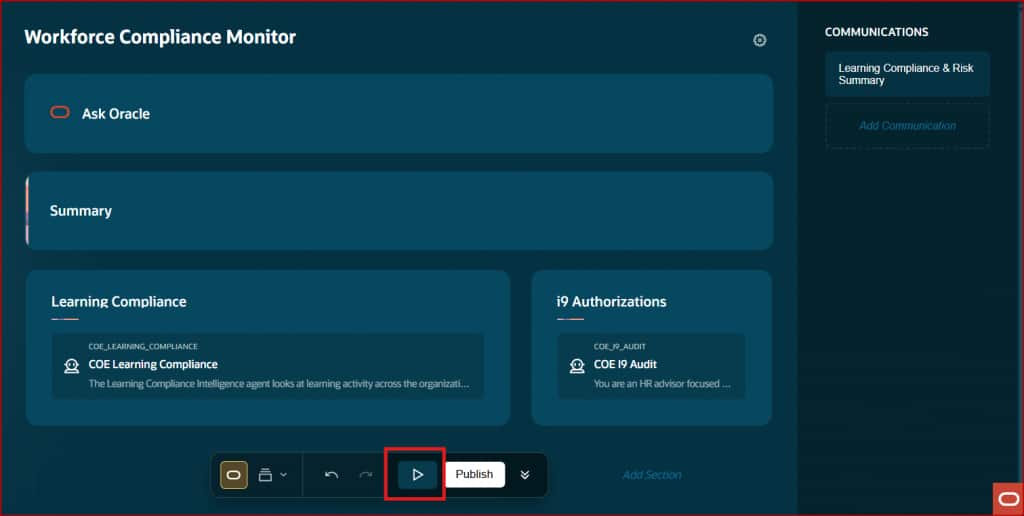
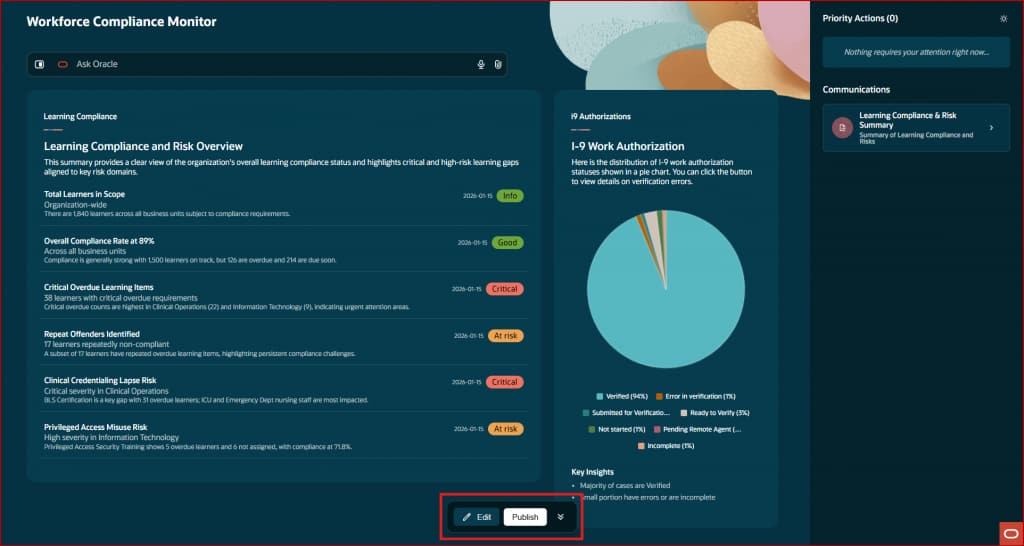
Preview App
Click on Play button on the Builder Toolbar. It opens the app in Preview mode so you can test it with live agent responses. Use this constantly during development to verify that your prompts, displays, and actions work as expected.
Publish App
When the testing is complete and app is ready to be shared with end users, click on Publish button on the Builder Toolbar. It publishes the app to production. Once published, users with the appropriate security roles can access it. You can continue editing after publishing—changes require re-publishing to go live.
Building Your First Agentic App
Now that you know every area of the Builder UI, here is the summarized flow for building an agentic app from scratch:
- Create the app. Set a meaningful title and subtitle.
- Configure static agents first. Optionally assign your Ask Oracle and Summary agents
- Add domain agents one at a time. For each agent, select the Agent Team from the dropdown, then configure its settings and prompts: Summary, Actions, Display. Test each agent in Preview mode before adding the next.
- Set up communications. Create templates in the Template Editor first, then add communications in the Builder and link them to the templates. Assign applicable agents.
- Build actions in the Actions Editor. Define the multi-step workflows that agents will invoke. Test each action flow.
- Preview extensively. Test every initialization event, every Ask Oracle interaction, every action, and every communication. Iterate on prompts until the outputs match your design intent.
- Publish when ready. Click Publish to go live. Monitor usage and iterate—you can republish at any time.
| Tip Keep AI Agent Studio open in one browser tab and the Agentic App Builder in another. Apps auto-save as you make changes, so you can quickly switch between configuring agent workflows (in AI Agent Studio) and previewing the app (in the Builder). This two-tab workflow is the fastest way to iterate. |
| The Builder Principle The Builder UI is designed so that domain experts and solution architects can create agentic apps without developers. Every setting is visual, every change auto-saves, and Preview lets you test instantly. The tool does the heavy lifting—your job is to bring the domain knowledge and write clear, specific prompts. |
New to Oracle Fusion AI Agents?
Explore AI Agent Studio Learning Path — blog series to help build from zero to production-grade AI agents, with deep dives on every agent pattern, node type, and tool integration.
Explore AI Agentic Apps Learning Path — blog series on everything you need to build Oracle Fusion AI Agentic Apps using AI Agent Studio.