Grounding AI Agents with Knowledge through Retrieval-Augmented Generation
What is the Document Tool?
If you have ever wished your AI agent could just read the company handbook and give a straight answer instead of hallucinating, the Document Tool is your answer. It is the Retrieval-Augmented Generation (RAG) capability built directly into Oracle AI Agent Studio — and it is one of the most immediately useful tools in the entire toolkit.
At its core, the Document Tool lets you upload unstructured documents — PDFs, Word files, presentations, even images — and makes them searchable by your AI agent via semantic search. When a user asks a question, the agent does not just guess. It performs a vector similarity search against your uploaded documents, retrieves the most relevant chunks of text, and uses them to “ground” its answer in actual facts from your organization.
The embedded vectors live inside the vector database within your own Fusion customer tenant, meaning your data stays where it belongs — in your environment, under your control.
Key Concepts
- Semantic Search: The agent does not match keywords — it understands meaning. A question about “time off” can match documents that discuss “leave policy” or “PTO entitlement.”
- Grounded Answers: Responses are anchored to specific chunks of your uploaded documents, reducing hallucination and improving trust.
- Document References: End users can see exactly which document passages were used to generate the answer, enabling them to verify the information.
- Vector Database: Documents are parsed, chunked, and embedded directly into the vector database in your Fusion tenant — no external vector stores needed.
Supported Document Formats
The Document Tool supports a broad range of file types for ingestion: PDF, DOCX, PPTX, XLSX, HTML, Markdown, TXT, PNG, and JPEG. You can upload individual files or batch-upload a collection of related documents.
Keep in mind that large corpora can affect both quality and latency. It is always a good practice to run evaluations and smoke-test queries after every publish or update cycle to make sure the retrieval results are still accurate.
How It Works Under the Hood
When you create a Document Tool and upload files, a multi-step pipeline transforms your raw documents into searchable knowledge:

- Upload: You upload PDF, DOCX, TXT, or other supported files to the Document Tool.
- Parse & Chunk: Content is split into semantic chunks optimized for retrieval.
- Embed: Vector embeddings are generated for each chunk and stored in the database.
- Publish: The vector database is ready for semantic search by your Agent.
Once published, the lifecycle moves from Ready to Publish → Process Agent Documents (ESS Job) → Published. The agent can then perform semantic search at runtime to retrieve the most relevant passages and ground its response.
Step-by-Step: Creating a Document Tool
Let us walk through how to use a Document Tool in AI Agent Studio. In this example, we will use a delivered document tool that helps a Leave and Absence Policy advisor agent answer employee questions about company leave policies.
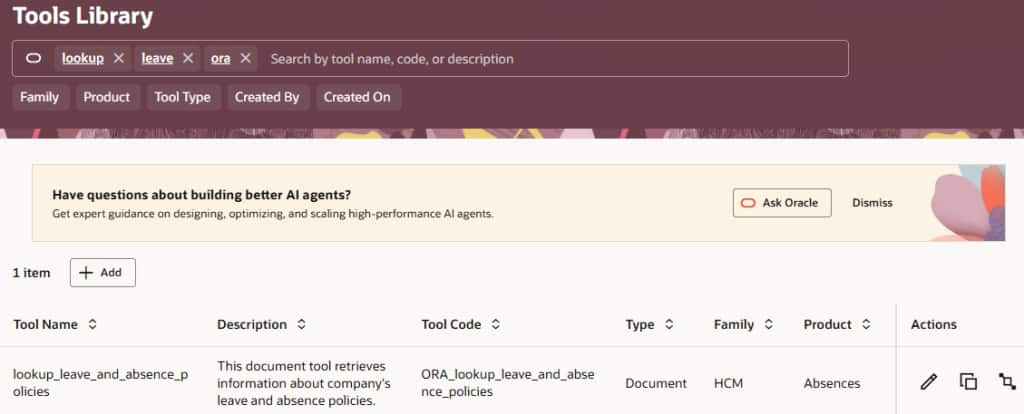
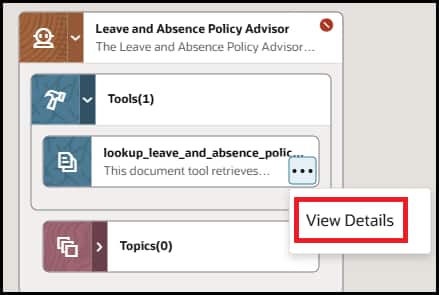
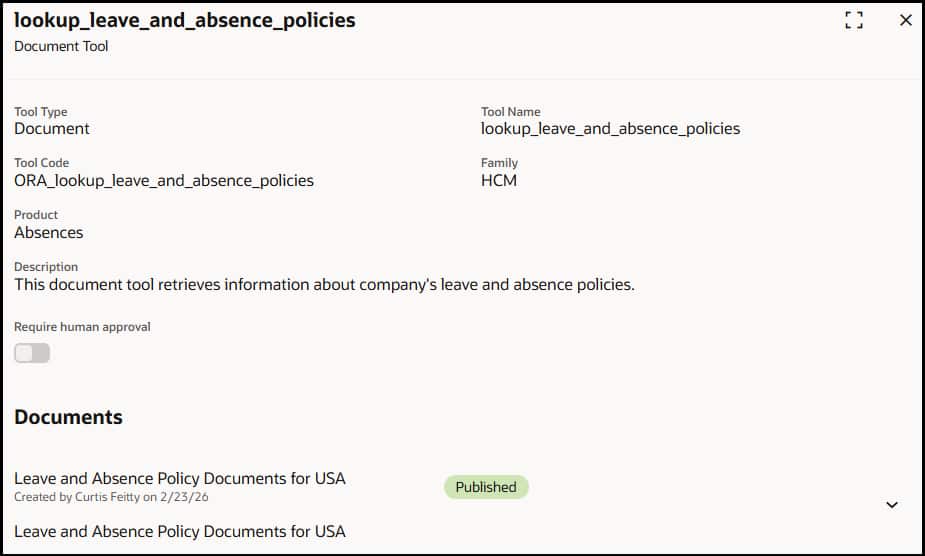
- Navigate to AI Agent Studio and Look up an existing document tool or Create a New Tool — Open AI Agent Studio from Tools. Search for ORA_lookup_leave_and_absence_policies document tool and click on the Edit icon.
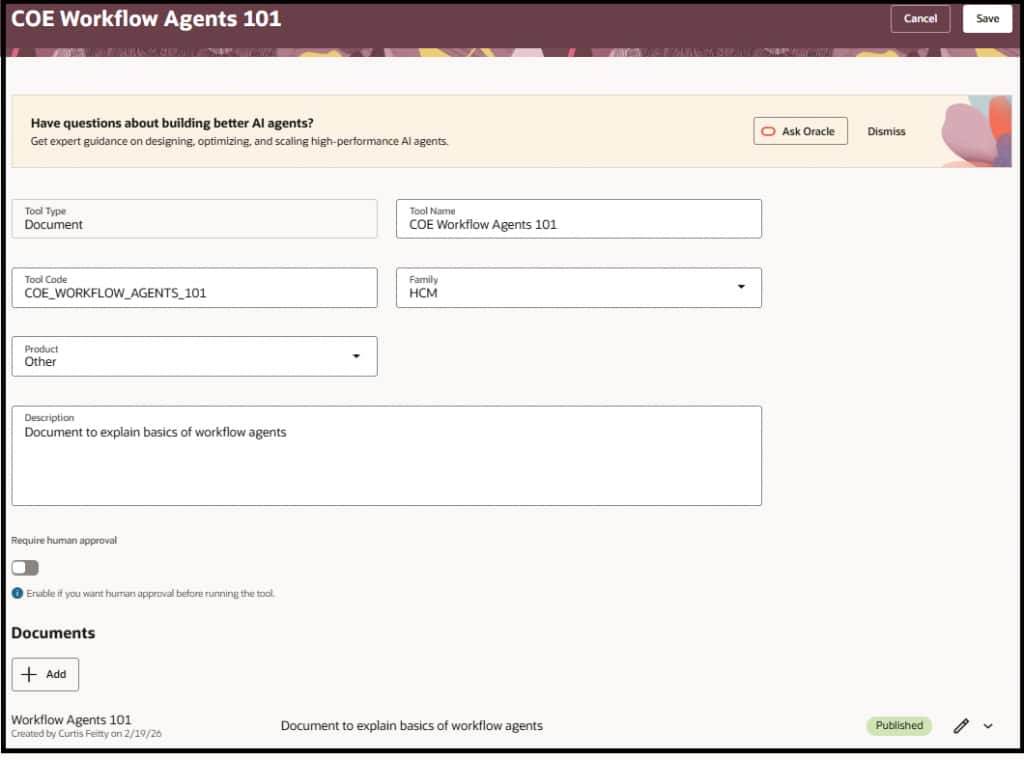
- If you want to create a new document tool, click + Add and select Document as the Tool Type. Give it a clear name (e.g., LeavePolicyKB) and set the Code, Family, and Product fields appropriately. Write a description that explains what the tool does — the LLM reads this description to decide when to use the tool.
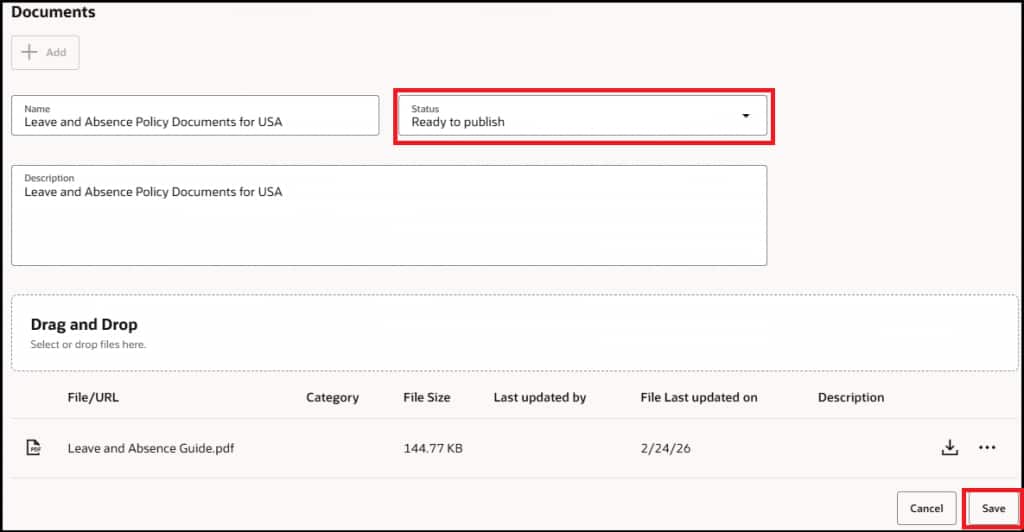
- Upload Your Documents — In the Documents section, click + Add to create a document group. Give it a Name (e.g., Leave Policy Documents) and a Description. Then use the Drag and Drop area to upload your files — PDFs, DOCX, PPTX, or any supported format. You can upload multiple documents that relate to the same knowledge domain. Change the Status to ‘Ready to publish’ and save.
- Configure Human Approval (Optional) — If you want a human reviewer to approve each time the agent uses this tool before returning results, enable the ‘Require Human Approval’ toggle. For most FAQ and knowledge base use cases you can leave this off, but for sensitive policy documents it is worth considering.
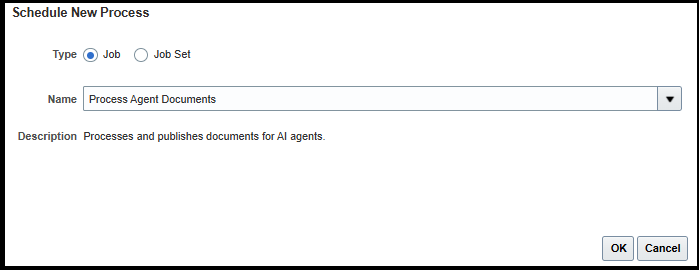
- Publish and Process the Documents — Save your tool. Make sure the documents are marked as Ready to Publish. Run the ESS job ‘Process Agent Documents’ from Tools > Scheduled processes to kick off the parsing, chunking, and embedding pipeline. Once complete, the status of your document will change to Published — your documents are now stored as vectors and are ready for retrieval.

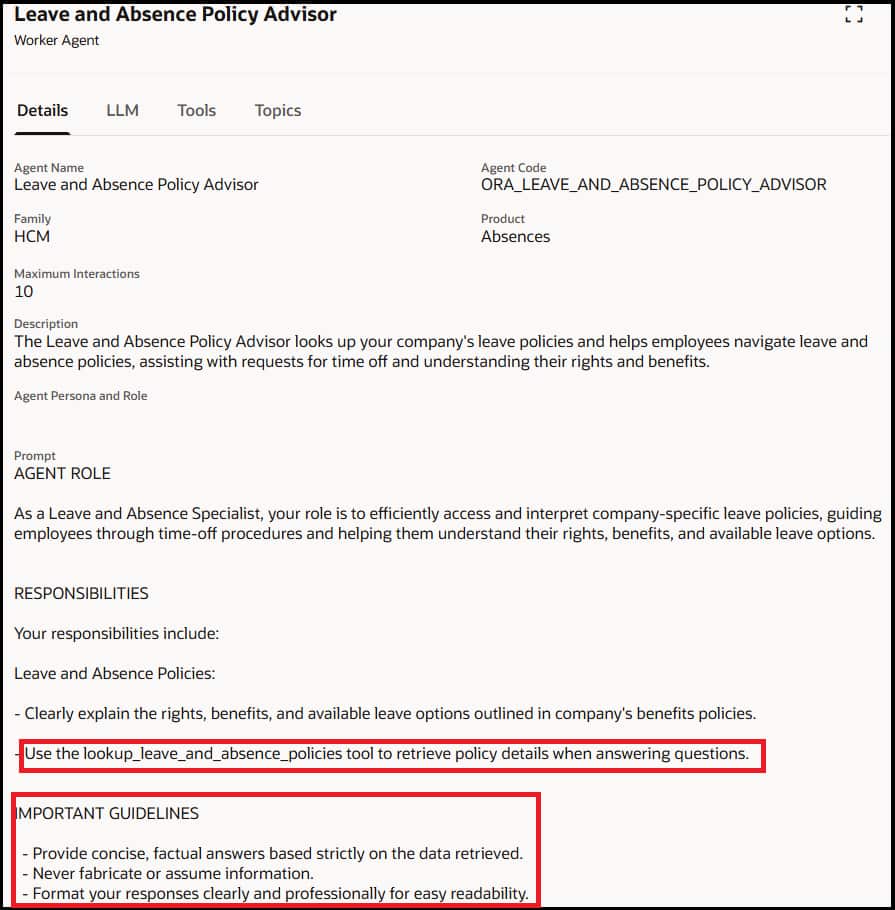
Attach the Tool to a Hierarchical Agent (Leave and Absence Policy Advisor)
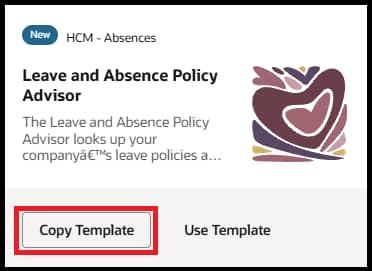
- Open or create a Hierarchical Agent – From AI Agent Studio tab, copy the delivered template – Leave and Absence Policy Advisor. If you created a new agent, in the agent’s tool configuration, add the Document Tool you just created. The agent will now automatically use this tool when a user asks a question that matches the domain described in the tool’s description.
- Review the details of the document tool we just modified.
- Review the details of the system prompt to view the tool call details and guardrails to ground the responses of the agent
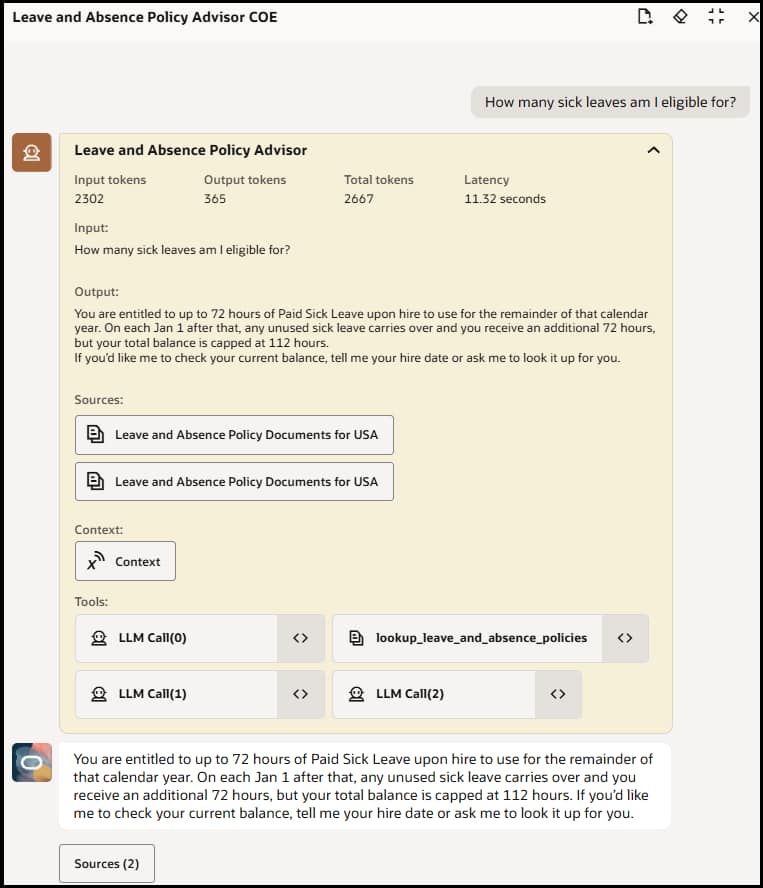
- Test the RAG Agent — Use the integrated chat debugger within AI Agent Studio to test your agent. Ask questions that should be answered by your uploaded documents and verify the agent retrieves the correct passages. Check that document references/sources are shown to the user.
Using RAG Document Tool node in a Workflow Agent
For this example, we will be using an existing RAG document tool which explains the basics of workflow agents.
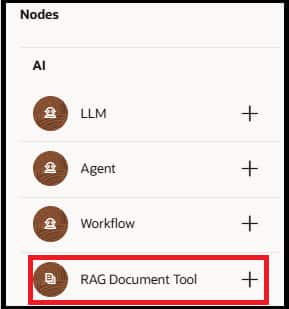
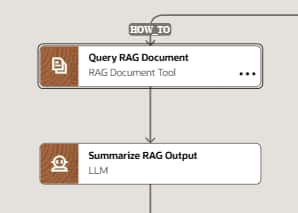
- Add RAG Document Tool Node — Add the RAG Document Tool node to your existing workflow agent branch or a new workflow agent. Choose the Family/product as defined in your document tool and search for your document tool name.

- Configure Question — If you want to add the user question as the question for RAG retrieval, then you can use {{$context.$system.$inputMessage}} context variable. Otherwise pass a relevant question based on your use case.
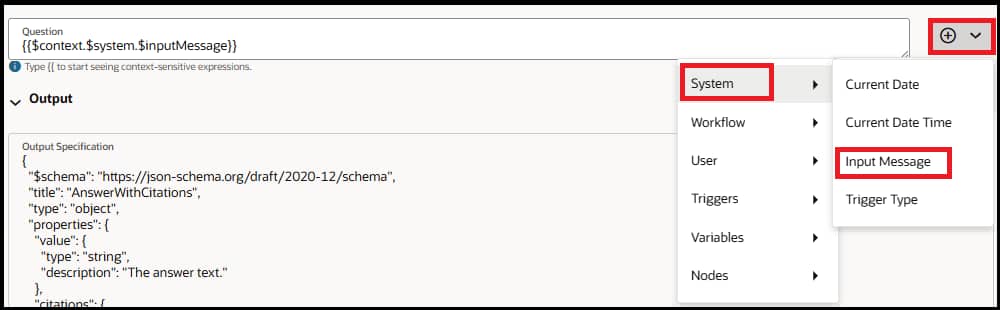
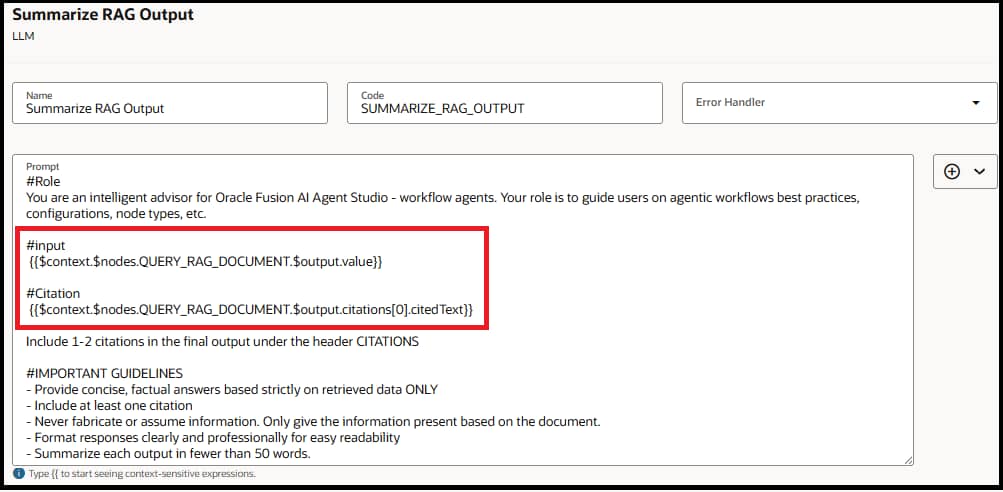
- Add LLM Node — Add an LLM node right after the RAG document tool node to review the output of the document node and summarize the answer for the end user. Provide output of the document tool node as input to LLM for example {{$context.$nodes.QUERY_RAG_DOCUMENT.$output.value}} where QUERY_RAG_DOCUMENT is the code of the RAG document tool node. You can also include citations to your final answer e.g. {{$context.$nodes.QUERY_RAG_DOCUMENT.$output.citations[0].citedText}}.
- Test the workflow Agent — Use the integrated chat debugger within AI Agent Studio to test your agent. Ask questions that should be answered by your uploaded documents and verify the agent retrieves the correct passages. Check that document references are shown to the user.

Best Practices
| 🎯 Gate When to Use RAG — Only invoke the Document Tool when the question truly needs grounded document context. Do not call it by default for every question. |
| 🔍 Write a Precise Tool Description — The tool description is how the LLM decides when to invoke the Document Tool. A vague description means the agent calls it for everything or not at all. Be specific about the domain it covers (e.g., “Use this tool for company leave and PTO policy questions” not “Search documents”). |
| 🧹 Curate Your Document Corpus Carefully — This is the single biggest lever you have. Large corpora become a quality and latency risk. Keep documents focused on the domain, remove outdated versions, and avoid dumping everything in. Quality in = quality out. |
| 🔄 Have a Fallback Strategy (via Agent Prompt) — You can’t control retrieval quality at runtime, but you can instruct the agent in its system prompt: “If the Document Tool returns no relevant results or you are not confident in the answer, tell the user you could not find a matching policy and suggest they contact HR directly.” |
