Oracle provides the Oracle Exadata Deployment Assistant (OEDA) tool to assist with the initial configuration of the Oracle Exadata Database Machine (Exadata) and the Oracle Zero Data Loss Recovery Appliance (ZDLRA). OEDA contains rules and best practices for configuring and managing the Exadata system setup. OEDA provides an intuitive web-based graphical user interface to gather Exadata configuration details and create the Oracle Exadata configuration file which contains the configuration settings for the Oracle Exadata rack. An “Exadata rack” refers to the physical hardware configuration within an Exadata deployment, and it consists of multiple compute servers and storage servers housed together in an Exadata system. An “Exadata rack” can refer to both Exadata and Oracle Exadata Storage Expansion Rack.
Exadata is a complete system optimized for running Oracle databases, while ZDLRA is specifically designed for backup and recovery management, focusing on capturing data changes from an Oracle database. Exadata and ZDLRA share the same platform and utilize similar management tools. OEDA also can be used to gather configuration details and create the ZDLRA configuration file. The ZDLRA configuration file then drives the automated installation and configuration process for a ZDLRA Rack. Given the platform similarities between Exadata and ZDLRA, the term “Exadata” is used to cover both platforms for simplicity of reference.
The OEDA Tool
The OEDA tool can be downloaded from Oracle and run natively on an Exadata Database Server (Oracle Exadata ships with the Oracle Linux operating system installed on the database servers) or on a stand-alone Linux, OSX, and Windows host. OEDA is also available for download from Exadata Database Machine and Exadata Storage Server Supported Versions. Please note that the OEDA Web-based interface is officially supported only on Chrome and Firefox browsers.
Exadata administrators use OEDA during the initial setup and configuration of a new Exadata system. It is a tool for defining network settings, storage configurations, and other critical parameters before the hardware arrives and is physically installed. During an initial Exadata installation, you start afresh with the OEDA GUI and follow the installation instructions for every required Exadata subsystem and module using the GUI-guided configuration sequence. Once the Exadata system has been configured, the OEDA-generated configuration is stored as a set of XML files.
It has been a practice that Exadata configurations be stored in a file called es.xml, with the “es” standing for “Engineered Systems”. Database Machine Administrators have the choice of choosing a configuration file name and are not bound to use the name es.xml. If you are working with an Exadata already running at a customer site, the configuration file on your system system may have been alternatively named. In this blog, references to es.xml will be references to the primary Exadata configuration file.
The OEDA web interface can also import a previously created OEDA XML configuration file to which changes or additions can be made. This capability is useful for operators who have inherited a configured Exadata system. Any planned configuration changes to this pre-configured Exadata are then appended to the imported configuration file, which can then be saved as a new configuration (recommended) or can be used to overwrite the imported configuration file.
The OEDA Application Server and GUI
The OEDA tool is composed of the following macro functional parts.
- Application Server that has the core logic for Exadata system configuration and deployment.
- Graphical User Interface (GUI) for graphically managing the Exadata configuration workflow. The GUI is enabled when the Application Server is activated.
Multiple shell script files become available when OEDA is installed on an Exadata Database Server. This blog will highlight the role of the installOedaServer.sh and the oedacli executable. A peek inside a representative directory where oeda is installed will show the following in addition to other files:
|
|
OEDA activation requires the start of the OEDA Application Server. This is accomplished by executing installOedaServer.sh as shown. The default port number of the OEDA application server is 7072. While any unused port number can be used, note that it is recommended that port numbers less than 1024 not be used.
|
|
A -g option is available in the execution of installOedaServer.sh and this allows the OEDA application server to accept connections on an available network interface.
Once the installOedaServer install script has been run, the OEDA Application Server is up and running, and this enables the OEDA GUI. The GUI can now be invoked via a browser by pointing to the Exadata URL with oeda as the landing page. The recommended access method is to run the browser on the same host as the OEDA application server and to specify localhost as the application server hostname.
This OEDA GUI provides a convenient and intuitive way to gather Exadata configuration details.
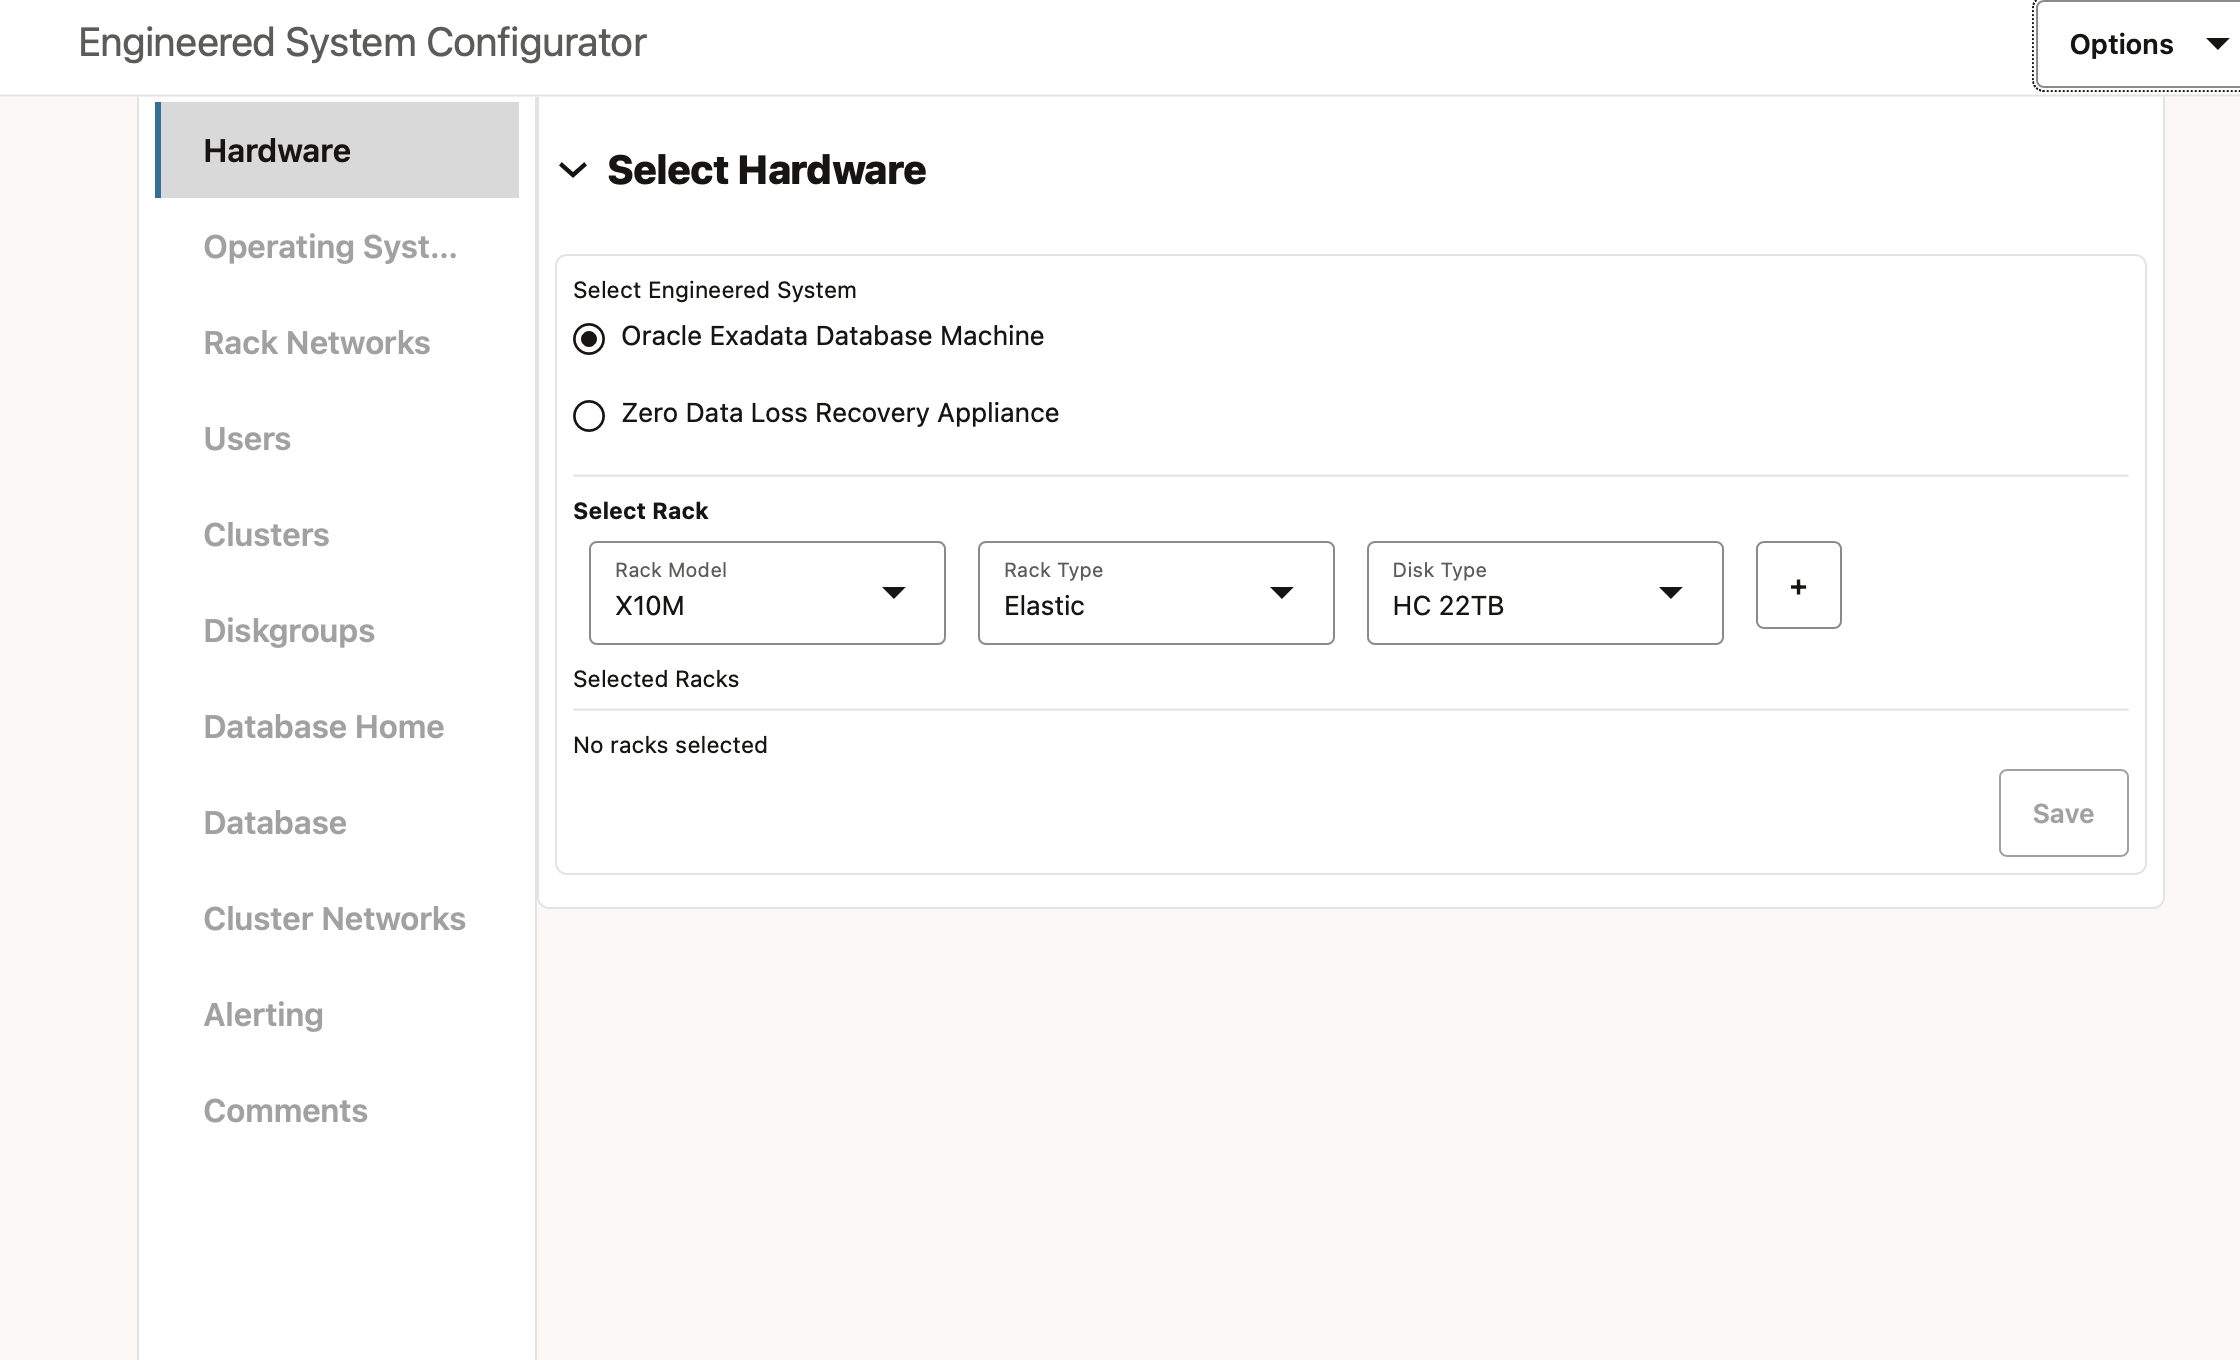
Setting up an Exadata requires two important functions. They are:
- Initial naming and configuration data gathering and creation of configuration files
- Deployment of the configuration files to an Exadata
The left panel of the OEDA Application Server Web UI landing page shows the functional modules for which configuration can be specified. Note that from the GUI landing page, the OEDA web UI allows users to input configuration details for network settings, user accounts, clusters, databases, and software installations. The OEDA application then builds the es.xml file. With helpful instructions and drop-down menus, the UI is straightforward to navigate, and the configuring user has complete control over the installation.
Introducing the role of the install.sh script
When OEDA is downloaded and installed, among the various files, an install.sh file is also present as shown above. Once an Exadata configuration file has been generated using OEDA, the install.sh script is used to install and deploy the configuration on an Exadata system.
Note that before using the install.sh command, it is best practice that:
- A backup of all existing databases be created
- The latest version of the OEDA be used. An update of OEDA is recommended in a section below to ensure that the version being used is the latest..
Typically, the install.sh script will execute 21 tasks in order. The comprehensive list of tasks, extracted from an existing es.xml configuration file is:
|
|
However, not all the listed tasks need always be executed. The install command provides the control granularity, using step numbers, to select one or a range and execute only a desired subset of the listed tasks. The install.sh command syntax is as follows. The associated options show how a single step or a set of steps, called out by step numbers, can be run.
|
|
The -cf, -s, and -r options are used in the above command and a few additional options are available:
|
|
Role of the OEDA Command Line Interface (OEDACLI)
OEDA and OEDACLI are two facets (GUI and CLI) of the same tool, with minor differences in capability*. OEDACLI can also be used to configure and manage lifecycle tasks on Exadata. OEDACLI supports lifecycle management (such as adding or removing nodes, databases, database home directories, disk groups, and storage cells). OEDACLI complements the capabilities of OEDA and can be used for tasks that involve configuration and provisioning, management, patching, monitoring, and cloud integration.
OEDACLI can also be used to update an existing Exadata configuration file.
*Unlike the OEDA GUI interface, which can configure either Exadata or ZDLRA, OEDACLI supports lifecycle management tasks for Exadata systems.
OEDA Install
Periodic updates to OEDA are available over time; the best practice is to download the latest OEDA from oracle.com/OTN when you use the utility.
Recall from earlier in this article that OEDA can also be manually installed on an Exadata platform or a Linux/OSX/Windows host.
To manually download OEDA to an Exadata instance or a host platform of choice:
- Download the latest version of the OEDA tool from the official Oracle download site.
- Ensure that the tool is set up in a well-known directory.
- In this blog, the representative directory on Exadata where the tool is located in: /u01/app/oracle/software/tools/oeda
OEDA and OEDACLI: Usage Guidelines
The Oracle best-practice guidelines are as follows:
- Use OEDA (Graphical User Interface) for:
- Initial Exadata Deployment: Use OEDA to set up a new Exadata system from scratch. This includes configuring hardware, software, storage, disk groups, and databases.
- When Exadata installation or platform update involves complex configurations: Use with intricate configurations that require a visual walkthrough of the needed steps.
- Easier navigation: If you are not yet a power user of Exadata or the OEDACLI and you’re looking for a structured configuration workflow, OEDA’s user-friendly GUI is recommended.
- OEDA ensures that all required values are entered and error checks at every step.
- Use OEDACLI (Command-Line Interface) for:
- Ongoing Management: You’re a power user and you are comfortable with OEDA or OEDACLI.
- With OEDACLI, you’re looking to maintain fine-grained control over Exadata configuration.
- When your Exadata system is already configured and is ready for incrementally additional capability.
- Supporting automation: For repetitive tasks or scripting, OEDACLI command files can be generated once and subsequently used with automation.
- Integration with other tools: OEDACLI-based command scripts can be integrated with well-known operational tools and scripts.
- Ongoing Management: You’re a power user and you are comfortable with OEDA or OEDACLI.
What Exadata configuration tasks are best for OEDACLI?
Exadata lifecycle management configuration actions are most appropriate for OEDACLI. A few prominent Exadata lifecycle actions are:
-
Add nodes to and remove nodes from a VM cluster
-
Add or remove Oracle Database home directories
-
Add or remove storage cells
-
Resize Oracle ASM disk groups
- Add or remove databases
Prerequisites for using OEDACLI on an Exadata Platform
OEDACLI builds or updates XML files that are subsequently used by the install.sh script. OEDACLI can be used to configure database servers, storage servers, and network fabric switches.
Key guiding points about OEDACLI and network access if the generated configuration must be deployed:
- Local network access needs to be enabled:
- OEDACLI interacts with devices on the local network to gather configuration details and apply settings.
- OEDACLI does not need the public internet but does need network access to the Exadata cluster on the local network.
- Access privilege to Servers and Switches is required:
-
You will need the user access credentials for the Servers and the Switches in the cluster (specifically for:
root,oracle,andgridUsers).
-
Getting started with OEDACLI on Exadata
To get started with OEDACLI and to make updates to a pre-configured Exadata, you have to edit the existing (es.xml) configuration file.
OEDACLI has two operating functions, Edit and Deploy.
-
Edit:
-
Edit an XML file, then save the updated XML file, which can then be used for later deployment
- System changes that have been done from outside of OEDA can be synced into the configuration file
-
-
Deploy:
-
Deploy the configuration or changes that have been made
-
A sample sequence is as follows:
- SSH into the Exadata database server as a privileged user.
%ssh root@exadata1.us.oracle.com
root@exadata1.us.oracle.com's password: <enter password> - Navigate to the default pre-assigned or assigned OEDA software directory.
- The best practice is to download and install the latest OEDA from oracle.com/OTN.
- Alternatively, if you are on an Exadata database server and you are using a KVM host, OEDA may be found installed in the location: /EXAVMIMAGES/onecommand/linux-x64.
- If you are on a bare metal server, OEDA may be found installed in the location: /u01/oeda
- In the data capture for this blog, a bare metal server was the underlying platform, and OEDA was manually installed in the following location: /u01/app/oracle/software/tools/oeda/
cd /u01/app/oracle/software/tools/oeda/
- Execute the “oedacli” script. This will put you into the OEDACLI shell.
./oedacli - Read an existing OEDACLI configuration file (named es.xml). Ensure that the file has been pre-loaded into a known location.
LOAD FILE name=/u01/app/oracle/software/tools/oeda/es.xml - Enter OEDACLI commands to make needed configuration changes.
<ENTER ONE MORE OEDACLI COMMANDS>   -- Example commands are shown in the section
                                     -- "Example of OEDACLI Use (with ASM Storage) for
-- adding a database"
-- that is later in this blog
-- The updates are called Actions, where an Action is:
-- a single atomic task or a composite of subtasks - Save the configured Action
SAVE ACTION -- Use this command to save the current action to
-- in-memory copy of the XML configuration - Once all changes are complete, save the new configuration file. Note below that the new configuration file name is now named es_new.xml.
-- NOTE: If a filename (a la es_new.xml) is not specified,
 -- OEDACLI automatically stores the updated configuration
-- in a new file with a timestamp in its name. The original
 -- configuration file is not overwritten.
SAVE FILE name=/u01/app/oracle/software/tools/oeda/es_new.xml
-- NOTE This updated XML file can be used at a later time for deployment -
A “checkip.sh” script is generated during the OEDA configuration workflow. The checkip.sh script is intended to perform a pre-installation check to verify that the IP addresses and host names that were specified via OEDA are defined in DNS, that the NTP servers and gateways are available, and that private addresses are not pingable.
It is good practice to re-run this network configuration check after the OEDACLI initiated changes, particularly if any network configurations have been changed.
This network check on the newly generated es_new.xml file is to be run as follows, where the checkip.sh script is pointed to the newly generated configuration file. The OEDACLI shell has to be exited to run this command.
./checkip.sh -cf es_new.xmlOnce the checkip.sh script has been run and the output file has a success message at the end, you have confirmation that the incrementally applied configuration has been validated.
- Re-enter the OEDA shell.
- Merge the Actions.
MERGE ACTIONS -- Use this command to merge the current actions into the Engineered System modelD - Deploy the Actions.
DEPLOY ACTIONS -- Use this command to run all actions from the configuration XML file.
-- Network access to Exadata is required. - Exit the OEDACLI session.
exit -- Exit the OEDACLI session
This completes a tour of how OEDACLI is used for Exadata system configuration. Let’s go on to some useful OEDA operational and deployment details.
Running OEDACLI on a non-Exadata Host
OEDACLI can be run on an Exadata database server or on a Linux/OSX/Windows host. The OEDA tool installation procedure for the non-Exadata hosts is similar to installing and running OEDACLI on Exadata. The workflow on a non-Exadata host follows very closely the above-shown workflow on Exadata. Optionally, if the host has access to the network where the engineered system will be deployed, configurations can be validated. However, if such access is not available, the generated configuration will have to be verified at a later time when network access is available.
For OEDACLI on Windows platforms, while the OEDACLI command syntax is identical to that on MacOS/Linux, there are minor operational command variants that apply to a Windows platform as compared to the commands that apply on MacOS/Linux. These command variants are not called out here but are intuitive to resolve.
OEDACLI Help is available within the utility
OEDACLI implements a “help” command that provides a view of all available operating commands and capabilities. Only a small subset of all available help is presented here. Note that the help for Database objects includes ADD, ALTER, DELETE, and LIST options.
|
|
Example of OEDACLI Use (with ASM Storage) for adding a database:
An OEDACLI-driven walkthrough of an ADD DATABASE action is presented below.
Step 1: Use the OEDACLI help command to understand the command syntax and mandatory parameters for ADD DATABASE
|
|
In the output of the help command, note the mandatorily required fields and parameters that are highlighted with the “*” after the colon that precedes the field descriptor
Step 2: List DATABASEHOMES. This output is needed to determine the DBHOMEID where the new database must be created
|
|
Note that the id is “test_databaseHome”. This parameter is used as DBHOMEID in a subsequent command.
Step 3: Gather the needed parameters
-
DATADG: Specifies the name of the DATA disk group for the new database. This argument is required when adding a database using Oracle ASM storage.-
In the command below, the representative name “DATATEST” is used
-
-
RECODG: Specifies the name of the RECO disk group for the new database. This argument is required when adding a database using Oracle ASM storage.-
In the command below, the representative name “RECOTEST” is used
-
Step 4: Run the ADD DATABASE command with the mandatory parameters specified.
- The following mandatory parameters are specified for the ADD DATABASE command:
-
- Database Name : oedacli_test
- Data Disk Group : DATATEST
- RECO Disk Group : RECOTEST
|
|
This creates the needed configuration Actions for “ADD DATABASE”.
Step 5: SAVE the ADD DATABASE command.
|
|
The ADD DATABASE configuration action has been persisted.
STEP 6: MERGE the ADD DATABASE command. This merges the configured Action into the system configuration.
|
|
The ADD DATABASE configuration action has been merged into the existing configuration file.
Step 7: Use the DEPLOY command to deploy all actions, using the newly updated XML configuration file.
|
|
Note from the “Done” system messages that the Database has been successfully created.
Complete list of OEDACLI DATABASE Commands: ADD/ALTER/DELETE/LIST
Step 1 in the previous section shows how to invoke help output for the specific “ADD DATABASE” OEDACLI command. Note that the help command has comprehensive capability and can be used to get details for an action on any one of OEDACLI-supported objects.
NOTE: What is shown here is a subset of all available OEDACLI commands that relate to Database actions.
|
|
Further Reading
If your curiosity about OEDACLI has been piqued, the Oracle OEDACLI documentation is helpful. There are also published articles that discuss specific use cases:
Conclusion
Oracle Exadata Deployment Assistant (OEDA) simplifies and accelerates the deployment of Oracle Exadata environments by aiding configuration and setup tasks. It ensures optimal hardware and software configurations and ensures that user inputs do not result in errored configuration. With its intuitive interface, OEDA streamlines planning and provisioning, saves time, and enhances operational efficiency.
If you’re comfortable with OEDA and/or you enjoy retaining extreme configuration control, the Exadata OEDACLI command-line interface comes with OEDA and is a great tool for you. OEDACLI, as a facet of OEDA offers a lot of flexibility and control for most lifecycle Exadata operations. For simple configuration tasks, or if you’re a novice Exadata user, while the OEDA GUI might be sufficient, OEDACLI provides more hands-on control with the available commands.
Enjoy using the OEDACLI utility and please give us feedback. Thank you.
Acknowledgements
Special thanks to my colleague Alex Blyth for his insights..