Alex Blyth has written an excellent blog on creating an ACFS filesystem on Exascale volumes. Alex details how to create and configure an ACFS-formatted volume within an Exascale environment, covering tasks such as volume creation, attachment, and use.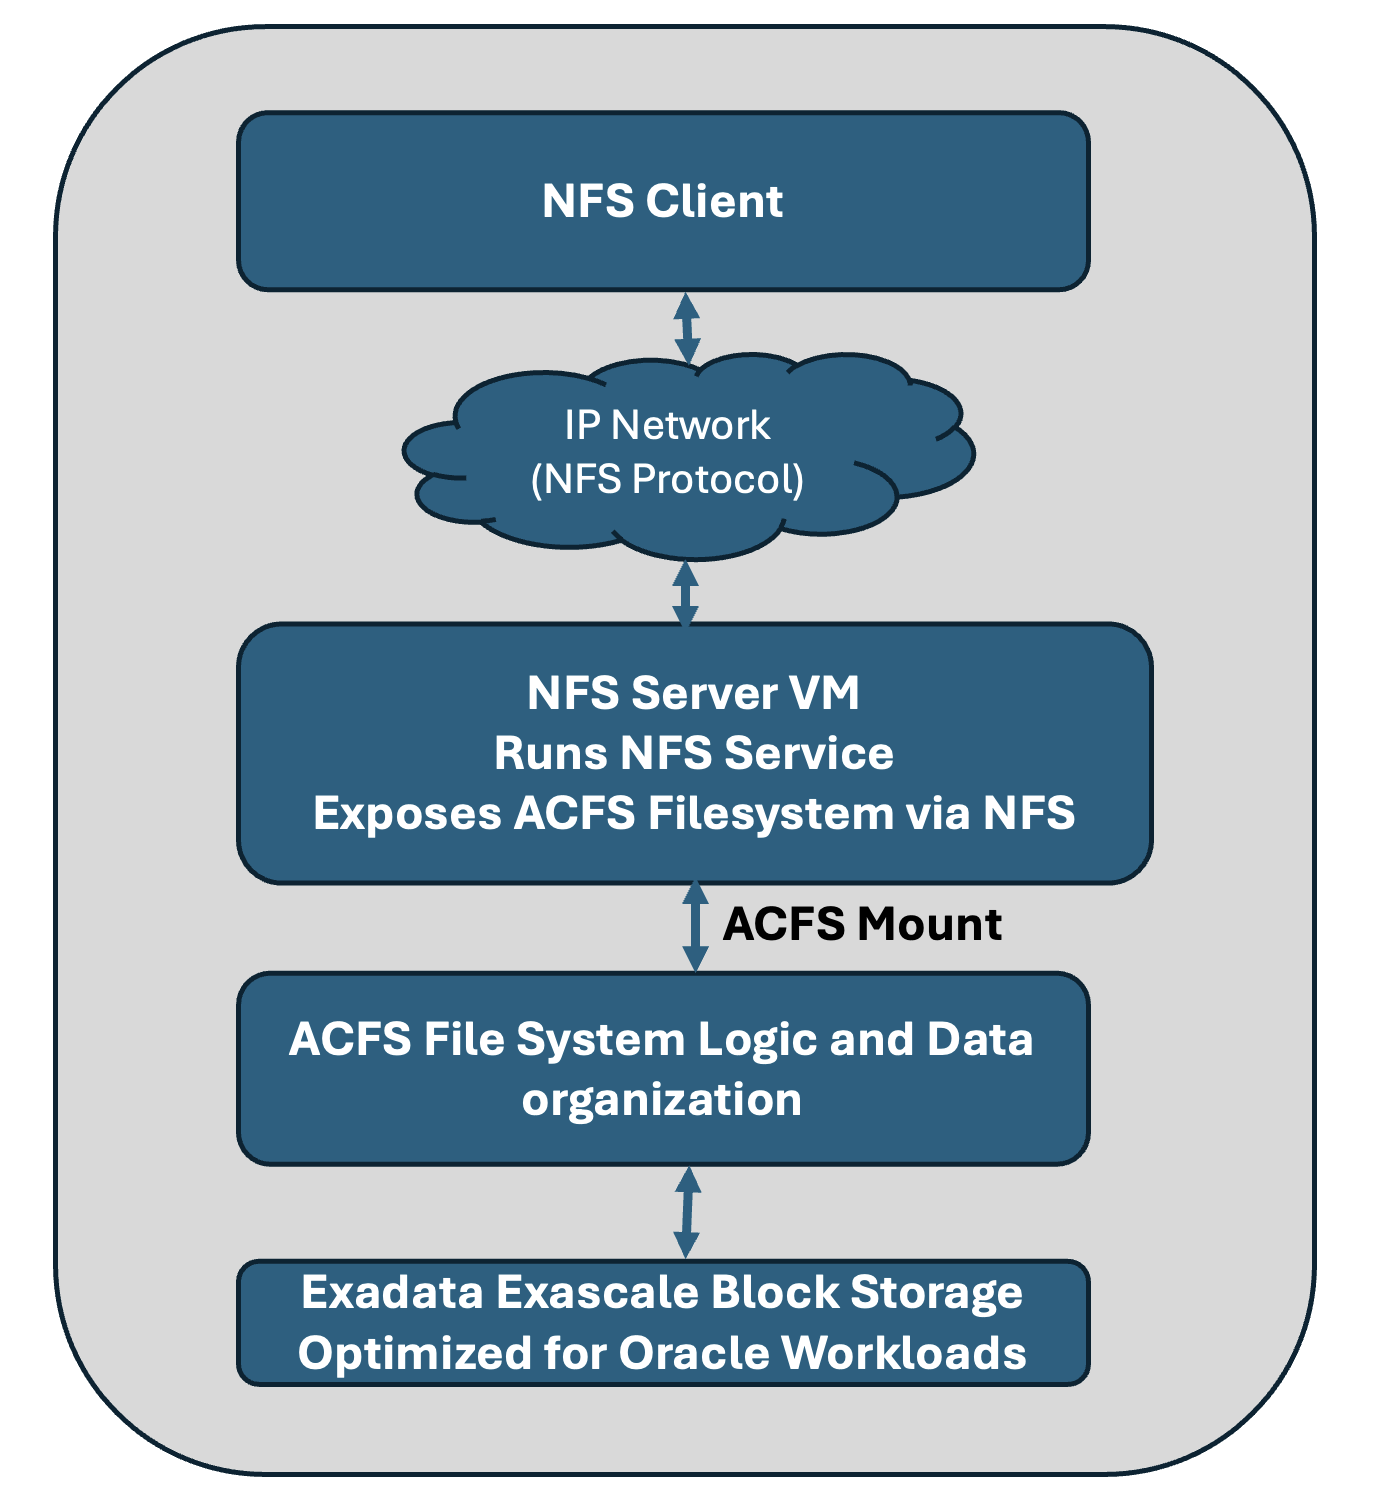
Expanding on that groundwork, this blog demystifies the process of layering an NFS export atop the ACFS filesystem. Once the ACFS volume is present and mounted, you can seamlessly share its resources over the network using NFS. Exporting an Exascale ACFS volume via NFS enables seamless file sharing across clusters and with non-Exadata platforms and applications. This is particularly valuable in environments where applications, tools, or users need access to files such as logs, exports, reports, or shared configuration without being directly connected to the database infrastructure. This use case extends the utility of Exadata storage beyond database workloads to general-purpose file access in heterogeneous environments.
Overlaying NFS on Exascale ACFS
This diagram captures the protocol layers and functional flow involved in exposing NFS on an ACFS volume in Exadata Exascale, capturing what the text below helps to set up. It visually connects the components and flows that make NFS access possible in an Exascale ACFS environment.
The following sections are a step-by-step guide to setting up an NFS filesystem overlay on an Oracle ACFS volume on Exadata. Before exploring further, it is helpful to clarify that the term Oracle ACFS NAS Maximum Availability Extensions (Oracle ACFS NAS|MAX) refers to a set of technologies that utilize ACFS and Clusterware resources to support running NFS or SMB over ACFS.
Confirm the existence of an ACFS Volume
In the above-referenced blog, an ACFS volume is created and named acfs2 during the setup process. This blog uses the same volume name, acfs2, to maintain consistency and ensure alignment with the prior instructions. Ensure that this ACFS volume exists. The df -h command provides detailed information about the mounted filesystems, including size, usage, and available space. A sample output is shown. For more detailed ACFS-specific statistics, the acfsutil info fs command is available.
[root@exadpmvm05 ~]# df -h /acfs2 Filesystem Size Used Avail Use% Mounted on /dev/exc/acfsvol2 50G 651M 50G 2% /acfs2 |
A couple of srvctl utility commands are available to view configured and mounted/active ACFS filesystems. It is good practice to verify the configuration by running these commands.
[root@exadpmvm05 ~]# srvctl config filesystem Volume device: /dev/exc/acfsvol2 Canonical volume device: /dev/exc/acfsvol2 Accelerator volume devices: Mountpoint path: /acfs2 Mount point owner: root Mount point group: root Mount permissions: owner:root:rwx,pgrp:root:r-x,other::r-x Mount users: oracle Type: ACFS Mount options: Description: ACFS file system is enabled ACFS file system is individually enabled on nodes: ACFS file system is individually disabled on nodes: [root@exadpmvm05 ~]# srvctl status filesystem ACFS file system /acfs2 is mounted on nodes exadpmvm05 |
Stage Files onto the ACFS Mount Point
Before clients can access data on the new NFS mount that will be created, it must first be populated with the necessary directories and files. All required files must be transferred to the ACFS mount point that will be exported using NFS, and appropriate permissions must be set so that clients can read or modify the data as intended. As an example, a text file has been loaded as the sample file intended for access by NFS clients.
[root@exadpmvm05 acfs2]# ls -la /acfs2 total 8870586 drwxr-xr-x 5 root root 32768 Jul 8 13:25 . drwxr-xr-x 21 root root 4096 Jul 4 09:45 .. -rw-rw-r-- 1 root root 529792 Jul 7 02:07 sample.txt |
Now that the ACFS environment has been verified and prepared with data for NFS clients to access, let’s set up the NFS environment.
Setting up the NFS Ecosystem
First, check whether nfs-utils is installed on your Exadata. If the package is installed, you’ll see the package name and version when an RPM query is run.
A short note on clarifying terminology before we get into the details.
- nfs-utils is the actual package name on Oracle Linux; it provides the tools required to run an NFS server.
- NFS Server refers to the network service that shares directories via NFS.
[root@exadpmvm05 ~]# rpm -q nfs-utils nfs-utils-2.3.3-59.0.2.el8.x86_64 |
In the output shown in the text block, you see nfs-utils-2.3.3-59.0.2.el8.x86_64. The nfs-utils package provides the essential utilities and background services needed to configure, manage, and run the NFS server on Linux. Your output may show a version variant if nfs-utils is installed. If nfs-utils is not installed, the output will indicate that it is not installed, and the installation of the Oracle-tested packages and dependencies will be required. With nfs-utils installed, server directories can be exported over the network, allowing clients to mount and access filesystems via the NFS protocol.
Installing the nfs-utils RPM Package
Only in the case that nfs-utils is not installed, an installation of the package is required. The installation can be performed manually or automatically through a script. The code block here shows how a dnf command can be executed directly on the command line or incorporated into a deployment script. Alex Blyth has another excellent blog, Accessing the ULN Mirror for Exadata, which explains how to access Exadata-specific yum/dnf channels, ensuring that Exadata systems are only configured using packages and dependencies tested by Oracle. This blog is essential reading to ensure you configure your Exadata systems using the correct, Oracle-tested software channels, avoiding compatibility and dependency issues that can arise from using generic repositories.
[root@exadpmvm05 ~]# sudo dnf install nfs-utils |
This command downloads and installs the necessary NFS utilities and dependencies required for NFS Server functionality. Users must ensure that an Exadata-specific yum/dnf channel is used to maintain support and compatibility.
nfs-utils is responsible for re-exporting the file system after a reboot. However, for ACFS and EDV file systems, Oracle ACFS NAS|MAX or another script solution will be required to handle the additional dependencies of EDV and ACFS. See the section below titled Oracle ACFS NAS|MAX for more information.
Starting and Enabling the NFS Server
Once nfs-utils is confirmed to be installed, the NFS server can be enabled and started as shown in the command box. The verbs “start” and “enable” seem to overlap, and so here is some clarification around what they mean.
- Enable: Configures the service to start automatically on boot. The –now flag starts the service immediately in the current session.
- Start: This command starts the specified service immediately, but does not enable it to start on boot.
# Preferred [root@exadpmvm05 ~]# sudo systemctl enable --now nfs-server # OR else use: [root@exadpmvm05 ~]# sudo systemctl start nfs-server # NOTE: Use one of the two above commands. If the chosen command exits # without errors, the NFS Server has been started/enabled |
The command sequence above both enables the NFS-server service and starts it, making Exadata ready to serve NFS exports.
Verifying the NFS Server Status
To verify that the NFS server is running correctly, its status can be checked.
[root@exadpmvm05 ~]# sudo systemctl status nfs-server
   nfs-server.service - NFS server and services
   Loaded: loaded (/usr/lib/systemd/system/nfs-server.service; enabled; vendor preset: disabled)
   Active: active (exited) since Tue 2025-07-08 14:56:34 PDT; 2h 5min ago
  Process: 165802 ExecStart=/bin/sh -c if systemctl -q is-active gssproxy; then systemctl
             reload gssproxy ; fi (code=exited, status=0/SUCCESS)
  Process: 165785 ExecStart=/usr/sbin/rpc.nfsd (code=exited, status=0/SUCCESS)
  Process: 165783 ExecStartPre=/usr/sbin/exportfs -r (code=exited, status=0/SUCCESS)
 Main PID: 165802 (code=exited, status=0/SUCCESS)
    Tasks: 0 (limit: 319999)
   Memory: 0B
   CGroup: /system.slice/nfs-server.service

Jul 08 14:56:34 exadpmvm05.us.oracle.com systemd[1]: Starting NFS server and services...
Jul 08 14:56:34 exadpmvm05.us.oracle.com systemd[1]: Started NFS server and services.
|
The status messages indicate that the NFS server service (nfs-server.service) is enabled and currently active on the test system.
- The line prefixed with “Loaded: loaded” confirms that the service is correctly installed and set to start automatically at boot.
- The “Active: active (exited)” status means the service’s main processes have started and completed their initialization successfully.
- The other log messages show that prerequisite actions, such as refreshing NFS exports and starting dependent components like
rpc.nfsd, were completed without errors.
The messages in the text box confirm that the NFS server is properly set up, initialized, and is ready to serve NFS shares.
Enabling Client Subnet Access
In the test environment used to support this blog, client access is specifically granted to the machine with IP address 10.31.13.234 for the ACFS volume named acfs2. To enable this access, an entry to the /etc/exports file is added on the Exadata server, specifying the export permissions for the desired client. This configuration ensures that only the designated client at 10.31.13.234 is allowed read and write access to the /acfs2 filesystem via NFS, thus enabling controlled and secure sharing of the ACFS volume. Of particular note is the FSID or File System ID option, specified within export options. Export options are required for the proper operation of certain ACFS features with NFS semantics, (i.e. rw, sync, fsid=XXX). The specified export options are:
-
rw: This stands for “read-write.” It allows NFS clients to both read from and write to the shared directory.
-
sync: This option ensures that all changes to files (writes, data, and metadata updates) are committed to stable storage before the server responds to the client’s request. This offers greater data reliability but may impact performance since operations wait for disk write confirmation before completing.
fsid:Provides a unique identifier for the NFS export, which helps NFS clients distinguish between different exported file systems, especially if they might otherwise appear to be identical (for example, if two paths point to the same underlying device).
If access for an entire subnet using a /17 mask is required instead of a single IP address, the network range can be specified in the /etc/exports entry. This configuration is also shown below.
The exports reference page provides authoritative documentation on export options and syntax, helping ensure that your NFS exports are configured securely and correctly. Please refer to this documentation when configuring exports.
# Enabling access for a specific client [root@exadpmvm05 ~]# sudo sh -c 'echo "/acfs2 10.31.13.234(rw,sync,fsid=2343)" >> /etc/exports' # Enabling access for a client subnet (this setting supercedes the command above) [root@exadpmvm05 ~]# sudo sh -c 'echo "/acfs2 10.31.0.0/17(rw,sync,fsid=2343)" >> /etc/exports' # Verify that /etc/exports is properly populated. [root@exadpmvm05 ~]# cat /etc/exports /acfs2 10.31.13.234(rw,sync,fsid=2343) /acfs2 10.31.0.0/17(rw,sync,fsid=2343) |
Activating NFS Export Changes
After the export file is updated to define the NFS share and its permitted clients, it’s essential to apply these changes so they take effect. Running the command exportfs -ra instructs the NFS Server to re-read the /etc/exports file and update the NFS active export tables. This ensures that any new or modified exports are immediately recognized by the NFS Server and made available to clients without needing to restart the entire NFS service. In essence, the command seamlessly activates configuration changes, allowing specified clients to access the NFS shares as intended.
[root@exadpmvm05 acfs2]# sudo exportfs -ra |
The exports have been activated. It’s time to verify. The command sudo exportfs -v provides a detailed, verbose listing of all active NFS exports on the server. It shows not only the exported directories but also the client addresses and the specific export options applied. Running this command allows the verification of filesystems that are currently accessible to clients and confirms that the exports are now in effect. The output from our test setup is shown.
[root@exadpmvm05 acfs2]# sudo exportfs -v /acfs2 10.31.13.234(sync,wdelay,hide,no_subtree_check,fsid=2343,sec=sys,rw,secure,no_all_squash) /acfs2 10.31.0.0/17(sync,wdelay,hide,no_subtree_check,fsid=2343,sec=sys,rw,secure,no_all_squash) |
With the NFS server installed and the ACFS volume properly mounted and exported, the next step is to configure an NFS test client to access the shared filesystem. Knowing the IP address of the Exadata server, as well as the exported directory (/acfs2), is all that is required. On the NFS client system, whether it’s a Linux machine or a macOS workstation, NFS utilities must already be installed. Most modern systems have NFS support built in, but if not, the appropriate NFS client package must be installed.
Executing NFS Mount on an NFS Client
To mount the ACFS volume, a local directory on the NFS client is created to use as a mount point. The mount command is then used to connect to the NFS export with the actual IP or DNS name of the Exadata NFS server. If the configuration is correct and network connectivity is working, the client will be able to browse, read, and write files in the ACFS export as if it were a local directory. A check of file and directory permissions is necessary if any issues arise, and verification of firewall settings and access controls on both the server and client is required to ensure connectivity. When testing or use is complete, the share can optionally be unmounted. We do not discuss unmounting here.
# Create local mount directory on the NFS client [root@nfsclient ~]# mkdir ~/acfs2 # Connect to the NFS export using the IP address of the server [root@nfsclient ~]# sudo mount -v -t nfs 10.31.13.232:/acfs2 ~/acfs2 mount.nfs: timeout set for Tue Jul 8 16:19:00 2025 mount.nfs: trying text-based options 'vers=4.2,addr=10.31.13.232,clientaddr=10.31.13.234' |
Once the NFS Client has mounted the exported ACFS volume from the Exadata, it can seamlessly access the shared filesystem as if it were a local directory. By navigating to the mount point on the client, NFS Clients will see all files and folders present on the ACFS volume, allowing them to read, write, and modify data according to the permissions set by the server. This direct visibility enables easy collaboration, data transfer, and integration with client-side applications or workflows.
The successful mount shown through command execution below demonstrates that the NFS configuration is functional and that the acfs2 ACFS filesystem is now readily available to external clients over the network via standard NFS protocols.
[root@nfsclient ~]# cd ~/acfs2 /root/acfs2 [root@nfsclient acfs2]# ls -la total 8870632 drwxr-xr-x 5 root root 32768 Jul 8 13:25 . dr-xr-x--- 8 root root 254 Jul 8 16:09 .. -rw-rw-r-- 1 root root 529792 Jul 7 02:07 sample.txt |
Note that the file that is visible to the NFS client is the same file that was made available on the NFS server. Also, any changes made on the server are immediately reflected on the client, ensuring a consistent view of the shared data.
Oracle ACFS NAS|MAX
To make configuring NFS support for ACFS as simple as possible, Oracle ACFS provides extensions known as Oracle ACFS NAS|MAX. One of the key benefits that this extension provides is the significant reduction in timing between OS boot-up and the appearance of the Oracle ACFS file system and EDV (or ADVM) volume devices. In traditional NFS, the boot-time service nfs-utils will handle exporting the /etc/exports file. However, Oracle ACFS file system and EDV (or ADVM) volume devices are not available at this time. Thus, to achieve automatic NFS exports on boot time, either the sysadmin must provide a custom initialization script, or Oracle ACFS NAS|MAX must be used. In both cases, dynamic exports after Oracle ACFS file systems and EDV (or ADVM) volume devices are available must be handled. Oracle ACFS NAS|MAX will also automatically ensure unique FSIDs for each required file system.
High Availability NFS with ACFS
In addition to simplifying the configuration of NFS + ACFS\EDV\ADVM, Oracle ACFS NFS|MAX also delivers a substantial enhancement in system availability. ACFS is configurable in any RAC or non-Oracle Restart configuration of Oracle Clusterware on Exadata. This is a huge bonus! The ACFS volume is cluster-mounted and can be automatically failed over to another node if the primary node becomes unavailable, ensuring continuous access. This setup is ideal for production environments where uninterrupted file sharing is critical, especially for workloads requiring integration with external systems or cross-cluster data exchange.
High availability for NFS is achieved using Oracle ACFS NAS Maximum Availability Extensions (Oracle ACFS NAS|MAX). The integrated architecture ensures uninterrupted access to shared data, even during maintenance operations or hardware failures. By providing seamless failover and minimal disruption for NFS clients, it provides the high availability required for mission-critical enterprise environments. Oracle ACFS NAS|MAX is built on top of ACFS, and this allows NFS shares to leverage the management interfaces and advantages of ACFS. NFS exports from ACFS volumes remain resilient in the event of node failures, failovers, or service restarts. Oracle Clusterware manages the failover of NFS services across nodes, ensuring continuous access to exported file systems. As a result, clients accessing ACFS-backed NFS mounts experience minimal disruption, even during maintenance or failure events, aligning with Exadata’s mission-critical availability. This approach makes ACFS-mounted NFS a viable and robust choice for enterprise-grade shared storage services.
Resources on Oracle ACFS and Oracle ACFS NAS|MAX
For those interested in further explorations of Oracle ACFS NAS|MAX or additional applications of Oracle ACFS NFS support, the following resources provide in-depth guidance:
- Oracle ACFS Oracle NAS|MAX Extensions (PDF)
- Best Practices for Oracle ACFS with RMAN (Oracle MAA Blog)
- Oracle ACFS Advanced Topics (Oracle Documentation)
NFS Multi-System Access: Important Consideration
When accessing an NFS volume from multiple clients, possibly on different clusters, it’s important to be aware of certain caveats and best practices to maintain data integrity. While NFS provides basic file locking mechanisms, it is ultimately the responsibility of the clients to coordinate access and utilize proper file or record-level locking in their applications. Without coordinated locking, simultaneous access by multiple clients can lead to race conditions, data corruption, or inadvertent overwriting of file contents. The Exascale NFS server presents the shared filesystem and does not enforce higher-level synchronization or prevent conflicting operations. Therefore, clients must implement best practices, and it is recommended that only applications that respect file locks and properly manage concurrent reads and writes be enabled to avoid potential issues when working in a multi-client environment.
Summary
Overlaying an NFS filesystem on an Exascale volume configured with ACFS provides a robust and flexible solution for sharing critical data across diverse environments. This approach leverages the advanced scalability, high availability, and data management features of Exadata Exascale storage while extending seamless, standards-based file sharing to external systems through NFS. By combining the strengths of ACFS and NFS, organizations can unify storage access, support cross-platform workflows, and facilitate collaboration without compromising on performance or reliability. Exadata Exascale empowers enterprises to build secure, scalable, and future-ready architectures, making it an ideal foundation for modern, data-driven operations. If you’re looking to maximize your infrastructure’s value and agility, the extensive and unparalleled capabilities of Exadata Exascale are a great choice for your most demanding storage and sharing needs.
Acknowledgements
Special thanks to Alex Blyth, a seasoned Exadata product manager, technologist, and operational specialist, for his invaluable insights and support.