In this blog, you will find step-by-step instructions required to use Universal Connection Pool (UCP) as a data source while connecting to Oracle Database using IBM Open Liberty. Refer to the table below for more details.
| Step Number | Description |
| Step 1 | IBM Open Liberty version used |
| Step 2 | Datasource configuration for UCP |
| Step 3 | Download JDBC driver and set the path |
| Step 4 | Create a Java Servlet that uses UCP |
| Step 5 | Start Open Liberty and Invoke the Servlet |
| Step 6 | References |
Step 1:
The IBM Open Liberty used and verified by using Gradle and following the step-by-step instructions on “Building a web application with Gradle”.
Step 2:
Add the below data source configuration for using UCP as a datasource in server.xml (~/guide-gradle-intro/start/src/main/liberty/config/server.xml). This takes sometime and wait for the installation to complete.
<dataSource id=”oracleUCPDS” jndiName=”jdbc/oracleUCPDS” >
<jdbcDriver libraryRef=”OracleUCPLib” />
<properties.oracle.ucp connectionFactoryClassName=”oracle.jdbc.pool.OracleDataSource”
URL=”jdbc:oracle:thin:@servicename?TNS_ADMIN=/Users/test/OpenLiberty/”
user=”username”
password=”password”
initialPoolSize=”1″
maxPoolSize=”50″
minPoolSize=”5″
fastConnectionFailoverEnabled=”true”
connectionProperties=”autoCommit=false”
/>
</dataSource>
<library id=”OracleUCPLib”>
<fileset dir=”${server.config.dir}” includes=”ojdbc8.jar ucp.jar ons.jar simplefan.jar oraclepki.jar osdt_core.jar osdt_cert.jar”/>
</library>
Step 3:
(a) Download JDBC driver and other jars: Download the latest 21c or 19.10 JDBC drivers from OTN
(b) Place it under config path.
Place the downloaded JDBC driver and other jars under config (~/guide-gradle-intro/start/src/main/liberty/config) folder.
Make sure to have ojdbc8.jar, ucp.jar, ons.jar and simplefan.jar in the classpath. Also, you need to have oraclepki.jar, osdt_core.jar, and osdt_cert.jar in the classpath if you are connecting to ATP or want SSL connection.
(c) Add the JDBC driver path in server.xml
Add the JDBC driver path in server.xml ((~/guide-gradle-intro/start/src/main/liberty/config/server.xml) as shown below.
<library id=”OracleUCPLib”>
<fileset dir=”${server.config.dir}” includes=”ojdbc8.jar ucp.jar ons.jar simplefan.jar oraclepki.jar osdt_core.jar osdt_cert.jar”/>
</library>
Step 4:
(a) Add the annotation for the data source in the servlet.
@Resource (name = “jdbc/oracleUCPDS”)
DataSource ds ;
(b) Get the connection to the Oracle database and perform some database operations
protected void doGet(HttpServletRequest request, HttpServletResponse response) throws ServletException, IOException {
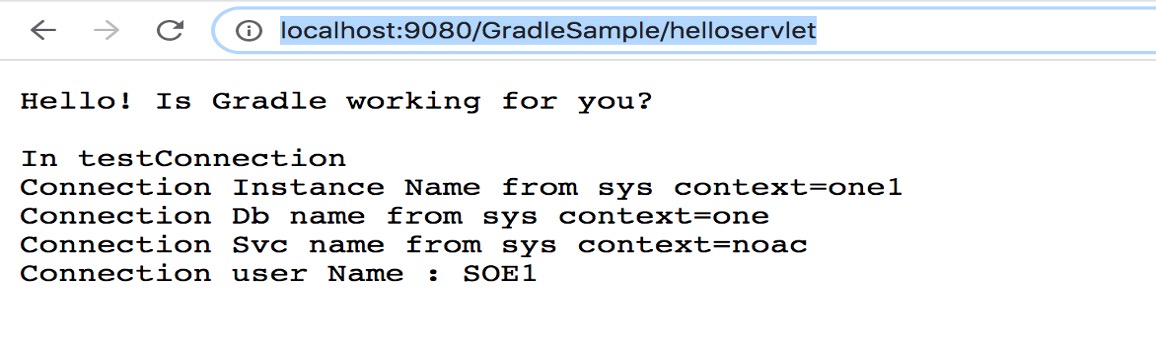
response.getWriter().append(“Hello! Is Gradle working for you?\n”);
Statement stmt = null;
ResultSet rs = null;
try {
Connection conn = ds.getConnection();
response.getWriter().append(“\nIn testConnection”);
stmt = conn.createStatement();
String query = “select sys_context(‘userenv’, ‘instance_name’),”
+ “sys_context(‘userenv’, ‘server_host’),”
+ “sys_context(‘userenv’, ‘service_name’),”
+ “sys_context(‘userenv’, ‘db_unique_name’)” + “,user” + ” from dual”;
rs = stmt.executeQuery(query);
if (rs.next()) {
String instanceName = rs.getString(1);
String serviceName = rs.getString(3);
String dbName = rs.getString(4);
String userName = rs.getString(5);
response.getWriter().append(“\nConnection Instance Name from sys context=” + instanceName);
response.getWriter().append(“\nConnection Db name from sys context=” + dbName);
response.getWriter().append(“\nConnection Svc name from sys context=”
+ serviceName);
response.getWriter().append(“\nConnection user Name : ” + userName);
}
} catch (Exception ex) {
ex.printStackTrace();
} finally {
try {
if (rs != null)
rs.close();
if (stmt != null)
stmt.close();
} catch (Exception ex) {
ex.printStackTrace();
}
}
}
Step 5:
From the place where the gradle is installed, start the IBM Open Liberty and invoke the servlet.
➜ start git:(master) ✗ ./gradlew :libertyDev
<————-> 0% EXECUTING [6s]
> :libertyDev
From the place where the Gradle is installed, stop the open liberty.
➜ start git:(master) ✗ ./gradlew :libertyStop
<————-> 0% EXECUTING [6s]
> :libertyDev
Step 6:
Open Liberty guides: https://openliberty.io/guides/