Introduction
Managing users and ACLs in Oracle Cloud Infrastructure (OCI) Streaming with Apache Kafka can easily become messy when done manually. Over time, permissions drift, changes are hard to track, and reproducing the same access model across environments becomes painful.
In this tutorial, I’ll show how to manage Kafka users and ACLs using a GitOps approach. User and ACL definitions will live in Git as YAML files, while passwords stay securely stored in OCI Vault. An OCI Function will read those files, fetch the secrets from Vault, and apply the desired state to the Kafka cluster.
This makes access management easier to review, automate, and maintain without storing sensitive data in the repository.
This tutorial is divided into two parts:
- Part 1: Implementing the OCI Function for Kafka User and ACL Management
- Part 2: Running GitOps with GitLab CI (you will need a Gitlab repository for this part)
Note:
- This tutorial is designed solely for educational and study purposes. It provides an environment for learners to experiment and gain practical experience in a controlled setting. It is crucial to note that the security configurations and practices employed in this tutorial might not be suitable for real-world scenarios.
- Security considerations for real-world applications are often far more complex and dynamic. Therefore, before implementing any of the techniques or configurations demonstrated here in a production environment, it is essential to conduct a comprehensive security assessment and review. This review should encompass all aspects of security, including access control, encryption, monitoring, and compliance, to ensure that the system aligns with the organization’s security policies and standards.
- Security should always be a top priority when transitioning from a lab environment to a real-world deployment.
Objectives
By the end of this tutorial, you will be able to:
- Manage Kafka users declaratively with
users.yaml - Manage Kafka ACLs declaratively with
acl.yaml - Store user passwords securely in OCI Vault
- Apply changes automatically to Oracle OCI Streaming with Apache Kafka using OCI Functions and GitOps
Prerequisites (mandatory)
- Oracle Cloud Infrastructure
- Oracle account with admin level access permissions.
- A compartment to create your resources.
- Note: Take note the compartment name and compartment ID.
- VCN with a private subnet. For more information, see Creating a Virtual Cloud Network.
- An Oracle Cloud Shell or a Compute VM with access to your VCN subnet.
- Note: Oracle Cloud Shell already provides OCI CLI, Docker, and Fn Project CLI. If you use a Compute VM instead, make sure these tools are installed before starting the tutorial.
- An OCI Vault in the same compartment, For more information, see Creating a Vault.
- A previsouly created OCI Streaming With Apache Kafka cluster, see Creating a Cluster.
- Make sure you have your SASL-SCRAM active and with a super user created on your Vault Secret, you will need the super user and password, see Configuring SASL/SCRAM.
- Auth token to Enable Login to Oracle Cloud Infrastructure Registry, see Generating an Auth Token.
- Note: Take note the auth token.
Part 1: Implementing the OCI Function for Kafka User and ACL Management
Task 1: Set up Dynamic Groups
Go to your domain, click Dynamic Groups and create the following group.
- Group Name:
MyFunctions.
# Rule 1
ALL {resource.type = 'fnfunc', resource.compartment.id = 'pasteYourCompartmentOCID'}
Task 2: Create Policies
- Go to Policies and create the following policies.
- Policy Name:
FunctionsPolicies.
Allow dynamic-group 'Default'/'MyFunctions' to manage repos in compartment YOUR-COMPARTMENT-NAME
Allow dynamic-group 'Default'/'MyFunctions' to read app-catalog-listing in compartment YOUR-COMPARTMENT-NAME
Allow dynamic-group 'Default'/'MyFunctions' to use volume-family in compartment YOUR-COMPARTMENT-NAME
Allow dynamic-group 'Default'/'MyFunctions' to use virtual-network-family in compartment YOUR-COMPARTMENT-NAME
Allow dynamic-group 'Default'/'MyFunctions' to read secret-bundles in compartment YOUR-COMPARTMENT-NAME
Task 3: Create OCI Container Registry
- Go to your Cloud Shell and run the following commands to create the OCI Container Registry
Name: lab/fn-sync-kafka-acl.
oci artifacts container repository create --display-name lab/fn-sync-kafka-acl --compartment-id ocid1.compartment.oc1..REPLACE_WITH_YOURS
2. Open the cloud shell, and proceed with the login on the registry. Check what is the correct URL for your region. In this tutorial, we are using Brazil East (Sao Paulo) where the registry URL is gru.ocir.io
docker login gru.ocir.io
Username: <your container namespace>/youruser
Password: YOUR_AUTH_TOKEN_CREATED_EARLIER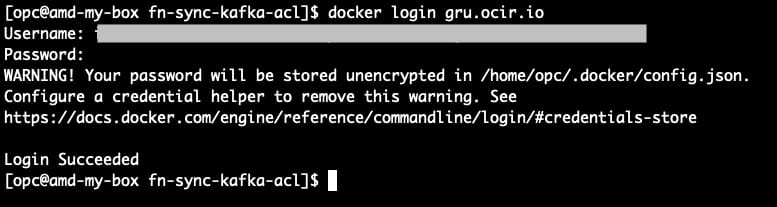
Task 4: Creating the function and needed configurations.
Note Make sure you select your private subnet.
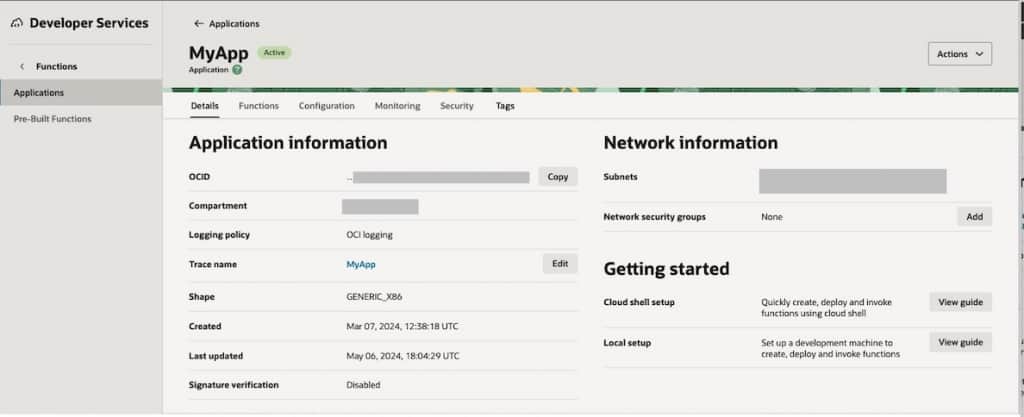
- Go to Developer Services, under Functions, click Applications and then click Create application.
We created a new application called: MyApp
2. Go to your cloud shell to download code from repository.
git clone https://github.com/jctarla/fn-sync-kafka-acl.git
cd fn-sync-kafka-acl
Now you’ve downloaded the code, we must modify the config/sample_configuration.json file with your information.
Note: You will need the super user name and password created when SASL/SCRAM was enabled for your Oracle OCI Streaming with Apache Kafka cluster. These credentials are stored in OCI Vault.
You will also need the KAFKA_BOOTSTRAP_SERVERS value. You can find it on the cluster page, in the Cluster Information section. Make sure to use the SASL/SCRAM endpoint.
The sample_configuration.json:
{
  "config": {
    "KAFKA_BOOTSTRAP_SERVERS": "example1:9092",
    "OCI_REGION": "sa-saopaulo-1",
    "KAFKA_SECURITY_PROTOCOL": "SASL_SSL",
    "KAFKA_SASL_MECHANISM": "SCRAM-SHA-512",
    "KAFKA_SASL_JAAS_CONFIG": "org.apache.kafka.common.security.scram.ScramLoginModule required username=\"super-user-xxxxx\" password=\"xxxxxxxxx\";",
    "KAFKA_REQUEST_TIMEOUT_MS": "30000"
  }
}
3. Go to the cloud shell where you have Docker, OCI CLI, Fn Project CLI installed and run the following commands to initialize the function.
Note: If you followed the tasks, your Docker login command has already been executed by now, if not, proceed with the Docker login steps in Task 3.
## If you're using Cloud Shell, you may need to use provider = oracle-cs instead of oracle below.
fn create context oci-cloud --provider oracle
##
fn use context oci-cloud
fn update context oracle.compartment-id PASTE_YOUR_COMPARTMENT_OCID
fn update context api-url https://functions.sa-saopaulo-1.oraclecloud.com
fn update context registry gru.ocir.io/PASTE_YOUR_REGISTRY_NAMESPACE/lab
fn list appsNote: In this tutorial, we are using Brazil East(Sao Paulo) region, if you are using a different region, you need to change the api-url and registry locations.
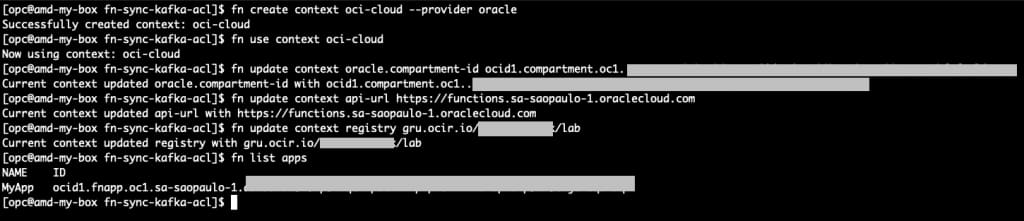
Note the created application is listed!
4. Build & Deploy the function
pwd ## check if you're on the function directory
ls -lrt
cd function
fn deploy --app MyApp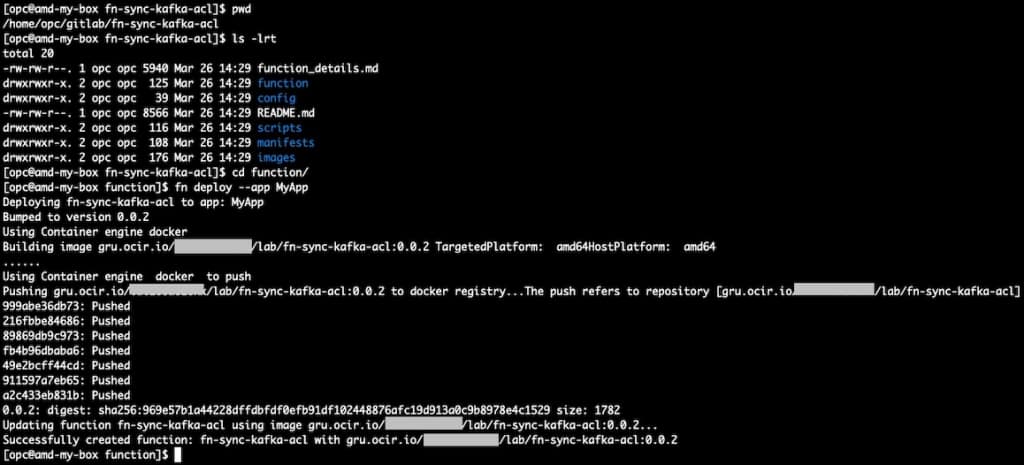
5. Apply function configurations We need to capture the function OCID and apply the sample_configuration.json file that was created earlier.
Note: At this point, your
config/sample_configuration.jsonfile should already be filled in with your own values.
## Make sure you're on the project root directory
cd ..
pwd
## Run to identify the function OCID
fn list functions MyApp |grep fn-sync-kafka-acl

oci fn function update --force \
  --function-id REPLACE_WITH_YOUR_FUNCTION_OCID \
  --from-json file://config/sample_configuration.json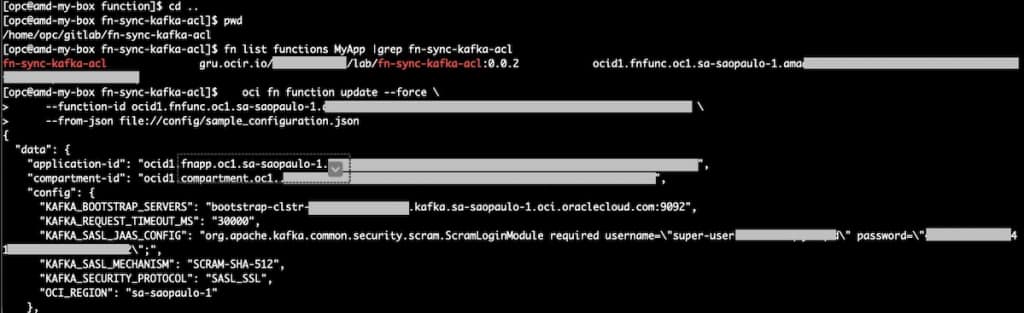
Task 5: Creating a new user and ACLs on Kafka based on the manifest file.
In this task, we will create a new Kafka user and define its ACLs using the manifest files.
The users.yaml file is used to declare SCRAM users. It is used only to create new users or update existing passwords and settings.
The acl.yaml file is used to declare the ACLs that should be applied to the cluster.
1. Open the manifests/users.yaml file and add a new user.
Note: Before adding the user to
users.yaml, create its password and store it in OCI Vault. Then copy the secret OCID and use it in thepassword_secret_ocidfield.
If you need help with Vault Secrets, check this Secret Management
Example:
version: 1

users:
  - username: "app-orders-producer"
    password_secret_ocid: "ocid1.secret.oc1.sa-saopaulo-1.exampleproducer"
    mechanism: "SCRAM-SHA-512"
    iterations: 4096
In this example, the user app-orders-producer will be created or updated as a SCRAM user.
Note: The OCI Function does not delete Kafka users. It only creates new SCRAM users or updates the password and settings of existing ones. The password will be read from OCI Vault using the
password_secret_ocid.
2. Open the manifests/acl.yaml file and add the ACL definition for the same user.
Example:
version: 1

acls:
  - username: "app-orders-producer"
    permissions:
      - resource:
          type: "TOPIC"
          name: "app.orders.events"
          pattern_type: "LITERAL"
        operations:
          - "WRITE"
          - "DESCRIBE"
In this example, the user will be allowed to write and describe the topic app.orders.events.
3. Create a file called payload.json with the manifest content inline
Note: If you create
payload.jsonmanually, make sure the YAML content is properly escaped as a JSON string. Incorrect escaping of line breaks or quotes will cause the Function invocation to fail.
Example:
{
  "users_yaml": "version: 1\n\nusers:\n  - username: \"app-orders-producer\"\n    password_secret_ocid: \"ocid1.vaultsecret.oc1.sa-saopaulo-1.xxxxxxxx\"\n    mechanism: \"SCRAM-SHA-512\"\n    iterations: 4096\n",
  "acl_yaml": "version: 1\n\nacls:\n  - username: \"app-orders-producer\"\n    permissions:\n      - resource:\n          type: \"TOPIC\"\n          name: \"app.orders.events\"\n          pattern_type: \"LITERAL\"\n        operations:\n          - \"WRITE\"\n          - \"DESCRIBE\"\n",
  "dry_run": false
}
4. Invoke the OCI Function manually using OCI CLI.
oci fn function invoke \
--function-id REPLACE_WITH_YOUR_FUNCTION_OCID \
--body "$(cat payload.json)" \
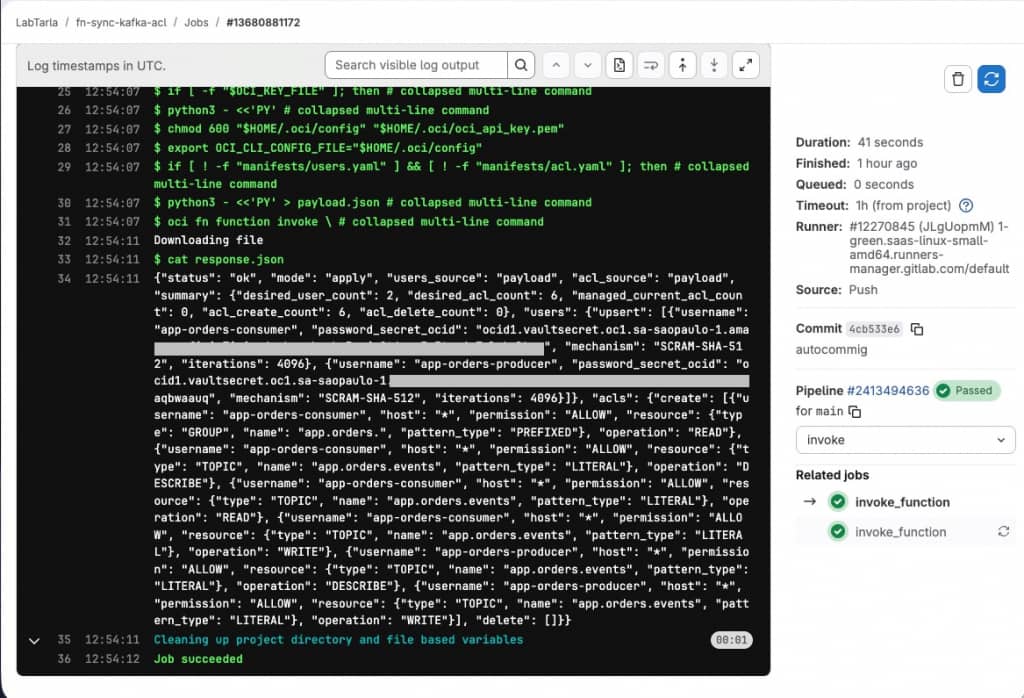
--file response.json5. Check the result.
cat response.jsonIf the execution is successful, the Function will create or update the user and apply the ACLs to the Kafka cluster.

Part 2: Running GitOps with GitLab CI
In Part 2, we will configure GitLab CI to invoke the OCI Function automatically whenever the manifest files change.
The goal of Part 2 is to:
- keep
users.yamlandacl.yamlin the repository - invoke the OCI Function automatically
- apply Kafka user and ACL changes through a GitOps workflow
This tutorial repository already includes a ready-to-use .gitlab-ci.yml file. In this part, you will configure the required GitLab variables and then trigger the pipeline using the existing CI definition.
Prerequisites (mandatory)
- GitLab
- A GitLab project where the repository is hosted.
- Permission to configure CI/CD Variables in the project.
- Oracle Cloud Infrastructure
- An IAM user dedicated to the GitLab CI integration.
- An API key created for this IAM user. For more information, see Required Keys and OCIDs.
- The OCI CLI configuration content for this IAM user.
- The private key content in PEM format for this IAM user.
- Permission for this IAM user to invoke the OCI Function created in Part 1, see Invoke and Manage Functions
Note: For security reasons, it is recommended to use a dedicated IAM user for GitLab CI instead of a personal user.
Task 1: Configure the required GitLab CI variables
Before running the pipeline, you need to configure the GitLab CI variables that will be used to authenticate to OCI and invoke the Function.
In your GitLab project:
- Go to Settings
- Go to CI/CD
- Open the Variables section
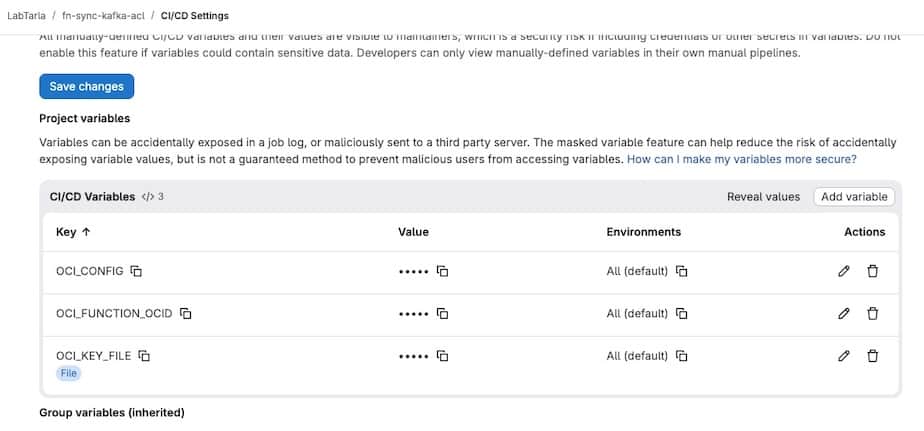
- Add the following variables
Required variables:
OCI_CONFIGOCI_KEY_FILEOCI_FUNCTION_OCID
The OCI_CONFIG variable should contain the content of your OCI CLI config file. You can store it as a regular variable or as a GitLab File variable.
The OCI_KEY_FILE variable should contain the content of your OCI private key in PEM format.
Example:
-----BEGIN PRIVATE KEY-----
...
-----END PRIVATE KEY-----
For OCI_KEY_FILE, it is recommended to create it in GitLab as a File variable.
The pipeline is prepared to support both cases:
- a regular variable containing the PEM content
- a File variable containing the PEM file
Example OCI config content:
[DEFAULT]
user=ocid1.user.oc1..example
fingerprint=aa:bb:cc:dd:ee:ff
tenancy=ocid1.tenancy.oc1..example
region=sa-saopaulo-1
## keep the key file this way, the FN will understand
key_file=/root/.oci/oci_api_key.pem
The OCI_FUNCTION_OCID variable should contain the OCID of the OCI Function created in Part 1.
Task 2: Review the manifest files and trigger the pipeline
Before triggering the pipeline, do a final review of the manifest files inside the manifests directory.
In this tutorial:
manifests/users.yamlis used to define the Kafka SCRAM users that should be created or updated. It is not used to delete users.manifests/acl.yamlis used to define the ACLs that should be applied to those users
In the current example, we are creating two users:
app-orders-producerapp-orders-consumer
You can change these names to match your own application users.
The ACLs implemented in this example are:
app-orders-producerWRITEandDESCRIBEon topicapp.orders.events
app-orders-consumerREADandDESCRIBEon topicapp.orders.eventsREADon consumer group prefixapp.orders.
At this point, make sure to confirm the right password_secret_ocid values in users.yaml are corret, otherwise the execution will fail.
After reviewing the files, commit and push the changes to the repository to start the GitLab pipeline.
git add .
git commit -m "Update Kafka users and ACL manifests"
git push
Once the push is completed, GitLab CI will start the pipeline and invoke the OCI Function automatically.
Task 3: List the users in the Kafka cluster
After the pipeline runs, you may want to verify the users already available in the Kafka cluster.
To do that, you need the Apache Kafka command line tools, especially kafka-configs.sh.
You can get the Kafka binaries from the official Apache Kafka documentation:
After downloading Kafka, extract the package and use the scripts available in the bin directory.
You will also need a client properties file with your Kafka connection settings, for example sasl.properties.
This file should look like this:
security.protocol=SASL_SSL
sasl.mechanism=SCRAM-SHA-512
sasl.jaas.config=org.apache.kafka.common.security.scram.ScramLoginModule required username="super-user-xxxxxx" password="xxxx";
Example command to list the users:
kafka-configs.sh \
  --bootstrap-server bootstrap-clstr-xxxxxxx.kafka.sa-saopaulo-1.oci.oraclecloud.com:9092 \
  --describe \
  --entity-type users \
  --command-config /home/opc/lab/sasl.properties
This command will show the users currently configured in the Kafka cluster.
If you also want to list the ACLs currently configured in the cluster, use:
kafka-acls.sh \
  --bootstrap-server bootstrap-clstr-xxx.kafka.sa-saopaulo-1.oci.oraclecloud.com:9092 \
  --list \
  --command-config /home/opc/lab/sasl.properties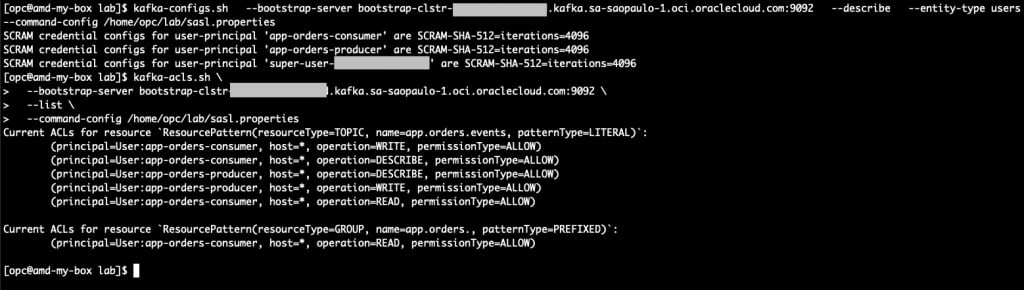
Conclusion
In this tutorial, we built a simple GitOps approach to manage Kafka users and ACLs on Oracle Cloud Infrastructure Streaming with Apache Kafka. We used an OCI Function to read the manifest files, retrieve SCRAM passwords from OCI Vault, and apply the desired state to the cluster.
With this approach, user and ACL management becomes easier to review, version, and automate through GitLab CI, while sensitive passwords remain outside the repository. This helps reduce manual work and keeps Kafka access management more consistent across environments.