Modern cloud-native applications demand high scalability, non-blocking performance, and secure data connectivity. In this blog, we explore how to build a fully reactive application leveraging Oracle Autonomous AI Database (ADB), R2DBC, and Spring WebFlux to efficiently store and manage JSON data.
We’ll walk through, how to
- Use R2DBC to establish reactive database connections
- Build reactive endpoints to store and retrieve JSON data
- Configure Oracle Wallet for secure connectivity
By the end, we have a cloud-ready, reactive Spring Boot application that connects securely to Oracle AI Database, enabling seamless JSON data management with non-blocking performance.
Introduction:
Reactive programming has become the backbone of modern cloud applications—enabling systems to scale, handle concurrency, and deliver real-time performance.
When paired with Oracle Autonomous AI Database, developers can take advantage of:
- Automated management (no manual tuning or patching)
- Native JSON support
- Secure, wallet-based connections
Combining this with Spring WebFlux and R2DBC gives us a fully reactive stack that’s secure, scalable, and efficient for modern workloads.
Technology Stack Overview
| Component | Purpose |
| Oracle Autonomous Database (ADB) | Managed database with JSON support and secure wallet connectivity |
| R2DBC (Reactive Relational Database Connectivity) | Non-blocking data access for relational databases |
| Oracle Wallet | Secure credential store for SSL authentication |
| Spring WebFlux | Reactive web framework built on Project Reactor |
| Java 17 + Spring Boot 3.x | Application runtime and configuration |
| Maven & IntelliJ IDEA | Build automation and development environment |
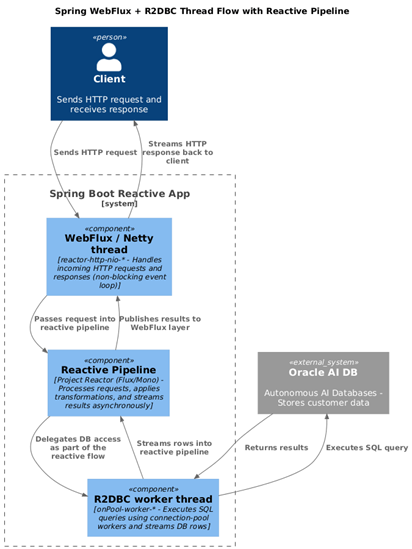
Architecture Overview
The reactive flow:
- Client sends HTTP/HTTPS requests (e.g., via Postman or UI).
- Spring WebFlux handles the requests using reactive streams (Mono/Flux).
- R2DBC manages asynchronous communication with the database.
- Oracle Wallet ensures secure connectivity.
- Oracle Autonomous AI Database stores JSON data natively.
Architect Diagram
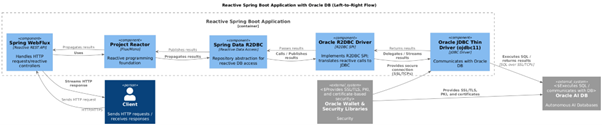
Spring Webflux + R2DBC Application Reactive PipeLine
Step-by-Step Implementation
Step 1: Configure Oracle ADB
- Create an Autonomous AI Database Instance
- Download ADB Wallet to configure TNSNAMES.ora to point Wallet
- Create a JSON Collection table and insert few records
Example
create JSON collection table CUSTOMER_DETAILS_J;

Insert into CUSTOMER_DETAILS_J (DATA) values ('{"_id":1001,"name":"crsk","phone":12345678,"Address":{"street":"200 Sporting Green","city":"chennai","state":"SNG1","zipCode":"600061","country":"SNG"},"card":"1234-5678-9012","lat":1.3421,"lng":103.8851}');

 ( Sample dataset can be seen here )
Step 2: Create and Configure the Spring Boot Project
2.1 Initialize the Project
- Use Spring Initializr or IntelliJ
2.2 Add Dependencies
- Spring Reactive Web (WebFlux)
- Spring Data R2DBC
- Oracle R2DBC Driver
- Spring Boot Actuator (optional)
Example of Project Structure
src/
           main/
             java/com/example/reactiveapp/
               controller/
               service/
               repository/
               model/
             resources/
               application.yml
               wallet/ (place extracted ADB-wallet files here)
Maven Dependencies (pom.xml)
<dependencies>
                <dependency>
                    <groupId>org.springframework.boot</groupId>
                    <artifactId>spring-boot-starter-webflux</artifactId>
                </dependency>
                <dependency>
                    <groupId>org.springframework.boot</groupId>
                    <artifactId>spring-boot-starter-data-r2dbc</artifactId>
                </dependency>
                <dependency>
                    <groupId>com.oracle.database.r2dbc</groupId>
                    <artifactId>oracle-r2dbc</artifactId>
                    <version>1.2.1</version>
                </dependency>
            </dependencies>
Step 3: Configure R2DBC Connection (application.yml)
Example:

>     url: r2dbc:oracle:tcps://adb.us-ashburn-1.oraclecloud.com:1522/db2025_high?walletLocation=./wallet
spring:
r2dbc:
url: r2dbc:oracle:tcps://<u><em><strong>adb.us-ashburn-1.oraclecloud.com</strong></em></u>:1522/db2025_high?walletLocation=./wallet
username: <ADB-User>
password: <ADB-User-Password>
main:
web-application-type: reactive
logging:
level:
org.springframework.r2dbc: DEBUGNote: Replace with your specific region details in the above connection string
Step 4: Build the Reactive Components
4.1 Model Class (Java)
@Table("Customer_Details_J")
               public class JsonRecord {
               @Column("data")
               private String jsonData; }
4.2 Reactive Repository (Java)
public interface
      JsonRepository extends ReactiveCrudRepository<JsonRecord, Long> {}
Note:
– If a primary key (for example, an Id column) is not defined at the database level, a reactive repository cannot be used.
– In such cases, database operations must be handled using custom queries within the service layer.
4.3 Service Layer (Java)
@Service
          public class JsonService {
          private final JsonRepository repository;

          public JsonService(JsonRepository repository) {
          this.repository = repository;             }
          public Mono<JsonRecord> save(JsonRecord record) {
          return repository.save(record);    }

          public Flux<JsonRecord> findAll() {
          return repository.findAll();   }}
4.4 Controller (Java)
@RestController

            @RequestMapping("/api/json")
             public class JsonController {
                 private final JsonService service;
                 public JsonController(JsonService service) {
                      this.service = service;    }

            @PostMapping
                public Mono<JsonRecord> create(@RequestBody JsonRecord record) {
                return service.save(record);  }

            @GetMapping
                public Flux<JsonRecord> getAll() {
                return service.findAll();  }
               }
Step 5: Test and validate
5.1 Run the application
Start the Spring Boot app using IntelliJ or the command line:
mvn spring-boot:run5.2 Test with Postman
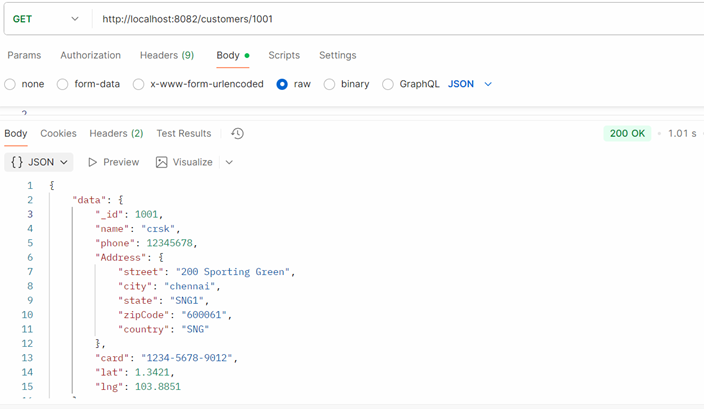
Now, we try to fetch the document for the customer ID 1001
GET → http://localhost:8082/customers/1001Here is the output of GET call
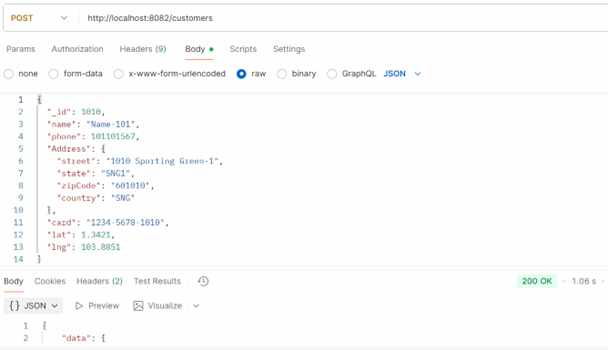
Let we try to Update the document for the customer id : 1010 with below content in payload
        {
             "_id": 1010,
             "name": "Name-101",
             "phone": 101101567,
             "Address": {
               "street": "1010 Sporting Green-1",
               "state": "SNG1",
               "zipCode": "601010",
               "country": "SNG" },
               "card": "1234-5678-1010",
               "lat": 1.3421,
               "lng": 103.8851
          }
POST → http://localhost:8082/customersThe updated result set of POST call
You can also view the results in SQL*Plus.
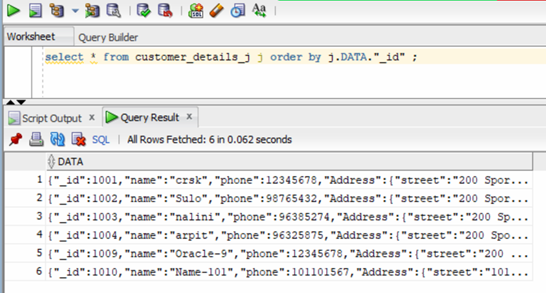
Summary
By integrating Spring WebFlux, R2DBC, and Oracle Autonomous AI Database, developers can build scalable, secure, and fully reactive applications (non-blocking reactive architecture) capable of handling complex JSON data with real-time responsiveness.
This setup not only modernizes database access patterns but also aligns perfectly with cloud-native, microservice-oriented, and event-driven architectures.
With this approach, we unlock the full potential of reactive programming and Oracle Cloud’s powerful database automation, enabling next-generation data-driven applications.