Welcome to the final entry in this series where we have taken a ground-up approach to build, test and deploy a microservice to the cloud in an automated manner. Here’s what we have covered so far in this series:
- Adventures In CI/CD [#1]: Intro & Getting Started With GitHub Actions
- Adventures in CI/CD [#2]: Building & Publishing A JAR
- Adventures in CI/CD [#3]: Running Tests & Publishing Test Reports
- Adventures in CI/CD [#4]: Deploying A Microservice To The Oracle Cloud With GitHub Actions [OCI CLI Edition]
- Adventures in CI/CD [#5]: Deploying A Microservice To The Oracle Cloud With GitHub Actions [Gradle Plugin Edition]
- Adventures in CI/CD [#6]: Adding A Persistence Tier To Our Microservice
- Adventures in CI/CD [#7]: Testing The Persistence Tier With Testcontainers
- Adventures in CI/CD [#8]: Deploying A Microservice With A Tested Persistence Tier In Place
- Adventures in CI/CD [#9]: Deploying A Microservice As A Docker Container
In this final post, we’re going to deploy our Docker container that contains our microservice application to a Kubernetes cluster in the Oracle Cloud. It’s not a complicated task, but it does have some noteworthy things to keep in mind, so let’s dig in!
You probably already have a Kubernetes cluster configured in your cloud environment, but if not here are a few resources to help you get one up and running quickly.
Tip! Check out The Complete Guide To Getting Up And Running With Docker And Kubernetes On The Oracle Cloud for help getting prepared for Docker & Kubernetes!
Create A Service Account
Before we can use kubectl in our pipeline, we need to configure a service account on our Kubernetes cluster so that our GitHub Actions pipeline has the proper authority to issue commands to our cluster. There is a helpful guide in our online docs, but we’ll walk through the steps needed to configure this below. We’re going to create a service account that has a non-expiring token that can execute commands from the pipeline.
Step 1
Create the service account that uses the name cicd-demo and a cluster role binding for that service account.
Step 2
Grab the name of the token that was created for the service account, then get the token.
Step 3
On your local machine, add the service account and token to your local config file by executing.
Step 4
Note: Do not skip this step, it is crucial!
Set the current context to be the service account user we created in step 1. You can change this later on, but it is important that this is done before step 5.
Step 5
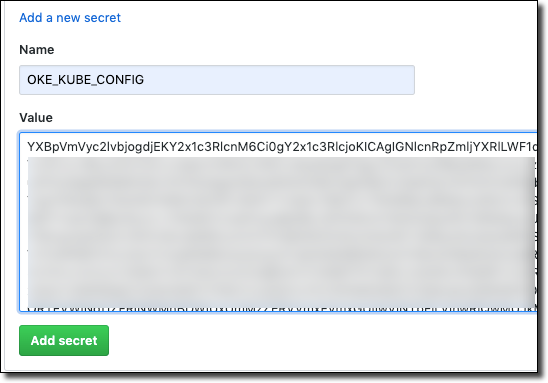
Export a base64 representation of your local kube config and copy to your clipboard.
Step 6
Create a GitHub secret containing the base64 representation of your config.
We can now start using the kubectl GitHub Action in our pipeline to work with our OKE cluster!
Create Kubernetes Deployment Configuration
The first thing we’re going to need to create is a deployment configuration for our microservice. This involves two things: an app.yaml to define our deployment and the associated service and a secret containing our DB password. If you’ve been following along with this series you know that we’ve already got that secret in our GitHub repository (we created it in part 8) so we just need to create our secret in our cluster from that value.
Create A Secret
Let’s add a step to our build to create the secret. We can do this directly via kubectl without writing a config file, so add a step to do that.
Create Deployment YAML
Next, create a file at k8s/app.yaml relative to your project root and populate it with the service and deployment definition. Make sure that the image value points to the proper location where your Docker image is being stored (see part 9). Notice that we’re using an imagePullPolicy of Always which means regardless of your tag on your Docker image, Kubernetes will always pull a new version instead of using a locally cached image. If you’re new to Kubernetes, make sure you create a secret containing your registry credentials and use that as your imagePullSecrets value.
Notice also the values we’re passing as environment variables to the deployment. The URL and username for our DB connection are passed as literal strings and the password is pulled from the secret that we just created.
Add Deployment Step
Now let’s add a step to our pipeline to perform the deployment.
Kill Existing Pod
Finally, add a step to grab the most recent Pod in this deployment and kill it. This will ensure that our deployment is running the latest and greatest Docker image that was pushed to OCIR during this build.
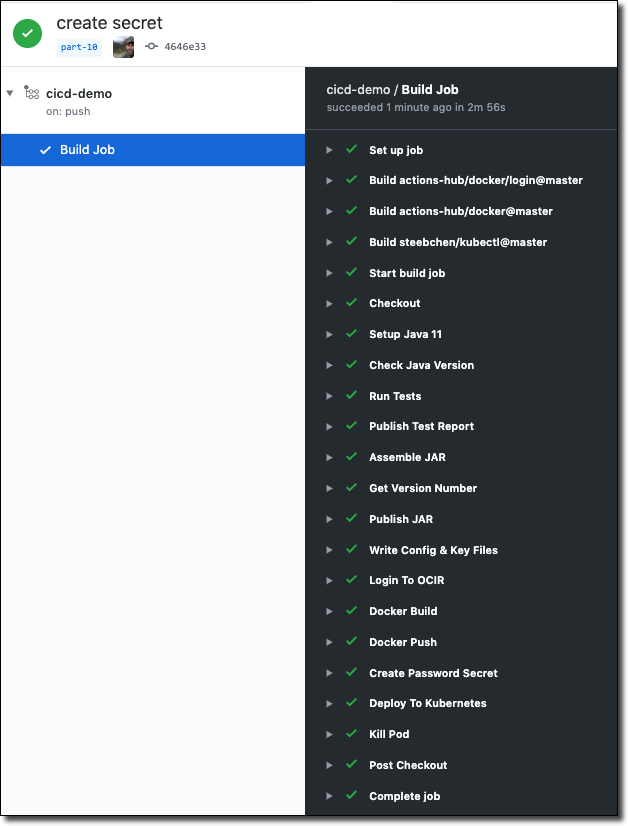
The Final Build
Once we commit and push our latest changes we can observe the final build in this blog series and confirm that it completed successfully.
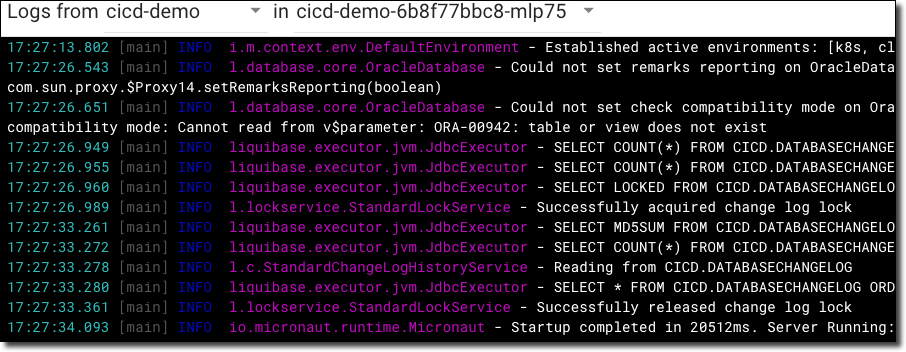
We can then view our pod logs in the Kubernetes dashboard to confirm Liquibase executed and our application has started up.
Now grab the newly created service IP address:

And confirm by POSTing a new user:
TL;DR
We’ve deployed our microservice as a Docker container in our OKE Kubernetes cluster!
Next
Unfortunately, our pilgrimage into the expansive, electrifying universe of continuous integration and continuous deployment has come to a sorrowful conclusion. I hope you have learned everything you possibly wanted to about automated deployments and have picked up some valuable tools that can make your application deployment rapid and painless when working with the Oracle Cloud.
If you have any feedback or would like to connect with me to suggest future content ideas or discuss anything Oracle Cloud or development related, feel free to connect with me on Twitter or YouTube. Thank you for reading!
Source Code
For this post can be found at https://github.com/recursivecodes/cicd-demo/tree/part-10
Photo by Joshua Earle on Unsplash