Introduction
Creating a table in an Oracle Autonomous Database has never been easier. This post introduces the concept of query-ready buckets, which leverage our Data Studio APIs to enable automatic table creation, triggered by an event rule associated with an OCI Bucket and an OCI Function that automates the process. In essence, when an object is placed in your bucket, it becomes immediately queryable without any additional action required. This post was inspired by the outstanding work and blog posts Using Data Studio Data Load APIs in PL/SQL and Data Loading using REST Data Services APIs by Bud Endress.
Business Value
Imagine how easy it would be for a user to simply upload an object, such as a CSV file, a Parquet file, or any other format supported by the Data Studio APIs into an OCI Bucket and have it become immediately queryable without any manual intervention. This approach simplifies and automates the process of building and loading tables into an Autonomous Database.
Solution Diagram
Here is what we will do to get this all going.
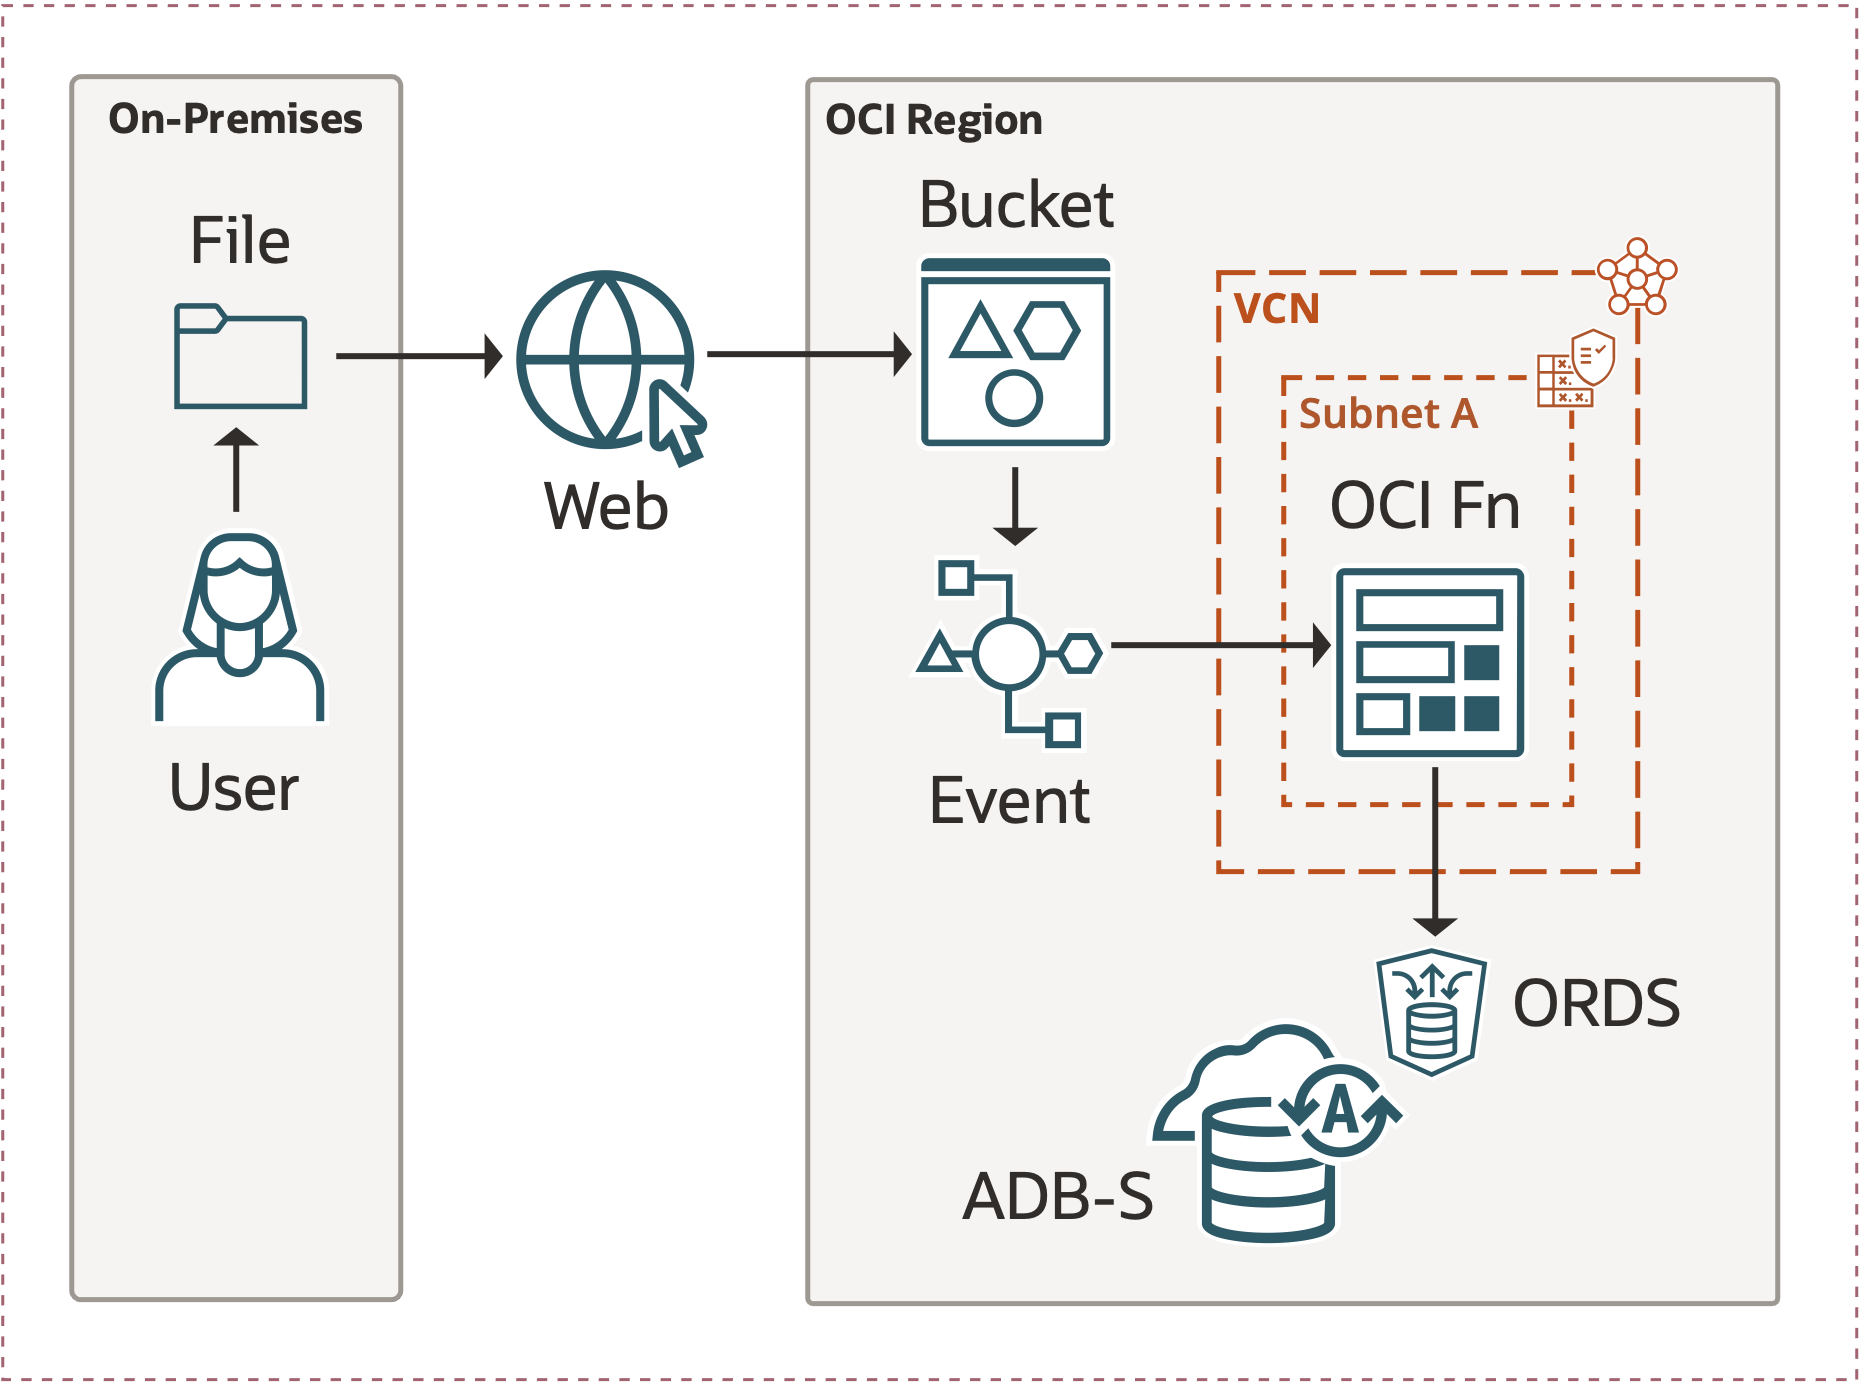
Solution
We assume that you have experience in Virtual Cloud Networking (VCN), Object Storage Bucket, Pre-Authenticated Requests (PAR), Events Service and Functions (Fn). If you are unfamiliar with these please follow the links to get a better understanding of that particular subject matter.
1) Manage your OCI Bucket
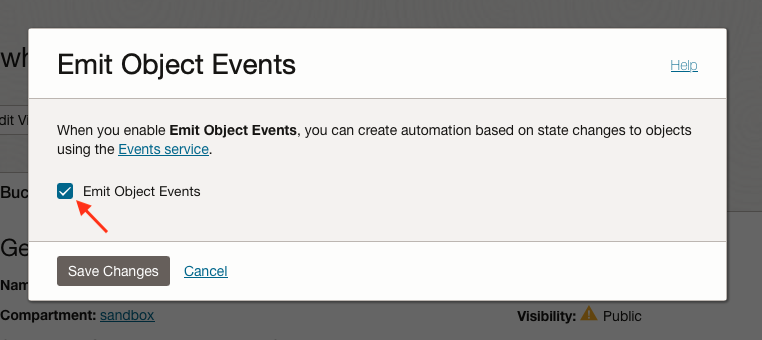
Ensure that Emit Object Events is enabled for your Object Storage Bucket.
Enable Emit Object Events in your Object Store Bucket allows Event Service to see Object State changes.
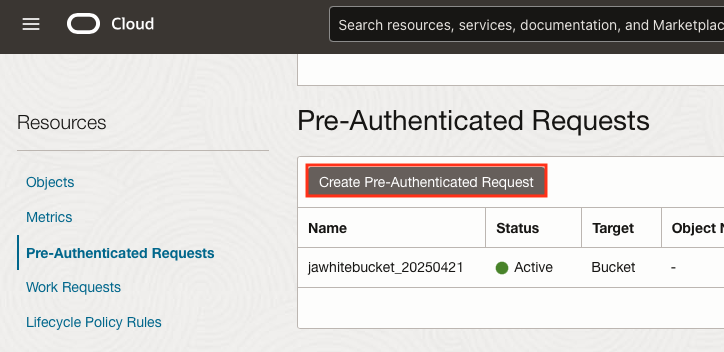
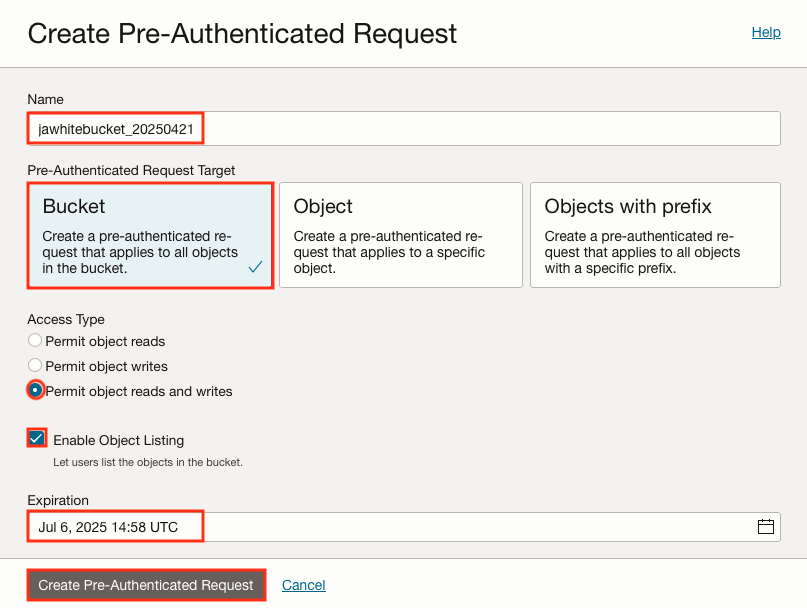
Ensure that a Pre-Authenticated Request is set up for your Object Storage Bucket.
I’d encourage you to check out the exciting blog post, New Features of Pre-Authenticated Requests in Oracle Autonomous Database and Secure and easy access to Oracle Autonomous Database Data via Pre-Authenticated URLs, by Alexey Filanovskiy.
2) Manage your Autonomous Database
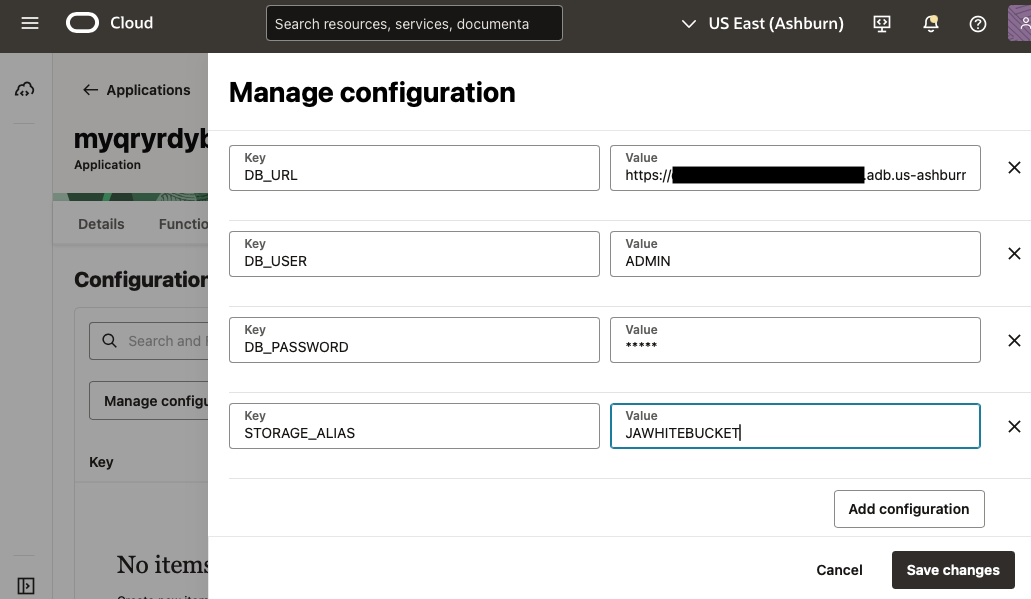
Please make note of the Database URL, Database Username and Password, and the Cloud Store Location name. These will be used to create the OCI Fn that automatically creates and populates your table. For this exercise the Autonomous Database is Public, however, it too can be used in a Private Subnet of a VCN if you so choose.
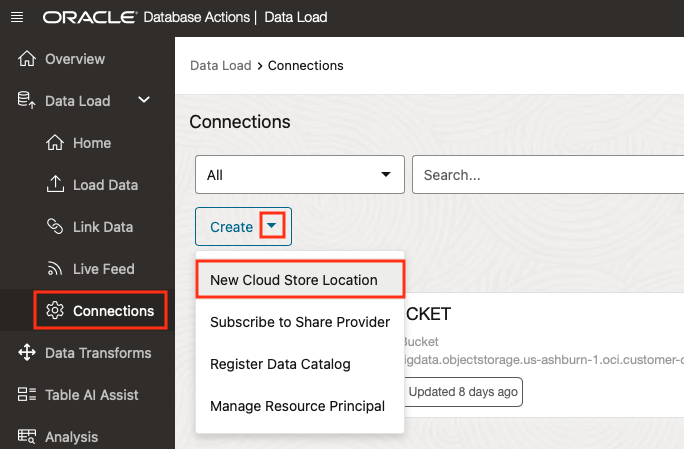
Create a Cloud Storage Location in Database Studio for your Bucket
You can look at Managing Cloud Storage Connections for more information, alternatively you can create it in Data Studio as we show here. For the purposes of this exercise my Cloud Store Location (which is referenced in the OCI Fn as STORAGE_ALIAS) is jawhitebucket.
3) Create an Application, then create the OCI Fn to Automate Table Creation
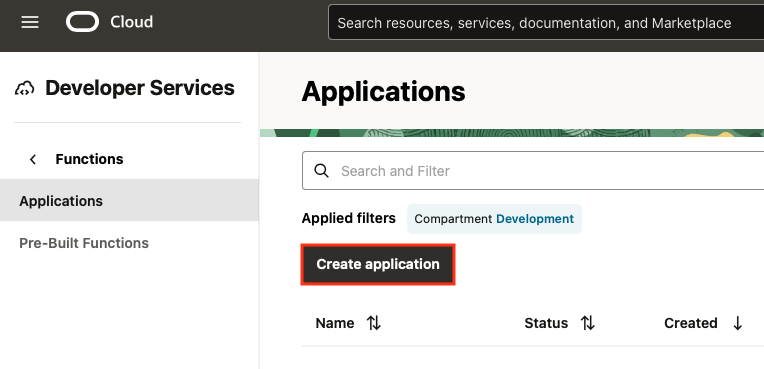
In Oracle Cloud Console Navigation Menu, go to Developer Services, then Applications.
Create an Application
Add Environment Variables
ATTENTION: Please note that storing a database password in this manner poses security risks. We recommend using Oracle Data Vault to securely store and manage passwords. For more information, refer to Oracle Database Vault: Oracle’s Best-Kept Secret, by Eugenio Galiano. This approach is relevant to the blog post, Querying Autonomous Database from an Oracle Function, by Todd Sharp.
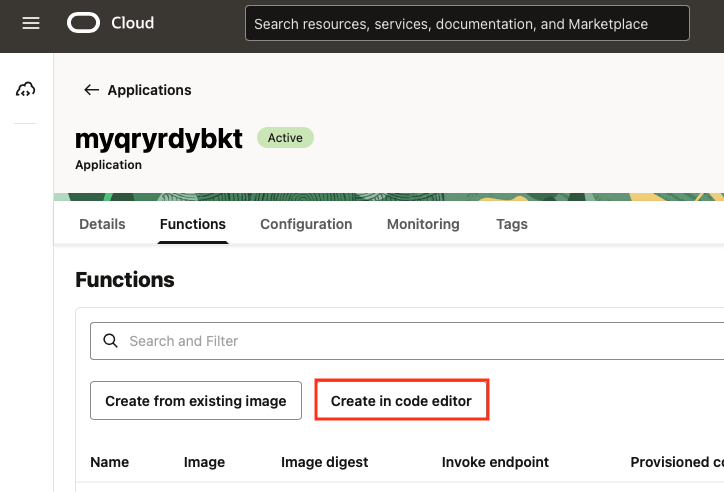
Create a Function
In short, you will open the Code Editor, select a prebuilt sample python function such as “Hello World”, edit the func.pyand requirements.txt files, and then deploy the application. If you are unfamiliar with this process, please refer to the blog post The Complete Guide To Invoking Serverless Oracle Functions by Todd Sharp.
Add the line “requests” to the requirements.txt file
echo -e '\nrequests' >> requirements.txtReplace the entire contents of func.py with the following python code.
Please note in the code that you can choose whether you want to create an External Table or a regular Table by editing the Target_Type parameter.
For this blog, we showcased the use of EXTERNAL_TABLE with Parquet, CSV, and CSV.GZ files, and TABLE with Parquet, JSON, JSON.GZ, XLSX, CSV, and CSV.GZ formats.
import io
import json
import os
import requests

def handler(ctx, data: io.BytesIO = None):
    # COLLECT EMIT BUCKET TRIGGERED EVENT PAYLOAD
    event_payload = json.loads(data.getvalue().decode('utf-8'))
    object_name = event_payload.get("data", {}).get("resourceName", "")
    object_name = str(object_name).strip()

    # GATHER ENVIRONMENT DETAILS PERTAINING TO DATABASE
    db_user = os.getenv("DB_USER")
    db_password = os.getenv("DB_PASSWORD")
    db_url = os.getenv("DB_URL")
    storage_alias = os.getenv("STORAGE_ALIAS")

    # PREPARE A USABLE TABLE NAME
    table_name = ''.join(filter(str.isalnum, os.path.splitext(os.path.splitext(object_name)[0])[0])).upper()

    # DATA STUDIO API SURVEY PREPARATION
    survey_payload = {
        "data_loads": [
            {
                "storage_link_name": storage_alias,
                "objects": [{"object_name": object_name}],
                "table_name": table_name,
#                "target_type": "EXTERNAL_TABLE"
                "target_type": "TABLE"
            }
        ]
    }

    # COLLECT SURVEY RESPONSE TO BE USED TO CREATE DATA LOAD JOB
    # THIS API GETS THE FORMAT, COLUMN LIST AND FIELD LIST IN JSON FORMAT
    # ALTHOUGH NOT COVERED HERE, PLEASE LOOK AT SURVEY CAPABILITIES
    survey_response = requests.post(
        f"{db_url}/ords/{db_user}/_/db-api/latest/data-tools/surveys/",
        json=survey_payload,
        auth=(db_user, db_password),
        headers={"accept": "application/json", "Content-Type": "application/json"} )

    data_survey = survey_response.json()

    # THIS CREATES THE DATA LOAD JOB USING DATA SURVEY
    requests.post(
        f"{db_url}/ords/{db_user}/_/db-api/latest/data-tools/data-loads/",
        json=data_survey,
        auth=(db_user, db_password),
        headers={"accept": "application/json", "Content-Type": "application/json"} )
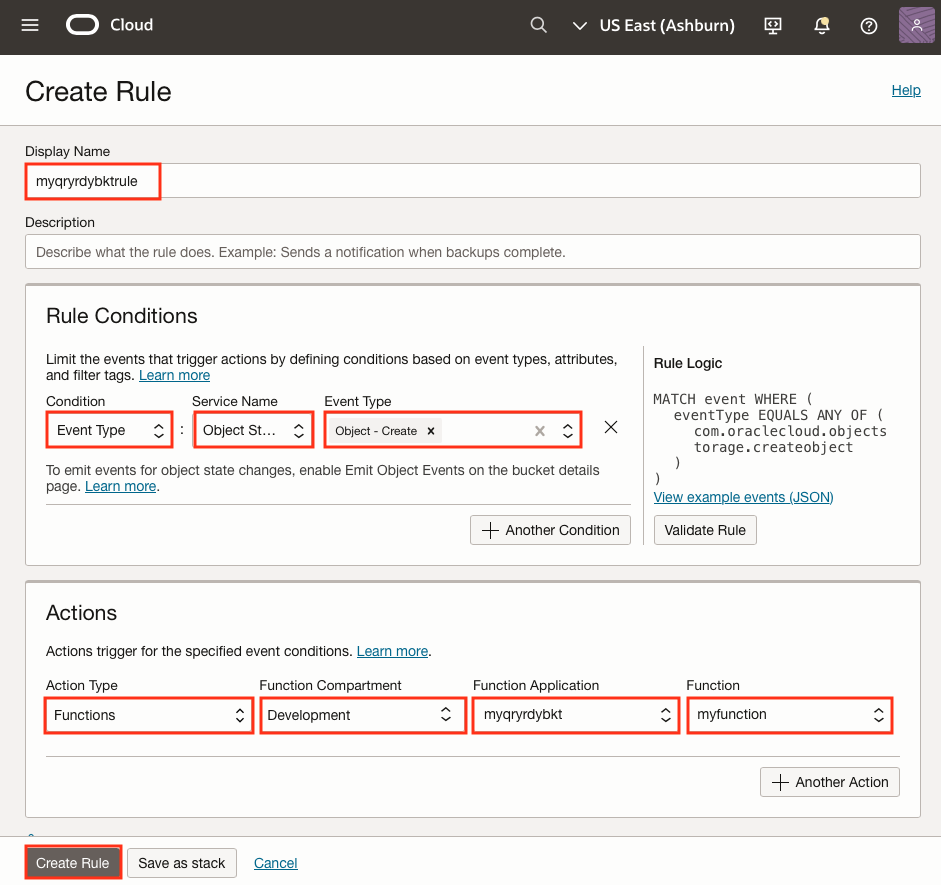
4) Create an Events Rule
In Oracle Cloud Console Navigation Menu, go to Observability & Management, then click Rules.
The purpose of this step is to link the object being added to the bucket with the function that creates the table.
Here’s the fun part!
Upload Something to your OCI Bucket
While you’re in the Bucket Details page, please scroll down to Object. Please Upload a small file for testing.
We uploaded a couple CSV files from the Sales History (SH) schema and one Parquet file from Human Resource (HR) to our bucket.
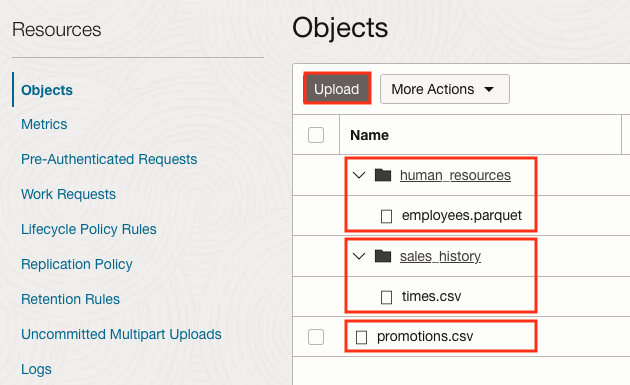
Here’s the result you’ll see!
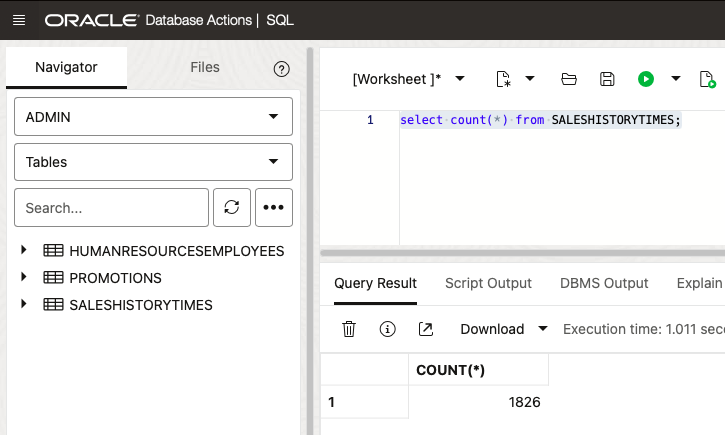
SQL Developer
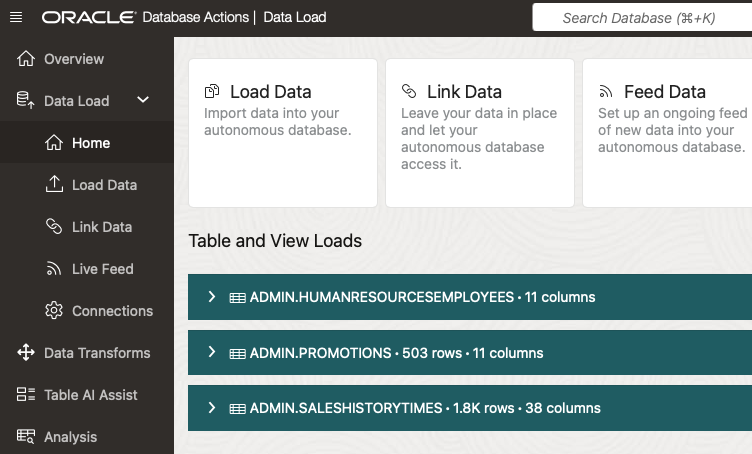
Data Studio
Summary
As demonstrated, once the files were uploaded, the corresponding tables were automatically created and are now accessible from your ADB-S instance without the need for manual intervention.
So now it’s time to empower your team with these fully query-ready data buckets!
