Introduction
This exercise illustrates the simplicity in defining a database link, and then demonstrates how easy it is to run Data Load to seamlessly transfer data from various databases into your Autonomous Database via Oracle Data Studio. This builds upon Alexey Filanovskiy’s Oracle Blog Posts: New Data Loading experience in Autonomous Database Data Studio; and Data Loading New Capabilities: AI and beyond.
Why is using Data Studio’s ‘Data Load’ utility so simple?
Data Studio brings the power of Oracle Autonomous Database to the forefront by simplifying the data loading process through several key features. It offers an intuitive and user-friendly interface, enabling users to perform complex tasks without the need for deep technical expertise. Data Studio seamlessly integrates with a variety of cloud databases, allowing users to effortlessly transfer data from different sources into their Autonomous Database. Additionally, it leverages the scalable and high-performance capabilities of Oracle’s Autonomous Database, ensuring efficient data loading.
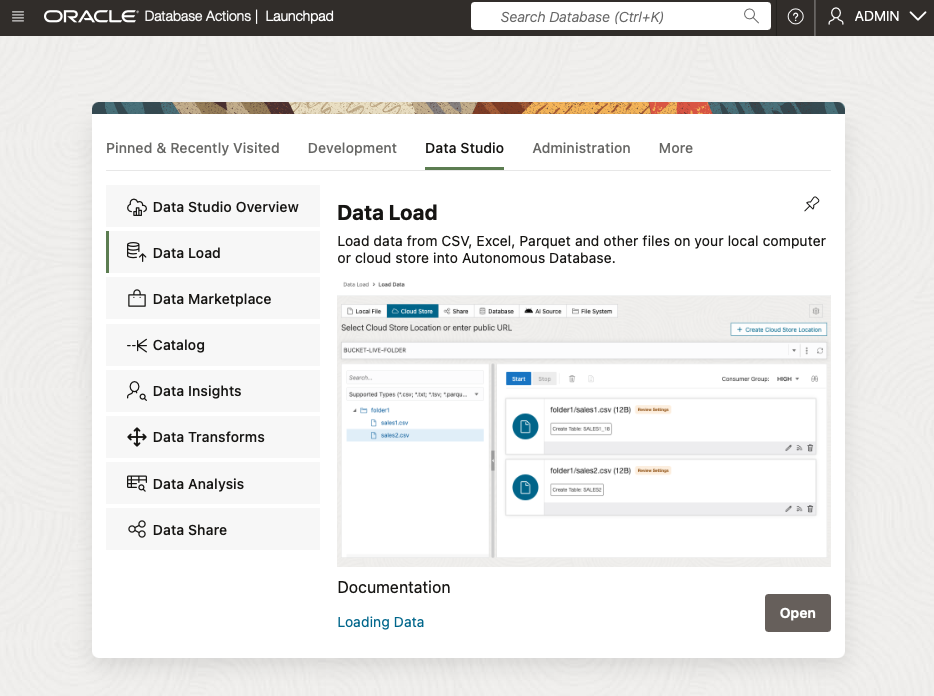
Log into Database Actions, from Lauchpad click the Data Studio tab, then choose Data Load.
Example Database Links
Pick your SQL entrypoint of choice then run something similar in your environment to create your database links. It’s worth noting that you can store your passwords in a Vault. Consider reading this post Store Your Credentials in a Secret When Making External Calls from Your Autonomous Database by Can Tuzla.
MySQL Private Endpoint
BEGIN
  DBMS_CLOUD.CREATE_CREDENTIAL(
    credential_name => 'MYSQLPE_CRED',
    username => 'admin',
    password => <enter password here> );
  DBMS_CLOUD_ADMIN.CREATE_DATABASE_LINK(
    db_link_name => 'MYSQLPE_DBLINK',
    hostname => 'scottmysql.scottprivate.com',
    port => '3306',
    service_name => 'scott',
    ssl_server_cert_dn => NULL,
    credential_name => 'MYSQLPE_CRED',
    private_target => TRUE,
    gateway_params => JSON_OBJECT('db_type' value 'MYSQL'));
END;
/
Microsoft Azure
BEGIN
  DBMS_CLOUD.CREATE_CREDENTIAL(
    credential_name => 'AZURE_CRED',
    username => 'oracle',
    password => <enter password here> );
  DBMS_CLOUD_ADMIN.CREATE_DATABASE_LINK(
    db_link_name => 'AZURE_DBLINK',
    hostname => 'scott-server.database.windows.net',
    port => '1433',
    service_name => 'scottdb',
    ssl_server_cert_dn => NULL,
    credential_name => 'AZURE_CRED',
    gateway_params => JSON_OBJECT('db_type' value 'AZURE'));
END;
/
Snowflake
BEGIN
  DBMS_CLOUD.CREATE_CREDENTIAL(
    credential_name => 'SNOWFLAKE_CRED',
    username => 'SCOTT',
    password => <enter password here> );
  DBMS_CLOUD_ADMIN.CREATE_DATABASE_LINK(
    db_link_name => 'SNOWFLAKE_DBLINK',
    hostname => 'https://abcdefg-hij12345.snowflakecomputing.com',
    port => '443',
    service_name => 'SCOTTDB',
    credential_name => 'SNOWFLAKE_CRED',
    gateway_params => JSON_OBJECT('db_type' value 'SNOWFLAKE'),
    directory_name => NULL,
    ssl_server_cert_dn => NULL);
END;
/
Autonomous Database
CREATE OR REPLACE DIRECTORY REG_WALLET_DIR AS 'reg_wallet_dir';

BEGIN
  DBMS_CLOUD.GET_OBJECT(
    object_uri => 'https://objectstorage.us-ashburn-1.oraclecloud.com/n/abcdefgh12ij/b/scott-bucket/o/cwallet.sso',
    credential_name => 'OCI_NATIVE_CRED',
    directory_name => 'REG_WALLET_DIR');
  DBMS_CLOUD.CREATE_CREDENTIAL(
    credential_name => 'ADBS_CRED',
    username => 'ADMIN',
    password => <enter password here> );
  DBMS_CLOUD_ADMIN.CREATE_DATABASE_LINK(
    db_link_name => 'ADBS_DBLINK',
    hostname => 'adb.us-ashburn-1.oraclecloud.com',
    port => '1522',
    service_name => 'ab1cdefgh2i3jkl_scottadbs_high.adb.oraclecloud.com',
    credential_name => 'ADBS_CRED',
    directory_name => 'REG_WALLET_DIR');
END;
/
Use Load Data utility to transfer data from other Cloud Databases via Database Link
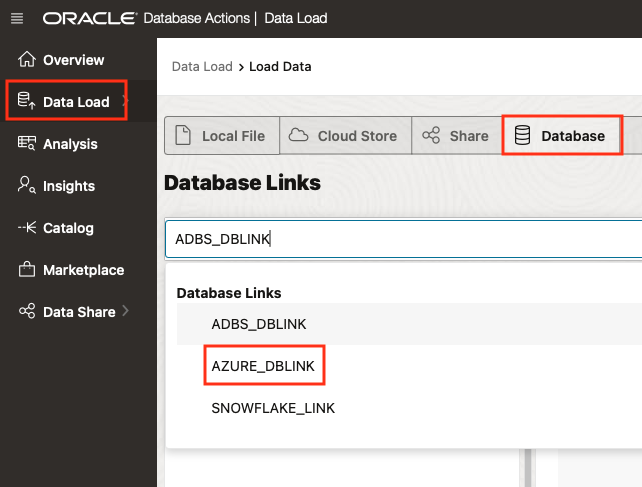
Click Data Load, then Database and finally choose from the list of Database Links. I picked AZURE_DBLINK.
Please note that, in the DDL examples above, MYSQLPE_DBLINK will not appear in the drop-down list because it resides within a Virtual Cloud Network (VCN), and the Autonomous Database would need to be either located in or connected to the Private Subnet within that VCN.
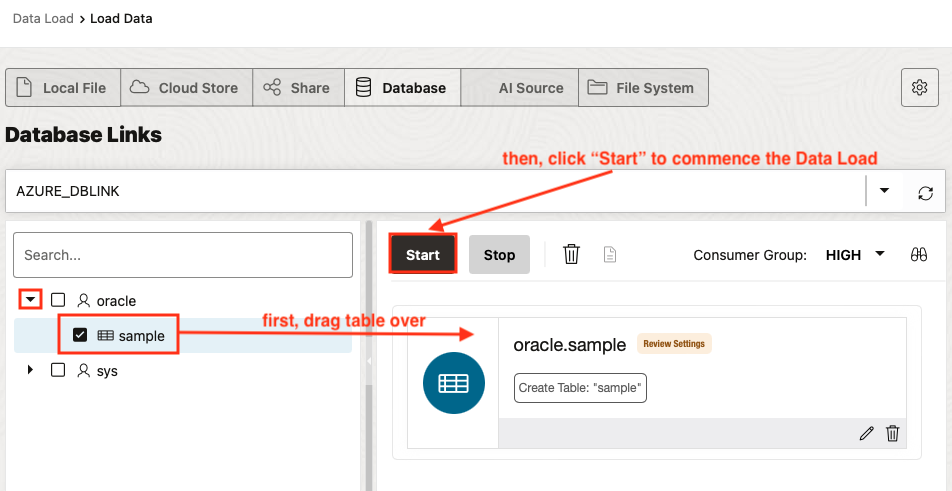
Drag the sample table over then click Start to commence the Data Load operation.
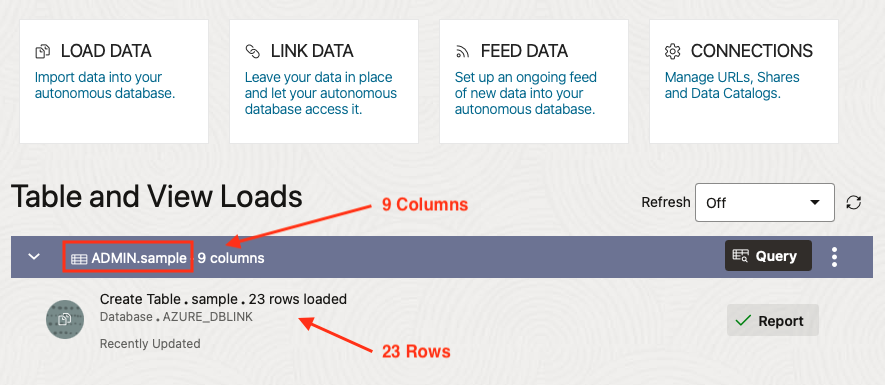
Here’s the result of the Data Load run. Notice the table “ADMIN”.”sample” was created and the table was loaded with 23 rows.
Now let’s take a look at the Link Data utility.
The Link Data utility, not to be confused with the Load Data utility, creates a view of the data by directly accessing Cloud Databases via Database Link.
Navigate to the Data Load tree in Database Actions | Data Load page and select Link Data. Next, click on Database and locate your entry from the Database Links drop-down menu. From within your schema, please drag the desired tables over to add them to the Data Linking Job, and then click Start to initiate the Link Data feature.
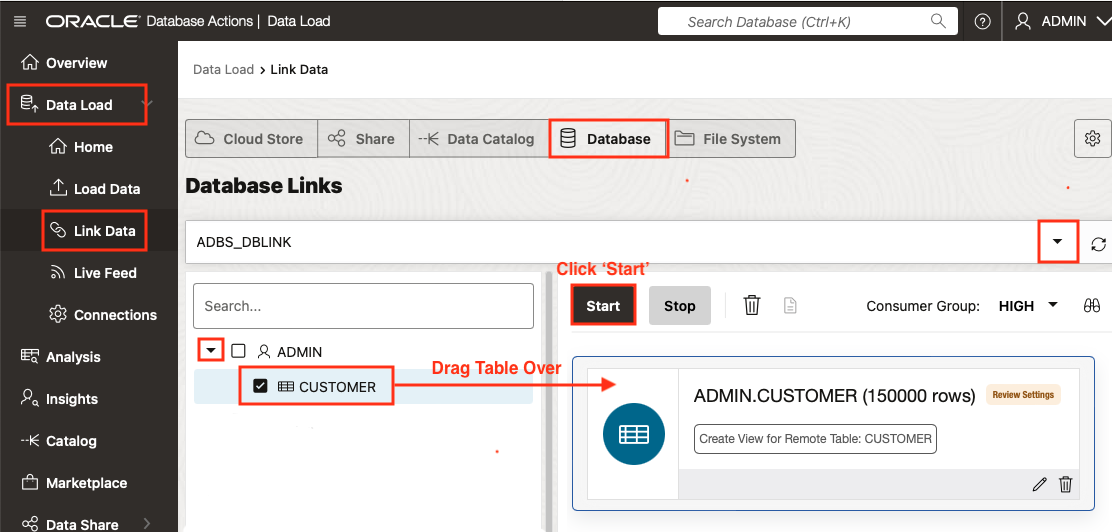
Here’s the result of the Data Link run. Notice the view “ADMIN”.”CUSTOMER” was created.

