This publication builds upon Jayant Mahto’s valuable insights into the Data Load tool by integrating additional recommendations concerning an Autonomous Database Private Endpoint. These suggestions encompass configuring Live Feed capabilities within a Virtual Cloud Network, particularly beneficial when dealing with data continuously being gathered into Oracle Cloud Infrastructure (OCI) Object Store. I encourage you to read the Oracle Blog Post, ‘Notification based Live Feed in Autonomous Database’ by Jayant Mahto before beginning this exercise. I also found ‘4 Ways to Connect to Autonomous Database on a Private Network‘ by Quentin Jansen and ‘Setting Up a Virtual Cloud Network (VCN) in Oracle Cloud Infrastructure‘ by Prasenjit Sarkar very useful.
For this exercise, we are assuming that you have a basic understanding of tasks such as setting up and configuring a Virtual Cloud Network (VCN), uploading objects to an Oracle Object Store Bucket, configuring a Bastion service (or Jump Host), and creating an Autonomous Database within a Private Subnet of your VCN.
The following diagram attempts to illustrate the process flow required to notify the Live Feed Table of any data changes in the files in your bucket, allowing it to refresh the table automatically.
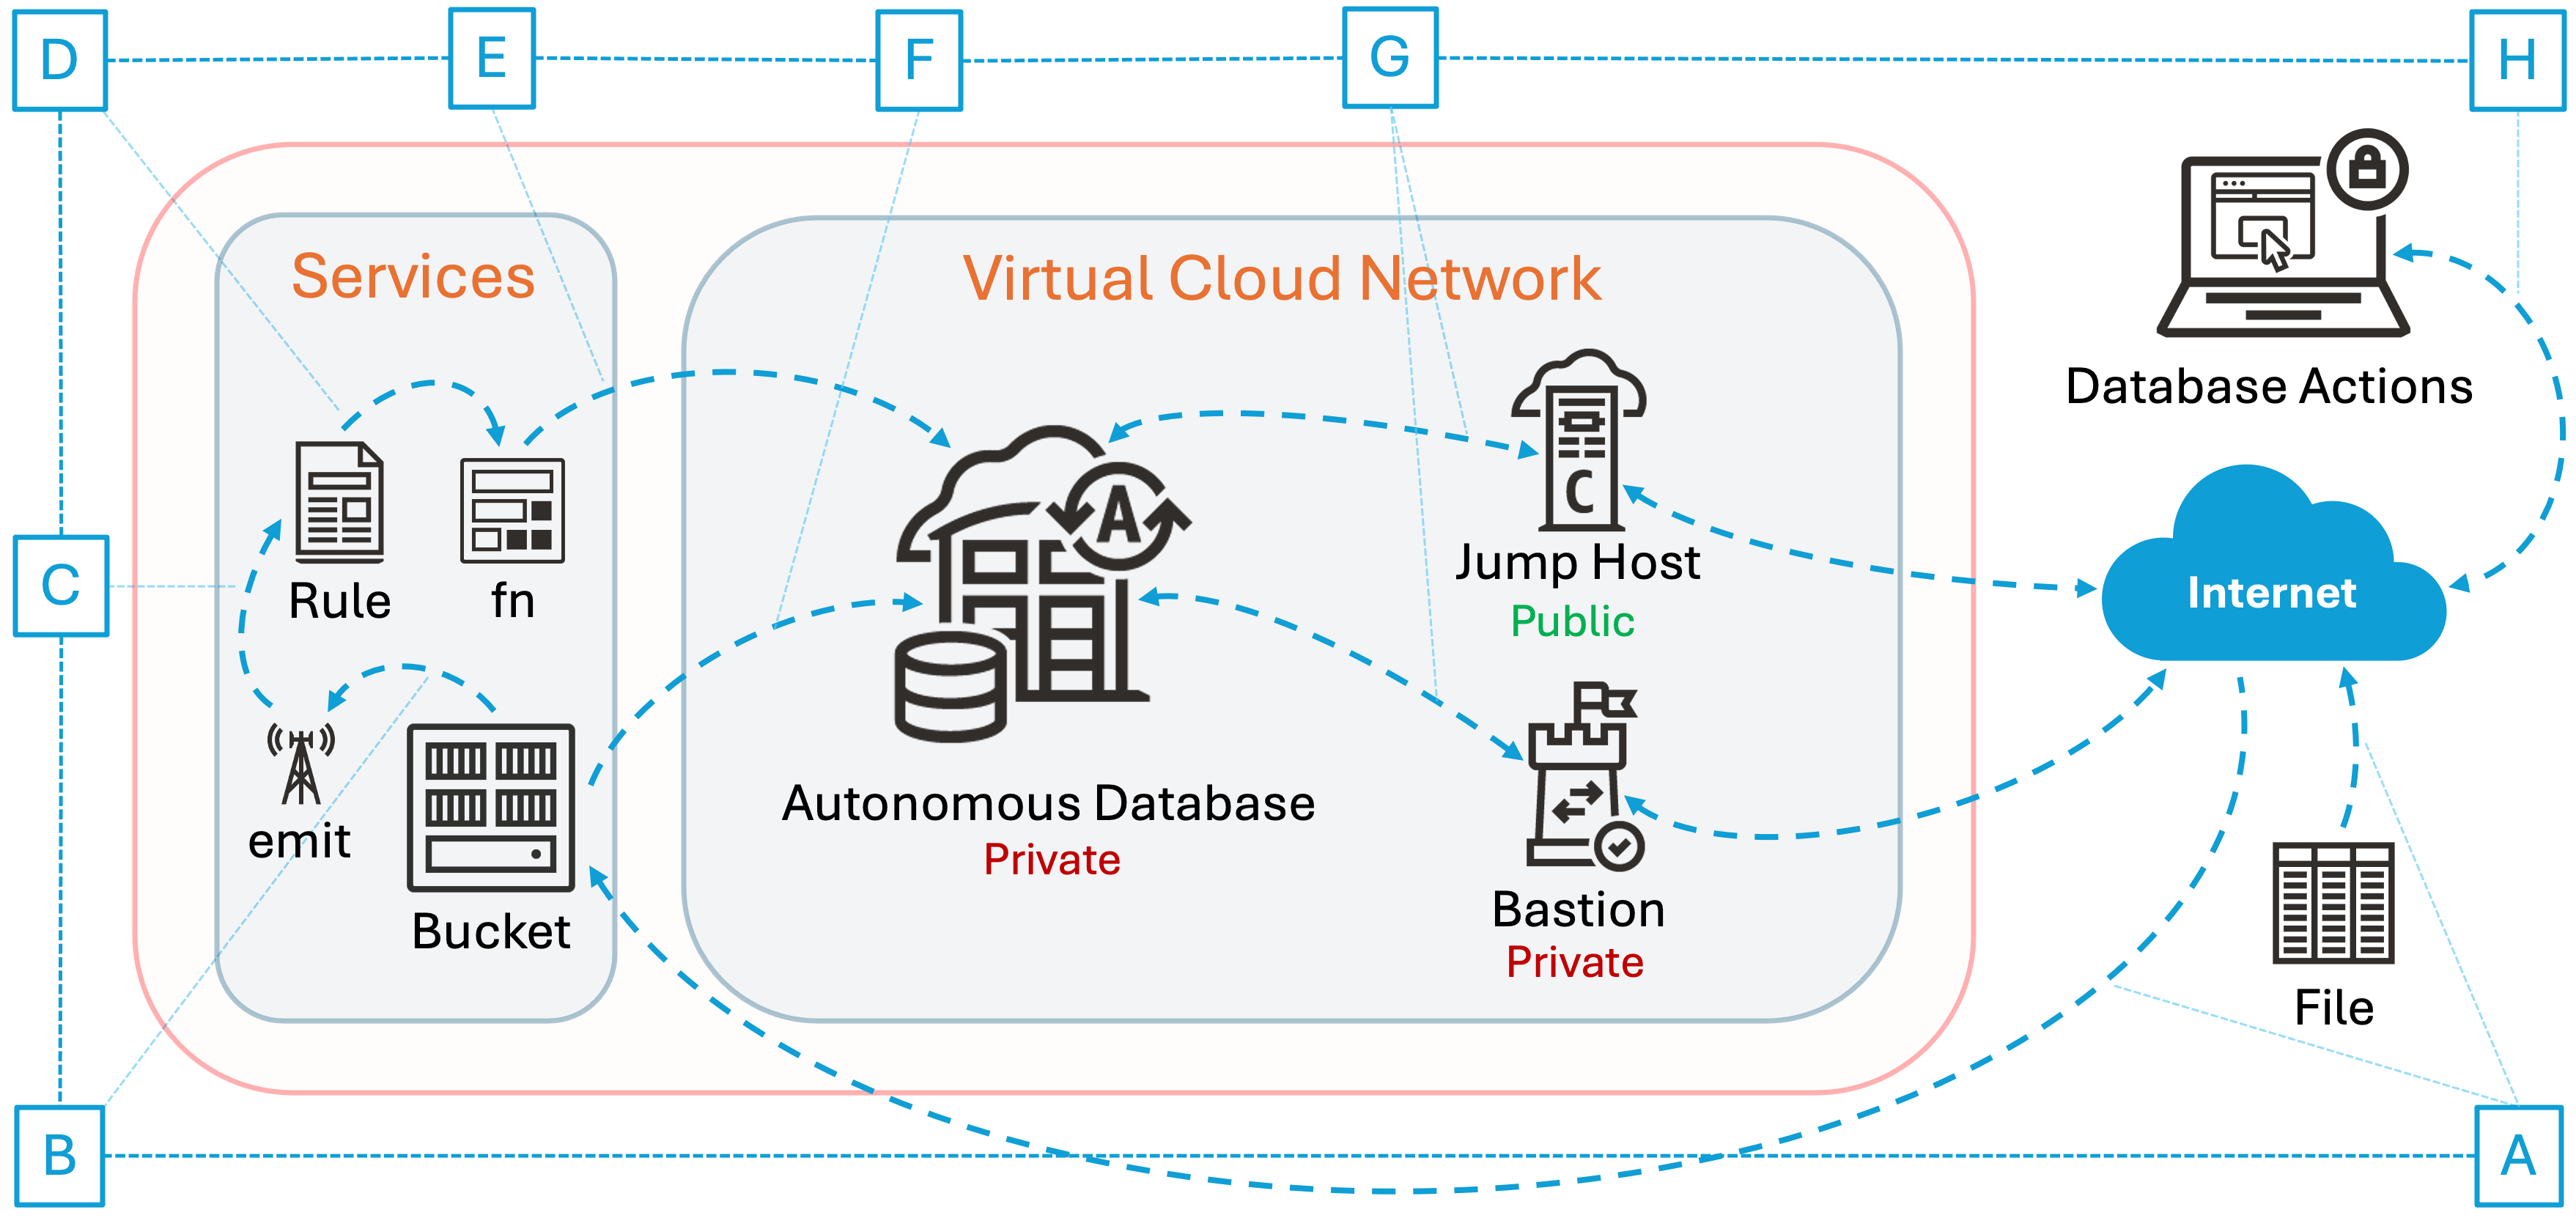
Begin by, (A) introducing a new file to the OCI Object Store Bucket that is currently in use by your Live Feed Table. This Bucket (B) ’emits’ changes in real-time as they happen. Subsequently, an Event Services Rule will (C) capture the occurrence of these changes and trigger (D) the OCI Function. Following this, the OCI Function will (E) execute a POST operation to the Notification URL obtained from the Live Feed Table details. At this point, the Live Feed Table is expected to (F) refresh. You can establish a connection to Database Actions through a Bastion (G) or Jump Host. Within Database Actions, you should now (H) observe the automatic application of data changes to the Live Feed Table.
Here are the steps you can take to get this running in your Oracle Cloud Tenancy.
1. You will begin by choosing to Emit Object Events in Object Store Bucket.
Enable Emit Object Events in your Object Store Bucket allows Event Service to see Object State changes.
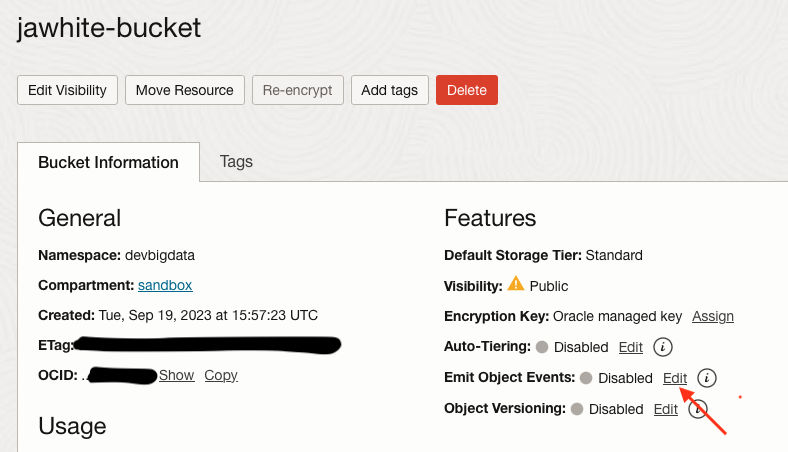
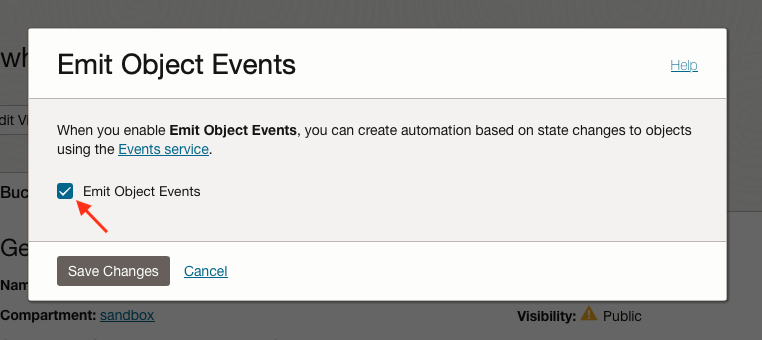
Click checkbox for Emit Object Events, then click Save Changes.
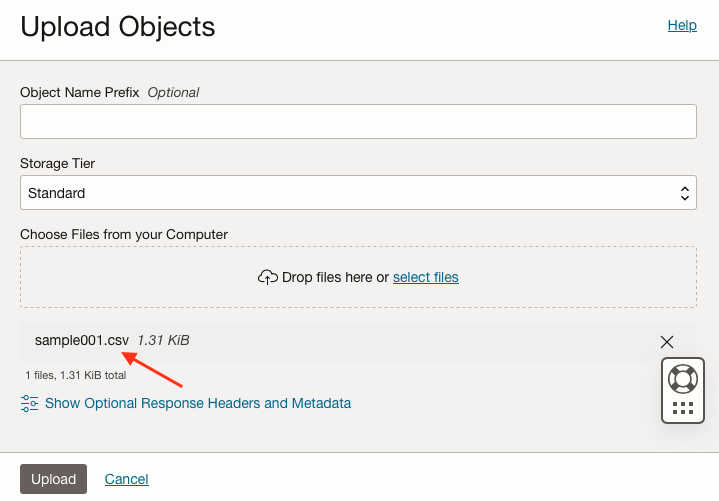
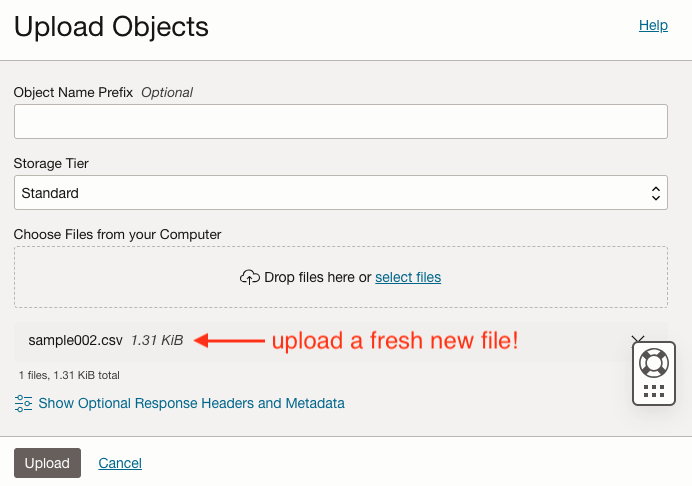
2. You will then Upload Objects to your Object Store Bucket.
While you’re in the Bucket Details page, please scroll down to Object. Please Upload a small file to use for Live Table Feed testing.
3. Now Startup your Bastion Session (alternatively you can connect via Jump Host)
Do this so you can connect securely to Database Action. We assume you’re able to do this. Consider reading ‘How to Securely Connect to Private Resources (for Free!) via the OCI Bastion Service‘ by Todd Sharp to setup your Bastion.

chmod 400 /Users/jawhite/Downloads/ssh-key-jawhitebastion.key
chmod 400 /Users/jawhite/Downloads/ssh-key-jawhitebastion.key.pub
ssh -i ~/Downloads/ssh-key-jawhitebastion.key -N -L 1443:10.0.1.XXX:443 -p 22 ocid1.bastionsession.oc1.iad.xxxxxxxxxxxxxxxxxxxxxxxxxxxxxxxxxxxxxxxxxxxxxxxxxxxxxxxxxxxx@host.bastion.us-ashburn-1.oci.oraclecloud.com
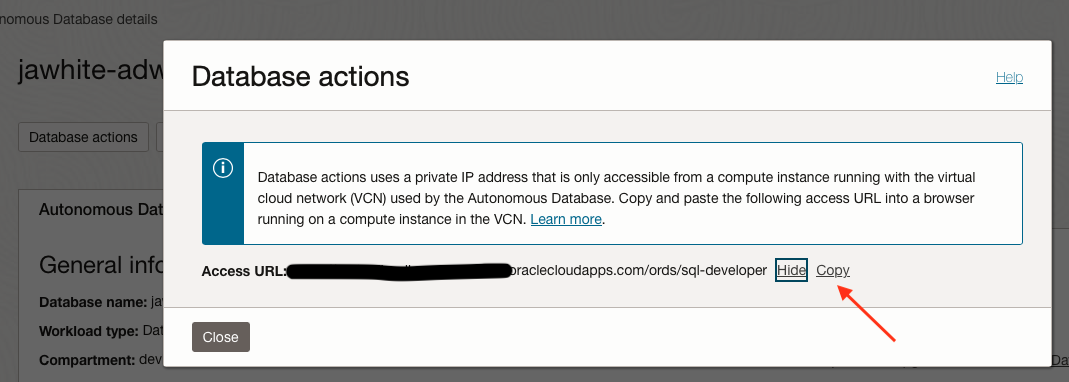
4. Please connect to Database Actions. Now for the fun stuff!
In OCI at your Autonomous Database, you can collect the Database Actions URL. –> if using a Bastion it would be https://localhost:1443/ords/sql-developer
Using a Web Browser (via Bastion or Jump Host) connect to the Database Actions URL in the Private Subnet of your VCN.
Route Outbound Connections via Private Endpoint.
Connect to SQL as ADMIN user
ALTER DATABASE PROPERTY SET ROUTE_OUTBOUND_CONNECTIONS = 'PRIVATE_ENDPOINT';
Create a Connection.
Connect to Data Studio from within Database Actions | Launchpad, then click Data Load.
Consider reading Introducing Data Studio by Mike Matthews to gain further incite into this amazing tool.

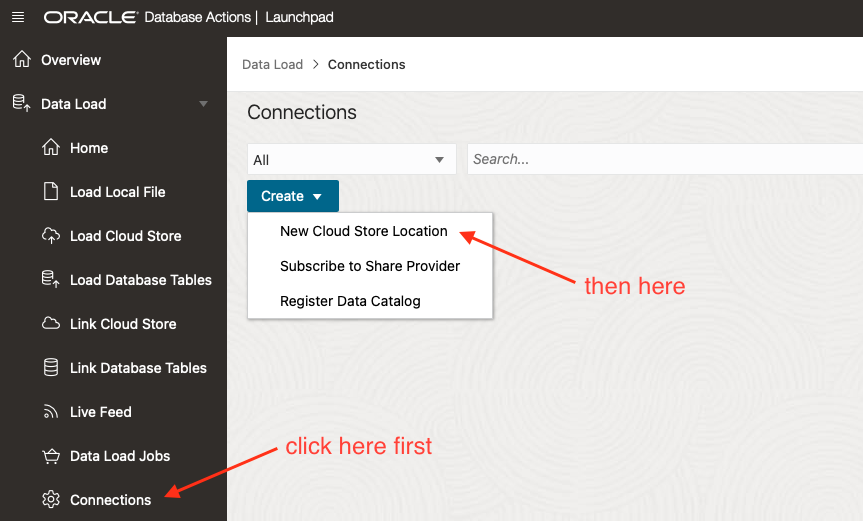
Click Connections, click Create, then choose New Cloud Store Location from the drop-down.
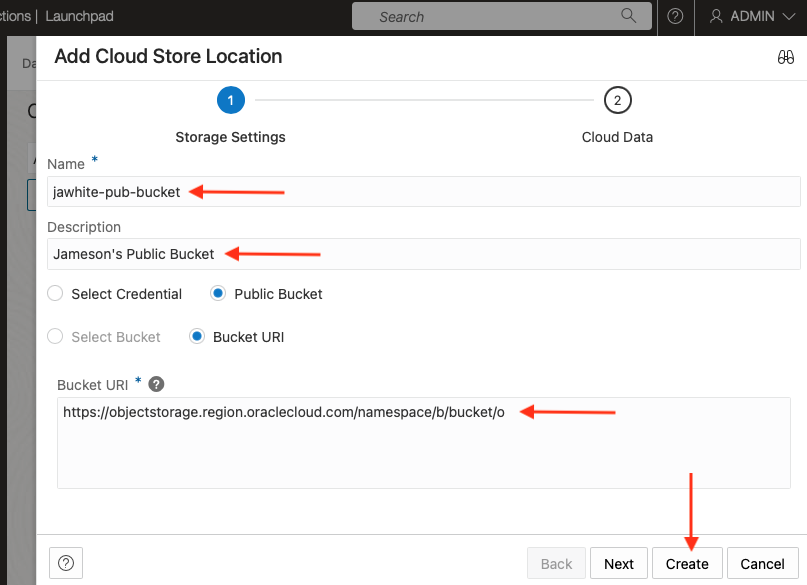
Enter Name, Description, Credential then enter your Bucket URI.
Create a Live Table Feed.
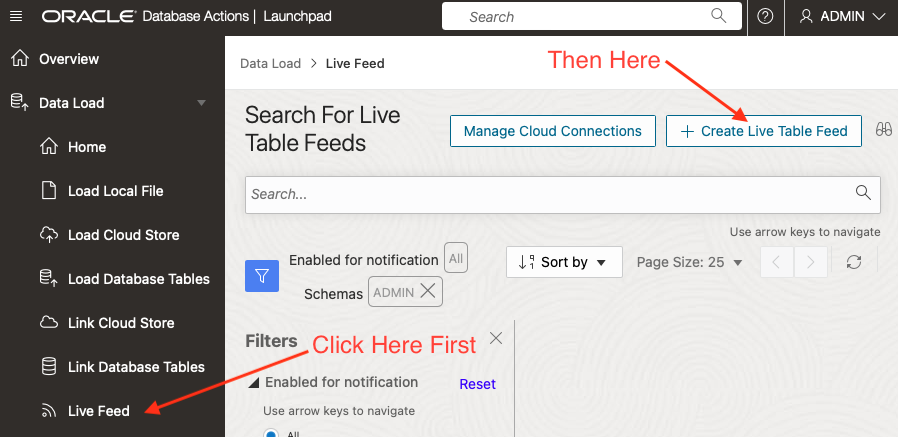
Under Data Load, click Live Feed, then click Create Live Table Feed.
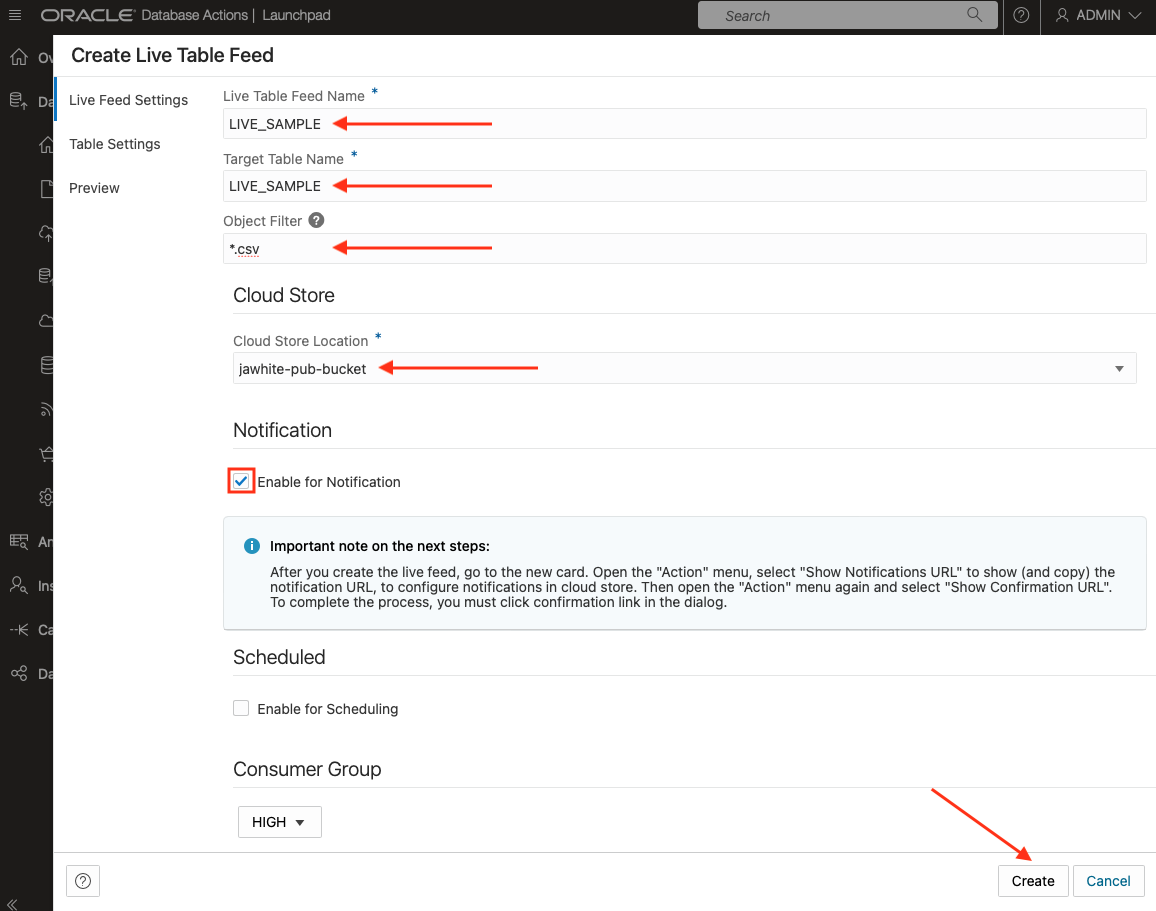
Fill in the Live Table Feed Name, Target Table Name, Object Filter, Cloud Store Location, check the box for Enable for Notification, then click Create.
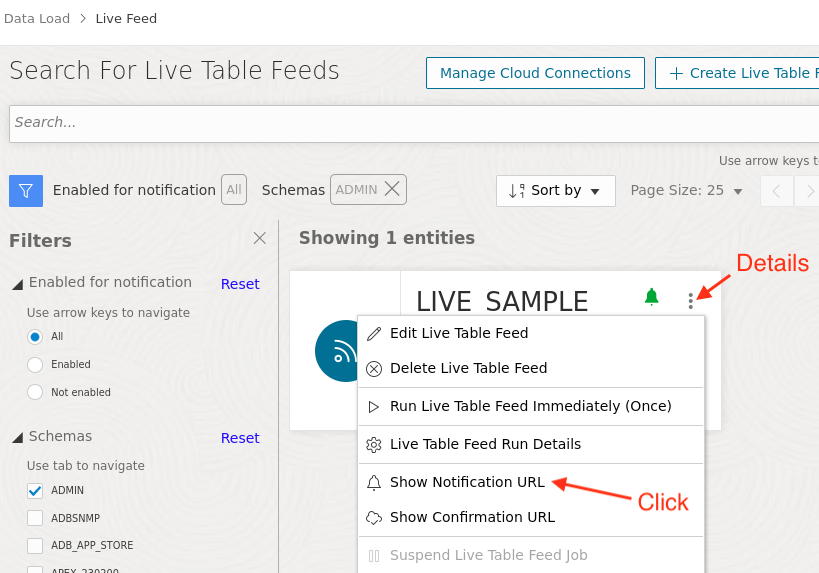
Show Notification URL
Click Show Notification URL under details of newly created table.
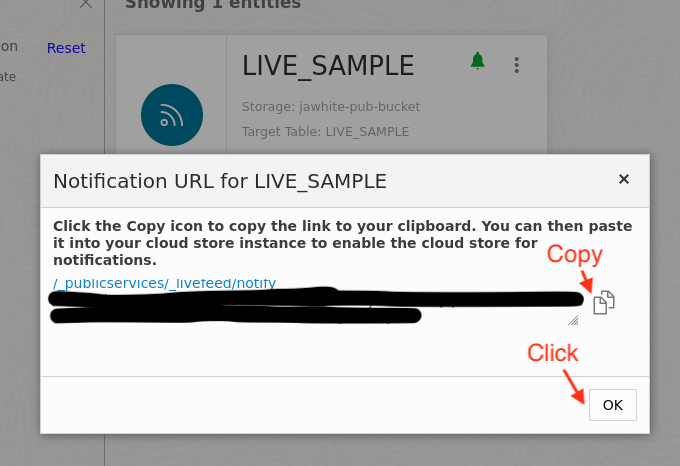
Copy Notification URL.
Save this information for later, you will need it when you create the OCI Function later on.
5. Create a Cloud Function
In Oracle Cloud Console Navigation Menu, go to Developer Services, then Applications.
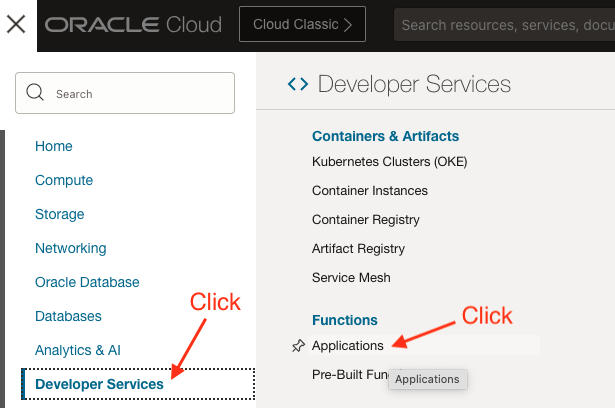
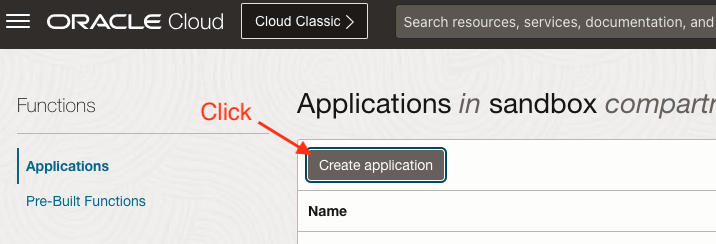
In this Functions management window, click Create Application.
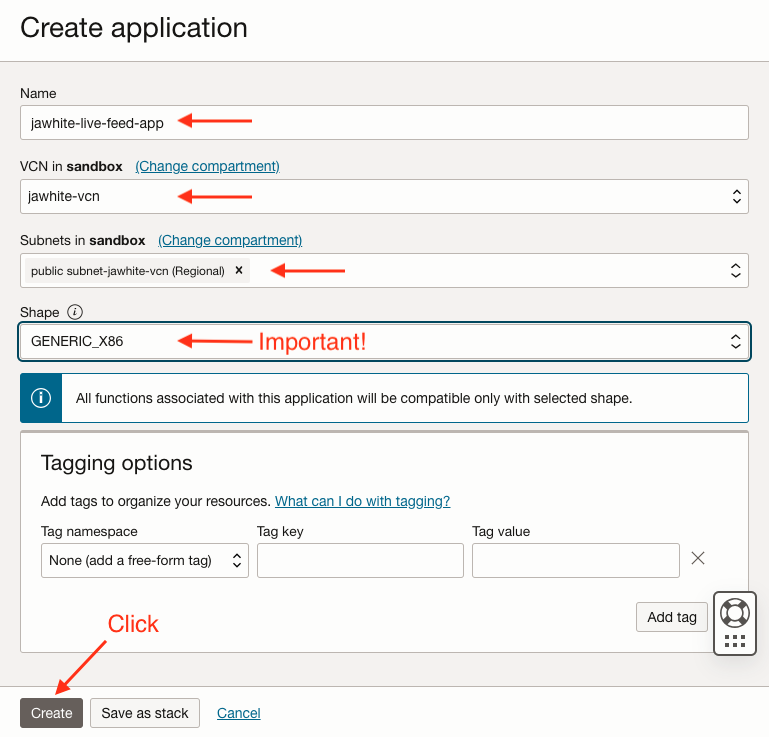
Under the configuration page enter Name, choose VCN in your compartment from drop-down list, then public subnet, it’s important to change the Shape to “GENERIC_X86,” then click Create.
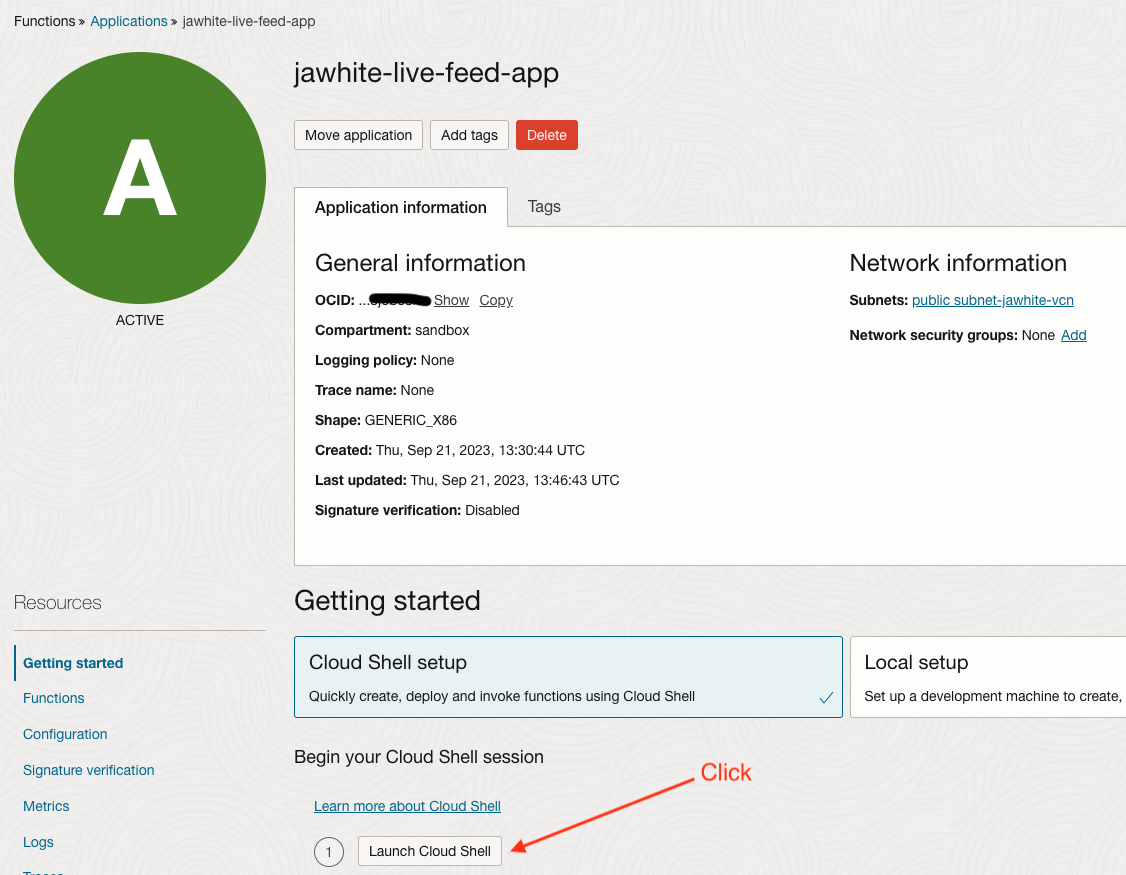
Within the Application you just created, click Launch Cloud Shell
Run this in the Cloud Shell as is to setup the boilerplate application.
fn init --runtime python jawhite-live-feed-fn
cd jawhite-live-feed-fn
fn -v deploy --app jawhite-live-feed-app
fn invoke jawhite-live-feed-app jawhite-live-feed-fn
Output should look like this.
{“message”: “Hello World”}
Edit requirements.txt by simply adding a new line for requests.
echo 'requests' >> requirements.txt
Please rename func.py to func.py_old.
mv func.py func.py_old
Open vi so you can edit func.py with this POST code.
vi func.py
Add this code to the new Python Function file. Be sure to change “https://your-live-feed-notification-url” to the URL I asked you to capture and save in an early step, when you created the Live Feed Table.
import io
import json
import logging
import requests

from fdk import response

def handler(ctx, data: io.BytesIO = None):

    url = "https://your-live-feed-notification-url"
    payload = {"key1": "value1", "key2": "value2"}

    response = requests.post(url, json=payload)

    if response.status_code == 200:
        return {"message": "POST PASS"}
    else:
        return {"message": "POST FAIL", "status_code": response.status_code}

fn -v deploy --app jawhite-live-feed-app
fn invoke jawhite-live-feed-app jawhite-live-feed-fn
You should see something like this confirming your application works.
{‘message’: ‘POST PASS’}
6. Create an Events Service > Rule.
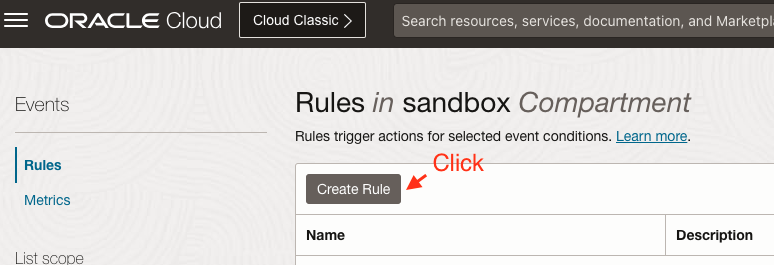
In the Navigation Menu of the Oracle Cloud Console, please go to Observability & Management, then click Rules.

In the Rules management window, click Create Rule.
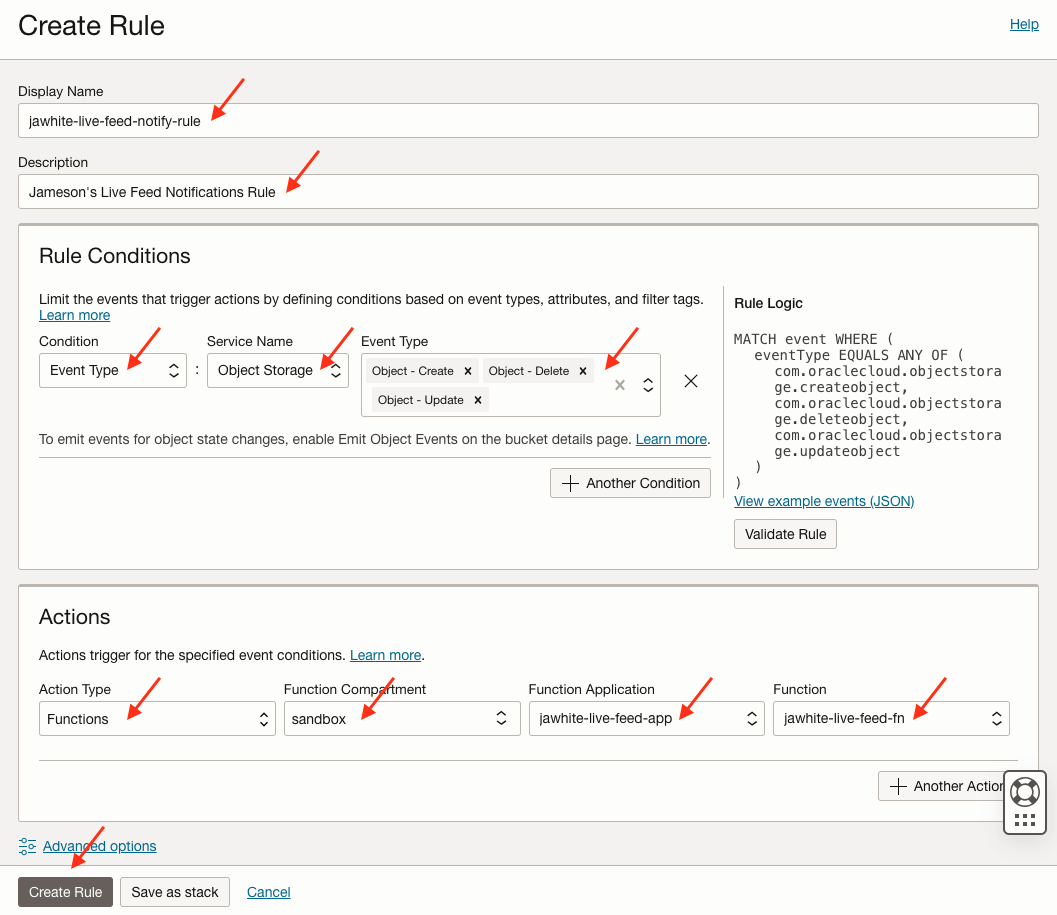
Under the configuration page enter Display Name, enter Description, choose Rule Conditions from drop-down list that match the event type for Object Store, then choose Actions, you should find your Action Type, choose ‘Functions,’ Function Compartment, choose yours, Function Application, choose ‘jawhite-live-feed-app’ and Function choose ‘jawhite-live-feed-fn’, then click Create Rule. I found ‘Oracle Cloud Infrastructure Events Service Now Generally Available‘ by Vimal Kocherla to be helpful.
7. Test the OCI Function with the Notification Rule
Upload a new file to your existing Object Store
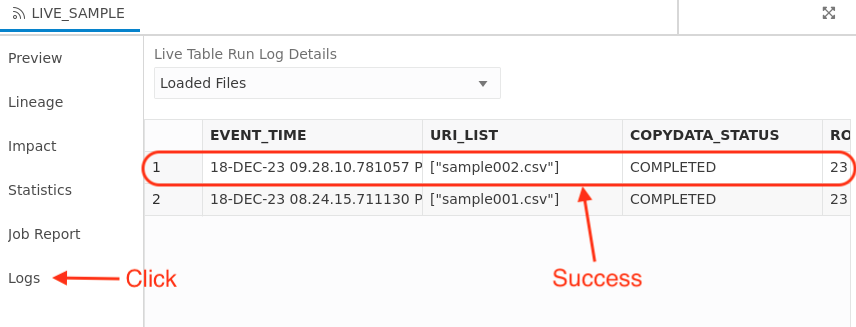
Now look at your Live Table Feed Run Details.
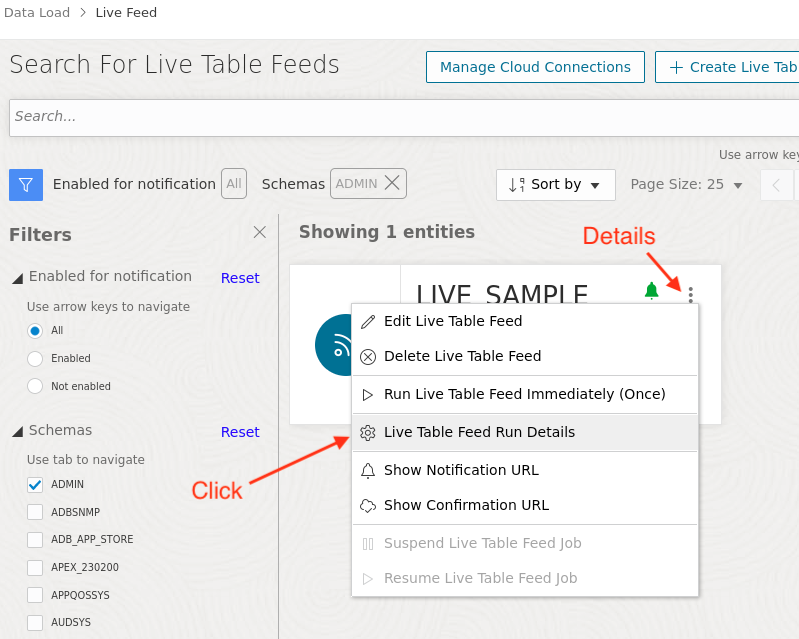
Click on Logs, then observe the new event capturing the new file you just uploaded. Success!