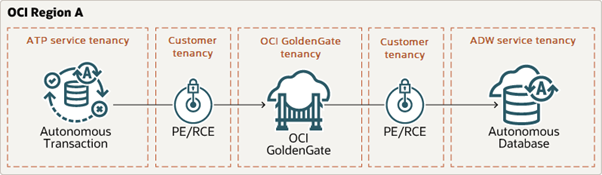
The OCI CLI is a great tool to manage OCI services, such as OCI GoldenGate, and their associated objects. With the OCI CLI, you can easily create OCI GoldenGate Deployments, edit them to change their underlying compute shapes, or create backups. This blog walks you through several examples of how the OCI CLI can help you easily manage OCI GoldenGate. In a series of two blogs, we will follow a use case of creating and running an end-to-end replication process between an Autonomous Transaction Processing (ATP) instance and an Autonomous Data Warehouse (ADW) running in OCI.
Set Up the Environment
In this blog (and the next one in this series), we use the sample data provided in one of our LiveLabs (link): Archive.zip. You can refer to the LiveLabs instructions to set up your ATP and ADW instances and load them with sample data.
Accessing the OCI CLI
There are several ways you can access the OCI CLI:
- Install it manually on your computer
- Use the pre-built Oracle Linux Cloud Developer Image to bootstrap a Compute instance running in OCI
- Use Cloud Shell directly inside the Oracle Cloud Console
In this article, I use Cloud Shell, as it comes pre-configured with my OCI credentials and makes it very easy to get started with the OCI CLI in just a few minutes!
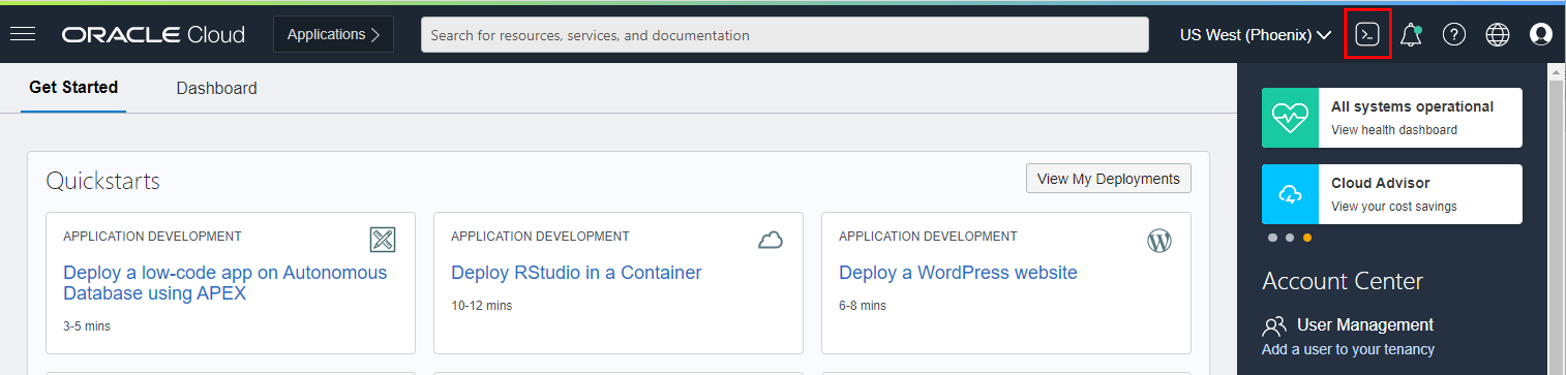
Accessing Cloud Shell
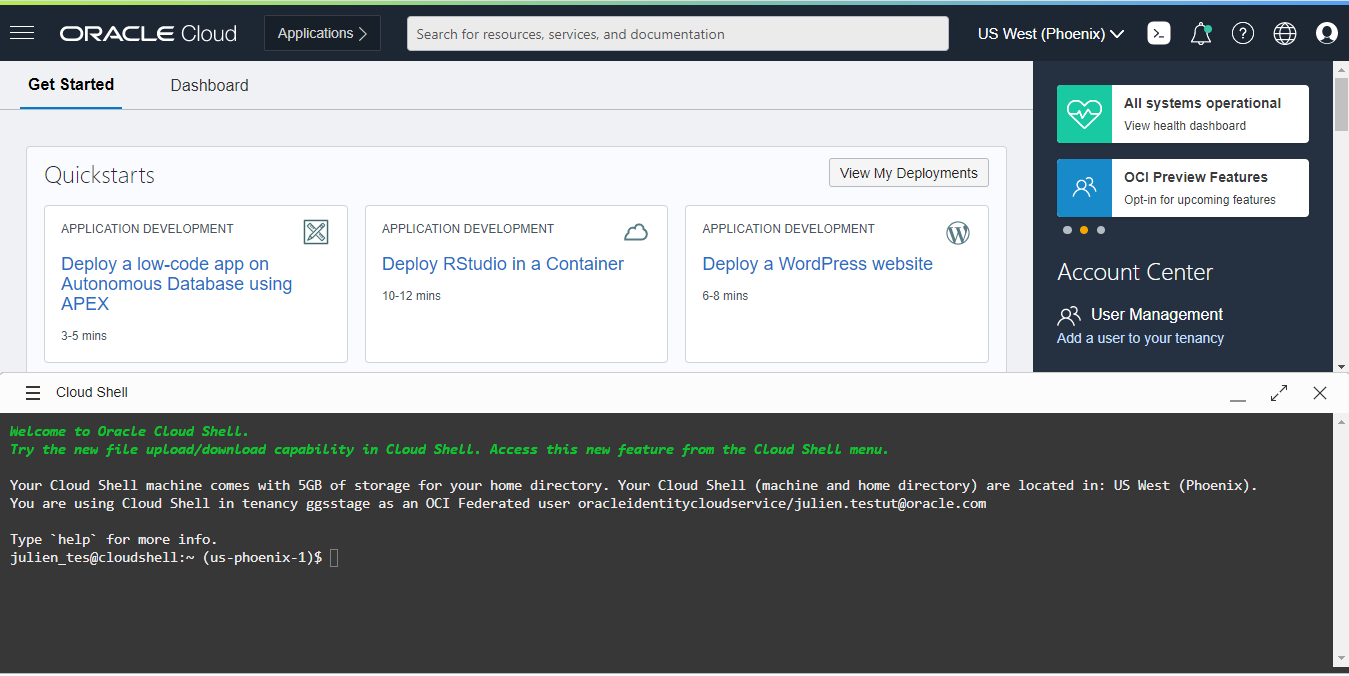
To access Cloud Shell, log into the Oracle Cloud Console, and then click the Cloud Shell icon next to your Region.
The Cloud Shell window opens at the bottom of the Oracle Cloud Console and loads the environment. It takes a few minutes the first time you connect or when you have not used it for some time. If you use it frequently, it boots up very quickly.
Run the ‘oci’ command to access the help and list the supported services.
OCI GoldenGate CLI Commands
Now that you have access to the OCI CLI using Cloud Shell, it is time to run some commands to manage OCI GoldenGate. You can review the complete list of commands available in the OCI CLI documentation.
Create an OCI GoldenGate Deployment
To create an OCI GoldenGate Deployment, use the create command: oci goldengate deployment create (link). This command requires some input parameters, such as your Compartment or Subnet OCID. You can gather this information using the OCI CLI:
- Name and OCID of all Compartments (doc link)
- oci iam compartment list –compartment-id-in-subtree true –all | jq ‘.data[] | {Name: .name, ID: .id}’
- Name and OCID of all Subnets in a Compartment (doc link)
- oci network subnet list –compartment-id <compartment OCID> –all | jq ‘.data[] | {Name: .”display-name”, ID: .id}’
Next, you can use the Compartment and Subnet OCID in the oci goldengate deployment create command:
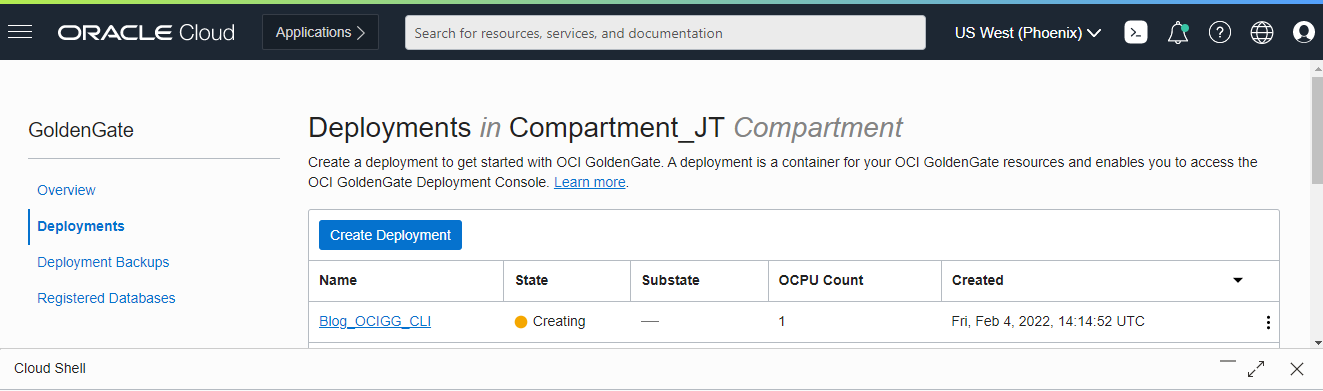
oci goldengate deployment create –deployment-name <deployment name> –display-name <deployment display name> –license-model <BRING_YOUR_OWN_LICENSE, LICENSE_INCLUDED> –compartment-id <compartment OCID> –subnet-id <subnet OCID> –cpu-core-count <number> –is-auto-scaling-enabled <true, false> –admin-username <username> –admin-password <password> –is-public <true, false>
You can set the number of OCPUs to the desired value (–cpu-core-count), enable or disable auto-scaling (–is-auto-scaling-enabled), and create a public endpoint or not to access your Deployment (–is-public).
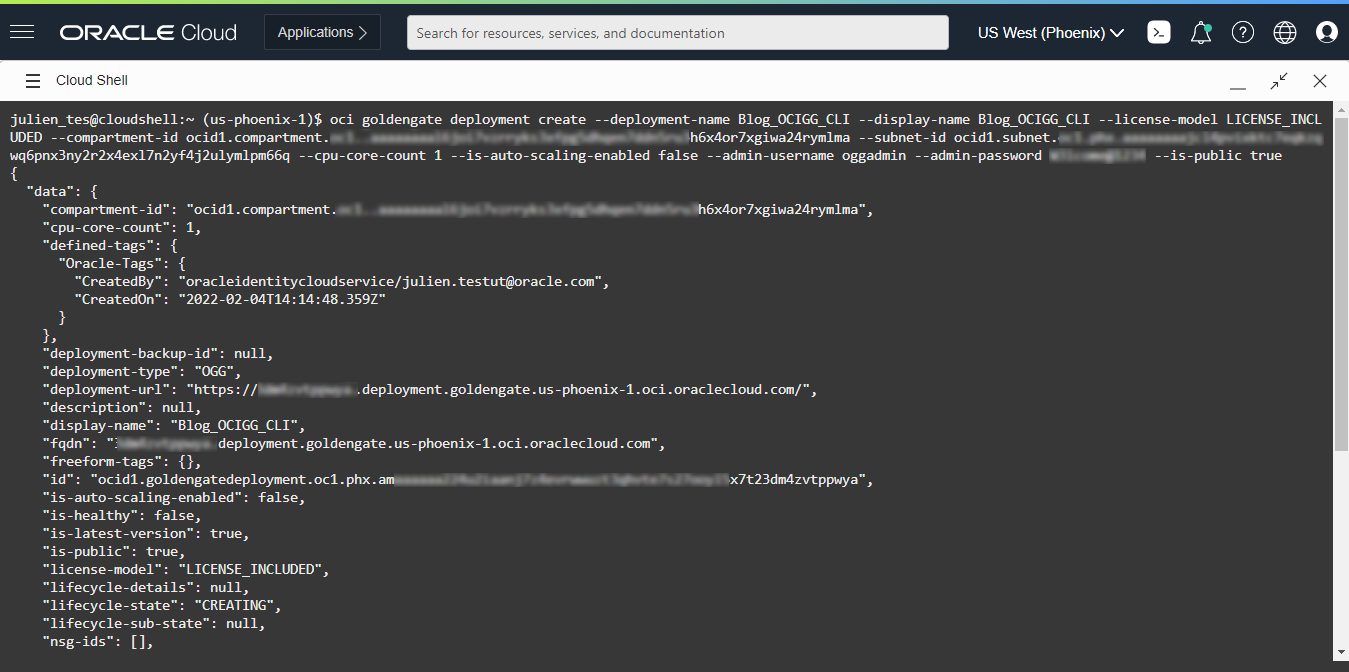
You can see the new Deployment being created in the OCI GoldenGate Deployments list.
The deployment’s status updates from Creating to Active after a few minutes. You can also use the oci goldengate deployment list command (doc link) to get the list of Deployments, and their status:
oci goldengate deployment list –compartment-id <compartment OCID> –all | jq ‘.data.items[] | {Name: .”display-name”, ID: .id, Status: .”lifecycle-state”}’

Now that your Deployment is created, you can start adding Database Registrations for each source and target used in OCI GoldenGate.
Create Database Registrations
Database Registrations have their own set of commands. You can find the full list in the OCI CLI documentation.
In this article, we will add a Database Registration for an Oracle Autonomous Database residing in the same tenancy as our OCI GoldenGate Deployment. The oci goldengate database-registration create command (doc link) takes several input parameters, including the Compartment OCID that we saw earlier. We can also optionally pass the database OCID to the command so that most of the database details are automatically fetched for us. You can use the following command to get a list of your Autonomous Databases along with their names and OCID:
oci db autonomous-database list –compartment-id <compartment OCID> | jq ‘.data[] | {Name: .”display-name”, ID: .id}’
We can now run oci goldengate database-registration create command with the Compartment OCID and the Autonomous Database OCID:
oci goldengate database-registration create –display-name <DB Registration display name> –compartment-id <compartment OCID> –fqdn adb.us-phoenix-1.oraclecloud.com –username “<username>” –password “<password>” –alias-name <credential alias name> –database-id <database OCID>
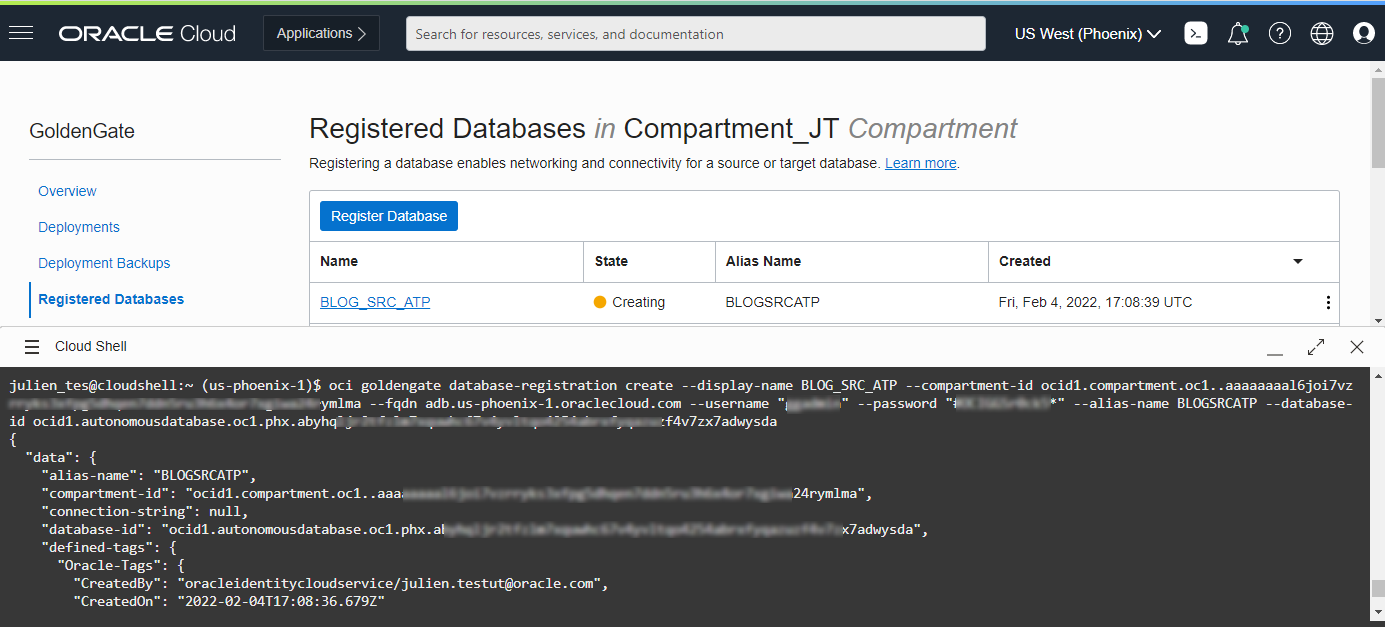
After a few minutes, its status updates from Creating to Active. In the meantime, you can use a similar command to add your target database registration.
Note: If you are connecting to a database in a different tenancy or outside of OCI, you will not be able to use the database OCID and will have to provide some of the database information manually (–connection-string, for example).
You can also connect to a database that can only be accessed privately. To do so, provide the Subnet (–subnet-id) in which the Private Endpoint should be created and the database Private IP (–ip-address). This information is also required when using the Redirect session mode to connect to a RAC database using SCAN.
Manage your OCI GoldenGate Deployments
The OCI CLI can be used to manage your OCI GoldenGate deployments, such as starting and stopping them or scaling them up and down.
To start your Deployments, you can use the oci goldengate deployment start command (doc link), which only needs a Deployment OCID as a mandatory parameter.
oci goldengate deployment start –deployment-id <deployment OCID>
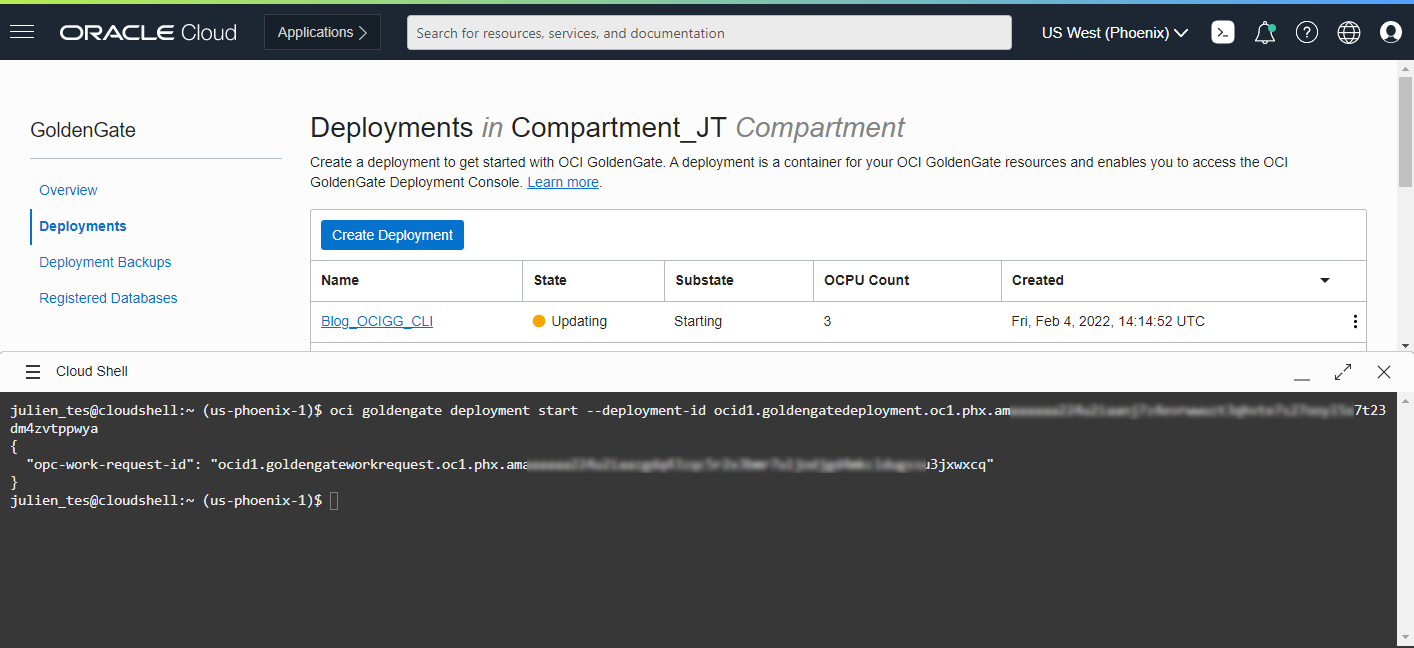
You can get your Deployment OCID from the oci goldengate deployment create command response. You can also use the oci goldengate deployment list command to list the names and OCID of each Deployment in a given Compartment (doc link), as we saw in the ‘Create an OCI GoldenGate Deployment’ section.
![]()
To stop a Deployment, simply use the oci goldengate deployment stop command (doc link), which only needs a Deployment OCID as a mandatory parameter.
oci goldengate deployment stop –deployment-id <deployment OCID>
![]()
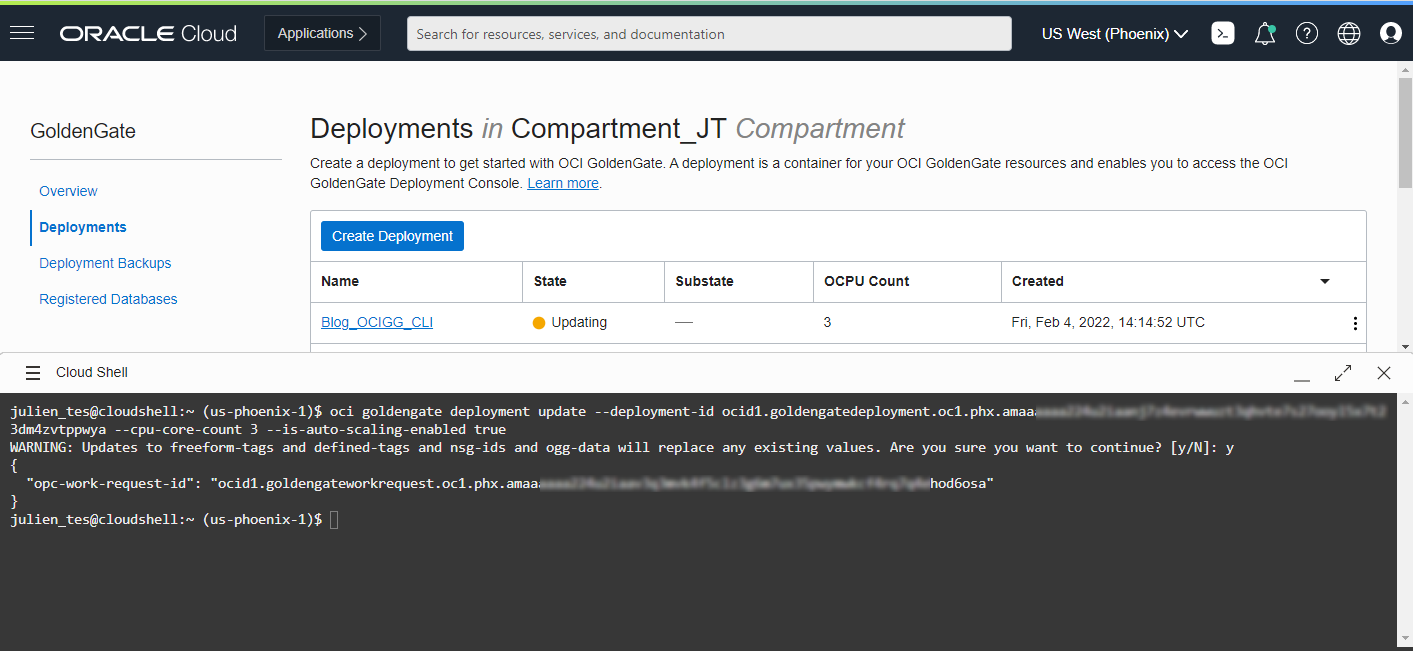
Sometimes you may want to increase or decrease the number of OCPUs allocated to an OCI GoldenGate Deployment, or you may want to enable or disable auto-scaling. In that case, you can rely on the oci goldengate deployment update command (doc link). In the following example, we will increase the number of OCPUs of the Deployment to three and enable auto-scaling.
oci goldengate deployment update –deployment-id <deployment OCID> –cpu-core-count 3 –is-auto-scaling-enabled true
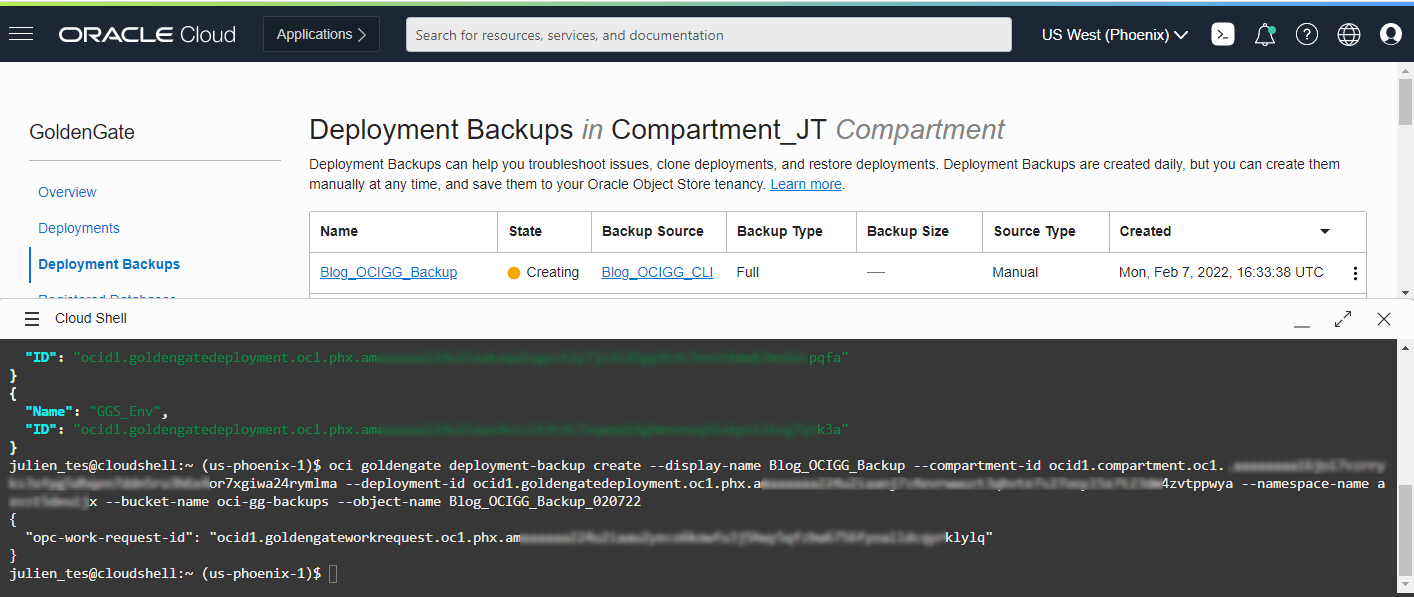
Deployment backups are handy when you need access to trail files or log files that may not be exposed via the Oracle Cloud Console. To create a manual Deployment Backup, you can use the oci goldengate deployment-backup create command (doc link). Creating a Deployment backup requires a couple of parameters which can be found using the OCI CLI:
- –deployment-id and –compartment-id as we saw earlier
- –-display-name: name of the Deployment Backup
- –bucket-name: use oci os bucket list (doc link) using a specific compartment OCID
- –namespace-name: use oci os ns get (doc link) using a specific compartment OCID
- –object-name: name of the archive that will be created for the backup
Once you have all the required information then you can run the following command:
oci goldengate deployment-backup create –display-name <name> –compartment-id <compartment OCID> –deployment-id <deployment OCID> –namespace-name <namespace> –bucket-name <object storage bucket name> –object-name <backup filename>
Conclusion
The OCI CLI makes it easy and straightforward to manage OCI GoldenGate and its objects. The commands we saw together can be used to automate specific operations and speed up your OCI GoldenGate maintenance operations. In a future blog, I will show how to use REST APIs with OCI GoldenGate to automate the creation of data replication processes. In the next blog in this series, we will use REST APIs to automate creating, running and monitoring OCI GoldenGate processes. Stay tuned for new blogs coming up soon!